I. description of preconditions
1.1 overview of installation preparation
Red Hat OpenShift container platform is composed of Red Hat as RPM package and container image. The RPM package is downloaded from the standard Red Hat repository (Yum repository) using the subscription manager, and the container image is from the Red Hat private repository.
OpenShift container platform installation requires multiple servers, supporting multiple forms of servers or virtual machines. At the same time, in order to simplify the deployment of OpenShift cluster, Red Hat provides an Ansible based installation program, which can be run interactively or automatically non interactively using the answer file containing the details of environment configuration.
Before running the installer, you need to perform some pre installation tasks, as well as post installation tasks, to obtain a fully functional OpenShift container platform cluster. Red hat provides two different ways to install the OpenShift container platform.
- The first method uses a quick installer that can be used for simple cluster settings.
- The second method is a more refined installation method, and uses Ansible playbook to automate the process.
This experiment uses ansible to automatically configure openshift cluster. At the same time, Ansible can prepare hosts for OpenShift installation, such as package installation, disabled services, and customized configuration.
Tip: more Ansible content reference https://www.cnblogs.com/itzgr/category/1333622.html.
1.2 node preparation
The corresponding master and node nodes need to be interconnected, and the master to all nodes must be configured for keyless login. At the same time, it can resolve all FQDN and register the corresponding repo library.
Tip: the above preparations can also be completed by running the corresponding yml directly through Ansible.
Experiment 1: precondition operation
2.1 environmental preparation
[ student@workstation ~]$lab install prepare setup? Run the prepare script
Tip: this environment is based on the RedHat RH280 environment. All lab commands prepare commands for environment automation, which will not be repeated in the future.
2.2 installing Ansible
[student@workstation ~]$ rpm -qa | grep ansible
[student@workstation ~]$ sudo yum -y install ansible
2.3 verify Ansible
[student@workstation ~]$ cd /home/student/DO280/labs/install-prepare/
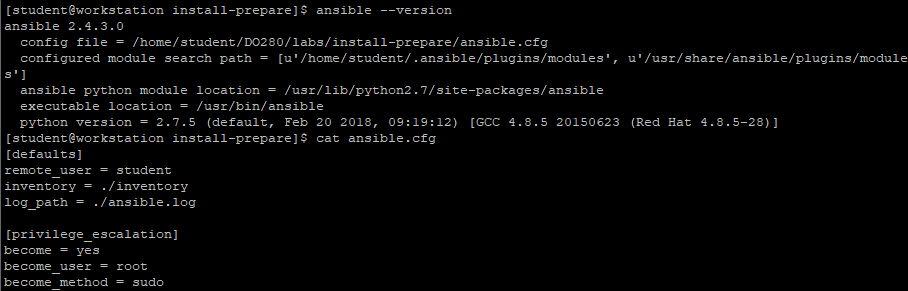
[student@workstation ~]$ ansible --version
[student@workstation install-prepare]$ cat ansible.cfg
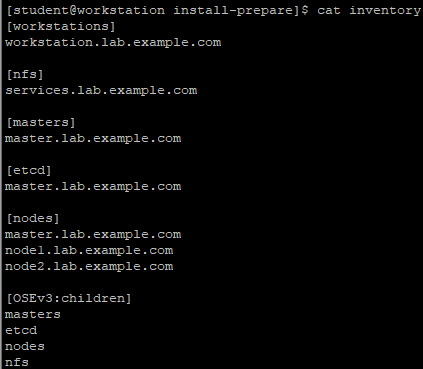
[student@workstation install-prepare]$ cat inventory
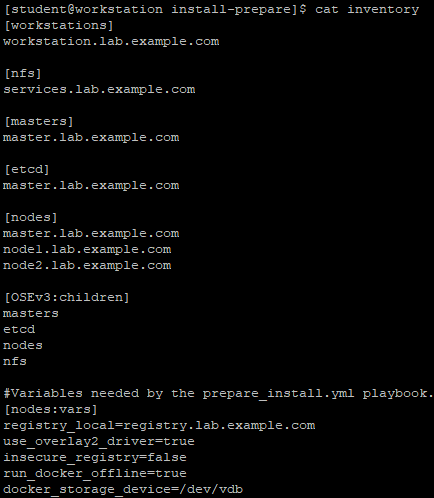
Inventory file explanation:
Inventory defines six host groups:
- workstations: the developer node, that is, the node running playbook;
- nfs: vm in the environment providing nfs service for cluster storage;
- masters: the node used as the master role in the OpenShift cluster;
- Etcd: the node of etcd service for OpenShift cluster. The master node is used in this environment;
- Node: node node in OpenShift cluster;
- OSEv3: all the receptions that make up the OpenShift cluster, including the nodes in the master, etcd, node or nfs group.
Note: by default, docker uses the online warehouse to download the container image. There is no network in this environment, so the docker warehouse is configured as an internal private warehouse. The warehouse configuration is introduced by using variables in yml.
In addition, the installation configures the docker daemons on each host to store container images using the overlay2 image driver. Docker supports many different image drivers. Such as AUFS, Btrfs, Device mapper and OverlayFS.
2.4 checking node connectivity
[student@workstation install-prepare]$ cat ping.yml
[student@workstation install-prepare]$ ansible-playbook -v ping.yml1 --- 2 - name: Verify Connectivity 3 hosts: all 4 gather_facts: no 5 tasks: 6 - name: "Test connectivity to machines." 7 shell: "whoami" 8 changed_when: false
2.5 confirm yml
[student@workstation install-prepare]$ cat prepare_install.yml
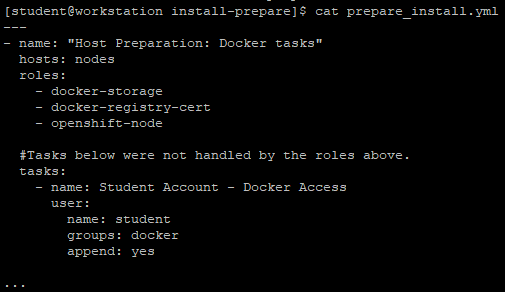
Explanation: as mentioned above, yml introduces three role s.
The content of docker storage is as follows. This role defines the backend storage driver of the relevant docker and the image storage path needed to create the docker, and finally starts the docker.
[student@workstation install-prepare]$ cat roles/docker-storage/tasks/main.yml
[student@workstation install-prepare]$ cat roles/docker-storage/templates/docker-storage-setup1 --- 2 - block: 3 - name: Customize default /etc/sysconfig/docker-storage-setup 4 template: 5 src: docker-storage-setup 6 dest: /etc/sysconfig/docker-storage-setup 7 owner: root 8 group: root 9 mode: 0644 10 when: not use_overlay2_driver 11 - name: Customize /etc/sysconfig/docker-storage-setup using overlay2 storage driver 12 template: 13 src: docker-storage-setup-overlay2 14 dest: /etc/sysconfig/docker-storage-setup 15 owner: root 16 group: root 17 mode: 0644 18 when: use_overlay2_driver 19 - name: Verify existence of /dev/docker-vg/docker-pool 20 stat: 21 path: /dev/docker-vg/docker-pool 22 register: p 23 - name: Stop docker 24 service: 25 name: docker 26 state: stopped 27 when: p.stat.exists == False 28 - name: Remove loopback docker files 29 file: 30 dest: /var/lib/docker 31 state: absent 32 when: p.stat.exists == False 33 - name: Run docker-storage-setup 34 command: /usr/bin/docker-storage-setup 35 when: p.stat.exists == False 36 - name: Start and enable docker 37 service: 38 name: docker 39 state: started 40 when: p.stat.exists == False 41 when: docker_storage_device is defined 42
The content of docker registry cert is as follows. This role defines the private warehouse used by the relevant docker, and imports the relevant crt certificate.1 DEVS={{ docker_storage_device }} 2 VG=docker-vg 3 SETUP_LVM_THIN_POOL=yes
[student@workstation install-prepare]$ cat roles/docker-registry-cert/tasks/main.yml
[student@workstation install-prepare]$ cat roles/docker-registry-cert/vars/main.yml1 --- 2 - name: Enable the Trust 3 shell: update-ca-trust enable 4 - name: Retrieve the certificate 5 fetch: 6 src: "{{ cacert }}" 7 dest: "{{ local_destination }}" 8 delegate_to: "{{ registry_host }}" 9 - name: Copy the certificate 10 copy: 11 src: "{{ source }}" 12 dest: "{{ destination }}" 13 owner: root 14 group: root 15 mode: 0755 16 - name: Update the Trust 17 shell: update-ca-trust extract 18 - name: Restart Docker 19 service: 20 name: docker 21 state: restarted 22
The content of OpenShift node is as follows. This role defines all the dependent package tasks required to install OpenShift.1 registry_host: services.lab.example.com 2 cacert: /etc/pki/tls/certs/example.com.crt 3 local_destination: /tmp/ 4 source: "/tmp/{{ ansible_fqdn }}/etc/pki/tls/certs/example.com.crt" 5 destination: /etc/pki/ca-trust/source/anchors/example.com.crt
[student@workstation install-prepare]$ ll roles/openshift-node/files/
total 4
-rw-r--r--. 1 student student 389 Jul 19 2018 id_rsa.pub
[student@workstation install-prepare]$ cat roles/openshift-node/meta/main.yml
[student@workstation install-prepare]$ cat roles/openshift-node/tasks/main.yml1 --- 2 dependencies: 3 - { role: docker }
  1 ---
  2 - name: Deploy ssh key to root at all nodes
  3   authorized_key:
  4     user: root
  5     key: "{{ item }}"
  6   with_file:
  7     - id_rsa.pub
  8 - name: Install required packages
  9   yum:
 10     name: "{{ item }}"
 11     state: latest
 12   with_items:
 13     - wget
 14     - git
 15     - net-tools
 16     - bind-utils
 17     - iptables-services
 18     - bridge-utils
 19     - bash-completion
 20     - kexec-tools
 21     - sos
 22     - psacct
 23     - atomic-openshift-clients
 24     - atomic-openshift-utils
 25     - atomic-openshift
 26
2.6 running playbook
[student@workstation ~]$ cd /home/student/DO280/labs/install-prepare/
[student@workstation install-prepare]$ ansible-playbook prepare_install.yml

Tip: this preparation will complete the following operations:
- Install and run Docker on each node;
- Docker uses a logical volume storage on each node;
- Each node uses self signed certificate to trust private Docker warehouse;
- The base package is installed on each node.
2.7 validation
[student@workstation install-prepare]$ for vm in master node1 node2;
do echo -e "\n$vm"
ssh $vm sudo systemctl status docker | head -n3
Do? Verify the docker service

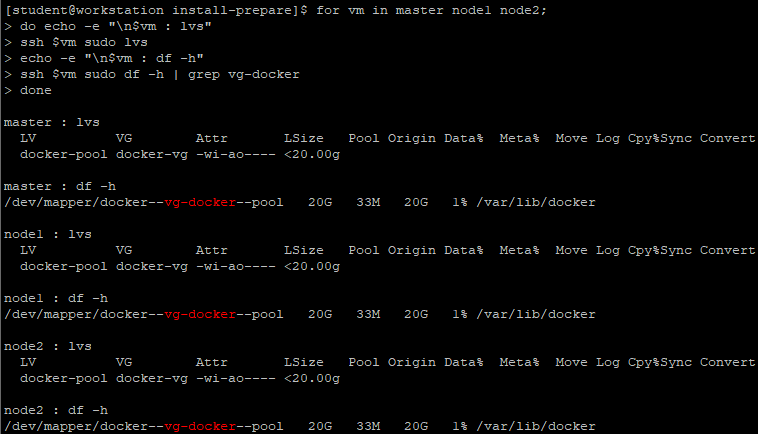
[student@workstation install-prepare]$ for vm in master node1 node2;
do echo -e "\n$vm : lvs"
ssh $vm sudo lvs
echo -e "\n$vm : df -h"
ssh $vm sudo df -h | grep vg-docker
Do? View the lvm used by docker
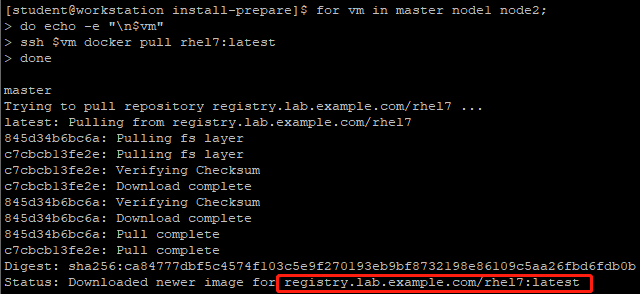
[student@workstation install-prepare]$ for vm in master node1 node2;
do echo -e "\n$vm"
ssh $vm docker pull rhel7:latest
Do? Test pull image
[student@workstation install-prepare]$ for vm in master node1 node2;
do echo -e "\n$vm"
ssh $vm rpm -qa wget git net-tools bind-utils \
yum-utils iptables-services bridge-utils bash-completion \
kexec-tools sos psacct atomic-openshift-utils
Do? Check if the dependent package is installed successfully
III. formal installation instructions
3.1 installation steps
After installation preparation, the formal installation includes four steps:
- Write a directory file to describe the required cluster characteristics and architecture;
- implement prerequisites.yml playbook;
- Execute deploy_cluster,yml's playbook;
- Verify the installation.
3.2 installation and configuration nodes
OpenShift Inventory defines the following host groups.
Master: for OpenShift, this is a required group. It defines which hosts in the OpenShift cluster act as master nodes;
Node: for OpenShift, this is a necessary group, which defines which hosts in the OpenShift cluster act as node nodes;
Etcd: all hosts listed in the [master] section should also belong to etcd;
NFS: this group is optional and should contain only one host. If there are specific variables in the Inventory file, OpenShift playbook will install and configure NFS on this machine;
OSEv3: this group contains any machines that belong to the OpenShift cluster. The installation script references this group to run tasks that are cluster wide.
[student@workstation install-prepare]$ cat inventory
explain:
- Install the required version of OpenShift container platform;
- Users use htpasswd authentication to authenticate the cluster;
- DNS entry apps.lab.example.com as a child domain of OpenShift applications;
- NFS storage is used for OpenShift etcd service and OpenShift internal warehouse;
- classroom container registry is used as a warehouse.
Variable description:
The OpenShift installation variable is recorded in the [OSEv3:vars] section of the Inventory. The install variable is used to configure multiple OpenShift components, such as:
- An internal container warehouse;
- Gluster, Ceph, etc. to provide persistent storage;
- Cluster log;
- Custom cluster certificate.
3.3 configure OpenShift version
You can determine the version of OpenShift by specifying the following configuration in [OSEv3:vars]:
openshift_deployment_type=openshift-enterprise
openshift_release=v3.9
Specifies the OpenShift deployment type, with the optional values OpenShift enterprise and origin.
openshift_image_tag=v3.9.14
openshift_disable_check=disk_availability,docker_storage,memory_availability
The containerized OpenShift service uses images marked "v3.9.14.". This will prevent the cluster from automatically upgrading to the updated container image;
For non production clusters, you can disable checking of system requirements.
3.4 configuration verification
OpenShift container platform authentication is based on OAuth, which provides an HTTP based APl for authentication of interactive and non interactive clients.
OpenShift master runs an OAuth server. OpenShift can support multiple providers, which can be integrated with organization specific identity management products. Provider s supported for OpenShift authentication:
- HTTP Basic, external single sign on (SSO) system;
- Use GitHub and GitLab accounts;
- OpenID connection, using OpenID compatible SSO and Google account;
- OpenStack Keystone v3;
- LDAP v3 server.
The OpenShift installer uses the default security method, and DenyAllPasswordIdentityProvider is the default Provider. Using this Provider means that only root users on the master host can use OpenShift client commands and API s.
3.5 configure htpasswd authentication
OpenShift HTPasswdPasswordIdentityProvider validates users and passwords against files generated by the Apache HTTPD htpasswd program.
The htpasswd program saves the user name and password in a plain text file, one record per line, with fields separated by colons. The password uses MD5 hash. If you add or remove users from this file, or change the user password, the OpenShift OAuth server automatically rereads the file.
To use HTPasswdPasswordIdentityProvider for OpenShift master configuration, openshift needs to be configured_ master_ identity_ providers.
  1 openshift_master_identity_providers.
  2 openshift_master_identity_providers=[{'name': 'htpasswd_auth', 'login': 'true',
  3 'challenge': 'true', 'kind': 'HTPasswdPasswordIdentityProvider',	#Configure backend drivers
  4 'filename': '/etc/origin/master/htpasswd'}]				#Make master
It also supports specifying the initial user name and password directly in the configuration file.
openshift_master_htpasswd_users="{'user1':'$apr1$.NHMsZYc$MdmfWN5DM3q280/W7c51c/',
'user2':'$apr1$.NHMsZYc$MdmfWN5DM3q280/W7c51c/'}"
The production hash password can be referred to as follows:
  1 [student@workstation ~]$ htpasswd -nb admin redhat
  2 [student@workstation ~]$ openssl passwd -apr1 redhat
3.6 network requirements
The wildcard DNS entry of the cluster node allows any newly created routes to be automatically routed to the cluster of subdomains. Wildcard DNS entries must exist in a unique subdomain, for example apps.mycluster.com And resolves to the host name or the IP address of the cluster node. The wildcard DNS entry in the inventory file is through the variable openshift_master_default_subdomain.
openshift_master_default_subdomain=apps.mycluster.com
3.7 master service port
Main service port openshift_ master_ api_ The port variable defines the listening port of the main API. The default port is 8443. When the master uses SSL, port 443 can also be used. Thus, the port number is omitted when connecting.
The master console port is opened by openshift_ master_ console_ The value setting of the port variable. The default port is 8443. The master console port can also be set to 443 to omit the port number when connecting.
3.8 firewall
The default firewall service on the OpenShift node is iptables. To use firewalld as a firewall service on all nodes, you need to set the operating system firewall to use the firewalld variable to true, that is, os_firewall_use_firewalld=true.
IV. configure persistent storage
4.1 persistent storage configuration
By default, container data is temporary and is lost when the container is destroyed. The Kubernetes persistent volume framework provides a mechanism for the container to request and use persistent storage. To avoid data loss, these services are configured to use persistent volumes.
OpenShift supports multiple plug-ins and uses various storage technologies to create persistent volumes. You can use NFS, iSCSI, clusterfs, Ceph, or other commercial cloud storage.
In this environment, the OpenShift container registry and OpenShift Ansible Broker services are configured to use NFS persistent storage.
Tip: by default, OpenShift does not support NFS persistent storage cluster in production environment. To allow NFS persistent storage on non production cluster, OpenShift needs to be configured_ enable_ unsupported_ configurations=true.
4.2 container warehouse
To configure NFS persistent storage for OpenShift container registry, add the following to the Inventory file:
  1 openshift_hosted_registry_storage_kind=nfs
  2 openshift_hosted_registry_storage_nfs_directory=/exports
  3 openshift_hosted_registry_storage_volume_name=registry
  4 openshift_hosted_registry_storage_nfs_options='*(rw,root_squash)'
  5 openshift_hosted_registry_storage_volume_size=40G
  6 openshift_hosted_registry_storage_access_modes=['ReadWriteMany']
4.3 OpenShift Ansible Broker
OpenShift Ansible Broker(OAB) is a containerized OpenShift service, which deploys its own etcd service. The configuration required for persistent etcd storage is similar to that required for registry.
  1 openshift_hosted_etcd_storage_kind=nfs
  2 openshift_hosted_etcd_storage_nfs_directory=/exports
  3 openshift_hosted_etcd_storage_volume_name=etcd-vol2
  4 openshift_hosted_etcd_storage_nfs_options="*(rw,root_squash,sync,no_wdelay)"
  5 openshift_hosted_etcd_storage_volume_size=1G
  6 openshift_hosted_etcd_storage_access_modes=["ReadWriteOnce"]
  7 openshift_hosted_etcd_storage_labels={'storage': 'etcd'}
Five other OpenShift configurations
5.1 configure offline local registry
OpenShift uses container warehouse as registry.lab.example.com, to configure the cluster to pull image from the internal warehouse, you need to configure the following in Inventory:
  1 #Modifications Needed for a Disconnected Install
  2 oreg_url=registry.lab.example.com/openshift3/ose-${component}:${version}
  3 #The location of the accessible image warehouse must end with ose-${component}:${version}.
  4 openshift_examples_modify_imagestreams=true
  5 #OpenShift installs the template for deploying the sample application. This variable instructs playbook to modify the IS of all samples to point to the private warehouse instead of registry.access.redhat.com.
  6 openshift_docker_additional_registries=registry.lab.example.com
  7 #This variable is used to add a local accessible warehouse to the docker configuration on each node.
  8 openshift_docker_blocked_registries=registry.access.redhat.com,docker.io
  9 #This variable is used to configure docker's blocked on the OpenShift node_ registries.
  1 #Image Prefix Modifications
  2 openshift_web_console_prefix=registry.lab.example.com/openshift3/oseopenshift_cockpit_deployer_prefix='registry.lab.example.com/openshift3/'
  3 openshift_service_catalog_image_prefix=registry.lab.example.com/openshift3/osetemplate_service_broker_prefix=registry.lab.example.com/openshift3/oseansible_service_broker_image_prefix=registry.lab.example.com/openshift3/oseansible_service_broker_etcd_image_prefix=registry.lab.example.com/rhel7/
#By prefixing the container image name with registry.lab.example.com to ensure that the container image for the OpenShift service can be downloaded from a private internal repository.
5.2 configure NODE labels
node label is any key/value description assigned to each node. node label is usually used to distinguish a meaningful description of the available resources on a geographic data center or identification node.
An application can configure a selector in its deployment based on node labels. If matched to, the application's pod must be deployed on its node labels compliant node.
Using the host variable openshift_node_tags sets the node label in the Inventory file.
  1 [nodes]
  2 ...output omitted...
  3 nodeX.example.com openshift_node_labels="{'zone':'west', 'gpu':'true'}"
  4 ...output omitted...
Configure to nodeX.example.com Configure two labels, zone=west and gpu=true.
A common architecture of OpenShift cluster is to distinguish master, infrastructure node and compute node.
In this architecture, the infrastructure node hosts the registry and router of OpenShift Pod, while the compute node hosts the application pod from the user project.
The master node does not host the application or infrastructure pod.
The node label can be used to identify the role of a specific node. Generally, the master node label is node-role.kubernetes.io/master=true , infrastructure node label is region=infra, compute node label is noderole.kubernetes.io/compute=true .
  1 [nodes]
  2 master.lab.example.com
  3 node1.lab.example.com openshift_node_labels="{'region':'infra'}"
  4 node2.lab.example.com
Tip: if a node is designed to host both infrastructure and application pods, two node labels must be explicitly defined.
[nodes]
...
nodeX.example.com openshift_node_labels="{'region':'infra', 'noderole.kubernetes.io/compute':'true'}"
...
Vi. execution script
6.1 script description
OpenShift needs to be installed prerequisites.yml And deploy_cluster.yml , installed by the atomic OpenShift utils package.
First of all prequisites.yml PlayBook checks that all hosts can meet OpenShift's deployment, and tries to modify the hosts to meet the deployment requirements. Then do deploy_ cluster.yml PlayBook starts formal cluster deployment
6.2 verify OpenShift
After deployment, you can access: https://master.lab.example.com Verify.
VII. Official installation of OpenShift
7.1 preparation
[student@workstation ~]$ lab install-prepare setup
[student@workstation ~]$ sudo yum -y install ansible
[student@workstation ~]$ cd /home/student/do280-ansible/
[ student@workstation do280-ansible]$ ansible-playbook playbooks/prepare_ install.yml #Set up relevant environment
[student@workstation do280-ansible]$ lab install-run setup
[student@workstation do280-ansible]$ cd /home/student/DO280/labs/install-run/
7.2 installing atomic
[student@workstation install-run]$ sudo yum -y install atomic-openshift-utils
Tip: atomic OpenShift utils provides the Ansible playbook and role required to install OpenShift.
7.3 create Inventory
[student@workstation install-run]$ cp inventory.initial inventory
[student@workstation install-run]$ cat inventory

[student@workstation install-run]$ echo -e "\n[OSEv3:vars]" >> inventory
7.4 configure related installation versions
  1 [student@workstation install-run]$ vi general_vars.txt
  2 #General Cluster Variables
  3 openshift_deployment_type=openshift-enterprise			#Configure to openshift enterprise version
  4 openshift_release=v3.9						#Configuration version is v3.9
  5 openshift_image_tag=v3.9.14
  6 openshift_disable_check=disk_availability,docker_storage,memory_availability	#Disable check
7.5 setting htpasswd authentication
  1 [student@workstation install-run]$ openssl passwd -apr1 redhat
  2 $apr1$/d1L7fdX$duViLRE.JG012VkZDq8bs0
  3 [student@workstation install-run]$ openssl passwd -apr1 redhat
  4 $apr1$rUMMfQfD$J8CEqQK.YenyNwYwKN1lA1				#Create two user passwords that are redhat
  5 [student@workstation install-run]$ vi authentication_vars.txt
  6 #Cluster Authentication Variables
  7 openshift_master_identity_providers=[{'name': 'htpasswd_auth', 'login': 'true', 'challenge': 'true', 'kind': 'HTPasswdPasswordIdentityProvider', 'filename': '/etc/origin/master/htpasswd'}]
  8 openshift_master_htpasswd_users={'admin':'$apr1$/d1L7fdX$duViLRE.JG012VkZDq8bs0', 'developer':'$apr1$rUMMfQfD$J8CEqQK.YenyNwYwKN1lA1'}
7.6 configure cluster network
  1 [student@workstation install-run]$ vi networking_vars.txt
  2 #OpenShift Networking Variables
  3 os_firewall_use_firewalld=true					#Turn on the firewall
  4 openshift_master_api_port=443					#Enable port
  5 openshift_master_console_port=443				        #Enable control port
  6 openshift_master_default_subdomain=apps.lab.example.com		#Specify subdomain
7.7 configuring NFS
  1 [student@workstation install-run]$ vi persistence_vars.txt
  2 #NFS is an unsupported configuration
  3 openshift_enable_unsupported_configurations=true
  4
  5 #OCR configuration variables
  6 openshift_hosted_registry_storage_kind=nfs
  7 openshift_hosted_registry_storage_access_modes=['ReadWriteMany']
  8 openshift_hosted_registry_storage_nfs_directory=/exports
  9 openshift_hosted_registry_storage_nfs_options='*(rw,root_squash)'
 10 openshift_hosted_registry_storage_volume_name=registry
 11 openshift_hosted_registry_storage_volume_size=40Gi
 12
 13 #OAB's etcd configuration variables
 14 openshift_hosted_etcd_storage_kind=nfs
 15 openshift_hosted_etcd_storage_nfs_options="*(rw,root_squash,sync,no_wdelay)"
 16 openshift_hosted_etcd_storage_nfs_directory=/exports
 17 openshift_hosted_etcd_storage_volume_name=etcd-vol2
 18 openshift_hosted_etcd_storage_access_modes=["ReadWriteOnce"]
 19 openshift_hosted_etcd_storage_volume_size=1G
 20 openshift_hosted_etcd_storage_labels={'storage': 'etcd'}
7.8 configure offline warehouse
  1 #Modifications Needed for a Disconnected Install
  2 oreg_url=registry.lab.example.com/openshift3/ose-${component}:${version}	#Add internal warehouse
  3 openshift_examples_modify_imagestreams=true					#Modify IS
  4 openshift_docker_additional_registries=registry.lab.example.com		#Internal warehouse to docker configuration
  5 openshift_docker_blocked_registries=registry.access.redhat.com,docker.io	#Prohibition of external official warehouses
  6 #Image Prefixes
  7 openshift_web_console_prefix=registry.lab.example.com/openshift3/ose-
  8 openshift_cockpit_deployer_prefix='registry.lab.example.com/openshift3/'
  9 openshift_service_catalog_image_prefix=registry.lab.example.com/openshift3/ose-
 10 template_service_broker_prefix=registry.lab.example.com/openshift3/ose-
 11 ansible_service_broker_image_prefix=registry.lab.example.com/openshift3/ose-
 12 ansible_service_broker_etcd_image_prefix=registry.lab.example.com/rhel7/
7.9 setting label
[student@workstation install-run]$ vi inventory
  1 ......
  2 [nodes]
  3 master.lab.example.com
  4 node1.lab.example.com openshift_node_labels="{'region':'infra', 'node-role.kubernetes.io/compute':'true'}"
  5 node2.lab.example.com openshift_node_labels="{'region':'infra', 'node-role.kubernetes.io/compute':'true'}"
7.10 merge and proofread Inventory
[student@workstation install-run]$ cat general_vars.txt networking_vars.txt authentication_vars.txt persistence_vars.txt disconnected_vars.txt >> inventory
[ student@workstation Install run] $lab install run grade. This environment provides scripts to check Inventory
[student@workstation install-run]$ cat inventory
  1 [student@workstation install-run]$ cat general_vars.txt networking_vars.txt authentication_vars.txt persistence_vars.txt disconnected_vars.txt >> inventory
  2 [student@workstation install-run]$ lab install-run grade		#This environment provides scripts for checking Inventory
  3 [student@workstation install-run]$ cat inventory
  4 [workstations]
  5 workstation.lab.example.com
  6
  7 [nfs]
  8 services.lab.example.com
  9
 10 [masters]
 11 master.lab.example.com
 12
 13 [etcd]
 14 master.lab.example.com
 15
 16 [nodes]
 17 master.lab.example.com
 18 node1.lab.example.com openshift_node_labels="{'region':'infra', 'node-role.kubernetes.io/compute':'true'}"
 19 node2.lab.example.com openshift_node_labels="{'region':'infra', 'node-role.kubernetes.io/compute':'true'}"
 20
 21 [OSEv3:children]
 22 masters
 23 etcd
 24 nodes
 25 nfs
 26
 27 #Variables needed by classroom host preparation playbooks.
 28 [nodes:vars]
 29 registry_local=registry.lab.example.com
 30 use_overlay2_driver=true
 31 insecure_registry=false
 32 run_docker_offline=true
 33 docker_storage_device=/dev/vdb
 34
 35
 36 [OSEv3:vars]
 37 #General Cluster Variables
 38 openshift_deployment_type=openshift-enterprise
 39 openshift_release=v3.9
 40 openshift_image_tag=v3.9.14
 41 openshift_disable_check=disk_availability,docker_storage,memory_availability
 42 #OpenShift Networking Variables
 43 os_firewall_use_firewalld=true
 44 openshift_master_api_port=443
 45 openshift_master_console_port=443
 46 openshift_master_default_subdomain=apps.lab.example.com
 47 #Cluster Authentication Variables
 48 openshift_master_identity_providers=[{'name': 'htpasswd_auth', 'login': 'true', 'challenge': 'true', 'kind': 'HTPasswdPasswordIdentityProvider', 'filename': '/etc/origin/master/htpasswd'}]
 49 openshift_master_htpasswd_users={'admin':'$apr1$/d1L7fdX$duViLRE.JG012VkZDq8bs0', 'developer':'$apr1$rUMMfQfD$J8CEqQK.YenyNwYwKN1lA1'}
 50
 51 #NFS is an unsupported configuration
 52 openshift_enable_unsupported_configurations=true
 53
 54 #OCR configuration variables
 55 openshift_hosted_registry_storage_kind=nfs
 56 openshift_hosted_registry_storage_access_modes=['ReadWriteMany']
 57 openshift_hosted_registry_storage_nfs_directory=/exports
 58 openshift_hosted_registry_storage_nfs_options='*(rw,root_squash)'
 59 openshift_hosted_registry_storage_volume_name=registry
 60 openshift_hosted_registry_storage_volume_size=40Gi
 61
 62 #OAB's etcd configuration variables
 63 openshift_hosted_etcd_storage_kind=nfs
 64 openshift_hosted_etcd_storage_nfs_options="*(rw,root_squash,sync,no_wdelay)"
 65 openshift_hosted_etcd_storage_nfs_directory=/exports
 66 openshift_hosted_etcd_storage_volume_name=etcd-vol2
 67 openshift_hosted_etcd_storage_access_modes=["ReadWriteOnce"]
 68 openshift_hosted_etcd_storage_volume_size=1G
 69 openshift_hosted_etcd_storage_labels={'storage': 'etcd'}
 70
 71 #Modifications Needed for a Disconnected Install
 72 oreg_url=registry.lab.example.com/openshift3/ose-${component}:${version}
 73 openshift_examples_modify_imagestreams=true
 74 openshift_docker_additional_registries=registry.lab.example.com
 75 openshift_docker_blocked_registries=registry.access.redhat.com,docker.io
 76
 77 #Image Prefixes
 78 openshift_web_console_prefix=registry.lab.example.com/openshift3/ose-
 79 openshift_cockpit_deployer_prefix='registry.lab.example.com/openshift3/'
 80 openshift_service_catalog_image_prefix=registry.lab.example.com/openshift3/ose-
 81 template_service_broker_prefix=registry.lab.example.com/openshift3/ose-
 82 ansible_service_broker_image_prefix=registry.lab.example.com/openshift3/ose-
 83 ansible_service_broker_etcd_image_prefix=registry.lab.example.com/rhel7/
7.11 execution of installation script
[student@workstation install-run]$ ansible-playbook /usr/share/ansible/openshift-ansible/playbooks/prerequisites.yml
#Perform preparation playbook

[student@workstation install-run]$ ansible-playbook /usr/share/ansible/openshift-ansible/playbooks/deploy_cluster.yml
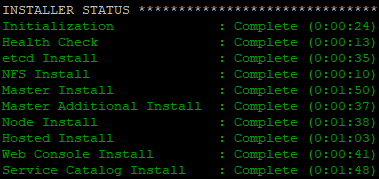
Tip: save the entire deployment log to the local directory ansible.log Medium.
VIII. Verification test
8.1 verification instructions
To verify the OpenShift installation, you must test and verify all OpenShift components. It is not enough to just start the pod from the sample container image, because this does not use OpenShift builders, Deployers, router, or internal registry.
- It is recommended that OpenShift be fully validated by:
- Check the status of all OpenShift nodes;
- Check the pod of the corresponding OpenShift registry and router;
- Using OpenShift to build an application from the source code, OpenShift generates the container image from the build result, and starts the pod from the image;
- Create a service so that the application can be accessed from the internal container network and OpenShift nodes;
- Create a route so that applications can be accessed from computers outside the OpenShift cluster.
After installation, the OpenShift client can use oc, and the master node can use oadm command. The root user of the master node will be configured to run the OpenShift client and administrator commands as a cloud administrator.
Some OpenShift internal services, such as internal repositories and router, are configured by default by the installer. Run the oc get nodes and oc get pods commands to verify that the installation was successful.
8.2 login test
Browser access: https://master.lab.example.com


8.3 verify OpenShift function
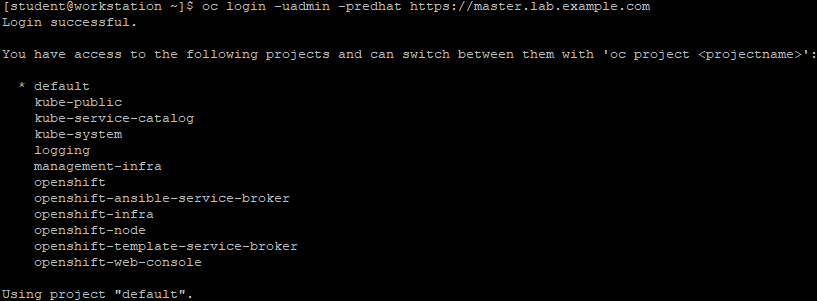
[student@workstation ~]$ oc login -uadmin -predhat https://master.lab.example.com

Tip: the account permission needs to be granted separately. The adminn created during the installation process does not have the administration privilege of the cluster.
8.4 authority granted
system:admin Is the only account with cluster administration rights. The root users of the master node are all clustered system:admin Users.
[root@master ~]# oc whoami
system:admin
[ root@master ~]#OC ADM policy add cluster role to user cluster admin
Tip: the cluster admin role has very high permissions, allowing administrative users to destroy and modify cluster resources, which must be used with caution.
8.5 viewing node status
Log in again using the command.
[student@workstation ~]$ oc login -uadmin -predhat https://master.lab.example.com
[student@workstation ~]$ oc get nodes
NAME STATUS ROLES AGE VERSION
master.lab.example.com Ready master 14h v1.9.1+a0ce1bc657
node1.lab.example.com Ready compute 14h v1.9.1+a0ce1bc657
node2.lab.example.com Ready compute 14h v1.9.1+a0ce1bc657
[student@workstation ~]$ oc get pods
NAME READY STATUS RESTARTS AGE
docker-registry-1-4w5tb 1/1 Running 1 14h
docker-registry-1-j7k59 1/1 Running 1 14h
registry-console-1-mtkxc 1/1 Running 1 14h
router-4-9dfxc 1/1 Running 0 4h
router-4-kh7th 1/1 Running 0 5h
8.6 create project
[student@workstation ~]$ oc new-project smoke-test
8.7 creating applications
[student@workstation ~]$ oc new-app --name=hello -i php:7.0 http://registry.lab.example.com/php-helloworld
[ student@workstation ~]$OC get Pods - W - monitor pod creation
8.8 view route
[student@workstation ~]$ oc get routes
NAME HOST/PORT PATH SERVICES PORT TERMINATION WILDCARD
hello hello-smoke-test.apps.lab.example.com hello 8080-tcp None
8.9 public services
[ student@workstation ~]$OC expose service hello? Exposes services to external networks
8.10 test services
[student@workstation ~]$ curl http://hello-smoke-test.apps.lab.example.com
Hello, World! php version is 7.0.10
[ student@workstation ~]$OC delete project install post
8.11 Test developer
[ student@workstation ~]$OC login - U developer - log in with redhat password
[student@workstation ~]$ oc new-project smoke-test
[student@workstation ~]$ oc new-app php:5.6~http://services.lab.example.com/php-helloworld --name hello
[ student@workstation ~]$OC logs - f BC / Hello - monitor build process
Tip: the output shows that OpenShift can build image from the warehouse clone code and push the new image into the internal warehouse at the same time.
[student@workstation ~]$ oc expose svc hello
route "hello" exposed
[student@workstation ~]$ oc get routes
NAME HOST/PORT PATH SERVICES PORT TERMINATION WILDCARD
hello hello-smoke-test.apps.lab.example.com hello 8080-tcp None
[student@workstation ~]$ curl hello-smoke-test.apps.lab.example.com
Hello, World! php version is 5.6.25