1 Introduction
1.1 background
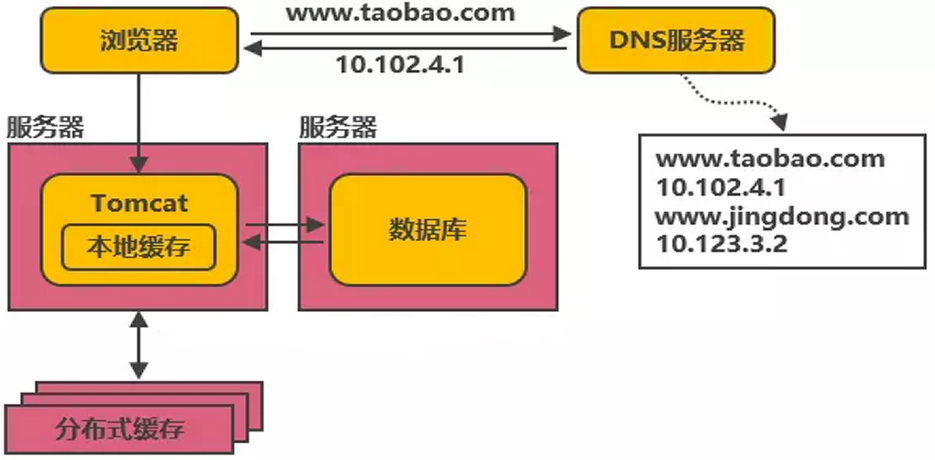
In our current project architecture, the Web server (Tomcat) and database are basically deployed independently and monopolize the server resources. With the growth of the number of users, concurrent reading and writing to the database will increase the pressure on database access and lead to performance degradation. In serious cases, it will directly lead to system downtime, for example:

At this time, we can add local cache on the same Tomcat server and external distributed cache to cache popular data. That is, the cache can intercept most requests before reading and writing to the database, greatly reducing the pressure on the database. For example:

Based on such an architecture design, some distributed databases like redis were born.
1.2 overview of redis
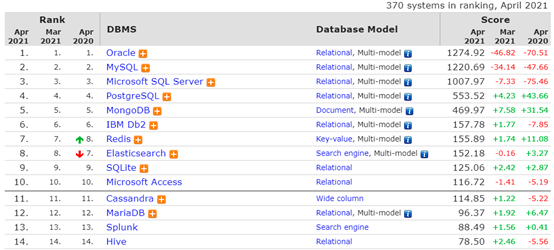
Redis is a key value storage system (official website: http://redis.io ), is a distributed cache database. In the database ranking of DB-Engines.com, redis rose to the seventh, as shown in the figure:

1.3 version and reference description
The even version number (the number after the first decimal point) of redis is the stable version (2.4, 2.6, etc.), and the odd version is the unstable Version (2.5, 2.7). It is generally recommended to use the stable version in the production environment. The latest version 6.2.2 adds a stream processing method with higher performance. Redis officially does not support the windows platform. The Windows version is a branch established by Microsoft and compiled, released and maintained based on the official redis source code. Therefore, the redis version of the windows platform is slightly lower than the official version.
Redis related reference websites are as follows:
Bootnb relevant: https://www.runoob.com/redis/redis-tutorial.html
Redis Official website: https://redis.io/
Source address: https://github.com/redis/redis
Redis Online test: http://try.redis.io/
Redis Command Reference: http://doc.redisfans.com/
2. Redis initial operation
2.1 start redis service
Startup in docker environment (multiple containers need to be run to start docker environment):
docker start redis01 #The bottom layer is also started through redis server. redis01 after the word start is the container name
- View redis service in docker
docker ps
- View the started redis process information
ps -ef|grep redis
root      3511     1  0 16:29 ?   00:00:01 redis-server *:6379
root      3515     1  0 16:29 ?   00:00:01 redis-server 127.0.0.1:6380
2.2 entering redis container
docker exec -it redis01 bash #redis01 is the container name
2.3 login to redis service
- Log in to local redis
redis-cli
 perhaps
redis-cli -p 6379
 perhaps
redis-cli -p 6379 -a  password #-a is followed by password. You need to turn on the requirepass option in redis.conf file for this operation
- Log in to remote redis
redis-cli -h ip -p 6379 -a password
2.4 viewing redis information
First log in to redis, and then enter the info command, such as
127.0.0.1:6379> info #View the detailed configuration information of the current redis node
2.5 clear redis screen
Clear redis screen content
127.0.0.1:6379> clear
2.6 exit redis service
Exit the redis service, for example
127.0.0.1:6379> exit
2.7 turn off redis service
Close the redis service, for example:
127.0.0.1:6379> shutdown
2.8 system help
You can view related instruction help based on the help instruction, such as
127.0.0.1:6379> help
redis-cli 2.8.19
Type: "help @<group>" to get a list of commands in <group>
      "help <command>" for help on <command>
      "help <tab>" to get a list of possible help topics
      "quit" to exit
3. Redis data storage operation
3.1 easy data access
- View key s in redis based on
127.0.0.1:6379> keys *
(empty list or set)
- Store data in the form of key/value
127.0.0.1:6379> set test1 123
OK
127.0.0.1:6379> set test2 ab
OK
127.0.0.1:6379> keys *
1) "test1"
2) "test2"
- Obtain data stored in redis based on key
127.0.0.1:6379> get test1
"123"
127.0.0.1:6379> get test2
"ab"
127.0.0.1:6379> get test3
(nil)
127.0.0.1:6379>
- Clear data in redis
- Clear current database data
127.0.0.1:6379> flushdb
OK
- Clear all database data
127.0.0.1:6379> flushall
OK
3.2 Key effective time design
In practice, we often need to control the effective duration of key s in redis, such as the timing of second kill operations, the effective duration of cached data, etc.
- Expire (setting effective time - unit: seconds)
Syntax: exit key seconds
127.0.0.1:6379> set bomb tnt
OK
127.0.0.1:6379> expire bomb 10
(integer) 1
127.0.0.1:6379> ttl bomb
(integer) 5
127.0.0.1:6379> ttl bomb
(integer) 3
127.0.0.1:6379> ttl bomb
(integer) 3
127.0.0.1:6379> ttl bomb
(integer) 2
127.0.0.1:6379> ttl bomb
(integer) 1
127.0.0.1:6379> ttl bomb
(integer) -2
127.0.0.1:6379> ttl bomb
(integer) -2
127.0.0.1:6379>
Among them, TTL views the remaining time of the key. When the return value is - 2, it indicates that the key is deleted.
When the key does not exist, - 2 is returned. When the key exists but the remaining lifetime is not set, - 1 is returned.
- Persist (cancel duration setting)
Invalidate the effective duration of a specific key setting through persist.
Syntax: PERSIST key
127.0.0.1:6379> set bomb tnt
OK
127.0.0.1:6379> expire bomb 60
(integer) 1
127.0.0.1:6379> ttl bomb
(integer) 49
127.0.0.1:6379> persist bomb
(integer) 1
127.0.0.1:6379> ttl bomb
(integer) -1
127.0.0.1:6379>
When setting new data, you need to reset the lifetime of the key, and resetting the value will also clear the lifetime.
- pexpire (in milliseconds)
pexpire allows the effective duration of the key to be measured in milliseconds, which can achieve more accurate time control. For example, it can be applied to a second kill scenario.
Syntax: PEXPIRE key milliseconds
127.0.0.1:6379> set bomb tnt
OK
127.0.0.1:6379> pexpire bomb 10000
(integer) 1
127.0.0.1:6379> ttl bomb
(integer) 6
127.0.0.1:6379> ttl bomb
(integer) 3
127.0.0.1:6379> ttl bomb
(integer) -2
127.0.0.1:6379>