1. Introduction to redis transaction
1.1 general
Transaction is a business and can also be regarded as a logical work unit. It is a control mechanism introduced to ensure the integrity of business and the correctness of data. In principle, transactions must meet the four characteristics of ACID (atomicity, consistency, isolation and persistence) in multiple transactions
During concurrent execution, in order to better ensure the realization of the four characteristics of transactions, transactions are usually locked. For performance, Redis adopts the optimistic locking method for transaction control. It uses the watch command to monitor the given key. When exec (commit transaction), if the monitored key changes after calling watch, the whole transaction will fail. You can also call watch to monitor multiple keys multiple times. Note that the key of watch is valid for the whole connection. If the connection is disconnected, monitoring and transactions will be automatically cleared. Of course, the exec, discard and unwatch commands will clear all monitoring in the connection.
1.2 basic instructions
When redis performs transaction control, it is usually implemented based on the following instructions, for example:
- multi open transaction
- exec commit transaction
- discard cancel transaction
- watch monitoring. If the monitored value changes, the transaction submission will fail
- unwatch remove monitoring
Redis ensures that all commands in a transaction are executed or not executed (atomicity). If the client is disconnected before sending the EXEC command, redis will empty the transaction queue and all commands in the transaction will not be executed. Once the client sends the EXEC command, all commands will be executed. Even if the client is disconnected, it doesn't matter, because all commands to be executed have been recorded in redis.
2. Redis transaction control practice
2.1 exec commit transaction
For example: analog transfer, tony 500, jack 200, tony to Jack 100. The process is as follows:
127.0.0.1:6379> set tony 500
OK
127.0.0.1:6379> set jack 200
OK
127.0.0.1:6379> mget tony jack
1) "500"
2) "200"
127.0.0.1:6379> multi #Open transaction
OK
127.0.0.1:6379(TX)> decrby tony 100 #All instruction operations are queued
QUEUED
127.0.0.1:6379(TX)> incrby jack 100
QUEUED
127.0.0.1:6379(TX)> mget tony jack
QUEUED
127.0.0.1:6379(TX)> exec  #Commit transaction
1) (integer) 400
2) (integer) 300
3) 1) "400"
   2) "300"
127.0.0.1:6379> mget tony jack
1) "400"
2) "300"
127.0.0.1:6379>
2.2 discard cancel transaction
Note that the redis transaction is too simple. Instead of rolling back, it has to be cancelled.
127.0.0.1:6379> mget tony jack
1) "400"
2) "300"
127.0.0.1:6379> multi
OK
127.0.0.1:6379> incrby jack 100
QUEUED
127.0.0.1:6379> discard
OK
127.0.0.1:6379> get jack
"300"
127.0.0.1:6379> exec
(error) ERR EXEC without MULTI
When an incorrect instruction occurs, the transaction will also be cancelled automatically.
127.0.0.1:6379> mget tony jack
1) "400"
2) "300"
127.0.0.1:6379> multi
OK
127.0.0.1:6379(TX)> incrby jack 100
QUEUED
127.0.0.1:6379(TX)> abcd
(error) ERR unknown command `abcd`, with args beginning with:
127.0.0.1:6379(TX)> get jack
QUEUED
127.0.0.1:6379(TX)> exec
(error) EXECABORT Transaction discarded because of previous errors.
127.0.0.1:6379> get jack
"300"
127.0.0.1:6379>
2.3 second kill ticket grabbing transaction
Based on a second kill and rush purchase case, demonstrate the optimistic lock mode of redis, for example
Step 1: open client 1 and perform the following operations
127.0.0.1:6379> set ticket 1
OK
127.0.0.1:6379> set money 0
OK
127.0.0.1:6379> watch ticket		#Optimistic lock. Observe the value. If the value changes, the transaction fails
OK
127.0.0.1:6379> multi				#Open transaction
OK
127.0.0.1:6379> decr ticket
QUEUED
127.0.0.1:6379> incrby money 100
QUEUED
Step 2: open client 2 and perform the following operations. Before client 1 submits the transaction, client 2 buys the ticket.
127.0.0.1:6379> get ticket
"1"
127.0.0.1:6379> decr ticket
(integer) 0
Step 3: return to client 1: commit the transaction and check the value of ticket
127.0.0.1:6379> exec
(nil) #Execute transaction, failed
127.0.0.1:6379> get ticket
"0"
127.0.0.1:6379> unwatch #Cancel monitoring
2.4 Jedis client transaction operation
Conduct transaction test based on Jedis, and the code is as follows:
package com.jt;
import org.junit.Test;
import redis.clients.jedis.Jedis;
import redis.clients.jedis.Transaction;

public class JedisTransactionTests {

    @Test
    public void testTransaction(){
        Jedis jedis=new Jedis("192.168.126.130",6379);
        jedis.auth("123456");
        jedis.set("tony","300");
        jedis.set("jack","500");
        //To implement the operation, tony transfers 100 to jack
        //Open transaction
        Transaction multi = jedis.multi();
        //Perform business operations
        try {
            multi.decrBy("tony", 100);
            multi.incrBy("jack", 100);
            int n=100/0;//Simulation anomaly
            //Commit transaction
            multi.exec();
        }catch(Exception e) {
            //An exception occurred to cancel the transaction
            multi.discard();
        }
        String tonyMoney=jedis.get("tony");
        String jackMoney=jedis.get("jack");
        System.out.println("tonyMoney="+tonyMoney);
        System.out.println("jackMoney="+jackMoney);
        jedis.close();
    }
}
2.5 jedis client second kill operation practice
package com.jt.demos;

import redis.clients.jedis.Jedis;
import redis.clients.jedis.Response;
import redis.clients.jedis.Transaction;

import java.util.List;

/**
 * redis Second kill exercise:
 * Simulate that both threads rush to buy the same ticket (consider music lock)
 */
public class SecondKillDemo02 {

      public static void secKill(){
          Jedis jedis=new Jedis("192.168.126.130",6379);
          jedis.auth("123456");
          jedis.watch("ticket","money");
          String ticket = jedis.get("ticket");
          if(ticket==null||Integer.valueOf(ticket)==0)
              throw new RuntimeException("No inventory");
          Transaction multi = jedis.multi();
          try {
              multi.decr("ticket");
              multi.incrBy("money", 100);
              List<Object> exec = multi.exec();
              System.out.println(exec);
          }catch (Exception e){
              e.printStackTrace();
              multi.discard();
          }finally {
              jedis.unwatch();
              jedis.close();
          }
      }
      public static void main(String[] args) {
          Jedis jedis=new Jedis("192.168.126.130",6379);
          jedis.auth("123456");
          jedis.set("ticket","1");
          jedis.set("money","0");

          Thread t1=new Thread(()->{
              secKill();
          });
          Thread t2=new Thread(()->{
              secKill();
          });
          t1.start();
          t2.start();
      }
}
3. Redis master-slave replication
3.1 introduction
The read-write capability supported by a single redis is still limited. At this time, we can use multiple redis to improve the concurrent processing capability of redis. How these redis cooperate requires a certain architecture design. Here, we first analyze and implement the master / slave architecture
3.2 basic structure
redis master-slave architecture is shown in the figure below:
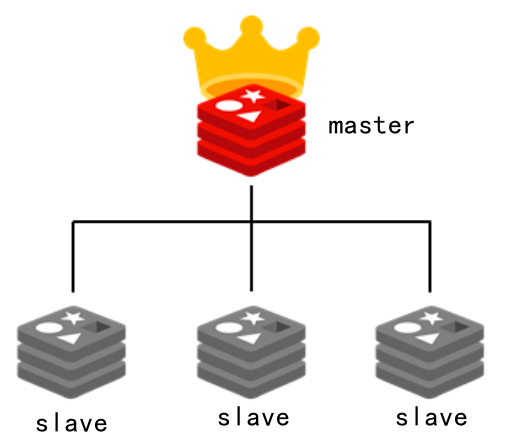
Among them, the master is responsible for reading and writing, synchronizing the data to the save, and the slave node is responsible for reading
3.3 quick start practices
Based on Redis, a Master-Slave architecture is designed, including one Master and two Slave. The Master is responsible for reading and writing Redis and synchronizing data to the Slave. The Slave is only responsible for reading, The steps are as follows:
Step 1: delete all original redis containers, for example:
docker rm -f redis Container name
Step 2: enter the docker directory of your host computer, and then copy redis01 in two copies, for example:
cp -r redis01/ redis03
cp -r redis01/ redis03
Step 3: start three new redis containers, for example:
docker run -p 6379:6379 --name redis6379 \
-v /usr/local/docker/redis01/data:/data \
-v /usr/local/docker/redis01/conf/redis.conf:/etc/redis/redis.conf \
-d redis redis-server /etc/redis/redis.conf \
--appendonly yes
Step 4: check the redis service role
Start the three clients, log in to the three redis container services respectively, and view the roles through the info command. By default, the three newly started redis service roles are master
127.0.0.1:6379> info replication
\# Replication
role:master
connected_slaves:0
master_repl_offset:3860
repl_backlog_active:1
repl_backlog_size:1048576
repl_backlog_first_byte_offset:2
repl_backlog_histlen:3859
Step 5: check the ip settings of redis6379
docker inspect redis6379
......
"Networks": {
                "bridge": {
                    "IPAMConfig": null,
                    "Links": null,
                    "Aliases": null,
                    "NetworkID": "c33071765cb48acb1efed6611615c767b04b98e6e298caa0dc845420e6112b73",
                    "EndpointID": "4c77e3f458ea64b7fc45062c5b2b3481fa32005153b7afc211117d0f7603e154",
                    "Gateway": "172.17.0.1",
                    "IPAddress": "172.17.0.2",
                    "IPPrefixLen": 16,
                    "IPv6Gateway": "",
                    "GlobalIPv6Address": "",
                    "GlobalIPv6PrefixLen": 0,
                    "MacAddress": "02:42:ac:11:00:02",
                    "DriverOpts": null
                }
            }
Step 6: set Master/Slave architecture
Log in to redis6380/redis6381 respectively, and then execute the following statement
slaveof 172.17.0.2 6379
Note: if the master has a password, it needs to be in redis.com of the slave Add the statement "masterauth your password" in the conf configuration file, restart redis, and then execute the slave of command
Step 7: log in to redis6379 again and check info
[root@centos7964 ~]# docker exec -it redis6379 redis-cli
127.0.0.1:6379> info replication
\# Replication
role:master
connected_slaves:2
slave0:ip=172.17.0.3,port=6379,state=online,offset=2004,lag=1
slave1:ip=172.17.0.4,port=6379,state=online,offset=2004,lag=1
master_failover_state:no-failover
master_replid:5baf174fd40e97663998abf5d8e89a51f7458488
master_replid2:0000000000000000000000000000000000000000
master_repl_offset:2004
second_repl_offset:-1
repl_backlog_active:1
repl_backlog_size:1048576
repl_backlog_first_byte_offset:1
repl_backlog_histlen:2004
Step 8: log in to redis6379 to test. The master can read and write
[root@centos7964 ~]# docker exec -it redis6379 redis-cli
127.0.0.1:6379> set role master6379
OK
127.0.0.1:6379> get role
"master6379"
127.0.0.1:6379>
Step 9: log in to redis6380 to test. slave can only read.
[root@centos7964 ~]# docker exec -it redis6380 redis-cli
127.0.0.1:6379> get role
"master6379"
127.0.0.1:6379> set role slave6380
(error) READONLY You can't write against a read only replica.
127.0.0.1:6379>
Read / write test analysis in Java. The code is as follows:
@SpringBootTest
public class MasterSlaveTests {
    @Autowired
    private RedisTemplate redisTemplate;

    @Test
    void testMasterReadWrite(){//The profile port is 6379
        ValueOperations valueOperations = redisTemplate.opsForValue();
        valueOperations.set("role", "master6379");
        Object role = valueOperations.get("role");
        System.out.println(role);
    }

    @Test
    void testSlaveRead(){//The profile port is 6380
        ValueOperations valueOperations = redisTemplate.opsForValue();
        Object role = valueOperations.get("role");
        System.out.println(role);
    }

}
3.4 principle analysis of master-slave synchronization
Redis master-slave structure can adopt one master-slave structure. Redis master-slave replication can be divided into full synchronization and incremental synchronization according to whether it is full or not.
-Redis full synchronization:
Redis full replication usually occurs in the Slave initialization stage. At this time, the Slave needs to copy all the data on the Master. The specific steps are as follows:
1) Connect the slave server to the master server and send the SYNC command;
2) After receiving the SYNC naming, the master server starts to execute the BGSAVE command to generate an RDB file and uses the buffer to record all write commands executed thereafter;
3) After the master server BGSAVE executes, it sends snapshot files to all slave servers, and continues to record the executed write commands during sending;
4) After receiving the snapshot file from the server, discard all old data and load the received snapshot;
5) After sending the snapshot from the master server, start sending the write command in the buffer to the slave server;
6) Loading the snapshot from the server, receiving the command request, and executing the write command from the main server buffer;
-Redis incremental synchronization
Redis incremental replication refers to the process of synchronizing the write operations of the master server to the Slave server when the Slave starts working normally after the Slave is initialized. The main process of incremental replication is that the master server sends the same write command to the Slave server every time it executes a write command, and the Slave server receives and executes the received write command.
Section 3.5 interview analysis
-What would you do if redis wanted to support 100000 + concurrency?
It's almost impossible for a single redis to say that the QPS exceeds 100000 +, unless there are some special circumstances, such as your machine's performance is particularly good, the configuration is particularly high, the physical machine and maintenance are particularly good, and your overall operation is not too complex. The average single machine is tens of thousands. To truly realize the high concurrency of redis, read-write separation is required. For cache, it is generally used to support high read concurrency. There are relatively few write requests, and write requests may be thousands of times a second. There will be relatively more requests to read, for example, 200000 times a second. Therefore, the high concurrency of redis can be realized based on the master-slave architecture and the read-write separation mechanism.
-What is the replication mechanism of Redis?
(1) redis copies data to the slave node asynchronously.
(2) A master node can be configured with multiple slave node s.
(3) When a slave node is replicated, the block master node will not work normally.
(4) When copying, slave node will not block its own query operations. It will use the old data set to provide services; However, when the copy is completed, the old dataset needs to be deleted and the new dataset needs to be loaded. At this time, the external service will be suspended.
(5) The slave node is mainly used for horizontal expansion and read-write separation. The expanded slave node can improve the read throughput.
4. Redis sentinel mode
4.1 introduction
Sentinel is a mechanism to achieve high availability under the master-slave architecture mode of Redis.
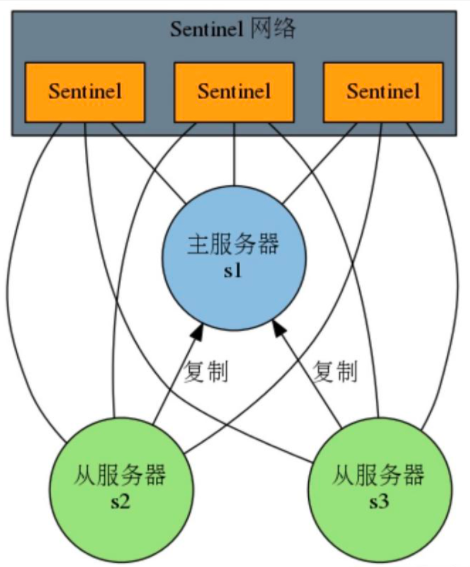
The Sentinel system composed of one or more Sentinel instance s can monitor any number of master servers and all slave servers under these master servers, and automatically upgrade a slave server under the offline master server to a new master server when the monitored master server enters the offline state, Then, the new master server continues to process the command request instead of the offline master server.
4.2 basic architecture
4.3 sentry quick start
Step 1: open three redis client windows, enter the three redis containers respectively, and execute the following statements in the directory / etc/redis specified in the container:
cat <<EOF > /etc/redis/sentinel.conf
sentinel monitor redis6379 172.17.0.2 6379 1
EOF
Among them, the above instruction indicates the master to be monitored, redis6379 is the service name, 172.17 0.2 and 6379 are the ip and port of the master. 1 indicates how many sentinel s consider a master to be invalid
Step 2: execute the following command in the / etc/redis directory inside each redis container to start the sentinel service
redis-sentinel sentinel.conf
Step 3: open a new client connection window and close redis6379 service (this service is the master service)
docker stop redis6379
In other client windows, detect log output, such as
410:X 11 Jul 2021 09:54:27.383 # +switch-master redis6379 172.17.0.2 6379 172.17.0.4 6379
410:X 11 Jul 2021 09:54:27.383 * +slave slave 172.17.0.3:6379 172.17.0.3 6379 @ redis6379 172.17.0.4 6379
410:X 11 Jul 2021 09:54:27.383 * +slave slave 172.17.0.2:6379 172.17.0.2 6379 @ redis6379 172.17.0.4 6379
Step 4: the login ip is 172.17 0.4 perform info detection on the corresponding service, for example:
127.0.0.1:6379> info replication
\# Replication
role:master
connected_slaves:1
slave0:ip=172.17.0.3,port=6379,state=online,offset=222807,lag=0
master_failover_state:no-failover
master_replid:3d63e8474dd7bcb282ff38027d4a78c413cede53
master_replid2:5baf174fd40e97663998abf5d8e89a51f7458488
master_repl_offset:222807
second_repl_offset:110197
repl_backlog_active:1
repl_backlog_size:1048576
repl_backlog_first_byte_offset:29
repl_backlog_histlen:222779
127.0.0.1:6379>
From the above information output, it is found that the redis6381 service has now become a master.
4.4 Sentinel configuration advanced
For sentinel The contents in the conf file can also be enhanced based on actual requirements, such as:
sentinel monitor redis6379 172.17.0.2 6379 1
daemonize yes #Background operation
logfile "/var/log/sentinel_log.log" #Run log
sentinel down-after-milliseconds redis6379 30000 #Default 30 seconds
Of which:
- Daemon yes indicates background operation (no by default)
- logfile is used to specify the location and name of the log file
- Sentinel down after milliseconds indicates how long it takes for the master to fail
For example: create sentinel based on cat instruction Conf file and add relevant contents
cat <<EOF > /etc/redis/sentinel.conf
sentinel monitor redis6379 172.17.0.2 6379 1
daemonize yes
logfile "/var/log/sentinel_log.log"
sentinel down-after-milliseconds redis6379 30000
EOF
4.5 analysis of sentry working principle
- Each Sentinel sends a PING command to its known Master, Slave and other Sentinel instances once a second.
- If the time of an instance from the last valid reply to the PING command exceeds the value specified by the down after milliseconds option (this configuration item specifies how long it takes to expire before a master is subjectively considered unavailable by the Sentinel. The unit is milliseconds, and the default is 30 seconds), the instance will be marked as subjectively offline by the Sentinel.
- If a Master is marked as subjective offline, all sentinels monitoring the Master should confirm that the Master has indeed entered the subjective offline state once per second.
- When a sufficient number of sentinels (greater than or equal to the value specified in the configuration file) confirm that the Master has indeed entered the subjective offline state within the specified time range, the Master will be marked as objective offline.
- In general, each Sentinel will send INFO commands to all known masters and Slave every 10 seconds.
- When the Master is marked as objectively offline by Sentinel, the frequency of Sentinel sending INFO commands to all Slave of the offline Master will be changed from once in 10 seconds to once per second.
- If not enough Sentinel agree that the Master has been offline, the objective offline status of the Master will be removed.
- If the Master returns a valid reply to Sentinel's PING command again, the Master's subjective offline status will be removed.
5. Redis cluster high availability
5.1 brief introduction
The reliability guarantee of redis single machine mode is not very good, and it is prone to single point of failure. At the same time, its performance is also limited by the processing capacity of CPU. Redis must be highly available in actual development, so the single machine mode is not our destination. We need to upgrade the current redis architecture mode.
Sentinel mode achieves high availability, but only one master is providing services in essence (in the case of read-write separation, the master is also providing services in essence). When the machine memory of the master node is insufficient to support the system data, the cluster needs to be considered.
Redis cluster architecture realizes the horizontal expansion of redis, that is, start n redis nodes, distribute and store the whole data in the n redis nodes, and each node stores 1/N of the total data. Redis cluster provides a certain degree of availability through partition. Even if some nodes in the cluster fail or cannot communicate, the cluster can continue to process command requests.
5.2 basic structure
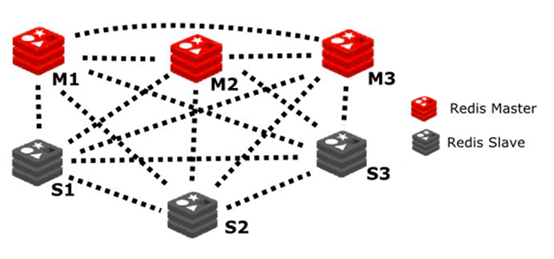
For a redis cluster, it is generally set to at least 6 nodes, 3 masters and 3 slave. Its simple architecture is as follows:
5.3 creating clusters
Step 1: prepare the network environment
The creation of virtual network card is mainly used for redis cluster to communicate with the outside world. Generally, the bridge mode is commonly used.
docker network create redis-net
To view the network card information of docker, you can use the following instructions
docker network ls
To view docker network details, you can use the command
docker network inspect redis-net
Step 2: prepare redis configuration template
mkdir -p /usr/local/docker/redis-cluster
cd /usr/local/docker/redis-cluster
vim redis-cluster.tmpl
In redis cluster Enter the following in tmpl
port ${PORT}
cluster-enabled yes
cluster-config-file nodes.conf
cluster-node-timeout 5000
cluster-announce-ip 192.168.126.129
cluster-announce-port ${PORT}
cluster-announce-bus-port 1${PORT}
appendonly yes
Of which:
Each node is explained as follows:
- Port: node port, that is, the port that provides external communication
- Cluster enabled: whether to enable the cluster
- Cluster config file: cluster configuration file
- Cluster node timeout: connection timeout
- Cluster announcement ip: host ip
- Cluster announcement port: cluster node mapping port
- Cluster announcement bus port: cluster bus port
- appendonly: persistent mode
Step 3: create a node profile
Execute the following command in redis cluser
for port in $(seq 8010 8015); \
do \
  mkdir -p ./${port}/conf  \
  && PORT=${port} envsubst < ./redis-cluster.tmpl > ./${port}/conf/redis.conf \
  && mkdir -p ./${port}/data; \
done
Of which:
- For variable in $(seq var1 var2);do …; done is a shell loop script in linux, for example:
[root@centos7964 ~]# for i in $(seq 1 5);
> do echo $i;
> done;
1
2
3
4
5
[root@centos7964 ~]#
- The instruction envsubst < source file > target file is used to update the contents of the source file into the target file
View the contents of the configuration file through the cat instruction
cat /usr/local/docker/redis-cluster/801{0..5}/conf/redis.conf
Step 4: create a redis node container in the cluster
for port in $(seq 8010 8015); \
do \
   docker run -it -d -p ${port}:${port} -p 1${port}:1${port} \
  --privileged=true -v /usr/local/docker/redis-cluster/${port}/conf/redis.conf:/usr/local/etc/redis/redis.conf \
  --privileged=true -v /usr/local/docker/redis-cluster/${port}/data:/data \
  --restart always --name redis-${port} --net redis-net \
  --sysctl net.core.somaxconn=1024 redis redis-server /usr/local/etc/redis/redis.conf; \
done
Where, -- privileged=true means that the started container user has real root permission, -- sysctl. Net core. Somaxconn = 1024, which is a linux kernel parameter used to set the size of the request queue. The default value is 128. Subsequent instructions to start redis should be put into the request queue first, and then started in turn
After the creation is successful, view the node content through the docker ps instruction.
Step 5: create redis cluster configuration
docker exec -it redis-8010 bash
redis-cli --cluster create 192.168.126.129:8010 192.168.126.129:8011 192.168.126.129:8012 192.168.126.129:8013 192.168.126.129:8014 192.168.126.129:8015 --cluster-replicas 1
The above instructions should be executed in one line as far as possible, and the last 1 represents the master-slave ratio. When the selection prompt message appears, enter yes. After the cluster is created, you can view the cluster information through some related instructions, such as
cluster nodes   #View the number of cluster nodes
cluster info #View basic cluster information
Step 6: connect the redis cluster and add data to redis
redis-cli -c -h 192.168.126.129 -p 8010
Where - c represents cluster, - H represents host (generally write ip address), and - p represents port
other:
During the construction process, you may need to stop or directly delete the docker container after a problem occurs. You can use the following reference commands:
Batch stop docker container, for example:
docker ps -a | grep -i "redis-801*" | awk '{print $1}' | xargs docker stop
Batch delete docker containers, for example
docker ps -a | grep -i "redis-801*" | awk '{print $1}' | xargs docker rm -f
Delete files, directories, etc. in batch, for example:
rm -rf 801{0..5}/conf/redis.conf
rm -rf 801{0..5}
The above is a simple step to build redis cluster based on docker. It may be more complex in practical application. This article is for reference only.
5.4 Jedis read / write data test
@Test
void testJedisCluster()throws Exception{
      Set<HostAndPort> nodes = new HashSet<>();
      nodes.add(new HostAndPort("192.168.126.129",8010));
      nodes.add(new HostAndPort("192.168.126.129",8011));
      nodes.add(new HostAndPort("192.168.126.129",8012));
      nodes.add(new HostAndPort("192.168.126.129",8013));
      nodes.add(new HostAndPort("192.168.126.129",8014));
      nodes.add(new HostAndPort("192.168.126.129",8015));
      JedisCluster jedisCluster = new JedisCluster(nodes);
      //redis using jedisCluster
      jedisCluster.set("test", "cluster");
      String str = jedisCluster.get("test");
      System.out.println(str);
      //Close connection pool
      jedisCluster.close();
 }
5.5 RedisTemplate read / write data test
Step 1: configure application YML, for example:
spring:
  redis:
    cluster: #redis cluster configuration
      nodes: 192.168.126.129:8010,192.168.126.129:8011,192.168.126.129:8012,192.168.126.129:8013,192.168.126.129:8014,192.168.126.129:8015
      max-redirects: 3 #Maximum number of jumps
    timeout: 5000 #Timeout
    database: 0
    jedis: #Connection pool
      pool:
        max-idle: 8
        max-wait: 0
Step 2: write the unit test class. The code is as follows:
package com.cy.redis;
@SpringBootTest
public class RedisClusterTests {
    @Autowired
    private RedisTemplate redisTemplate;
    @Test
    void testMasterReadWrite(){
        //1. Get data operation object
        ValueOperations valueOperations = redisTemplate.opsForValue();
        //2. Read and write data
        valueOperations.set("city","beijing");
        Object city=valueOperations.get("city");
        System.out.println(city);
    }
}
Section 5.6 interview analysis
- What is the relationship between the high concurrency of Redis and the high concurrency of the whole system?
First: if you want to achieve high concurrency in Redis, it is inevitable to do a good job in the underlying cache. For example, mysql has high concurrency through a series of complex sub databases and tables, order system and transaction requirements. The QPS is tens of thousands, which is relatively high.
Second: to do some e-commerce product details pages, the real ultra-high concurrency. There are hundreds of thousands or even millions of requests in QPS, and millions of requests per second. Redis is not enough, but redis is a very important link in the whole large cache architecture supporting the high concurrency architecture.
Third, your underlying cache middleware and cache system must be able to support the high concurrency we call. Secondly, after a good overall cache architecture design (multi-level cache architecture and hot cache), it can support hundreds of thousands or even millions of real high concurrency.