10. Database and identity authentication
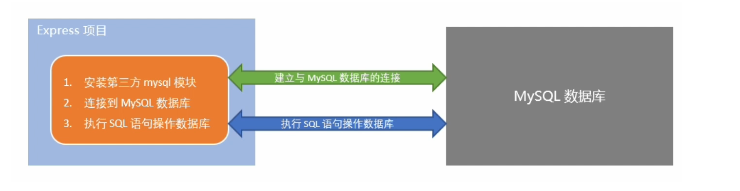
1. Steps to operate the database in the project
- Install the third-party module (MySQL) that operates the MySQL database
- Connect to MYSQL database through MYSQL module
- Execute SQL statements through mysql module
2. The code realizes the connection to the database
//1. Import mysql module
//import mysql from 'mysql'
const mysql = require('mysql')
//2. Establish the link relationship with mysql database

const db=mysql.createPool({
    host: '192.168.142.129',
    user: 'root',
    password: '123456',
    database: 'mysql',
})

//3. Test whether the mysql module can work normally

db.query('select Host,User from user',(err,results)=>{
    if(err) return console.log(err.message)

    console.log(results)
})
result:

insert data
const us={Host:'localhost',User:'xiaohong'}

const sql2="insert into user (Host,User) values (?,?)"

db.query(sql2 , [us.Host,us.User] , (err,results)=>{
    if(err) return console.log(err.message)   //fail

    if(results.affectedRows === 1) {console.log('Insert data successfully')}
})
Convenient form for inserting data
const us={Host:'localhost',User:'xiaohong',ssl_cipher:'ssss',x509_issuer:'fsf',x509_subject:'54'}
const sql2 ='insert into user set ?'

db.query(sql2,us,(err,results)=>{
    if(err) return console.log(err.message)   //fail

    if(results.affectedRows === 1) {console.log('Insert data successfully')}
})
Update data
const us={Host:'lt',User:'xiao',ssl_cipher:'ssss',x509_issuer:'fsf',x509_subject:'54'}
const sql2 ='insert into user set ?'

const upd='update user set ? where ssl_cipher= ?'
db.query(upd,[us,us.ssl_cipher],(err,data)=>{
    console.log("Come in and update the data!!")
    if(err) return console.log(err.message)
    if(data.affectedRows === 1) {
        console.log("Data update succeeded!!")
    }

})
Delete data
db.query("delete from user where User='xiaohong'",(err,data)=>{
    if(err) return console.log(err.message)
    console.log("Start deleting")
    if(data.affectedRows === 1){
        console.log("Delete succeeded!")
    }
})
3. Web development mode
-
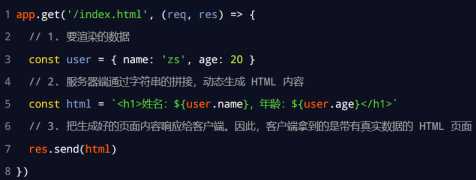
Web development mode of server rendering
The HTML page sent by the server to the client is dynamically generated through string splicing in the server. Therefore, the client does not need to use technologies such as Ajax to request additional data of the page.
The example code is as follows:
- advantage
- The front-end takes less time. Because the server side is responsible for dynamically generating HTML content, the browser only needs to render the page directly. Especially the mobile terminal, which saves more power.
- Conducive to SEO. Because the server responds to the complete HTML page content, the crawler is easier to crawl and obtain information, which is more conducive to SEO.
- shortcoming
- Occupy server-side resources. That is, the server completes the splicing of HTML page content. If there are many requests, it will cause certain access pressure to the server.
- It is not conducive to the separation of front and rear ends, and the development efficiency is low. When server-side rendering is used, there is no division of labor and cooperation, especially for projects with high front-end complexity, which is not conducive to the efficient development of the project.
- advantage
-
Web development mode with front end and back end separated
The development mode of front end and back end separation depends on the wide application of Ajax technology. In short, the Web development mode of separating the front end from the back end is the development mode in which the back end is only responsible for providing API interfaces and the front end uses Ajax to call interfaces.
- advantage
- Good development experience. The front end focuses on the development of UI pages, while the back end focuses on the development of APIs, and the front end has more selectivity.
- Good user experience. The wide application of Ajax technology greatly improves the user experience and can easily realize the local refresh of the page.
- Reduces the rendering pressure on the server side. Because the page is ultimately generated in each user's browser.
- shortcoming
- Not conducive to SEO. Because the complete HTML page needs to be dynamically spliced at the client, the crawler cannot crawl the effective information of the page. (solution: using the SSR (server side render) technology of front-end frameworks such as Vue and React can well solve the SEO problem!)
- advantage
-
How to choose Web development mode
- The main function of an enterprise website is to display without complex interaction, and it needs good SEO. At this time, we need to use server-side rendering;
- Background management projects are highly interactive and do not need to consider SEO, so you can use the development mode of separating the front and back ends.
- The specific development mode used is not absolute. In order to take into account the rendering speed of the home page and the development efficiency of front and back separation at the same time, some websites adopt the development mode of first screen server-side rendering + front and back separation of other pages.
4. Identity authentication of front and rear end
-
Identity authentication under different development modes
For the two development modes of server-side rendering and front-end and back-end separation, there are different identity authentication schemes:
- Session authentication mechanism is recommended for server-side rendering
- JWT authentication mechanism is recommended for front and rear end separation
-
Session authentication mechanism
- Statelessness of HTTP protocol
- The statelessness of HTTP protocol means that each HTTP request of the client is independent, there is no direct relationship between consecutive requests, and the server will not actively retain the state of each HTTP request.
- What is a cookie
- A Cookie is a string of no more than 4 KB stored in the user's browser. It consists of a Name, a Value and several other optional properties that control the validity, security and scope of use of cookies.
- Cookie s under different domain names are independent. Whenever the client initiates a request, it will automatically send all unexpired cookies under the current domain name to the server.
- Several features of cookie s
- Auto send
- Domain name independence
- Expiration time limit
- 4KB limit
- Statelessness of HTTP protocol
-
Cookie s are not secure
- Because cookies are stored in the browser, and the browser also provides an API for reading and writing cookies, cookies are easy to be forged and have no security. Therefore, it is not recommended that the server send important privacy data to the browser in the form of cookies.
-
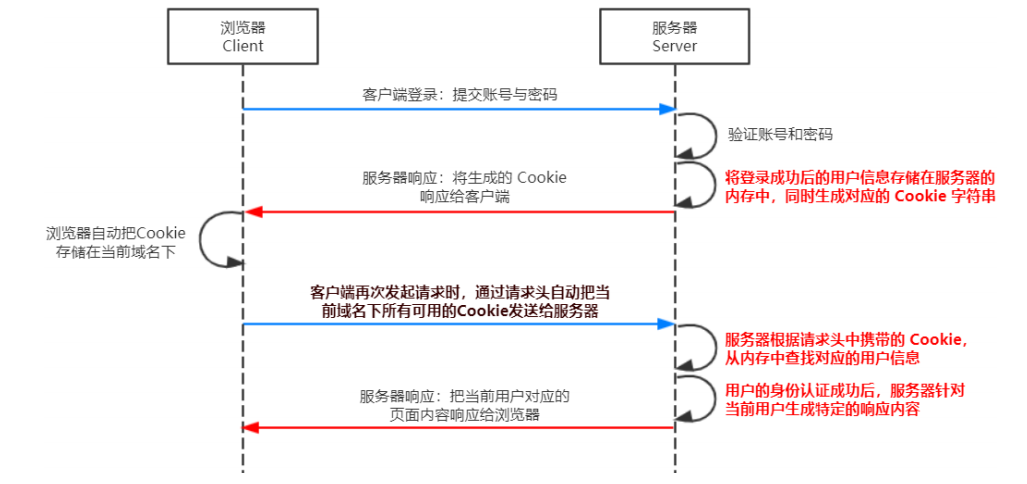
Session (to improve the security of cookie s)
working principle:
-
Using Session authentication in Express
- Configuring session Middleware
// TODO_01: Please configure Session Middleware

const session=require('express-session')

app.use(session({
  secret: 'itheima',
  resave: false,              //Fixed writing
  saveUninitialized: true,    //Fixed writing
}))
b. Save the user information after successful login to the session
// TODO_02: please save the user information after successful login to the Session
  req.session.user=req.body     //User information
  req.session.islogin=true              //User login status

  res.send({ status: 0, msg: 'Login successful' })
c. Get the user name from the session and respond to the client
// Interface to get user name
app.get('/api/username', (req, res) => {
  // TODO_03: please get the user's name from the Session and respond to the client
  if(!req.session.islogin){
    return res.send({status: 1,msg: 'fail'})

  }
  res.send({
    status: 0,
    msg: 'success',
    username: 'req.session.user.username',
  })

})
d. Exit the login interface and clear the session information
// Exit the logged in interface app.post('/api/logout', (req, res) => { // TODO_04: clear Session information req.session.destroy() res.send({ status: 0, msg: 'Log out successfully!' }) }) -
JWT authentication mechanism
-
Introduction to JWT
- JWT (Jason web token) is the most popular cross domain authentication solution at present.
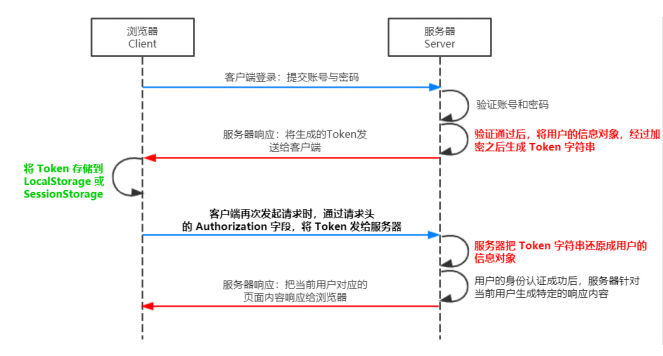
- working principle
-
Three components of JWT
- Header (security related)
- Payload (real user information)
- Signature (security related part)
-
JWT usage
After receiving the JWT returned by the server, the client usually stores it in localStorage or sessionStorage.
After that, the client should bring this JWT string every time it communicates with the server. The recommended practice is to put the JWT in the Authorization field of the HTTP request header
Authorization: Bearer <token>
-
-
Use of JWT
-
Two bags
- jsonwebtoken generates JWT strings
- Express JWT is used to restore JWT string parsing to JSON objects
-
Define secret key
In order to ensure the security of JWT string and prevent JWT string from being cracked by others during network transmission, we need to define a special secret key for encryption and decryption:
- When generating the JWT string, you need to use the secret key to encrypt the user's information, and finally get the encrypted JWT string
- When the JWT string is parsed and restored to a JSON object, the secret key needs to be used for decryption
-
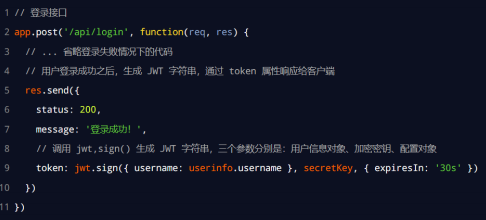
Generate JWT string after successful login
Call the sign() method provided by the jsonwebtoken package, encrypt the user's information into a JWT string, and respond to the client:
-
Restore JWT strings to JSON objects
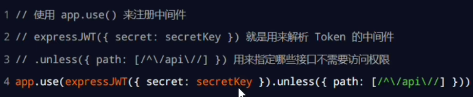
Every time the client accesses those authorized interfaces, it needs to actively send the Token string to the server through the Authorization field in the request header for identity authentication.
At this time, the server can automatically restore the Token parsing sent by the client to JSON objects through express JWT:
-
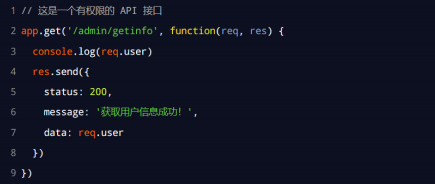
Use req User get user information
After the express JWT middleware is successfully configured, you can use req The user parses the string information from the JWT object as follows:
-
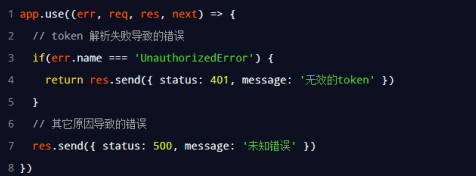
Capture the error generated after parsing JWT failed
When using Express JWT to parse the Token string, if the Token string sent by the client is expired or illegal, an error of parsing failure will be generated, which will affect the normal operation of the project. We can capture this error and handle it through the error middleware of Express. The example code is as follows:
-