1. Common Linux commands
2. Common CMD commands under windows
1, Directory operation
pwd				View current working directory
clear 			Clear screen
cd ~			Current user directory
cd /			root directory
cd -			Last accessed directory
cd ..			Upper level directory
- 1
- 2
- 3
- 4
- 5
- 6
View information in the directory
ll View the contents of the current directory( LL (lowercase)
- 1
Create directory
mkdir aaa		Create in current directory aaa Directory, relative path;
mkdir ./bbb		Create in current directory bbb Directory, relative path;
mkdir /ccc		Create in root directory ccc Directory, absolute path;
- 1
- 2
- 3
Create a directory recursively (it will create a directory folder that does not exist)
mkdir -p temp/nginx
- 1
Search command
find / -name 'b'		Query the root directory (including subdirectories) with the name b Contents and documents of;
find / -name 'b*'		Query the root directory (including subdirectories) with the name b Directories and files at the beginning;
- 1
- 2
rename
mv The name of the original directory file mv tomcat001 tomcat
- 1
Cut command (if there is a directory, cut it to the specified directory; if not, cut it to the specified directory)
mv	/aaa /bbb			The file in the root directory aaa Directory, moving to bbb Directory, in bbb,Also known as aaa catalogue
mv	bbb usr/bbb			The current directory bbbb Directory, moving to usr Directory and change the name to bbb;
- 1
- 2
duplicate catalog
cp -r /aaa /bbb			take/Directory aaa Copy directory to/bbb Directory, in/bbb The name under the directory is aaa
cp -r /aaa /bbb/aaa		take/Directory aa Copy directory to/bbb Directory, and the modified name is aaa;
- 1
- 2
Forcibly delete the specified directory
rm -rf /bbb Force deletion/Directory bbb catalogue If bbb There are subdirectories in the directory, which will also be forcibly deleted without prompting;
- 1
Delete directory
rm -r /bbb Normal deletion. Will ask you if you want to delete each file
- 1
2, File operation
delete
rm -r a.java Delete the in the current directory a.java File (ask whether to delete each time) y: (agreed)
- 1
Force deletion
rm -rf a.java		Force deletion of files in the current directory a.java file
rm -rf ./a*			Forcibly delete the current directory to a All documents at the beginning;
rm -rf ./*			Forcibly delete all files in the current directory (use with caution);
- 1
- 2
- 3
create a file
touch testFile
- 1
Recursive deletion pyc format file
find . -name '*.pyc' -exec rm -rf {} \;
- 1
Print files of the specified size in the current folder
find . -name "*" -size 145800c -print
- 1
Recursively delete files of specified size (145800)
find . -name "*" -size 145800c -exec rm -rf {} \;
- 1
Recursively delete files of the specified size and print them out
find . -name "*" -size 145800c -print -exec rm -rf {} \;
- 1
- "." indicates recursive search from the current directory
- "- name '*.exe'" search by name. To find all folders or files ending in. exe
- "- type f" looks for a file of type
- "- print" outputs the directory name of the file to be searched
- -size 145800c specifies the size of the file
- -exec rm -rf {} \; Recursive deletion (the result of the previous query)
3, File content operation (view log, change configuration file)
Modify file content
vim a.java   	Enter general mode
i(Key)   		Enter insert mode(Edit mode)
ESC(Key)  		sign out
: wq 			Save exit( shift+: Turn up the input box)
: w!			Exit without saving( shift+: Turn up the input box)
- 1
- 2
- 3
- 4
- 5
View of file contents
cat a.java		see a.java The last page of the document;
more a.java		View from the first page a.java Press enter to view the contents of the file line by line,
                    Press the spacebar to view page by page, q sign out;
less a.java		View from the first page a.java Press enter to see the contents of the file line by line,
                    Press the spacebar to see page by page. It supports the use of PageDown and PageUp Turn the page, q sign out;
- 1
- 2
- 3
- 4
- 5
Summarize the differences between more and less:
- less can press the up and down direction keys on the keyboard to display the up and down contents, more cannot control the display through the up and down direction keys
- less does not have to read the whole file, and the loading speed will be faster than more
- After less exits, the shell will not leave the content just displayed, while after more exits, the content just displayed will be left on the shell
- Because more can't go back
View the last few lines of the file in real time (view the log in real time)
tail -f a.java see a.java The last 10 lines of the document;
- 1
View in front and back lines
head a.java				see a.java The first 10 lines of the document;
tail -f a.java			see a.java The last 10 lines of the document;
head -n 7 a.java		see a.java The first 7 lines of the document;
tail -n 7 a.java		see a.java The last 7 lines of the document;
- 1
- 2
- 3
- 4
Search the specified content inside the file
grep under 123.txt			At 123.txt Search in file under String, case sensitive, display line;
grep -n under 123.txt		At 123.txt Search in file under String, case sensitive, display line and line number;
grep -v under 123.txt		At 123.txt Search in file under String, case sensitive, showing lines that are not searched;
grep -i under 123.txt		At 123.txt Search in file under String, case sensitive, display line;
grep -ni under 123.txt		At 123.txt Search in file under String, case sensitive, display line and line number;
- 1
- 2
- 3
- 4
- 5
Terminate current operation
Both Ctrl+c and Ctrl+z are interrupt commands, but their functions are different.
ctrl+z
ctrl+c
- 1
- 2
Ctrl+Z plays a similar role, interrupting the task, but the task does not end. It just maintains the suspended state in the process. Users can use fg/bg to operate the foreground or background tasks. fg command restarts the foreground interrupted tasks, and bg command executes the interrupted tasks in the background.
Ctrl+C also plays a similar role, forcing the execution of the program to be interrupted.
Redirection function
You can use > or < to redirect the output of the command to test Txt file (if not, create one)
echo 'Hello World' > /root/test.txt
- 1
4, System log location
cat /etc/redhat-release		View operating system version
/var/log/message			The information and error log after system startup are Red Hat Linux One of the most commonly used logs in
/var/log/message			The information and error log after system startup are Red Hat Linux One of the most commonly used logs in
/var/log/secure				Security related log information
/var/log/maillog			Message related log information
/var/log/cron				Log information related to scheduled tasks
/var/log/spooler			And UUCP and news Device related log information
/var/log/boot.log			Log messages related to Daemon Start and stop
- 1
- 2
- 3
- 4
- 5
- 6
- 7
- 8
View the user operation log under a file
After reaching the operation directory, execute the following procedure:
cat .bash_history
- 1
5, Create and delete soft connections
1. Create soft connection
ln -s /usr/local/app /data
- 1
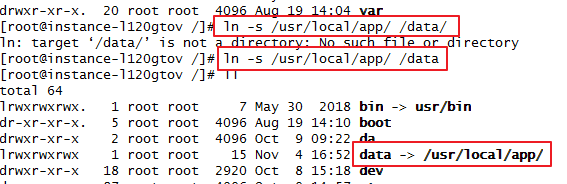
2. Delete soft connection
rm -rf /data
- 1
Note: cancel the soft connection, and there is no /, rm -rf soft connection at last. Add / delete folder;

6, Compression and decompression
tar
tar -zcvf start.tar.gz a.java b.java	Put the current directory a.java,b.java pack
tar -zcvf start.tar.gz ./*				Package and compress the desired files in the current directory into haha.tar.gz file
- 1
- 2
tar -xvf start.tar.gz				decompression start.tar.gz Compress the package to the current folder;
tar -xvf start.tar.gz -C usr/local(C (upper case, no space in the middle)
									decompression start.tar.gz Compressed package, to/usr/local Directory;
- 1
- 2
- 3
unzip
unzip file1.zip  				Unzip one zip Format compressed package
zip lib.zip tomcat.jar			Compress a single file(lib.zip)
zip -r lib.zip lib/				Compress directory(lib.zip)
zip -r lib.zip tomcat-embed.jar xml-aps.jar		Compress multiple files into zip file(lib.zip)
- 1
- 2
- 3
- 4
English Zip package and unzip it to / usr/app in the specified directory/
unzip -d /usr/app/com.lydms.english.zip
- 1
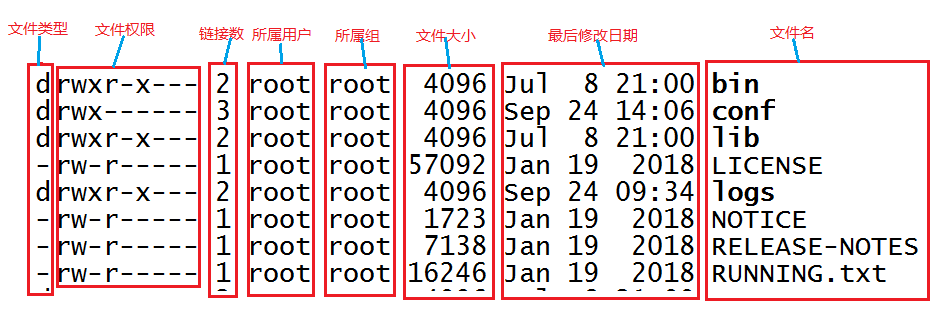
7, Details of files under Linux
 R:Read  w:write  x: execute implement
-rw-r--r-- 1 root root  34942 Jan 19  2018 bootstrap.jar
 The first three represent the file permissions of the current user: can read/Can write/Cannot execute
 The middle three represent the operation permissions of other users in the current group on the current file: readable/Can't write/Cannot execute
 The last three other users have permissions on the current file: can read/Can't write/Cannot execute
- 1
- 2
- 3
- 4
- 5
Change file permissions
chmod u+x web.xml (---x------)		Is the owner of the file( user)Add execution permission;
chmod g+x web.xml (------x---)		Is the group of the file owner( group)Add execution permission;
chmod 111 web.xml  (---x--x--x)	Classify all users and add executable permissions;
chmod 222 web.xml (--w--w--w-)		Classify all users and add writable permissions;
chmod 444 web.xml (-r--r--r--)		Classify all users and add readable permissions;
- 1
- 2
- 3
- 4
- 5
8, Common docker container commands:
1. Download Image
Linux server download installation package image command
wget https://mirrors.huaweicloud.com/elasticsearch/7.8.0/elasticsearch-7.8.0-windows-x86_64.zip
- 1
Huawei open source mirror station
https://mirrors.huaweicloud.com/
- 1
2. Common commands
#1. View the downloaded image in docker:
docker images
 #2. Container name required for query:
docker search mysql
#3. Download and run the required docker container locally (name, port number, msyql password, ID):
docker run -di --name=first -p 3306:3306 -e MYSQL_ROOT_PASSWORD=root 26d26dsfsd31a
#4. To view the docker container running:
docker ps
#5. View all docker containers (including those not running):
docker ps -a
#6. Stop the currently running docker container:
docker stop first
#7. Start docker container:
docker start first
#8. Restart docker container:
docker restart first
#9. Delete docker container:
docker rm first
- 1
- 2
- 3
- 4
- 5
- 6
- 7
- 8
- 9
- 10
- 11
- 12
- 13
- 14
- 15
- 16
- 17
- 18
9, Common operation and maintenance commands
1. Check if the server port number is available
Check if the server is available
ping 49.32.587.164
- 1
Check whether the specified port of the server is available
telnet 49.32.587.164 8093
- 1
This is an article I wrote about installing Telnet on Linux.
https://blog.csdn.net/lydms/article/details/113698856
- 1
1. Shutdown
Shutdown is the most commonly used and safest shutdown and restart command. It calls fsck to check the disk before shutdown. -h and -r are the most commonly used parameters.
-h: Stop system services and shut down
-r:  Restart after stopping system service
- 1
- 2
Case:
shutdown -h now  --Shut down immediately
shutdown -h 10:53  --To 10:53 Shut down. If the time is less than the current time, it will be until the next day
shutdown -h +10  --10 Automatic shutdown in minutes
shutdown -r now  --Restart now
shutdown -r +30 'The System Will Reboot in 30 Mins'   --30 Restart after minutes and send notification to other online users
- 1
- 2
- 3
- 4
- 5
2. View the number of connections in various states (ESTABLISHED, CLOSE_WAIT, TIME_WAIT)
netstat -n | awk '/^tcp/ {++S[$NF]} END {for(a in S) print a, S[a]}'
- 1

View connections in ESTABLISHED state
netstat -nt | awk '{if($NF=="ESTABLISHED"){wait[$5]++}}END{for(i in wait) print i,wait[i]}'
- 1
View closed_ Wait status connection
netstat -nt | awk '{if($NF=="CLOSE_WAIT"){wait[$5]++}}END{for(i in wait) print i,wait[i]}'
- 1
View at TIME_WAIT status connection
netstat -nt | awk '{if($NF=="TIME_WAIT"){wait[$5]++}}END{for(i in wait) print i,wait[i]}'
- 1
3. ping command
To www.lydms.com Com sends 4 ping packets to check whether they are connected
ping -c 4 www.lydms.com
- 1
4. netstat command
netstat command is used to display various network related information, such as network connection, routing table, interface status, etc;
List all tcp ports that are listening:
netstat -lt
- 1
View all port information, including PID and process name
netstat -tulpn
- 1
5. View the current port number usage
1. Used to view the occupancy of a port
lsof -i:8080
- 1
2. Display the ports and processes of tcp and udp
netstat -tunlp
- 1
3. Process of specifying port number
netstat -tunlp|grep 8080
- 1
4. View PID process information
ps -aux |grep 28990
- 1
Check the thread information in the JVM according to the PID ('0x9eb 'is nid value)
jstack 2246|grep '0x9eb' -A 50
- 1
6. ps command
Filter the ssh process information in the current system
ps aux | grep 'ssh'
- 1
7. Pipeline command
In short, the function of pipeline in Linux is to take the output of the previous command as the input of the next command, and execute each command in series like pipe. The operator of pipeline is|
Pipeline command to view the program named java in the currently running program
ps -ef|grep java
- 1
View the root content in the / etc/passwd file
cat /etc/passwd | grep 'root'
- 1
View the ip connection of the current system (common to Windows and Linux)
netstat -an
- 1
Set sh test Put the SH task in the background and output the printed log to nohup In the out file, the terminal can no longer receive any input (standard input)
nohup sh test.sh &
- 1
Set sh test Put the SH task in the background and output the printed log to nohup In the out file, the terminal can receive any input
nohup sh test.sh &
- 1
8. Add Host address
Open profile
vim /etc/hosts
- 1
Add to an open file
49.235.32.164 www.lydms.com
- 1
After saving the file, restart the network
/etc/init.d/network restart
- 1
Reload succeeded:

10, yum common commands
yum install iptables-services		Download and install iptables
yum list					Lists all packages installed in the current system
yum search package_name		stay rpm Search for packages in the warehouse
yum update package_name.rpm		Update all installed in the current system rpm package
yum update package_name		Update a rpm package
yum remove package_name		Delete a rpm package
yum clean all				Delete all cached packages and header files
- 1
- 2
- 3
- 4
- 5
- 6
- 7
11, Other commands
View occupied resources
ps -au		The occupied resources are the average occupied resources calculated from the start of the process, such as cpu etc.
top			Resources occupied in real time;
- 1
- 2
View the storage occupied by the current directory
du -lh			View the storage space occupied by each folder under the current file
du -sh			View the storage space occupied by the current folder
du --max-depth=<Directory layers> 	Directories exceeding the specified number of layers are ignored.
du --max-depth=1 			Only view the storage space occupied by files in the current directory
- 1
- 2
- 3
- 4
Pipeline command:
View the project and project path according to the project viewing process
ps -ef 						View all processes
ps -ef | grep mysql			see mysql Related processes
- 1
- 2
View the occupied port number through the process PID
netstat -nap |grep process ID(PID)
- 1
View system storage utilization under Linux
df -h Check the system hard disk usage
- 1
Kill process (according to PID)
kill -9 2630 process pid
- 1
Turn off the firewall
service iptables stop      Temporarily turn off the firewall
chkconfig iptables off     Firewall on or off
service iptables status    View firewall status
- 1
- 2
- 3
Boot options
msconfig					View Boot Options
chkconfig					View the list of startup services
- 1
- 2
View the status of MySQL service application
service mysql start        open MySQL
service mysql status       see MySQL State of
service mysql stop         close MySQL
- 1
- 2
- 3
12, Linux kernel optimization
Open profile
vim /etc/sysctl.conf
- 1
Load a new configuration (you need to open the firewall iptables, otherwise an error will be reported)
sysctl -p
- 1
https://www.cnblogs.com/lldsn/p/10489593.html
- 1
13, User permission Operation
1. Add user
Add user sum:
useradd –d /usr/sum -m sum
- 1
Some parameters of useradd:
-u: Specify UID, which must be greater than or equal to 500 and not occupied by other users
-g: Specify the default group, which can be GID or GROUPNAME. It must also exist
-G: Specify additional groups
-c: Specifies the user's comment information
-d: Specify the user's home directory
User sum setup password created
passwd sum
- 1
The new user is displayed on the face
cat /etc/passwd
- 1
Delete user sum
userdel sum
- 1
Delete user folder
rm -rf /usr/sum
- 1
Switch to the user just added
su sum
- 1
Go back to root
exit
- 1
2. Add group
Add user group
groupadd groupname
- 1
Delete user group
groupdel groupname
- 1
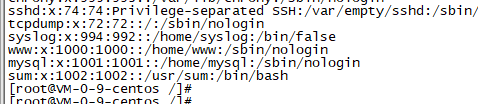
You can see your own group and group id
cat /etc/group
- 1
sum: x:1000:1000:: /usr/sum :/bin/bash
sum: x:0:1000:: /usr/sum :/bin/bash
14, TOP
Resources occupied in real time:
top
- 1

The execution result of the top command is divided into two areas: statistical information area and process information area
1. Statistical information area
TOP: task queue information, which is the same as the execution result of uptime command
- 15: 33:39: system time
- up 5:40: running time of the host
- 2 users: number of user connections (not the number of users, who command)
- load average: 1.09, 1.04, 0.98: the average load of the system. It counts the average load of the system in the last 1, 5, and 15 minutes
Tasks: process information
- 123 total: total number of processes
- 3 running: the number of running processes
- 120 sleeping: number of sleep processes
- 0 stopped: number of processes stopped
- 0 zombie: number of zombie processes
%CPU(s): CPU information (when there are multiple CPUs, these contents may exceed two lines)
- 42.1 us: percentage of CPU occupied by user space
- 2.0 sy: percentage of CPU occupied by kernel space
- 0.0 ni: percentage of CPU occupied by processes that have changed priority in user process space
- 49.2 id: percentage of idle CPU
- 0.0 wa: percentage of CPU time waiting for input and output
- 6.0 hi: Hardware CPU terminal occupancy percentage
- 0.7 si: soft interrupt occupancy percentage
- 0.0 st: virtual machine occupancy percentage
KiB Mem: memory information (similar to the information in the fifth line, similar to the free command)
- 3780.9 total: total physical memory
- 727.4 free: total memory used
- 668.8 used: total free memory (free + user = total)
- 2384.7 buff/cache: the amount of memory used as kernel cache
KiB: swap information
- 2048.0 total: total number of exchange partitions
- 2046.0 free: total number of swap partitions used
- 2.0 used: total number of free exchange partitions
- 859.6 avail able: the total amount of buffered swap area. The contents in the memory are swapped out to the swap area and then swapped into the memory, but the used swap area is not overwritten. The size of the swap area in which these contents of the swap area already exist in the memory. When the corresponding memory is swapped out again, it is not necessary to write to the swap area.
2. Process information area
-
PID: process id
-
USER: USER name of the process owner
-
PR: priority
-
NI:nice value. Negative values indicate high priority and positive values indicate low priority
-
RES: the size of physical memory used by the process and not swapped out
-
%CPU: percentage of CPU time used since the last update
-
%MEM: percentage of physical memory used by the process
-
TIME +: total CPU TIME used by the process, unit: 1 / 100 second
-
COMMAND: COMMAND name / line
-
PPID: parent process id
-
RUSER:Real user name
-
UID: id of the process owner
-
Virt: the total amount of virtual memory used by the process, in kb. VIRT=SWAP+RES
-
GROUP: the GROUP name of the process owner
-
TTY: terminal name of the starting process. Processes that are not started from the terminal are displayed as?
-
NI:nice value. Negative values indicate high priority and positive values indicate low priority
-
P: The last CPU used only makes sense in a multi CPU environment
-
TIME: total CPU TIME used by the process, in seconds
-
SWAP: the size of the virtual memory used by the process
-
CODE: the amount of physical memory occupied by executable CODE
-
DATA: the amount of physical memory occupied by parts other than executable code (DATA segment + stack)
-
SHR: shared memory size
-
nFLT: number of page errors
-
nDRT: the number of pages that have been modified since the last write
-
S: Process status (D = non interruptible sleep status, R = running, s = sleep, T = tracking / stopping, Z = zombie process)
-
WCHAN: if the process is sleeping, the system function name in sleep will be displayed
-
Flags: task flag