This article takes you to make your own open source module. The general process is as follows:
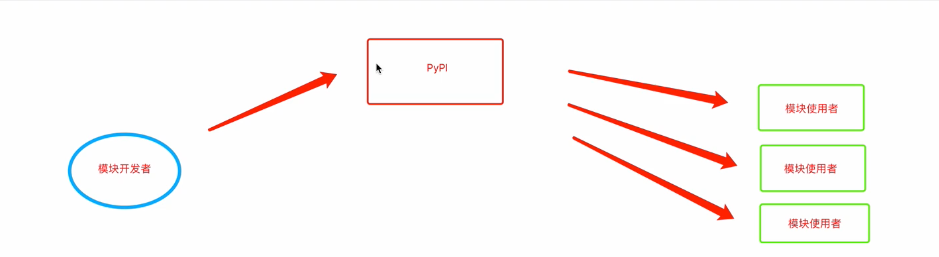
For module developers, there are essentially three things to do:
- Write code
- Package modules
- Upload to PyPI (PyPI account needs to be registered first)
For the user of the module, only two things are required:
- Install the module through pip install
- Call the module for use
Suppose, now we want to do a module called funker, and follow the following steps step by step.
Step 1 project folder
Create the following documents as required and fill in the contents.
funker
├── LICENSE     # Declare to the module user whether the user can be used for commercial purposes free of charge, etc.
├── README.md    # Module introduction
├── demos      # Use case
├── funker        # Module code directory
│   └── __init__.py   # Must have
└── setup.py    # Scripts that provide information to setuptools (name, version, etc.)
1.1 Liscense
The LICENSE file is the LICENSE of our module. It shows the module users whether they can be used for commercial purposes free of charge. Generally, open source software will choose a relatively broad LICENSE MIT, that is, the author retains the copyright without any other restrictions.
Copyright (c) 2018 The Python Packaging Authority

Permission is hereby granted, free of charge, to any person obtaining a copy
of this software and associated documentation files (the "Software"), to deal
in the Software without restriction, including without limitation the rights
to use, copy, modify, merge, publish, distribute, sublicense, and/or sell
copies of the Software, and to permit persons to whom the Software is
furnished to do so, subject to the following conditions:

The above copyright notice and this permission notice shall be included in all
copies or substantial portions of the Software.

THE SOFTWARE IS PROVIDED "AS IS", WITHOUT WARRANTY OF ANY KIND, EXPRESS OR
IMPLIED, INCLUDING BUT NOT LIMITED TO THE WARRANTIES OF MERCHANTABILITY,
FITNESS FOR A PARTICULAR PURPOSE AND NONINFRINGEMENT. IN NO EVENT SHALL THE
AUTHORS OR COPYRIGHT HOLDERS BE LIABLE FOR ANY CLAIM, DAMAGES OR OTHER
LIABILITY, WHETHER IN AN ACTION OF CONTRACT, TORT OR OTHERWISE, ARISING FROM,
OUT OF OR IN CONNECTION WITH THE SOFTWARE OR THE USE OR OTHER DEALINGS IN THE
SOFTWARE.
For more additional licenses, see: https://choosealicense.com/
1.2 readme
readme is the description information of the current module, which is generally written in markdown format, such as:
funker It's a NB Software for......
This file can also write a simple user manual for the module. If the manual is too complex, it is recommended to create a doc folder to store the user manual.
1.3 demos directory
demos will generally write some examples of the module, so that users can quickly apply the module to generation.
1.4 setup.py
setup.py file is actually a configuration file, which is used to provide setuptools with some module related information, such as module name, module version, applicable Python version, author, github address, etc.
import setuptools

with open("README.md", 'r') as fh:
    long_description = fh.read()

setuptools.setup(
    name="funker",            # Module name
    version="1.0",          # current version
    author="xxx",           # author
    author_email="mailbox",        # Author email
    description="A very NB My bag",    # Module introduction
    long_description=long_description,          # Module details
    long_description_content_type="text/markdown",  # Module details format
    url="github address",                    # Module github address
    packages=setuptools.find_packages(),        # Automatically find imported modules in the project
    # Module related metadata (more description)
    classifiers=[
        "Programming Language :: Python :: 3",
        "License :: OSI Approved :: MIT License",
        "Operating System :: Independent",
    ],
    # Dependent module
    install_requires=[
        "pillow"
    ],
  # python version
    python_requires=">=3",
)
1.5 funker directory
For plug-in content, you can write relevant code here, such as WP py
def func():
    print("A magical bag")
Finally, our folders are as follows:
funker
├── LICENSE
├── README.md
├── demos
├── funker
│   ├── __init__.py
│   └── wp.py
└── setup.py
Step 2 code packaging & uploading
After you have written the folder and code in the above steps, you need to package the code.
2.1 installation of packing tools
To package code, you need to install setuptools and wheel first. You can install them separately or pip to install them automatically.
pip install -U setuptools wheel
2.2 packaging code
# Perform packaging
python setup.py sdist bdist_wheel
The following directory will appear
funker
├── LICENSE
├── README.md
├── funker
│    ├── __init__.py
│    └── wp.py
├── funker.egg-info
│   ├── PKG-INFO
│   ├── SOURCES.txt
│   ├── dependency_links.txt
│   └── top_level.txt
├── build
│   ├── bdist.macosx-10.6-intel
│   └── lib
│        └── funker
│             │── __init__.py
│             └── wp.py
├──demos
├──dist
│   │── funker-0.0.1-py3-none-any.whl
│   └── funker-0.01.tar.gz
└── setup.py
2.3 release module (upload)
After the file is packaged, you need to upload the packaged file to PyPI. If you want to upload it, you need to go first http://pypi.org/ Register an account.
- Install the tool used to release the module: Twin [the installed one does not need to be installed repeatedly]
pip install --upgrade twine
- Publish (upload)
twine upload --repository-url https://upload.pypi.org/legacy/ dist/*
Prompt: you need to enter the user name and password of PyPI.
Step 3: installation and use
pip install Module name