background
The defense is broken 😭! Suddenly, I found that the number of fans of SegmentFault platform has exceeded 1000. It is the first of my three blog platforms nuggets, blog Garden and SegmentFault to exceed 1000. So I designed and developed this page to commemorate it. Thank you very much for your attention 🙏, In the future, I will pay more attention to the sorting and sharing of front-end knowledge and write more high-quality articles. (I hope other platforms will break the thousand as soon as possible.) 😂)
This article uses react + three JS technology stack to realize the 3D commemorative page with fans breaking through 1000. The main knowledge points include: three JS provides light source, DirectionLight directional light, HemisphereLight hemispherical light source, AmbientLight ambient light, medal material generation, mapping knowledge, MeshPhysicalMaterial physical material, TWEEN lens gap animation, CSS fireworks animation, etc.
effect
The implementation effect diagram is shown in the article 👆 As shown in the Banner diagram, the page consists of medals containing my personal information 🥇, 1000+ Followers model. You can preview it in real time through the following link 🤣.
👀 Online preview: https://dragonir.github.io/3d...
realization
Introduce resources
Firstly, the library required for development functions is introduced, in which FBXLoader is used to add 1000 + font model, OrbitControls lens track control, TWEEN is used to generate gap animation, and Stats is used to view performance during development.
import * as THREE from "three";
import { FBXLoader } from "three/examples/jsm/loaders/FBXLoader";
import { OrbitControls } from "three/examples/jsm/controls/OrbitControls";
import { TWEEN } from "three/examples/jsm/libs/tween.module.min.js";
import Stats from "three/examples/jsm/libs/stats.module";
Scene initialization
This part is mainly used to initialize scenarios and parameters. For detailed explanation, you can click the link at the end of the article to read my previous article, which will not be repeated in this article.
container = document.getElementById('container');
renderer = new THREE.WebGLRenderer({ antialias: true });
renderer.setPixelRatio(window.devicePixelRatio);
renderer.setSize(window.innerWidth, window.innerHeight);
renderer.shadowMap.enabled = true;
renderer.shadowMap.needsUpdate = true;
container.appendChild(renderer.domElement);
// scene
scene = new THREE.Scene();
// Set a nice background for the scene
scene.background = new THREE.TextureLoader().load(backgroundTexture);
// video camera
camera = new THREE.PerspectiveCamera(60, window.innerWidth / window.innerHeight, 0.1, 1000);
camera.position.set(0, 0, 0);
camera.lookAt(new THREE.Vector3(0, 0, 0));
// controller
controls = new OrbitControls(camera, renderer.domElement);
controls.target.set(0, 0, 0);
controls.enableDamping = true;
controls.enableZoom = false;
controls.enablePan = false;
controls.rotateSpeed = .2;
📌 For better visual effects, OrbitControls are set with zoom disabled, translation disabled, and reduce the default rotation speed
Lighting effect
In order to simulate the real physical scene, three kinds of light sources are used in this example.
// Direct light
const cubeGeometry = new THREE.BoxGeometry(0.001, 0.001, 0.001);
const cubeMaterial = new THREE.MeshLambertMaterial({ color: 0xffffff });
const cube = new THREE.Mesh(cubeGeometry, cubeMaterial);
cube.position.set(0, 0, 0);
light = new THREE.DirectionalLight(0xffffff, 1);
light.intensity = 1;
light.position.set(18, 20, 60);
light.castShadow = true;
light.target = cube;
light.shadow.mapSize.width = 512 * 12;
light.shadow.mapSize.height = 512 * 12;
light.shadow.camera.top = 80;
light.shadow.camera.bottom = -80;
light.shadow.camera.left = -80;
light.shadow.camera.right = 80;
scene.add(light);
// Hemispherical light
const ambientLight = new THREE.AmbientLight(0xffffff);
ambientLight.intensity = .8;
scene.add(ambientLight);
// Ambient light
const hemisphereLight = new THREE.HemisphereLight(0xffffff, 0xfffc00);
hemisphereLight.intensity = .3;
scene.add(hemisphereLight);
💡 Three.js provided light source
Three. The JS library provides a number of column lights, and none of them have specific behavior and purpose. These light sources include:
| Light source name | describe |
|---|---|
| Ambient light | This is a basic light source whose color is added to the current color of the entire scene and all objects |
| PointLight point light | A point in space that emits light in all directions |
| SpotLight spotlight | This kind of light source has the effect of concentrating light, similar to table lamp, ceiling chandelier, or flashlight |
| DirectionLight directional light | Also known as infinite light. The light emitted from this light source can look parallel. For example, sunlight |
| HemishpereLight hemispherical light | This is a special light source that can be used to create more natural outdoor light, simulating the lighting surface and weak sky |
| AreaLight area light | Use this light source to specify a plane that emits light, not a point in space |
| LensFlare lens glare | This is not a light source, but LensFlare allows you to add a glare effect to light sources in your scene |
💡 THREE.DirectionLight directional light
THREE.DirectionLight can be regarded as light at a long distance, and all the rays it emits are parallel to each other. An example of directional light is sunlight. The whole area illuminated by the directional light receives the same light intensity.
Constructor:
new THREE.DirectionLight(color);
Attribute description:
- Position: the position of the light source in the scene.
- Target: target. Its direction is very important. Using the target attribute, you can point the light source to a specific object or position in the scene. This property requires a three Object3d objects.
- Intensity: the intensity of the light source. The default value is 1.
- castShadow: projection. If set to true, this light source will generate shadows.
- onlyShadow: shadows only. If this attribute is set to true, the light source only generates shadows and does not add any lighting to the scene.
- shadow.camera.near: projection near point, indicating the position from the light source where the shadow begins to be generated.
- shadow.camera.far: the far point of projection, which indicates where the shadow can be generated from the light source.
- shadow.camera.left: project the left boundary.
- shadow.camera.right: project the right boundary.
- shadow.camera.top: project the upper boundary.
- shadow.camera.bottom: project the lower boundary.
- shadow.map.width and shadow map. Height: shadow mapping width and shadow mapping height. Determines how many pixels are used to generate shadows. You can increase this value when shadows have jagged edges or look unsmooth. Cannot be changed after the scene is rendered. The default value for both is 512.
💡 THREE.HemisphereLight hemispherical light source
Using a hemispherical light source, you can create a more natural lighting effect.
Constructor:
new THREE.HeimsphereLight(groundColor, color, intensity);
Attribute description:
- groundColor: the color of light emitted from the ground.
- Color: the color of light emitted from the sky.
- Intensity: the intensity of light exposure.
💡 THREE. Ambient light
Create three When ambientlight, the color is applied to the global. The light source has no special source direction and will not produce shadows.
Constructor:
new THREE.AmbientLight(color);
Suggestions for use:
- It is usually not possible to put three Ambientlight is the only light source in the scene because it renders all objects in the scene to the same color.
- Use other light sources, such as three Spotlight or three Directionlight is used in conjunction with it to weaken shadows or add some additional colors to the scene.
- Because of three Ambientlight does not need to specify a location and is applied globally, so you only need to specify a color and add it to the scene.
Add grid and ground
The grid is added to facilitate development, and the appropriate relative position of the model can be adjusted. In this example, the purpose of retaining the grid is to make the page more 3D depth of field effect. The ground of transparent material is to show the shadow of the model.
// grid
const grid = new THREE.GridHelper(200, 200, 0xffffff, 0xffffff);
grid.position.set(0, -30, -50);
grid.material.transparent = true;
grid.material.opacity = 0.1;
scene.add(grid);
// Create a ground with transparent material showing shadows
var planeGeometry = new THREE.PlaneGeometry(200, 200);
var planeMaterial = new THREE.ShadowMaterial({ opacity: .5 });
var plane = new THREE.Mesh(planeGeometry, planeMaterial);
plane.rotation.x = -0.5 * Math.PI;
plane.position.set(0, -30, -50);
plane.receiveShadow = true;
scene.add(plane);
Create medals
Due to the time relationship, the medal model in this example directly uses three JS comes with the basic cube model tree Boxgeometry. You can also use other cubes, such as spheres and beads, and even use professional modeling software such as Blender to create your favorite medal shape. (ps: personally, I think the cube is also very beautiful 😂)
💡 Medal UI material generation
🥇 Medal upper and lower and side mapping:
In order to generate medals with gold texture, it is used in this example 👇 This material is mapped to create a bright and blind 24K pure gold effect 🤑.

🥇 Medal front and back mapping:
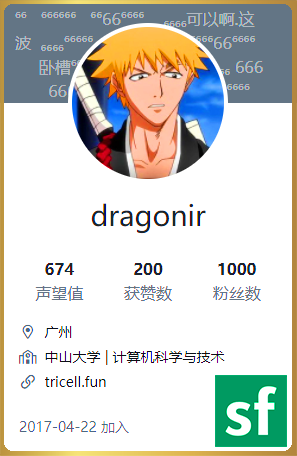
The map used on the front and back of the medal is a screenshot of the personal center page of SegmentFault. In order to have more metal effect, I use it 👆 The metal material map above adds a border with rounded corners to it.
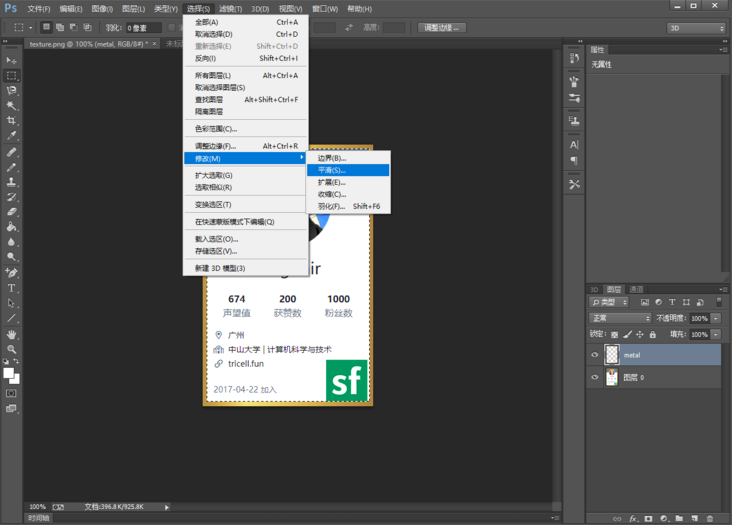
Specific method of generating rounded metal frame in Photoshop: add metal layer on the screenshot - > use the box selection tool to select the content to be deleted - > Click selection - > click Modify - > Click smooth - > input appropriate rounded size - > delete selection - > merge layer - > finish and export the picture.
The final front and back material maps are as follows: 👇 As shown in the figure below, in order to display more clearly, I modified the contrast and saturation of the picture in Photoshop, and added the Logo of SegmentFault on it.
🥇 Production of FA phase map on the front and back of medals:
In order to generate bump texture, you need to add normal phase map to the model. use 👆 For the front and back material maps already generated above, you can automatically generate normal phase maps using online tools. When generating, you can fine tune the style by adjusting parameters such as Strength, Level and Blur, and preview it in real time. After adjustment, click Download to Download.
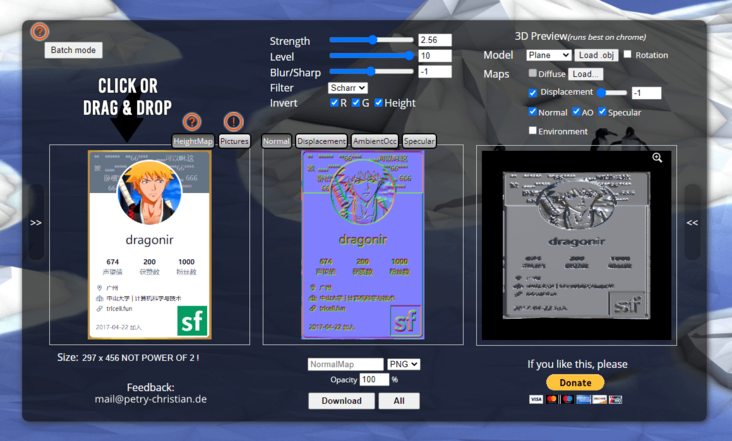
🚪 Normal phase map online production tool portal: NormalMap-Online
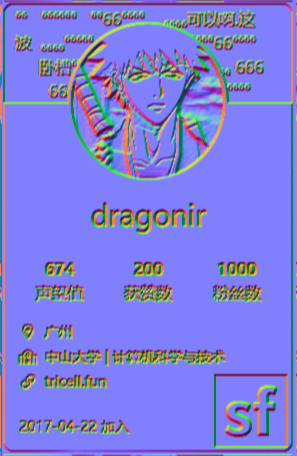
Through multiple adjustments and optimization, the final normal phase map is as follows: 👇 As shown in the figure below.
Using the materials generated above, now build the medal model. Use personal information materials on the front and back, and metal materials on other sides. Then traverse and adjust the metallicity and roughness styles for all faces.
let segmentMap = new THREE.MeshPhysicalMaterial({map: new THREE.TextureLoader().load(segmentTexture), normalMap: new THREE.TextureLoader().load(normalMapTexture) });
let metalMap = new THREE.MeshPhysicalMaterial({map: new THREE.TextureLoader().load(metalTexture)});
// Create texture array
const boxMaps = [metalMap, metalMap, metalMap, metalMap, segmentMap, segmentMap];
// 💡  The length width height ratio of the cube should be consistent with the size ratio of the map, and the thickness can be set arbitrarily
box = new THREE.Mesh(new THREE.BoxGeometry(297, 456, 12), boxMaps);
box.material.map(item => {
  // Material style adjustment
  item.metalness = .5;
  item.roughness = .4;
  item.refractionRatio = 1;
  return item;
});
box.scale.set(0.085, 0.085, 0.085);
box.position.set(-22, 2, 0);
box.castShadow = true;
meshes.push(box);
scene.add(box);
👆 The above four renderings correspond to:
- Figure 1: create a BoxGeometry without a map, just a white cube.
- Figure 2: adding material map to the cube without bump effect.
- Figure 3: add normal phase map to the cube to produce bump effect.
- Figure 4: adjust the metallicity, roughness and reflectivity of cube material to make it more realistic.
💡 Three. Maps in JS
Map type
- Map: material map
- normalMap: normal map
- bumpMap: bump map
- envMap: environment map
- specularMap: specular map
- lightMap: lightMap
Mapping principle
Create a new map object through the texture map loader () and then call the load() method to load a picture. In this way, a texture object will be returned. The texture object can be used as the value of the color map attribute of the model material. After the color map attribute of the material is set, the model will collect pixel values from the texture map.
💡 MeshPhysicalMaterial physical material
MeshPhysicalMaterial is a PBR physical material, which can better simulate lighting calculation. Compared with the specular mesh material, MeshPhongMaterial has more realistic rendering effect.
If you want to show a product, you'd better choose this material for more realistic rendering effect. If the game is for better display effect, you can choose PBR material MeshPhysicalMaterial instead of highlight material MeshPhongMaterial.
Special properties
- . metalness metallicity attribute: indicates how much the material looks like metal. Use 0.0 for non-metallic materials, such as wood or stone, 1.0 for metal, and no (usually) in the middle Default 0.5 Values between 0.0 and 1.0 can be used for rusty metal appearance. If a roughness map is also provided metalnessMap, both values are multiplied.
- . roughness attribute: indicates the roughness of the material 0.0 for smooth specular reflection and 1.0 for full diffuse reflection Default 0.5 If you also provide a roughness map roughnessMap, the two values are multiplied
- . metalnessMap metallicity map: the blue channel of the texture is used to change the metallicity of the material
- . roughnessMap roughness map: the green channel of the texture is used to change the roughness of the material.
📌 Note that when using physical materials, you generally need to set the environment map envMap.
Load 1000 + text model
The 1000 + model uses three Loadingmanager and FBXLoader load. The detailed usage method will not be repeated in this article. Please refer to the link at the end of the article to view my other articles, which are described in detail. 😁
const manager = new THREE.LoadingManager();
manager.onProgress = async(url, loaded, total) => {
  if (Math.floor(loaded / total * 100) === 100) {
    // Set loading progress
    _this.setState({ loadingProcess: Math.floor(loaded / total * 100) });
    // Load lens movement gap animation
    Animations.animateCamera(camera, controls, { x: 0, y: 4, z: 60 }, { x: 0, y: 0, z: 0 }, 3600, () => {});
  } else {
    _this.setState({ loadingProcess: Math.floor(loaded / total * 100) });
  }
};
const fbxLoader = new FBXLoader(manager);
fbxLoader.load(textModel, mesh => {
  mesh.traverse(child => {
    if (child.isMesh) {
      // Generate shadows
      child.castShadow = true;
      // Style adjustment
      child.material.metalness = 1;
      child.material.roughness = .2;
      meshes.push(mesh);
    }
  });
  mesh.position.set(16, -4, 0);
  mesh.rotation.x = Math.PI / 2
  mesh.scale.set(.08, .08, .08);
  scene.add(mesh);
});
Patching animation
The camera moves to realize roaming and other animations. When the page is opened, the model is loaded, and the animation from large to small is realized through TWEEN.
animateCamera: (camera, controls, newP, newT, time = 2000, callBack) => {
  var tween = new TWEEN.Tween({
    x1: camera.position.x, // Camera x
    y1: camera.position.y, // Camera y
    z1: camera.position.z, // Camera z
    x2: controls.target.x, // Center point of control point x
    y2: controls.target.y, // Center point of control point y
    z2: controls.target.z, // Center point of control point z
  });
  tween.to({
    x1: newP.x,
    y1: newP.y,
    z1: newP.z,
    x2: newT.x,
    y2: newT.y,
    z2: newT.z,
  }, time);
  tween.onUpdate(function (object) {
    camera.position.x = object.x1;
    camera.position.y = object.y1;
    camera.position.z = object.z1;
    controls.target.x = object.x2;
    controls.target.y = object.y2;
    controls.target.z = object.z2;
    controls.update();
  });
  tween.onComplete(function () {
    controls.enabled = true;
    callBack();
  });
  tween.easing(TWEEN.Easing.Cubic.InOut);
  tween.start();
}
Animation update
Finally, don't forget to update the scene, track controller, TWEEN, and model rotation in the requestanimation frame 🌍 Wait.
// Monitor page zooming, update camera and rendering
function onWindowResize() {
  camera.aspect = window.innerWidth / window.innerHeight;
  camera.updateProjectionMatrix();
  renderer.setSize(window.innerWidth, window.innerHeight);
}
function animate() {
  requestAnimationFrame(animate);
  renderer.render(scene, camera);
  stats && stats.update();
  controls && controls.update();
  TWEEN && TWEEN.update();
  // Medal model rotation
  box && (box.rotation.y += .04);
}
Fireworks animation
Finally, add to the page through box shadow and simple CSS animation 🎉 Blooming effect, creating 🎅 Festive atmosphere!
<div className="firework_1"></div>
<div className="firework_2"></div>
<!-- ... -->
<div className="firework_10"></div>
Style animation:
[class^=firework_] {
  position: absolute;
  width: 0.1rem;
  height: 0.1rem;
  border-radius: 50%;
  transform: scale(8)
}
.firework_1 {
  animation: firework_lg 2s both infinite;
  animation-delay: 0.3s;
  top: 5%;
  left: 5%;
}
@keyframes firework_lg {
  0%, 100% {
    opacity: 0;
  }
  10%, 70% {
    opacity: 1;
  }
  100% {
    box-shadow: -0.9rem 0rem 0 #fff, 0.9rem 0rem 0 #fff, 0rem -0.9rem 0 #fff, 0rem 0.9rem 0 #fff, 0.63rem -0.63rem 0 #fff, 0.63rem 0.63rem 0 #fff, -0.63rem -0.63rem 0 #fff, -0.63rem 0.63rem 0 #fff;
  }
}
Effect achieved:
🔗 Complete code https://github.com/dragonir/3...
summary
The main knowledge points involved in this paper include:
- Three.js provided light source
- THREE.DirectionLight directional light
- THREE.HemisphereLight hemispherical light source
- THREE. Ambient light
- Medal UI material generation
- Three. Maps in JS
- MeshPhysicalMaterial physical material
- TWEEN shot gap animation
- CSS fireworks animation
Want to know about scene initialization, lighting, shadows and other three JS related knowledge, you can read my other articles. If you think the article is helpful to you, don't forget to click three times 👍.
appendix
- [1]. Three.js to realize the 3D creative page of the Spring Festival in the year of the tiger
- [2]. Three.js to realize the 3D dynamic Logo of Facebook meta universe
- [3]. Three.js to achieve 3D panoramic detective games
- [4]. Use three JS to achieve cool acid style 3D pages
- [5]. Environment map source: dribbble
- [6]. Font model source: sketchfab