Introduction to Docker
What is Docker?
To tell you the truth about what Docker is, let me show you what Docker is through four points.
- Docker is the world's leading software container platform, developed and implemented in the Go Language.
- Docker frees developers by automating repetitive tasks such as setting up and configuring development environments.
- Users can easily create and use containers to put their own applications in them. Containers can also be versioned, copied, shared, and modified, just like normal code.
- Docker is an operating system-level virtualization technology that encapsulates and isolates processes. Isolated processes are also called containers because they are independent of the host and other isolated processes.
Official address: https://www.docker.com/ .
Why use Docker?
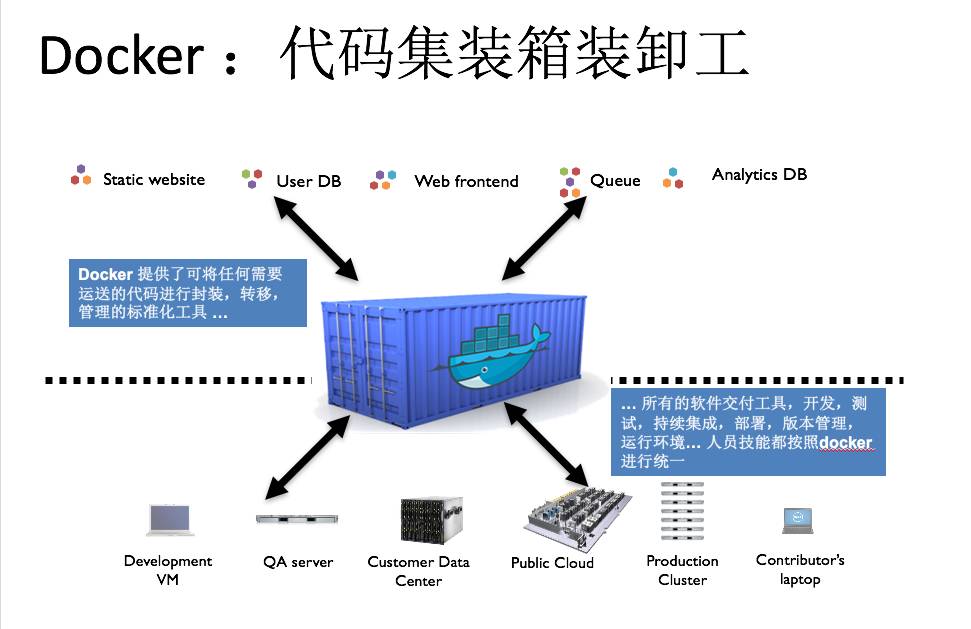
Docker s can allow developers to package their applications and dependencies into a lightweight, portable container that can then be published to any popular Linux machine, or they can be virtualized.
Containers are fully sandboxed and do not have any interfaces with each other (app s like the iPhone), more importantly, they have very low performance overhead.
In the traditional development process, our projects usually need to use MySQL, Redis, FastDFS and other environments, which need to be downloaded and configured manually. The installation and configuration process is extremely complex, and the operation is different under different systems.
Docker perfectly solves this problem by allowing us to install MySQL, Redis, and other software environments in containers that separate the application from the environment architecture. Its advantages are:
- Consistent running environment for easier migration
- Encapsulate and isolate processes so that containers do not interfere with each other and make efficient use of system resources
- Multiple consistent containers can be replicated by mirroring
In addition, Docker from Getting Started to Practice is an open source book that gives reasons for using Docker.
Installation of Docker
Windows
Next, install the Docker, using the Windows system as an example, to access the Docker's official network:
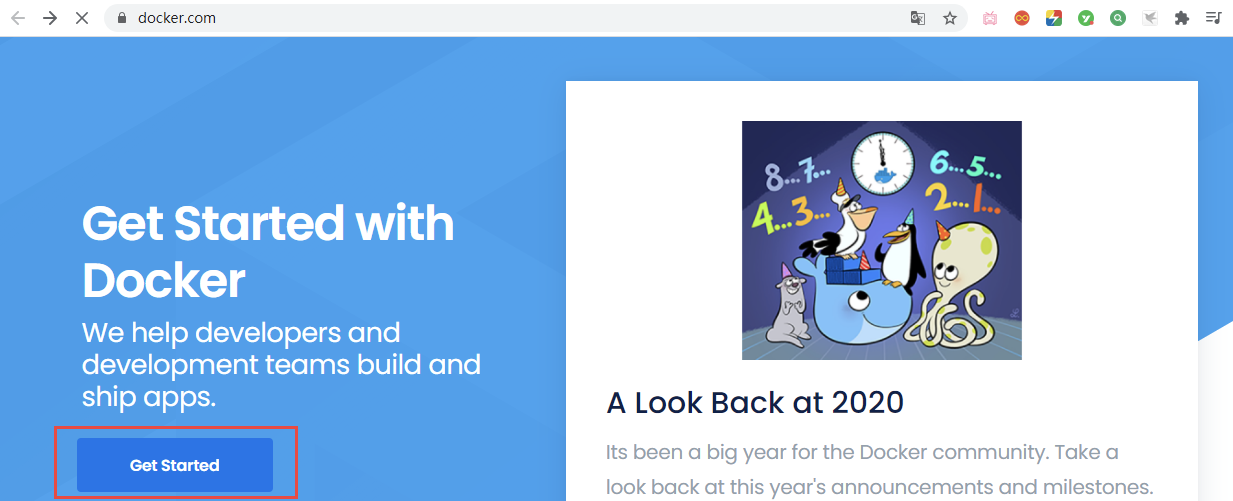
Then click Get Started:
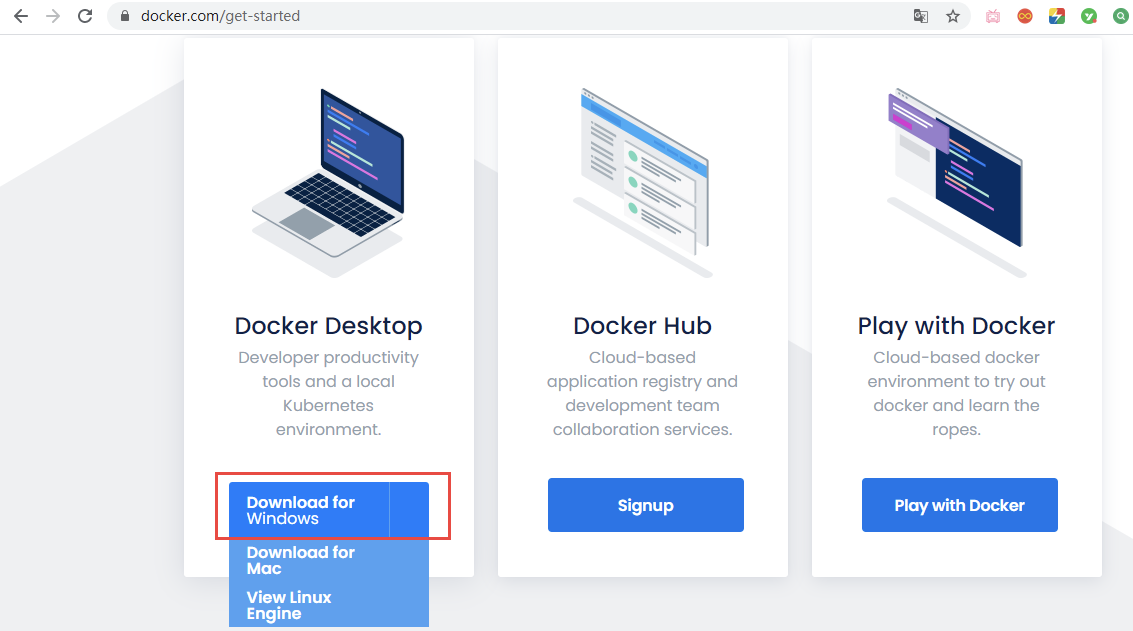
Click Download for Windows here to download.
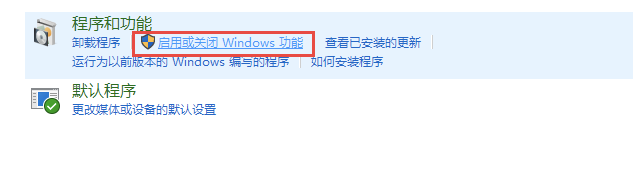
If your computer is a Windows 1064-bit professional operating system, you need to turn on Hyper-V before installing Docker, as follows. Open the control panel and select the program:

Click to enable or turn off Windows functionality:
Check Hyper-V and click OK:
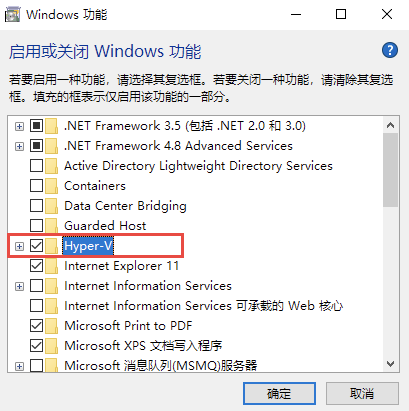
The computer needs to be restarted once the changes are complete.
Once Hyper-V is turned on, we can install Docker. After opening the installer, wait a moment and click Ok:
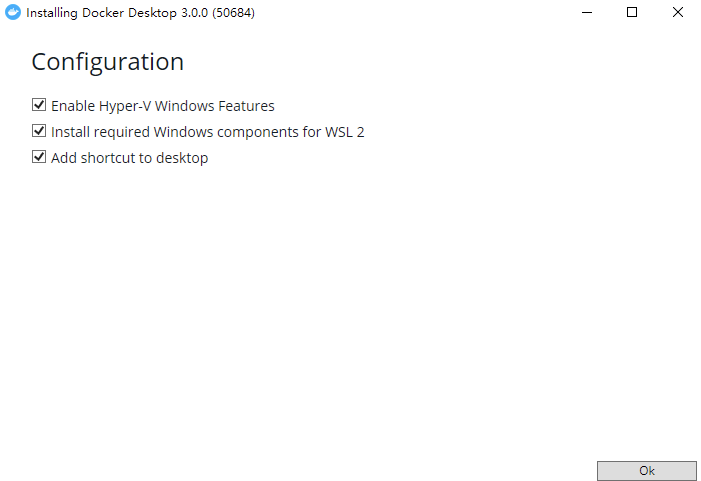
After installation, we still need to restart the computer. After restart, if prompted as follows:
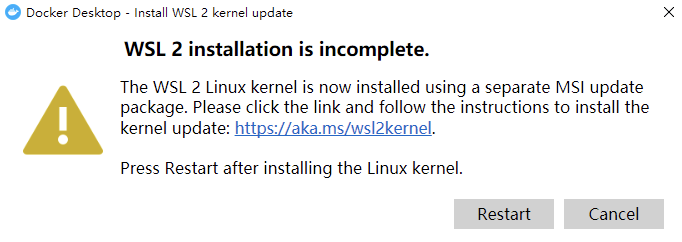
It means asking if we use WSL2, a Windows-based Linux subsystem. If we cancel this, it will use the HPYER-V virtual machine we checked earlier.
Since this is the operation of the graphical interface, there is no specific use of Docker Desktop.
Mac
Install using Homebrew directly
brew install --cask docker
Linux
Here's how to install Docker on Linux, with CentOS7 as an example.
In a test or development environment, Docker Official provides a convenient installation script to simplify the installation process, which automatically prepares everything and installs a stable version of Docker on the system.
curl -fsSL get.docker.com -o get-docker.sh
sh get-docker.sh --mirror Aliyun
Start the service directly after installation:
systemctl start docker
Recommended settings for boot-up self-start to execute instructions:
systemctl enable docker
Several concepts in Docker
Before learning Docker formally, we need to understand several core concepts in Docker:
image
Mirror is a read-only template that can be used to create Docker containers, and one image can create multiple containers
container
Containers are running instances created by mirroring, and Docker runs one or a group of applications independently using containers. It can be started, started, stopped, deleted, and each container is an isolated, secure platform. Containers can be thought of as a simple Linux environment and an application running in it. Containers are defined almost identically to mirrors and are a unified view of a stack of layers, except that the top layer of a container is readable and writable
Warehouse
A warehouse is a place where mirrored files are centrally stored. Warehouse and warehouse registration servers are different. Warehouse registration servers often store multiple warehouses. Each warehouse contains multiple mirrors, and each image has a different label. Warehouses are divided into public warehouses and private warehouses. The largest public warehouse is DockerHub, which stores a large number of mirrors for users to download. The domestic public warehouses are Aliyun, NetEase Cloud and so on.
summary
Popular saying, a mirror represents a software; Running based on a mirror generates a program instance, which is a container. The warehouse is used to store all the mirrors in the Docker.
The warehouses are divided into remote warehouses and local warehouses, similar to Maven, which can greatly reduce efficiency if the dependency is downloaded from a remote location each time. For this reason, Maven's strategy is to download the dependency to a local warehouse the first time it is accessed, and then use the dependency of the local warehouse directly for the second and third time. Docker's remote and local warehouses work similarly.
Docker's first experience
Let's start with a preliminary use of Docker. Here's an example of downloading a mirror of MySQL (under CentOS7).
Like GitHub, DockerHub also provides a DockerHub for querying the address of various mirrors and installation tutorials. To do this, first visit DockerHub: https://hub.docker.com/
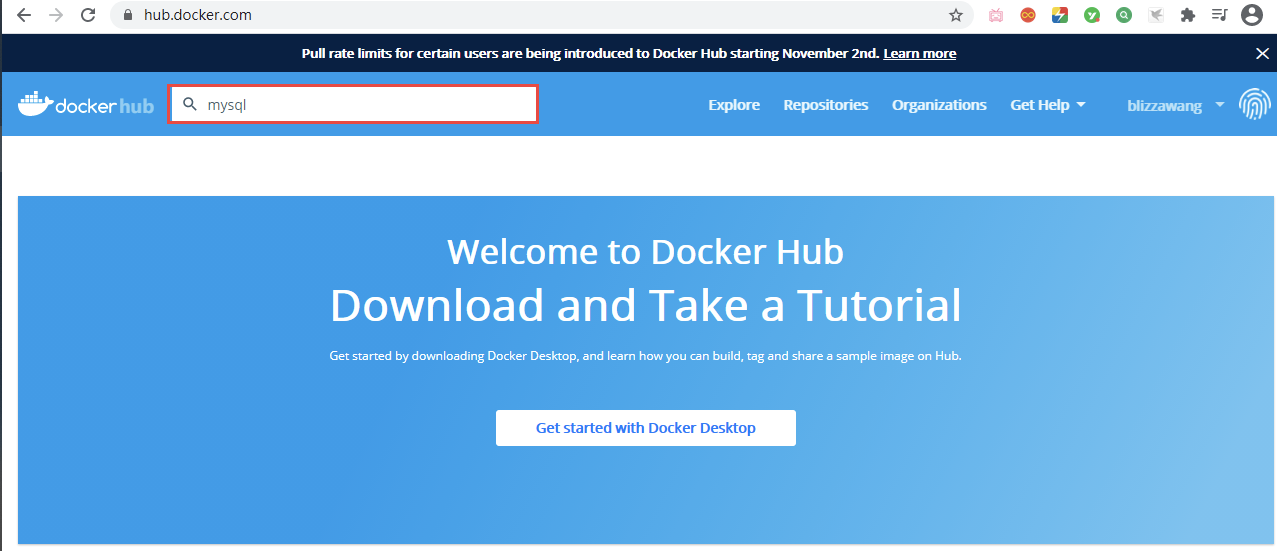
Enter MySQL in the search box in the upper left corner and return:
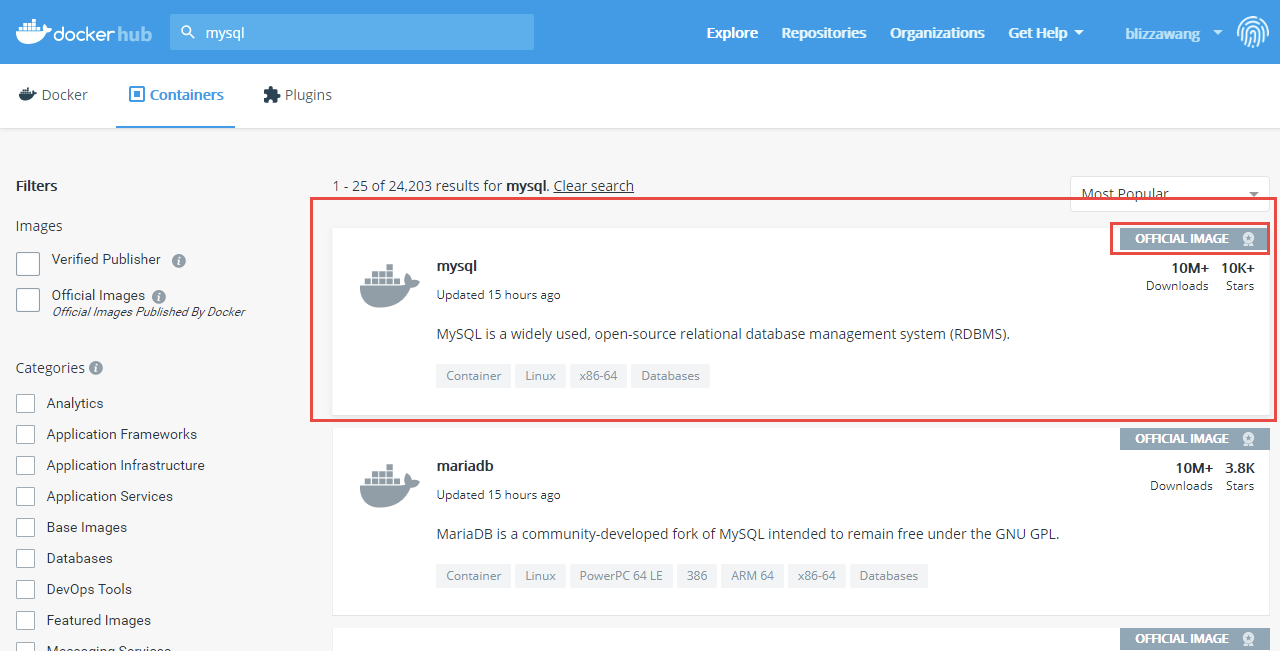
You can see that there are many mirrors of MySQL. If there is an OFFICIAL IMAGE identification in the upper right corner, it means the official image, so we click on the first MySQL image:
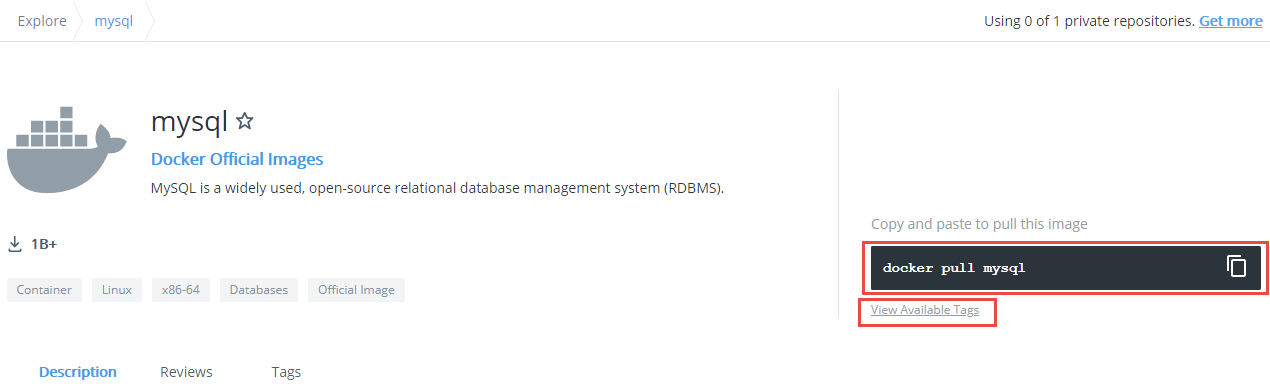
The directive to download MySQL mirrors is docker pull MySQL on the right, but it always downloads the latest version of MySQL mirrors.
To download a specific version of the image, click View Available Tags below:
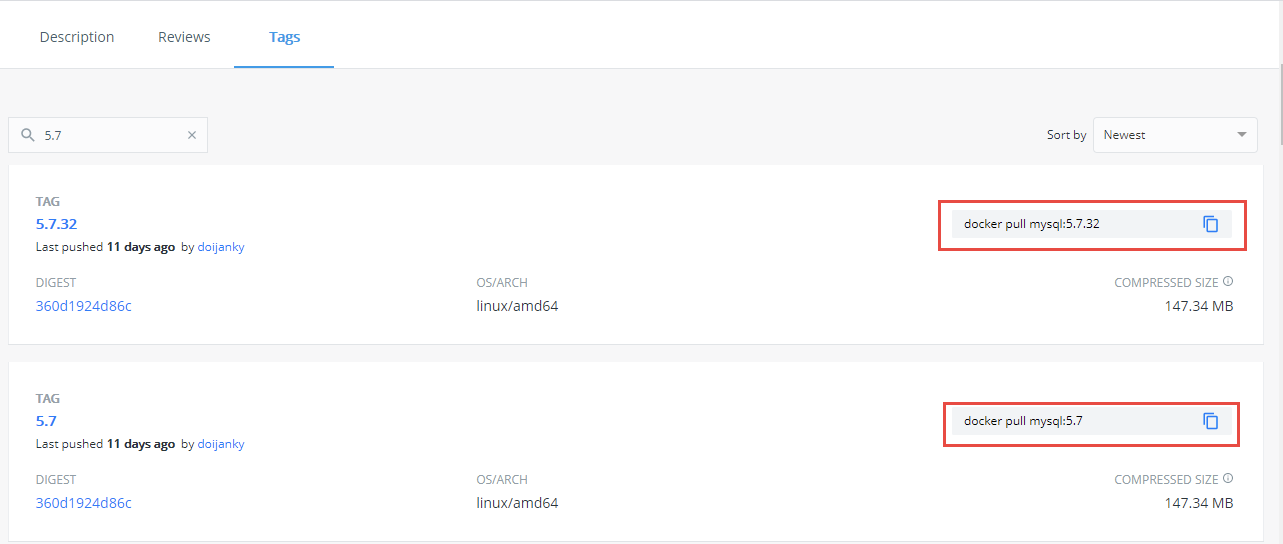
You can see the various versions of Mirrors here, with download instructions on the right, so if you want to download the 5.7.32 version of MySQL Mirrors, execute:
docker pull MySQL:5.7.32
However, the process of downloading mirrors is very slow, so we need to configure a mirror source to speed up the download and visit the Aliyun official website:

Click Console:
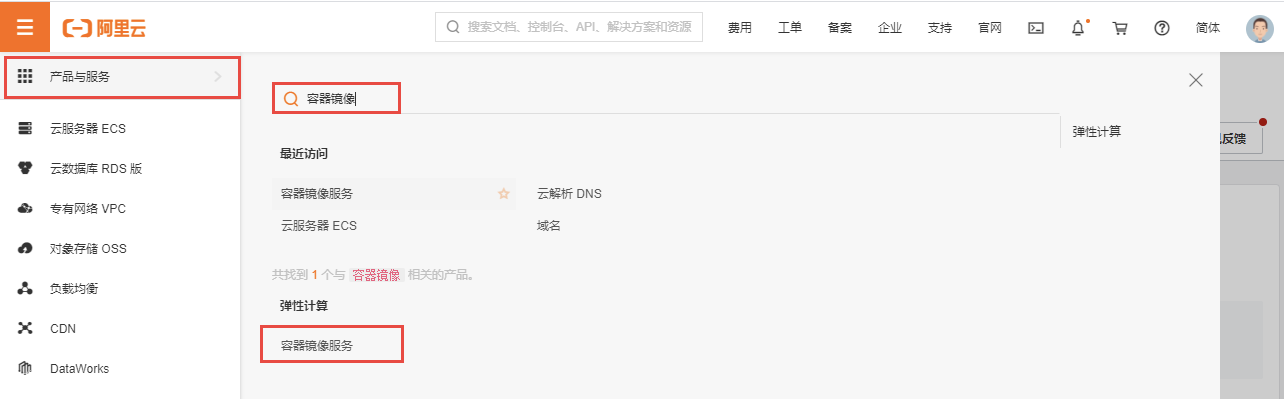
Then click on the menu in the upper left corner, hover over products and services in the pop-up window, search for container mirroring services on the right, and finally click on container mirroring services:
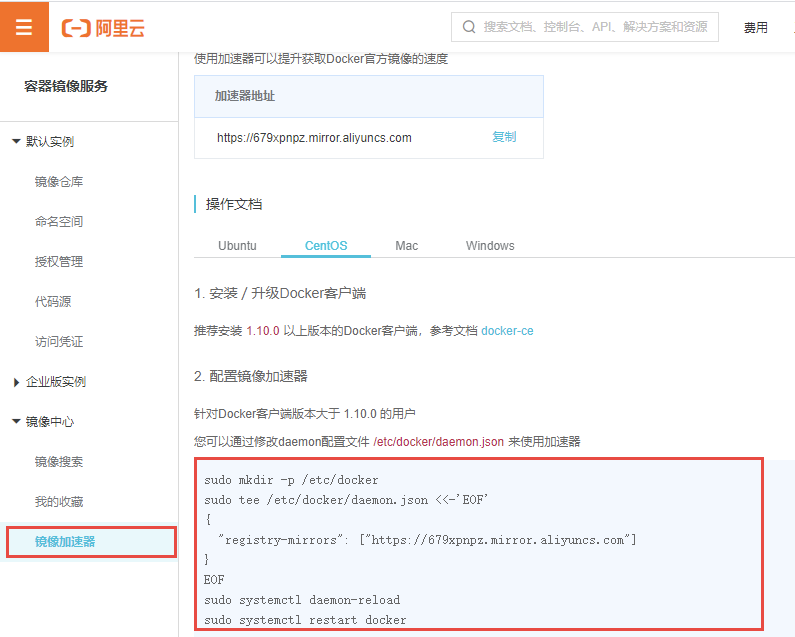
Click the mirror accelerator on the left and execute the configuration instructions on the right in turn.
sudo mkdir -p /etc/docker
sudo tee /etc/docker/daemon.json <<-'EOF'
{
  "registry-mirrors": ["https://679xpnpz.mirror.aliyuncs.com"]
}
EOF
sudo systemctl daemon-reload
sudo systemctl restart docker
Docker Mirror Instruction
Dockers need to work with related mirrors frequently, so let's first look at the mirroring instructions in Docker.
If you want to see which mirrors are currently in the Docker, you can use the docker images command.
[root@izrcf5u3j3q8xaz ~]# docker images
REPOSITORY    TAG       IMAGE ID       CREATED         SIZE
MySQL         5.7.32    f07dfa83b528   11 days ago     448MB
tomcat        latest    feba8d001e3f   2 weeks ago     649MB
nginx         latest    ae2feff98a0c   2 weeks ago     133MB
hello-world   latest    bf756fb1ae65   12 months ago   13.3kB
REPOSITORY is the image name, TAG is the version flag, IMAGE ID is the image ID (unique), CREATED is the creation time. Note that this time is not when we download the image into the Docker, but when the image creator created it, SIZE is the size of the image.
This directive queries the specified mirror name:
docker image MySQL
If you do this, all MySQL mirrors in the Docker will be queried:
[root@izrcf5u3j3q8xaz ~]# docker images MySQL
REPOSITORY   TAG       IMAGE ID       CREATED         SIZE
MySQL        5.6       0ebb5600241d   11 days ago     302MB
MySQL        5.7.32    f07dfa83b528   11 days ago     448MB
MySQL        5.5       d404d78aa797   20 months ago   205MB
The directive also carries the -p parameter: docker images -q, -q denotes the id of the mirror only:
[root@izrcf5u3j3q8xaz ~]# docker images -q
0ebb5600241d
f07dfa83b528
feba8d001e3f
d404d78aa797
To download the image, use:
docker pull MySQL:5.7
The docker pull is fixed, followed by a mirror name and version flag that you need to download. If you execute docker pull MySQL directly instead of writing the version flag, the latest version of the mirror will be downloaded.
Generally, before downloading a mirror, we need to search which versions of the mirror are available to download the specified version, using the instructions:
docker search MySQL

However, this directive can only view mirrored information about MySQL, not know which versions exist, and if you want to know which versions, you can only query like this:
docker search MySQL:5.5

If the version of the query does not exist, the result is empty:

Delete Mirror Usage Instructions:
docker image rm MySQL:5.5
If no version is specified, the latest version is also deleted by default.
You can also delete by specifying a mirror id:
docker image rm bf756fb1ae65
However, a mistake was made:
[root@izrcf5u3j3q8xaz ~]# docker image rm bf756fb1ae65
Error response from daemon: conflict: unable to delete bf756fb1ae65 (must be forced) - image is being used by stopped container d5b6c177c151
This is because the hello-world image to be deleted is running, so the image cannot be deleted, and you need to force the deletion:
docker image rm -f bf756fb1ae65
This directive deletes both the mirror and the container that is executed through it and is used with caution.
Docker also provides a simplified version of Delete Mirror: docker rmi Mirror Name: Version Flag.
Now we can do some joint operations with rmi and-p, for example, if you want to delete all MySQL mirrors now, then you need to query the IDs of MySQL mirrors and execute docker rmi deletions one by one based on those id s, but now we can do this:
docker rmi -f $(docker images MySQL -q)
All mirrored IDs of MySQL are first queried through docker images MySQL-q, which means that only IDs are queried and passed as parameters to the docker rmi-f directive so that all MySQL mirrors are deleted.
Docker Container Directive
Once you have the instructions for mirroring, we need to understand the instructions for containers, which are mirror-based.
If you need to run a container through mirroring, use:
docker run tomcat:8.0-jre8
Of course, if you have this image, download it first:
docker pull tomcat:8.0-jre8
Once the download is complete, it's ready to run. After running, check out the currently running container: docker ps.

Where CONTAINER_ID is the id of the container, IMAGE is the mirror name, COMMAND is the command executed in the container, CREATED is the creation time of the container, STATUS is the state of the container, PORTS is the port on which the service in the container listens, and NAMES is the name of the container.
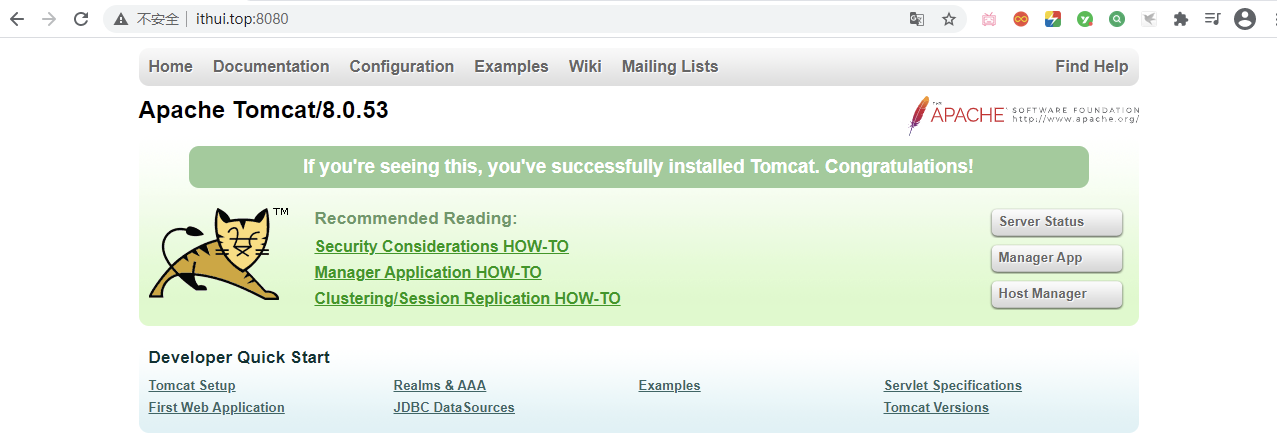
tomcat running in this way cannot be accessed directly from outside because containers are isolated. If you want to access tomcat inside a container directly through port 8080, you need to map the host port to the port inside the container:
docker run -p 8080:8080 tomcat:8.0-jre8
Explain what these two ports do (8080:8080). The first 8080 is the host port, the second 8080 is the port inside the container, and external access to 8080 will access port 8080 inside the container through mapping.
Tomcat is now accessible externally:
If mapping is done as follows:
docker run -p 8088:8080 tomcat:8.0-jre8
It is important to note that containers run independently of each other, so running multiple tomcat containers at the same time does not cause port conflicts.
Containers can also run in the background so that they do not occupy terminals:
docker run -d -p 8080:8080 tomcat:8.0-jre8
The container is given a name by default when it is started, but the name can be set by using the instructions:
docker run -d -p 8080:8080 --name tomcat01 tomcat:8.0-jre8
In this case, the container name is tomcat01, and the container name must be unique.
Let's extend a few of the instruction parameters in docker ps, such as -a:
docker ps -a
This parameter lists all running and non-running containers:
The -q parameter will only query the running container id:docker ps-q.
[root@izrcf5u3j3q8xaz ~]# docker ps -q
f3aac8ee94a3
074bf575249b
1d557472a708
4421848ba294
If used in combination, query all container id s: docker ps-qa that are running and not running.
[root@izrcf5u3j3q8xaz ~]# docker ps -aq
f3aac8ee94a3
7f7b0e80c841
074bf575249b
a1e830bddc4c
1d557472a708
4421848ba294
b0440c0a219a
c2f5d78c5d1a
5831d1bab2a6
d5b6c177c151
The next step is the stop and restart instructions for the container, which are so simple that they are not covered much.
docker start c2f5d78c5d1a
This directive allows you to run containers that have stopped running either by the id of the container or by the name of the container.
docker restart c2f5d78c5d1a
This directive restarts the specified container.
docker stop c2f5d78c5d1a
This directive stops the specified container.
docker kill c2f5d78c5d1a
This command kills the specified container directly.
The above instructions can be used in combination with container id and container name.
When the container is stopped, it still exists although it is no longer running. If you want to delete it, use the instructions:
docker rm d5b6c177c151
It is important to note that the id of the container does not need to be written out entirely, only a unique identification is required.
If you want to delete a running container, you need to add the -f parameter to force the deletion:
docker rm -f d5b6c177c151
If you want to delete all containers, you can use the combination directive:
docker rm -f $(docker ps -qa)
The IDs of all containers are queried through docker ps-qa, and then deleted through docker rm-f.
When a container is running in the background, we are not aware of the state of the container. If you need to view the container's running log, use the instructions:
docker logs 289cc00dc5ed
Logs displayed in this way are not real-time. For real-time display, the -f parameter is required:
docker logs -f 289cc00dc5ed
The -t parameter also allows you to display the timestamp of the log, which is often used in conjunction with the -f parameter:
docker logs -ft 289cc00dc5ed
To see which processes are running inside the container, you can use instructions:
docker top 289cc00dc5ed

If you want to interact with a container, use the instructions:
docker exec -it 289cc00dc5ed bash

At this point, the terminal will enter the container, the instructions executed will be valid in the container, only some simple instructions can be executed in the container, such as ls, cd, etc. If you want to exit the container terminal and return to CentOS, execute exit.
Now that we are able to enter the container terminal to perform related operations, how do we deploy a project to the tomcat container?
docker cp ./test.html 289cc00dc5ed:/usr/local/tomcat/webapps
The docker cp directive allows you to copy files from the CentOS to containers,. / test.html is the resource path in the CentOS, 289cc00dc5ed is the container id, and/usr/local/tomcat/webapps is the resource path of the container, then test. The HTML file will be copied to that path.
[root@izrcf5u3j3q8xaz ~]# docker exec -it 289cc00dc5ed bash
root@289cc00dc5ed:/usr/local/tomcat# cd webapps
root@289cc00dc5ed:/usr/local/tomcat/webapps# ls
test.html
root@289cc00dc5ed:/usr/local/tomcat/webapps#
If you want to copy the files in the container to the CentOS, write the other way around:
docker cp 289cc00dc5ed:/usr/local/tomcat/webapps/test.html ./
So if you want to deploy the project now, first upload the project to CentOS, then copy the project from CentOS to the container, then start the container.
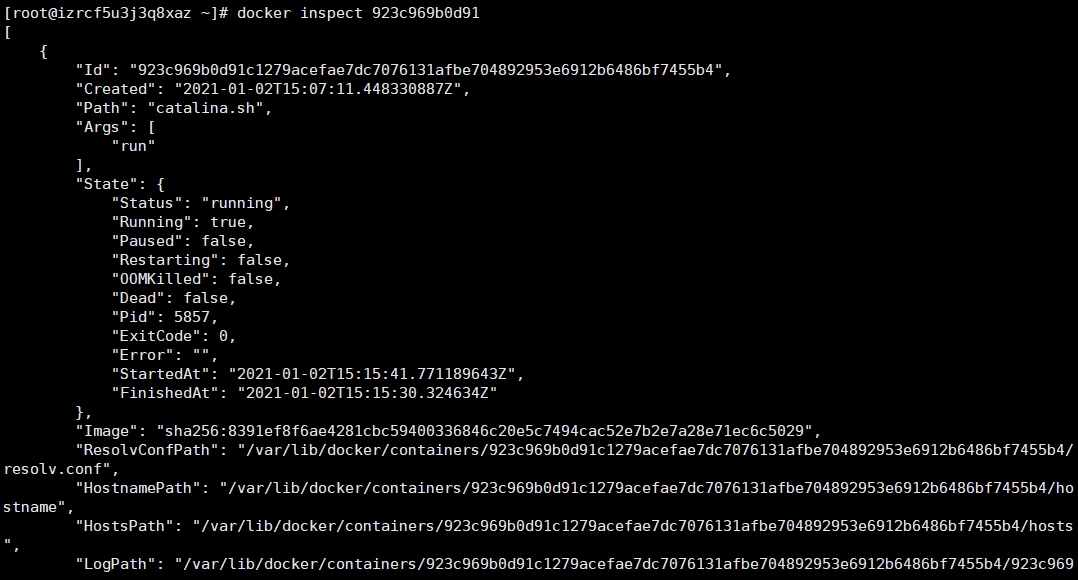
Although it is very simple to use Docker to launch the software environment, there is also a problem that we do not know the details inside the container, such as the port to listen on, the ip address to bind, and so on. The good thing about these Dockers is that they help us think of them and just use instructions:
docker inspect 923c969b0d91
Docker Data Volume
After learning about the container instructions, let's look at the data volume in Docker, which enables file sharing between the host and the container. The benefit is that modifications to the host's files will directly affect the container without having to copy the host's files back into the container.
Now if you want to make a data volume from the host / opt/apps directory and the webapps directory in the container, you should write instructions like this:
docker run -d -p 8080:8080 --name tomcat01 -v /opt/apps:/usr/local/tomcat/webapps tomcat:8.0-jre8
However, at this point, accessing tomcat will reveal that it is inaccessible:
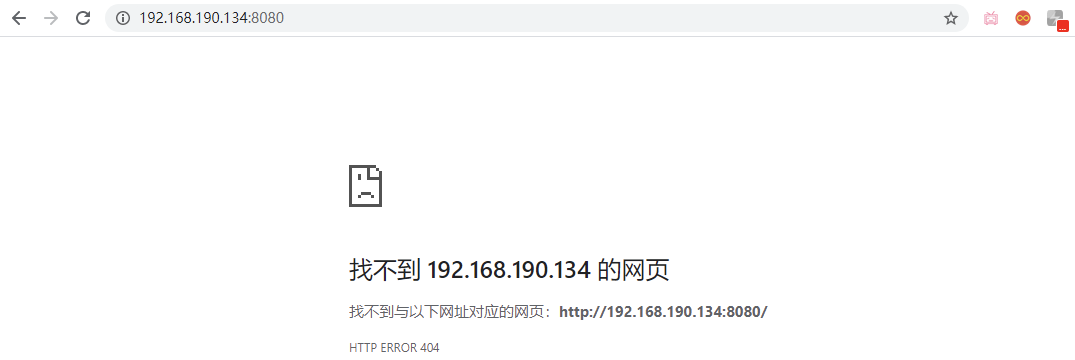
This means that our data volume setup was successful, and Docker synchronizes the webapps directory in the container with the / opt/apps directory, which is empty at this time, causing the webapps directory to become empty, so it is not accessible.
At this point, we only need to add files to the / opt/apps directory, so that the webapps directory will also have the same files, to achieve file sharing, test it:
[root@centos-7 opt]# cd apps/
[root@centos-7 apps]# vim test.html
[root@centos-7 apps]# ls
test.html
[root@centos-7 apps]# cat test.html
<h1>This is a test html!</h1>
A test is created in the / opt/apps directory. HTML file, will the webapps directory in the container have that file? Terminal into container:
[root@centos-7 apps]# docker exec -it tomcat01 bash
root@115155c08687:/usr/local/tomcat# cd webapps/
root@115155c08687:/usr/local/tomcat/webapps# ls
test.html
There is already this file in the container, so let's write a simple Web application:
public class HelloServlet extends HttpServlet {

    @Override
    protected void doGet(HttpServletRequest req, HttpServletResponse resp) throws ServletException, IOException {
        resp.getWriter().println("Hello World!");
    }

    @Override
    protected void doPost(HttpServletRequest req, HttpServletResponse resp) throws ServletException, IOException {
        doGet(req,resp);
    }
}
This is a very simple Servlet that we will package and upload to / opt/apps, then the file will definitely be synchronized in the container and accessed at this time:

This way of setting up a data volume is called a custom data volume, because the directory of the data volume is set by us, and Docker provides us with another way of setting up the data volume:
docker run -d -p 8080:8080 --name tomcat01 -v aa:/usr/local/tomcat/webapps tomcat:8.0-jre8
The aa at this time is not the directory of the data volume, but the alias of the data volume. Docker automatically creates a data volume named aa for us, and copies all the contents of the webapps directory in the container to the data volume in the / var/lib/docker/volumes directory:
[root@centos-7 volumes]# pwd
/var/lib/docker/volumes
[root@centos-7 volumes]# cd aa/
[root@centos-7 aa]# ls
_data
[root@centos-7 aa]# cd _data/
[root@centos-7 _data]# ls
docs  examples  host-manager  manager  ROOT
At this point, we only need to modify the contents of the directory to be able to affect the container.
Finally, several container and mirror-related instructions are described:
docker commit -m "Descriptive Information" -a "Mirror Author" tomcat01 my_tomcat:1.0
This directive allows you to package a container into a mirror, in which case query the mirror:
[root@centos-7 _data]# docker images
REPOSITORY          TAG                 IMAGE ID            CREATED             SIZE
my_tomcat           1.0                 79ab047fade5        2 seconds ago       463MB
tomcat              8                   a041be4a5ba5        2 weeks ago         533MB
MySQL               latest              db2b37ec6181        2 months ago        545MB
If you want to back up the mirror, you can use the command:
docker save my_tomcat:1.0 -o my-tomcat-1.0.tar
[root@centos-7 ~]# docker save my_tomcat:1.0 -o my-tomcat-1.0.tar
[root@centos-7 ~]# ls
anaconda-ks.cfg  initial-setup-ks.cfg  Public Video Document Music
get-docker.sh    my-tomcat-1.0.tar     Template Picture Download Desktop
If you own it. Mirror in tar format, how do I load it into Docker? Execute instructions:
docker load -i my-tomcat-1.0.tar
root@centos-7 ~]# docker load -i my-tomcat-1.0.tar
b28ef0b6fef8: Loading layer [==================================================>]  105.5MB/105.5MB
0b703c74a09c: Loading layer [==================================================>]  23.99MB/23.99MB
......
Loaded image: my_tomcat:1.0
[root@centos-7 ~]# docker images
REPOSITORY          TAG                 IMAGE ID            CREATED             SIZE
my_tomcat           1.0                 79ab047fade5        7 minutes ago       463MB
Last:
Recently, I have compiled a complete set of ** Summary of JAVA Core Knowledge Points **, and to be honest, as a Java programmer, you should take a good look at this material whether you need an interview or not. It's always good to get it ~Many of my fans also get Offer s from companies like Tencent Byte Express
Enter [ Java Architecture Resource Exchange Group ], get it from the administrator!