Click here to enter: Fast Construction of APP Series Catalog Map from Zero
Click here to enter: UI Programming Series Directory Map
Click here to enter: Four Component Series Catalog Map
Click here to enter: Data Network and Thread Series Directory Map
This section routine download address: WillFlowFragment

How do we use debris to make full use of flat screen space? If we are developing a news application, one of the interfaces uses ListView to display a set of news headlines, and when one of the headlines is clicked, another interface opens to show the details of the news. If it is designed in a mobile phone, we can put the list of news headlines in one activity and the details of news in another activity.
I. Static Creation of Fragment s
This is the easiest way to use Fragment s, which can be written directly in Activity's layout file as a common control.
Steps for creating Fragment s statically:
1. Inherit Fragment and rewrite onCreateView to determine the layout of Fragemnt
2. Declare this Fragment in Activity as if it were a normal View
Let's use an example to illustrate the process of creating fragments statically.
Create a new left_fragment.xml fragment layout with the following code:
<RelativeLayout xmlns:android="http://schemas.android.com/apk/res/android"
android:layout_width="match_parent"
android:layout_height="match_parent"
android:orientation="vertical">
<Button
android:id="@+id/button"
android:layout_width="wrap_content"
android:layout_height="wrap_content"
android:layout_gravity="center_horizontal"
android:text="Button"
android:layout_marginTop="96dp"
android:layout_alignParentTop="true"
android:layout_centerHorizontal="true" />
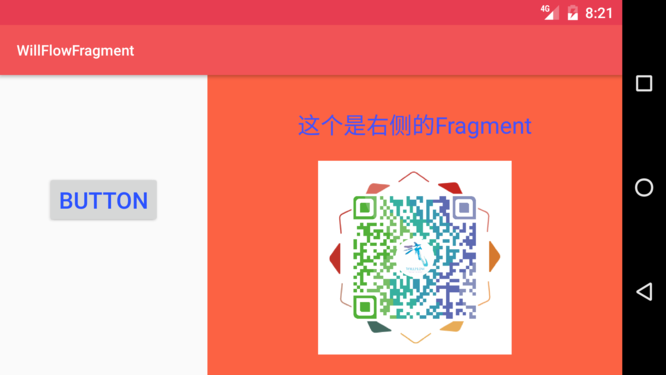
</RelativeLayout>The layout is very simple, with only one button placed and displayed horizontally in the middle.
Then create the right fragment layout right_fragment.xml with the following code:
<?xml version="1.0" encoding="utf-8"?>
<RelativeLayout xmlns:android="http://schemas.android.com/apk/res/android"
    xmlns:app="http://schemas.android.com/apk/res-auto"
    android:layout_width="match_parent"
    android:layout_height="match_parent"
    android:background="#fc6243"
    android:orientation="vertical">

    <TextView
        android:layout_width="wrap_content"
        android:layout_height="wrap_content"
        android:layout_gravity="center_horizontal"
        android:textColor="#4352fc"
        android:text="This is on the right side. Fragment"
        android:textSize="22sp"
        android:layout_marginTop="96dp"
        android:layout_alignParentTop="true"
        android:layout_centerHorizontal="true"
        android:id="@+id/textView" />

    <ImageView
        android:id="@+id/imageView"
        android:layout_width="236dp"
        android:layout_height="236dp"
        android:layout_marginTop="40dp"
        app:srcCompat="@drawable/willflow"
        android:layout_below="@+id/textView"
        android:layout_centerHorizontal="true" />
</RelativeLayout>
As you can see, we set the background color of this layout to light red and put a TextView to display a paragraph of text.
Next, create a new LeftFragment class, inherit from Fragment, and insert code into the critical lifecycle method (just in and out of processing). Activity Time is the same. Note: Create Fragment When necessary, it must be rewritten. onCreateView() The callback method defines the layout. In fact, this is the only callback method that needs to be rewritten to make Fragment work.
The code for Left Fragment is as follows:
public class LeftFragment extends Fragment {
    @Override
    public View onCreateView(LayoutInflater inflater, ViewGroup container, Bundle savedInstanceState) {
        View view = inflater.inflate(R.layout.left_fragment, container, false);
        return view;
    }
}
This is simply a rewriting of Fragment's onCreateView() method, in which the left_fragment layout just defined is dynamically loaded through LayoutInflate's inflate() method. The whole method is simple enough.
Then we create a new RightFragment in the same way. The code is as follows:
public class RightFragment extends Fragment {
    @Override
    public View onCreateView(LayoutInflater inflater, ViewGroup container, Bundle savedInstanceState) {
        View view = inflater.inflate(R.layout.right_fragment, container, false);
        return view;
    }
}
Basically the code is the same, I believe there is no need to do anything to explain.
Next, modify the code in activity_main.xml as follows:
<?xml version="1.0" encoding="utf-8"?>
<LinearLayout xmlns:android="http://schemas.android.com/apk/res/android"
    android:layout_width="match_parent"
    android:layout_height="match_parent">

    <fragment
        android:id="@+id/left_fragment"
        android:name="com.wgh.willflowfragment.LeftFragment"
        android:layout_width="0dp"
        android:layout_height="match_parent"
        android:layout_weight="1" />

    <fragment
        android:id="@+id/right_fragment"
        android:name="com.wgh.willflowfragment.RightFragment"
        android:layout_width="0dp"
        android:layout_height="match_parent"
        android:layout_weight="1" />
</LinearLayout>
As you can see, we used tags to add fragments to the layout. Most of the attributes specified are familiar to us, but we also need to explicitly specify the name of the fragmented class to be added through the android:name attribute. Be careful to add the package name of the class as well.
Compile and run to see the effect:
Note: Fragments cannot be dynamically removed when they are added to Activity through an XML layout file. If you want to cut and cut Fragments in and out of user interaction, you must add Fragments to Activity after Activity starts. Let's learn this method next.
II. Dynamic Creation of Fragment s
In the previous example, we have learned how to add Fragments to layout files, but the real strength of Fragments is that it can be dynamically added to Activity while the program is running. By adding Fragment dynamically according to the specific situation, we can customize the program interface more diversified.
Create another_right_fragment.xml with the following code:
<RelativeLayout xmlns:android="http://schemas.android.com/apk/res/android"
    android:layout_width="match_parent"
    android:layout_height="match_parent"
    android:background="#ffaa00"
    android:orientation="vertical">

    <TextView
        android:id="@+id/textView"
        android:layout_width="wrap_content"
        android:layout_height="wrap_content"
        android:layout_alignParentTop="true"
        android:layout_centerHorizontal="true"
        android:layout_gravity="center_horizontal"
        android:layout_marginTop="33dp"
        android:text="This is the other one on the right. Fragment"
        android:textColor="#cb43fc"
        android:textSize="20sp" />

    <ImageView
        android:id="@+id/imageView"
        android:layout_width="136dp"
        android:layout_height="136dp"
        android:layout_below="@+id/textView"
        android:layout_centerHorizontal="true"
        android:layout_marginTop="24dp"
        android:src="@mipmap/ic_launcher" />

</RelativeLayout>
The layout file code is basically the same as the code in right_fragment.xml, except that the background color is changed to orange and the text displayed is changed.
Then create AnotherRight Fragment as another right-hand fragment with the following code:
public class AnotherRightFragment extends Fragment {
    @Override
    public View onCreateView(LayoutInflater inflater, ViewGroup container, Bundle savedInstanceState) {
        View view = inflater.inflate(R.layout.another_right_fragment, container, false);
        return view;
    }
}
The code is also very simple, loading the other_right_fragment layout just created in the onCreateView() method. So we're ready for another Fragment, and then we'll see how it can be dynamically added to the activity.
Modify activity_main.xml with the following code:
<LinearLayout xmlns:android="http://schemas.android.com/apk/res/android"
    android:layout_width="match_parent"
    android:layout_height="match_parent">

    <fragment
        android:id="@+id/left_fragment"
        android:name="com.wgh.willflowfragment.LeftFragment"
        android:layout_width="0dp"
        android:layout_height="match_parent"
        android:layout_weight="1" />

    <FrameLayout
        android:id="@+id/right_layout"
        android:layout_width="0dp"
        android:layout_height="match_parent"
        android:layout_weight="1">

        <fragment
            android:id="@+id/right_fragment"
            android:name="com.wgh.willflowfragment.AnotherRightFragment"
            android:layout_width="match_parent"
            android:layout_height="match_parent" />
    </FrameLayout>
</LinearLayout>
As you can see, the right Fragment is now placed in a FrameLayout. Do you remember the layout? As we've learned before, this is the simplest layout in Android. It doesn't have any positioning, and all controls are placed in the top left corner of the layout. Since only one Fragment needs to be placed in the layout, it is very suitable to use FrameLayout frame layout. Then we will replace the content in FrameLayout in the code to realize the function of adding Fragments dynamically.
Modify the code in MainActivity as follows:
    @Override
    protected void onCreate(Bundle savedInstanceState) {
        super.onCreate(savedInstanceState);
        setContentView(R.layout.activity_main);

        Button button = (Button) findViewById(R.id.button_lf);
        button.setOnClickListener(new View.OnClickListener() {
            @Override
            public void onClick(View view) {
                AnotherRightFragment fragment = new AnotherRightFragment();
                FragmentManager fragmentManager = getFragmentManager();
                FragmentTransaction transaction = fragmentManager.beginTransaction();
                transaction.replace(R.id.right_layout, fragment);
                transaction.commit();
            }
        });
    }
As you can see, first we register a click event for the button in the left Fragment, and then we put the logic of dynamically adding Fragments into the click event.
This completes the function of adding fragments dynamically in activities, and then runs to see the effect:

Dynamic Fragment ation is divided into five steps:
- Create an instance of Fragment to be added.
- Get the FragmentManager, which can be obtained directly by calling the getFragmentManager() method in Activity.
- Open a transaction by calling the beginTransaction() method.
- Fragment is added to the container, which is usually implemented by the replace() method. It needs to pass in the id of the container and the fragment instance to be added.
- Commit the transaction and call the commit() method to complete it.
3. Fragment Communication
1. Communicate with Activity
Method 1: findViewById()
Although Fragment is implemented as an object independent of Activity and can be used within multiple Activities, a given instance of Fragment is bound directly to the Activity that contains it.
Specifically, Fragment s can access Activity instances through getActivity() and easily perform tasks such as finding views in Activity layout.
View listView = getActivity().findViewById(R.id.listView);Likewise, our Activity can also use findFragmentById() or findFragmentByTag() to invoke methods in Fragments by obtaining references to Fragments from FragmentManager. For example:
ExampleFragment fragment = (ExampleFragment) getFragmentManager().findFragmentById(R.id.example_fragment);Method 2: Create event callbacks to Activity
In some cases, we may need to share events with Activity through Fragments. A good way to do this is to define a callback interface in Fragment and ask the host Activity to implement it. When Activity receives callbacks through this interface, it can share this information with other fragments in the layout as needed.
For example, if an Activity of a news application has two fragments: one for displaying a list of articles (Fragment A) and the other for displaying articles (Fragment B) - then Fragment A must inform Activity after the list item is selected so that it can inform Fragment B to display the article.
In the following example, the OnArticleSelectedListener interface declares in FragmentA:
public static class FragmentA extends ListFragment {
    public interface OnArticleSelectedListener {
        public void onArticleSelected(Uri articleUri);
    }
}
Then, the host activity of the Fragment implements the OnArticleSelectedListener interface and replaces onArticleSelected(), notifying Fragment B of events from Fragment A. To ensure that the host Activity implements this interface, the onAttach() callback method of Fragment A (the method invoked by the system when adding Fragment to Activity) instantiates an instance of OnArticleSelectedListener by transforming to Activity in onAttach():
public static class FragmentA extends ListFragment {
    OnArticleSelectedListener mListener;
    @Override
    public void onAttach(Activity activity) {
        super.onAttach(activity);
        try {
            mListener = (OnArticleSelectedListener) activity;
        } catch (ClassCastException e) {
            throw new ClassCastException(activity.toString() + " must implement OnArticleSelectedListener");
        }
    }
}
If Activity does not implement the interface, Fragment will cause ClassCastException. When implemented, mListener members retain references to the OnArticleSelectedListener implementation of Activity so that Fragment A can share events with Activity by calling methods defined by the OnArticleSelectedListener interface. For example, if Fragment A is an extension of ListFragment, the system calls onListItemClick() in the fragment every time a user clicks on a list item, and then the method calls onArticleSelected() to share events with Activity:
    public static class FragmentA extends ListFragment {
        OnArticleSelectedListener mListener;
        @Override
        public void onListItemClick(ListView l, View v, int position, long id) {
            Uri noteUri = ContentUris.withAppendedId(ArticleColumns.CONTENT_URI, id);
            mListener.onArticleSelected(noteUri);
        }
    }
The id parameter passed to onListItemClick() is the line id of the clicked item, that is, the id of the article used by Activity (or other fragments) to retrieve from the ContentProvider of the application.
2. Communication with other Fragment s
To reuse Fragment UI components, we should build each Fragment into a fully self-contained, modular component that defines its own layout and behavior. Once we define these reusable fragments, we can associate them with Activity through application logic to achieve the overall composite UI.
Usually Fragment s may need to interact with each other, such as content changes based on user events. All interaction between fragments should be accomplished through the Activeness associated with them, that is, there should be no direct interaction between two fragments.
(1) Defining interfaces
In order for Fragment to interact with the Activity that contains it, an interface can be defined in the Fragment class and implemented in the Activity. The Fragment captures the implementation of the interface in its onAttach() method lifecycle, and then invokes the method of the interface to interact with Activity.
Here is an example of Fragment interacting with Activity:
public class HeadlinesFragment extends ListFragment {
    OnHeadlineSelectedListener mCallback;

    // Container Activity must implement this interface
    public interface OnHeadlineSelectedListener {
        public void onArticleSelected(int position);
    }

    @Override
    public void onAttach(Activity activity) {
        super.onAttach(activity);

        // Verify that the container Activity has implemented the callback interface. Otherwise, throw an exception
        try {
            mCallback = (OnHeadlineSelectedListener) activity;
        } catch (ClassCastException e) {
            throw new ClassCastException(
             activity.toString() + " This interface must be implemented!");
        }
    }
}
Fragment can now communicate with Activity by calling the onArticleSelected() method of mCallback (an instance of the OnHeadlineSelectedListener interface), or other methods.
For example, when a user clicks on a list entry, the following method in Fragment will be invoked:
    @Override
    public void onListItemClick(ListView l, View v, int position, long id) {
        // Transmitting events to host Activity
        mCallback.onArticleSelected(position);
    }
##### (2) Implementation interface
In order to receive callback events, the host Activity must implement the interface defined in Fragment.
For example, the following Activity implements the interface in the above example:
public static class MainActivity extends Activity implements HeadlinesFragment.OnHeadlineSelectedListener{
    public void onArticleSelected(int position) {
        // What can I do here _____________
    }
}
(3) Delivery of messages to Fragment
Host Activity obtains an instance of Fragment through findFragmentById(), and then directly calls Fragment's public method to deliver the message to Fragment.
For example, suppose that the activity shown above may contain another Fragment that is used to display the specified data returned from the callback method above. In this case, Activity can pass the information received from the callback method to the Fragment that displays the data.
public static class MainActivity extends Activity implements HeadlinesFragment.OnHeadlineSelectedListener{

    public void onArticleSelected(int position) {

        ArticleFragment articleFrag = (ArticleFragment) getSupportFragmentManager().findFragmentById(R.id.article_fragment);

        if (articleFrag != null) {
            articleFrag.updateArticleView(position);
        } else {
            ArticleFragment newFragment = new ArticleFragment();
            Bundle args = new Bundle();
            args.putInt(ArticleFragment.ARG_POSITION, position);
            newFragment.setArguments(args);

            FragmentTransaction transaction = getSupportFragmentManager().beginTransaction();
            transaction.replace(R.id.fragment_container, newFragment);
            transaction.addToBackStack(null);
            transaction.commit();
        }
    }
}
This involves the concept of return stack, we will give you a brief introduction next.
Simulate the return stack in debris:
In the above code, we succeeded in adding Fragments to Activity dynamically, but after adding a Fragment by clicking the button, the program will exit directly by pressing the Back key instead of returning. If I were here
To mimic the effect of a return stack, you need to add a transaction to the return stack. Modify the code in MainActivity as follows:
    @Override
    protected void onCreate(Bundle savedInstanceState) {
        super.onCreate(savedInstanceState);
        setContentView(R.layout.activity_main);
        Button button = (Button) findViewById(R.id.button_lf);
        button.setOnClickListener(new View.OnClickListener() {
            @Override
            public void onClick(View view) {
                AnotherRightFragment fragment = new AnotherRightFragment();
                FragmentManager fragmentManager = getFragmentManager();
                FragmentTransaction transaction = fragmentManager.beginTransaction();
                transaction.replace(R.id.right_layout, fragment);
                transaction.addToBackStack(null);
                transaction.commit();
            }
        });
    }
Add the effect of returning to the stack:
Click here to enter: GitHub Open Source Project "Love Reading" . "Love Reading" focuses on collecting high-quality articles, websites, tutorials, and sharing them with you. The following is the effect diagram of "Love Reading":