What is a tunnel agent? Let's take a look at the following screenshot:

The so-called tunnel proxy is a proxy service that can help you automatically change the proxy IP.
In your code, you only need to write an entry proxy address, and then send a request normally. The request received by the target server is a different proxy address every time.
On an agent website, the price of 50 concurrent tunnel agents per second is 4000 yuan / month:
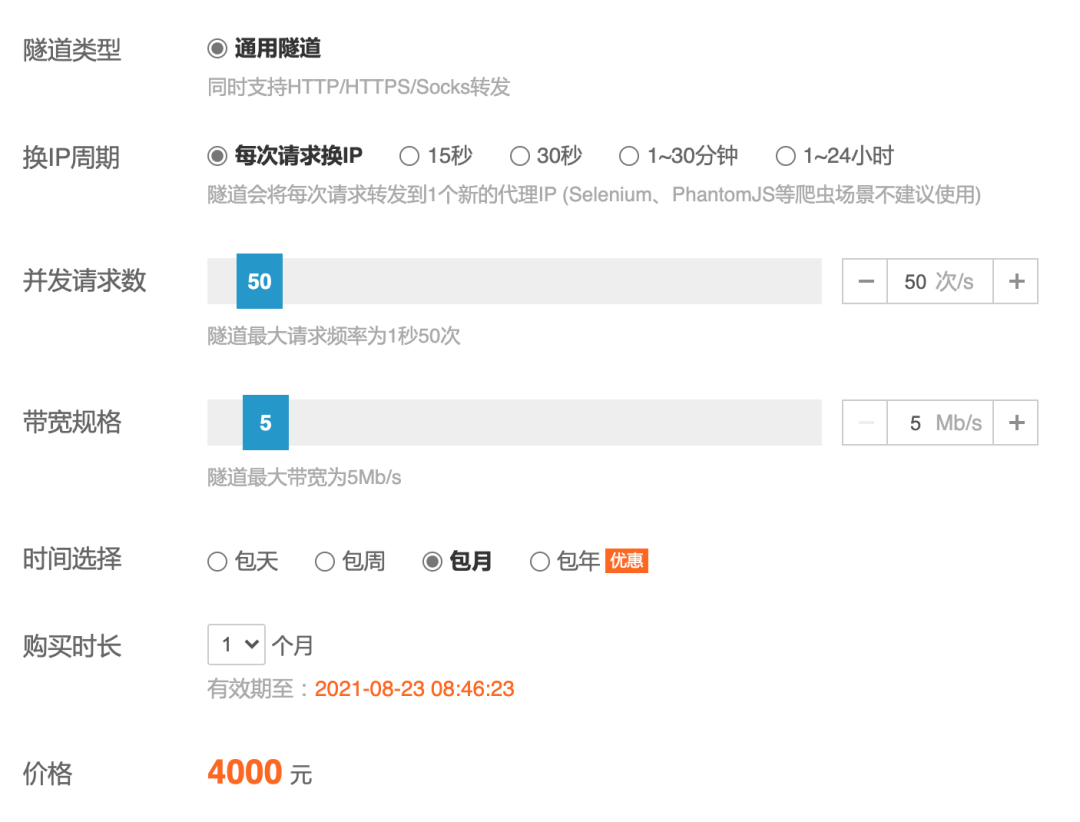
In the conventional way, the request interface first gets a batch of proxy IP S, and then selects an original proxy server that initiates the request. The price is only more than 600 yuan a month:

Therefore, if we can be a tunnel agent ourselves, we will save a lot of money!
The principle of tunnel agent is different from that of conventional agent, which can be explained by the following two figures:
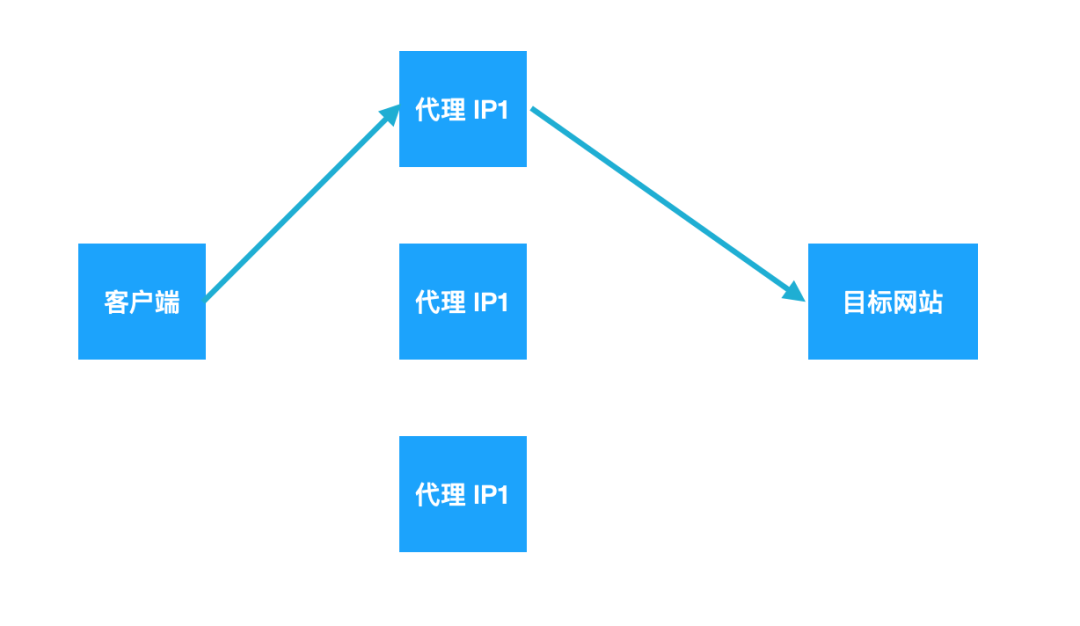
Traditional agent service
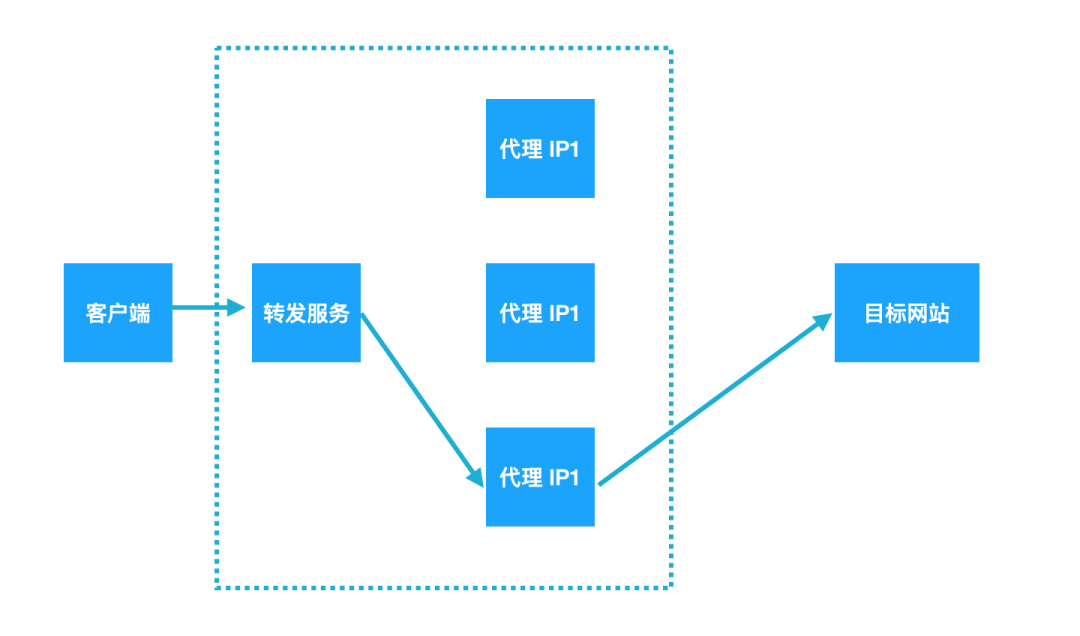
Tunnel agent
To develop such a tunnel agent ourselves, we need to do two steps:
-
Build an agent pool
-
Implement agent automatic forwarding
Build agent pool
Suppose you buy a cheap agent from an agent supplier. The agent address is: http://xxx.com/ips , request directly on the browser. The page effect is shown in the following figure:
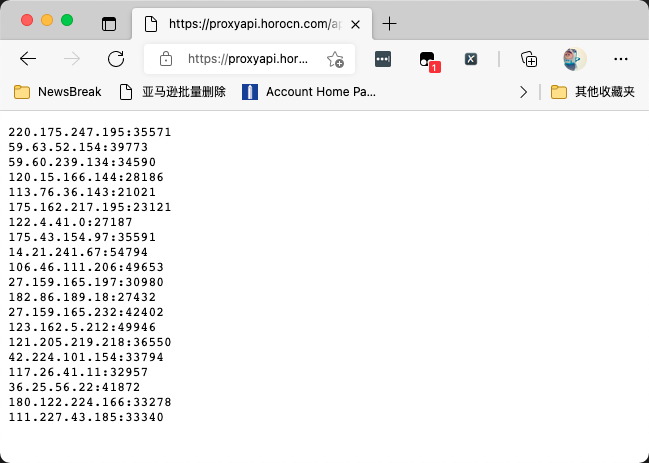
Now, all you need to do is write a program, periodically access the url, pull the latest available IP address, and then put it in Redis.
Here, we use Redis's Hash data structure, in which the Hash field name is IP: port, and the value in it is some information related to each IP.
You need to ensure that all the proxy addresses currently in Redis are available. Here, I give an example program:
"""
ProxyManager.py
~~~~~~~~~~~~~~~~~~~~~
Simple agent pool management tool, directly from URL Read all from
 The latest proxy and write Redis.
"""
import yaml
import time
import json
import redis
import datetime
import requests


class ProxyManager:
    def __init__(self):
        self.config = self.read_config()
        self.redis_config = self.config['redis']
        self.client = redis.Redis(host=self.redis_config['host'],
                                  password=self.redis_config['password'],
                                  port=self.redis_config['port'])
        self.instance_dict = {}

    def read_config(self):
        with open('config.yaml') as f:
            config = yaml.safe_load(f.read())
            return config

    def read_ip(self):
        resp = requests.get(self.config['proxy']).text
        if '{' in resp:
            return []
        proxy_list = resp.split()
        return proxy_list

    def delete_ip(self, live_ips, pool_ips):
        ip_to_removed = set(pool_ips) - set(live_ips)
        if ip_to_removed:
            print('ip to be removed:', ip_to_removed)
            self.client.hdel(self.redis_config['key'], *list(ip_to_removed))

    def add_new_ips(self, live_ips, pool_ips):
        ip_to_add = set(live_ips) - set(pool_ips)
        if ip_to_add:
            print('ip to add:', ip_to_add)
            ips = {}
            for ip in ip_to_add:
                ips[ip] = json.dumps({'private_ip': ip,
                                      'ts': datetime.datetime.now().strftime('%Y-%m-%d %H:%M:%S')})
            self.client.hset(self.redis_config['key'], mapping=ips)

    def run(self):
        while True:
            live_ips = self.read_ip()
            pool_ips = [x.decode() for x in self.client.hgetall(self.redis_config['key'])]
            self.delete_ip(live_ips, pool_ips)
            self.add_new_ips(live_ips, pool_ips)
            time.sleep(40)


if __name__ == '__main__':
    manager = ProxyManager()
    manager.run()
Among them, I wrote the Redis related configuration and the URL of the proxy provider into a yaml configuration file to prevent you from seeing it. The format of the configuration file is shown in the following figure:
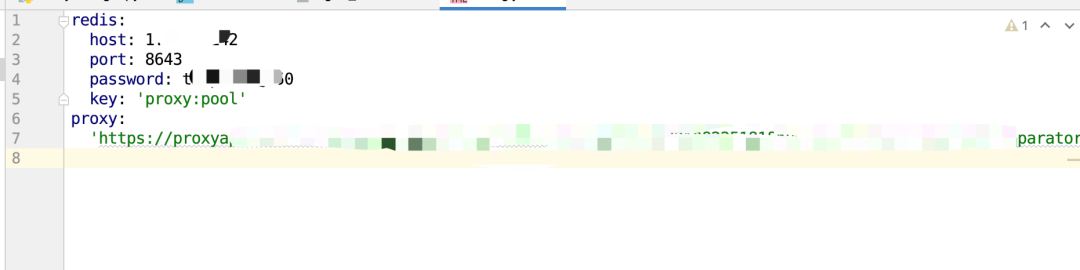
Since the IP provided by my proxy provider is valid for 1-5 minutes, I change the IP every 40 seconds for insurance. Incremental replacement is adopted during replacement.
Compare the currently pulled IP with the existing IP in Redis. No, all the pulled IPS are removed from Redis, and then the new IP is added to Redis.
In the actual process, you can also add some agent verification logic to ensure that the agents pulled down from the URL are also checked for effectiveness, and those found invalid can be removed immediately.
Realize automatic forwarding
To achieve automatic forwarding, we can use OpenResty[1]. This is a high-performance Web platform based on Nginx and Lua. Through it, we can use Lua language to implement some logic, such as reading data from Redis and forwarding the source request to the upstream proxy server
Therefore, we use OpenResty to build a forwarding service. And take the IP address of the server where the forwarding service is located as our entry IP address.
When using Requests and other network request clients to send Requests, you only need to set the entry IP address as the proxy. Then, when the client sends a request, the request first arrives at OpenResty.
Then it randomly selects an agent IP from Redis as the upstream agent, and forwards the just sent request to the upstream agent. So as to achieve the effect of tunnel agent.
Lua is a very old language. Its syntax is different from Python in many places. But you don't have to worry. I've written this configuration file. You can take it and change it.
The corresponding configuration file is shown in the figure below:
worker_processes 16; #nginx # worker # quantity
error_log /usr/local/openresty/nginx/logs/error.log; #Specify the error log file path
events {
worker_connections 1024;
}
stream {
##TCP} proxy log format definition
log_format tcp_proxy '$remote_addr [$time_local] '
'$protocol $status $bytes_sent $bytes_received '
'$session_time "$upstream_addr" '
'"$upstream_bytes_sent" "$upstream_bytes_received" "$upstream_connect_time"';
##TCP} proxy log configuration
access_log /usr/local/openresty/nginx/logs/access.log tcp_proxy;
open_log_file_cache off;
##TCP} proxy configuration
upstream backend{
server 127.0.0.2:1101;#Write whatever you like. Anyway, the following code has been changed for you
balancer_by_lua_block {
-- initialization balancer
local balancer = require "ngx.balancer"
local host = ""
local port = 0
host = ngx.ctx.proxy_host
port = ngx.ctx.proxy_port
-- set up balancer
local ok, err = balancer.set_current_peer(host, port)
if not ok then
ngx.log(ngx.ERR, "failed to set the peer: ", err)
end
}
}
server {
preread_by_lua_block{
local redis = require("resty.redis")
--Create instance
local redis_instance = redis:new()
--Set timeout (MS)
redis_instance:set_timeout(3000)
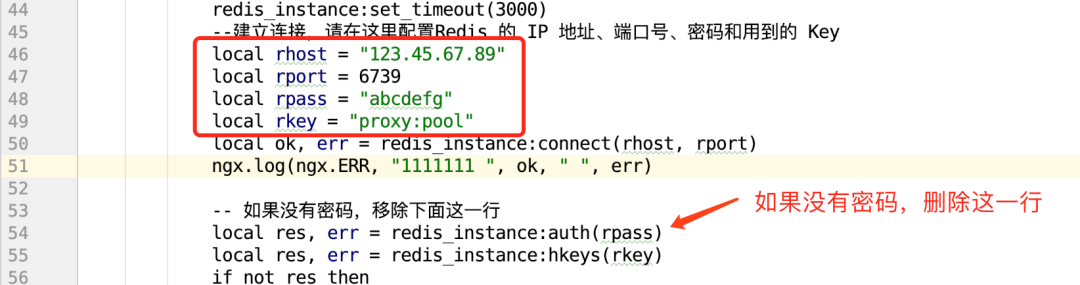
--To establish a connection, please configure it here Redis of IP Address, port number, password and used Key
local rhost = "123.45.67.89"
local rport = 6739
local rpass = "abcdefg"
local rkey = "proxy:pool"
local ok, err = redis_instance:connect(rhost, rport)
ngx.log(ngx.ERR, "1111111 ", ok, " ", err)
-- If you don't have a password, remove the line below
local res, err = redis_instance:auth(rpass)
local res, err = redis_instance:hkeys(rkey)
if not res then
ngx.log(ngx.ERR,"res num error : ", err)
return redis_instance:close()
end
math.randomseed(tostring(ngx.now()):reverse():sub(1, 6))
local proxy = res[math.random(#res)]
local colon_index = string.find(proxy, ":")
local proxy_ip = string.sub(proxy, 1, colon_index - 1)
local proxy_port = string.sub(proxy, colon_index + 1)
ngx.log(ngx.ERR,"redis data = ", proxy_ip, ":", proxy_port);
ngx.ctx.proxy_host = proxy_ip
ngx.ctx.proxy_port = proxy_port
redis_instance:close()
}
#The following is the local port, which is the fixed write dead port of the crawler
listen 0.0.0.0:9976; #Listen to the local address and port. When keeplived is used, use keeplived} VIP
proxy_connect_timeout 3s;
proxy_timeout 10s;
proxy_pass backend; #Fill in the address of the opposite end here
}
}
I have made notes in the configuration file for the places that need to be modified. Specifically, the areas to be modified include:
-
Redis address, port, password and Key. If your redis does not have a password, you can delete the line of setting the password
-
Port of entry agent

After setting up these configurations, we can start it using docker. Docker's configuration file is extremely simple:
from openresty/openresty:centos

copy nginx_redis.conf /usr/local/openresty/nginx/conf/nginx.conf
Then, execute the command to build and run:
docker build --network host -t tunnel_proxy:0.01 .
docker run --name tunnel_proxy --network host -it tunnel_proxy:0.01
After running, you will see that the Docker command line seems to be stuck. This is a normal request. It will output content only if you have a request.
Now, you can use Requests to quickly write a piece of code to verify:
import requests
import time

proxies = {'http': 'http://13.88.220.207:9976'}
for _ in range(10):
    resp = requests.get('http://httpbin.org/ip', proxies=proxies).text
    print(resp)
    time.sleep(1)
The operation effect is shown in the figure below.
It indicates that the tunnel agent is successfully built. At present, the tunnel agent has been running stably for half a year and has never had a problem. You can rest assured to use it.
To be honest, I feel very happy every time I see some readers' responses in the background. I want to contribute some of my collection of programming dry goods to everyone and give back to every reader. I hope I can help you.
Dry goods mainly include:
① More than 2000 Python e-books (both mainstream and classic books should be available)
② Python standard library materials (the most complete Chinese version)
③ Project source code (forty or fifty interesting and classic hand training projects and source code)
④ Videos on basic introduction to Python, crawler, web development and big data analysis (suitable for Xiaobai)
⑤ Summary of all Python knowledge points (you can find out all directions and technologies of Python)
If you can use it, you can take it directly. In my QQ technical exchange group, you can take it by yourself. The group number is 781344551.