5 network configuration and system management operation
5.1 view network IP and gateway
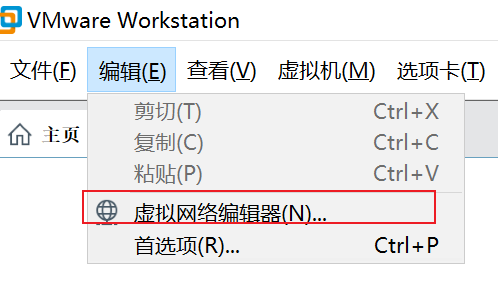
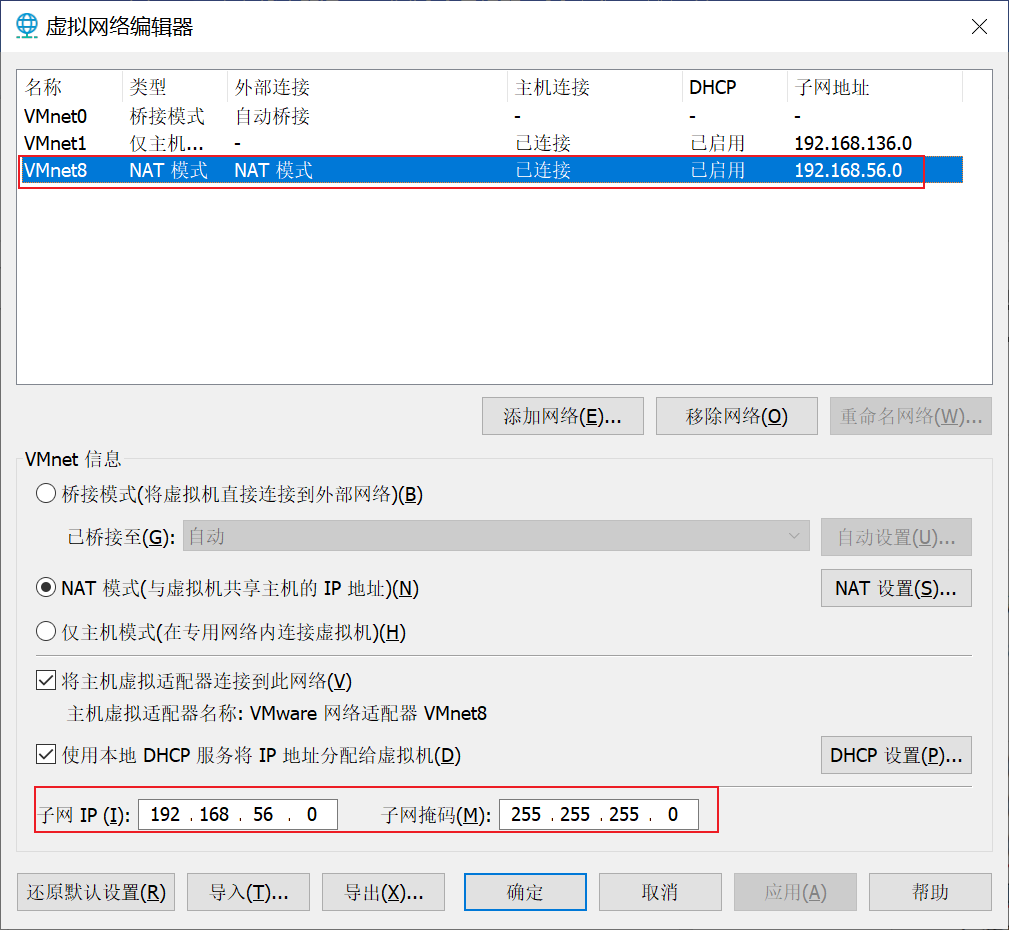
- (1) View virtual network editor
- (2) Modify virtual network card Ip

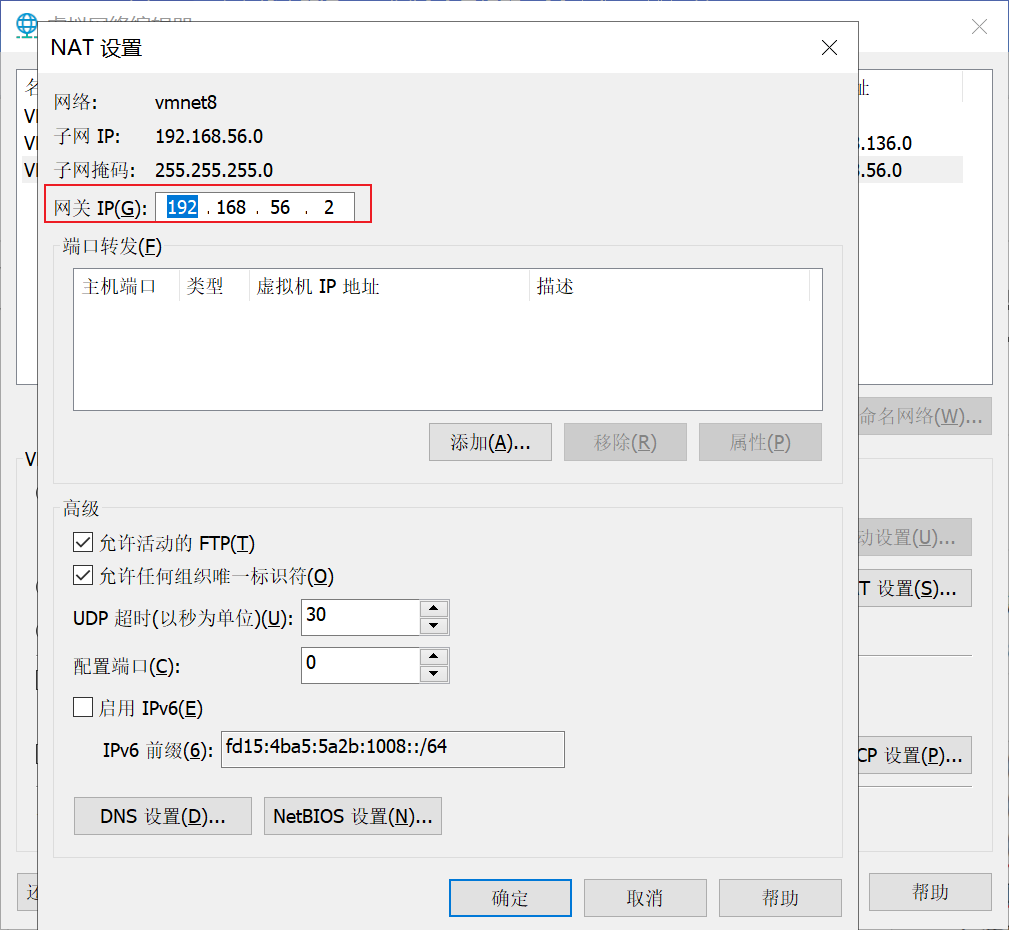
- (3) View gateway
- (4) View VMnet8 network configuration in windows Environment

5.2 configuring network ip addresses
5.2.1 ifconfig configuration network interface
Ifconfig: network interfaces configuring
1. Basic grammar
ifconfig (Function Description: display configuration information of all network interfaces)
- Case practice
(1) View current network ip
ifconfig
If it is under windows, check whether the current network ip is ipconfig
5.2.2 ping test network connectivity between hosts
- Basic grammar
ping Destination host
(Function Description: test whether the current server can connect to the destination host)
- Case practice
(1) Test whether the current server can connect to Baidu
ping www.baidu.com
5.2.3 modify IP address
- (1) View IP profile
vim /etc/sysconfig/network-scripts/ifcfg-ens33
If you can't remember the file location, you can use the find instruction to search
find /etc -name *ens32
The following items marked in red must be modified. Those with values shall be modified according to the following values, and those without such items shall be added.
TYPE = "Ethernet" # network TYPE (usually Ethernet)
PROXY_METHOD="none"
BROWSER_ONLY="no"
BOOTPROTO="dhcp" #IP configuration method [none|static|bootp|dhcp] (do not use protocol | static allocation of IP|BOOTP protocol | DHCP protocol during boot)
DEFROUTE="yes"
IPV4_FAILURE_FATAL="no"
IPV6INIT="yes"
IPV6_AUTOCONF="yes"
IPV6_DEFROUTE="yes"
IPV6_FAILURE_FATAL="no"
IPV6_ADDR_GEN_MODE="stable-privacy"
NAME="ens33"
UUID = "e83804c1-3257-4584-81bb-660665ac22f6" # random id
DEVICE = "ens33" # interface name (DEVICE, network card)
ONBOOT = "yes" # whether the network interface is valid when the system is started (yes/no)
#IP address
IPADDR=192.168.202.100
#Gateway
GATEWAY=192.168.202.2
#Domain name parser
DNS1=192.168.202.2
After modification
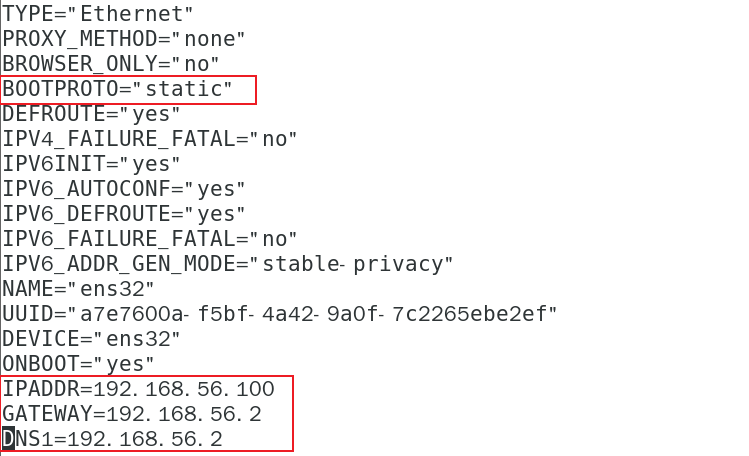
After editing, press esc and enter: wq.
- (2) Execute service network restart to restart the network
5.3 configuring host names
5.3.1 modify host name
- Basic grammar
hostname
(function description: view the host name of the current server) - Case practice
(1) View the current server host name
hostname
(2) If we feel that this host name is inappropriate, we can modify it. By editing the / etc/hostname file
vim /etc/hostname
After modification, restart to take effect.
5.3.2 modifying the hosts mapping file
- Modify the linux host mapping file (hosts file)
In the subsequent hadoop phase, there are many virtual opportunities, and the host name is usually used for configuration
Relatively simple and convenient. You don't have to remember the ip address.
(1) Open / etc/hosts
vim /etc/hosts
Add the following
192.168.56.100 hadoop100
192.168.56.101 hadoop101
192.168.56.102 hadoop102
192.168.56.103 hadoop103
192.168.56.104 hadoop104
192.168.56.105 hadoop105
(2) Restart the device. After restarting, check the host name. It has been modified successfully
2. Modify the host mapping file (hosts file) of Windows 7
(1) Enter the C:\Windows\System32\drivers\etc path
(2) Open the hosts file and add the following
192.168.56.100 hadoop100
192.168.56.101 hadoop101
192.168.56.102 hadoop102
192.168.56.103 hadoop103
192.168.56.104 hadoop104
192.168.56.105 hadoop105
- Modify the host mapping file (hosts file) of windows 10
(1) Enter the C:\Windows\System32\drivers\etc path
(2) Copy hosts file to desktop
(3) Open the desktop hosts file and add the following
192.168.56.100 hadoop100
192.168.56.101 hadoop101
192.168.56.102 hadoop102
192.168.56.103 hadoop103
192.168.56.104 hadoop104
192.168.56.105 hadoop105
(4) Overwrite the desktop hosts file with the C:\Windows\System32\drivers\etc path hosts file
5.4 turn off the firewall
5.4.1 service
- Basic grammar
Service service name start | stop | restart | status - Experience skills
How to view the service: / etc / init D / service name. It is found that only two services remain in service
cd /etc/init.d
ls -al
obtain
drwxr-xr-x.  2 root root  4096 3 September 19-15:24 .
drwxr-xr-x. 10 root root  4096 3 May 19-15:24 ..
-rw-r--r--.  1 root root 18104 1 March 2018 functions
-rwxr-xr-x.  1 root root  4334 1 March 2018 netconsole
-rwxr-xr-x.  1 root root  7293 1 March 2018 network
-rw-r--r--.  1 root root  1160 4 November 2018 README
data
ls displays the current following files and folders
ls -a displays all files and folders in the current directory, including hidden ones And... Etc
ls -al displays all files and folders in the current directory, including hidden files And... And display detailed information, including size, belonging group and creation time
- Case practice
(1) View the status of network services
service network status
(2) Stop network service
service network stop
(3) Start network service
service network start
(4) Restart network service
service network restart
5.4.2 chkconfig sets the auto start configuration of the background service
- Basic grammar
chkconfig (function description: view all server bootstrap configurations)
chkconfig service name off (function description: turn off the automatic startup of the specified service)
chkconfig service name on (function description: enable the automatic startup of the specified service)
chkconfig service name -- list (function description: View service startup status)
Example: the service name is network
- Case practice (Linux 6. X)
The current is 7 X version, demo unsuccessful
(1) Turn on / off automatic startup of iptables (firewall) service
chkconfig iptables on
chkconfig iptables off
(2) Turns on / off the automatic start of iptables service at the specified level
chkconfig --level Specify level iptables on
chkconfig --level Specify level iptables off
5.4.3 systemctl
- Basic grammar
systemctl start | stop | restart | status service name - Experience skills
How to view services: / usr/lib/systemd/system
cd /usr/lib/systemd/system
ls -al
obtain
-rw-r--r--. 1 root root  275 4 July 27, 2018 abrt-ccpp.service
-rw-r--r--. 1 root root  380 4 July 27, 2018 abrtd.service
-rw-r--r--. 1 root root  361 4 July 27, 2018 abrt-oops.service
-rw-r--r--. 1 root root  266 4 July 27, 2018 abrt-pstoreoops.service
-rw-r--r--. 1 root root  262 4 July 27, 2018 abrt-vmcore.service
-rw-r--r--. 1 root root  311 4 July 27, 2018 abrt-xorg.service
-rw-r--r--. 1 root root  751 4 November 2018 accounts-daemon.service
-rw-r--r--. 1 root root  527 3 May 25, 2017 alsa-restore.service
-rw-r--r--. 1 root root  486 3 May 25, 2017 alsa-state.service
......
- Case practice
(1) View the status of the firewall service
systemctl status firewalld
(2) Stop firewall service
systemctl stop firewalld
(3) Start firewall service
systemctl start firewalld
(4) Restart firewall service
systemctl restart firewalld
5.4.4 systemctl sets the auto start configuration of background services
- Basic grammar
systemctl list-unit-files
(Function Description: View service startup status)
systemctl disable service_name
(Function Description: turn off the automatic start of the specified service)
systemctl enable service_name
(Function Description: enable the automatic start of the specified service)
- Case practice
(1) Turn on / off automatic startup of iptables (firewall) service
systemctl enable firewalld.service
systemctl disable firewalld.service
5.4.5 process operation level
1.Linux Process runlevel [CentOS6]

View the default level: vim /etc/inittab
Linux systems have seven runlevels: commonly used are levels 3 and 5
- Operation level 0: the system is in shutdown status. The system default operation level cannot be set to 0, otherwise it cannot be started normally
- Operation level 1: single user working status, root permission, used for system maintenance, and remote login is prohibited
- Runlevel 2: multi user state (no NFS), no network support
- Run level 3: full multi-user status (with NFS). After logging in, enter the console command line mode
- Run level 4: system not used, reserved
- Operation level 5: X11 console, log in and enter the graphical GUI mode
- Operation level 6: the system is shut down and restarted normally. The default operation level cannot be set to 6, otherwise it cannot be started normally
2. The operation level of centos7 is simplified to:
multi-user.target is equivalent to the original operation level 3 (multi-user network, no graphical interface)
multi-user.target is equivalent to the original operation level 5 (multi-user, network and graphical interface)
3. View the default run level:
vim /etc/inittab
obtain
# inittab is no longer used when using systemd.
#
# ADDING CONFIGURATION HERE WILL HAVE NO EFFECT ON YOUR SYSTEM.
#
# Ctrl-Alt-Delete is handled by /usr/lib/systemd/system/ctrl-alt-del.target
#
# systemd uses 'targets' instead of runlevels. By default, there are two main targets:
#
# multi-user.target: analogous to runlevel 3
# graphical.target: analogous to runlevel 5
#
# To view current default target, run:
# systemctl get-default
#
# To set a default target, run:
# systemctl set-default TARGET.target
Case operation:
>1. To view the default operation of the current system, you can use the systemctl get default command
systemctl get-default
multi-user.target
>2. Switch between different run levels and use the systemctl [target name] command as an administrator
systemctl isolate graphical.target
Switch to graphical interface
5.4.6 close the firewall
- Temporarily turn off the firewall
(1) View firewall status
systemctl status firewalld
(2) Temporarily turn off the firewall
systemctl stop firewalld
2. Turn off the firewall at startup
(1) View firewall startup status
systemctl enable firewalld.service
(2) Set to turn off the firewall at power on
systemctl disable firewalld.service
5.5 shutdown and restart command
In the field of linux, it is mostly used on the server, and rarely encountered the operation of shutdown.
After all, there is no end to running a service on the server. It will be shut down only under special circumstances.
The correct shutdown process is: sync > shutdown > reboot > halt
- Basic grammar
(1)sync (Function Description: synchronize data from memory to hard disk)
(2)halt (Function Description: shut down the system, equivalent to shutdown -h now and poweroff)
(3)reboot (Function Description: restart, equivalent to shutdown -r now)
(4)shutdown [option] time

- Experience skills
In order to improve the reading and writing efficiency of the disk in the Linux system, the pre reading and late writing operation mode is adopted for the disk.
When a user saves a file, the Linux core does not necessarily write the saved data to the physical disk immediately,
Instead, the data is saved in the buffer and written to the disk when the buffer is full,
This method can greatly improve the efficiency of writing data to the disk.
However, it also brings security risks. If the data is not written to the disk, the system will power down or other serious problems occur,
Will result in data loss.
Using the sync instruction, you can immediately write the data in the buffer to disk.
3. Case practice
(1) Synchronize data from memory to hard disk
sync
(2) Restart
reboot
(3) Shut down
halt
(4) The computer will shut down in 1 minute and will be displayed in the current screen of the logged in user
shutdown -h 1
'This server will shutdown after 1 mins'
(5) Shut down immediately (equivalent to halt)
shutdown -h now
(6) Restart the system immediately (equivalent to reboot)
shutdown -r now
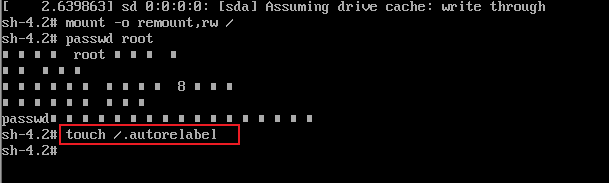
5.6 retrieve root password
1. Restart Linux, see the figure below, and select the first one through the up and down direction keys on the keyboard
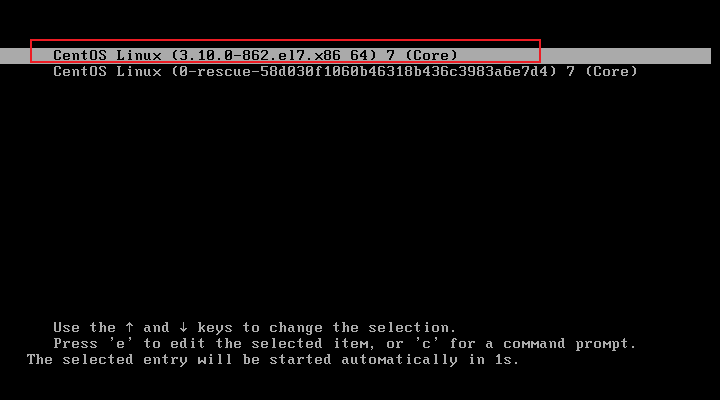
2. Press e to display the interface
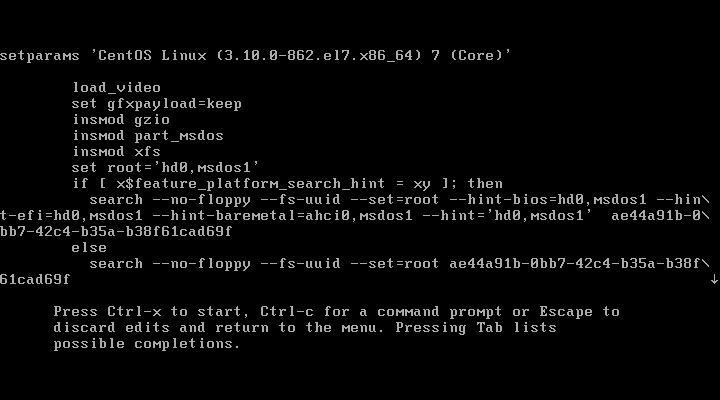
3. Locate LANG=zh_CN.UTF-8, followed by init=/bin/sh
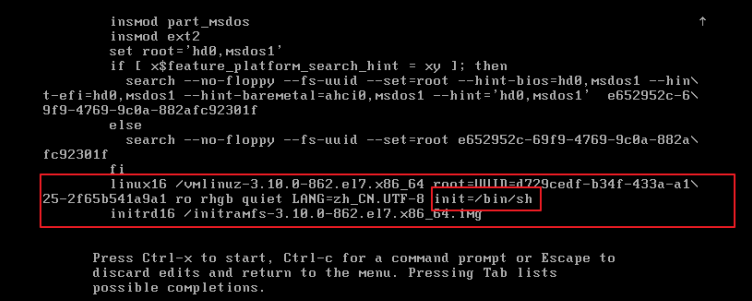
4. Press ctrl+x to start the boot and enter the following interface

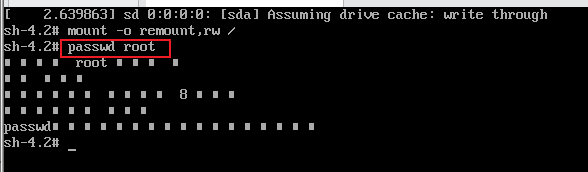
5. Mount the root directory

6. Select the user name to change the password, passwd root, enter the same password twice, and press enter successively.
Note: the input password is not displayed. Be sure to enter it correctly
7. Update system information touch / autorelabel
8. Finally, enter the exec /sbin/init command to restart the system
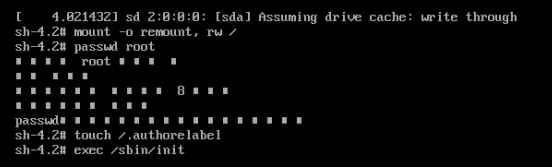
9. Enter the login interface and enter the modified password to log in.