Introduction to mysql
(1) Introduction to MySQL
Mysql is a relational database. It is characterized by saving these data in different two-dimensional tables and putting these tables into the database, which can increase its reading speed.
(2) Application architecture of mysql
Single, suitable for small-scale applications
Replication, suitable for small and medium-sized applications
Cluster, suitable for large-scale applications
(3) mysql transactions
A transaction is a group of atomic SQL queries, or an independent unit of work. If the database engine can successfully execute all the statements of the group of queries on the database, the group of queries will be executed. If any of the statements cannot be executed due to crash or other reasons, all the statements will not be executed, that is, the statements in the transaction, Either all execution succeeded or all execution failed.
1. Installation and deployment of MySQL database
wget mysql-boost-5.7.31.tar.gz
tar zxf mysql-boost-5.7.31.tar.gz  decompression
cd mysql-5.7.31/yum install cmake  install
 cmake -DCMAKE_INSTALL_PREFIX=/usr/local/mysql -DMYSQL_DATADIR=/data/mysql -DMYSQL_UNIX_ADDR=/data/mysql/mysql.sock -DWITH_INNOBASE_STORAGE_ENGINE=1 -DSYSCONFDIR=/etc -DENABLED_LOCAL_INFILE=1 -DWITH_EXTRA_CHARSETS=all -DDEFAULT_CHARSET=utf8mb4 -DDEFAULT_COLLATION=utf8mb4_unicode_ci -DWITH_BOOST=/root/mysql-5.7.31/boost/boost_1_59_0      Configuration test
 Two plug-ins are missing, download and install
yum install bison.x86_64
yum install gcc-c++ -y
cmake -DCMAKE_INSTALL_PREFIX=/usr/local/mysql -DMYSQL_DATADIR=/data/mysql -DMYSQL_UNIX_ADDR=/data/mysql/mysql.sock -DWITH_INNOBASE_STORAGE_ENGINE=1 -DSYSCONFDIR=/etc -DENABLED_LOCAL_INFILE=1 -DWITH_EXTRA_CHARSETS=all -DDEFAULT_CHARSET=utf8mb4 -DDEFAULT_COLLATION=utf8mb4_unicode_ci -DWITH_BOOST=/root/mysql-5.7.31/boost/boost_1_59_0    Retest
make    compile
make install    install
Installation succeeded
View first mysql Directory where the command is located
/usr/local/mysql/bin/mysql
cd Switch to home directory
vim .bash_profile Configure environment variable file
PATH=$PATH:$HOME/bin:/usr/local/mysql/bin Add path
source .bash_profile
vim /etc/my.cnf  to configure/etc/my.cnf file
[mysqld]
datadir=/data/mysql
socket=/data/mysql/mysql.sock
[mysqld_safe]
log-error=/data/mysql/mariadb.log
pid-file=/data/mysql/mariadb.pid


create directory/data/mysql
 Establish user useradd -d /usr/local/mysql -M -s /sbin/nologin mysql
 Make the directory belong to users and user groups chown mysql.mysql /data/mysql

cd /usr/local/mysql/support-files
cp mysql.server /etc/init.d/mysqld take mysql.server Add to system service script
mysqld --initialize --user=mysql initialization
/etc/init.d/mysqld start Open service
mysql_secure_installation mysql Configuration Wizard
Configuration succeeded
2. Web database mysql
cd Switch to home directory
wget http://172.25.254.51/westos/lamp/phpMyAdmin-5.0.2-all-languages.zip download the installation package
ls View Downloads
yum install unzip -y download unzip Decompression mode
unzip phpMyAdmin-5.0.2-all-languages.zip
mv phpMyAdmin-5.0.2-all-languages /usr/local/nginx/html Move this software to nginx To the release directory
cd /var/local/nginx/html
ln -s phpMyAdmin-5.0.2-all-languages/ phpadmin Establish soft link
systemctl start php-fpm.service   open php-fpm service
systemctl enable php-fpm.service  Set startup and self startup
vim /usr/local/nginx/conf/nginx.conf combination nginx and php
 location / {
            root   html;
            index  index.php index.html index.htm;
        }

location ~ \.php$ {
            root           html;
            fastcgi_pass   127.0.0.1:9000;
            fastcgi_index  index.php;
        #    fastcgi_param  SCRIPT_FILENAME  /scripts$fastcgi_script_name;
            include        fastcgi.conf;
        }
nginx -t
nginx -s reload
vim /usr/local/lnmp/php/etc/php.ini
pdo_mysql.default_socket=/data/mysql/mysql.sock  1057 that 's ok
mysqli.default_socket = /data/mysql/mysql.sock  1166 that 's ok
systemctl restart php-fpm.service Restart service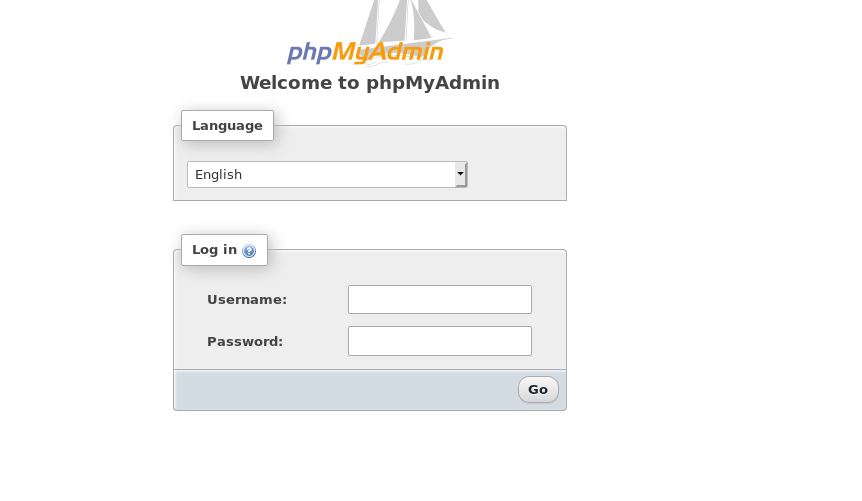
Create various information through web version mysql
3. Asynchronous replication of MySQL - master-slave replication based on binary log files
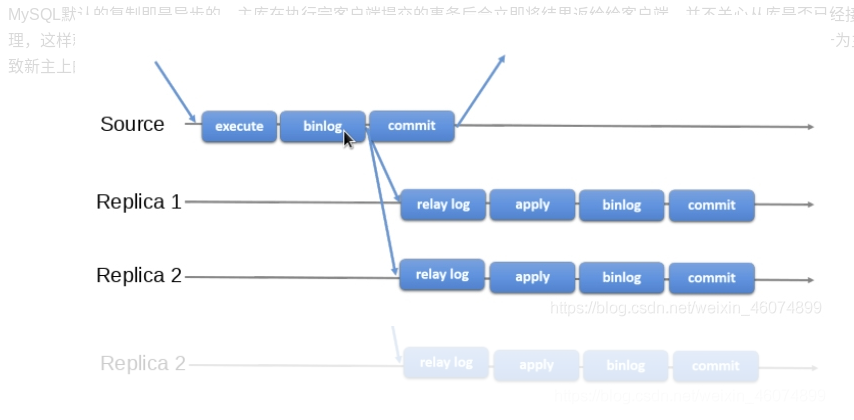
MySQL replication is asynchronous by default. After executing the transactions submitted by the client, the master database will immediately return the results to the client. It does not care whether the slave database has received and processed them. In this way, there will be a problem. If the Master goes down, the transactions submitted by the master may not be transferred to the slave. If the slave is forced to be promoted to the master, it may lead to the failure of the new master Incomplete data.
Experimental environment:

vm1:main mysql
vm2:from mysql
 stay vm1 Upper:
 vim /etc/my.cnf  Modify profile

[mysqld]
log-bin=mysql-bin
server-id=1

/etc/init.d/mysqld restart restart mysql
mysql -pwestos          get into mysql
create user 'wl'@'%' identified by 'westos'   Establish remote user
grant replication slave on *.* to 'wl'@'%';  Authorize users
flush privileges;                Refresh
show master status;              see master State of

stay vm2 Upper:
vim /etc/my.cnf  Modify profile
[mysqld]
server-id=2
/etc/init.d/mysqld restart restart mysql
mysql -pwestos          get into mysql

change master to
    -> master_host='172.25.254.1',
    -> master_user='wl',
    -> master_password='westos',
    -> master_log_file='mysql-bin.000001',
    ->  master_log_pos=1192;
start slave;
show slave status\G;
4. Asynchronous replication of MySQL - master-slave replication based on global transaction ID (GTID)
(1) Concept of gtid
The GTID(Global Transaction ID) introduced in MySQL 5.6 makes the configuration, monitoring and management of its replication function easier to implement and more robust.
GTID is the global transaction ID (global transaction identifier). GTID is actually composed of UUID+TID. UUID is the unique identifier of a MySQL instance. TID represents the number of transactions committed on the instance and increases monotonically with transaction submission.
The following is the specific form of a GTID:
4e659069-3cd8-11e5-9a49-001c4270714e:1-77
Because the format of GTID is clear, the UUID can tell which instance the transaction is committed on. The GUID can facilitate the failover of the replication structure and the new master setting
(2) Do not introduce new master settings for GTID
When Server1(Master) crashes, according to the value of Master_log_File/Read_Master_Log_Pos obtained from show slave status, Server2(Slave) has caught up with the master and Server3(Slave) Failed to keep up with the master. At this time, if server2 is promoted to the master and Server3 becomes the slave of server2, it is relatively troublesome to do some calculations when performing change on Server3. Server3 synchronizes the data on the new master database server2 as a slave database. Since the transaction id recorded in the binlog in server2 is different from that of the previous master database of server1, server2 needs to Convert the previous synchronization progress of server1 to the synchronization progress on server2.
(3) Main database switching process after introducing GTID
Since the GTID of the same transaction has the same value on all nodes, we can locate the GTID on Server2 according to the GTID of the current stop point of Server3. We don't need to know the specific value of GTID. We can directly complete the failover work by using the CHANGE MASTER TO MASTER_HOST = 'xxx', MASTER_AUTO_POSITION command
The master-slave configuration of mysql is also called replication, AB replication. Based on binlog binary logs, the master database must enable binlog binary logs to replicate.
- The master database records the changes to the binlog binary log (the master database has a log dump thread and a binlog passed from the i/o thread of the database).
- Generate two threads from the library, one i/o thread and one SQL thread.
- The i/o thread requests the binlog of the main database and writes the binlog log to the relay log file.
- Then, the master library will generate a log dump thread to transfer binlog to the i/o thread of the slave library; the SQL thread will read the relay log file and parse it into specific operations for execution, so that the master-slave operations are consistent and the final data are consistent.
stay vm1 Medium:
vim /etc/my.cnf  Write configuration file

[mysqld]
log-bin=mysql-bin
server-id=1
gtid_mode=ON
enforce-gtid-consistency=ON

/etc/init.d/mysqld restart Restart service
 get into mysql Create and authorize users in

stay vm2 Medium:
vim /etc/my.cnf  Write configuration file

[mysqld]
server-id=2
gtid_mode=ON
enforce-gtid-consistency=ON

mysql -pwestos
stop slave;
mysql> change master to
    -> MASTER_HOST = '172.25.254.1',
    -> MASTER_USER = 'wl',
    -> MASTER_PASSWORD = 'westos',
    -> MASTER_AUTO_POSITION = 1;
start slave;
show status slave;
5. Semi synchronous replication of MySQL
Between asynchronous replication and full synchronous replication, the master database does not return to the client immediately after executing the transactions submitted by the client, but waits for at least one database to receive and write to the relay log before returning to the client. Compared with asynchronous replication, semi synchronous replication improves the security of data, and it also causes a certain degree of delay, which is at least a T CP / IP round trip time. Therefore, semi synchronous replication is best used in low latency networks.
stay vm1:
mysql -pwestos
mysql> install plugin rpl_semi_sync_master soname 'semisync_master.so';
Query OK, 0 rows affected (0.02 sec)

mysql> set global rpl_semi_sync_master_enabled=ON;
Query OK, 0 rows affected (0.00 sec)

mysql> show status like 'Rpl_semi%';

stay vm2 Upper:

mysql> INSTALL PLUGIN rpl_semi_sync_slave SONAME 'semisync_slave.so';
Query OK, 0 rows affected (0.01 sec)

mysql> SET GLOBAL rpl_semi_sync_slave_enabled = 1;
Query OK, 0 rows affected (0.00 sec)

mysql> STOP SLAVE IO_THREAD;
Query OK, 0 rows affected (0.02 sec)

mysql> START SLAVE IO_THREAD;
Query OK, 0 rows affected (0.00 sec)
mysql> show status like '%rpl%';
mysql> show variables like '%rpl%';

verification:
stay vm1 in
mysql> insert into linux values ('user3','19');
mysql> show status like '%rpl%';
stay vm2 in
mysql> use westos;
mysql> select * from linux;
6. Delayed synchronization of MySQL
stay slave End:
mysql> stop slave;
Query OK, 0 rows affected (0.01 sec)

mysql> change master to master_delay=3;
Query OK, 0 rows affected (0.02 sec)

mysql> show slave status\G;
7.mysql slow query
MySQL's slow query log is a kind of log record provided by mysql. It is used to record statements whose response time exceeds the threshold in MySQL. Specifically, SQL whose running time exceeds the long_query_time value will be recorded in the slow query log. The default value of long_query_time is 10, which means running statements for more than 10S. By default, MySQL database does not start the slow query log, We need to set this parameter manually. Of course, if it is not necessary for tuning, it is generally not recommended to start this parameter, because opening the slow query log will have a certain performance impact more or less. The slow query log supports writing log records to files and log records to database tables.
mysql> set global slow_query_log=ON;
Query OK, 0 rows affected (0.02 sec)

mysql> show variables like "long%";
mysql> set  long_query_time=5;
mysql> show status like 'slow%';
8.mysql parallel replication
stay mysql The command line is used for setting. It is temporary and can be restarted mysql After that, it will be effective
mysql> stop slave;

Query OK, 0 rows affected (0.03 sec)

mysql> set global slave_parallel_workers=16;

Query OK, 0 rows affected (0.05 sec)

mysql> start slave;

Query OK, 0 rows affected, 1 warning (0.07 sec)
SHOW VARIABLES LIKE 'slave_parallel_%';  Check whether the setting is successful
show processlist   See 16 SQL Status of the thread

Change in configuration file
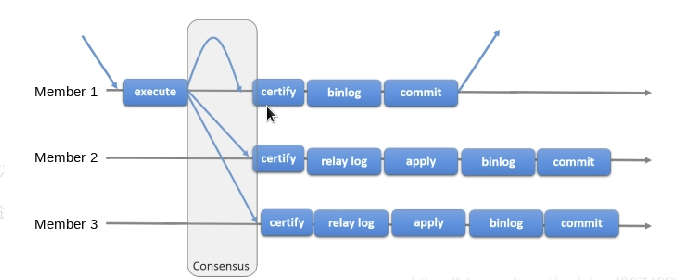
9.mysql group replication (full synchronization)
When the master database executes a transaction, all slave databases execute the transaction before returning to the client. Because you need to wait for all slave libraries to execute the transaction before returning, the performance of full synchronous replication is bound to be seriously affected.
master1:

/etc/init.d/mysqld stop     Be sure to stop the service first
cd /data/mysql

rm -fr *     All files are deleted and then reinitialized
uuidgen    Random generation UUID


vim /etc/my.cnf    #Edit profile
\\\
server-id=1
gtid_mode=ON
enforce-gtid-consistency=true
master_info_repository=TABLE
relay_log_info_repository=TABLE
binlog_checksum=NONE      close binlog check
log_slave_updates=ON
log_bin=binlog
binlog_format=ROW       Group replication relies on a row based replication format
transaction_write_set_extraction=XXHASH64
group_replication_group_name="aaaaaaaa-aaaa-aaaa-aaaa-aaaaaaaaaaaa"
plugin_load_add='group_replication.so'
group_replication_start_on_boot=off
group_replication_local_address= "vm1:33061"
group_replication_group_seeds= "vm1:33061,vm2:33061,vm3:33061"
group_replication_bootstrap_group=off    Whether the plug-in boots automatically is generally required off The node initiating the group replication only needs to be started and only started once. If yes on,The next time you restart, a group with the same name will be generated, which may cause conflicts
group_replication_ip_whitelist="172.25.254.0/24,127.0.0.1/8"
group_replication_enforce_update_everywhere_checks=ON
group_replication_single_primary_mode=OFF
group_replication_allow_local_disjoint_gtids_join=ON

Reinitialize
mysqld --initialize --user=mysql   #initialization
/etc/init.d/mysqld start   Start database
mysql_secure_installation   Change password login
mysql -pwestos
alter user root@localhost identified by 'westos';    #Change user root password
SET SQL_LOG_BIN=0;    Close the binary log to prevent it from being transmitted to other server upper
CREATE USER 'wl'@'%' IDENTIFIED BY 'westos';     Create users for replication
GRANT REPLICATION SLAVE ON *.* TO 'wl'@'%';     All tables for all libraries
FLUSH PRIVILEGES;          Refresh authorization table
SET SQL_LOG_BIN=1;           After setting, open the log
CHANGE MASTER TO MASTER_USER='wl', MASTER_PASSWORD='westos' FOR CHANNEL 'group_replication_recovery';
SET GLOBAL group_replication_bootstrap_group=ON;    The group replication initiating node enables this parameter
START GROUP_REPLICATION;       Turn on group replication
SET GLOBAL group_replication_bootstrap_group=OFF;
SELECT * FROM performance_schema.replication_group_members;     View group status
master 2,master3 And master3 The configuration process is basically the same
 Only when you enter a command on the database command line, you do not need to write
SET GLOBAL group_replication_bootstrap_group=ON;
SET GLOBAL group_replication_bootstrap_group=OFF;
10.MySQL Router realizes read-write separation based on port
1. Introduction to MySQL router
1.1MySQL Router introduction
MySQL Router is a lightweight middleware officially provided by MySQL and a part of InnoDB Cluster. It can provide transparent routing between applications and back-end MySQL servers. It is mainly used to solve the problems of high availability, load balancing and easy expansion of MySQL master-slave database cluster. As a traffic forwarding layer, Router is located between the application and MySQL server, and its function is similar to LVS.
1.2 why use MySQL Router?
Based on the group replication (MGR) mechanism, when the primary node goes down and leaves the cluster, the remaining nodes will elect a new primary node based on paxos protocol. There is a problem here. If the application side is connected to the master node, the master node goes down and leaves the cluster, and the available database IP address changes, the client application will still try to connect to the failed node. Although the connection configuration of the client application can be modified, this situation is basically unrealistic.
1.3MySQL Router diagram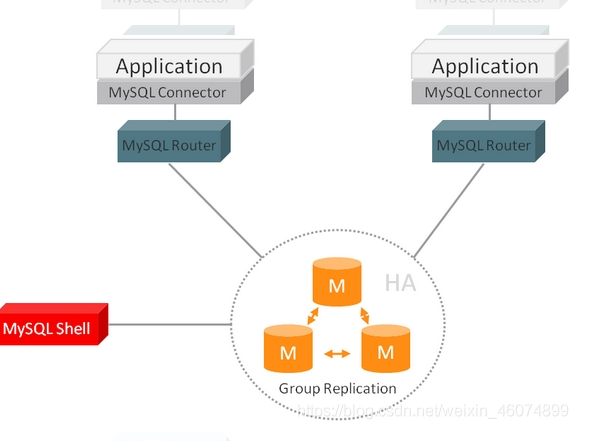
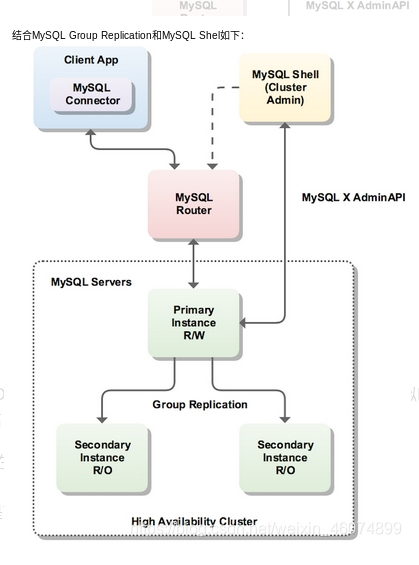
1.4 the figure above fully illustrates the role of MySQL Router in InnoDB cluster. Its main role is to provide a virtual IP for the database cluster as a single connection point for applications. Through this single connection point, database high availability schemes such as load balancing, read-write separation and failover are realized.
MySQL Router is recommended to be installed on the machine where the application is located. The reasons include:
Improve performance through local Unix socket connection instead of TCP/IP
Reduce network latency
MySQL instance does not need an additional account, only one router@198.51.100.45 , not myapp @%
Improve application server scalability
New virtual machine 4 as router
rpm -ivh mysql-router-community-8.0.21-1.el7.x86_64.rpm

vim /etc/mysqlrouter/mysqlrouter.conf   Write configuration file
\\\
[routing:ro]
bind_address = 0.0.0.0
bind_port = 7001
destinations = 172.25.254.1:3306,172.25.254.2:3306,172.25.254.3:3306
routing_strategy = round-robin    Rotation mode

[routing:rw]
bind_address = 0.0.0.0
bind_port = 7002
destinations = 172.25.254.1:3306,172.25.254.2:3306,172.25.254.3:3306
routing_strategy = first-available
\\\

 systemctl restart mysqlrouter.service  Just restart the router
Verify read load balancing: it can be seen from the results that each read accesses a different host
mysql -h 172.25.254.4 -P 7001 -uwl -pwestos -e "select * from linux"
Verify write load balancing: the results show that each write is written to the primary node. When the primary node goes down, another node's database will take over the write function
mysql -h 172.25.254.4 -P 7001 -uwl -pwestos -e "select * from linux"
11.MHA high availability
MHA high availability principle
MHA is a software package for automatic master failover and Slave promotion. It is based on standard MySQL replication (asynchronous / semi synchronous). The software consists of two parts: MHA Manager (management node) and MHA Node (data node).
1) MHA Manager can be deployed on a separate machine to manage multiple master slave clusters, or on a slave node. MHA Manager will regularly detect node nodes in the cluster. When a master fails, it can automatically promote the slave with the latest data to a new master, and then direct all other slave to the new master. The whole failover process is transparent to the application.
2) MHA Node runs on each MySQL server. It speeds up failover by monitoring scripts with the functions of parsing and cleaning logs.
In the process of MHA automatic failover, MHA tries to save binary logs from the down primary server to ensure no data loss to the greatest extent, but this is not always feasible. For example, if the primary server hardware fails or cannot be accessed through ssh,
MHA cannot save binary logs, only fails over and loses the latest data. Semi synchronous replication using MySQL 5.5 or later can greatly reduce the risk of data loss. MHA can be combined with semi synchronous replication. If only one slave has received the latest binary log, MHA can apply the latest binary log to all other slave servers, so it can ensure the data consistency of all nodes.
At present, MHA mainly supports a master-slave architecture. To build MHA, there must be at least three database servers in a replication cluster, one master and two slaves, that is, one serves as a master, one as a standby master and the other as a slave, because at least three servers are required.
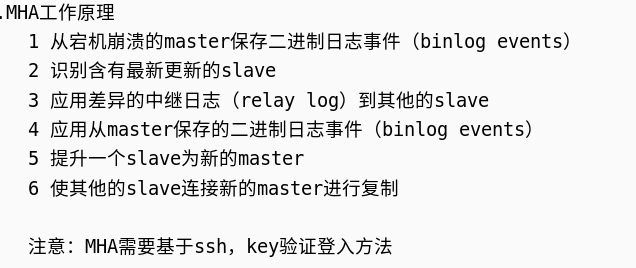
General process of MHA online switching (heat treatment):
1. Detect replication settings and determine the current master server
2. Determine the new master server
3. Block writing to the current primary server
4. Wait for all slave servers to catch up with replication
5. Grant write to the new master server
6. Reset slave server
(1) Basic experimental environment
stay vm1 Upper:
First stop the service /etc/init.d.mysqld stop
cd /data/mysql
rm -rf *
vim /etc/my.cnf
 To delete the previous group synchronization policy, you only need to enable it gtid that will do

Reinitialize mysqld --initialize-insecure --user=mysql Reinitialize(-insecure No password)
open mysql /etc/init.d/mysqld start
 get into mysql mysql
mysql> set sql_log_bin=0;
mysql> alter user root@localhost identified by 'westos'; Change Password
mysql> create user 'wl'@'%' identified by 'westos';
mysql> grant replication slave on *.* to 'wl'@'%' ;   Authorized user
 stay vm2 vm3 upper
 The same operation, pay attention/etc/mysql.cnf Medium user id Different
 On the command line

mysql> alter user root@localhost identified by 'westos';
mysql> set sql_log_bin=0;
mysql> change master to master_host='172.25.254.1',master_user='westos',master_password='westos',master_auto_position=1;
mysql> start slave;
(2) Installation and configuration of MHA
stay vm4 Upper:
MHA Official download rpm Package in format
cd /MHA-7:
ls
mha4mysql-manager-0.58-0.el7.centos.noarch.rpm
mha4mysql-manager-0.58.tar.gz
mha4mysql-node-0.58-0.el7.centos.noarch.rpm
perl-Config-Tiny-2.14-7.el7.noarch.rpm
perl-Email-Date-Format-1.002-15.el7.noarch.rpm
perl-Log-Dispatch-2.41-1.el7.1.noarch.rpm
perl-Mail-Sender-0.8.23-1.el7.noarch.rpm
perl-Mail-Sendmail-0.79-21.el7.noarch.rpm
perl-MIME-Lite-3.030-1.el7.noarch.rpm
perl-MIME-Types-1.38-2.el7.noarch.rpm
perl-Net-Telnet-3.03-19.el7.noarch.rpm
perl-Parallel-ForkManager-1.18-2.el7.noarch.rpm

yum install -y *.rpm 	##Install all rpm packages

take node Transfer to vm1 main,2 from,3 From the top:
scp mha4mysql-node-0.58-0.el7.centos.noarch.rpm vm1:
scp mha4mysql-node-0.58-0.el7.centos.noarch.rpm vm2:
scp mha4mysql-node-0.58-0.el7.centos.noarch.rpm vm3:

stay vm1,2,3 Upper:
rpm -ivh mha4mysql-node-0.58-0.el7.centos.noarch.rpm
vm1,2,3,4 Secret free communication is required
 stay vm1 upper
ssh-keygen
ssh-copy-id vm1
scp -r .ssh/ vm2
scp -r .ssh/ vm3:
scp -r .ssh/ vm4:
stay vm4 Medium:
cd MHA-7/
tar zxf mha4mysql-manager-0.58.tar.gz
cd mha4mysql-manager-0.58
#AUTHORS COPYING lib  MANIFEST README  samples testsbin debian Makefile.PL  MANIFEST.SKIP  rpm     t
cd samples
#conf  scripts
cd conf
#app1.cnf  masterha_default.cnf
mkdir /etc/mha
mkdir /etc/mha/app1
cat masterha_default.cnf app1.cnf > /etc/mha/app.cnf
cd /etc/mha
vim app.cnf
cat app.cnf
[server default]
manager_workdir=/etc/masterha		manager working directory
manager_log=/etc/masterha/mha.log   manager log file
master_binlog_dir=/data/mysql		mysql Primary server binlog catalogue
#master_ip_failover_script=/usr/bin/master_ip_failover 		 Failover auto switch script
#master_ip_online_change_script= /usr/local/bin/master_ip_online_change 		 Manual switch script
user=root			mysql The administrator user password of the master-slave node to ensure that you can log in remotely
password=westos
ping_interval=3		send out ping The time interval of the packet is 3 seconds by default. It will be automatically entered when there is no response after three attempts failover
remote_workdir=/tmp		Distal mysql When switching occurs binlog Save in
repl_user=repl			Master slave copy user password
repl_password=westos
#report_script=/usr/local/send_report 		 Script to send alarm after switching
secondary_check_script=/usr/bin/masterha_secondary_check -s 172.25.254.2 -s 172.25.254.3
#shutdown_script=""		#After the fault occurs, close the script of the fault host to prevent brain crack
ssh_user=root			#ssh user name
[server1]
hostname=172.25.254.1
port=3306
#candidate_master=1
#check_repl_delay=0

[server2]
hostname=172.25.254.2
port=3306
candidate_master=1	appoint failover This time slave Will take over master,Even if the data is not up-to-date.
check_repl_delay=0	By default, if one slave backward master 100M of relay logs If so, MHA The will not be selected slave As a new master,Because for this slave The recovery of takes a long time to set check_repl_delay=0,MHA Trigger switching when selecting a new master The replication delay will be ignored. This parameter is set for candidate_master=1 The host is very useful because the candidate host must be new during the handover process master

[server3]
hostname=172.25.254.3
port=3306
no_master=1			Always slave
Verify that the configuration is successful
masterha_check_ssh --conf=/etc/masterha/app1.conf    testing ssh
masterha_check_repl --conf=/etc/masterha/app1.conf    testing repl,Check whether the status of one master and two slaves is correct
 After all are successful, you can enter instructions for manual switching or script automatic switching
Manually switch master (heat treatment)
masterha_master_switch --conf=/etc/masterha/app1.conf --master_state=alive --new_master_host=172.25.7.2 --new_master_port=3306 --orig_master_is_new_slave --running_updates_limit=10000 Manual switching master,Will still be running master Replace with standby master
In the original master vm1 upper
stop slave;
CHANGE MASTER TO MASTER_HOST='172.25.254.2',MASTER_PORT=3306, MASTER_AUTO_POSITION=1,MASTER_USER='wl', MASTER_PASSWORD='westos';
start slave;
set GLOBAL SQL_SLAVE_SKIP_COUNTER=1;
Manually switch master (troubleshooting)
masterha_master_switch --master_state=dead --conf=/etc/masterha/app1.conf --dead_master_host=172.25.254.1 --dead_master_port=3306 --new_master_host=172.25.254.2 --new_master_port=3306 --ignore_last_failover    This command is to replace the database that has been down
 Here is the first failover master,--ignore_last_failover Parameters can be omitted
Note: by default, after MHA switching, the app1.failover.complete file will be generated in the log directory, that is, the / data set above. If the file is found in this directory during the next switching, the switching is not allowed to be triggered unless the file is deleted after the first switching. If you want to continue the switching next time, add the parameter - ignore_last_failover
View in vm3, and the standby vm2 becomes the master
Auto switch master
stay mha Upper:
nohup masterha_manager --conf=/etc/masterha/app1.cnf &> /dev/null & Start monitoring and enter the background
stay slave View on master show slave status\G
 In the original master upper
 Start the database first systemctl start mysqld,Then enter the database
stop slave;
CHANGE MASTER TO MASTER_HOST='172.25.254.2',MASTER_PORT=3306, MASTER_AUTO_POSITION=1,MASTER_USER='wl', MASTER_PASSWORD='westos';
start slave;
12.mha realizes vip drift
stay master Add users to
ip addr add 172.25.254.100/24 dev eth0
cd mha4mysql-manager-0.58
ls
cd scripts/
ls
master_ip_failover  master_ip_online_change  power_manager  send_report
cp master_ip_failover  master_ip_online_change /usr/local/bin/
cd /usr/local/bin/
ls
master_ip_failover  master_ip_online_change
vim master_ip_failover
 my $vip = '172.25.254.100/24';
 my $ssh_start_vip = "/sbin/ip addr add $vip dev eth0";   Pay attention to the network card device name you use
 my $ssh_stop_vip = "/sbin/ip addr del $vip dev eth0

chmod 755 *
vim /etc/masterha/app1.conf
Uncomment 
Detect after configuration file and script editing
masterha_check_repl --conf=/etc/masterha/app1.conf
The test is successful. Now the VIP user is in the master
Enable automatic replacement of master
masterha_manager --conf=/etc/masterha/app1.conf &
Stop database for vm1
/etc/init.d/mysqld stop
At this point, the master will automatically switch to vm2
Check the ip address and find that the VIP users are transferred to vm2 along with the master