> Original articles are welcome to be reproduced. Reproduced please note: reproduced from ____________ IT Person Story Club Thank you!
> Original Link Address: kubernetes of docker Build Cluster Add Authorization (below) (39)
Connect with the last continued certification version of the k8s build.
kubectl
Preparation Certificate
#The kubectl certificate is placed here, because kubectl is equivalent to the system administrator, and the old iron is named after admin.
mkdir -p /etc/kubernetes/ca/admin
#Preparing admin certificate configuration - kubectl only requires client certificates, so the hosts field in the certificate request can be empty
cp ~/kubernetes-starter/target/ca/admin/admin-csr.json /etc/kubernetes/ca/admin/
cd /etc/kubernetes/ca/admin/
#Issuing admin certificate using root certificate (ca.pem)
cfssl gencert \
        -ca=/etc/kubernetes/ca/ca.pem \
        -ca-key=/etc/kubernetes/ca/ca-key.pem \
        -config=/etc/kubernetes/ca/ca-config.json \
        -profile=kubernetes admin-csr.json | cfssljson -bare admin
#The old iron will end up with admin-key.pem and admin.pem.
ls
admin.csr  admin-csr.json  admin-key.pem  admin.pem
8.2 Configure kubectl
#Specify apiserver address and certificate location (ip self-modifying)
kubectl config set-cluster kubernetes \
--certificate-authority=/etc/kubernetes/ca/ca.pem \
--embed-certs=true \
--server=https://192.168.68.101:6443
#Set client authentication parameters, specify admin certificate and secret key
kubectl config set-credentials admin \
--client-certificate=/etc/kubernetes/ca/admin/admin.pem \
--embed-certs=true \
--client-key=/etc/kubernetes/ca/admin/admin-key.pem
#Associated Users and Clusters
kubectl config set-context kubernetes \
--cluster=kubernetes --user=admin
#Setting the current context
kubectl config use-context kubernetes
#The result of the setup is a configuration file, so you can see the content.
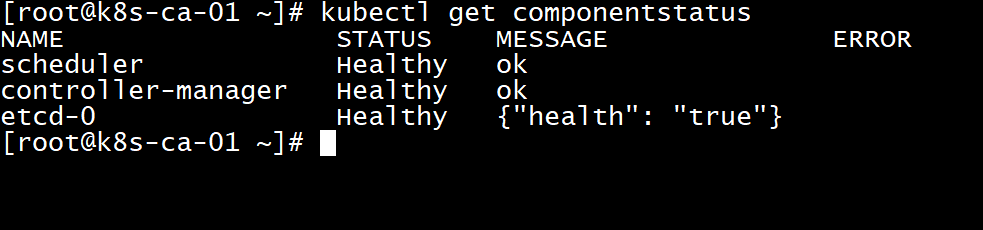
cat ~/.kube/configVerify master node
#You can use the newly configured kubectl to view component status
kubectl get componentstatus
calico-node (master node generates certificates, 102,103 copies past through scp)
Preparation Certificate
As you can see later, calico certificates are used in four places:
- Calco/node This docker container accesses etcd using certificates at runtime
- In the cni configuration file, the cni plug-in needs to access etcd usage certificates
- calicoctl accesses etcd using certificate when operating cluster network
- Access to etcd using certificate when calico/kube-controllers synchronous cluster network strategy
#The calico certificate is here
mkdir -p /etc/kubernetes/ca/calico
#Preparing calico certificate configuration - calico only requires client certificates, so the hosts field in the certificate request can be empty
cp ~/kubernetes-starter/target/ca/calico/calico-csr.json /etc/kubernetes/ca/calico/
cd /etc/kubernetes/ca/calico/
#Issuing calico certificate using root certificate (ca.pem)
cfssl gencert \
    -ca=/etc/kubernetes/ca/ca.pem \
    -ca-key=/etc/kubernetes/ca/ca-key.pem \
    -config=/etc/kubernetes/ca/ca-config.json \
    -profile=kubernetes calico-csr.json | cfssljson -bare calico
#The old iron will end up with calico-key.pem and calico.pem.
ls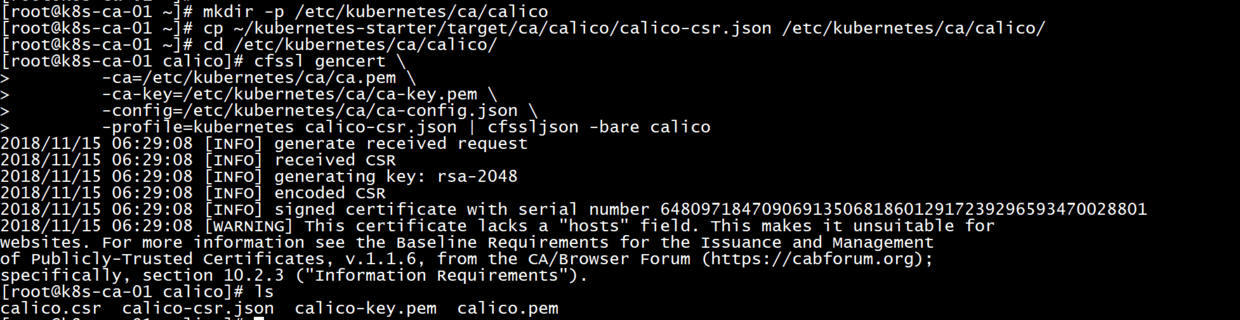
Copy Master Certificate calico
Because the calico service needs to be started by all nodes, these files need to be copied to each server.
** Copy to 102,103 machines via master node
#root passwords are vagrant
scp -r /etc/kubernetes/ca/ root@192.168.68.102:/etc/kubernetes/ca/
scp -r /etc/kubernetes/ca/ root@192.168.68.103:/etc/kubernetes/ca/
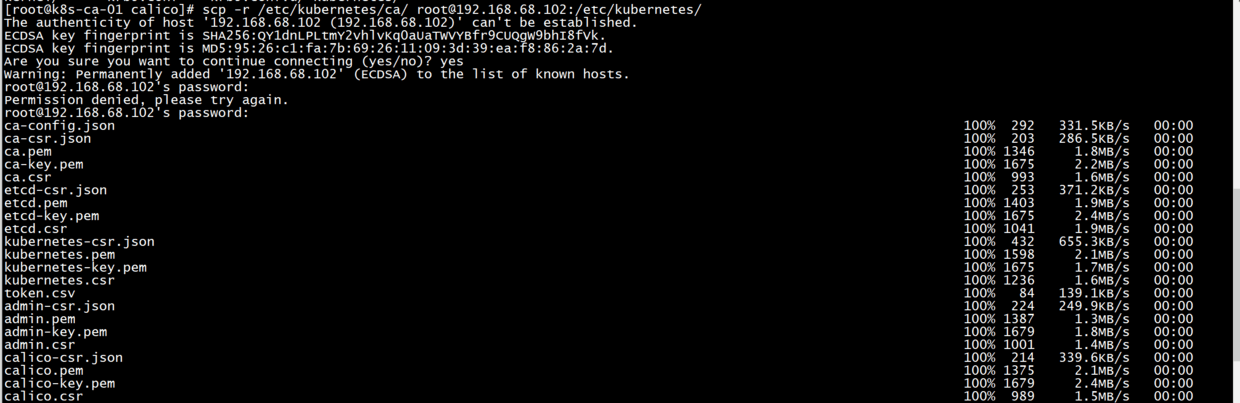
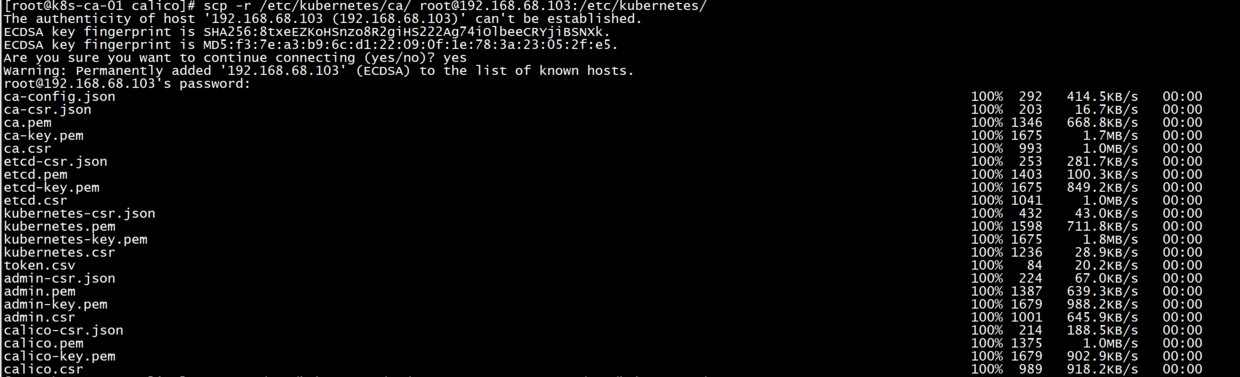
Determine that the directories in / etc/kubernetes/ca / and 102,103 of the lower primary node are identical.
Update calico services
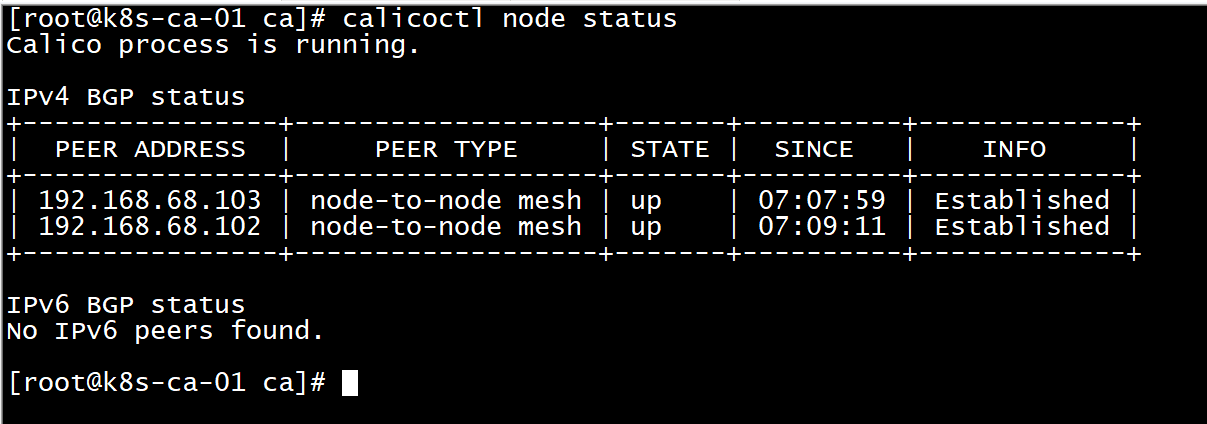
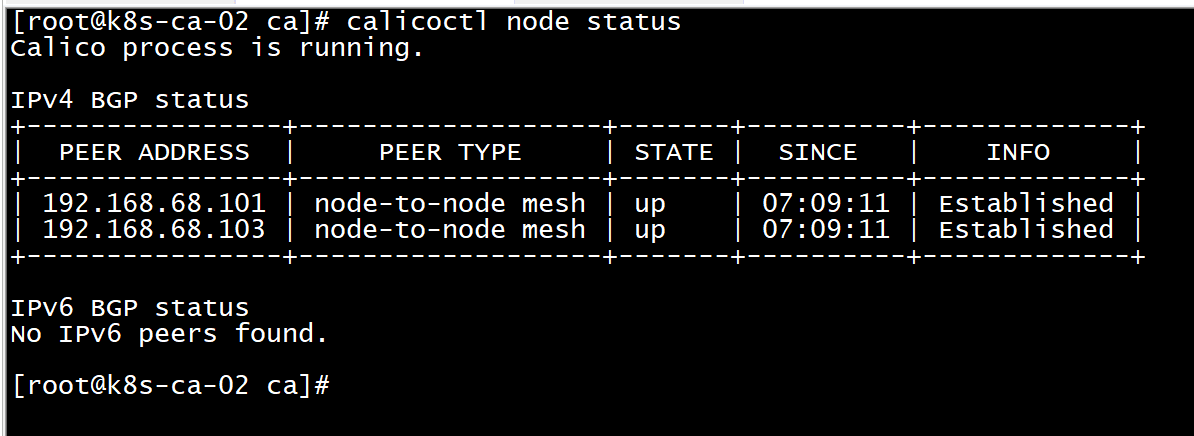
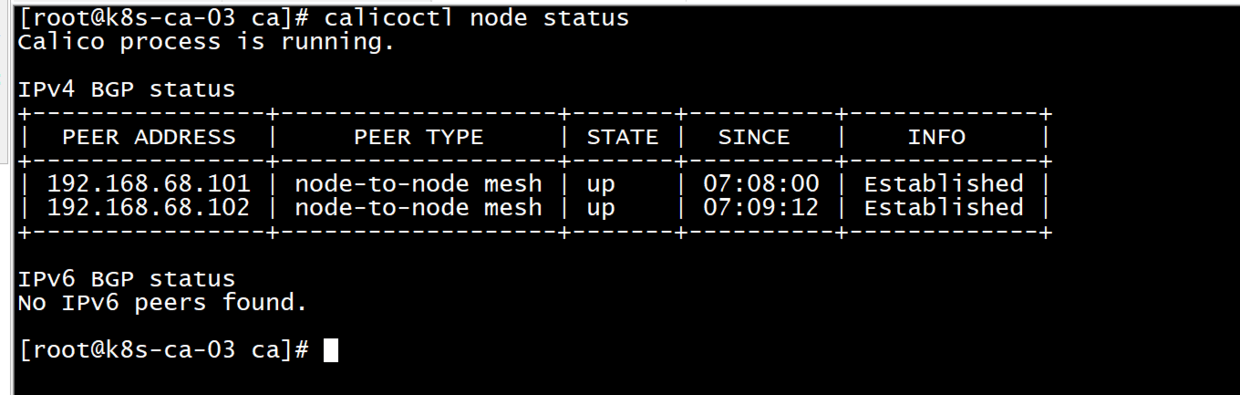
cp ~/kubernetes-starter/target/all-node/kube-calico.service /lib/systemd/system/
systemctl daemon-reload
service kube-calico start

#Verify calico (see the list of other nodes, that's right)
calicoctl node status
kubelet
The old iron allows kubelet to authenticate in the way of token guidance, so the authentication way is different from the previous components. Its certificate is not generated manually, but is requested by the working node TLS BootStrap to api-server and automatically issued by the controller-manager of the main node.
Create role bindings (primary nodes)
The way to boot token requires the client to tell him your username and token when making a request to api-server, and this user has a specific role: system:node-bootstrapper, so you need to assign the kubelet-bootstrap user in the bootstrap token file to this particular role first, then kubelet has the right to initiate the creation of authentication request.
Execute the following commands at the primary node
#The cluster role list can be queried by the following command
kubectl -n kube-system get clusterrole

#You can review the contents of the token file
cat /etc/kubernetes/ca/kubernetes/token.csv

#Create role binding (binding user kubelet-bootstrap to role system:node-bootstrapper)
kubectl create clusterrolebinding kubelet-bootstrap \
         --clusterrole=system:node-bootstrapper --user=kubelet-bootstrap


Create bootstrap.kubeconfig (102, 103 working nodes)
This configuration is used to complete bootstrap token authentication. It saves important authentication information such as user, token and so on. This file can be generated with the help of kubectl command: (you can also write your own configuration)

Very important.
0b1bd95b94caa5534d1d4a7318d51b0e
Here's a description of how this came about.
#Setting cluster parameters (note replacing ip)
kubectl config set-cluster kubernetes \
        --certificate-authority=/etc/kubernetes/ca/ca.pem \
        --embed-certs=true \
        --server=https://192.168.68.101:6443 \
        --kubeconfig=bootstrap.kubeconfig
#Setting client authentication parameters (note replacing token)
kubectl config set-credentials kubelet-bootstrap \
        --token=0b1bd95b94caa5534d1d4a7318d51b0e\
        --kubeconfig=bootstrap.kubeconfig
#Setting context
kubectl config set-context default \
        --cluster=kubernetes \
        --user=kubelet-bootstrap \
        --kubeconfig=bootstrap.kubeconfig
#Selection context
kubectl config use-context default --kubeconfig=bootstrap.kubeconfig
mkdir -p /var/lib/kubelet
mkdir -p /etc/kubernetes
mkdir -p /etc/cni/net.d
#Move the newly generated file to the appropriate location
mv bootstrap.kubeconfig /etc/kubernetes/
Prepare cni configuration (102, 103 working nodes)
copy configuration
cp ~/kubernetes-starter/target/worker-node/10-calico.conf /etc/cni/net.d/
kubelet service
Update service
cp ~/kubernetes-starter/target/worker-node/kubelet.service /lib/systemd/system/
systemctl daemon-reload
service kubelet start
** Login 101 Main Node Enter Command to View Status
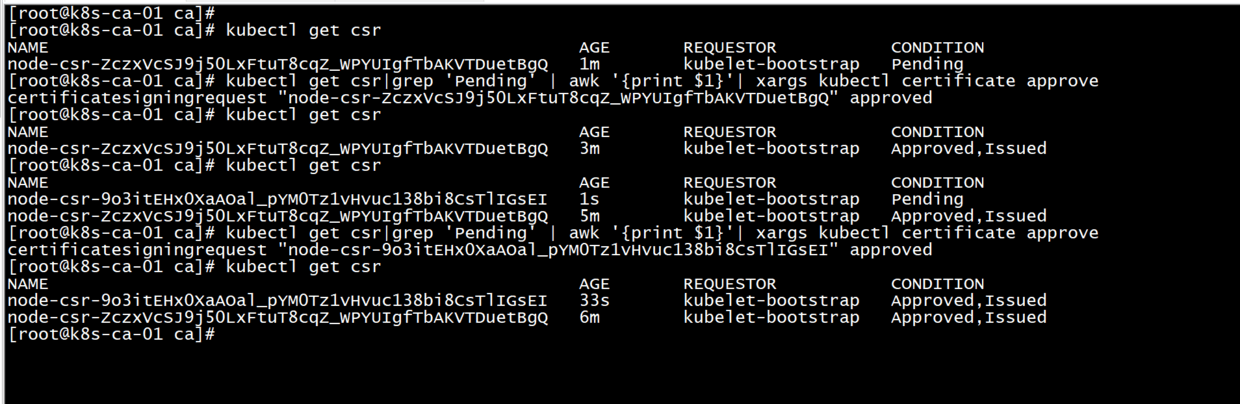
kubectl get csr
#After starting kubelet, go to master node and allow worker to join (approve worker's tls certificate request)
#--------* executes at the primary node*------------------------------------------------------------------------------------------------------
kubectl get csr|grep 'Pending' | awk '{print $1}'| xargs kubectl certificate approve
#-----------------------------

#Check log
journalctl -f -u kubelet
Join the primary node. One hundred and two

103 requests to join, 102 has joined

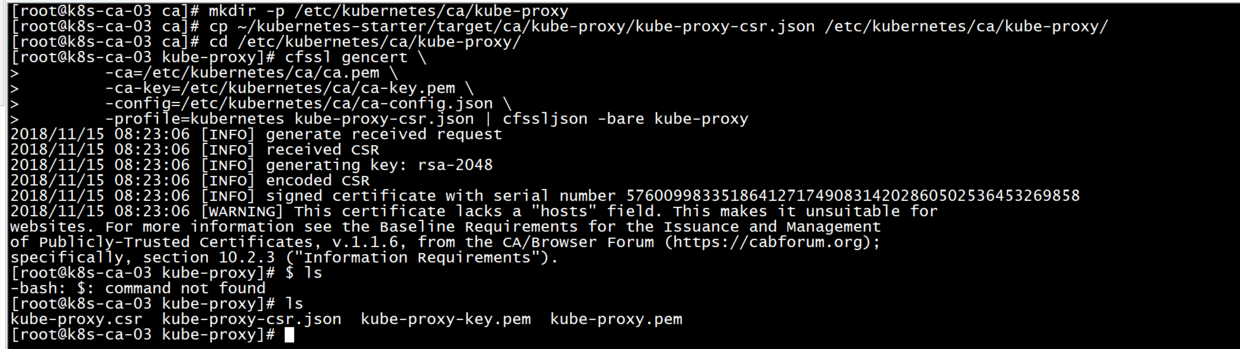
kube-proxy (sub-node 102,103)
Preparation Certificate
#The proxy certificate is here
mkdir -p /etc/kubernetes/ca/kube-proxy

#Preparing proxy certificate configuration - proxy only requires client certificates, so the hosts field in the certificate request can be empty.
#CN specifies that the User of the certificate is system:kube-proxy, and the predefined Cluster RoleBinding system: node-proxy binds User system:kube-proxy to Role system:node-proxier, granting permission to call the relevant API of kube-api-server proxy.
cp ~/kubernetes-starter/target/ca/kube-proxy/kube-proxy-csr.json /etc/kubernetes/ca/kube-proxy/
cd /etc/kubernetes/ca/kube-proxy/

#Issuing calico certificate using root certificate (ca.pem)
cfssl gencert \
        -ca=/etc/kubernetes/ca/ca.pem \
        -ca-key=/etc/kubernetes/ca/ca-key.pem \
        -config=/etc/kubernetes/ca/ca-config.json \
        -profile=kubernetes kube-proxy-csr.json | cfssljson -bare kube-proxy
#The old iron will end up with kube-proxy-key.pem and kube-proxy.pem.
ls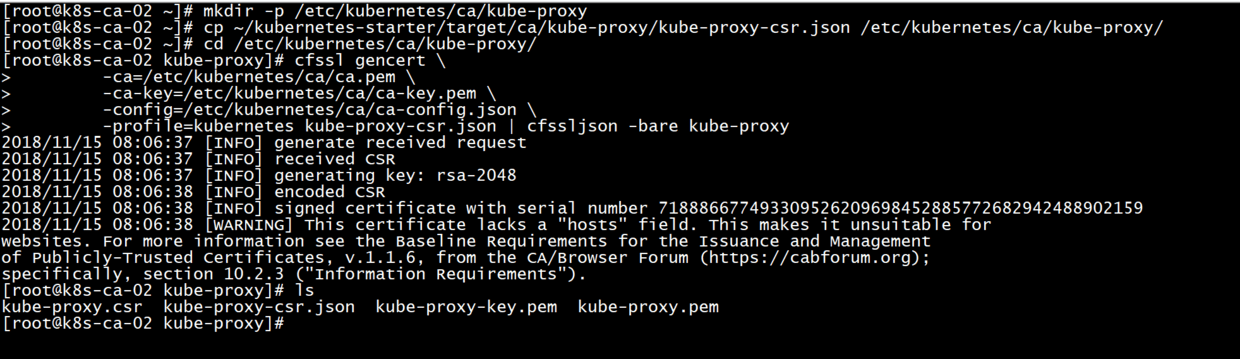
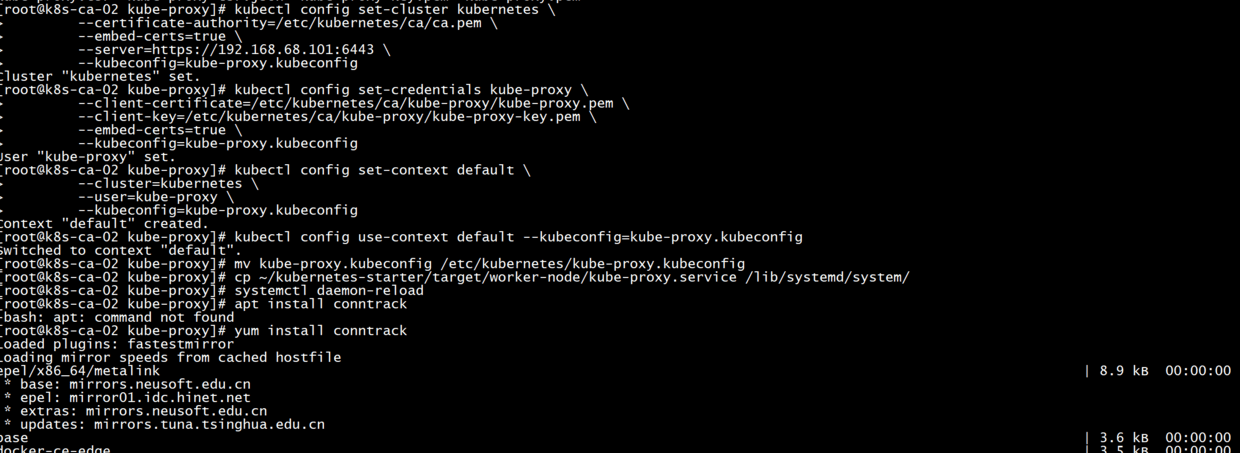
Generate the kube-proxy.kubeconfig configuration
#Setting cluster parameters (note replacing ip)
kubectl config set-cluster kubernetes \
        --certificate-authority=/etc/kubernetes/ca/ca.pem \
        --embed-certs=true \
        --server=https://192.168.68.101:6443 \
        --kubeconfig=kube-proxy.kubeconfig
#Setting Client Authentication Parameters
kubectl config set-credentials kube-proxy \
        --client-certificate=/etc/kubernetes/ca/kube-proxy/kube-proxy.pem \
        --client-key=/etc/kubernetes/ca/kube-proxy/kube-proxy-key.pem \
        --embed-certs=true \
        --kubeconfig=kube-proxy.kubeconfig
#Setting context parameters
kubectl config set-context default \
        --cluster=kubernetes \
        --user=kube-proxy \
        --kubeconfig=kube-proxy.kubeconfig
#Selection context
kubectl config use-context default --kubeconfig=kube-proxy.kubeconfig
#Move to the right place
mv kube-proxy.kubeconfig /etc/kubernetes/kube-proxy.kubeconfig
kube-proxy service
Startup service
 mkdir -p /var/lib/kube-proxy
cp ~/kubernetes-starter/target/worker-node/kube-proxy.service /lib/systemd/system/
systemctl daemon-reload

#Installing Dependent Software
yum -y install conntrack

#Startup service
service kube-proxy start
#view log
journalctl -f -u kube-proxy
12. kube-dns
kube-dns is somewhat special because it runs in a kubernetes cluster and in the form of kubernetes applications. So its authentication and authorization method is different from the previous components. It requires service account authentication and RBAC authorization.
service account authentication:
Each service account automatically generates its own secret, which contains a ca, token, and secret for authentication with api-server
RBAC Authorization:
Permissions, roles, and role bindings are created automatically by kubernetes. Old iron only needs to create a ServiceAccount called kube-dns, and the existing configuration of the government has already included it.
Prepare configuration files
Add variables on the official basis to generate the configuration suitable for the old iron cluster. Just copy it directly.
cd ~/kubernetes-starter
The new configuration does not set api-server. Without access to api-server, how does it know the cluster ip of each service and the endpoints of pod? This is because when kubernetes starts each service, it injects information such as ip, port and so on into all services in the way of environment variables.
Create kube-dns (primary 101)
kubectl create -f ~/kubernetes-starter/target/services/kube-dns.yaml
#See if the boot is successful
kubectl -n kube-system get pods

PS: Finally, the Security version of the kubernetes cluster is deployed. There are many details involved, just two blog posts. If each configuration is explained in detail, it is estimated that a book will be written. Understand authentication and authorization from an introductory perspective.
The old fellow who uses the new cluster first reviews the commands before learning, and then knows some new commands, new parameters and new functions.