What I do on the remote interaction between the board and the board when I'm doing a competition
The things found in Baidu are also fragmented.
At the same time, I hope my blog can give you a little help
PS. This is also my first time to write inappropriate blog terms. I also hope you will understand and point out
Dead work
- Ready to install the Arduino ide.
- ESP8266 module + UNO or NodeMCU and WIFIduino (the last two are highly recommended and I use the last two because I really don't understand the esp8266 + board)
- Set up your own MQTT server
- Prepare two libraries, PubSubclient and esp8266wifi
Introduction to MQTT Server
MQTT (Message Queuing Telemetry Transport) is a "lightweight" communication protocol based on publish/subscribe mode, which was built on TCP/IP protocol and published by IBM in 1999.The great advantage of MQTT is that it can provide real-time and reliable messaging services for connecting remote devices with minimal code and limited bandwidth.As a low-cost, low-bandwidth instant messaging protocol, it is widely used in the Internet of Things, small devices, mobile applications and so on.
MQTT is a client-server based messaging publishing/subscription transport protocol.The MQTT protocol is lightweight, simple, open and easy to implement, which makes it widely applicable.In many cases, this includes limited environments such as machine-to-machine (M2M) communication and the Internet of Things (IoT).It has been widely used in satellite-link communication sensors, occasional dial-up medical devices, smart home, and some miniaturized devices.
For Arduino, simply publishing and receiving messages is a great choice, and there are libraries out there that don't require us to do much more.
Setup of MQTT Server
When I set up my MQTT server on Windows, I always encountered a missing.dll file, so I went to Ubuntu to set up my server.
Personally recommended to use EMQ as a software (admin desk interface is nice and has Chinese)
The disadvantage of using a server on your own computer is that you must be under the same local area network - that is, your board, your mobile phone and your computer are linked to the same WIFI - to link this server. The main reason is that your computer does not have a public network IP and cannot be accessed under the network. If you are just learning something, it is recommended to build it on your own computer.
If you want to rent Ali's server as a product suggestion (I'm a friend in vain)
Two library files
PubSubclient This library file should be the perfect library file to support MQTT
Please go to this github link to download or offline
github download link: link.
Official download link: link.
For a detailed description of this library file, see the API documentation for the library file
API documentation: link.
And all we really use is one example: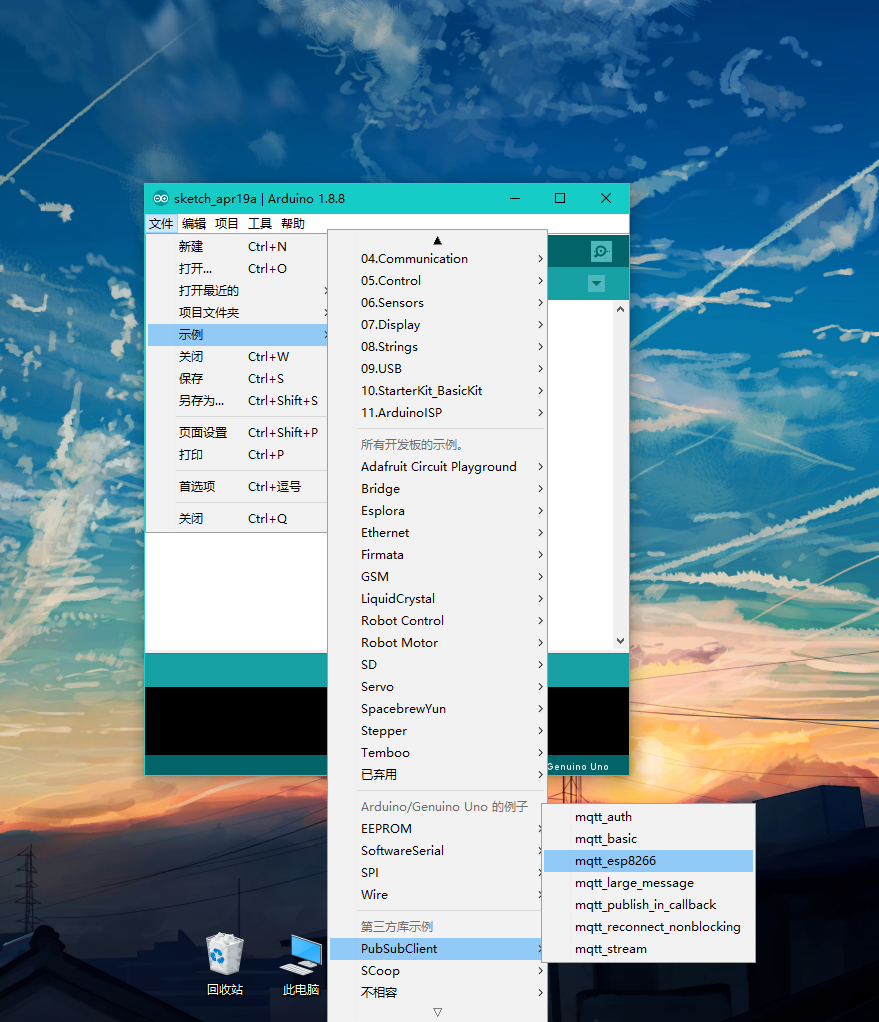
ESP8266WIFI
This library can be found on my github:
Download link: link.
Next, I'll explain this example in detail, which implements the simplest way to publish and receive information:
/*
Basic ESP8266 MQTT example

 The sketch demonstrates the combined functionality of the pubsub library
 With ESP8266 board/library.
 It connects to the MQTT server, and then:
   - Publish "hello world" to the "outTopic" theme every two seconds
   - Subscribe to "inTopic" topics and print out any messages
    It receives.NB - It assumes that the payload received is a non-binary string
   - If the first character of the subject "inTopic" is 1, open ESP Led.
    Otherwise turn it off
 If you use Block Lost Connection, it will reconnect to the server
 Reconnect function.See the'mqtt_reconnect_nonblocking'example for how to use it
 The same result is achieved without blocking the main loop.

 To install the ESP8266 board, (using Arduino 1.6.4+):
   - Add the following third-party card manager under File - > Preferences - > Other Card Manager URL:
      http://arduino.esp8266.com/stable/package_esp8266com_index.json
   - Open Tools - > Board - > Board Manager and click Install of ESP8266.
   - Select your ESP8266 in Tools - > Board
 This is where I translated the top comment with a translation
*/

#include <ESP8266WiFi.h>
#include <PubSubClient.h>

const char* ssid = "........";//The name of the WiFi you want the board to link to
const char* password = "........";//The password for this WiFi
const char* mqtt_server = "broker.mqtt-dashboard.com";//Your server address

WiFiClient espClient;
PubSubClient client(espClient);
long lastMsg = 0;
char msg[50];
int value = 0;

void setup_wifi() {

  delay(10);
   Serial.println();
  Serial.print("Connecting to ");
  Serial.println(ssid);

  WiFi.begin(ssid, password);

  while (WiFi.status() != WL_CONNECTED) {
    delay(500);
    Serial.print(".");
  }

  randomSeed(micros());

  Serial.println("");
  Serial.println("WiFi connected");
  Serial.println("IP address: ");
  Serial.println(WiFi.localIP());
}//Link WiFi

void callback(char* topic, byte* payload, unsigned int length) {
  Serial.print("Message arrived [");
  Serial.print(topic);
  Serial.print("] ");
  for (int i = 0; i < length; i++) {
    Serial.print((char)payload[i]);
  }//Serial port prints out received information
  Serial.println();

  // Turn on the LED if you receive 1 as the first character
  if ((char)payload[0] == '1') {
    digitalWrite(BUILTIN_LED, LOW);   // Here he says that the accepted'1'turns on the light, but when I receive 0 when I use it, the'LOW' in this line and the'HIGH'below should be replaced. ESP-01 is also mentioned below
    // but actually the LED is on; this is because
    // it is active low on the ESP-01)
  } else {
    digitalWrite(BUILTIN_LED, HIGH);  // Turn the LED off by making the voltage HIGH
  }

}

void reconnect() {
  // Loop until we're reconnected
  while (!client.connected()) {
    Serial.print("Attempting MQTT connection...");
    // Create a random client ID
    String clientId = "ESP8266Client-";//Link name of the board
    clientId += String(random(0xffff), HEX);//Generate a random number to avoid multiple boards having duplicate names
    //Attempt to connect
    if (client.connect(clientId.c_str())) {
      Serial.println("connected");
      // After connection, issue announcement...
      client.publish("outTopic", "hello world");//This topic and statement will be published when the link is successful
      // ...and subscribe
      client.subscribe("inTopic");//This is the subject that you let your board subscribe to (accept the message on that subject)
    } else {
      Serial.print("failed, rc=");
      Serial.print(client.state());
      Serial.println(" try again in 5 seconds");
      // If the link fails, wait five minutes for the link to be re-linked
      delay(5000);
    }
  }
}

void setup() {
  pinMode(BUILTIN_LED, OUTPUT);     // Initialize BUILTIN_LED pin as output
  Serial.begin(115200);
  setup_wifi();
  client.setServer(mqtt_server, 1883);//The default port for MQTT is 1883
  client.setCallback(callback);
}

void loop() {

  if (!client.connected()) {
    reconnect();
  }
  client.loop();

  long now = millis();
  if (now - lastMsg > 2000) {
    lastMsg = now;
    ++value;
    snprintf (msg, 50, "hello world #%ld", value);
    Serial.print("Publish message: ");
    Serial.println(msg);//Serial port printing, as the serial debugger can see
    client.publish("outTopic", msg);//Receive this topic message
  }
}
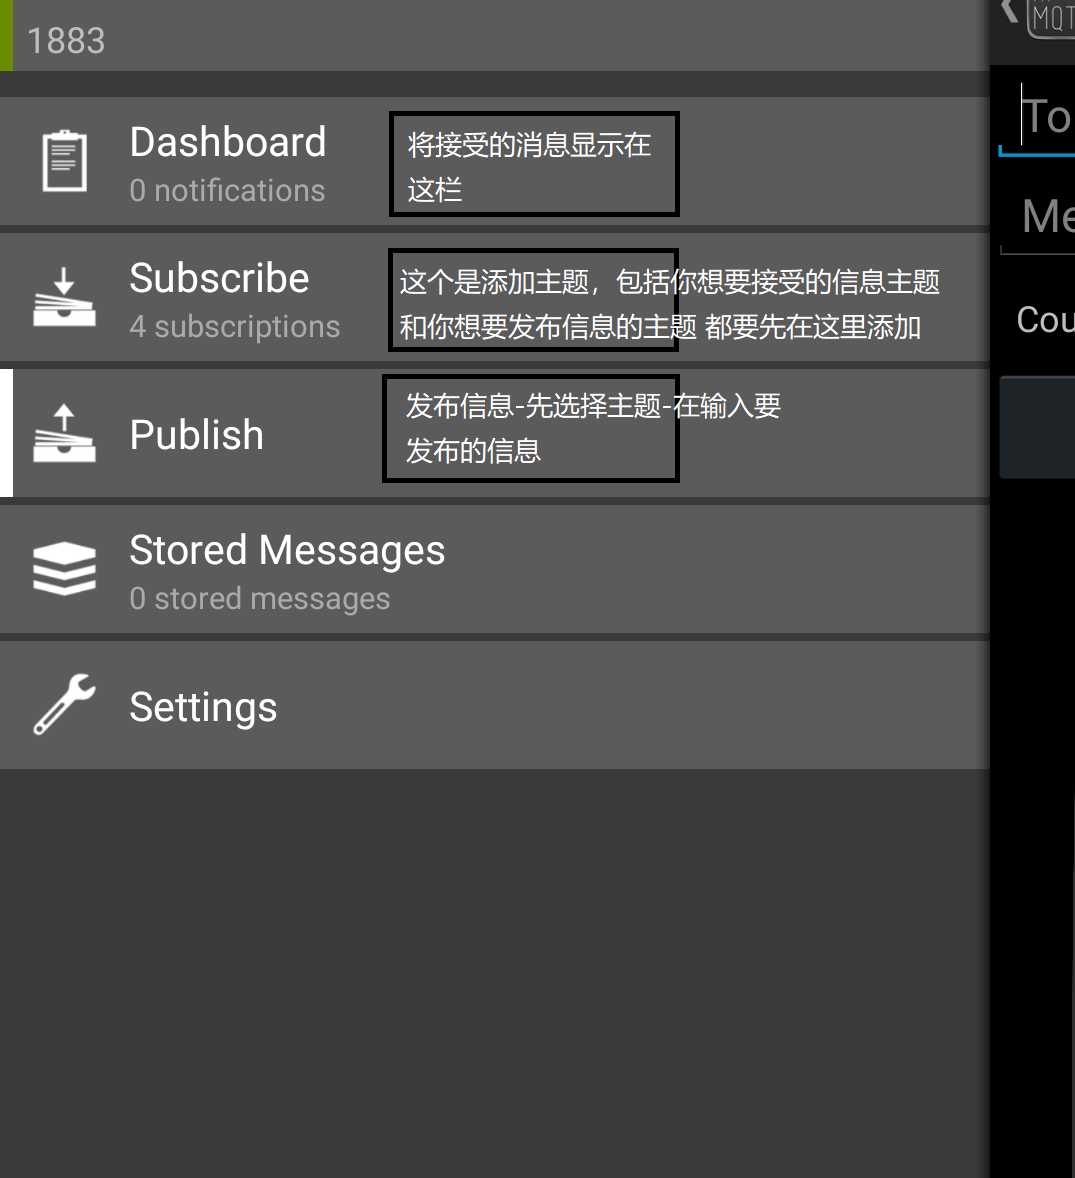
Mobile Debugging Software - MyMQTT
The software has been put on Google, friends who have no condition to climb the wall. I uploaded the software to Baidu Disk and can download it under the link
Links: link.
Extraction Code: jdd8
Here's how to use the software simply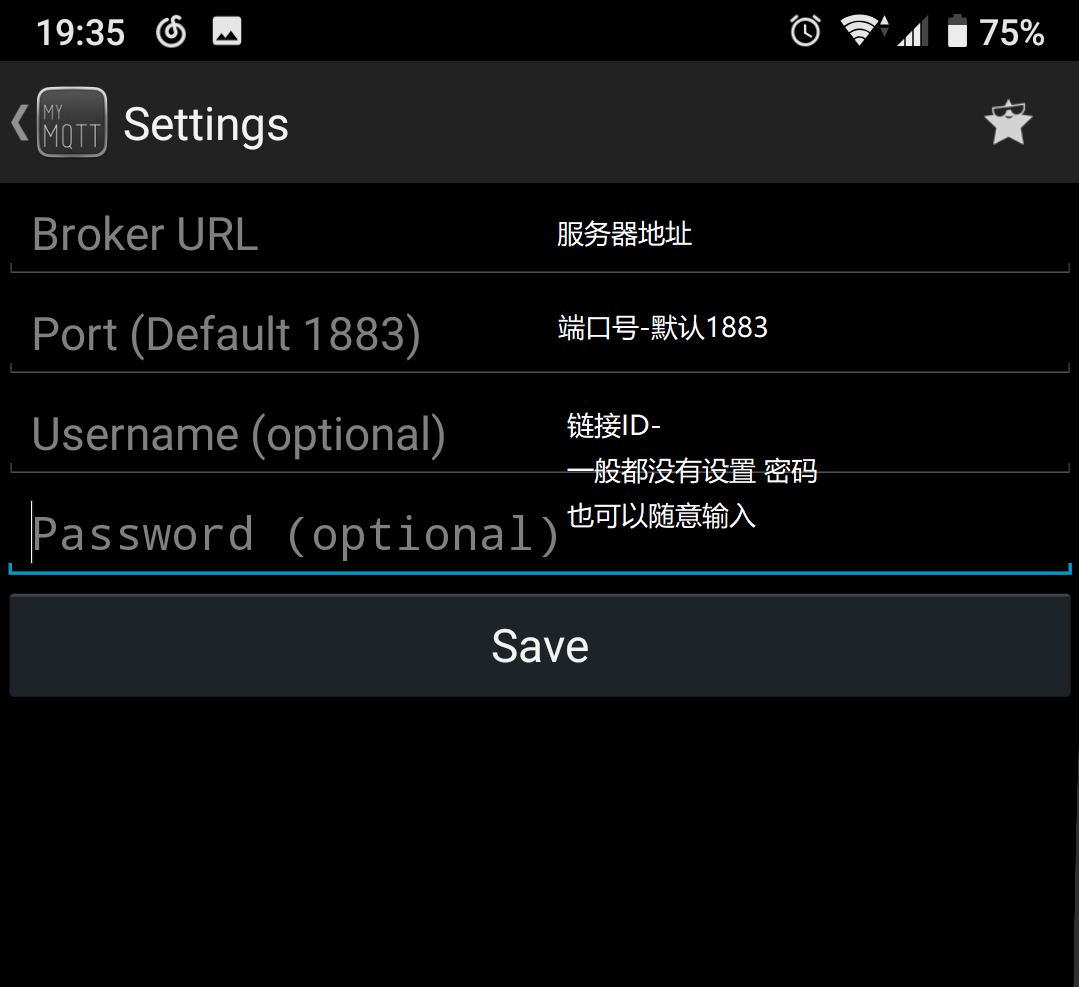
Below is my own code to separate publishing from subscribing (to be improved)
Publish a message
/*
Basic ESP8266 MQTT example

 The sketch demonstrates the combined functionality of the pubsub library
 With ESP8266 board/library.
Just publish information, for example, photoresistors
*/

#include <ESP8266WiFi.h>
#include <PubSubClient.h>

const char* ssid = "***";//wifi name
const char* password = "***";//wifi password
const char* mqtt_server = "***";//server address
const char* out_topic_name="***";//Name of published topic
const char* bolid_name="***";//Number-name of the board
/**/

WiFiClient espClient;
PubSubClient client(espClient);
long lastMsg = 0;
char msg[50];
int value = 0;

void setup_wifi()
{
  delay(10);
  Serial.println();
  Serial.print("Connecting to ");
  Serial.println(ssid);

  WiFi.begin(ssid, password);

  while (WiFi.status() != WL_CONNECTED) {
    delay(500);
    Serial.print(".....");
  }//Link wifi

  randomSeed(micros());
  Serial.println("");
  Serial.println("WiFi connected");
  Serial.println("IP address: ");
  Serial.println(WiFi.localIP());
}

void reconnect()
{
  while (!client.connected()) {
    Serial.print("Attempting MQTT connection...");
    String clientId = bolid_name;
    if (client.connect(clientId.c_str())) {
      Serial.println("connected");
      // Publish announcement Success after connection
      client.publish("out_topic_name", "Success!");
      } else {
      Serial.print("failed, rc=");
      Serial.print(client.state());
      Serial.println(" try again in 5 seconds");
      delay(5000);
    }
  }
}//Loop until you connect to the server

void setup() {
  Serial.begin(115200);//set baud rate
  setup_wifi();
  client.setServer(mqtt_server, 1883);
}

void loop() {
 int sensorValue = analogRead(A0);//Photosensitive reading
  if (!client.connected()) {
    reconnect();
  }
  client.loop();

    snprintf (msg, 50, "%ld",sensorValue );
    Serial.print("Publish message: ");
    Serial.println(msg);//Simultaneous Serial Output
    client.publish("out_topic_name", msg);
    delay(10000);

}
Subscribe
//Accept information to control the light bulb
#include <ESP8266WiFi.h>
#include <PubSubClient.h>

const char* ssid = "***";
const char* password = "***";
const char* mqtt_server = "***";
const char* in_Topic_name="***";//Name of subject received
const char* bolid_name="***";//Name-number of the board

WiFiClient espClient;
PubSubClient client(espClient);
char msg[50];
int light = 255;

void setup_wifi()
{ delay(10);
  Serial.println();
  Serial.print("Connecting to ");
  Serial.println(ssid);
  WiFi.begin(ssid, password);
  while (WiFi.status() != WL_CONNECTED) {
    delay(500);
    Serial.print("....");
  }

  randomSeed(micros());

  Serial.println("");
  Serial.println("WiFi connected");
  Serial.println("IP address: ");
  Serial.println(WiFi.localIP());
}//Link wifi

void callback(char* topic, byte* payload, unsigned int length)
{ int l=0;
  int p=1;
  Serial.print("Message arrived [");
  Serial.print(topic);
  Serial.print("]:  ");
  for (int i = length-1; i >=0; i--) {
    l+=(int)((char)payload[i]-'0')*p;
    Serial.print(l);//Increase Serial Port Display
     p*=10;
  }
  Serial.println();
  light=l;

}//Incoming information changes the value of light 1-bright 0-not-bright

void reconnect() {
  // Loop until we're reconnected
  while (!client.connected()) {
    Serial.print("Attempting MQTT connection...");
    String clientId = "bolid_name";//Name of the board
    // Attempt to connect
    if (client.connect(clientId.c_str())) {
      Serial.println("connected");

      client.subscribe("in_Topic_name");//Subscription Subject
    } else {
      Serial.print("failed, rc=");
      Serial.print(client.state());
      Serial.println(" try again in 5 seconds");
      // Wait five seconds until link
      delay(5000);
    }
  }
}

void setup()
{ pinMode(D2, OUTPUT); //Bulb for d2 control
  Serial.begin(115200);
  setup_wifi();
  client.setServer(mqtt_server, 1883);
  client.setCallback(callback);
}

void loop()
{  if (!client.connected()) {
    reconnect();
  }//Reconnect if the link is not established
  client.loop();
  delay(500);
  analogWrite(D2,light);
}
More PubSubclien libraries are available in the official API documentation above.
That's basically it.