Models are unavoidable in our development of unity3d projects, and these materials need to be placed on the server, which is impossible to place locally. However, we need to load these resources from the server. Unity3d provides us with a packaging form, assetsBundle!
First, let's talk about packing:
In the first step, we get our model resources, of course, can also be various resources, made into prefabricated bodies, as shown in the figure: 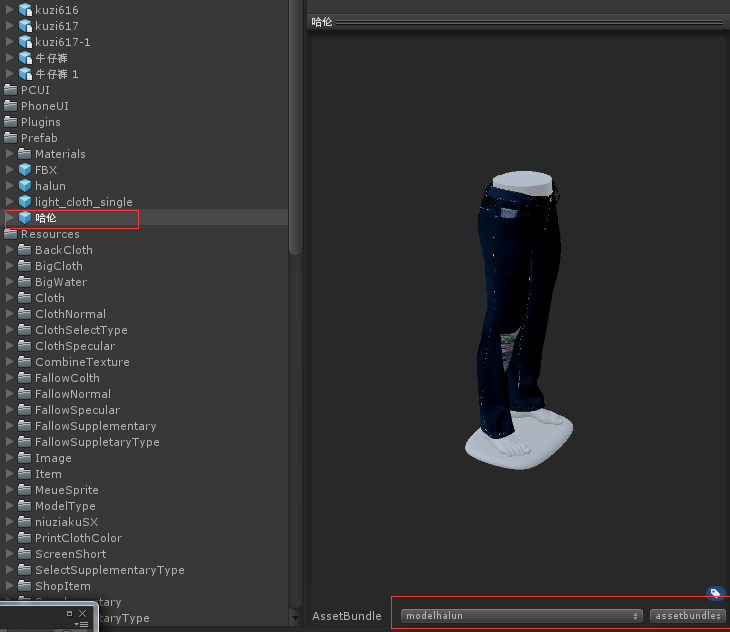
One of the red boxes in the figure is prefabricated, followed by the ass package name and suffix name.
The second step is to write the package code, which needs to inherit unityEditor. The code is as follows:
using UnityEditor;
using UnityEngine;

public class BuildAssetBundle
{
    /// <summary>
    /// After clicking, all settings are set AssetBundle Named resources are packaged individually
    /// </summary>
    [MenuItem("AssetBundle/Build (Single)")]
    static void Build_AssetBundle()
    {
        BuildPipeline.BuildAssetBundles(Application.dataPath + "/AssetBundle", BuildAssetBundleOptions.None, BuildTarget.StandaloneWindows);
        //Refresh
        AssetDatabase.Refresh();
    }

    /// <summary>
    /// Selected resources are packaged together
    /// </summary>
    [MenuItem("AssetBundle/Build (Collection)")]
    static void Build_AssetBundle_Collection()
    {
        AssetBundleBuild[] buildMap = new AssetBundleBuild[1];
        //Packaged resource bundle name
        buildMap[0].assetBundleName = "enemybundle";

        //In the Project view, select the object to be packaged
        Object[] selects = Selection.GetFiltered(typeof(Object), SelectionMode.DeepAssets);
        string[] enemyAsset = new string[selects.Length];
        for (int i = 0; i < selects.Length; i++)
        {
            //Get the path of the selected object
            enemyAsset[i] = AssetDatabase.GetAssetPath(selects[i]);
        }
        buildMap[0].assetNames = enemyAsset;

        BuildPipeline.BuildAssetBundles(Application.dataPath + "/Test_AssetBundle", buildMap, BuildAssetBundleOptions.None, BuildTarget.StandaloneWindows);
        //Refresh
        AssetDatabase.Refresh();
    }
}
We need to put the code in
Editor folder!
The third step is that we can see new options on the unity3d menu bar because of the addition of the MenuItem("Asset Bundle/Build (Collection)] menu, as shown in the figure: 
Finally, we select the resources and click Build to get resources like the following: 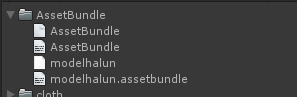
The packaging of resources is over!
Resource loading:
The first step is to give the ass to the back-end personnel. They will give you an interface, that is, the server address. We can download the resource through the WWW class. What kind of resources are loaded when we pack them? The code is as follows:
    /// <summary>
    /// Request model
    /// </summary>
    IEnumerator GetModels(string path)
    {
        WWW getdata = new WWW(path);
        yield return getdata;
        UnityEngine.Object[] models = getdata.assetBundle.LoadAllAssets();
        GameObject model = Instantiate((GameObject)models[0]);
        model.transform.localPosition = new Vector3(0, 0, 0);
        model.transform.localScale = new Vector3(5, 5, 5);
        model.GetComponent<Animation>().Stop();
        model.transform.SetParent(_modelParent.transform);
    }
After we request to the model, we need to instantiate it, and we can control the location, zoom and so on.
Load image resources:
To load the images one by one, we can pass in the image component in the request mode of WWW class. The code is as follows:
    /// <summary>
    /// Get custom images
    /// </summary>
    /// <param name="_url"></param>
    /// <param name="_wForm"></param>
    /// <returns></returns>
    IEnumerator GetPhoto(string _url, RawImage img)
    {
        WWW postData = new WWW(_url);
        yield return postData;
        img.texture = postData.texture;
    }
When instantiating subitems:
            GameObject item = Instantiate(_item);
            item.name = _customAllInfoData.port[i].id;
            StartCoroutine(GetPhoto(_customAllInfoData.port[i].texture, item.GetComponent<CustomItemScript>()._price));
In this way, the instantiated sub-items can be formed first, and the pictures can be loaded subsequently.