The original article was published in cu: 2016-08-25
Reference documents:
- Nginx reverse proxy, load balancing, page caching, URL rewriting, etc. http://freeloda.blog.51cto.com/2033581/1288553
- Nginx reverse proxy/load balancing simple configuration: http://www.cnblogs.com/jacktang/p/3669115.html
- Nginx reverse proxy, back-end web how to get real ip: http://www.bubuko.com/infodetail-822723.html
In this paper, several common features of Nginx are simply validated (skipped by experts), familiar with configuration through simple validation.
I. Environmental preparation
1. Operating system
CentOS-7-x86_64-Everything-1511
2. Nginx version
Nginx-1.11.3: http://nginx.org/download/nginx-1.11.3.tar.gz
See Installation Configuration: http://blog.chinaunix.net/uid-26168435-id-5715005.html
3. topological graph
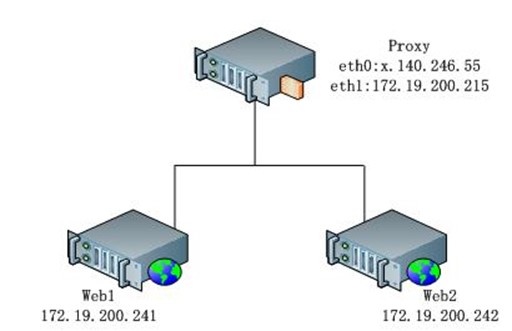
- Proxy server is a virtual server using VMware ESXi. It has installed and started nginx service. The front access address is x.140.246.55 (real Internet ip address, hidden), and the back address is 172.19.200.215.
- Web1 server is a server generated by Docker technology. It has installed and started nginx service with ip address 172.19.200.241.
- Web2 and Web1 servers, ip address 172.19.200.242;
-
Set up web1/2 test page (path reference nginx installation steps) to facilitate the follow-up view of the verification results, as follows:
web1:
[root@e84e8f6ba866 ~]# echo "<h1>Welcome to test site web1!</h1>" /usr/local/nginx/html/index.html
web2:
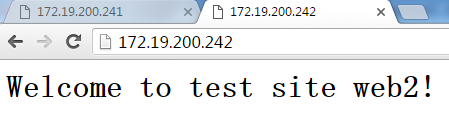
[root @56f610597bcd ~]# echo "<h1>Welcome to test site web2!</h1>" /usr/local/nginx/html/index.html
II. Reverse Agency
1. Reverse proxy description
Instruction: proxy_pass
Syntax: proxy_pass URL
Use field: location field
# A URL can be an ip address of the proxy server, an ip address + port, or a mapped url.
2. Reverse proxy configuration
#Proxy Server Temporary Settings web1;
#Important: Reload nginx Configuration file, which can be used before reloading /usr/local/nginx/sbin/nginx -t -c /usr/local/nginx/conf/nginx.conf"Test whether configuration file modifications are correct
[root@localhost ~]# cd /usr/local/nginx/conf/
[root@localhost conf]# vim nginx.conf
        location / {
             proxy_pass http://172.19.200.241;
        }
[root@localhost conf]# service nginx reload
3. validation
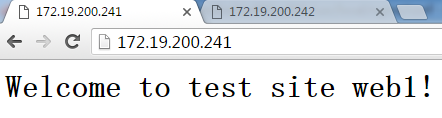
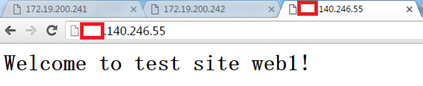
Way 1: Access the proxy server through the browser, and return the result to the test page of web 1, as follows:
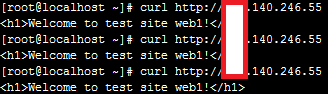
Way 2: Access the proxy server through curl command, and return the result to the test page of web1, as follows:
[root@localhost ~]# curl http://x.140.246.55
4. View the access log of the web server
#As you can see from the access log, the client ip All are nginx Backend of Proxy Server ip,back-end web The server did not capture the real client ip
[root@e84e8f6ba866 ~]# cd /usr/local/nginx/logs/
[root@e84e8f6ba866 logs]# tail -f access.log
172.19.200.215 - - [24/Aug/2016:09:20:49 +0000] "GET / HTTP/1.0" 304 0 "-" "Mozilla/5.0 (Windows NT 6.1; WOW64) AppleWebKit/537.36 (KHTML, like Gecko) Chrome/52.0.2743.116 Safari/537.36"
172.19.200.215 - - [24/Aug/2016:09:20:49 +0000] "GET / HTTP/1.0" 304 0 "-" "Mozilla/5.0 (Windows NT 6.1; WOW64) AppleWebKit/537.36 (KHTML, like Gecko) Chrome/52.0.2743.116 Safari/537.36"
172.19.200.215 - - [24/Aug/2016:09:20:52 +0000] "GET / HTTP/1.0" 200 36 "-" "curl/7.29.0"
172.19.200.215 - - [24/Aug/2016:09:20:53 +0000] "GET / HTTP/1.0" 200 36 "-" "curl/7.29.0"
5. web server captures real client ip
1) Modify nginx proxy server configuration
#"proxy_set_header X-Real-IP $remote_addr"Instructions will be sent to the request header of the proxy server to redefine or add fields; this value can be a text, a variable, or a combination of them;
#proxy_set_header If it is not defined in a specified field, it inherits from its parent field.
[root@localhost ~]# cd /usr/local/nginx/conf/
[root@localhost conf]# vim nginx.conf
        location / {
             proxy_set_header X-Real-IP $remote_addr;
             proxy_pass http://172.19.200.241;

        }
[root@localhost conf]# service nginx reload
2) Modify the web server configuration
#"set_real_ip_from IP"Instruction in http In the field, but in server Out of field,IP by nginx The proxy server has access to the back end web The address of the server.
[root@e84e8f6ba866 ~]# cd /usr/local/nginx/conf/
[root@e84e8f6ba866 conf]# vim nginx.conf
set_real_ip_from 172.19.200.215;
[root@e84e8f6ba866 conf]# service nginx reload
6. Verify capturing real client ip
#Used on the client side curl Command access proxy server, view back end web Server access log;
#As you can see from the access log, the back end web The server has captured the real client ip
[root@e84e8f6ba866 logs]# tail -f access.log

3. Load Balancing
1. Load Balancing Description
1) upstream module
upstream is Nginx's HTTP Upstream module, which achieves load balancing from client ip to back-end server through a simple scheduling algorithm.
2) Load balancing algorithm supported by upstream
(1) Polling (default)
Each request is allocated to different back-end servers in chronological order. If one of the back-end servers goes down, the fault system is automatically eliminated and user access is unaffected. You can specify polling weights by weight. The larger the weight, the higher the access probability allocated. It is mainly used in the case of uneven performance of each server in the back end.
(2)ip_hash
Each request is allocated according to the hash result of accessing ip, so that visitors from the same IP can access a back-end server regularly, which can effectively solve the session sharing problem of dynamic web pages.
(3)fair
More intelligent load balancing algorithms than the above two. This algorithm can balance the load intelligently according to page size and loading time, that is, according to the response time of the back-end server to allocate requests, the priority allocation of short response time. Nginx itself does not support fair. If you need to use this scheduling algorithm, you must download Nginx's upstream_fair module.
(4)url_hash
This method assigns requests according to the hash results of accessing urls, and directs each URL to the same back-end server, which can further improve the efficiency of the back-end cache server. Nginx itself does not support url_hash. If you need to use this scheduling algorithm, you must install Nginx's hash package.
3) state parameters supported by upstream
In upstream module, the state of load balancing scheduling can be set after each back-end server. Commonly used states are:
(1)down
Represents that the current server is temporarily not involved in load balancing.
(2)backup
The reserved backup machine requests the backup machine only when all other non-backup machines fail or are busy, so the machine has the least pressure.
(3)max_fails
The number of requests that are allowed to fail is 1 by default. When the maximum number of times is exceeded, the error defined by the proxy_next_upstream module is returned.
(4)fail_timeout
After the failure of max_fails, the time to suspend the service can be used with fail_timeout.
2. Load balancing configuration
[root@localhost ~]# cd /usr/local/nginx/conf/

#upstream Module in http In the field, server Module outside;upstream The specified load balancing name can be customized, followed by location Field " proxy_pass"Instructions call custom load balancing names.
#weight By default, no configuration is required. If the performance of the back-end server is uneven, you can use the weight Value load scheduling;
#Can pass backup Reserve backup server for status parameters;
#By default, polling scheduling algorithm is used if ip_hash Scheduling algorithm, back-end server load balancing scheduling state can not be backup
[root@localhost conf]# vim nginx.conf
    upstream test.backend {
             # ip_hash;
             server 172.19.200.241 weight=1;
             server 172.19.200.242 weight=1;
             # server 127.0.0.1:8080 backup;
     }

    server {
        listen       80;
        server_name  localhost;

        #charset koi8-r;
        #access_log  logs/host.access.log  main;

        location / {
             proxy_set_header X-Real-IP $remote_addr;
             proxy_pass http://test.backend;
        }
    }

[root@localhost conf]# service nginx reload
3. validation
The proxy server is accessed by curl command and the test pages of web1 and web2 are returned alternately as follows:
[root@localhost ~]# date ; curl http://x.140.246.55

Page caching
1. Page caching instructions
1)proxy_cache_path
Instruction: proxy_cache_path
Syntax: proxy_cache_path [levels = number] keys_zone = zone_name: zone_size [inactive = time] [max_size = size];
Use fields: http fields, outside server fields
# Directives specify the path of the cache and some other parameters. The cached data is stored in the file. The cache file uses the hash value of the proxy url as the keyword and file name.
# levels parameter specifies the specified directory structure, specifies the number of cached subdirectories, can use any one or two digits as the directory structure, but can only be three-level directories, such as X, X:X, or X: X, converted to instructions such as "2", "2:2", "1:1:2" and so on.
# All active keys and metadata are stored in a shared memory pool, which is specified with the keys_zone parameter. The name of the shared pool is customized, and the size of the shared pool can be represented by "m". The size of the memory pool is set according to the proportion of cached pages. The metadata size of a page (file) is determined by the operating system, such as 64 bytes under FreeBSD/i386 and 128 bytes under FreeBSD/amd64.
# The inactive parameter specifies the cache timeout time, and deletes data that is not requested within the specified time. The default inactive is 10 minutes.
# A process named cache manager controls the size of the disk cache, which is used to delete inactive caches and control the size of the cache. These are defined in the max_size parameter. When the value of the current cache exceeds the value specified by max_size, the least-used data (LRU replacement algorithm) will be deleted when it exceeds its size.
2)proxy_cache
Instruction: proxy_cache
Syntax: proxy_cache zone_name;
Use fields: http, server, location
# Set a (custom) name for a cache area, and the same area can be used in different places.
# Caching instructions rely on proxy buffers, which do not take effect if proxy_buffers are set to off.
3)proxy_cache_valid
Instruction: proxy_cache_valid
Syntax: proxy_cache_valid reply_code [reply_code... time;
Use fields: http, server, location
# Set different cache times for different responses, such as: "proxy_cache_valid 200 302 10m;"
When the response code is 200 and 302, the cache time is set to 10 minutes.
# If only time is defined: e.g. "proxy_cache_valid 5 m;" then only the replies with code 200, 301 and 302 are cached;
# You can use any parameter to answer, such as: "proxy_cache_valid any 1m;"
2. Description of Page Cache Variables
If you do not configure page caching variables in the proxy server configuration file, it is inconvenient to view the results during validation.
1)$server_addr
Server address, which can be determined after a system call is completed; if you want to bypass the system call, you must specify the address in listen and use the bind parameter.
2)$upstream_cache_status
MISS: Missing
EXPIRED - expired: Requests are sent to the back end
UPDATING - expired: Because proxy/fastcgi_cache_use_stale is being updated, the old response will be used
STALE - expired: Because proxy/fastcgi_cache_use_stale expires, the back end will get an expired response
HIT: hit
3. Page cache configuration
[root@localhost ~]# cd /usr/local/nginx/conf/

#Cache path customization, note key_zone Defined shared memory pools and location Field " proxy_cache"Corresponding;
#Two " add_header"The instruction adds a header. If it is not set, it is not convenient to view the results when validating.
#"proxy_buffering"If so " off",Cache does not take effect
[root@localhost conf]# vim nginx.conf
    proxy_cache_path /usr/local/nginx/cache/testcache levels=1:2 keys_zone=testcache:20m max_size=1g;

    upstream test.backend {
             # ip_hash;
             server 172.19.200.241;
             server 172.19.200.242;
             # server 127.0.0.1:8080 backup
     }

    server {
        listen       80;
        server_name  localhost;

        #charset koi8-r;
        #access_log  logs/host.access.log  main;

        add_header X-Via $server_addr;
        add_header X-Cache $upstream_cache_status;

        location / {
             proxy_set_header X-Real-IP $remote_addr;
             proxy_pass http://test.backend;
             # proxy_buffering off;
             proxy_cache testcache;
             proxy_cache_valid 200 10m;
        }
    }

#In " proxy_cache_path"The path defined in this section needs to be complemented and authorized
[root@localhost conf]# mkdir -p /usr/local/nginx/cache/testcache
[root@localhost conf]# chown www:www /usr/local/cache
[root@localhost conf]# service nginx reload
4. validation
Using browser to access proxy server, F5 refreshes constantly and returns to web2 (or web1) test page as follows:
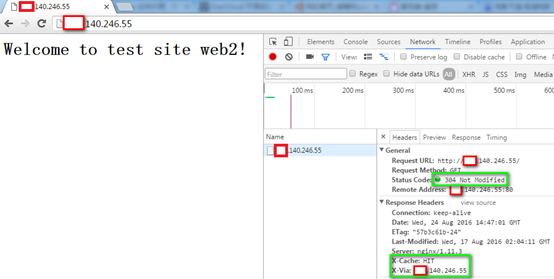
- Press F12 to call the development and debugging tool of the browser and select the Network option. You can see that in Response Headers, the green box says, "X-Cache: HIT" (related to "add_header" in the proxy server configuration file).
-
Note also that in General, the green box says, "Status Code:304 Not Modified".
5. URL redirection
URL rewriting is complex, so here's just a simple verification of redirection.
1. Description of URL rewriting module
Rewrite module allows the use of regular expressions to re-URI, but requires the support of the PCR E library, and can redirect and select different configurations according to the relevant variables.
If the rewrite instruction is specified in the server field, it will be executed before the requested location is determined; if there are other rewrite rules in the location selected after the instruction is executed, the instruction will also be executed. If the execution of this instruction in location produces a new URI, then location identifies a new URI again. Such a loop can be executed up to 10 times, and beyond that, nginx returns 500 errors.
2. Redirectional configuration
Redirectional authentication scheme: redirect client requests to web1 to web2.
Design:
-
Remove web2 from the load balancer, and the load balancer only retains web1.
-
(option) cancel the settings of page caching in nginx reverse proxy service to prevent interference with verification results;
-
Set redirection rules in web1 configuration file.
1) Nginx reverse proxy service configuration
[root@localhost ~]# cd /usr/local/nginx/conf/

[root@localhost conf]# vim nginx.conf
    upstream test.backend {
             # ip_hash;
             server 172.19.200.241 weight=1;
             # server 172.19.200.242 weight=1;
             # server 127.0.0.1:8080 backup
     }

    server {
        listen       80;
        server_name  localhost;

        #charset koi8-r;
        #access_log  logs/host.access.log  main;

        location / {
             proxy_set_header X-Real-IP $remote_addr;
             proxy_pass http://test.backend;
        }

[root@localhost conf]# service nginx reload
2) Proxy server web1 configuration
[root@e84e8f6ba866 ~]# cd /usr/local/nginx/conf/

[root@e84e8f6ba866 conf]# vim nginx.conf
        location / {
            root   html;
            index  index.html index.htm index.php;
            rewrite ^/ http://172.19.200.242;
        }

[root@e84e8f6ba866 conf]# service nginx reload
3. validation
-
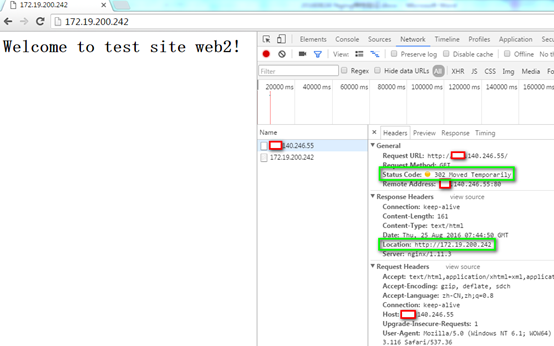
Accessing the reverse proxy server in the client browser: http://x.140.246.55
-
Return results have been redirected to web2 (where the client can access 172.19.200.0 segments, if not, the browser address bar redirects to the new address, but the test page returns errors);
-
Using the development debugging tool, we can see that when accessing the reverse proxy server, the status code is "302 Moved Temporarily", and the return address has been redirected to "172.19.200.242", the address of web2;
-
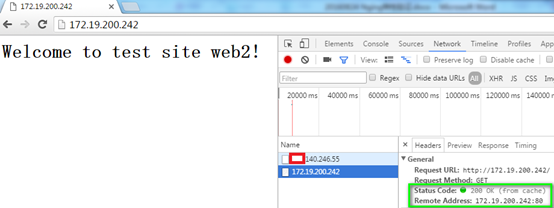
The status code of the redirected page is "200 OK (from cache)".