Technology is something that needs to be accumulated over time, learning a little new things every day, and reviewing the old things. Only in this way, if you persist for a period of time, your ability can be improved. It is not that you check when you use it, but that you pay more attention to discovering new things to study and discovering what you have studied to review. Today, I review a little bit of knowledge, that is to use ViewPager + Fragment + Page Transformer to realize sliding animation. It's very simple. Finally, I will attach the source code demo download address, skipped it.
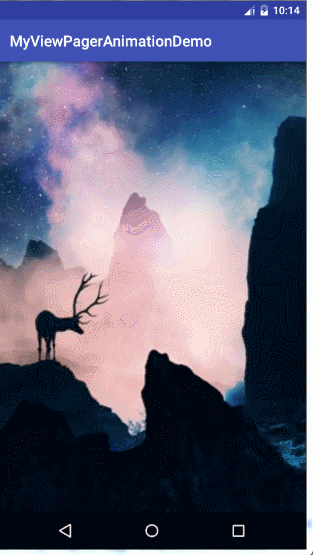
First, let's look at the first effect:

After viewing the effect, we begin to do the preparatory work. First, we use ViewPager+Fragment to achieve the most common sliding effect. I found three big pictures to do the background of three fragments, and created our XML layout file for each fragment. The code is as follows:
layout_fragment1:
<?xml version="1.0" encoding="utf-8"?>
<RelativeLayout xmlns:android="http://schemas.android.com/apk/res/android"
    android:layout_width="match_parent"
    android:layout_height="match_parent"
    android:orientation="vertical"
    android:id="@+id/rlayout">

    <ImageView
        android:layout_width="match_parent"
        android:layout_height="match_parent"
        android:background="@drawable/timg1" />
</RelativeLayout>
Layout_fragment2:
<?xml version="1.0" encoding="utf-8"?>
<RelativeLayout xmlns:android="http://schemas.android.com/apk/res/android"
    android:layout_width="match_parent"
    android:id="@+id/rlayout"
    android:layout_height="match_parent"
    android:orientation="vertical">

    <ImageView
        android:layout_width="match_parent"
        android:layout_height="match_parent"
        android:background="@drawable/timg2" />
</RelativeLayout>
Layout_fragment3:
<?xml version="1.0" encoding="utf-8"?>
<RelativeLayout xmlns:android="http://schemas.android.com/apk/res/android"
    android:layout_width="match_parent"
    android:layout_height="match_parent"
    android:id="@+id/rlayout"
    android:orientation="vertical">

    <ImageView
        android:layout_width="match_parent"
        android:layout_height="match_parent"
        android:background="@drawable/timg3" />
</RelativeLayout>
Simply, with an ImageView inside each, and a ViewPager added to the main Activity layout file, the layout will not be pasted. Take a look at the code inside the main Activity:
public class MainActivity extends AppCompatActivity {
private ViewPager myViewpager;
    private int[] layouts_fragment=new int[]{R.layout.layout_fragment1,R.layout.layout_fragment2,R.layout.layout_fragment3};
    @Override
    protected void onCreate(Bundle savedInstanceState) {
        super.onCreate(savedInstanceState);
        setContentView(R.layout.activity_main);
        myViewpager= (ViewPager) findViewById(R.id.myViewpager);
        myViewpager.setAdapter(new MyPagerAdpter(getSupportFragmentManager()));

    }

    public  class MyPagerAdpter extends FragmentPagerAdapter{

        public MyPagerAdpter(FragmentManager fm) {
            super(fm);
        }

        @Override
        public Fragment getItem(int position) {
            MyImageViewFragment myfragment= new MyImageViewFragment();
            Bundle bundle= new Bundle();
            bundle.putInt("position",layouts_fragment[position]);
            myfragment.setArguments(bundle);
            return myfragment;
        }

        @Override
        public int getCount() {
            return 3;
        }
    }
}
It's also simple to save different fragment layout file id with an array, inherit Fragment Pager Adapter to customize an adpter, create our fragment in getItem(), pass different layouts to fragment through different position s to show different layouts in fragment, return a number of 3 in getCount() method, and look at the code in fragment:
public class MyImageViewFragment extends Fragment {
    @Nullable
    @Override
    public View onCreateView(LayoutInflater inflater, @Nullable ViewGroup container, @Nullable Bundle savedInstanceState) {
        return inflater.inflate(getArguments().getInt("position"), null);
    }
}
It's also very simple to create fragments according to the layout id passed in, so that we can achieve the most common sliding effect. The top is the cushion, the back is the focus. It's also very simple to implement animation effect for ViewPager. google has provided us with related classes for our custom animation, namely ViewPager.PageTransformer. We implement ViewPageTransform. User interface custom animation, rewrite transformPage (View page,float) The position method has two parameters. The first parameter represents each Page in the ViewPage, and the second parameter represents the position corresponding to the current Page in the screen. If the current Page is displayed on the screen, then its corresponding position is 0. The position of its former Page is -1, and the position of its latter Page is 1. The position of its latter Page will change in the sliding process, such as now. If you slide the current Page to the right, the last Page will leak out, and it will be slowly sliding out of the screen (right side). This process is because the position of the previous Page before sliding is -1, which will slowly change to 0 with the sliding of our fingers. It is float type itself, such as - 1... - 0.9861111... - 0.837037... - 0.5638889... - 0.22314. 815... 0.0, and the position of Page that we showed on the screen before will gradually change from 0 to 1. It's the same as the other Pages. If you slide the screen to the left, the Page on the right will come out and the position will decrease. If you slide the screen to the right, the Page on the left will leak out, and the position will become larger. So we define our animation based on this now, because we only need to animate the Page that is currently displayed and the Page that will be displayed during the sliding process. The rest will be ignored, because the user can't see it at all, so we only need to achieve the above effect. Just code as below:
public class MyTransformer implements ViewPager.PageTransformer {
    /**
     * The main method of animation is called by every Fragment in the sliding process.
     *
     * @param page: Each Page;
     * @param position: The location of the current Page, when 0, indicates that the current Page is being displayed.
     */
    @Override
    public void transformPage(View page, float position) {
        System.out.println("Log_LYL:position_"+position);
        if (position > -1 && position < 1) {
//            Effect 1: Scale relative to XY axis;
            page.setScaleX(1-Math.abs(position));
            page.setScaleY(1-Math.abs(position));

        }
    }
}
Analyse that effect, because we only care about the Page that will be displayed and displayed, so here we only take the page between position-1 and 1 to do the operation. Look at the effect in the picture is only a zoom effect relative to X and Y axis. Slide to the left, the page on the right will be displayed. The current page will be pushed to the right. Analyse the page that will be missing. He has one. His position is from - 1 to 0, and we take the absolute value from 1 to 0, so we need to subtract 1 from this value to satisfy a process from 0 to 1, that is, from small to large.
Look at the second effect below.
Understanding the first effect of this effect is easy to achieve, that is, there is an additional restriction, small to a certain extent, stop becoming smaller, the code is as follows:
page.setScaleX(1-Math.abs(position)<0.9f?0.9f:1-Math.abs(position));
page.setScaleY(1-Math.abs(position)<0.9f?0.9f:1-Math.abs(position));
There's nothing to say about this. Look at the next effect.
This is a 3D rotation effect, look at the code implementation:
page.setPivotX(position < 0f ? page.getWidth() :0f);
page.setPivotY(page.getHeight()*0.5f);
page.setRotationY(position * 45f);
First we set the axis of rotation, then we only rotate 45 degrees. Look at the next effect:

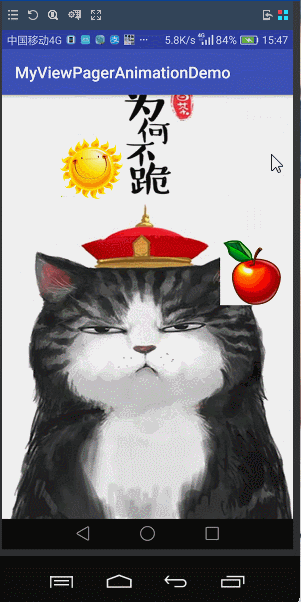
A parallax effect is achieved here. Looking at the apple, you can see that I found a few small pictures and put them in each fragment layout file. When we slide ViewPager in one direction, the sliding speed of the small picture above is not synchronized with the overall sliding speed. How can this be achieved? Look at the code:
ViewGroup vg = (ViewGroup) page.findViewById(R.id.rlayout);
for (int i = 0; i < vg.getChildCount(); i++) {
    if (i == 0)
        continue;
    View v = vg.getChildAt(i);
    float factor = (float) Math.random() * 3;
    if (v.getTag() == null) {
        v.setTag(factor);
    } else {
        factor = (float) v.getTag();
    }
    /**Each child control achieves a different parallax effect, and translationX is different.
     * position : 0 ~ -1
     * translationX: 0 ~ childView.getWidth();
     */
    v.setTranslationX(factor * v.getWidth() * position);
}
In fact, it is to move every sub-View according to a random value. Of course, our whole background picture is immovable. Then we save the random value of each picture. Each icon only corresponds to a random value. It is very simple and cheap to move the position of the picture according to the random value plus the change of position.
Let's just talk about it. It's nothing. The most important thing is to know something like ViewPager. Page Transformer, and then to implement different animations according to their different needs. Click Download Source Code.