Write before
Originally intended to update a blog every week, while recording the state of life for a week, but a little busy work will not take into account the blog. Miserable
Or to mention the recent situation, in the last two weeks has been receiving the company's application billing point, Wo store, silver shells, Wechat, etc., and then is constantly being urged, really the first two big. During this period, the project team also launched an App membership login system, accepting third-party logins, then applied to the existing App, and then a burst of crazy Coding.
Speaking of third-party login, it will inevitably contain third-party user information, such as avatars, nicknames, etc. In the original project, Picasso framework was used, and it has not been studied too deeply before. Taking this opportunity, we carefully studied its source code implementation, resulting in this blog.
text
Speaking of Picasso, I believe Android developers are no strangers. It's an image-loading artifact developed by Square. The coder that used it is absolutely passionate: for itself, it is lightweight, safe, effective in loading pictures and preventing OOM; for our developers, it is simple and convenient to load pictures in one line of code. So it's loved by Android developers.
As for its more advantages and advantages, I believe you are very clear without my introduction. Here we go straight to the topic to explain its use and to analyze its loading principle from the point of view of source code.
Picasso Basic Use
Introduction of a project
Add dependencies on the Picasso framework to our project build.gradle:
compile 'com.squareup.picasso:picasso:2.5.2'
Here I use the latest version of 2.5.2.
Adding permissions
Because loading pictures requires access to the network, we add permission to access the network in Manifest:
<uses-permission android:name="android.permission.INTERNET"/>
3. Create a Load Picture Layout File
Add a Button and an Image View to our MainActivity layout file:

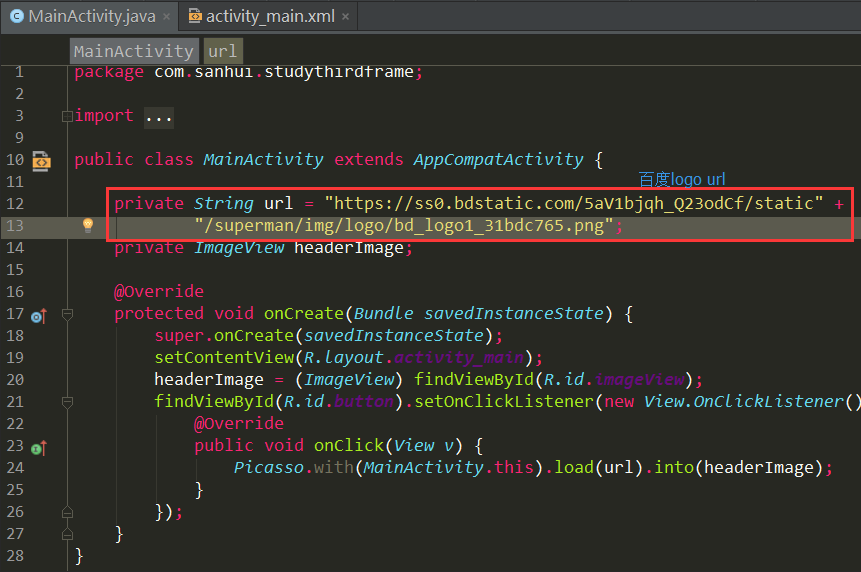
Four Main Activities Click to Load Pictures
Here we click Button to load an image of Baidu Logo and display it in the ImageView control.
Five loading pictures
Click Button to load the picture to see the results:
ok, it's loaded, but what exactly have we done?
Basic Loading
In fact, what we do is very simple, that is to add a line of code to Button's click event:
Picasso.with(MainActivity.this).load(url).into(headerImage);
That's one line of code to load the picture. As for how it is implemented, we will parse it in detail in the later source code analysis. Now let's look at its other uses.
Occupancy map
Not only is loading an image very simple, but it can also use a placeholder map in the loading process, which can be very friendly to tell the user that it is loading, rather than showing a blank interface in the loading process.
Picasso.with(MainActivity.this)
.load(url)
.placeholder(R.mipmap.ic_launcher)
.into(headerImage);
Using placeholder to set a placeholder for ImageView that has not yet been loaded into the image is a friendly way to display.
Anomaly map
Not only can you set placeholder maps, but you can also set exception maps for ImageView when the image cannot be loaded or when the image cannot be found to be loaded:
Picasso.with(MainActivity.this)
       .load(url)
       .placeholder(R.mipmap.ic_launcher)
       .error(R.drawable.error)
       .into(headerImage);
Using error, we can set an exception graph for the ImageView that loads the exception, modify our picture URL so that it can not get the correct picture address, and then we can see the results:
Converter
Not only that, we can also readjust the loaded image, such as changing the size of the image, displaying the shape, and so on. We can use the transform method, such as:
First, let's customize a Transformation:
 private class customTransformer implements Transformation{

        @Override
        public Bitmap transform(Bitmap source) {
            //You can do it here. Bitmap Do operations, such as changing size, shape, etc.

            return source;
        }
        @Override
        public String key() {
            return null;
        }
    }
Then, in the transform method, it processes:
 Picasso.with(MainActivity.this)
        .load(url)
        .placeholder(R.mipmap.ic_launcher)
        .transform(new customTransformer())
        .error(R.drawable.error)
        .into(headerImage);
In this way, we can control and select the pictures in a certain sense to make them more in line with our needs.
Of course, there are many other applications in Picasso, such as setting the load size, using resizeDimen method, using centerCrop, fit and so on, you can try to use them if you need. Let's not introduce them one by one.
Picasso source code parsing
ok, the above part of Picasso's basic use, very simple, a line of code to do what you need, then let's parse how it actually realizes our image loading and use from the point of view of the source code.
The following most concise loads are examples:
Picasso.with(MainActivity.this).load(url).into(headerImage);
with
First Picasso calls the static with method, so let's see how the with method is implemented:
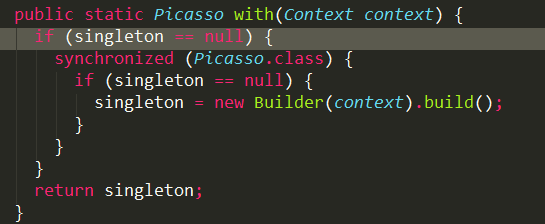
From the above source code, we can see that the main thing to do in the with method is to return a Picasso instance, of course, this instance is not so simple to create. In order to prevent multiple creation of Picasso, we use the double-locking singleton mode to create, the main purpose is to ensure thread security. But it is not created directly using the singleton pattern. In the process of creating an instance, the Builder pattern is used. It enables Picasso to initialize many objects at the time of creation for later use. So let's see how the Builder works.

In the construction method of Builder, only the context of the current application level is obtained, which shows that Picasso is for the use of application level, and it will not change with the life cycle of Activity or Fragment. Only when the current application exits or destroys, Picasso will stop its behavior.
Next, let's look at what is done in the build method.
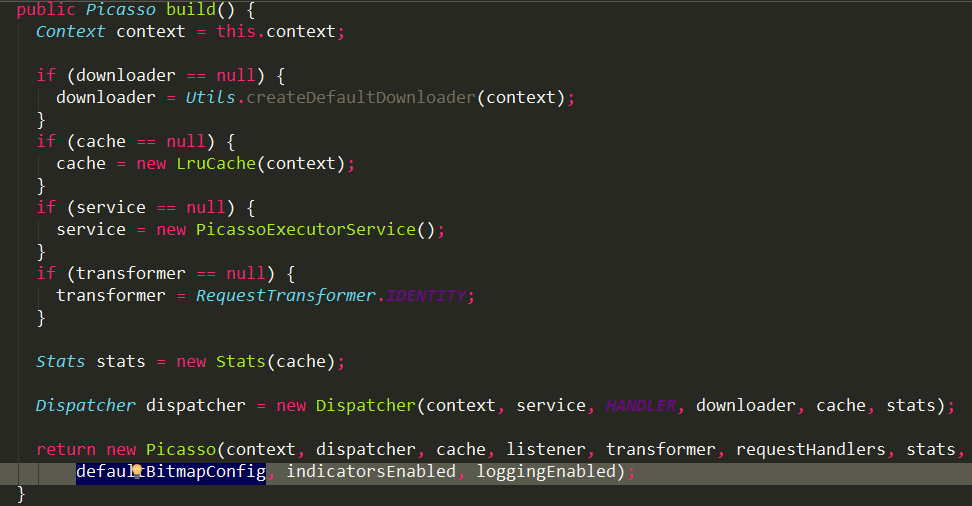
The code here is also very simple. It initializes several instance variables, such as downloader, cache, service, dispatcher, and so on. The values of these variables are also set:
   public Builder downloader(Downloader downloader) {
      if (downloader == null) {
        throw new IllegalArgumentException("Downloader must not be null.");
      }
      if (this.downloader != null) {
        throw new IllegalStateException("Downloader already set.");
      }
      this.downloader = downloader;
      return this;
    }

    public Builder executor(ExecutorService executorService) {
      if (executorService == null) {
        throw new IllegalArgumentException("Executor service must not be null.");
      }
      if (this.service != null) {
        throw new IllegalStateException("Executor service already set.");
      }
      this.service = executorService;
      return this;
    }

    public Builder memoryCache(Cache memoryCache) {
      if (memoryCache == null) {
        throw new IllegalArgumentException("Memory cache must not be null.");
      }
      if (this.cache != null) {
        throw new IllegalStateException("Memory cache already set.");
      }
      this.cache = memoryCache;
      return this;
    }

    ...
These settings are just like Alert Dialog, which we usually use when we arrive at Builder.
ok, let's now look at some very important variables in initialization:
downloader Downloader
First, look at downloader. The builder first determines whether the Downloader is null. When it is null, it initializes the default value for it, such as:
if (downloader == null) {
        downloader = Utils.createDefaultDownloader(context);
}
Let's look at how downloader is initialized in Utils:
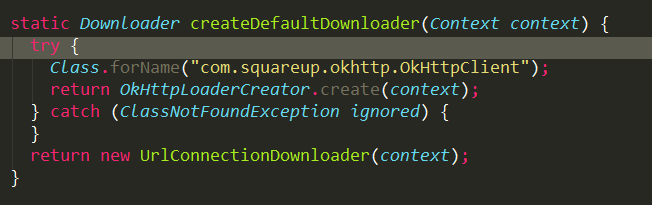
In the createDefaultDownloader method, java reflection mechanism is used to find out whether the okhttp network loading framework is used in the project. If it is used, okhttp will be used as the loading mode of images. If it is not used, the built-in encapsulation loader UrlConnection Downloader will be used.
Note: Because the package name of okhttp3 has been changed, the built-in package Downloader is used here. This is a small bug waiting to be perfected. When repaired, Picasso+okhttp3 is the best way to load.
service thread pool
In the same way, the first step is to determine whether it is empty or not, and if it is empty, initialize the default object:
if (service == null) {
    service = new PicassoExecutorService();
}
Let's look at the source code for Picasso Executor Service:
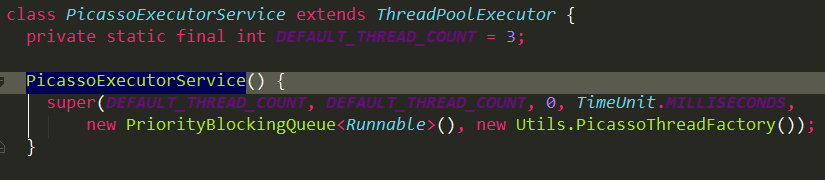
Picasso Executor Service directly inherits from ThreadPool Executor thread pool and initializes the main thread size and maximum thread in the construction method, such as:
public ThreadPoolExecutor(int corePoolSize,
                              int maximumPoolSize,
                              long keepAliveTime,
                              TimeUnit unit,
                              BlockingQueue<Runnable> workQueue,
                              ThreadFactory threadFactory) {
        if (corePoolSize < 0 ||
            maximumPoolSize <= 0 ||
            maximumPoolSize < corePoolSize ||
            keepAliveTime < 0)
            throw new IllegalArgumentException();
        if (workQueue == null || threadFactory == null || handler == null)
            throw new NullPointerException();
        this.corePoolSize = corePoolSize;
        this.maximumPoolSize = maximumPoolSize;
        this.workQueue = workQueue;
        this.keepAliveTime = unit.toNanos(keepAliveTime);
        this.threadFactory = threadFactory;
        this.handler = handler;
Of course, the number of main threads and maximum threads in the Picasso thread pool is variable. The number of threads is set according to the network type used by users. Its application will be described in detail later.
dispatcher transaction distributor
dispatcher plays a very important role in Picasso. It can be said that it is the transit station in the whole picture loading process. The switching between the main thread and the sub-thread mainly depends on its existence. Next, we will carefully study its design in the future, understand its existence and understand the whole Picasso framework is basically clear.
First of all, let's take a look at its appearance.
Dispatcher dispatcher = new Dispatcher(context, service, HANDLER, downloader, cache, stats);
Its debut is to create a Dispatcher object instance, of course, it passes on the object instance initialized in the Builder, such as downloader downloader, for image downloads, of course, downloads can no longer be carried out by the main thread, so the service thread pool is also passed here, and downloaded resources can not update the UI directly in the sub-thread, so at the same time. The HANDLER in the main thread is passed in. At the same time, application level context, cache, state change stats and so on are also passed in for corresponding business operations.
Through the above analysis, we can clearly see that such a simple example of creation has clearly expressed the significance of Dispatcher's existence, and we have also identified its general responsibilities.
Then let's look at what Dispatcher does in its construction method.
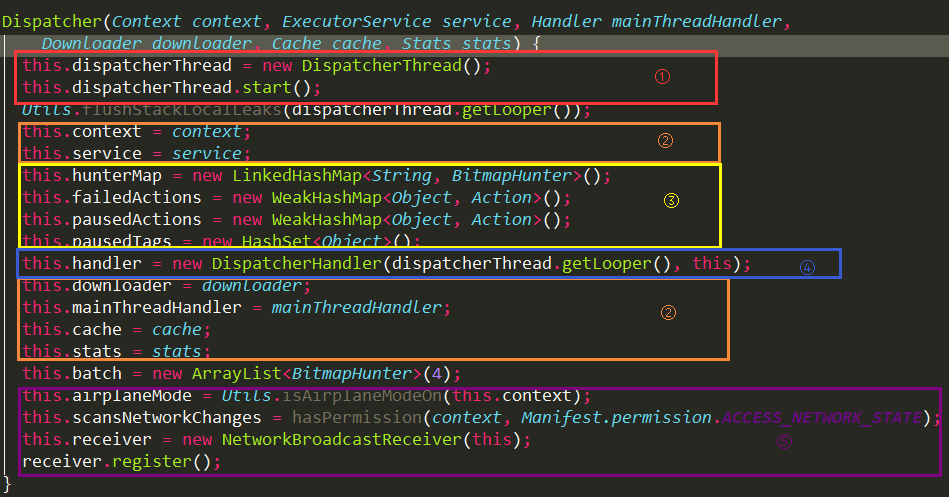
In the construction method of Dispatcher, I divide it into five parts. The following is a detailed analysis:
(1) dispatcher Thread, which is a Handler Thread thread, such as:
 static class DispatcherThread extends HandlerThread {
    DispatcherThread() {
      super(Utils.THREAD_PREFIX + DISPATCHER_THREAD_NAME, THREAD_PRIORITY_BACKGROUND);
    }
  }
Its creation is mainly to open a sub-thread for Dispatcher calls, the purpose is to perform time-consuming image download operations in the sub-thread.
(2) The acceptance of object instances is mainly the acceptance of object instances initialized in Picasso, which has nothing to say.
(3) Create a collection of data and objects, that is, for the purpose of saving objects or states.
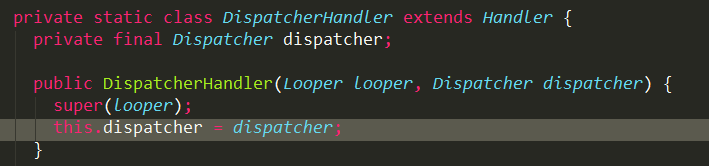
(4) Dispatcher Handler, which is a handler and works in dispatcher Thread thread, is used to transfer the operation of dispatcher Thread sub-thread to Dispatcher. Its construction method accepts Dispatcher object:
Let's see how his handleMessage method handles messages:
@Override public void handleMessage(final Message msg) {
      switch (msg.what) {
        case REQUEST_SUBMIT: {
          Action action = (Action) msg.obj;
          dispatcher.performSubmit(action);
          break;
        }
        case REQUEST_CANCEL: {
          Action action = (Action) msg.obj;
          dispatcher.performCancel(action);
          break;
        }
        case TAG_PAUSE: {
          Object tag = msg.obj;
          dispatcher.performPauseTag(tag);
          break;
        }
        case TAG_RESUME: {
          Object tag = msg.obj;
          dispatcher.performResumeTag(tag);
          break;
        }
        case HUNTER_COMPLETE: {
          BitmapHunter hunter = (BitmapHunter) msg.obj;
          dispatcher.performComplete(hunter);
          break;
        }
        case HUNTER_RETRY: {
          BitmapHunter hunter = (BitmapHunter) msg.obj;
          dispatcher.performRetry(hunter);
          break;
        }
        case HUNTER_DECODE_FAILED: {
          BitmapHunter hunter = (BitmapHunter) msg.obj;
          dispatcher.performError(hunter, false);
          break;
        }
        case HUNTER_DELAY_NEXT_BATCH: {
          dispatcher.performBatchComplete();
          break;
        }
        case NETWORK_STATE_CHANGE: {
          NetworkInfo info = (NetworkInfo) msg.obj;
          dispatcher.performNetworkStateChange(info);
          break;
        }
        case AIRPLANE_MODE_CHANGE: {
          dispatcher.performAirplaneModeChange(msg.arg1 == AIRPLANE_MODE_ON);
          break;
        }
        default:
          Picasso.HANDLER.post(new Runnable() {
            @Override public void run() {
              throw new AssertionError("Unknown handler message received: " + msg.what);
            }
          });
      }
    }
From its handleMessage, we can see that all messages are not processed directly, but transferred to dispatcher and processed accordingly in dispatcher.
_: Monitor network change operation, which is used to monitor the changes of user's mobile phone network. Let's mainly look at the Network Broadcast Receiver class:
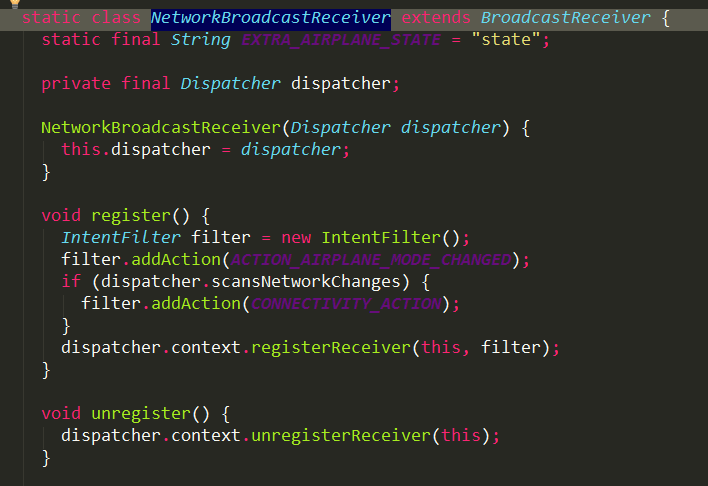
Dispatcher objects are also received in the construction parameters, and there are ways to register and destroy broadcasts. Of course, it is not directly processed, but also passed to Dispatcher for digestion.
Let's see what it does when the user's network changes:
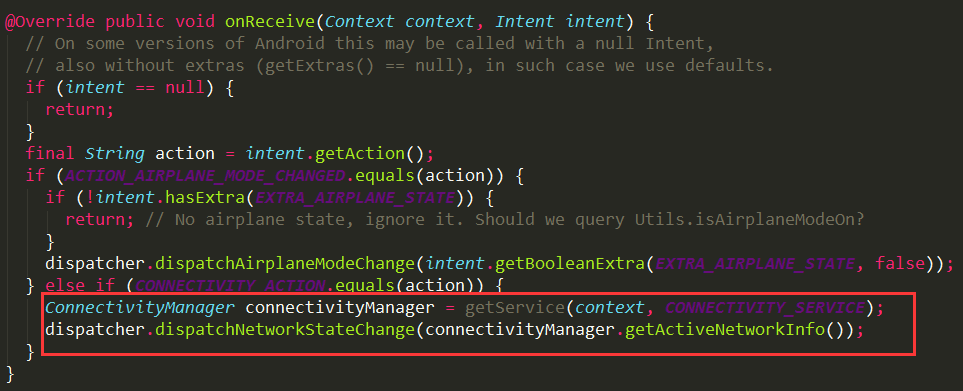
We can see that there are two main types, one is the flight mode, and the other is the normal network state change. We don't need to pay attention to the flight mode first. We mainly look at the operation of network change.
void dispatchNetworkStateChange(NetworkInfo info) {
         handler.sendMessage(handler.obtainMessage(NETWORK_STATE_CHANGE, info));
}
The handler here is Dispatcher Handler, so let's see how it works.
 case NETWORK_STATE_CHANGE: {
          NetworkInfo info = (NetworkInfo) msg.obj;
          dispatcher.performNetworkStateChange(info);
          break;
        }
Call the dispatcher's performNetworkStateChange method to process:
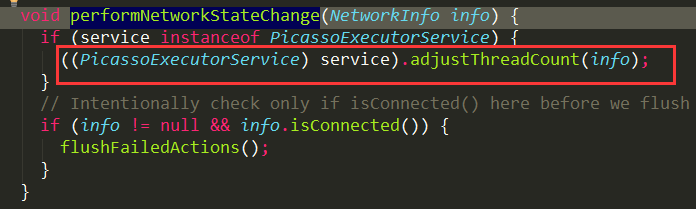
When the network changes, it will pass to our Picasso Executor Service thread pool. In the adjustThreadCount method, we can judge which type of network the user is using, such as wifi, 4G, etc., and then set the corresponding number of threads for the thread pool. Look at:
  void adjustThreadCount(NetworkInfo info) {
    if (info == null || !info.isConnectedOrConnecting()) {
      setThreadCount(DEFAULT_THREAD_COUNT);
      return;
    }
    switch (info.getType()) {
      case ConnectivityManager.TYPE_WIFI:
      case ConnectivityManager.TYPE_WIMAX:
      case ConnectivityManager.TYPE_ETHERNET:
        setThreadCount(4);
        break;
      case ConnectivityManager.TYPE_MOBILE:
        switch (info.getSubtype()) {
          case TelephonyManager.NETWORK_TYPE_LTE:  // 4G
          case TelephonyManager.NETWORK_TYPE_HSPAP:
          case TelephonyManager.NETWORK_TYPE_EHRPD:
            setThreadCount(3);
            break;
          case TelephonyManager.NETWORK_TYPE_UMTS: // 3G
          case TelephonyManager.NETWORK_TYPE_CDMA:
          case TelephonyManager.NETWORK_TYPE_EVDO_0:
          case TelephonyManager.NETWORK_TYPE_EVDO_A:
          case TelephonyManager.NETWORK_TYPE_EVDO_B:
            setThreadCount(2);
            break;
          case TelephonyManager.NETWORK_TYPE_GPRS: // 2G
          case TelephonyManager.NETWORK_TYPE_EDGE:
            setThreadCount(1);
            break;
          default:
            setThreadCount(DEFAULT_THREAD_COUNT);
        }
        break;
      default:
        setThreadCount(DEFAULT_THREAD_COUNT);
    }
  }

  private void setThreadCount(int threadCount) {
    setCorePoolSize(threadCount);
    setMaximumPoolSize(threadCount);
  }
As mentioned above, the number of threads is set according to different network types. For example, when the user uses wifi, the number of threads will be set to 4, and 4,000 threads will be set to 3, etc. So it is very humane to design the number of threads according to the specific situation of the user, which is worthy of our imitation.
ok, so far our important Dispatcher object construction method has been fully analyzed. From the above analysis, we clearly see the significance of Dispatcher as a transit station. Almost all the thread conversion operations are controlled by Dispatcher. Of course, there may be small partners who do not know how it works and how to enter sub-threads. That's why. For our explanation, we have not yet proceeded to the step of entering the sub-thread, the following will be further explained.
Summarize the important object examples included in Dispatcher:
(1) Picasso Executor Service Thread Pool
downloader Downloader
(3) Dispatcher Handler Processor for Dispatcher Thread Threads
Network Broadcast Receiver Network Monitor
_: Andler of the main Thread Handler thread
_: Collection of saved data: hunterMap, paused Actions, batch, etc.
Understanding the meaning of the above objects will be of great benefit to the following understanding. Please read it carefully without fully understanding it.
ok, after knowing what important object instances Dispatcher contains, let's go back to Picasso's Builder. The final object instance returned in the build method is Picasso's:
return new Picasso(context, dispatcher, cache, listener, transformer, requestHandlers, stats,defaultBitmapConfig, indicatorsEnabled, loggingEnabled);
In the construction method of Picasso, we only need to pay attention to the application of request Handlers:
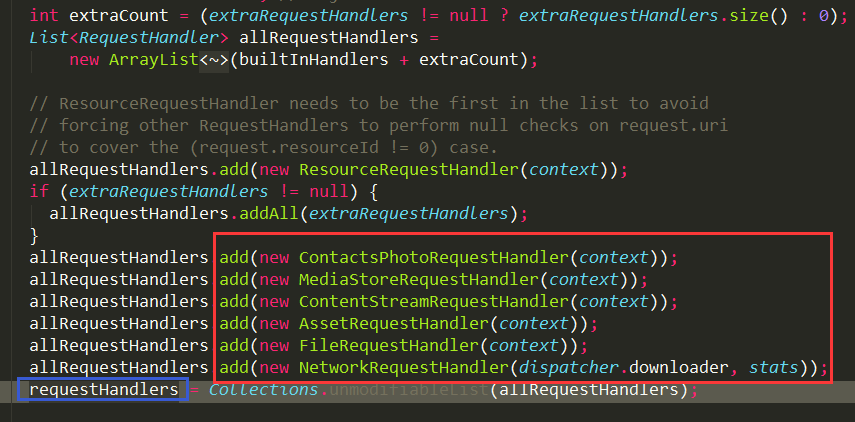
In this paper, Picasso can be applied to all RequestHandler are added to the collection, and then according to the specific needs of the corresponding Handler for business processing.
ok, what you have done in the with method in Picasso has been completely displayed in front of you. I believe you have a thorough understanding of this application.
So to sum up, Picasso now has those important object instances:
(1) dispatcher, the importance is self-evident, the above has fully demonstrated its importance, as a transit station, Picasso must have. The ultimate goal is to get our main thread into the sub-thread for time-consuming download operations.
(2) Request Handlers, which exists to select a request processing method, for example, downloading network pictures requires the use of the Network Request Handler requester.
(3) HANDLER, which is the main thread's Handler, is used to process the returned results. For example, it is through HANDLER that the UI is updated after the picture download is successful. This will be explained in detail when the UI is updated after the picture download is completed.
(4) Some examples of configuration objects, such as cache, default BitmapConfig for image loading, stats for state storage, etc.
load
In with method, we mainly do a basic configuration work, such as Picasso configuration, Dispatcher configuration, which are very important prerequisites. Only when we do these configurations well can we use them effortlessly.
Let's take a look at its application. In the load method, we need to pass a parameter, which can be Url, a path path path, a file, a resource layout, etc.
①: url
public RequestCreator load(Uri uri) {
    return new RequestCreator(this, uri, 0);
}

②: path
public RequestCreator load(String path) {
    if (path == null) {
      return new RequestCreator(this, null, 0);
    }
    if (path.trim().length() == 0) {
      throw new IllegalArgumentException("Path must not be empty.");
    }
    return load(Uri.parse(path));
}

③: file
public RequestCreator load(File file) {
    if (file == null) {
      return new RequestCreator(this, null, 0);
    }
    return load(Uri.fromFile(file));
}

④: resourceId
public RequestCreator load(int resourceId) {
   if (resourceId == 0) {
      throw new IllegalArgumentException("Resource ID must not be zero.");
    }
    return new RequestCreator(this, null, resourceId);
}
Whatever parameter is passed, it returns a request constructor, RequestCreator. Let's see what its constructor does.
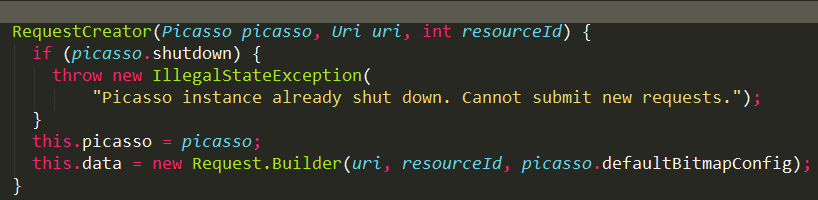
The main purpose is to obtain Picasso objects and build a Builder object in Request with Builder pattern:
Builder(Uri uri, int resourceId, Bitmap.Config bitmapConfig) {
      this.uri = uri;
      this.resourceId = resourceId;
      this.config = bitmapConfig;
    }
This Builder object mainly accepts some parameter information, including url, resource layout, and default image configuration.
Because the load method returns a RequestCreator object, we can use the method chain to invoke other methods, such as adding bitmaps, exception maps, converters to requests, and so on. Specifically, we can see the source code.
ok, in general, the load method creates a RequestCreator object, and a Request.Builder object is constructed in the RequestCreator.
So let's see what important object instances RequestCreator has:
(1) picasso object
(2) Request.Builder object instance data, which includes the URL address we requested, resource files and default image configuration.
into
In the load method, a RequestCreator object is created, and the url/path/file/resourceId resource address path to load is obtained. Then the next thing to do is to load the image in the into method. Let's first look at what the into method does:
 public void into(ImageView target, Callback callback) {
    long started = System.nanoTime();
    checkMain();

    if (target == null) {
      throw new IllegalArgumentException("Target must not be null.");
    }

    if (!data.hasImage()) {
      picasso.cancelRequest(target);
      if (setPlaceholder) {
        setPlaceholder(target, getPlaceholderDrawable());
      }
      return;
    }

    if (deferred) {
      if (data.hasSize()) {
        throw new IllegalStateException("Fit cannot be used with resize.");
      }
      int width = target.getWidth();
      int height = target.getHeight();
      if (width == 0 || height == 0) {
        if (setPlaceholder) {
          setPlaceholder(target, getPlaceholderDrawable());
        }
        picasso.defer(target, new DeferredRequestCreator(this, target, callback));
        return;
      }
      data.resize(width, height);
    }

    Request request = createRequest(started);
    String requestKey = createKey(request);

    if (shouldReadFromMemoryCache(memoryPolicy)) {
      Bitmap bitmap = picasso.quickMemoryCacheCheck(requestKey);
      if (bitmap != null) {
        picasso.cancelRequest(target);
        setBitmap(target, picasso.context, bitmap, MEMORY, noFade, picasso.indicatorsEnabled);
        if (picasso.loggingEnabled) {
          log(OWNER_MAIN, VERB_COMPLETED, request.plainId(), "from " + MEMORY);
        }
        if (callback != null) {
          callback.onSuccess();
        }
        return;
      }
    }

    if (setPlaceholder) {
      setPlaceholder(target, getPlaceholderDrawable());
    }

    Action action =
        new ImageViewAction(picasso, target, request, memoryPolicy, networkPolicy, errorResId,
            errorDrawable, requestKey, tag, callback, noFade);

    picasso.enqueueAndSubmit(action);
  }
If the above source code can know that into has done a lot of things, the following one by one analysis:
(1) checkMain(): First check whether the main thread runs or not, and if not in the main thread, an exception that should run on the main thread is throw: throw new Illegal State Exception ("Method call should happen from the main thread."); this shows that this step is still running on the main thread.
(2) data.hasImage(): The data here is the previously initialized Request.Builder object, which contains url address, resourceId and default configuration. This is to determine whether uri or resourceId is null or not. If so, cancel the image view request: picasso.cancelRequest(target);
(3) deferred: deferred, if needed, will be executed, and then to get the size of the image in the data, if not, get the width of the target to reset the size of the image to be loaded: data.resize(width, height);
createRequest: Create a Request object in the data.build() method that will contain uri or resourceId and default image config. The transformation is then performed after the resulting Request object, which is mainly related to whether we customized the Request Transformer at the time of Picasso construction.
_: createKey: It mainly returns the String type key. The main purpose is to establish an association between the ImageView and the key. It can get the status of the ImageView through the key, such as whether it has been cached or not.
_ShouReadFromMemoryCache: Look at the method name, you can also know whether it is used to read data from the memory cache, if so, read data from the cache. If you get data, you will cancel the current ImageView request and set Bitmap directly to it, and if there are callbacks, you will call back the successful method.
_: ImageViewAction: Building an ImageViewAction object, it is noteworthy that when building an object, the ImageView will be added to the RequestWeakReference for storage, so that it can be easily used to find, RequestWeakReference is a WeakReference type of weak reference. At the same time, ImageViewAction is also a key class to update the UI when loading images, which will be explained in detail later.
_: enqueueAndSubmit: Invoke the enqueueAndSubmit method of picasso to submit the task.
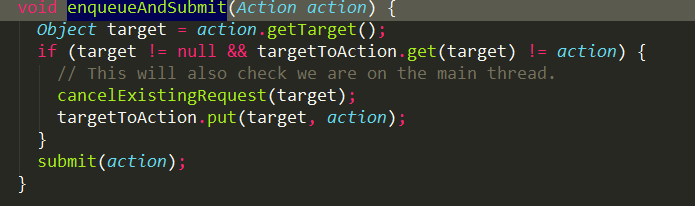
Let's look at the operation of the submit method:
void submit(Action action) {
    dispatcher.dispatchSubmit(action);
}
Here we use the dispatcher task distributor again to submit our task action to Dispatcher for processing. Then look at the dispatchSubmit method:
void dispatchSubmit(Action action) {
    handler.sendMessage(handler.obtainMessage(REQUEST_SUBMIT, action));
  }
From Dispatcher's construction method, we can know that the handler at this time is Dispatcher Handler, so let's see how it handles our task behavior:
 case REQUEST_SUBMIT: {
          Action action = (Action) msg.obj;
          dispatcher.performSubmit(action);
          break;
Get our task Action directly in handleMessage, and then call the performSubmit method:
void performSubmit(Action action, boolean dismissFailed) {
    if (pausedTags.contains(action.getTag())) {
      pausedActions.put(action.getTarget(), action);
      if (action.getPicasso().loggingEnabled) {
        log(OWNER_DISPATCHER, VERB_PAUSED, action.request.logId(),
            "because tag '" + action.getTag() + "' is paused");
      }
      return;
    }

    BitmapHunter hunter = hunterMap.get(action.getKey());
    if (hunter != null) {
      hunter.attach(action);
      return;
    }

    if (service.isShutdown()) {
      if (action.getPicasso().loggingEnabled) {
        log(OWNER_DISPATCHER, VERB_IGNORED, action.request.logId(), "because shut down");
      }
      return;
    }

    hunter = forRequest(action.getPicasso(), this, cache, stats, action);
    hunter.future = service.submit(hunter);
    hunterMap.put(action.getKey(), hunter);
    if (dismissFailed) {
      failedActions.remove(action.getTarget());
    }

    if (action.getPicasso().loggingEnabled) {
      log(OWNER_DISPATCHER, VERB_ENQUEUED, action.request.logId());
    }
  }
The performance Submit method is the specific place for the real task submission. Let's interpret its source code.
(1) Firstly, the action flag is used to query whether it exists in the paused action list. If it exists, the action will be stored in the set list of paused actions in order to wait for the wake-up request.
(2) Then query the existence of the hunterMap request item from the hunterMap collection by action key. If it exists, the attach method of hunter will be invoked to merge the request, avoiding repeated requests from an ImageView:
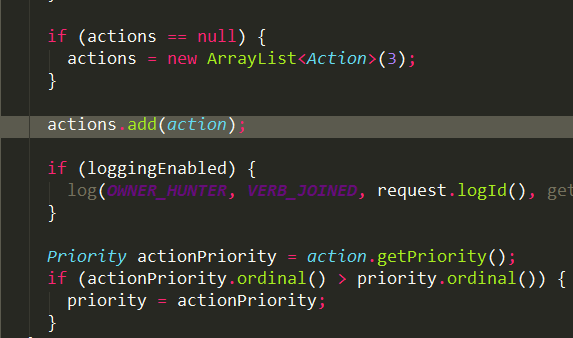
Store the action in the ArrayList. If the same action exists according to the non-repeatability of the ArrayList, an action will be saved and the new attribute value priority will be updated.
(3) When the thread pool service is not closed, a BitmapHunter thread of Runnable type is obtained by forRequest method, and the source code of forRequest is looked at.
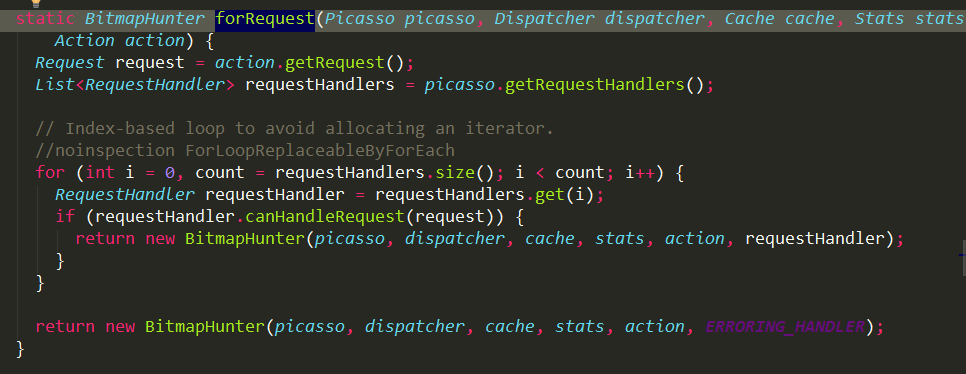
Request requests and all requestHandlers request processors are retrieved from action and picasso, respectively. Then all requesters are traversed to get each request processor. CanHandleRequest is called to try to see if the processor can handle it. See the canHandleRequest method:
public abstract boolean canHandleRequest(Request data);It is an abstract method that needs to be searched by subclasses, and the subclasses that implement it are all based on the following constraints to determine whether the request can be processed:
String scheme = data.uri.getScheme();
That is to say, judging by the Scheme s constraint of url address, and getting url from Request in our current action begins with http/https, then look at the canHandleRequest source code in NetworkRequestHandler:
private static final String SCHEME_HTTP = "http";
private static final String SCHEME_HTTPS = "https";

@Override
public boolean canHandleRequest(Request data) {
    String scheme = data.uri.getScheme();
    return (SCHEME_HTTP.equals(scheme) || SCHEME_HTTPS.equals(scheme));
  }
You can see the right match and conclude that the Network Request Handler processor will process the data we request.
Matched with the request handler, a BitmapHunter thread will be returned, the thread will be opened in the thread pool after getting it, and the thread will be stored in the hunterMap thread set so that multiple requests can merge the same thread:
    hunter.future = service.submit(hunter);
    hunterMap.put(action.getKey(), hunter);
ok, now you can go to our thread pool Picasso Executor Service to see how it works. The submit source code is as follows:
@Override
  public Future<?> submit(Runnable task) {
    PicassoFutureTask ftask = new PicassoFutureTask((BitmapHunter) task);
    execute(ftask);
    return ftask;
  }
By encapsulating our thread task into Picasso FutureTask, Picasso FutureTask is a more convenient thread for us to control, then call execute to open the thread, then transfer our thread to the addWorker method, and start the thread in addWorker:
boolean workerStarted = false;
        boolean workerAdded = false;
        Worker w = null;
        try {
            w = new Worker(firstTask);
            final Thread t = w.thread;
            if (t != null) {
                final ReentrantLock mainLock = this.mainLock;
                mainLock.lock();
                try {
                    // Recheck while holding lock.
                    // Back out on ThreadFactory failure or if
                    // shut down before lock acquired.
                    int rs = runStateOf(ctl.get());

                    if (rs < SHUTDOWN ||
                        (rs == SHUTDOWN && firstTask == null)) {
                        if (t.isAlive()) // precheck that t is startable
                            throw new IllegalThreadStateException();
                        workers.add(w);
                        int s = workers.size();
                        if (s > largestPoolSize)
                            largestPoolSize = s;
                        workerAdded = true;
                    }
                } finally {
                    mainLock.unlock();
                }
                if (workerAdded) {
                    t.start();
                    workerStarted = true;
                }
The above source code is executed in the ThreadPool Executor thread pool. You can see the source code.
When the thread opens, where does it execute?
We know that our encapsulated thread started with BitmapHunter, so let's go inside and see how it works:
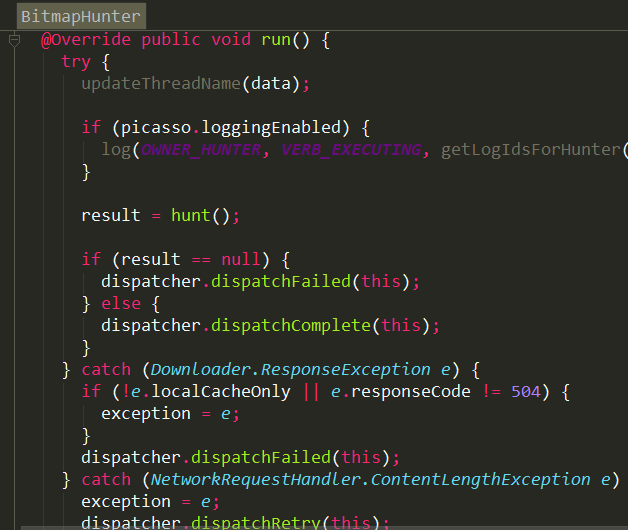
In BitmapHunter's run method, first modify the thread name, then execute the hunt method, and store the execution results in the result. Let's first see how the hunt method performs:
Bitmap hunt() throws IOException {
    Bitmap bitmap = null;

    if (shouldReadFromMemoryCache(memoryPolicy)) {
      bitmap = cache.get(key);
      if (bitmap != null) {
        stats.dispatchCacheHit();
        loadedFrom = MEMORY;
        if (picasso.loggingEnabled) {
          log(OWNER_HUNTER, VERB_DECODED, data.logId(), "from cache");
        }
        return bitmap;
      }
    }

    data.networkPolicy = retryCount == 0 ? NetworkPolicy.OFFLINE.index : networkPolicy;
    RequestHandler.Result result = requestHandler.load(data, networkPolicy);
    if (result != null) {
      loadedFrom = result.getLoadedFrom();
      exifRotation = result.getExifOrientation();

      bitmap = result.getBitmap();

      // If there was no Bitmap then we need to decode it from the stream.
      if (bitmap == null) {
        InputStream is = result.getStream();
        try {
          bitmap = decodeStream(is, data);
        } finally {
          Utils.closeQuietly(is);
        }
      }
    }

    if (bitmap != null) {
      if (picasso.loggingEnabled) {
        log(OWNER_HUNTER, VERB_DECODED, data.logId());
      }
      stats.dispatchBitmapDecoded(bitmap);
      if (data.needsTransformation() || exifRotation != 0) {
        synchronized (DECODE_LOCK) {
          if (data.needsMatrixTransform() || exifRotation != 0) {
            bitmap = transformResult(data, bitmap, exifRotation);
            if (picasso.loggingEnabled) {
              log(OWNER_HUNTER, VERB_TRANSFORMED, data.logId());
            }
          }
          if (data.hasCustomTransformations()) {
            bitmap = applyCustomTransformations(data.transformations, bitmap);
            if (picasso.loggingEnabled) {
              log(OWNER_HUNTER, VERB_TRANSFORMED, data.logId(), "from custom transformations");
            }
          }
        }
        if (bitmap != null) {
          stats.dispatchBitmapTransformed(bitmap);
        }
      }
    }

    return bitmap;
  }
Parse the lower source code:
(1) The key corresponding to the action behavior is obtained first, and the bitmap is found from the cache by the key. If there is a change in the state, the bitmap is returned directly.
(2) If the cache does not exist, we need to load requestHandler.load(); we know from the above analysis that the requestHandler that can handle the current requesr is NetworkRequestHandler, so let's go to the load method of NetworkRequestHandler to see:
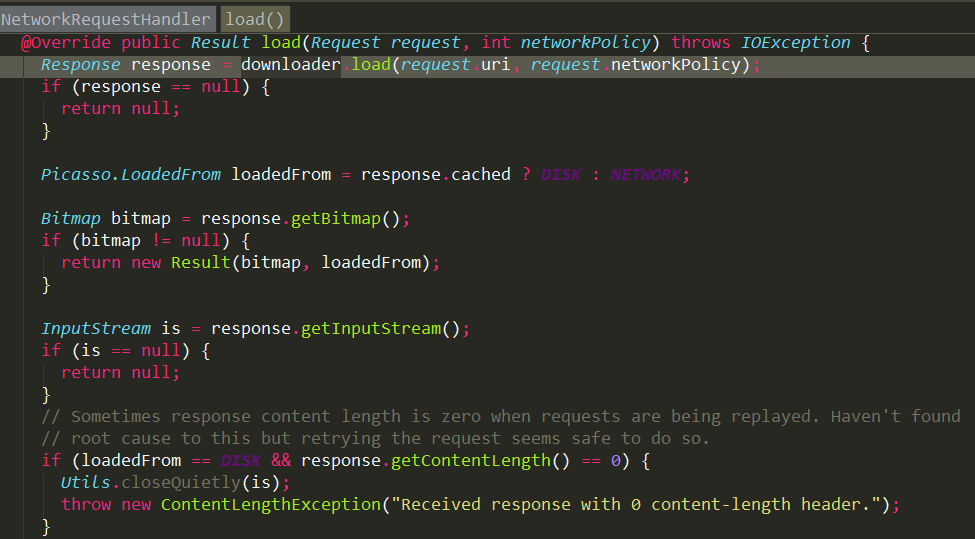
It's clear here that downloader's load method is called directly, and our downloader clearly stated when Picasso built the Builder that it was UrlConnection Downloader, so look at the load method to UrlConnection Downloader:
protected HttpURLConnection openConnection(Uri path) throws IOException {
    HttpURLConnection connection = (HttpURLConnection) new URL(path.toString()).openConnection();
    connection.setConnectTimeout(Utils.DEFAULT_CONNECT_TIMEOUT_MILLIS);
    connection.setReadTimeout(Utils.DEFAULT_READ_TIMEOUT_MILLIS);
    return connection;
  }

  @Override public Response load(Uri uri, int networkPolicy) throws IOException {
    if (Build.VERSION.SDK_INT >= Build.VERSION_CODES.ICE_CREAM_SANDWICH) {
      installCacheIfNeeded(context);
    }

    HttpURLConnection connection = openConnection(uri);
    connection.setUseCaches(true);

    if (networkPolicy != 0) {
      String headerValue;

      if (NetworkPolicy.isOfflineOnly(networkPolicy)) {
        headerValue = FORCE_CACHE;
      } else {
        StringBuilder builder = CACHE_HEADER_BUILDER.get();
        builder.setLength(0);

        if (!NetworkPolicy.shouldReadFromDiskCache(networkPolicy)) {
          builder.append("no-cache");
        }
        if (!NetworkPolicy.shouldWriteToDiskCache(networkPolicy)) {
          if (builder.length() > 0) {
            builder.append(',');
          }
          builder.append("no-store");
        }

        headerValue = builder.toString();
      }

      connection.setRequestProperty("Cache-Control", headerValue);
    }

    int responseCode = connection.getResponseCode();
    if (responseCode >= 300) {
      connection.disconnect();
      throw new ResponseException(responseCode + " " + connection.getResponseMessage(),
          networkPolicy, responseCode);
    }

    long contentLength = connection.getHeaderFieldInt("Content-Length", -1);
    boolean fromCache = parseResponseSourceHeader(connection.getHeaderField(RESPONSE_SOURCE));

    return new Response(connection.getInputStream(), fromCache, contentLength);
  }
The code here is believed to be familiar to all of us, that is, to build a HttpURLConnection to make network requests, and of course, to implement some network caching strategies according to the network policy. Finally, the results are stored in the Response object.
Then NetworkRequestHandler's load method retrieves data from the Response object and stores it in the Result object. Then it returns to the RequestHandler.Result result of the hunt method in BitmapHunter, gets the input stream from the result, parses the input stream into Bitmap and returns.
So far, we have downloaded data from the network and converted it into bitmap. Then, in the run method returned to our BitmapHunter, we get bitmap. Then we call dispatcher to distribute things. If successful, we call dispatchComplete, otherwise we call dispatchFailed.
Let's look at the dispatchComplete method in dispatcher:
void dispatchComplete(BitmapHunter hunter) {
    handler.sendMessage(handler.obtainMessage(HUNTER_COMPLETE, hunter));
  }
In the same way, the handler here is Dispatcher Handler, so let's look at its handling:
 case HUNTER_COMPLETE: {
          BitmapHunter hunter = (BitmapHunter) msg.obj;
          dispatcher.performComplete(hunter);
          break;
        }
Go to the dispatcher's performance Complete method:

Here we first save our results in the cache and then remove the key corresponding to BitmapHunter from the hunterMap collection because the request has been completed. Then call batch(hunter); method:
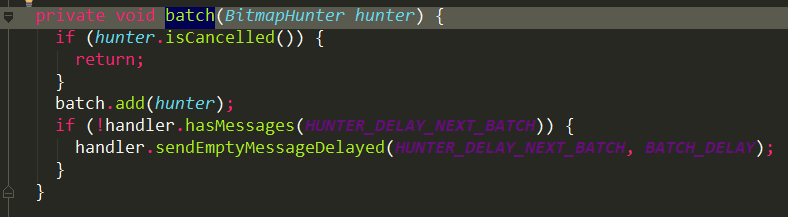
First, determine whether BitmapHunter has been cancelled, then store BitmapHunter in a List < BitmapHunter > batch set, and finally send an empty delay message through Dispatcher Handler. The purpose is to delay the next network load to handle the current bitmap work. See how it handles:
 case HUNTER_DELAY_NEXT_BATCH: {
          dispatcher.performBatchComplete();
          break;
        }
Enter PerfmBatch Complete to see:
void performBatchComplete() {
    List<BitmapHunter> copy = new ArrayList<BitmapHunter>(batch);
    batch.clear();
    mainThreadHandler.sendMessage(mainThreadHandler.obtainMessage(HUNTER_BATCH_COMPLETE, copy));
    logBatch(copy);
  }
In performance BatchComplete, the collection of BitmapHunter is first retrieved, and then the message is sent by calling mainThreadHandler.
Remember how mainThreadHandler was?
In the build method of building Builder in Picasso class, create a Dispatcher object and pass in a parameter of HANDLER. See:
Dispatcher dispatcher = new Dispatcher(context, service, HANDLER, downloader, cache, stats);
This HANDLER is mainThreadHandler.
So how does it handle the messages it sends?
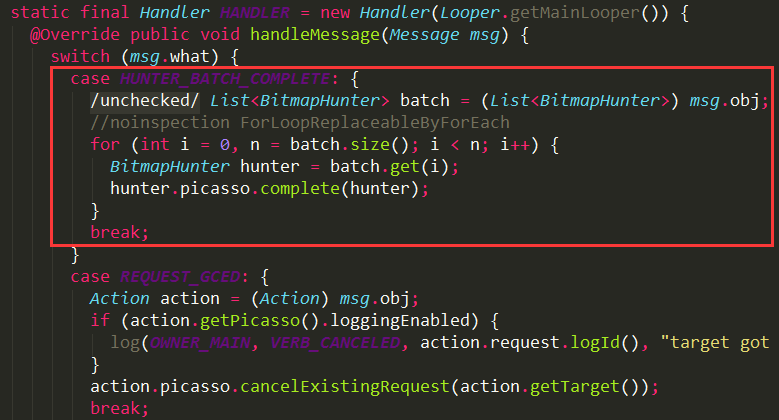
Get the BitmapHunter collection for traversal, and then call the complete method in Picasso directly:
void complete(BitmapHunter hunter) {
    Action single = hunter.getAction();
    List<Action> joined = hunter.getActions();

    boolean hasMultiple = joined != null && !joined.isEmpty();
    boolean shouldDeliver = single != null || hasMultiple;

    if (!shouldDeliver) {
      return;
    }

    Uri uri = hunter.getData().uri;
    Exception exception = hunter.getException();
    Bitmap result = hunter.getResult();
    LoadedFrom from = hunter.getLoadedFrom();

    if (single != null) {
      deliverAction(result, from, single);
    }

    if (hasMultiple) {
      //noinspection ForLoopReplaceableByForEach
      for (int i = 0, n = joined.size(); i < n; i++) {
        Action join = joined.get(i);
        deliverAction(result, from, join);
      }
    }

    if (listener != null && exception != null) {
      listener.onImageLoadFailed(this, uri, exception);
    }
  }
In the complete method, data information such as Action, Uri, Bitmap and so on is obtained directly from BitmapHunter, and then the delivery action method is called:
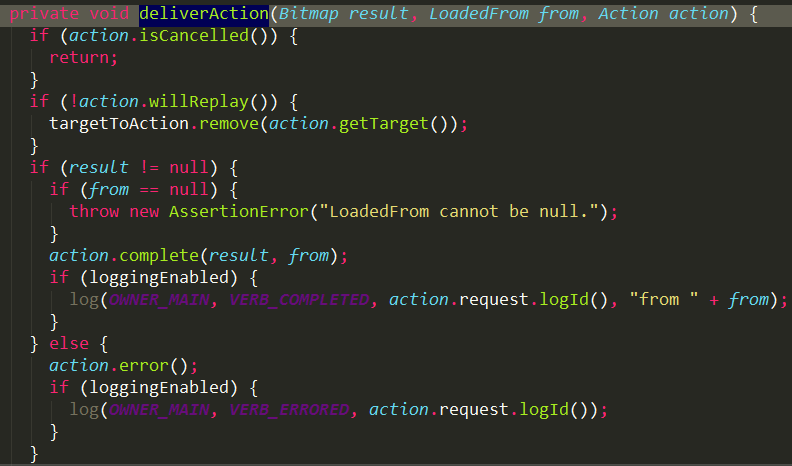
A series of judgments are made here. When action is not cancelled and Bitmap is not empty, action.complete(result, from); is called to complete the operation.
Do you remember what we did when we created action?
Action action =
        new ImageViewAction(picasso, target, request, memoryPolicy, networkPolicy, errorResId,
            errorDrawable, requestKey, tag, callback, noFade);
So it's clear that our Action is actually ImageView Action.
So let's see how the complete of ImageViewAction works.
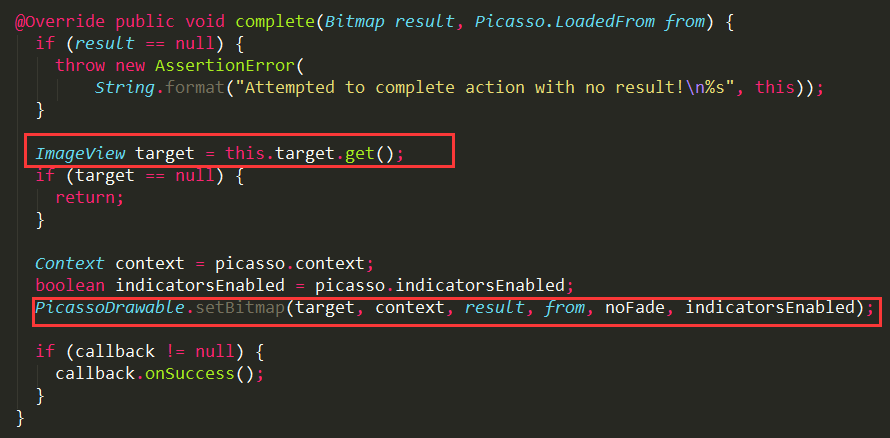
target is the ImageView that we passed when we created the ImageView Action. Now we get it, and then call the PicassoDrawable.setBitmap method to complete the setup picture:
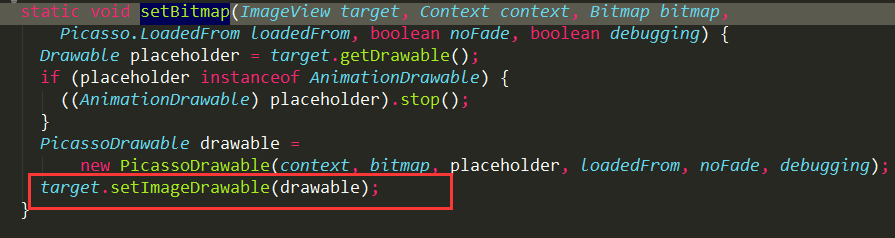
When we see target.setImageDrawable(drawable), is it a relief to finally see the information of setting up pictures for ImageView?
Well, at this point, the whole process of source code execution of Picasso loading pictures has been completely analyzed. I believe you can understand the loading process of the whole framework very clearly. At the same time, I also believe that few people can do such a detailed and complete analysis of the whole execution process, and the whole process did not leave any blind spots for you. It is really true. Big source code parsing.
If there is anything you don't understand, or if what I'm talking about here is not thorough enough, or where I'm wrong, please leave a message to correct it. Let's make progress together. Thank you.
At the same time, please sweep the public number of my Wechat, although not very diligent, but each article has quality assurance, so that you can learn the real knowledge.