Earlier we talked about Eureka and Spring Cloud Config, and today we introduced an all-round player, Consul.It is a tool introduced by HashiCorp to provide service discovery and service configuration.It is developed in go language and has good portability.Included by Spring Cloud, Eureka stopped the development of new versions and wanted developers to use Consul more as a service registration discovery.
Consul provides the following functions:
Service Discovery
Consul makes service registration and service discovery (through DNS and HTTP interfaces) simpler, even for external services such as SaaS registration.
Fault Detection
Through health checks, service discovery prevents requests from being routed to unhealthy hosts and makes it easy to disconnect (no longer provide services).
Multiple Data Centers
Consul can easily expand to multiple data centers without complex configuration, find services from other data centers, or simply request services from the current data center.
Key Value Storage
Flexible key-value storage provides dynamic configuration, feature tagging, collaboration, leader election, and other functions, enabling instant notification of configuration changes through long polling.
Spring Cloud Consul automatically configures and further encapsulates Consul.
Spring Cloud Consul can replace the existing Spring Cloud Eureka, which is used as a service registration discovery framework.The Eureka 2.x version has also been discontinued, and Spring Cloud officially recommends using Spring Cloud Consul instead. Of course, if Eureka is already used in the project, it will be stable enough to work properly without any problems.
Spring Cloud Consul can replace the existing Spring Cloud Config, which is used as a configuration center.
Spring Cloud Consul is mainly used for service registration discovery and is officially recommended as an alternative to Eureka, so it certainly has the advantages that Eureka or other frameworks do not have. Here's a look at comparing it to other service discovery methods (taken from the network):
| Function Point | euerka | Consul | zookeeper | etcd |
|---|---|---|---|---|
| Service Health Examination | Allowable Support | Service status, memory, hard disk, etc. | (Weak) Long connection, keep alive | Connect heartbeat |
| Multiple Data Centers | — | Support | — | — |
| kv storage service | — | Support | Support | Support |
| Uniformity | — | raft | paxos | raft |
| cap | ap (High Availability, Partition Fault Tolerance) | ca (data consistent, highly available) | cp | cp |
| Using interfaces (multilingual capabilities) | http(sidecar) | Support for http and dns | Client | http/grpc |
| watch support | Support for long polling/most increments | Full/long polling support | Support | Support for long polling |
| Self-monitoring | metrics | metrics | — | metrics |
| security | — | acl /https | acl | https support (weak) |
| spring cloud integration | Supported | Supported | Supported | Supported |
Consul uses raft algorithm to ensure strong consistency of data, so the benefits are obvious and there are some sacrifices:
- Service registration is slightly slower than Eureka.Because Consul's raft protocol requires that more than half of the nodes be written successfully before registration is considered successful;
- When the Leader hangs up, the entire consul is unavailable during the re-election, which guarantees strong consistency but sacrifices availability.
Installation and Startup of Consul
Unlike Eureka, Consul needs to be installed independently and can be downloaded on the official website (https://www.consul.io/downloads.html).Specific operating systems are installed in different ways, you can refer to the official website.
Consul provides a series of parameters for execution on the command line.Consul provides a web UI interface by default to view the configuration.You can access the web UI console by accessing the server's port 8500.
During the development process, we can start the development mode by commanding consul agent-dev. After successful startup, visit localhost:8500 to see all services of the current consul.As follows: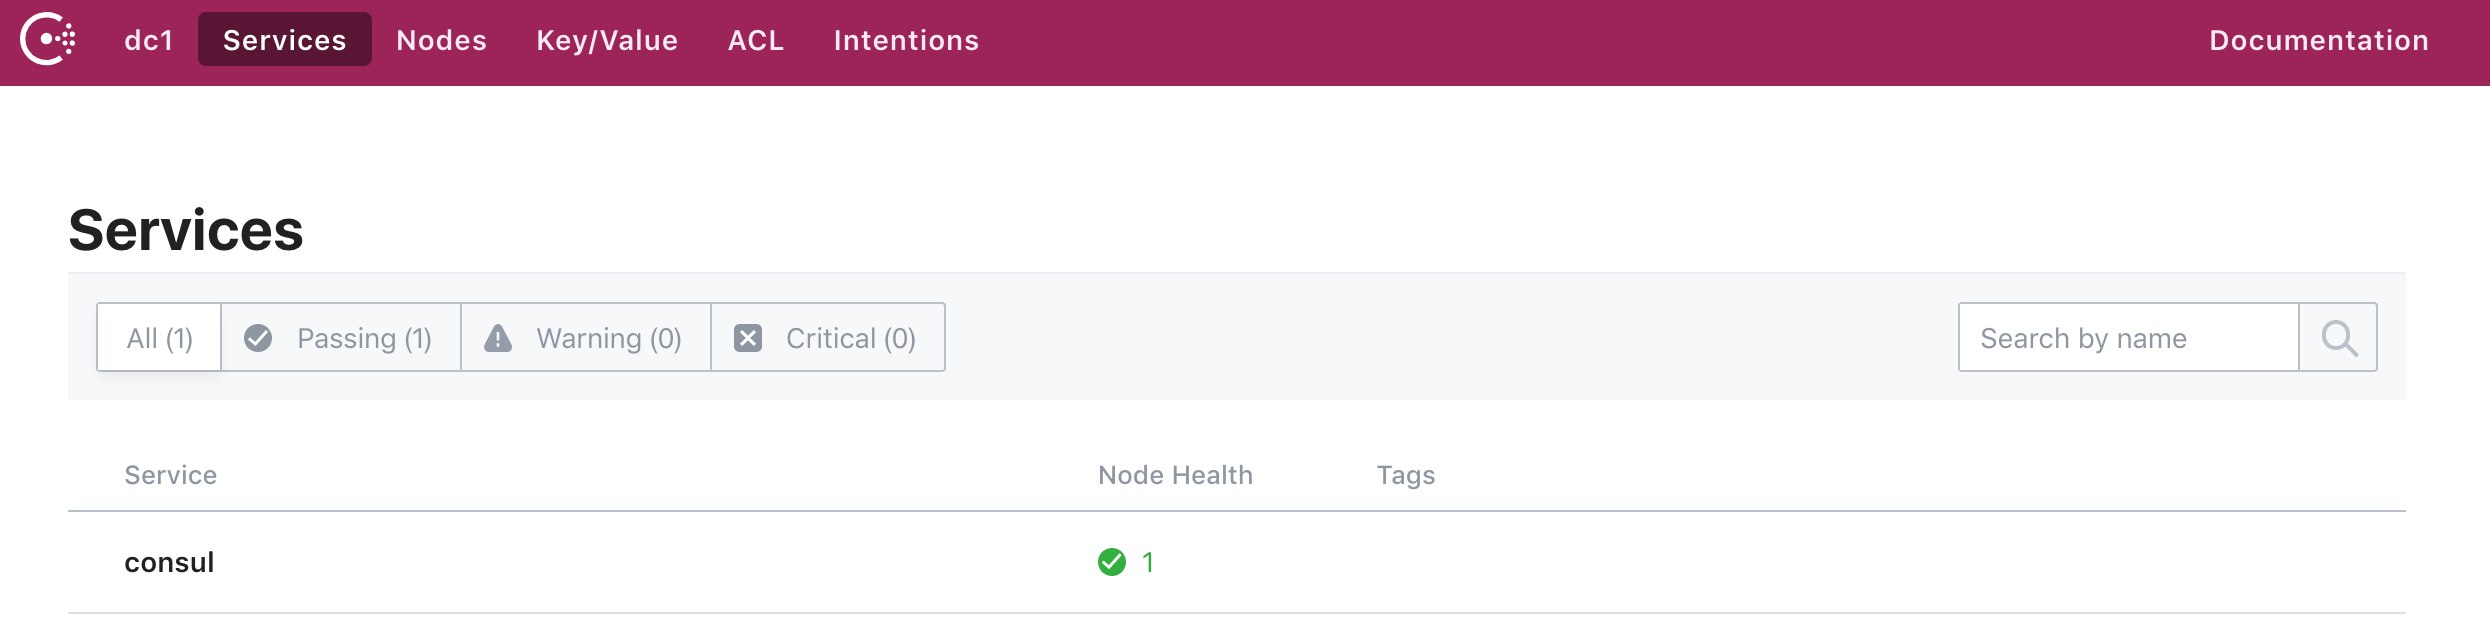
More deployments in the build environment can search for introductions themselves, and for the time being, only dev mode is used to launch introducing the use of Spring Cloud Consul.
Implement service providers
1. Reference to spring-cloud-consul
<dependency>
    <groupId>org.springframework.cloud</groupId>
    <artifactId>spring-cloud-starter-consul-all</artifactId>
</dependency>
<dependency>
    <groupId>org.springframework.boot</groupId>
    <artifactId>spring-boot-starter-web</artifactId>
</dependency>
<dependency>
    <groupId>org.springframework.boot</groupId>
    <artifactId>spring-boot-starter-actuator</artifactId>
</dependency>
<dependencyManagement>
    <dependencies>
        <dependency>
            <groupId>org.springframework.cloud</groupId>
            <artifactId>spring-cloud-consul-dependencies</artifactId>
            <version>2.1.0.M2</version>
            <type>pom</type>
            <scope>import</scope>
        </dependency>
    </dependencies>
</dependencyManagement>
2. Set up consul-related configuration as follows in the bootstrap.yml configuration file:
spring:
  cloud:
    consul:
      discovery:
        service-name: consul-provider  ## Service Provider Name
      host: localhost                  ## Service Address of consul
      port: 8500                       ## consul port
3. Set up server-related configuration as follows in the application.yml configuration file:
spring:
  application:
    name: consul-provider
server:
  port: 5000

endpoints:
  health:
    sensitive: false
  restart:
    enabled: true
  shutdown:
    enabled: true

management:
  security:
    enabled: false
4. Add a RestController and write two test service methods
@RestController
@Slf4j
public class HelloController {

    @Autowired
    private DiscoveryClient discoveryClient;

    @GetMapping(value = "test")
    public String test(){
        List<String> services = discoveryClient.getServices();
        for(String s : services){
            log.info(s);
        }
        return "hello spring cloud!";
    }

    @GetMapping(value = "nice")
    public String nice(){
        List<String> services = discoveryClient.getServices();
        for(String s : services){
            log.info("gogogo" + s);
        }
        return "nice to meet you!";
    }
}
5. Spring boot startup class
@SpringBootApplication
@EnableDiscoveryClient
public class Application {
    public static void main(String[] args) {
        SpringApplication.run(Application.class, args);
    }
}
The @EnableDiscoveryClient annotation indicates that this is a client end.
Start the service provider and open http://localhost:8500 to see the service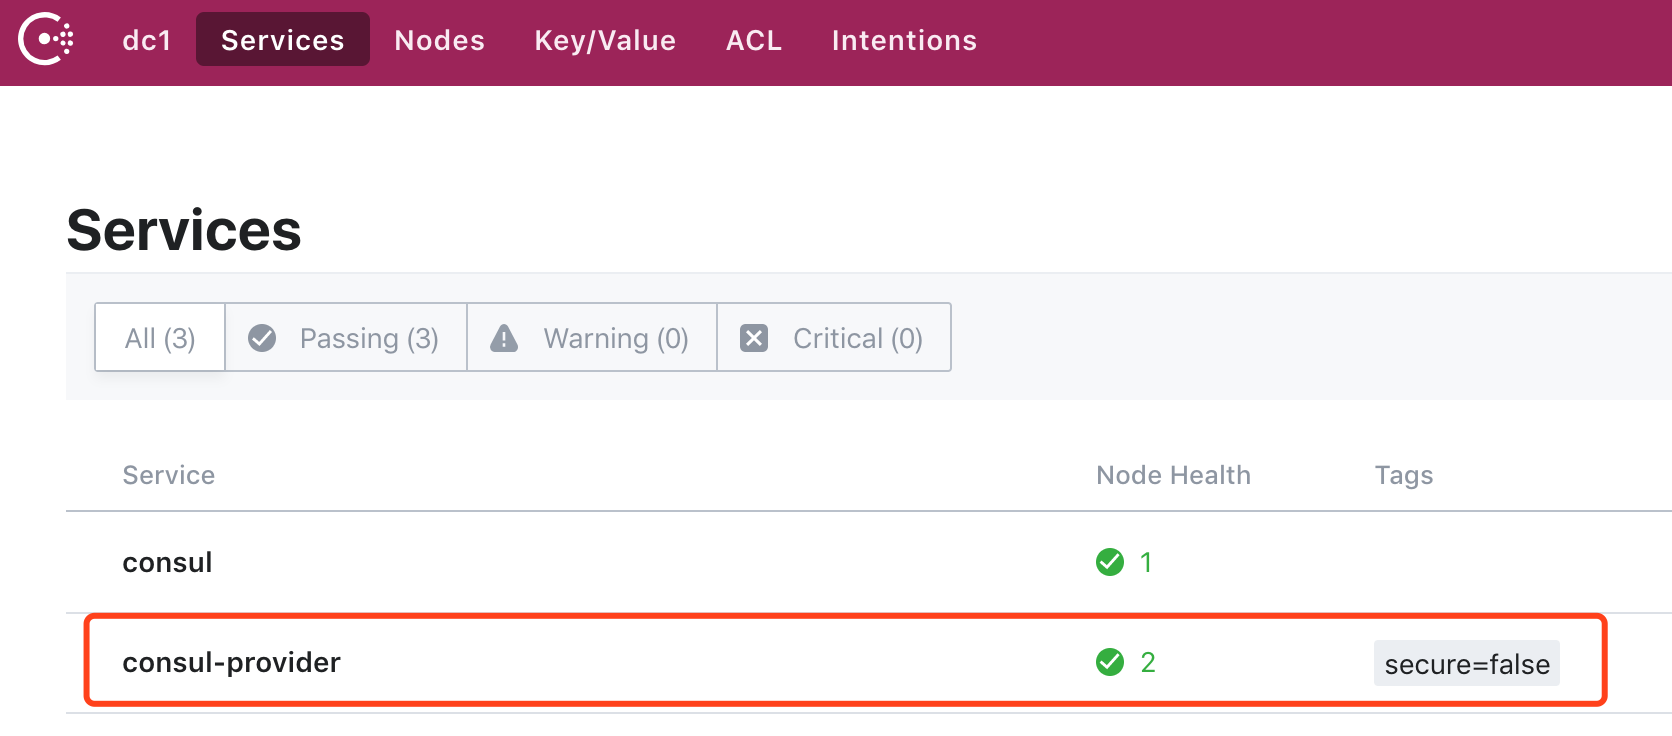
Implementing service consumers
1. Reference the related maven package, referencing openFeign in addition to the same package as the service provider above
<dependency>
    <groupId>org.springframework.cloud</groupId>
    <artifactId>spring-cloud-starter-openfeign</artifactId>
</dependency>
2. bootstrap.yml configuration, because as a service consumer, settings are not registered with consul
spring:
  cloud:
    consul:
      discovery:
        register: false
3. application.yml Configuration
spring:
  application:
    name: consul-customer
server:
  port: 5001

endpoints:
  health:
    sensitive: false
  restart:
    enabled: true
  shutdown:
    enabled: true

management:
  security:
    enabled: false
4. Project Startup Class
@SpringBootApplication
@EnableDiscoveryClient
@EnableFeignClients
public class Application {

    @Bean
    @LoadBalanced
    public RestTemplate restTemplate() {
        return new RestTemplate();
    }

    public static void main(String[] args) {
        SpringApplication.run(Application.class, args);
    }
}
Use the @EnableDiscoveryClient annotation to indicate that as the service client side, @EnableFeignClients enables openFeign.
5. Create a new openFeign service interface
@FeignClient(value = "consul-provider")
public interface IHelloService {

    @RequestMapping(value = "/hello")
    String hello();

    @RequestMapping(value = "nice")
    String nice();
}
Two RESTful interface addresses provided in the corresponding service provider
6. Implement a RestController to access services opened by service providers
@RestController
public class ConsumerController {

    @Autowired
    private LoadBalancerClient loadBalancer;

    @Autowired
    private DiscoveryClient discoveryClient;


    @Autowired
    private RestTemplate restTemplate;

    @Autowired
    private IHelloService helloService;

    private final static String SERVICE_NAME = "consul-provider";


    /**
     * Accessing services using the common estTemplate method
     *
     * @return
     */
    @GetMapping(value = "test")
    public Object test() {
        String result = restTemplate.getForObject("http://"+SERVICE_NAME + "/test", String.class);
        System.out.println(result);
        return result;
    }

    /**
     * Accessing services using openFeign
     *
     * @return
     */
    @GetMapping(value = "feign")
    public Object feign() {
        String s = helloService.nice();
        return s;
    }


    /**
     * Get all service instances
     *
     * @return
     */
    @GetMapping(value = "/services")
    public Object services() {
        return discoveryClient.getInstances(SERVICE_NAME);
    }

    /**
     * Select a service from all services (polling)
     */
    @GetMapping(value = "/choose")
    public Object choose() {
        return loadBalancer.choose(SERVICE_NAME).getUri().toString();
    }
}
Start the consumer program and access the corresponding RESTful interface to get the results.
Implementing a highly available service provider
Online microservices are best not in a single point format. Next, configure to start two service providers, which means the same service as long as the service-name is the same.
1. The bootstrap.yml configuration is unchanged
spring:
  cloud:
    consul:
      discovery:
        service-name: consul-provider
      host: localhost
      port: 8500
2. application.yml is modified to the following configuration
spring:
  profiles:
    active: consul-provider1
endpoints:
  health:
    sensitive: false
  restart:
    enabled: true
  shutdown:
    enabled: true

management:
  security:
    enabled: false

---
spring:
  profiles: consul-provider1
  application:
    name: consul-provider1

server:
  port: 5000

---
spring:
  profiles: consul-provider2
  application:
    name: consul-provider2

server:
  port: 5002
3. Add vm parameter when starting.Add parameters separately:
-Dspring.profiles.active=consul-provider1
-Dspring.profiles.active=consul-provider2
Start service provider consul-provider on port 5000 and port 5002, respectively
4. Finally, you can still access the consumer's RESTful interface address and see the service instance invoked by each request in the service provider's background.
Use as Configuration Center
We know that Spring Cloud Config provides configuration center functionality, but it needs to be used with git, svn, or external storage (such as various databases), so now that Consul is used, you can use the configuration center functionality provided by Consul without the need for additional git, svn, databases, and so on.
Next, I'll give you a brief introduction to how Spring Cloud Consul can be used as a configuration center.Consul supports configuration file contents in yaml and properties formats, for example, in yaml format.
1. Reference to related maven packages
<dependency>
    <groupId>org.springframework.cloud</groupId>
    <artifactId>spring-cloud-starter-consul-config</artifactId>
</dependency>
<dependency>
    <groupId>org.springframework.boot</groupId>
    <artifactId>spring-boot-starter-web</artifactId>
</dependency>
<dependency>
    <groupId>org.springframework.boot</groupId>
    <artifactId>spring-boot-starter-actuator</artifactId>
</dependency>
2. bootstrap.yml configuration, where config parameters are mainly set
spring:
  cloud:
    consul:
      config:
        enabled: true    # Enable Configuration Center
        format: yaml     # Specify configuration format as yaml
        data-key: mysql_config # That is, the key in consul
        prefix: config         # Can be understood as the outermost directory where the configuration file is located
        defaultContext: consul-config  # Can be understood as the parent directory of mysql_config
      discovery:
        register: false
For consul, the configuration in key/value is as follows: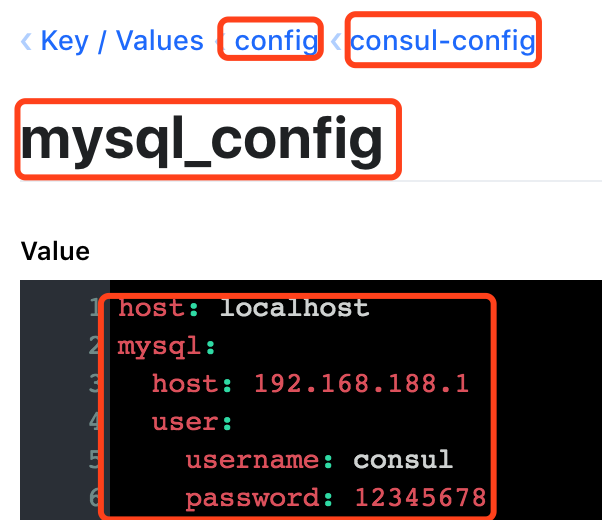
3. application.yml profile content
spring:
  application:
    name: consul-config
server:
  port: 5008

endpoints:
  health:
    sensitive: false
  restart:
    enabled: true
  shutdown:
    enabled: true

management:
  security:
    enabled: false
4. Define the profile entity class, specify the @ConfigurationProperties annotation, and specify the prefix mysql, which is the top key in the key/value profile.
@Component
@ConfigurationProperties(prefix = "mysql")
public class MySqlComplexConfig {

    public static class UserInfo{

        private String username;

        private String password;

        public String getUsername() {
            return username;
        }

        public void setUsername(String username) {
            this.username = username;
        }

        public String getPassword() {
            return password;
        }

        public void setPassword(String password) {
            this.password = password;
        }

        @Override
        public String toString() {
            return "UserInfo{" +
                    "username='" + username + '\'' +
                    ", password='" + password + '\'' +
                    '}';
        }
    }

    private String host;

    private UserInfo user;


    public String getHost() {
        return host;
    }

    public void setHost(String host) {
        this.host = host;
    }

    public UserInfo getUser() {
        return user;
    }

    public void setUser(UserInfo user) {
        this.user = user;
    }

}
5. Create a new RestController to get the output value content
@RestController
@Slf4j
public class ConfigController {

    @Autowired
    private MySqlConfig mySqlConfig;

    @Autowired
    private MySqlComplexConfig mySqlComplexConfig;


    @GetMapping(value = "mysqlhost")
    public String getMysqlHost(){
        return mySqlConfig.getHost();
    }

    @GetMapping(value = "mysqluser")
    public String getMysqlUser(){
        log.info(mySqlComplexConfig.getHost());
        MySqlComplexConfig.UserInfo userInfo = mySqlComplexConfig.getUser();
        return userInfo.toString();
    }

}
6. Finally, start the application and access the RESTful interface in RestController to see the contents of the configuration file.
Compared to Spring Cloud Config, Consul updates the configuration immediately after the console changes, without requiring a combination such as Spring Cloud Bus.
Source Address
If you feel your writing is OK, click "Recommendation"
Welcome to update this series and other articles from time to time
Ancient kites, enter the public number to join the communication group