scene
Step by step, we will teach you to quickly build a spring boot project in IEDA:
https://blog.csdn.net/BADAO_LIUMANG_QIZHI/article/details/87688277
Please refer to the following blog for plug-in installation
Use @ Data to install Lombok plug-in for SpringBoot project in IDEA
https://blog.csdn.net/BADAO_LIUMANG_QIZHI/article/details/88362861
The project uses the EasyCode plug-in to automatically generate code, which can be used as a reference
Install EasyCode plug-in in IDEA and connect to database to generate code:
https://blog.csdn.net/BADAO_LIUMANG_QIZHI/article/details/103132436
Realization
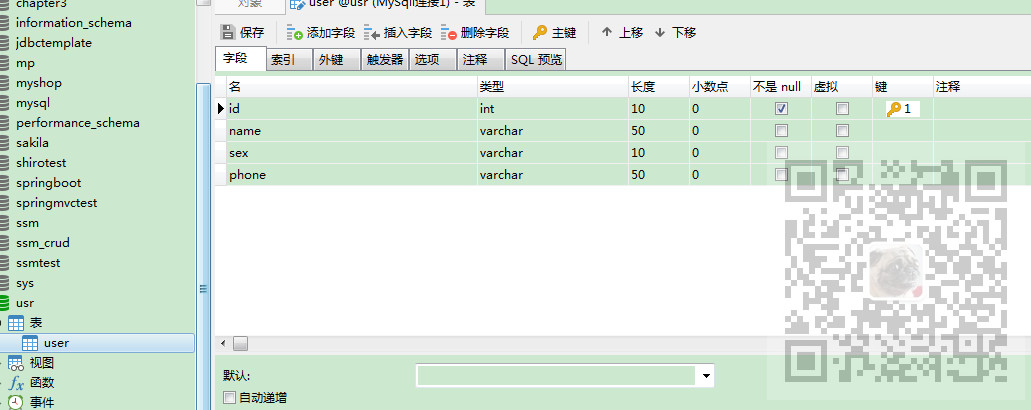
Build database
Install Mysql 8.0 locally, install Navicat, a tool for connecting Mysql, create a new database usr, and create a new table user
New spring boot project in IDEA
Refer to the above blog to build the spring boot project in IDEA, and the directory of the project is
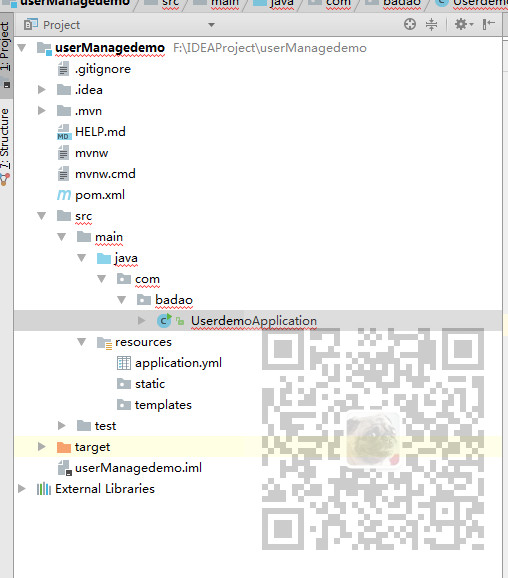
Create a new application startup class under badao package
package com.badao.usermanage;


import org.springframework.boot.SpringApplication;
import org.springframework.boot.autoconfigure.SpringBootApplication;

@SpringBootApplication
public class UsermanageApplication {

    public static void main(String[] args) {
        SpringApplication.run(UsermanageApplication.class, args);
    }

}
Then add dependency in pom file
<?xml version="1.0" encoding="UTF-8"?>
<project xmlns="http://maven.apache.org/POM/4.0.0" xmlns:xsi="http://www.w3.org/2001/XMLSchema-instance"
         xsi:schemaLocation="http://maven.apache.org/POM/4.0.0 https://maven.apache.org/xsd/maven-4.0.0.xsd">
    <modelVersion>4.0.0</modelVersion>
    <parent>
        <groupId>org.springframework.boot</groupId>
        <artifactId>spring-boot-starter-parent</artifactId>
        <version>2.2.1.RELEASE</version>
        <relativePath/> <!-- lookup parent from repository -->
    </parent>
    <groupId>com.badao</groupId>
    <artifactId>springbootdemo</artifactId>
    <version>0.0.1-SNAPSHOT</version>
    <name>springbootdemo</name>
    <description>Demo project for Spring Boot</description>

    <properties>
        <java.version>1.8</java.version>
    </properties>

    <dependencies>
        <dependency>
            <groupId>org.springframework.boot</groupId>
            <artifactId>spring-boot-starter-web</artifactId>
        </dependency>
        <dependency>
            <groupId>org.projectlombok</groupId>
            <artifactId>lombok</artifactId>
            <optional>true</optional>
        </dependency>

        <!-- mybatis-plus Plug-in unit -->
        <dependency>
            <groupId>com.baomidou</groupId>
            <artifactId>mybatis-plus-boot-starter</artifactId>
            <version>3.1.0</version>
        </dependency>


        <!-- mysql jdbc drive -->
        <dependency>
            <groupId>mysql</groupId>
            <artifactId>mysql-connector-java</artifactId>
            <scope>runtime</scope>
        </dependency>
        <dependency>
            <groupId>org.springframework.boot</groupId>
            <artifactId>spring-boot-starter-test</artifactId>
            <scope>test</scope>
            <exclusions>
                <exclusion>
                    <groupId>org.junit.vintage</groupId>
                    <artifactId>junit-vintage-engine</artifactId>
                </exclusion>
            </exclusions>
        </dependency>
    </dependencies>

    <build>
        <plugins>
            <plugin>
                <groupId>org.springframework.boot</groupId>
                <artifactId>spring-boot-maven-plugin</artifactId>
            </plugin>
        </plugins>
        <resources>
        <resource>
            <directory>src/main/java</directory>
            <includes>
                <include>**/*.yml</include>
                <include>**/*.xml</include>
            </includes>
            <filtering>false</filtering>
        </resource>
        </resources>
    </build>

</project>
Then change the application.properties file under resources to application.yml (personal habits)
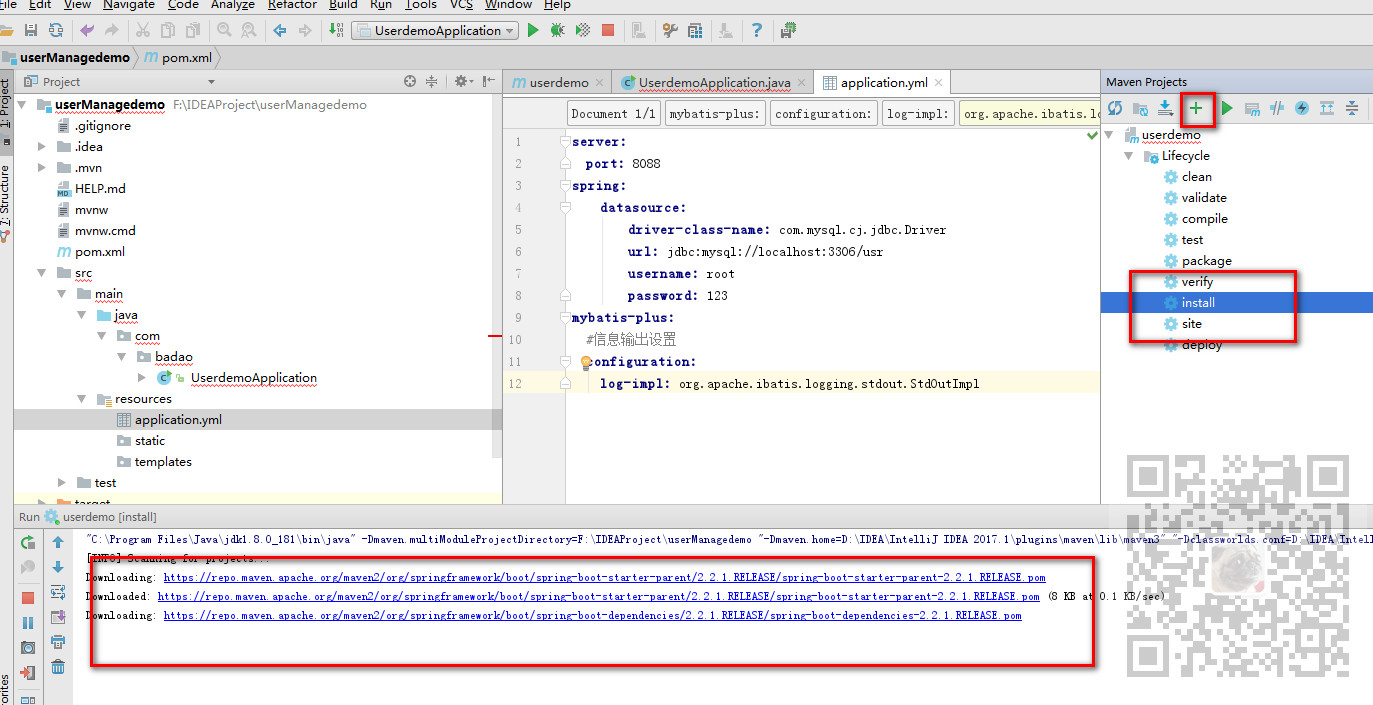
Modify the configuration file to
server:
  port: 8088
spring:
  datasource:
    driver-class-name: com.mysql.cj.jdbc.Driver
    url: jdbc:mysql://localhost:3306/usr
    username: root
    password: 123
mybatis-plus:
  #Information output settings
  # xml address
  mapper-locations: classpath:mapper/*Dao.xml
  # Entity scanning, multiple package s separated by commas or semicolons
  # type-aliases-package: ***   #Own entity class address
  configuration:
    log-impl: org.apache.ibatis.logging.stdout.StdOutImpl

Note that my local Mysql version here is 8.0, so the driver url here is as above.
The reason why the above projects are reported as red is that some dependencies have not been downloaded yet.
In the Maven panel on the right -- click + and select pom.xml for the current project, then click install or the refresh icon in the upper left corner.
Using EasyCode to generate code
Refer to the above blog to install the EasyCode plug-in in IDEA and use it to generate code. The directory after generating code is
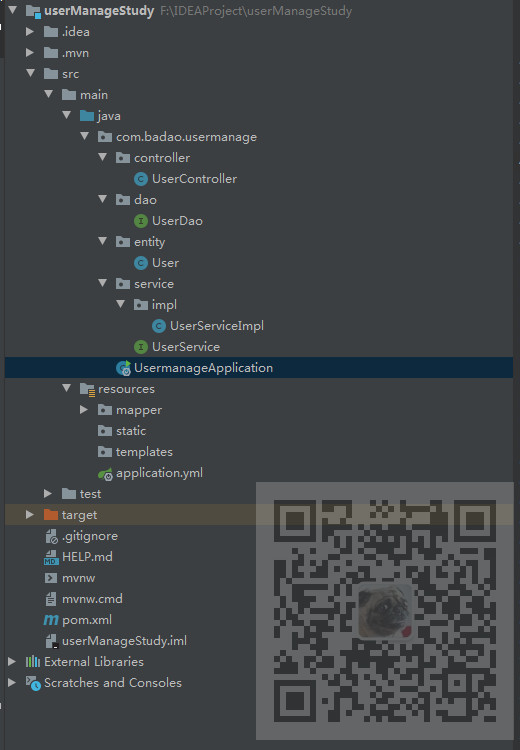
Since the default code generation template is used after code generation, you also need to add MapperScan annotation and specify dao layer package in the startup class
package com.badao.usermanage;

import org.mybatis.spring.annotation.MapperScan;
import org.springframework.boot.SpringApplication;
import org.springframework.boot.autoconfigure.SpringBootApplication;

@SpringBootApplication
@MapperScan("com.badao.usermanage.dao")
public class UsermanageApplication {

    public static void main(String[] args) {
        SpringApplication.run(UsermanageApplication.class, args);
    }

}
Paging plug-in configuration
According to the usage specification of the paging plug-in of MybatisPlus, create a new config package, and then create a new MyBatisPlusConfig under the package
package com.badao.usermanage.config;

import com.baomidou.mybatisplus.extension.plugins.PaginationInterceptor;
import org.springframework.context.annotation.Bean;
import org.springframework.context.annotation.Configuration;
import org.springframework.transaction.annotation.EnableTransactionManagement;

@EnableTransactionManagement
@Configuration
public class MyBatisPlusConfig {
    @Bean
    public PaginationInterceptor paginationInterceptor() {
        PaginationInterceptor paginationInterceptor = new PaginationInterceptor();
        // Set the operation after the requested page is larger than the maximum page, true to return to the home page, false to continue the request ﹣ default false
        // paginationInterceptor.setOverflow(false);
        // Set the maximum number of single page restrictions, the default is 500, and - 1 is unlimited
        // paginationInterceptor.setLimit(500);
        return paginationInterceptor;
    }
}
Using PostMan to test API interface
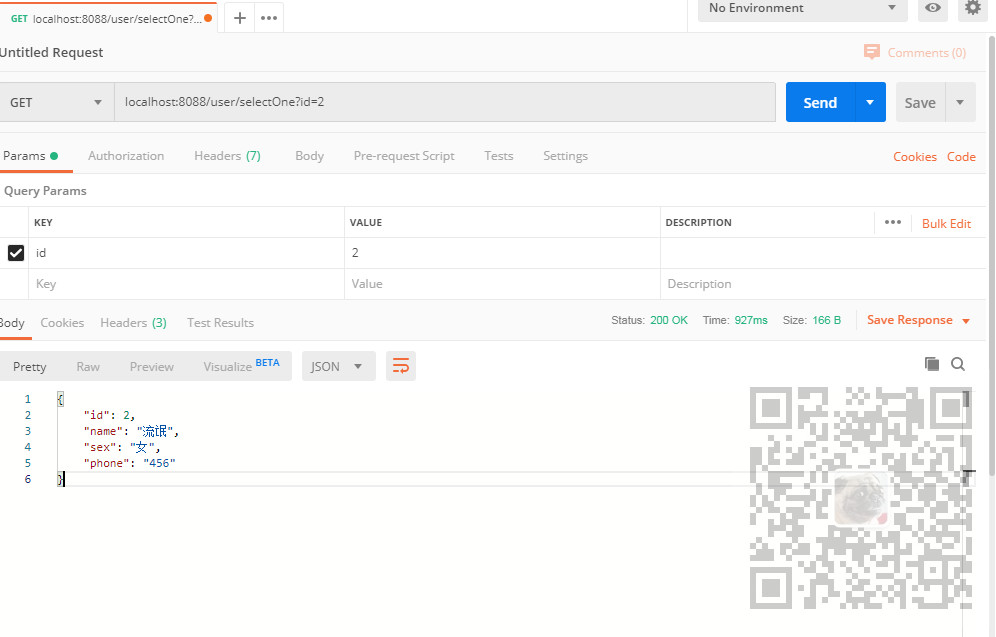
Start the project, open PostMan, enter the address and parameters of the test interface
localhost:8088/user/selectOne?id=2
Here, query according to the ID, passing the ID parameter as 2.
Quickly build element UI project
Refer to the following article to quickly build an element UI project
https://blog.csdn.net/BADAO_LIUMANG_QIZHI/article/details/103285539
Then use axios to request background data
Install axios
npm install axios
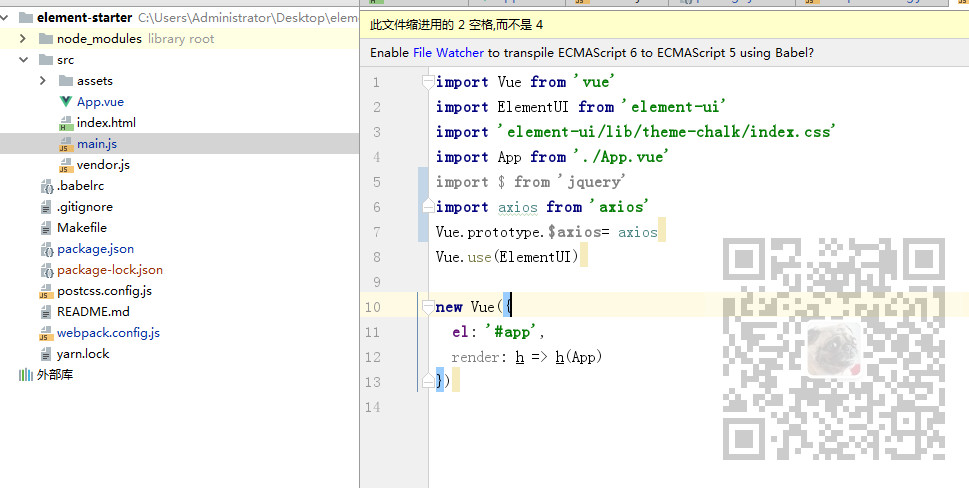
Then open the entry program main.js to add axios
import axios from 'axios'
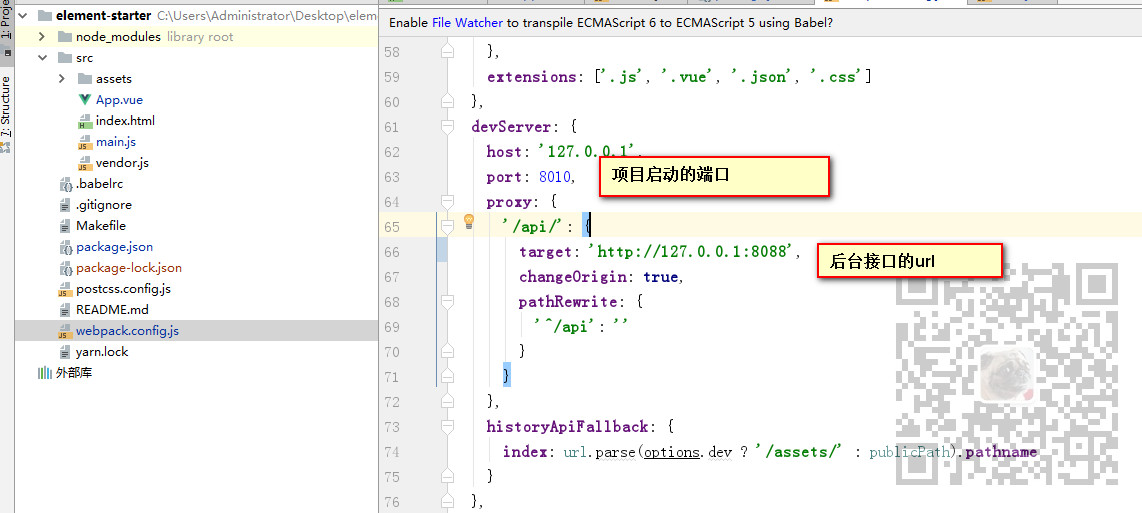
Then open webpack.config.js to configure the url proxy
 devServer: {
    host: '127.0.0.1',
    port: 8010,
    proxy: {
      '/api/': {
        target: 'http://127.0.0.1:8088',
        changeOrigin: true,
        pathRewrite: {
          '^/api': ''
        }
      }
    },
The above configuration indicates that the starting port of the project is 8010. When ElementUI requests the Url from the background, it will request the request of / api / to the address executed in target
So we can call the background data interface in page App.vue like this
//When initializing a page, call
        created: function(){
            debugger
            this.getData()
        },
        methods: {
            //Request the server through ajax to obtain data
            getData() {
                debugger
                let url = "/api/user/selectAllLimit?offset=2&limit=1" ;
                this.$axios.get(url).then((res) => {

                    this.tableData = res.data;//Assign the returned data to packData

                }).catch(function(error){

                    console.log(error);

                })
            }
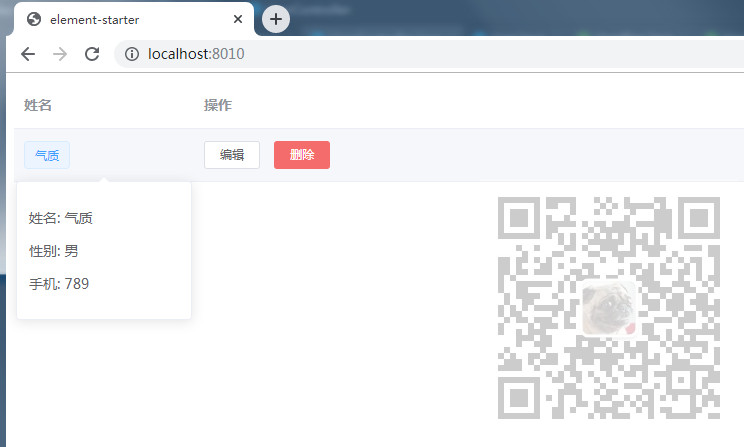
Request effect
App.vue full code
<template>
  <el-table
          :data="tableData"
          style="width: 100%">
    <el-table-column
            label="Full name"
            width="180">
      <template slot-scope="scope">
        <el-popover trigger="hover" placement="top">
          <p>Full name: {{ scope.row.name }}</p>
          <p>Gender: {{ scope.row.sex }}</p>
          <p>Mobile phone: {{ scope.row.phone }}</p>
          <div slot="reference" class="name-wrapper">
            <el-tag size="medium">{{ scope.row.name }}</el-tag>
          </div>
        </el-popover>
      </template>
    </el-table-column>
    <el-table-column label="operation">
      <template slot-scope="scope">
        <el-button
                size="mini"
                @click="handleEdit(scope.$index, scope.row)">edit</el-button>
        <el-button
                size="mini"
                type="danger"
                @click="handleDelete(scope.$index, scope.row)">delete</el-button>
      </template>
    </el-table-column>
  </el-table>
</template>

<script>
    export default {
        data() {
            return {
                //ajax: null,
                //List correlation
                tableData: [],
                dialogFormVisible: false
            }
        },

        //When initializing a page, call
        created: function(){
            debugger
            this.getData()
        },
        methods: {
            //Request the server through ajax to obtain data
            getData() {
                debugger
                let url = "/api/user/selectAllLimit?offset=2&limit=1" ;
                this.$axios.get(url).then((res) => {

                    this.tableData = res.data;//Assign the returned data to packData

                }).catch(function(error){

                    console.log(error);

                })
            }
        }
    }
</script>
Code download
Pay attention to the public address:
Domineering procedural ape
Reply:
ElementUISpringBoot