Hello, welcome to the program workplace, where you need to improve technology, career planning, personal growth, sideline development and other articles.
Learn and improve with more small partners.
In the last part, we talked about the authority database and authority control in the background. After that, we will start the logical development. Are we looking forward to it... If you haven't read the previous article, you can click to enter Spring Boot + Vue front and back end separation (VIII) authority database design.
This article is the first in the Spring Boot + Vue front and back end separation series. Understanding the previous articles helps to better understand this article:
1.Spring Boot + Vue front end separation (I) front end Vue environment construction
2.Spring Boot + Vue front and rear end separation (II) front end Vue start process
3.Spring Boot + Vue front and back end separation (3) implementation of login function
4.Spring Boot + Vue front end separation (IV) front end routing
5.Spring Boot + Vue front and back end separation (V) login interceptor
6.Spring Boot + Vue front and back separation (VI) using Element to render login interface
7.Spring Boot + Vue front and rear end separation (VII) back end system, function navigation page
8.Spring Boot + Vue front and back end separation (VIII) authority database design
Catalog
(1) Introduction and introduction of Shiro
(2) . add user page
(3) . add user's controller logic
(4) . results display
Preface
There are many things recently. I'm so busy and dizzy. Not only my work but also my own sideline. I don't usually explain about sideline in the article, but I've been doing it all the time. I've published an article about sideline very early. If you are interested in it, you can have a look Open the way of sideline , the projects related to the article are all written by working overtime in the evening. In fact, many of them also want to try new technologies, so I am learning while doing, making progress together with you, interested in adding my wechat and chatting together.
OK, I don't want to talk about it with you. I need to discuss it with you.
(1) Introduction and introduction of Shiro
1. Let's find out what Shiro is first?
Shiro is a Java security framework. At present, there are more and more people using Apache Shiro, because it is quite simple. Compared with Spring Security, it may not be as powerful as Spring Security, but it may not need so complicated things in actual work, so using small and simple Shiro is enough (the best one is suitable).
Shiro can easily realize the authentication, authority authentication and other related security functions of the project. The Shiro version used in this project is 1.5.1, which is the latest one on the official website. I think it is recommended to use some libraries. The stability of the higher version is higher, and the function encapsulation is more perfect.
For more details on shiro, please refer to this article, which explains the shiro framework in a proper way:
https://blog.csdn.net/pengjwhx/article/details/84867112
2. Introducing Shiro
Just add dependency directly by introducing Shiro. You can copy and use the code directly here. The version is the latest.
<!-- shiro --><dependency><groupId>org.apache.shiro</groupId><artifactId>shiro-spring</artifactId><version>1.5.1</version></dependency>
(2) . add user page
To add users, I'll use the interface effect directly, so it looks more clear.
In fact, adding users is the user adding logic in user management. In order to explain the encryption process, it is implemented directly and simply. It will be explained again in the subsequent development of functions.
The effect of the login interface referenced in the interface is just to change the background color.
The code effect is as follows:
<template><body id="paper"><el-form class="login-container" label-position="left"label-width="0px" v-loading="loading"><h3 class="login_title">Add user</h3><el-form-item><el-input type="text" v-model="loginForm.username"auto-complete="off" placeholder="Account number"></el-input></el-form-item><el-form-item><el-input type="password" v-model="loginForm.password"auto-complete="off" placeholder="Password"></el-input></el-form-item><el-form-item style="width: 100%"><el-button type="primary" style="width: 100%;background: #505458;border: none" v-on:click="register">Newly added</el-button></el-form-item></el-form></body></template><script>export default{data () {return {checked: true,loginForm: {username: '',password: ''},loading: false}},methods: {register () {var _this = thisthis.$axios.post('/adduser', {username: this.loginForm.username,password: this.loginForm.password}).then(resp => {if (resp.data.code === 200) {this.$alert('Add success', 'Tips', {confirmButtonText: 'Determine'})// _this.$router.replace('/login') / / enter the login interface} else {this.$alert(resp.data.message, 'Tips', {confirmButtonText: 'Determine'})}}).catch(failResponse => {})}}}</script><style>#paper {background:#505458;background-position: center;height: 100%;width: 100%;background-size: cover;position: fixed;}body{margin: 0px 0px;}.login-container {border-radius: 15px;background-clip: padding-box;margin: 100px auto;width: 350px;padding: 35px 35px 15px 35px;background: #fff;border: 1px solid #eaeaea;box-shadow: 0 0 25px #cac6c6;}.login_title {margin: 0px auto 40px auto;text-align: center;color: #505458;}</style>
Interpretation:
1. Call to add user interface
.post('/adduser2,
this.$alert('successfully added ',' prompt '{
  confirmButtonText: 'OK'
})
Others are basic interfaces, no longer too much to explain, if there are not understand the small partners can first look at the previous article.
(3) . add user's controller logic
The logic added by the user is still added to the logged in controller to let the user log in and add these together for searching. The code is as follows:
@CrossOrigin@PostMapping(value = "adduser")public Result register(@RequestBody User user) {String username = user.getUsername();String password = user.getPassword();username = HtmlUtils.htmlEscape(username);user.setUsername(username);if (username.equals("") || password.equals("")) {String message = "User name or password is empty, failed";return ResultFactory.buildFailResult(message);}boolean exist = userService.isExist(username);if (exist) {String message = "User name is already in use";return ResultFactory.buildFailResult(message);}// Generate salt, the default length is 16 bits --- generate salt (part, need to be stored in the database)String salt = new SecureRandomNumberGenerator().nextBytes().toString();// Set iteration times of hash algorithmint times = 3;// Get the password after hash//Add salt to the original password (the salt generated above), and encrypt it three times with md5 algorithm, and store the final result in the database// String encodedPassword = new SimpleHash("md5", password, salt, times).toString();String encodedPassword = new Md5Hash(password,salt,times).toString();// Store user information, including passwords after salt and hashuser.setSalt(salt);user.setPassword(encodedPassword);userService.add(user);return ResultFactory.buildSuccessResult(user);}
1, @CrossOrigin is an annotation used to process cross domain requests
2, String salt = new SecureRandomNumberGenerator().nextBytes().toString();
Generate salt, the default length is 16 bits --- generate salt (part, need to be stored in the database)
3, String encodedPassword = new Md5Hash(password,salt,times).toString();
//Add salt to the original password (the salt generated above), and encrypt it three times with md5 algorithm, and store the final result in the database
4. User. Setsalt (salt); / / stores user information, including passwords after salt and hash
(4) . results display
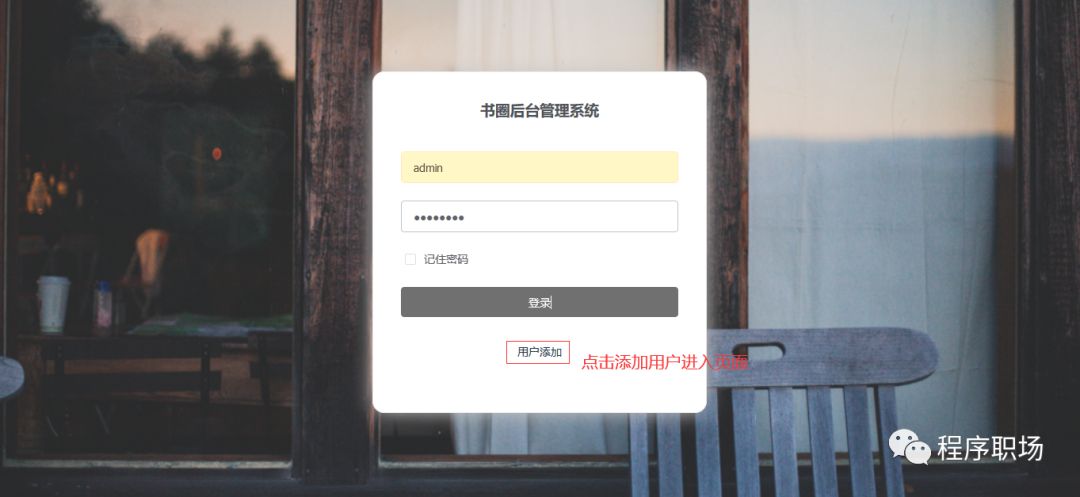
First, we start the project --- browser and input http:localhost:8080/login to enter the login interface. Click user add to jump to add the user interface.


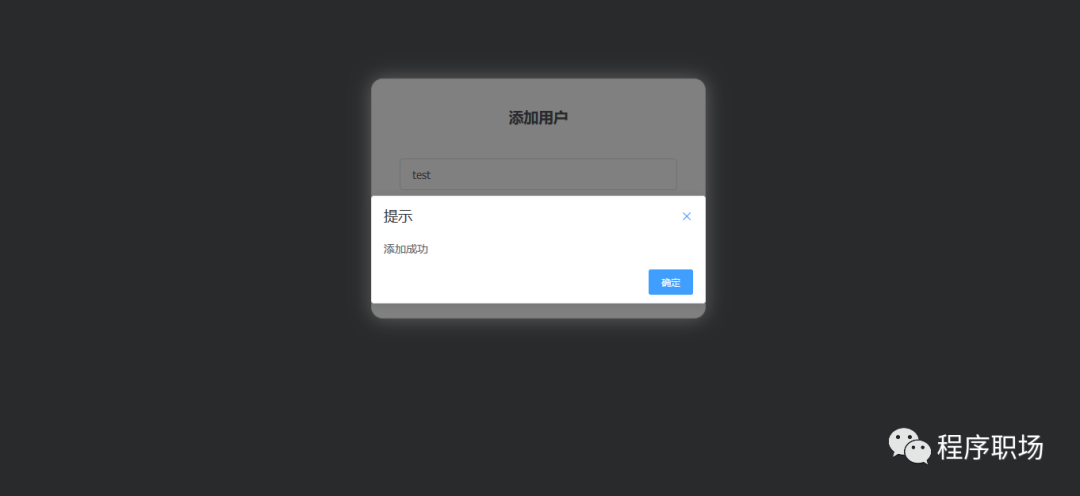
Enter a user password to test. For example: user: Test password: test. The result is as follows:

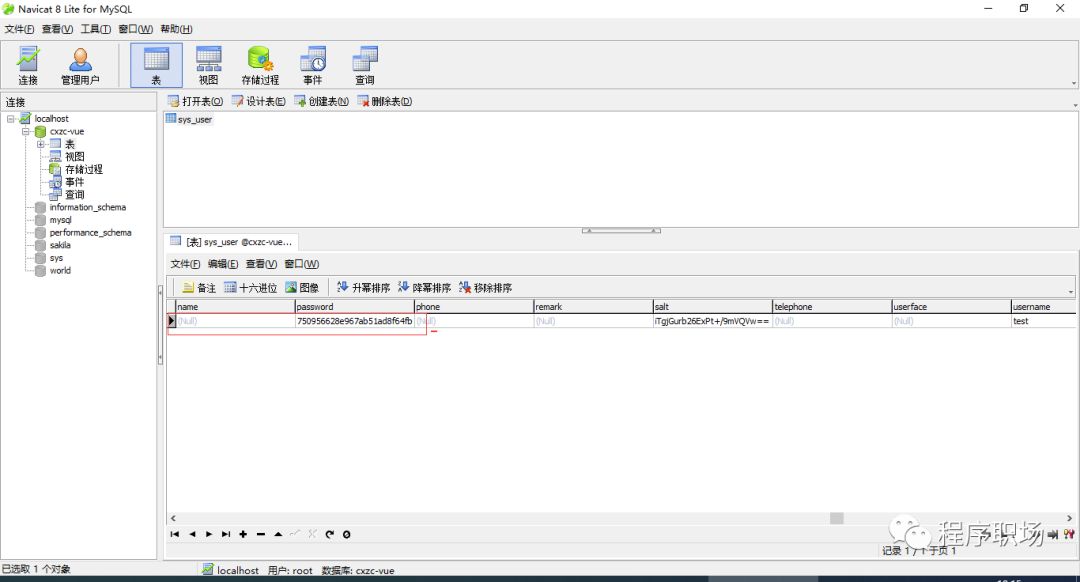
The prompt is successful. In this way, we still don't know whether the addition is successful or not. Let's check the database and see that there is a piece of data in the database. Here I'll explain that it is possible that the database has been created before. It's better to delete it and start the automatic generation of the project, so as to avoid any changes in the database.

Well, we have finished Shiro's implementation of encryption to add users. In the next article, we will talk about Shiro's login authentication, which is to log in through the added users, how to encrypt and then how to decrypt, and then log in, needless to say about the security.
Source link: https://github.com/ProceduralZC/bookcircle
Please look forward to the next...
Add WeChat (mmlz6879), reply to "program workplace" or click "pick me up > plus group" in the lower right corner of official account, and pull you into the discussion group and many small buddy partners who love learning together.

Author: Little dandelion
Official account: procedural workplace
Wechat: mmlz6879
Introduction: focus on Spring Boot, microservice, front-end APP, sideline earning, workplace planning, operation management, personal growth, etc., pay attention to and reply to the learning materials, and get the learning dry goods carefully prepared for you!
A dedicated professional programmer
Data: the dry cargo data that can be acquired by the official account can be returned to the public information system.

