In the previous section, we talked about the configuration of haproxy's access control ACL. For a review, please refer to https://www.cnblogs.com/qiuhom-1874/p/12817773.html ; Today let's talk about the configuration of haproxy's https, tcp-based four-tier load balancing, and access control.
First let's look at the configuration of haproxy's https; what HTTPS are I won't go into much detail here. Please refer to the instructions for Certificate Application https://www.cnblogs.com/qiuhom-1874/p/12237944.html ; in the haproxy configuration file, we explicitly state that we listen on a port that requires ssl protocol access, similar to listen 443 in nginxSSL configuration; in addition to crt, we need to specify the certificate; unlike nginx, haproxy's certificate content contains private key information; so after we apply for the certificate, we need to merge the certificate file content with the private key file;
Example: Configure haproxy to listen on port 443 and support https
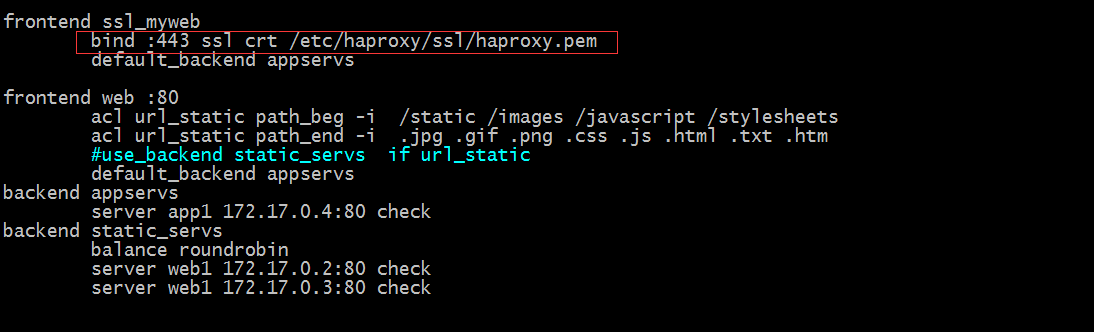
Tip: The contents in the red box indicate listening on port 443 and explicitly specify access using SSL protocol; the certificate file is/etc/haproxy/ssl/haproxy.pem
Create ssl directory and certificate file
[root@docker_node1 ~]# mkdir -p /etc/haproxy/ssl
[root@docker_node1 ~]# cd /etc/haproxy/ssl
[root@docker_node1 ssl]# ls
[root@docker_node1 ssl]# (umask 066;openssl genrsa -out haproxy.key 2048)
Generating RSA private key, 2048 bit long modulus
.......+++
...+++
e is 65537 (0x10001)
[root@docker_node1 ssl]# ls
haproxy.key
[root@docker_node1 ssl]# openssl req -new -x509 -key haproxy.key -out haproxy.crt -subj "/CN=www.test.com"
[root@docker_node1 ssl]# ls
haproxy.crt  haproxy.key
[root@docker_node1 ssl]# cat haproxy.crt haproxy.key > haproxy.pem
[root@docker_node1 ssl]# ls
haproxy.crt  haproxy.key  haproxy.pem
[root@docker_node1 ssl]# openssl  x509 -in haproxy.pem -noout -text
Certificate:
    Data:
        Version: 3 (0x2)
        Serial Number:
            e6:c5:30:f9:10:e5:da:cf
    Signature Algorithm: sha256WithRSAEncryption
        Issuer: CN=www.test.com
        Validity
            Not Before: May  2 14:41:50 2020 GMT
            Not After : Jun  1 14:41:50 2020 GMT
        Subject: CN=www.test.com
        Subject Public Key Info:
            Public Key Algorithm: rsaEncryption
                Public-Key: (2048 bit)
                Modulus:
                    00:e6:bd:db:2d:37:1e:b3:26:21:45:37:c3:bc:c2:
                    f8:f0:35:31:7c:af:f4:22:be:bc:f2:01:a1:ce:31:
                    32:91:37:06:14:a8:eb:ec:99:30:ae:8f:66:6b:51:
                    03:94:bb:d1:ae:7d:15:23:ea:9a:83:74:6d:d0:be:
                    30:5d:bf:4c:dd:79:c6:8d:51:01:ea:d7:a8:e5:93:
                    f9:11:d9:75:cc:2c:65:d6:31:db:15:20:7f:5e:9f:
                    56:15:3e:17:b9:82:a8:25:ba:40:17:1c:ef:f2:fc:
                    11:cb:72:ce:07:5b:57:5d:c3:f1:f6:42:1f:02:63:
                    b0:33:de:87:a3:43:c7:a0:1b:03:c4:ab:09:f4:67:
                    ce:ec:ef:1f:88:7a:c2:aa:ca:41:ed:1d:78:60:b1:
                    41:6d:b9:46:67:1e:c9:ce:43:d8:d6:36:be:ba:ed:
                    d9:2b:01:9a:0c:8e:64:59:07:3a:c2:2c:55:2b:9b:
                    06:e5:5b:c7:ba:e2:9f:ea:be:71:9f:76:da:79:c6:
                    f0:b8:94:70:c0:4f:7b:57:53:5c:30:71:c5:82:d0:
                    7a:a8:d0:71:32:2c:f0:38:61:69:9b:9e:ac:da:45:
                    74:63:25:76:78:91:c3:be:6c:7c:72:1c:54:4a:ac:
                    10:24:45:9c:89:6a:1f:5b:00:22:3a:b6:fe:3f:b8:
                    73:7b
                Exponent: 65537 (0x10001)
        X509v3 extensions:
            X509v3 Subject Key Identifier:
                B2:EC:53:AE:68:E0:65:1D:E6:DB:C8:16:E3:BA:D3:70:BC:E7:79:81
            X509v3 Authority Key Identifier:
                keyid:B2:EC:53:AE:68:E0:65:1D:E6:DB:C8:16:E3:BA:D3:70:BC:E7:79:81

            X509v3 Basic Constraints:
                CA:TRUE
    Signature Algorithm: sha256WithRSAEncryption
         91:a2:36:9b:b8:d3:fd:89:ea:6c:b4:b9:3c:b6:a1:f3:86:87:
         71:13:8b:10:a0:73:e9:96:b7:1b:dd:7e:91:64:41:a4:c3:80:
         7c:b6:f2:ce:a7:77:28:74:51:da:a6:52:98:a7:88:48:41:2f:
         ad:3d:cb:36:bd:94:f9:27:72:f1:e8:ae:f8:bd:38:2e:d6:ea:
         0b:26:2d:8b:49:3e:bc:4e:58:9e:bf:79:99:5b:88:23:da:98:
         e4:45:79:9c:d2:c9:05:05:9f:23:8a:0f:38:db:9a:c4:5c:e9:
         a0:f5:e5:aa:02:bc:df:a7:5d:11:cd:35:08:cc:41:08:40:b6:
         0b:e4:ad:79:df:9a:1d:7b:70:8b:65:e5:dc:85:34:55:5c:f2:
         94:dc:07:91:43:d0:bb:b4:fb:31:b9:74:19:7a:69:43:11:70:
         41:41:86:93:ad:83:42:62:e2:67:69:38:cd:18:c7:e9:f7:f4:
         be:78:22:ea:ee:20:db:27:1f:06:87:4c:51:67:19:0a:64:97:
         3a:e6:2c:32:bd:84:91:88:96:d2:01:e5:c3:62:59:11:c8:20:
         7d:a1:c8:5a:3d:8a:fc:f5:14:fe:41:15:97:ee:47:ec:e5:19:
         49:0b:c1:8a:c9:3f:10:4d:66:bf:d5:01:21:2d:fd:8b:a7:95:
         17:08:7e:46
[root@docker_node1 ssl]#
Tip: I will use -subj directly to specify certificate/CN to generate self-signed certificate; haproxy's certificate requires that certificate information and private key information be combined together, so we need to merge certificate file information with new private key information by redirection;
Testing: Restart haproxy for browser access
Tip: You can see that our access with https is normal, but the certificate browser does not trust it, so we will be prompted that it is not safe;
* Redirect request for port 80 to fixed 443
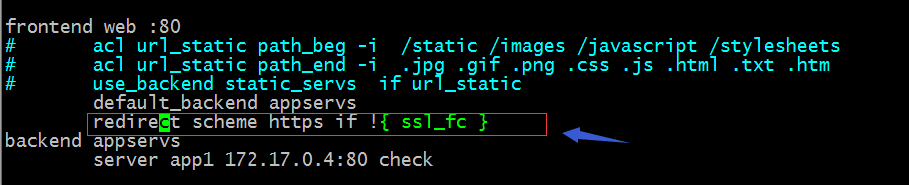
Tip: The configuration in the red box indicates that the http request is redirected to https, which is similar to the rewritten url in nginx;
Testing: Visit http://192.168.0.22 in your browser to see if you want to rewrite HTTP as https?

Tip: You can see that our access is accessed using http, and in the response message the browser is told to access https://192.168.0.22 using location; this enables the full site of https;
Pass user-requested protocols and ports (frontend or backend) to back-end
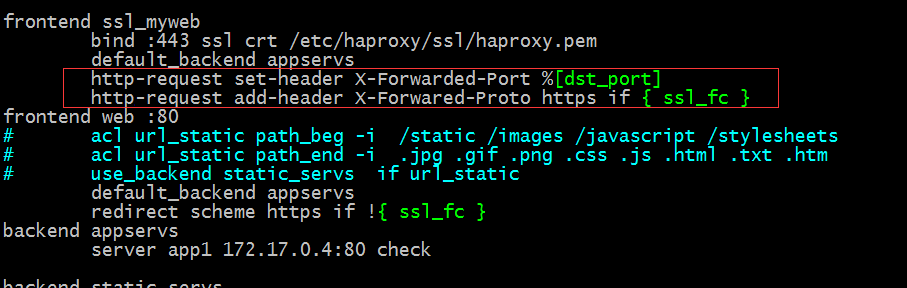
Tip: The content in the red box means setting the value of the dst_port variable in the X-Forwarded-port header in the request message to the back end; adding the X-Forwarded-Proto header with the value of HTTPS when the request protocol is https; these two settings are usually required for the front end HTTPS requests to be passed to the back end through X-Forwarded-Proto when the back end application server requires HTTPS access;
Testing: Configure the log format on the back-end server, log these two headers separately, and then access to see if the values recorded in the log for these two headers are the 443 port and https protocol we visited?

Tip: Define the httpd log format above to record the values at the beginning of {X-Forwarded-Port and X-Forwared-Proto, respectively
Use a browser to access the test and see the information recorded in the log

Tip: You can see that the corresponding access port and protocol are passed to the back-end server in the log.
haproxy does tcp load balancing based on 4-tier proxy
Example: Load balancing mysql based on tcp
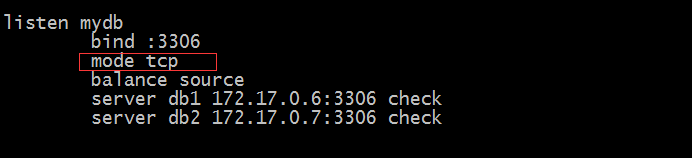
Tip: The above configuration indicates that tcp protocol is used to proxy back-end server;
Backend server environment preparation
[root@docker_node1 ~]# docker images
REPOSITORY          TAG                 IMAGE ID            CREATED             SIZE
wordpress           latest              c3fa1c8546fb        44 hours ago        540MB
mysql               5.7                 f965319e89de        4 days ago          448MB
httpd               2.4.37-alpine       dfd436f9a5d8        16 months ago       91.8MB
[root@docker_node1 ~]# docker run --name db1 -d --net bridge -e MYSQL_ROOT_PASSWORD=admin mysql:5.7
8cade03e4f28f40e7d7e970355735c8b881892754b18a637fef0d956f3f88877
[root@docker_node1 ~]# docker run --name db2 -d --net bridge -e MYSQL_ROOT_PASSWORD=admin mysql:5.7
1bff841c226abe88441103764655dc86257d5b99079eaa113384fd04b62cf0f8
[root@docker_node1 ~]# docker ps
CONTAINER ID        IMAGE                 COMMAND                  CREATED             STATUS              PORTS                 NAMES
1bff841c226a        mysql:5.7             "docker-entrypoint.s..."   7 seconds ago       Up 6 seconds        3306/tcp, 33060/tcp   db2
8cade03e4f28        mysql:5.7             "docker-entrypoint.s..."   12 seconds ago      Up 12 seconds       3306/tcp, 33060/tcp   db1
3572c621f827        wordpress             "docker-entrypoint.s..."   9 hours ago         Up 9 hours          80/tcp                wordpress
f07288d607e5        httpd:2.4.37-alpine   "httpd-foreground"       7 days ago          Up 13 hours         80/tcp                web3
971595b7f409        httpd:2.4.37-alpine   "httpd-foreground"       7 days ago          Up 13 hours         80/tcp                web2
5c74f3be1868        httpd:2.4.37-alpine   "httpd-foreground"       7 days ago          Up 13 hours         80/tcp                web1
[root@docker_node1 ~]# docker exec -it db1 /bin/sh
# mysql -padmin
mysql: [Warning] Using a password on the command line interface can be insecure.
Welcome to the MySQL monitor.  Commands end with ; or \g.
Your MySQL connection id is 2
Server version: 5.7.30 MySQL Community Server (GPL)

Copyright (c) 2000, 2020, Oracle and/or its affiliates. All rights reserved.

Oracle is a registered trademark of Oracle Corporation and/or its
affiliates. Other names may be trademarks of their respective
owners.

Type 'help;' or '\h' for help. Type '\c' to clear the current input statement.

mysql> grant all on *.* to "myuser"@'172.17.0.%' identified by 'admin';
Query OK, 0 rows affected, 1 warning (0.00 sec)

mysql> \q
Bye
# exit
[root@docker_node1 ~]# docker exec -it db2 /bin/sh
# mysql -padmin
mysql: [Warning] Using a password on the command line interface can be insecure.
Welcome to the MySQL monitor.  Commands end with ; or \g.
Your MySQL connection id is 2
Server version: 5.7.30 MySQL Community Server (GPL)

Copyright (c) 2000, 2020, Oracle and/or its affiliates. All rights reserved.

Oracle is a registered trademark of Oracle Corporation and/or its
affiliates. Other names may be trademarks of their respective
owners.

Type 'help;' or '\h' for help. Type '\c' to clear the current input statement.

mysql> grant all on *.* to "myuser"@'172.17.0.%' identified by 'admin';
Query OK, 0 rows affected, 1 warning (0.01 sec)

mysql> \q
Bye
# exit
[root@docker_node1 ~]#
Tip: When starting the mysql container, we need to set a password for the root; when creating a new user, the host IP address we specify should be the address of the docker0 bridge, although it is based on a 4-tier tcp proxy, it still needs to change the source ip;
Testing: Restart haproxy and use the mysql client to access port 3306 that haproxy listens on to see if it can properly connect to the back-end mysql container?
Tip: You can see that mysql clients on other hosts can normally access port 3306 that haproxy listens on;
haproxy does access control based on 4-tier tcp
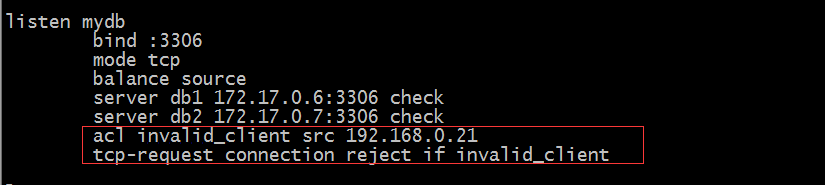
Tip: tcp-request connection indicates that incoming connections are operated upon according to Layer 4 conditions; the above configuration denies connections with source address 192.168.0.21
Testing: Restart haproxy and connect 192.168.0.22:3306 using the mysql client on 192.168.0.21 to see if it works?
Tip: You can see that mysql on 192.168.0.21 cannot be connected with the mysql tool on 192.168.0.22;
Example: only host access with open source address 192.168.0.21, deny access to other hosts
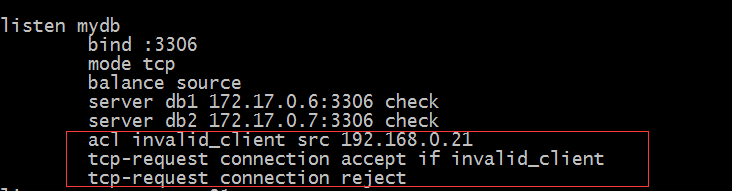
Tip: tcp-request connection allows access to be identified by accept and rejects by reject; if it is used in combination, all entries except ACL entries matched above can be represented without writing conditions; unlike http-request, HTTP-request allows access to be identified by allow and deny is rejected;
Testing: Connect mysql client on host with source address 192.168.0.21 to mysql client on 192.168.0.22 and mysql client on source address other than 192.168.0.21 to see if they can connect?
Tip: You can see that using the mysql client at the source address other than 192.168.0.21 cannot connect to the backend mysql container; this is because it is not matched by the ACL we defined, so it will be matched by tcp-request connect reject; thus, the connection will be rejected;
Last topic, we talked about the configuration of the status page of haproxy in the previous blog; in which we demonstrated how to manage the back-end server by clicking on the mouse through the page; this is a challenge for us to monitor haproxy itself and the back-end server; smart you must have noticed that there is an s in the global configuration section of haproxyConfigurations such as Tat socket/var/lib/haproxy/stats; let's move on to what this configuration is for;

Tip: The above configuration means binding monitoring page information to a socket file; we can achieve the purpose of haproxy by sending specific instructions to the socket file
Example: Pass help information to/var/lib/haproxy/stats via socat and have them print help pages
[root@docker_node1 ~]# echo "help"|socat stdio /var/lib/haproxy/stats
Unknown command. Please enter one of the following commands only :
  clear counters : clear max statistics counters (add 'all' for all counters)
  clear table    : remove an entry from a table
  help           : this message
  prompt         : toggle interactive mode with prompt
  quit           : disconnect
  show info      : report information about the running process
  show pools     : report information about the memory pools usage
  show stat      : report counters for each proxy and server
  show errors    : report last request and response errors for each proxy
  show sess [id] : report the list of current sessions or dump this session
  show table [id]: report table usage stats or dump this table's contents
  get weight     : report a server's current weight
  set weight     : change a server's weight
  set server     : change a server's state or weight
  set table [id] : update or create a table entry's data
  set timeout    : change a timeout setting
  set maxconn    : change a maxconn setting
  set rate-limit : change a rate limiting value
  disable        : put a server or frontend in maintenance mode
  enable         : re-enable a server or frontend which is in maintenance mode
  shutdown       : kill a session or a frontend (eg:to release listening ports)
  show acl [id]  : report available acls or dump an acl's contents
  get acl        : reports the patterns matching a sample for an ACL
  add acl        : add acl entry
  del acl        : delete acl entry
  clear acl <id> : clear the content of this acl
  show map [id]  : report available maps or dump a map's contents
  get map        : reports the keys and values matching a sample for a map
  set map        : modify map entry
  add map        : add map entry
  del map        : delete map entry
  clear map <id> : clear the content of this map
  set ssl <stmt> : set statement for ssl

[root@docker_node1 ~]#
Tip: From the help information above, we can see that we can manage the backend server by piping the corresponding instructions to the / var/lib/haproxy/stats file.
Example: Mark web1 disable d with the socat command

Tip: We executed marking web1 disable, which prompted us that we do not have permissions; let's configure the permissions next

Tip: The above configuration indicates that the socket file has admin privileges. Next, mark web1 disable (modifying the haproxy configuration file requires restarting haproxy)

Tip: After we modified the permissions, there are no permissions reported and other errors when we execute the above command. Next, we open the status page to see what the status of web1 is.

Tip: You can see that web1 has become a maintenance mode;
Example: List information for monitoring page indicator data
[root@docker_node1 ~]# echo "show info " |socat stdio /var/lib/haproxy/stats
Name: HAProxy
Version: 1.5.18
Release_date: 2016/05/10
Nbproc: 4
Process_num: 3
Pid: 6374
Uptime: 0d 0h05m04s
Uptime_sec: 304
Memmax_MB: 0
Ulimit-n: 8039
Maxsock: 8039
Maxconn: 4000
Hard_maxconn: 4000
CurrConns: 0
CumConns: 3
CumReq: 10
MaxSslConns: 0
CurrSslConns: 0
CumSslConns: 0
Maxpipes: 0
PipesUsed: 0
PipesFree: 0
ConnRate: 0
ConnRateLimit: 0
MaxConnRate: 1
SessRate: 0
SessRateLimit: 0
MaxSessRate: 1
SslRate: 0
SslRateLimit: 0
MaxSslRate: 0
SslFrontendKeyRate: 0
SslFrontendMaxKeyRate: 0
SslFrontendSessionReuse_pct: 0
SslBackendKeyRate: 0
SslBackendMaxKeyRate: 0
SslCacheLookups: 0
SslCacheMisses: 0
CompressBpsIn: 0
CompressBpsOut: 0
CompressBpsRateLim: 0
ZlibMemUsage: 0
MaxZlibMemUsage: 0
Tasks: 14
Run_queue: 1
Idle_pct: 100
node: docker_node1
description:

[root@docker_node1 ~]#
Tip: The above information is the indicator data in the monitoring page;
Example: online web1

View the status of web1 on the Monitor page

Tip: You can see that web1 is online normally; smart enough, you must have thought of dynamically managing the back-end server in this way; so you can achieve many functions, such as monitoring status indicators in haproxy through zabbix; dynamically uploading and downloading servers through scripts; dynamically modifying the weight of back-end servers (this needs to be done according to the algorithm, ifScheduling algorithms are supported dynamically but not statically;