Using kind to build a single tier architecture Node/Express network application
Kubernetes practice - build microservice1 from scratch

preface
Prepare to write a series of practical Kubernetes tutorials. After all, cnblogs, as the earliest technology blog in China, have started to move to Kubernetes. Here, we need to give applause to the blog park. The series will be more practical, and the theory will only be explained when necessary.
On Docker hub, I personally think there are two image s that make wonderful works
- dind, docker in docker
- kind, kubernetes in docker / k8s in docker
Many people start to learn k8s from minikube, but, however, when you compare king and minikub, you will find that king is at least three times faster (on my mac).
1 Preparation
Need to be installed in advance
- docker
- kubernetes-cli
Install kind
- mac
brew install kind
- linux
curl -Lo ./kind https://kind.sigs.k8s.io/dl/v0.8.1/kind-$(uname)-amd64
chmod +x ./kind
mv ./kind /some-dir-in-your-PATH/kind
- windows Refer to King's official guide
Try running kind --version to make sure that kind is installed properly.
2 create the first cluster
About 2-3 minutes, kind create cluster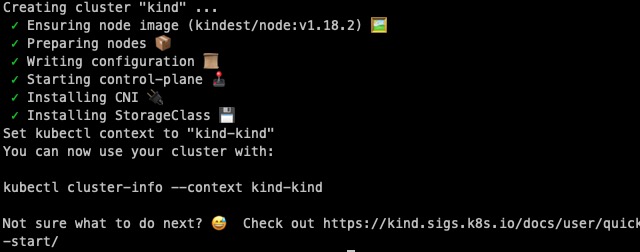
A cluster named kind kind will be created
Kubectl cluster info
Kubernetes master is running at https://127.0.0.1:51842
KubeDNS is running at https://127.0.0.1:51842/api/v1/namespaces/kube-system/services/kube-dns:dns/proxy

To further debug and diagnose cluster problems, use 'kubectl cluster-info dump'.
Even if your k8s control plane
If you run docker ps again, at least one kind control plane container will be running.
Try the following command again:
- kind get clusters get all clusters
- kubectl config get-contexts
- kubectl get nodes -o wide
- kubectl get svc
So far, a single node k8s cluster has been built in the local docker environment. 👌
3 publish a node/express app
Create the following file and save it.
Dcoker and App
- inde.js
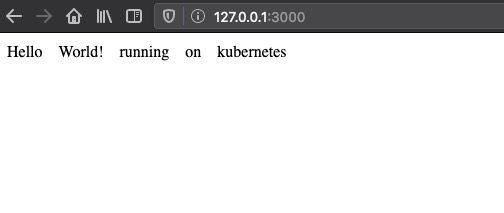
const express = require('express')
const app = express()
const port = 3000

app.get('/', (req, res) => res.send('Hello World! running on kubernetes'))

app.listen(port, () => console.log(`Example app listening at http://localhost:${port}`))
package.json, package-lock.json The entire project file, please visit github repo
- Dockerfile
FROM node:14.2.0-alpine
EXPOSE 3000
WORKDIR /anode

ADD package.json .
ADD package-lock.json .

RUN npm ci
ADD . .

CMD ["node", "index.js"]
Upload image to docker hub (optional)
Clone all required code and configuration files. Before you push the image, don't forget docker login.
docker build -t {yout dockerhub name}/a-node:v1 .
docker push  {yout dockerhub name}/a-node:v1
deployment, service configuration
- deployment.yaml
apiVersion: apps/v1
kind: Deployment
metadata:
  name: a-node-deployment
  labels:
    app: node
spec:
  replicas: 1
  selector:
    matchLabels:
      app: a-node
  template:
    metadata:
      labels:
        app: a-node
    spec:
      containers:
        - name: a-node-container
          image: tim010/a-node:v1 # or your own image
          ports:
            - containerPort: 3000
- service.yaml
apiVersion: v1
kind: Service
metadata:
  name: a-node-service
spec:
  ports:
    - targetPort: 3000
      protocol: TCP
      port: 80
  selector:
    app: a-node-service
  type: NodePort
release
kubectl apply -f deployment.yaml
deployment.apps/a-node-deployment created
kubectl apply -f service.yaml
service/a-node-service created
To ensure a successful release, run
kubectl get pods
You should be able to output the results as shown in the figure. Don't forget to copy your pod name.
kubectl get service
NAME             TYPE        CLUSTER-IP     EXTERNAL-IP   PORT(S)        AGE
a-node-service   NodePort    10.111.52.71   <none>        80:32709/TCP   7h25m
kubernetes          ClusterIP     10.96.0.1       <none>         443/TCP            8h
Wait, even if the release is successful, where is my app?
- http://10.111.52.71:3000? localhost:3000
- no
You need port forwarding
Kubectl port forward {your port name for deployment} 3000:3000
Unpublish teardown
kubectl delete -f deployment.yml
kubectl delete -f service.yml
Stop the whole cluster
kind delete cluster
Conclusion
At this point, the life of your local k8s cluster ends.
It will always be much faster to do it by hand than to only learn the theory. I hope this first tutorial can let everyone start quickly and not be scared by the complicated concept of K8s. More on Kubernetes high availability and architecture will be written later in the series.
Tips
- King recommends that docker memory be set to at least 6G, which is still available on mac 2018.
- docker is a little different on mac, There are many annoying restrictions on docker desktop mac on the network
- If access to docker hub is limited, please try the domestic large factory node
Source code, references and recommendations
- github repo source code
- kind
- Zhang Jintao blog One of the developers of kind