Article catalog
- 1, CSS introduction
- 2, Grammatical format
- 3, How to use CSS
- 4, Selector
- 1. Basic selector
- 2. Property selector
- 3. Relationship selector
- 4. Pseudo class and pseudo element selector
- 5. Selector priority [weight]
- 5, css common style properties
- 1. Background
- 1. Background color
- 2. Background picture
- 3. Background picture location
- 4. Background picture size
- 5. Background tiling
- 6. Composite attribute writing
- 2. Font and text
- 3. Border
- 6, Box div attribute
- 7, Block level, inline, inline block elements
- 1. Block level elements
- 2. In line elements
- 3. Inline block elements
- 4. display attribute
- 5. Block level element mutual conversion case [panel switching]
- 8, Element overflow
- 1.hidden beyond element hiding
- 2.scroll bar to view class browser
- 3.auto scrolling
- 4. Hide redundant words with
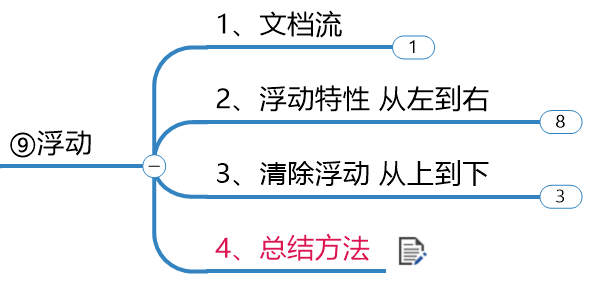
- 9, Floating
- 1. Document flow
- 2. Floating characteristics
- 3. Summary of three ways to clear floating
- 1. Set fixed height for parent element
- 2. By writing selectors
- 3. Use the mature clear floating style
- 4. Summary method [application scenario]
- 10, Positioning
- 1. Relative positioning
- 2. Absolute positioning
- 3. Fixed positioning
- 4. Default positioning static and z-index
- End

What is an engineer
-
Web front end Engineer
Responsible for webpage compilation
-
Web backend Engineer
Responsible for compiling database and query logic -
Web full stack engineer
Both of the above and project control
The back-end engineer doesn't need to focus on the front-end completely, but also needs to know some content and use it. What is the "degree", that is, the knowledge is as follows
1, CSS introduction
We learned that html, hypertext label, is the operation of fonts on Web pages
Now learn how to design the page layout. At this time, you need CSS cascading style
Just like we draw pictures, we can set the color, size and position.
2, Grammatical format
Here, we will point out a basic format. See the following operations for details
Basic format of CSS:
			Selector{
				Attribute: value;
				Attribute: value;
}
3, How to use CSS
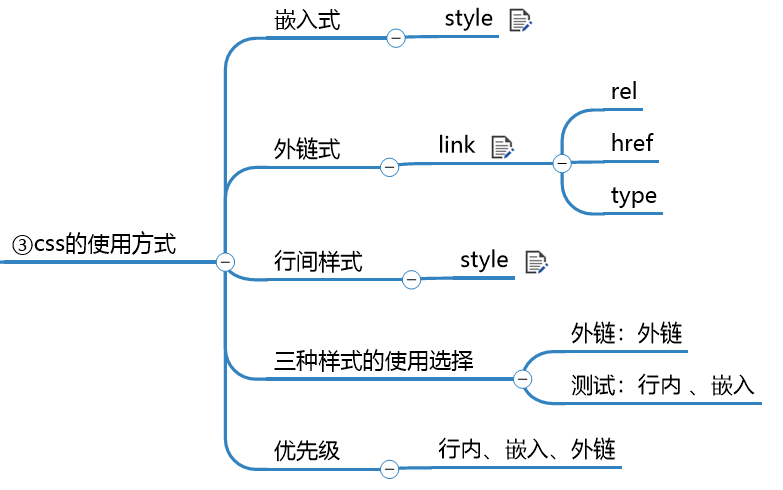
We need to know three ways
1. Embedded
Keyword style
Insert a code slice here
<!DOCTYPE html> <html lang="en"> <head> <meta charset="UTF-8"> <title>Title</title> <style> h5{ color:red; font-size: initial; } </style> </head> <body> <h1 id="jingyesi">In the Quiet Night</h1> <h5>©Author:<Plum white></h5> <h3>abed, I see a silver light</h3> <h3>The frost on the ground</h3> <h3>look at the bright moon</h3> <h3>Bow your head and think of your hometown</h3> <hr> </body> </html>
The declaration is used in the < head > < head > tag
Define < style > < / style > and write in it
As you can see, we declared h5 as a label, and set the color and font style
Why use the h5 name? It's related to the selector. It will be introduced in the next section. Let's first understand the location and way of address setting
The effect is as follows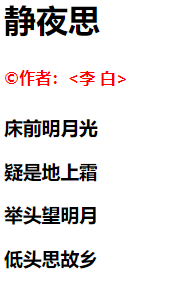
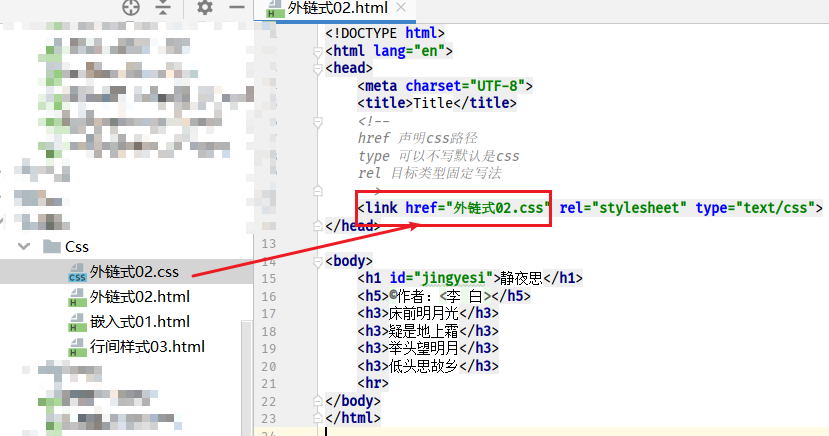
2. Outer chain
<!DOCTYPE html> <html lang="en"> <head> <meta charset="UTF-8"> <title>Title</title> <!-- href statement css route type Can not write default is css rel Target type fixed writing --> <link href="Outer chain 02.css" rel="stylesheet" type="text/css"> </head> <body> <h1 id="jingyesi">In the Quiet Night</h1> <h5>©Author:<Plum white></h5> <h3>abed, I see a silver light</h3> <h3>The frost on the ground</h3> <h3>look at the bright moon</h3> <h3>Bow your head and think of your hometown</h3> <hr> </body> </html>
External chaining is to store the written embedded writing in the file with. css suffix and import the reference. rel and type are the default writing methods.
In the actual project development, the external chain is used to separate the style and content.
The following figure is a screenshot of css file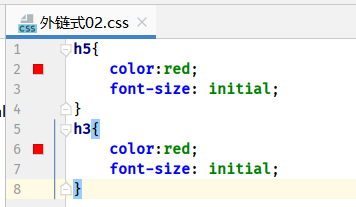
Set the color and font, as shown in the following figure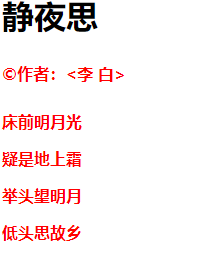
3. Line style
<!DOCTYPE html> <html lang="en"> <head> <meta charset="UTF-8"> <title>Title</title> </head> <body> <h1 style="color: red;font-size: initial" id="jingyesi">In the Quiet Night</h1> <h5>©Author:<Plum white></h5> <h3>abed, I see a silver light</h3> <h3>The frost on the ground</h3> <h3>look at the bright moon</h3> <h3>Bow your head and think of your hometown</h3> <hr> </body> </html>
Inter line style is written in the label that needs to be designed, and is often used to develop project style.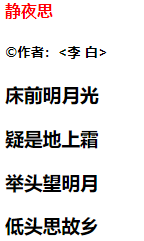
4. Three style priorities and application scenarios
Three styles, need to find out where to write
Project finalization: external chain, which is to put the written embedded in the. css suffix file and import it
Test common: inter line style, embedded
Priority: in line, embedded, external chain [proximity principle]
Whoever is close to the label to be set will adopt it first. That is, when you use three ways to set the color for the same label, you can use the one with the highest priority.
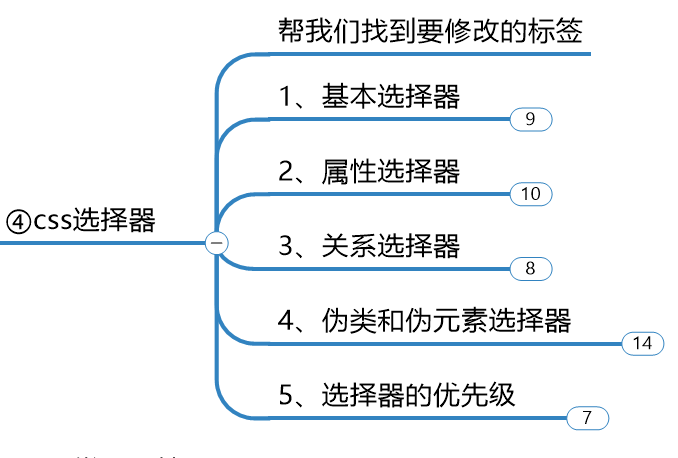
4, Selector
In the previous css usage, we used selectors. Now let's talk about the selector in detail.
The knowledge is shown in the figure below. The selector is to help us find the label to be set
1. Basic selector
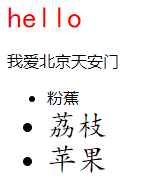
1, All tuple selections
Let's see what tags are written in the html below
There are div, p, ul, li tags. We can select all through the general configuration *.
<!DOCTYPE html>
<html lang="en">
<head>
    <meta charset="UTF-8">
    <title>css selector</title>
    <style>
        /*All tuples*/
        *{
            color:red;
            font-size: 22px;
        }

    </style>
</head>
<body>
<div class="myclass myclass2">hello</div>
<p id="mytext">I Love Beijing Tiananmen </p>
<ul>
    <li>Banana</li>
    <li class="myclass">litchi</li>
    <li class="myclass">Apple</li>
</ul>
</body>
</html>
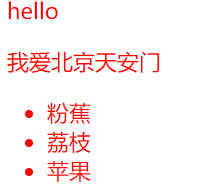
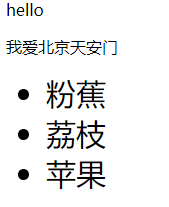
2. Label selector
Gu Mingsi means to use the tag name directly
We can see that there are also div, p, ul and li tags. We have selected li tags and set the text to 30px, so the effect is that other tags will not change, not like wildcards. In addition to special cases, we will not point out what tags are used. QAQ
<!DOCTYPE html>
<html lang="en">
<head>
    <meta charset="UTF-8">
    <title>css selector</title>
    <style>
        /*tag chooser */
        li{
            font-size: 30px;
        }

    </style>
</head>
<body>
<div class="myclass myclass2">hello</div>
<p id="mytext">I Love Beijing Tiananmen </p>
<ul>
    <li>Banana</li>
    <li class="myclass">litchi</li>
    <li class="myclass">Apple</li>
</ul>
</body>
</html>
3. id selector
id selector, remember to use a ××××××××××××××××××××××××××××××××××××××××××××××××××××××××××××××××××××
#mytext {} is like this
This ID directly creates a new attribute id = "mytext" where the tag needs to be set
<!DOCTYPE html>
<html lang="en">
<head>
    <meta charset="UTF-8">
    <title>css selector</title>
    <style>
        /*id selector*/
        #mytext{
            font-family: Regular script;
            font-size: 30px;
        }


    </style>
</head>
<body>
<div class="myclass myclass2">hello</div>
<p id="mytext">I Love Beijing Tiananmen </p>
<ul>
    <li>Banana</li>
    <li class="myclass">litchi</li>
    <li class="myclass">Apple</li>
</ul>
</body>
</html>
ul label is selected, and the font is in regular script and the size is 30px
4. Class selector
Class selector, also need to pass a. Then write the class name
. myclass like this
The label property class = "myclass myclass2" to be set can set multiple class names separated by spaces
<!DOCTYPE html>
<html lang="en">
<head>
    <meta charset="UTF-8">
    <title>css selector</title>
    <style>
        /*Class selector */
        .myclass{
            font-family: Regular script;
            font-size: 30px;
        }
        .myclass2{
            color: red;
        }
    </style>
</head>
<body>
<div class="myclass myclass2">hello</div>
<p id="mytext">I Love Beijing Tiananmen </p>
<ul>
    <li>Banana</li>
    <li class="myclass">litchi</li>
    <li class="myclass">Apple</li>
</ul>
</body>
</html>
5. Overall operation code
<!DOCTYPE html>
<html lang="en">
<head>
    <meta charset="UTF-8">
    <title>css selector</title>
    <style>
        /*All tuples*/
      /*  *{
            color:red;
            font-size: 22px;
        }*/

        /*tag chooser */
        /*li{
            font-size: 30px;
        }*/

        /*id selector*/
        /*#mytext{
            font-family: Regular script;
            font-size: 30px;
        }*/

		/*Class selector */
        .myclass{
            font-family: Regular script;
            font-size: 30px;
        }
        .myclass2{
            color: red;
        }
    </style>
</head>
<body>
<div class="myclass myclass2">hello</div>
<p id="mytext">I Love Beijing Tiananmen </p>
<ul>
    <li>Banana</li>
    <li class="myclass">litchi</li>
    <li class="myclass">Apple</li>
</ul>
</body>
</html>
2. Property selector
There are four ways to use it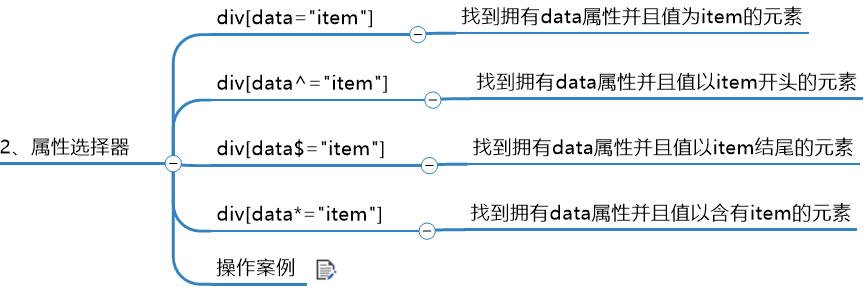
Reference code
<!DOCTYPE html>
<html lang="en">
<head>
    <meta charset="UTF-8">
    <title>css attribute selectors </title>
    <style>
        a[alt="Picture not loaded"]{
            font-size: 30px;
        }
        a[title^="a"]{
            color: black;
        }
    </style>
</head>
<body>
    <div><a href="#" title="" alt="Picture not loaded">a1</a></div>
    <div><a href="#" title="" alt="Picture not loaded">a2</a></div>
    <div><a href="#" title="a3">a3</a></div>
    <div><a href="#" title="a4">a4</a></div>
</body>
</html>
There's no explanation here. It's not difficult. Look at it.
That is to point to the attribute name as the selection within the label
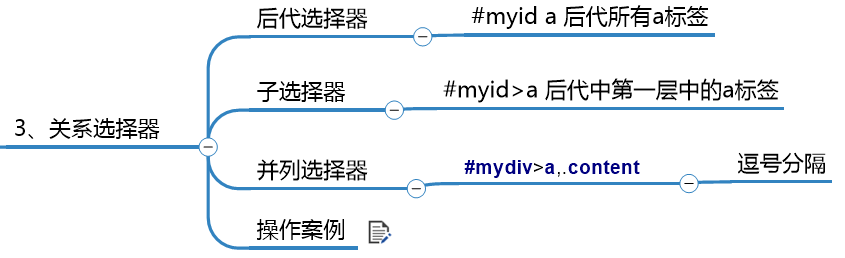
3. Relationship selector
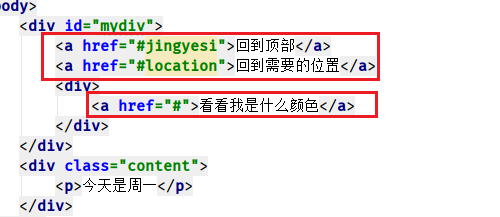
Reference cases
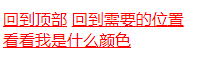
<!DOCTYPE html>
<html lang="en">
<head>
    <meta charset="UTF-8">
    <title>Title</title>
    <style>
        /*1,Descendant Selectors */
        /*#mydiv a{*/
        /*    color: red;*/
        /*}*/

        /*2,Descendant selectors select only the first closest*/
        /*#mydiv>a{*/
        /*    color: red;*/
        /*}*/

        /*3,Paratactic selector paratactic relationship*/
        #mydiv>a,.content{
            color: red;
        }

    </style>
</head>
<body>

    <div id="mydiv">
        <a href="#jingyesi">Back to top</a>
        <a href="#location">Go back to where you need to be</a>
        <div>
            <a href="#" class="content"> See what color I am</a>
        </div>
    </div>
</body>
</html>
Generally speaking, there are three kinds of relationship selectors. We need to pay attention to the difference between the offspring and the subband, and pay attention to the graph.
Descendant selector: myid a is all the following a Tags
The sub selector "mydiv > a" is all a tags of the first layer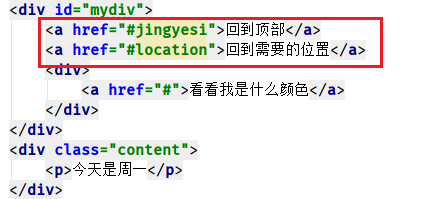
The parallel selector "mydiv a" can be selected at the same time
4. Pseudo class and pseudo element selector
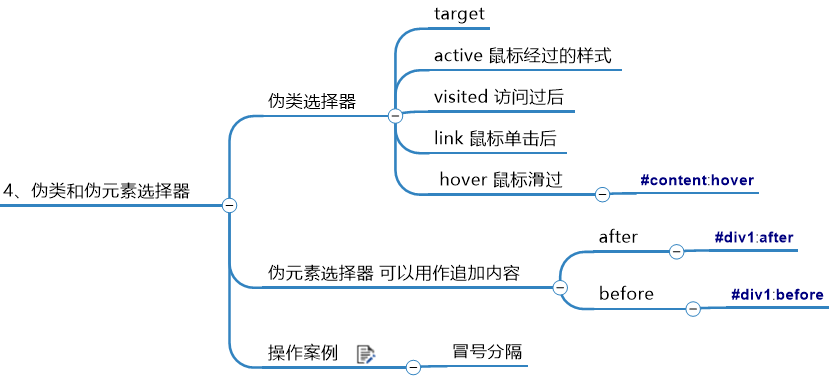
Here we use the after, befor, and hover in the pseudo element selector
Other target, active, visited and link of pseudo elements can refer to other articles of my blog.
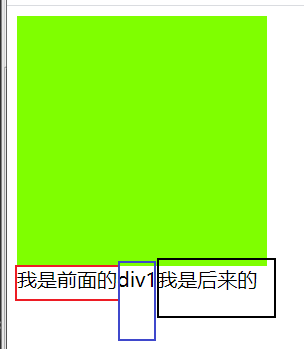
<!DOCTYPE html>
<html lang="en">
<head>
    <meta charset="UTF-8">
    <title>Title</title>
    <style>
        #content{
            width: 200px;
            height: 200px;
            background-color: chartreuse;
        }
        /*1,hover Hover over to change color*/
        #content:hover{
            background-color: red;
        }
        /*2,after Additional content*/
        #div1:after{
            content: "I came later";
        }
        /*3,before I'm in the front*/
        #div1:before{
            content: "I'm in the front";
        }
    </style>
</head>
<body>

    <div id="content"></div>

    <div id="div1">div1</div>

</body>
</html>
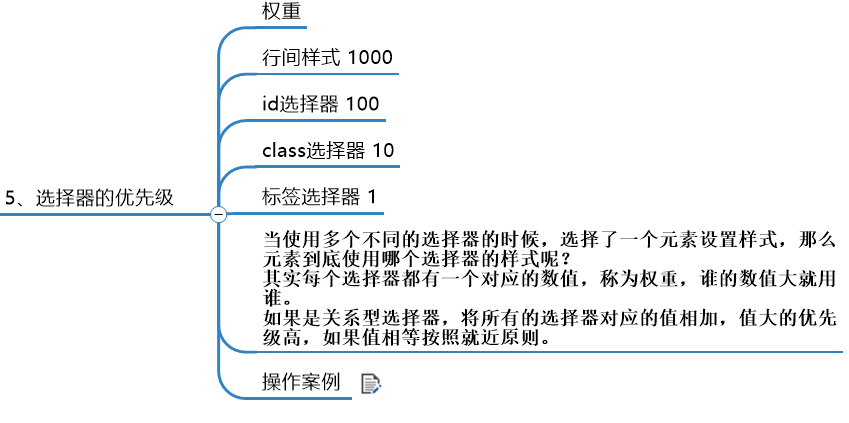
5. Selector priority [weight]
Review review
We know the priority of three ways to use css
Interline style > embedded > outer chain is based on the principle of proximity
Here we need to know the concept of weight
 When multiple selectors are used, an element is selected to set the style. Which selector style does the element use?
In fact, each selector has a corresponding value, which is called weight. Whoever has a large value will use it.
If it is a relational selector, add the corresponding values of all selectors, and the higher the value, the higher the priority. If the values are equal, follow the principle of proximity.
Reference code
<!DOCTYPE html>
<html lang="en">
<head>
    <meta charset="UTF-8">
    <title>Title</title>
    <style>
        /*101*/
        #mydiv a{
            color: red;
        }
        /*12*/
        body .xx a{
            color: black;
        }

    </style>
</head>
<body>

    <div id="mydiv" class="xx">
        <a href="#jingyesi">Back to top</a>
        <a href="#location">Go back to where you need to be</a>
        <div>
            <a href="#" class="content"> See what color I am</a>
        </div>
    </div>
</body>
</html>
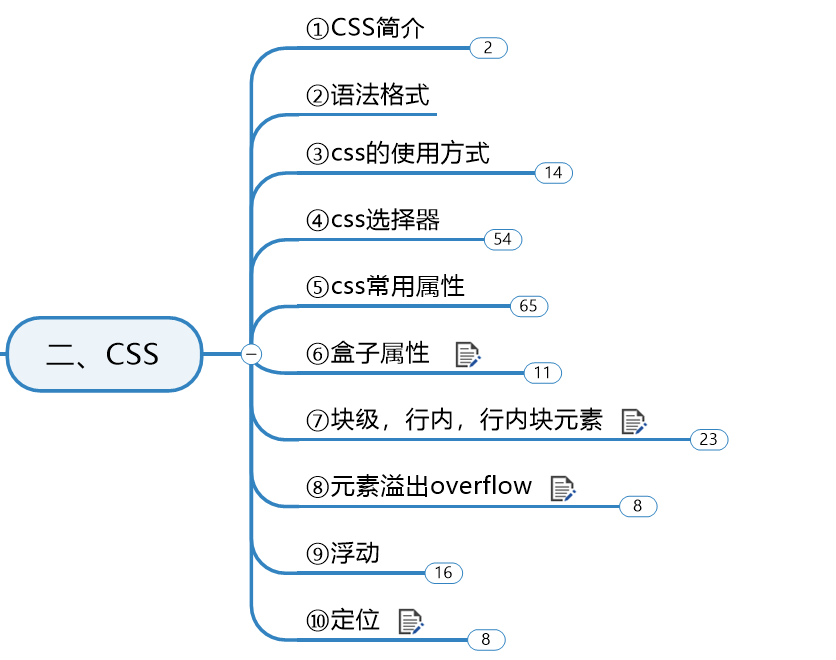
5, css common style properties
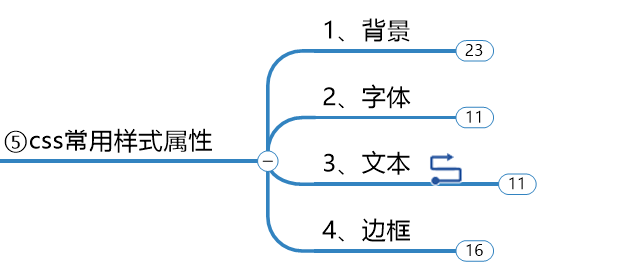
Style attribute is the one we have mentioned before, such as color, font size
I didn't explain before. Let's start with a detailed description of the style attributes
Recommend a manual to you
CSS2.0 Chinese manual. chm, CSDN can be found anywhere
For example, I want to know how to use the background. I have one search here. This article focuses on what knowledge the back-end engineers master about the front-end knowledge. You can use the manual for further understanding.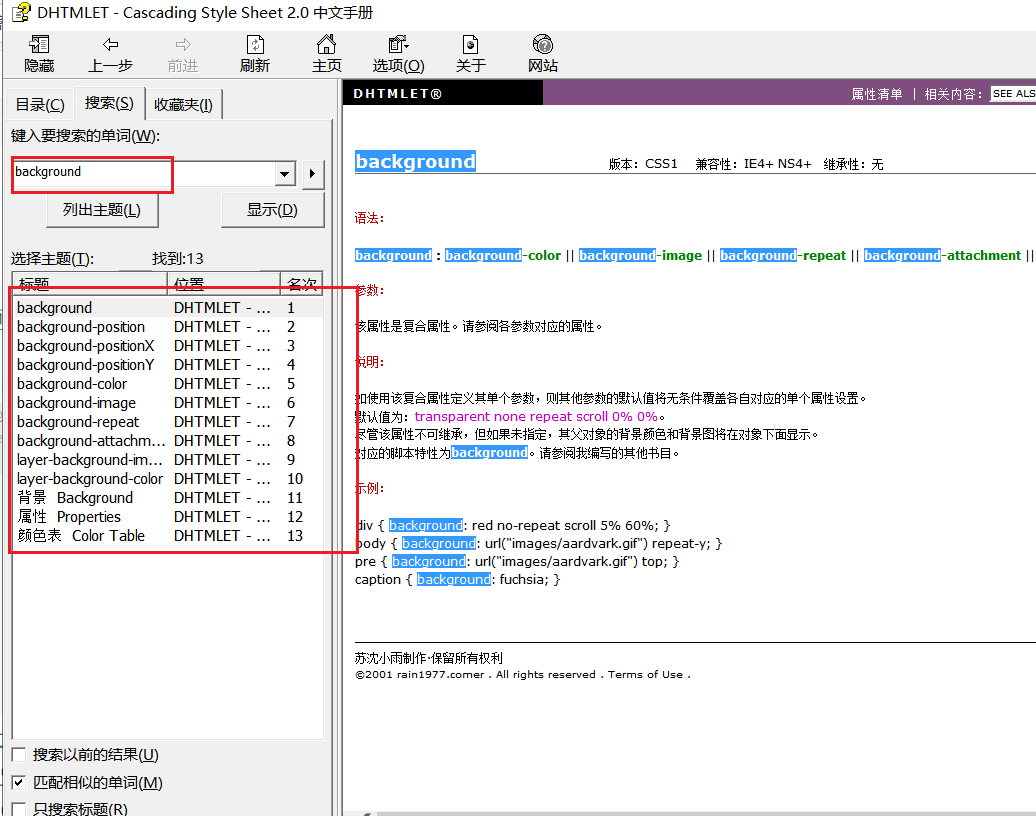
1. Background
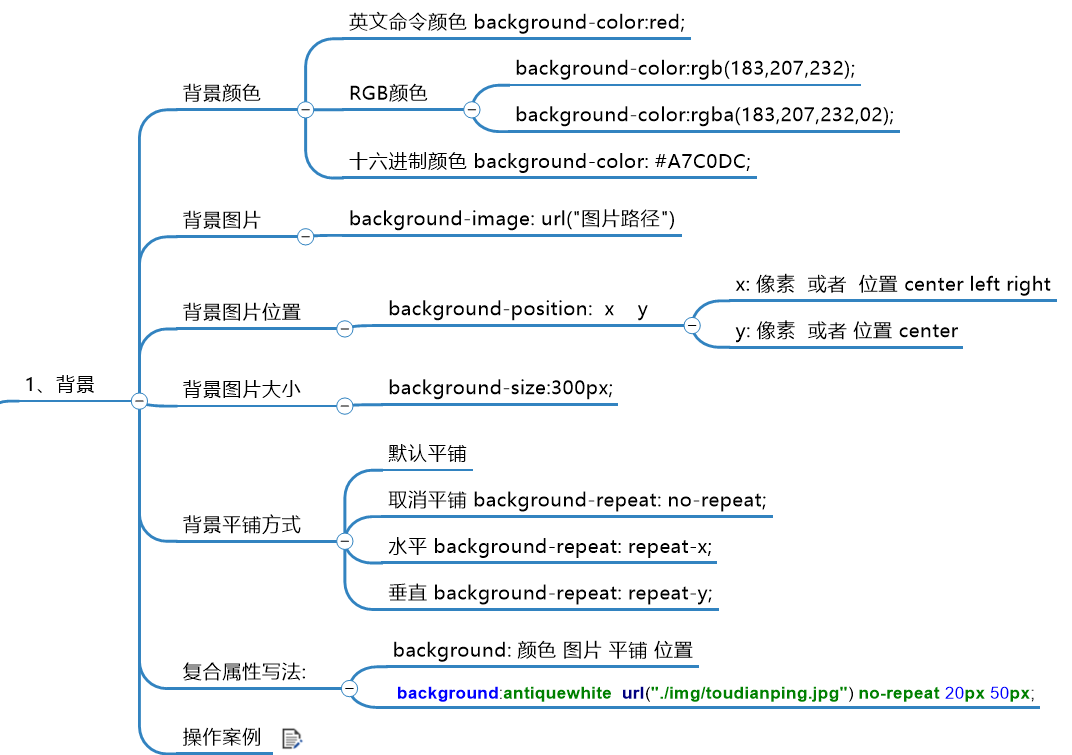
1. Background color
We set the width and height to 200 Px, and
Background color: red
<!DOCTYPE html>
<html lang="en">
<head>
    <meta charset="UTF-8">
    <title>Title</title>
    <style>
        .div1{
            width: 200px;
            height: 200px;
            background-color: red;
        }
    </style>

</head>
<body>
    <div class="div1">

    </div>

</body>
</html>
2. Background picture
Instruction: background image: URL (". / img/ toudianping.jpg "); picture path in the middle
<!DOCTYPE html>
<html lang="en">
<head>
    <meta charset="UTF-8">
    <title>Title</title>
    <style>
        .div1{
            width: 500px;
            height: 500px;
            background-image: url("./img/toudianping.jpg");
        }

    </style>
</head>
<body>
    <div class="div1">

    </div>
</body>
</html>
Be sure to set the box size. The default method is to repeat the mapping. Later, the default tiling will be cancelled. You can adjust the size width and height to choose one of them. The default is to scale proportionally
3. Background picture location
It's not very clear here
Note that you must debug the background position yourself: 200px 300px;
<!DOCTYPE html>
<html lang="en">
<head>
    <meta charset="UTF-8">
    <title>Title</title>
    <style>
        .div1{
            width: 500px;
            height: 500px;
            background-image: url("./img/toudianping.jpg");
            background-position: 200px 300px;
        }
    </style>
</head>
<body>
    <div class="div1">

    </div>
</body>
</html>
4. Background picture size
Background size: 50px; distinguish between width and height. This is to set the box size. It's equivalent to that you have a drawer div, which is what you store
<!DOCTYPE html>
<html lang="en">
<head>
    <meta charset="UTF-8">
    <title>Title</title>
    <style>
        .div1{
            width: 500px;
            height: 500px;
            background-image: url("./img/toudianping.jpg");
            background-size: 50px;
        }
    </style>
</head>
<body>
    <div class="div1">

    </div>
</body>
</html>
5. Background tiling
Tile by default
Undo tiling background repeat: no repeat
Horizontal background repeat: repeat-x;
Vertical background repeat: repeat-y;
<!DOCTYPE html>
<html lang="en">
<head>
    <meta charset="UTF-8">
    <title>Title</title>
    <style>
        .div1{
            width: 500px;
            height: 500px;
            background-image: url("./img/toudianping.jpg");
            background-size: 50px;
            background-repeat: no-repeat;
        }
    </style>
</head>
<body>
    <div class="div1">

    </div>
</body>
</html>
Cancel the tiling and try the rest on your own.
6. Composite attribute writing
Use method background: color picture tile position
background:antiquewhite url("./img/toudianping.jpg") no-repeat 20px 50px;
<!DOCTYPE html>
<html lang="en">
<head>
    <meta charset="UTF-8">
    <title>Title</title>
    <style>
        .div1{
            width: 200px;
            height: 200px;
            background: red url("./img/toudianping.jpg") no-repeat 20px 20px;
        }
    </style>
</head>
<body>
    <div class="div1">

    </div>
</body>
</html>
2. Font and text
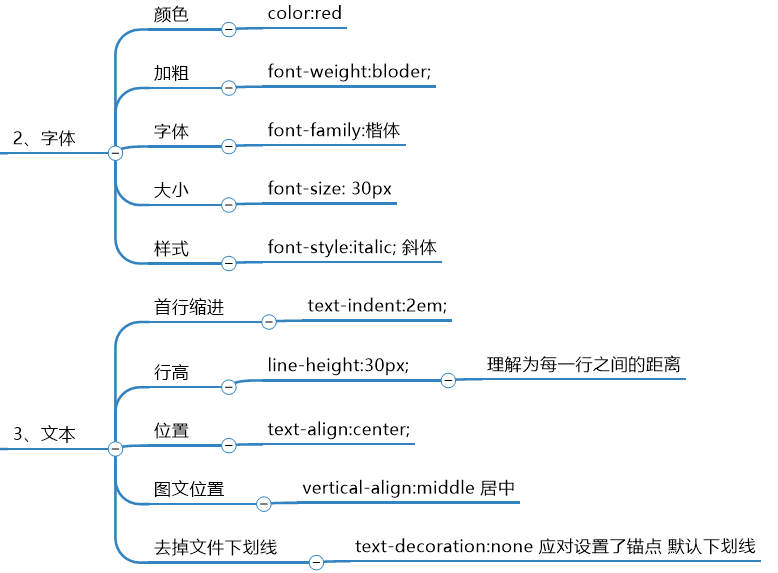
From now on, without too much explanation, just look at my code, which has been explained in general
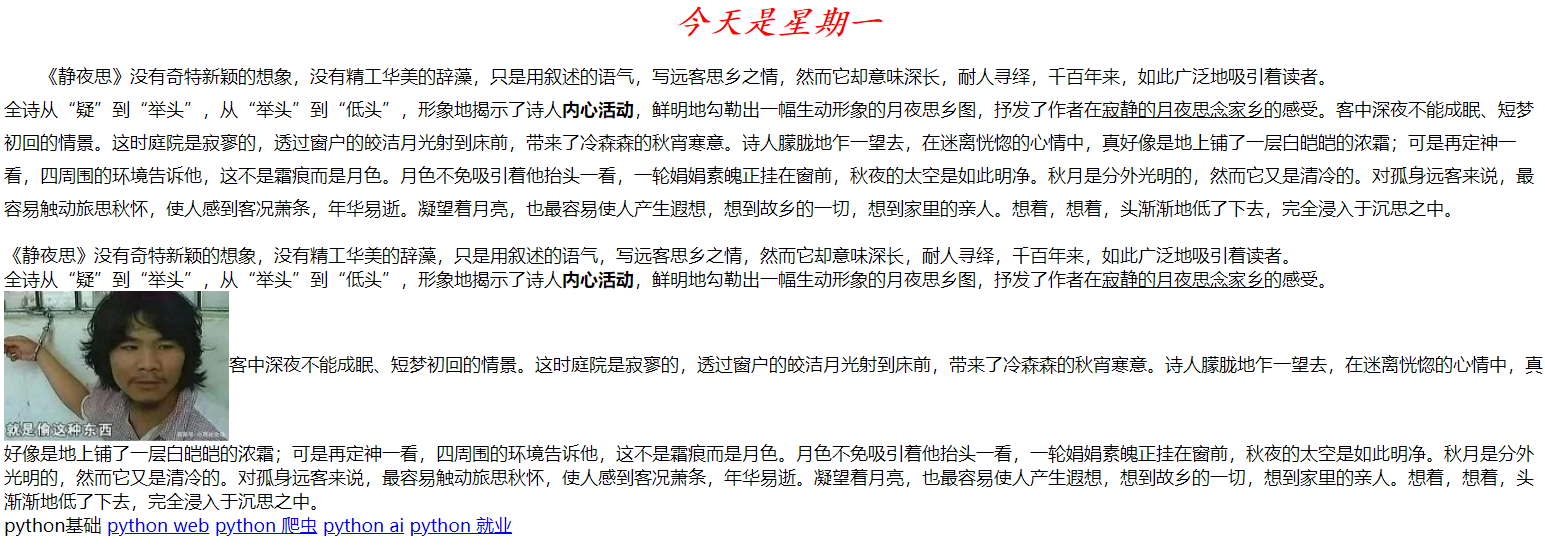
<!DOCTYPE html>
<html lang="en">
<head>
    <meta charset="UTF-8">
    <title>Title</title>
    <style>
        #div1{
            /*Text color*/
            color: red;
            /*Bold text*/
            font-weight: bolder;
            /*Text font*/
            font-family: Regular script;
            /*Text size*/
            font-size: 30px;
            /*Text style*/
            font-style: italic;

            /*font: italic bolder 30px Regular script;*/
        }
        p{
            /*text-indent*/
            text-indent: 2em;
            /*Row height*/
            line-height: 30px;
        }
        #div1{
            /*div The default width is 100% of the parent form*/
            /*Text centered*/
            text-align: center;
        }
        #div2 img{
            /*Set text location*/
            vertical-align: middle;
        }
        /*#div3 a{*/
        /*    !*Remove file underline *!*/
        /*    text-decoration: none;*/
        /*}*/
    </style>
</head>
<body>
    <div id="div1">Today is Monday</div>
    <p>
        <There is no strange and novel imagination, no refined and gorgeous words, just a narrative tone to write the feelings of homesickness of distant guests, but it is meaningful and endurable. For thousands of years, it has attracted readers so widely.<br>The whole poem reveals the poet vividly from "doubt" to "raising head", from "raising head" to "bowing head"<b>Inner activity</b>,It vividly outlines a vivid picture of homesickness on the moon night, expressing the author's<u>Silent moonlit night missing hometown</u>The feeling of. Guests can not sleep in the middle of the night, short dream back to the scene. At this time, the courtyard is lonely. The bright moonlight through the window shoots at the front of the bed, bringing the chill of autumn night. At first glance, the poet looked vaguely. In his trance, it was as if the ground had been covered with a thick layer of white frost. But when he looked again, the surroundings around him told him that it was not frost marks but moonlight. The moon inevitably attracted him to look up, a round of JUANJUAN soul is hanging in front of the window, the space in autumn night is so clear. Autumn moon is extraordinarily bright, but it is cold. For a long-distance guest alone, it's easy to touch his mind and make him feel depressed and fleeting. Staring at the moon is also the easiest way to make people daydream, think of everything in their hometown, and think of their family members. Thinking, thinking, head gradually lowered, completely immersed in meditation.
    </p>
    <div id="div2">
        <There is no strange and novel imagination, no refined and gorgeous words, just a narrative tone to write the feelings of homesickness of distant guests. However, it is meaningful and endurable. For thousands of years, it has attracted readers so widely.<br>The whole poem reveals the poet vividly from "doubt" to "raising head", from "raising head" to "bowing head"<b>Inner activity</b>,It vividly outlines a vivid picture of homesickness on the moon night, expressing the author's<u>Silent moonlit night missing hometown</u>The feeling of.<img src="./img/Li Bai.jpg">Guests can not sleep in the middle of the night, short dream back to the scene. At this time, the courtyard is lonely. The bright moonlight through the window shoots at the front of the bed, bringing the chill of autumn night. At first glance, the poet looked vaguely. In his trance, it was as if the ground had been covered with a thick layer of white frost. But when he looked again, the surroundings around him told him that it was not frost marks but moonlight. The moon inevitably attracted him to look up, a round of JUANJUAN soul is hanging in front of the window, the space in autumn night is so clear. Autumn moon is extraordinarily bright, but it is cold. For a long-distance guest alone, it's easy to touch his mind and make him feel depressed and fleeting. Staring at the moon is also the easiest way to make people daydream, think of everything in their hometown, and think of their family members. Thinking, thinking, head gradually lowered, completely immersed in meditation.
    </div>
    <div id="div3">
        <a >python Basics</a>
        <a href="#">python web</a>
        <a href="#">python Reptile</a>
        <a href="#">python ai</a>
        <a href="#">python obtain employment</a>
    </div>
</body>
</html>
3. Border
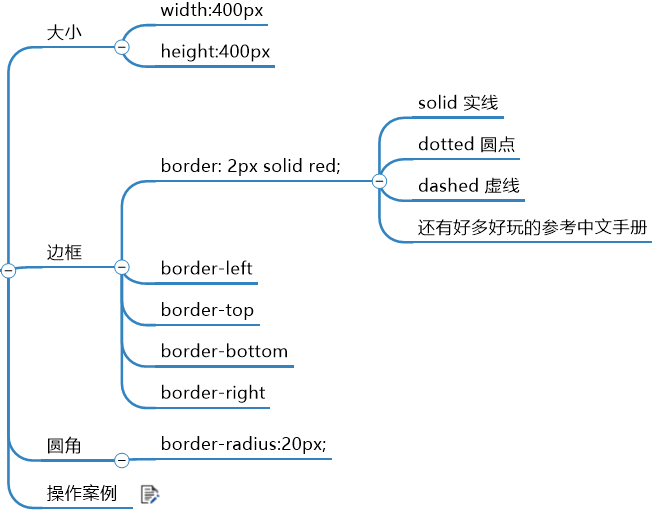
Fillet this thing is, fillet. Turn the rectangular part into a round corner
border can also be written in compound order. It doesn't matter
If you want to design only the style above a certain border, you can implement border top, but you need to cancel the compound writing method, otherwise it will conflict.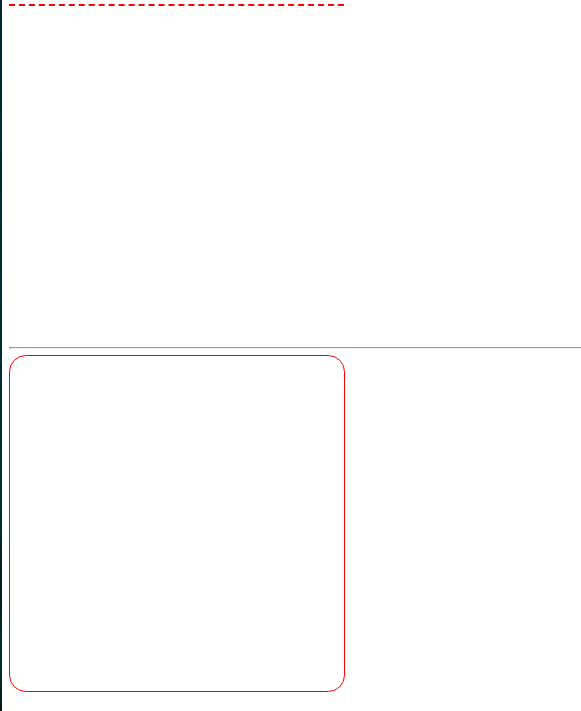
6, Box div attribute
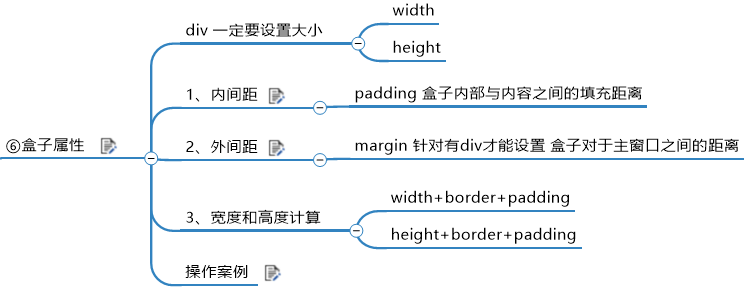
What is a box? Those who have learned html should know that here is a simple explanation.
For example, a drawer, you can put a rectangular book in it. Drawers are divs, books are object elements. Books can also be used as divs and then nested inside. Russian Dolls
The element is displayed as a box in the page, similar to a box. The CSS box model is to use the real box as a metaphor to help us set the corresponding style of the element. The box model is as follows: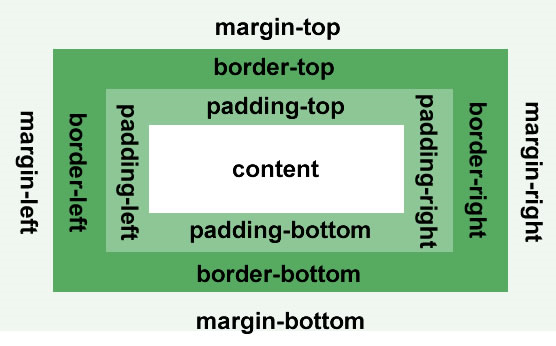
Call the element box, and set the corresponding styles as: the border of the box, the content in the box and the spacing between the borders, and the spacing between the boxes.
A box width is equal to content (width) + padding (fill) + border (border thickness)
High homology
The painting is ugly. Do you like it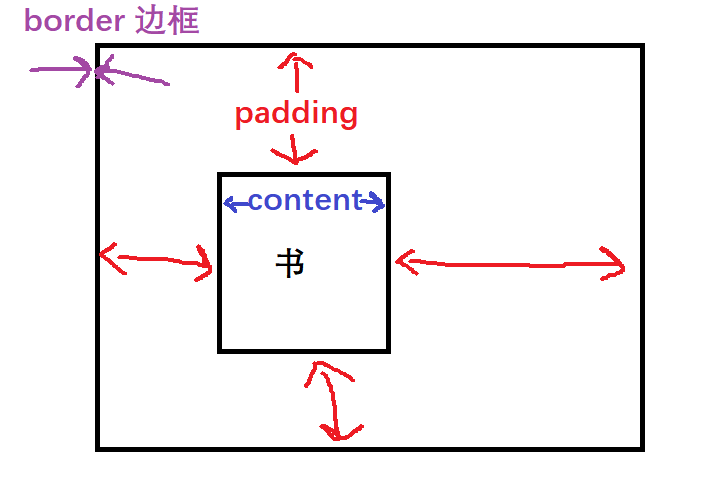
Margin is outside the border. Margin is the distance between boxes. By default, the outermost box is the browser. If you want to center, margin: 0 auto; is OK
0 means the distance above is 0, and the left distance of auto is centered relative to another box
Case operation, it is better to manually adjust the parameters, you can see the effect.
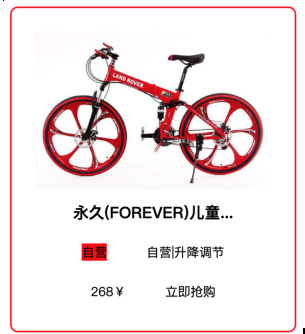
<!DOCTYPE html>
<html lang="en">
<head>
    <meta charset="UTF-8">
    <title>Title</title>
    <style>
        *{
            padding: 0px;
            margin: 0px;
        }
        #content{
            width: 250px;
            height: 400px;
            border: 2px solid red;
            border-radius: 20px;
            margin: 0 auto;
            padding: 25px;
        }
        #content img{
            width: 250px;
        }
        .title{
            text-align: center;
            font-size: 30px;
            font-family: Regular script;
            font-weight: bolder;
            margin: 30px 0px;
        }
        .des{
            text-align: center;
            margin: 30px 0px;
        }
        .ziying{
            background-color: red;
            color: white;
            margin-right: 50px;
        }

    </style>
</head>
<body>
    <div id="content">
        <div>
            <img src="./img/bike.jpg">
        </div>
        <div class="title">My bike</div>
        <div class="des">
            <span class="ziying">self-support</span><span>self-support|Lifting adjustment</span>
        </div>
        <div class="des">
            <span class="ziying">self-support</span><span>self-support|Lifting adjustment</span>
        </div>
    </div>
</body>
</html>
7, Block level, inline, inline block elements
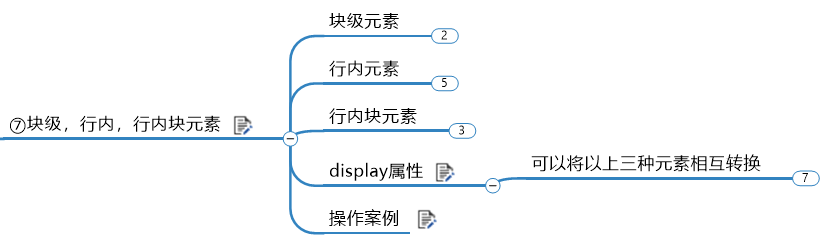
Element is a label. There are three kinds of labels commonly used in layout: block element, inline element and inline block element. Only by understanding the characteristics of these three elements can you skillfully layout the page.
| Label type | features | give an example |
|---|---|---|
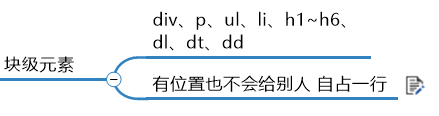
| Block level elements | 1. Support all styles 2. If no width is set, the default width is 100% of the parent width 3. The box occupies a row |
div,p,ul,li,h1~h6,d1,dt,dd |
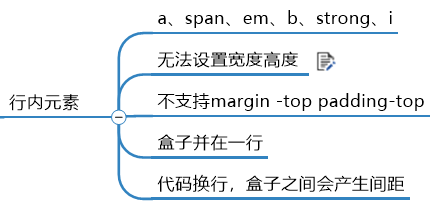
| Inline elements | 1. Partial styles are supported (width, height, margin up and down, padding up and down are not supported) 2. Width depends on content 3. Box and line 4. Code wrapping, space between boxes |
a,span,em,b,strong,i |
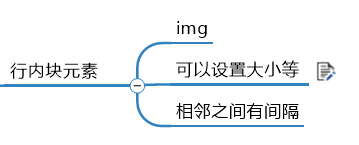
| Inline block element | 1. Support all styles 2. If the width and height are not set, the width and height are determined by the content 3. The box will be in one line and the code will wrap. The box will generate spacing |
Is a new element type. Existing elements are not included in this category. You can use the display attribute to convert block elements or inline elements to this type of elements. img |
1. Block level elements
<!DOCTYPE html>
<html lang="en">
<head>
    <meta charset="UTF-8">
    <title>Title</title>
    <style>
        #div1,#div2{
            width: 100px;
            height: 100px;
            border: 1px solid red;
        }
    </style>

</head>
<body>
<!--    Block level labels own more than half of them-->
    <div id="div1">div1</div>

    <div id="div2">div2</div>

</body>
</html>
You can see that there are many blanks on the right side of div1, and div2 is not allowed to be on the same line
I opened the computer steward here for space comparison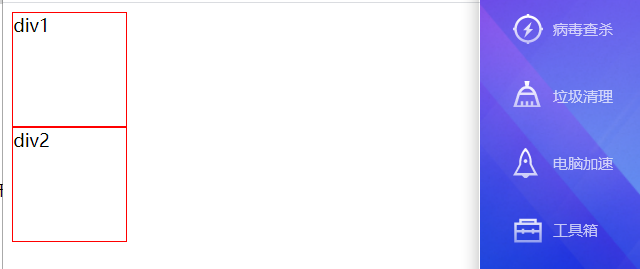
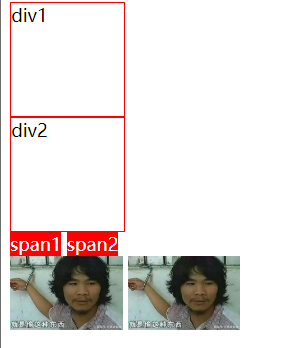
2. In line elements
<!DOCTYPE html>
<html lang="en">
<head>
    <meta charset="UTF-8">
    <title>Title</title>
    <style>
        #div1,#div2{
            width: 100px;
            height: 100px;
            border: 1px solid red;
        }
        #div3 span{
            background-color: red;
            color: white;
            width: 200px;
        }
    </style>

</head>
<body>
<!--    Block level labels own more than half of them-->
    <div id="div1">div1</div>

    <div id="div2">div2</div>
    <div id="div3">
        <!--
        //In line label: sharing space with other labels, setting width and height is not supported
        -->
        <span>span1</span>
        <span>span2</span>
    </div>
</body>
</html>
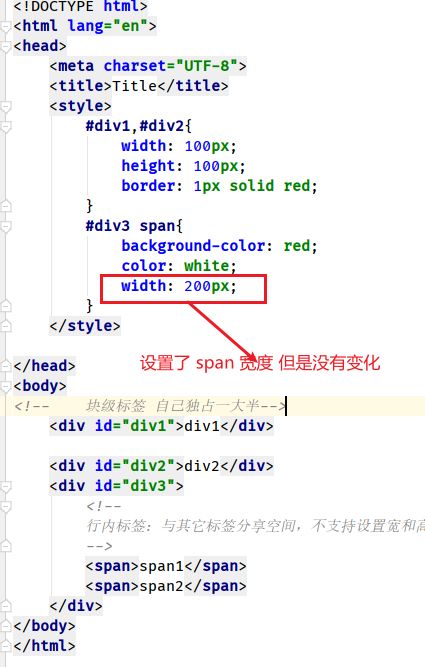
As you can see, the width of span tag is set, but there is no change. div3 box is opened by span block level elements. You can write more contents in span tag, and you can understand.
Without setting the height and width of the div3 box, the size of the outer box depends on the content of the block level elements. Be sure to test, or you won't understand.
There will be gaps between the block elements in the row. It is better to look at the summary on the head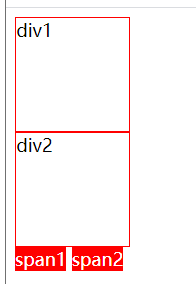
3. Inline block elements
<!DOCTYPE html>
<html lang="en">
<head>
    <meta charset="UTF-8">
    <title>Title</title>
    <style>
        #div1,#div2{
            width: 100px;
            height: 100px;
            border: 1px solid red;
        }
        #div3 span{
            background-color: red;
            color: white;
            width: 200px;
        }
        #div4 img{
            width: 100px;
        }
    </style>

</head>
<body>
<!--    Block level labels own more than half of them-->
    <div id="div1">div1</div>

    <div id="div2">div2</div>
    <div id="div3">
        <!--
        //In line label: sharing space with other labels, setting width and height is not supported
        -->
        <span>span1</span>
        <span>span2</span>
    </div>
    <div id="div4">
        <img src="img/toudianping.jpg">
        <img src="img/toudianping.jpg">
    </div>
</body>
</html>
4. display attribute
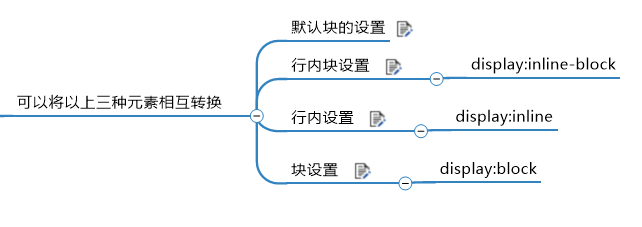
| Value options | describe |
|---|---|
| none | Element hidden and not in place |
| block | Elements are displayed as block elements |
| inline | Element inline element display |
| inline-block | Element inline block element display |
<!DOCTYPE html>
<html lang="en">
<head>
    <meta charset="UTF-8">
    <title>Title</title>
    <style>
        #div1, #div2 {
            width: 100px;
            height: 100px;
            border: 1px solid red;
        }

        #div3 span {
            background-color: red;
            color: white;
            width: 500px;
        }

        #div4 img {
            width: 300px;
            /*It's gone. It's not shown*/
            display: none;
        }

        #div5, #div6 {
            width: 100px;
            height: 100px;
            border: 1px solid red;
            /*Block in row*/
            /*display: inline-block;*/
            /*Hanlin Academician*/
            /*display: inline;*/
        }
        #div7 span{
            width:200px;
            border: 1px solid red;
            /*display: inline-block;*/
            /*block*/
            display: block;
        }
    </style>
</head>
<body>
<!--
//Block level label: own a large block, do not share space with other labels
-->
<div id="div1">div1</div>
<div id="div2">div2</div>
<div id="div3">
    <!--
    //Inline Tags: share space with other tags
        //Setting width and height is not supported
    -->
    <span>span1</span>
    <span>span2</span>
</div>
<div id="div4">
    <!--
    //Inline block: share space with other tags, support setting width and height
    -->
    <img src="./img/toudianping.jpg">
    <img src="./img/toudianping.jpg">
</div>
<hr>
<div id="div5">div5</div>
<div id="div6">div6</div>
<hr>
<div id="div7">
    <span>span1</span>
    <span>span2</span>
</div>
</body>
</html>
You can see the code for operation. It is better to compare the settings of "div7 span" and "div3 span"
You can see that the inner element and outer box can only be opened by the content size, and setting the width is useless.
It should be noted that none also has these block level conversion application scenarios.
For example, if you often encounter something, you need to click a directory to display something.
Usually the result of conversion between block level elements.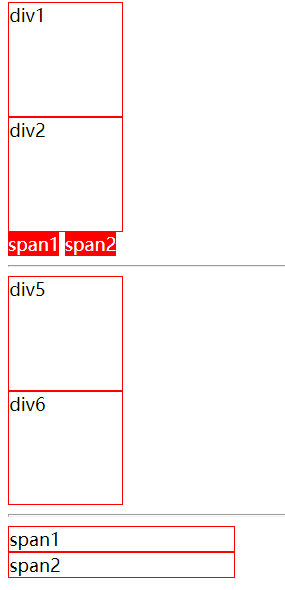
5. Block level element mutual conversion case [panel switching]
<!DOCTYPE html>
<html lang="en">
<head>
    <meta charset="UTF-8">
    <title>Title</title>
    <style>
        *{
            padding: 0px;
            margin: 0px;
        }
        ul {
            list-style: none;
            width: 800px;
            margin: 0 auto;
        }
        li {
            width: 100px;
            height: 30px;
            line-height: 30px;
            border: 1px solid red;
            float: left;
            text-align: center;
        }
        a{
            text-decoration: none;
        }
        .panle{
            width: 715px;
            background-color: #00F0F0;
            clear: both;
            display: none;
            text-align: center;
        }
        /*Clear influence of child float on parent height 0*/
        .clearfix:after{
            content: "";
            display: table;
            clear: both;
        }
        :target{
            display: block;
        }
    </style>
</head>
<body>
<ul class="clearfix">
         <li><a href="#test1">home page</a></li>
         <li><a href="#">Company profile</a></li>
         <li><a href="#">Solution</a></li>
         <li><a href="#">Company news</a></li>
         <li><a href="#">Industry action</a></li>
         <li><a href="#">invite to one 's side men of wisdom and valor</a></li>
         <li><a href="#">contact us</a></li>
        <div class="panle" id="test1">
            //Test test<br>
            //Test test<br>
            //Test test<br>
            //Test test<br>
        </div>
</ul>
</body>
</html>
What we need to know is that there are anchor operations in html knowledge
Set the line of test text to none
Get the anchor operation of all a tags through pseudo class selector: target {}
A label anchor, I have set a test1 to point to id = "test1". When I click, set the display of a label anchor object to block, and it will be displayed.
As for the clearing floating method in the figure below clearfix:after And open floating, which will be covered in the next floating column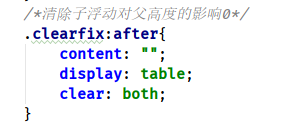
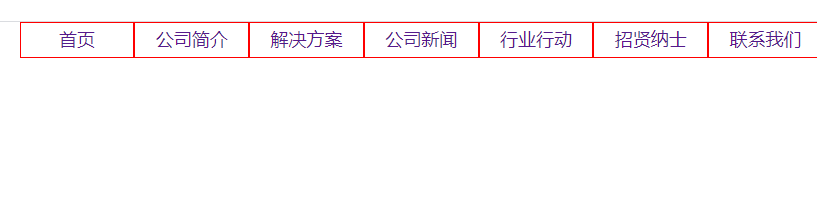
Appears when we click on the home page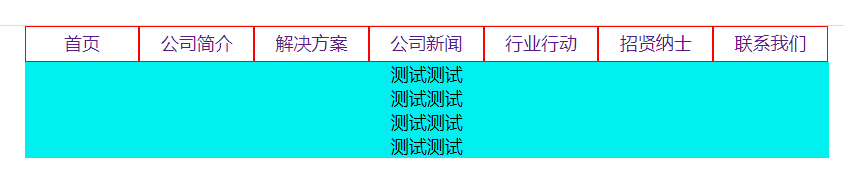
8, Element overflow
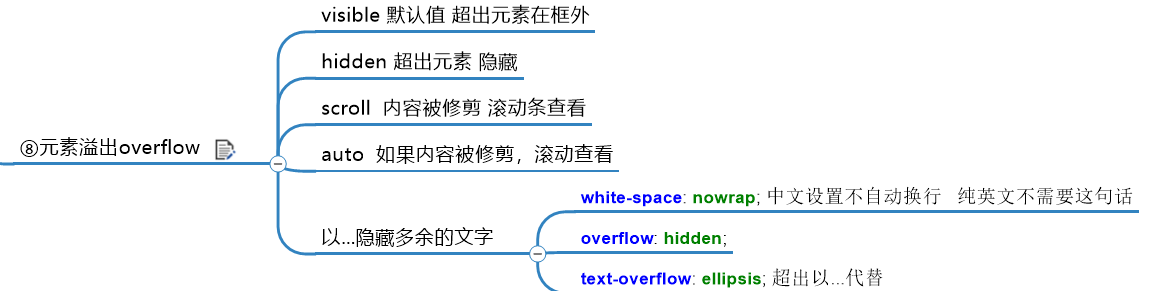
When the size of the child element exceeds the size of the parent element, you need to set the way in which the parent element displays the overflow child element, which is set through the overflow attribute.
| Settings for overflow | |
|---|---|
| visible | By default, content will not be trimmed and will appear outside the element box |
| hidden | Content is trimmed and the rest is invisible |
| scroll | The content will be trimmed, but the browser will have scroll bars to display the rest, just like the browser |
| auto | If the content is trimmed, the browser displays a scroll bar to view the rest |
The text overflow attribute specifies what happens when the text overflows the containing element
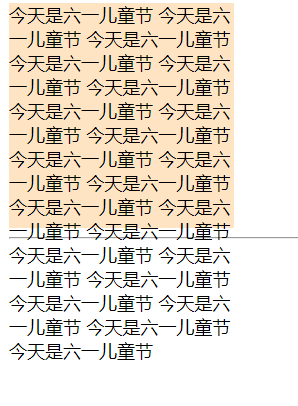
First, let's look at the problem of text beyond the box
<!DOCTYPE html>
<html lang="en">
<head>
    <meta charset="UTF-8">
    <title>Title</title>
    <style>
        #div1{
            width: 200px;
            height: 200px;
            background-color: bisque;
            overflow: scroll;
            /*Hide*/
            /*overflow: hidden;*/
            /*Scroll*/
            overflow: scroll;
            /*auto*/
            /*overflow: auto;*/
        }
    </style>
</head>
<body>
    <div id="div1">
        Today is June 1 children's day.
        Today is June 1 children's day.
        Today is June 1 children's day.
        Today is June 1 children's day.
        Today is June 1 children's day.
        Today is June 1 children's day.
        Today is June 1 children's day.
        Today is June 1 children's day.
        Today is June 1 children's day.
        Today is June 1 children's day.
        Today is June 1 children's day.
        Today is June 1 children's day.
        Today is June 1 children's day.
        Today is June 1 children's day.
        Today is June 1 children's day.
        Today is June 1 children's day.
        Today is June 1 children's day.
        Today is June 1 children's day.
        Today is June 1 children's day.
        Today is June 1 children's day.
        Today is June 1 children's day.
        Today is June 1 children's day.
    </div>
    <hr>
</body>
</html>
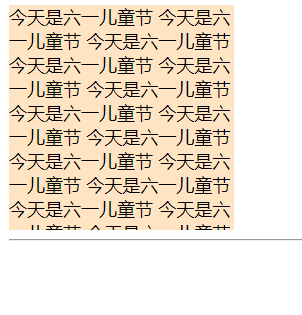
As you can see, the text is out
1.hidden beyond element hiding
Now let's use overflow to set hidden first
Cancel the comment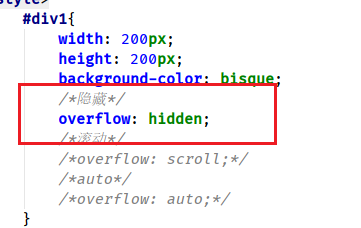
2.scroll bar to view class browser
Try scroll ing again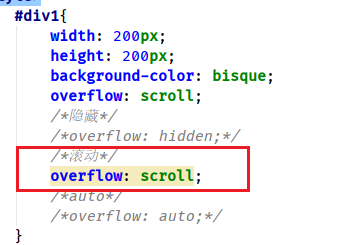
Just like the browser, you can drag. Why there is no drag left and right? Because you need additional settings, you don't need to set them here.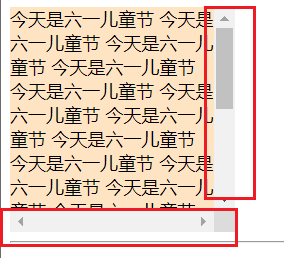
3.auto scrolling
Modify the original code, comment other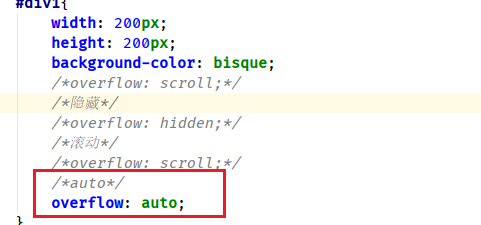
Less horizontal scroll bar than scroll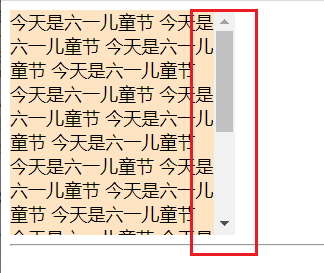
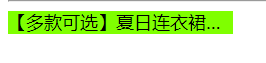
4. To Hide extra text
Text overflow fixed format, just remember.
When we often visit Taobao, we will see that the titles of some items are omitted at the end of.
<!DOCTYPE html>
<html lang="en">
<head>
    <meta charset="UTF-8">
    <title>Title</title>
    <style>
        #div1{
            width: 200px;
            height: 20px;
            line-height: 20px;
            background-color: chartreuse;

            /*Chinese does not wrap*/
            white-space: nowrap;
            /*Redundant hiding*/
            overflow: hidden;
            /*To replace with*/
            text-overflow: ellipsis;

        }
    </style>
</head>
<body>
    <hr>
    <div id="div1">
        [Multiple options] summer dress women's suit new summer Daisy short sleeve 2020 t T-shirt suit retro Chiffon floral skirt shows thin and trendy picture color L
    </div>
</body>
</html>
9, Floating
Float is float, so I understand that it is to break away from the basic layer [break away from the document flow] to the float layer.
1. Document flow
Document flow means that the boxes are arranged from top to bottom and from right according to the order of HTML tags
Block elements occupy a row, and the elements within the row are arranged from to the right. The ones written first are arranged first, and the ones written later are arranged later. Each box occupies its own position.
This is not a good example. You will know later
2. Floating characteristics
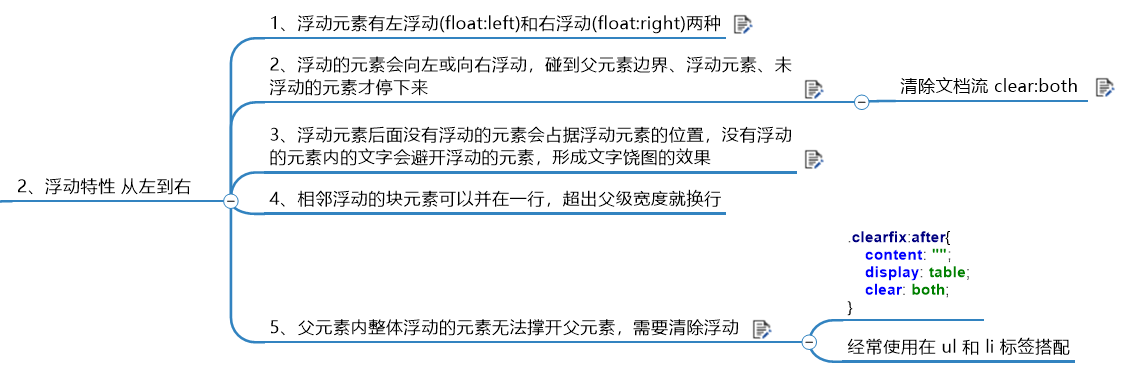
1. Left and right float
Floating element has left float( float:left )And right float( float:right )Two kinds
Let's see first that floating is not enabled. The block level element div used here is exclusive to one line
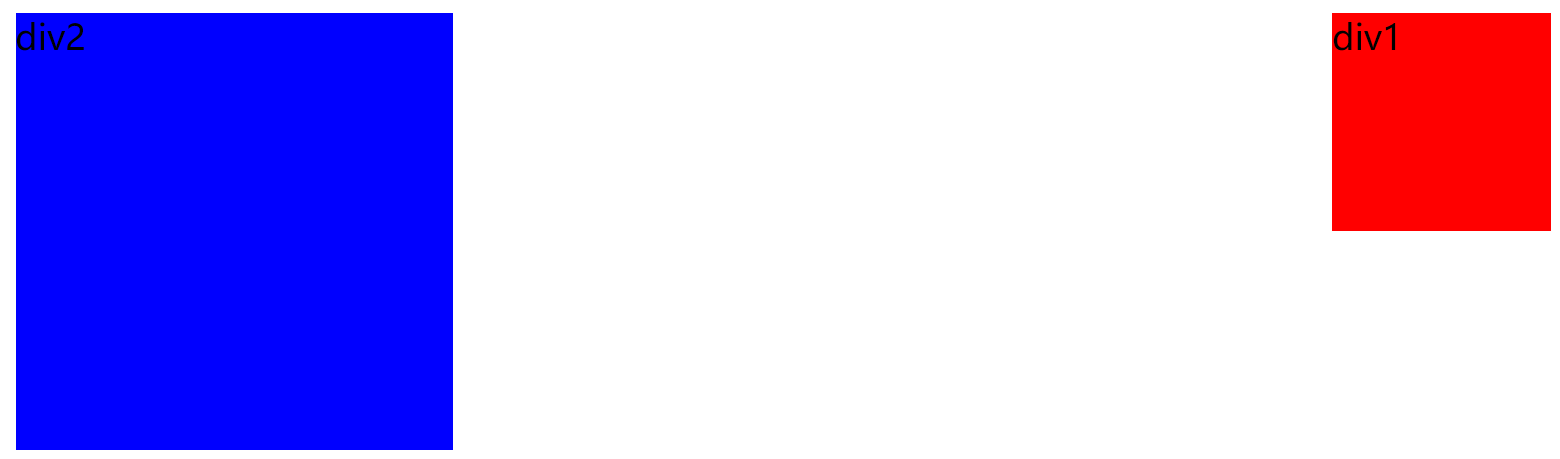
<!DOCTYPE html>
<html lang="en">
<head>
    <meta charset="UTF-8">
    <title>Title</title>
    <style>
        #div1{
            width: 100px;
            height: 100px;
            background-color: red;
            /*Floating, out of document flow*/
            /*float: right;*/
            /*float: left;*/
        }
        #div2{
            width: 200px;
            height: 200px;
            background-color:blue;
            /*float: left;*/
        }
    </style>
</head>
<body>
    <div id="div1">div1</div>
    <div id="div2">div2</div>
</body>
</html>
As you can see, the two boxes are not on the same line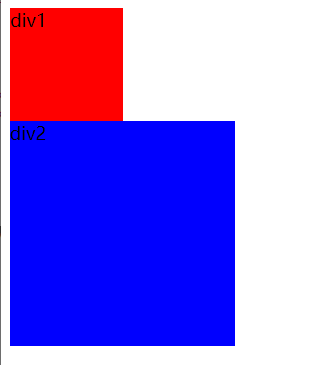
Open float, modify code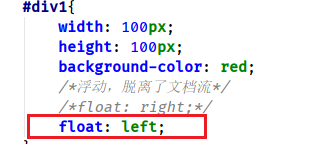
As you can see, we can open the float by setting the div1 box to float:left , floating to the left off the document stream
But the text is still influenced by the div1 box inside. Outside of the box, we can compose the word surround effect. For example, the poet Li Bai's head portrait is used as the div1 box, and then the text inside the div2 box writes the introduction, which can form the text surround effect.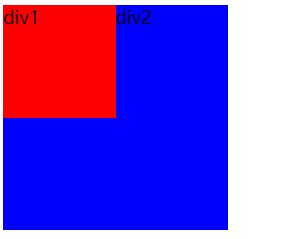
Now let's set it to float right and change the code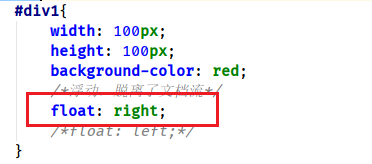
As you can see, the original div is a block level element, which should be followed by one line. Div1 broke away from the document flow and went to the floating layer. Therefore, div2 is not affected by div1 block level elements, occupying the first line
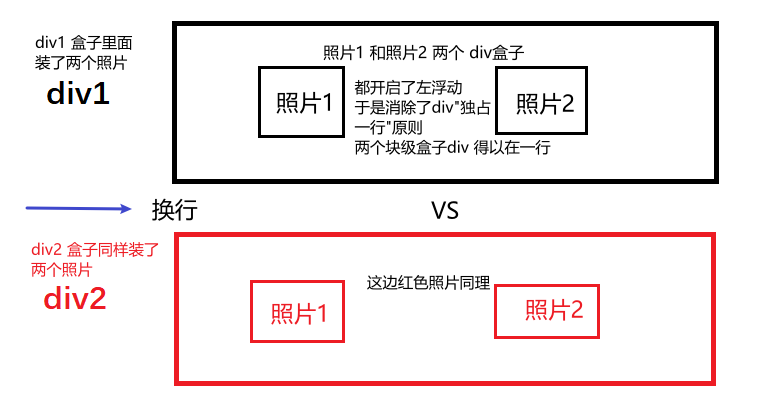
Application scenarios, for example, we need multiple div block level elements to contain photos, and we need to set two boxes to float in one line
Eliminate block level elements, exclusive row constraints
Modify the code. Both boxes open left float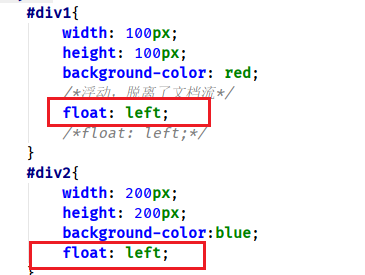
As you can see, the two boxes are juxtaposed in a row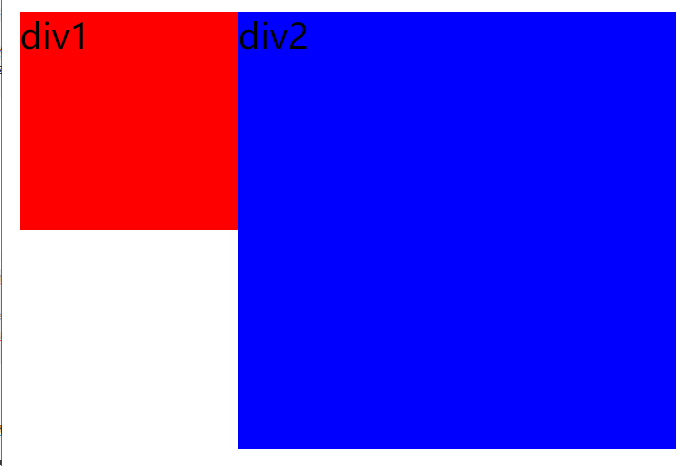
2. Clear floating [clear document flow]
The floating element will float to the left or right, and it will stop only when it touches the parent element boundary, floating element and non floating element
The first box, div1, is floating and detached from the document flow. Originally, div2, according to the principle, monopolizes one line and occupies the first line (the first line of div1 detached from the document flow is empty), but I wrote instructions in box div2 clear:both , clear the impact of the float
<!DOCTYPE html>
<html lang="en">
<head>
    <meta charset="UTF-8">
    <title>Title</title>
    <style>
        #div1{
            width: 100px;
            height: 100px;
            background-color: red;
            /*Floating, out of document flow*/
            float: left;
            /*float: left;*/

        }
        #div2{
            clear: both;
            width: 200px;
            height: 200px;
            background-color:blue;
            float: left;
        }
    </style>
</head>
<body>
    <div id="div1">div1</div>
    <div id="div2">div2</div>
</body>
</html>
You can see that both are on a new line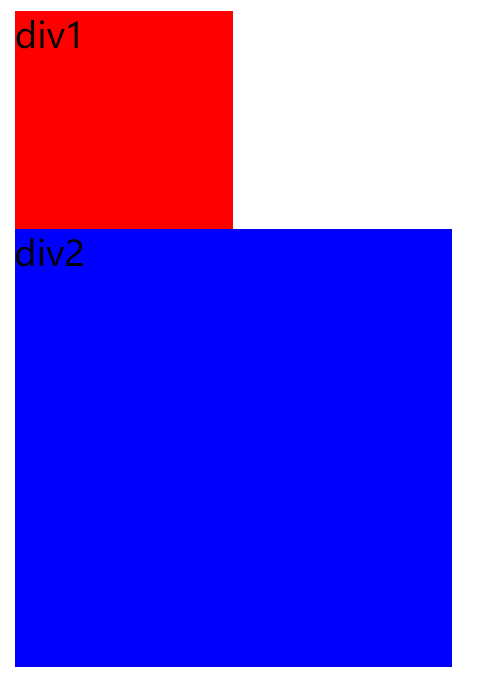
Application scenario, very important!!!!!!
Everyone has played the Three Kingdoms killing. The figure below is a simulation of the Three Kingdoms killing
First camp above, second camp below, middle vs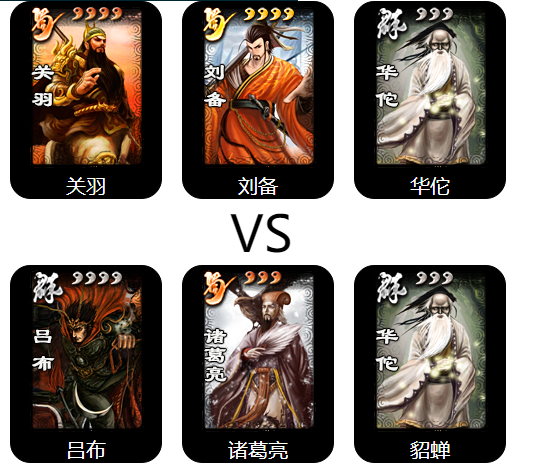
Do you think that the peripheral div1 and div2 must occupy the first and second lines of the browser respectively, because they are block level elements.
But pay attention!! The boxes in which we put the photos are all left floating, so they will not be on the same horizontal line!! The floating effect between the two is not cleared!!
Here is the code of Sanguo kill. If you don't have a picture, try to find one
<!DOCTYPE html>
<html lang="en">
<head>
    <meta charset="UTF-8">
    <title>Three Kingdoms killing</title>

    <style>
        * {
            padding: 0;
            margin: 0;
        }
        .box{
            width: 150px;
            border: 1px black solid;
            background: black;
            border-radius: 20px;
            color: white;
            float: left;
            margin-left: 20px;
        }
        .box>img{
            margin: 0 18px;
        }
        .name{
            text-align: center;
            font-size: 20px;
        }
        #vs{
            font-size: 50px;
            margin: auto 240px;
        }
        /*.inner2{*/
        /*    clear: both;*/
        /*}*/

    </style>
</head>
<body>
        <div id="outer">
            <div class="inner1">
                <div  class="box" >
                    <img src="img/Guan Yu.png" >
                    <p class="name">Guan Yu</p>
                </div>
                <div  class="box" >
                    <img src="img/Liu Bei.png" >
                    <p class="name">Liu Bei</p>
                </div>
                <div  class="box" >
                    <img src="img/Hua Tuo.png" >
                    <p class="name">Hua Tuo</p>
                </div>
            </div>

            <div id="vs"><p>VS</p></div>

            <div class="inner2">
                <div  class="box" >
                    <img src="img/Lv Bu.png" >
                    <p class="name">Lv Bu</p>
                </div>
                <div  class="box" >
                    <img src="img/Zhugeliang.png" >
                    <p class="name">Zhugeliang</p>
                </div>
                <div  class="box" >
                    <img src="img/Hua Tuo.png" >
                    <p class="name">army officer's hat ornaments</p>
                </div>
            </div>
        </div>
</body>
</html>
I annotated the class selector content of inner2, the second box. In order to reflect the idea that the two block level elements we just understood are not exclusive to each other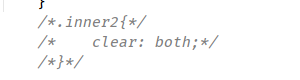
Let's take a look at the results. Because the box in the div1 box is open floating, as long as there are open floating boxes, there is a document flow impact, so we need to clear the document flow impact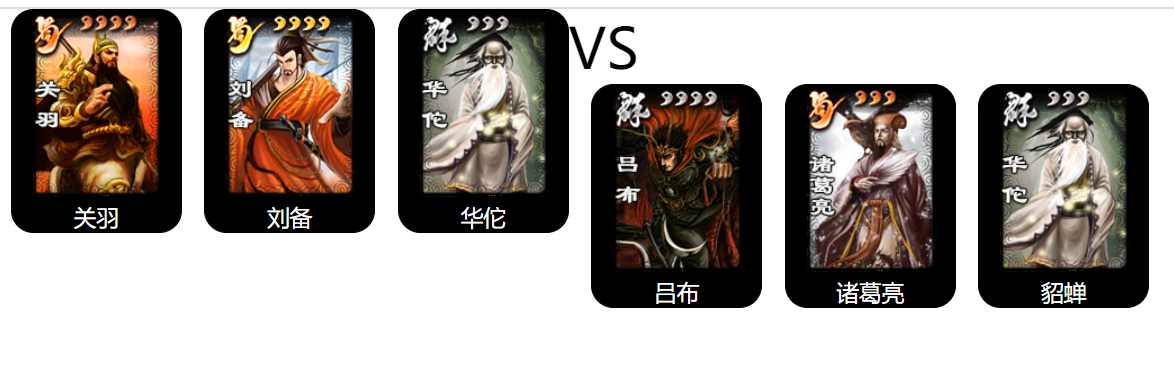
Comment code, uncomment
Clearing inner2's second large box is affected by all document flows. You can see that there are still problems in VS. look back at the code
We found that vs is also a box, so we also need to eliminate the flow of documents. Do we need to write a selector clear:both
It's too much trouble. If there are many boxes, write a pile clear:both !!! look-behind 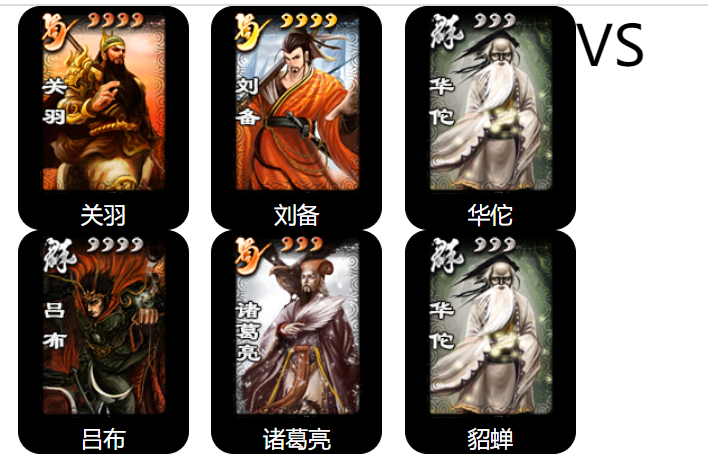
The first method
Let's think about it. If the first line box is floating inside or outside, there will be document flow impact,
The previous solution is to write the second box to the selector clear: both can eliminate the impact of document flow, right?
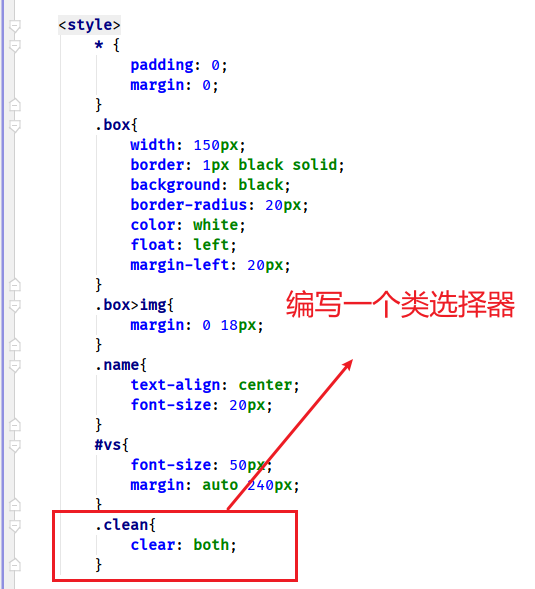
The second method
Which I write an empty box, in need to eliminate the floating place a put not on the beautiful Zizi?
Modification code
<!DOCTYPE html>
<html lang="en">
<head>
    <meta charset="UTF-8">
    <title>Three Kingdoms killing</title>

    <style>
        * {
            padding: 0;
            margin: 0;
        }
        .box{
            width: 150px;
            border: 1px black solid;
            background: black;
            border-radius: 20px;
            color: white;
            float: left;
            margin-left: 20px;
        }
        .box>img{
            margin: 0 18px;
        }
        .name{
            text-align: center;
            font-size: 20px;
        }
        #vs{
            font-size: 50px;
            margin: auto 240px;
        }
        .clean{
            clear: both;
        }

    </style>
</head>
<body>
        <div id="outer">
            <div class="inner1">
                <div  class="box" >
                    <img src="img/Guan Yu.png" >
                    <p class="name">Guan Yu</p>
                </div>
                <div  class="box" >
                    <img src="img/Liu Bei.png" >
                    <p class="name">Liu Bei</p>
                </div>
                <div  class="box" >
                    <img src="img/Hua Tuo.png" >
                    <p class="name">Hua Tuo</p>
                </div>
            </div>

            <div class="clean"></div>

            <div id="vs"><p>VS</p></div>

             <div class="clean"></div>

            <div class="inner2">
                <div  class="box" >
                    <img src="img/Lv Bu.png" >
                    <p class="name">Lv Bu</p>
                </div>
                <div  class="box" >
                    <img src="img/Zhugeliang.png" >
                    <p class="name">Zhugeliang</p>
                </div>
                <div  class="box" >
                    <img src="img/Hua Tuo.png" >
                    <p class="name">army officer's hat ornaments</p>
                </div>
            </div>
        </div>
</body>
</html>

Can see the same effect, it is better to use!!!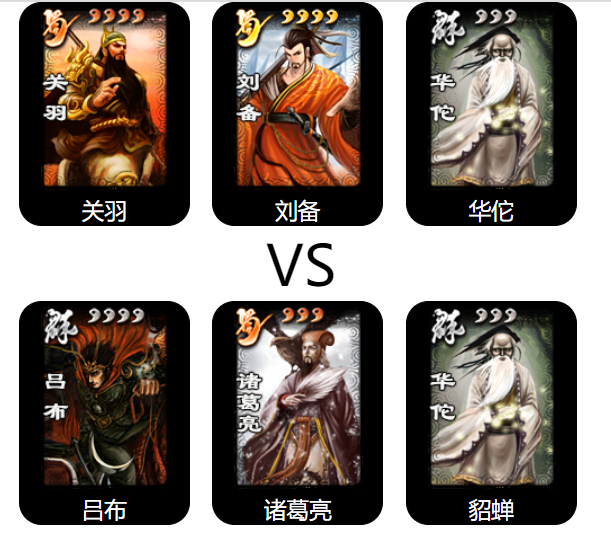
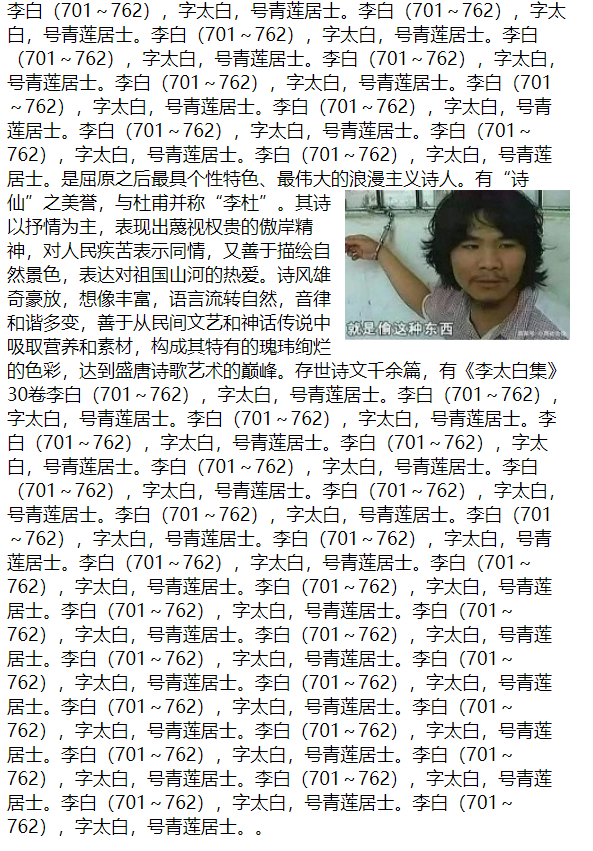
3. Text wrapping
Use your own pictures to test
In fact, the text around, in the previous floating features of the left and right floating has been mentioned, here is a simple description.
<!DOCTYPE html>
<html lang="en">
<head>
    <meta charset="UTF-8">
    <title>Title</title>
    <style>
        #div1{
            width: 500px;
        }
         #div1 img{
             float: right;
         }

    </style>
</head>
<body>
    <div id="div1">
        Li Bai (701-762), with the character of Taibai, is a resident of Qinglian. Li Bai (701-762), with the character of Taibai, is a resident of Qinglian. Li Bai (701-762), with the character of Taibai, is a resident of Qinglian. Li Bai (701-762), with the character of Taibai, is a resident of Qinglian. Li Bai (701-762), with the character of Taibai, is a resident of Qinglian. Li Bai (701-762), with the character of Taibai, is a resident of Qinglian. Li Bai (701-762), with the character of Taibai, is a resident of Qinglian. Li Bai (701-762), with the character of Taibai, is a resident of Qinglian. Li Bai (701-762), with the character of Taibai, is a resident of Qinglian. Li Bai (701-762), with the character of Taibai, is a resident of Qinglian. Li Bai (701-762), with the character of Taibai, is a resident of Qinglian. He is the greatest Romantic poet after Qu Yuan. It has a good reputation of "immortal of poetry", and is also called "Li Du" with Du Fu. <img src="./img/ toudianping.jpg "> his poems are mainly lyrical, showing the proud spirit of contempt for power, sympathy for the suffering of the people, and good at describing the natural scenery and expressing his love for the motherland. Poetry is magnificent, imaginative, natural in language circulation, harmonious and changeable in tone. He is good at absorbing nutrition and materials from folk literature and legends, forming his unique magnificent color, and reaching the peak of poetry art in the Tang Dynasty. There are more than one thousand poems and articles in the world, including 30 volumes of Libai (701-762) in Libai collection, with the character of Taibai and the title of Qinglian scholar. Li Bai (701-762), with the character of Taibai, is a resident of Qinglian. Li Bai (701-762), with the character of Taibai, is a resident of Qinglian. Li Bai (701-762), with the character of Taibai, is a resident of Qinglian. Li Bai (701-762), with the character of Taibai, is a resident of Qinglian. Li Bai (701-762), with the character of Taibai, is a resident of Qinglian. Li Bai (701-762), with the character of Taibai, is a resident of Qinglian. Li Bai (701-762), with the character of Taibai, is a resident of Qinglian. Li Bai (701-762), with the character of Taibai, is a resident of Qinglian. Li Bai (701-762), with the character of Taibai, is a resident of Qinglian. Li Bai (701-762), with the character of Taibai, is a resident of Qinglian. Li Bai (701-762), with the character of Taibai, is a resident of Qinglian. Li Bai (701-762), with the character of Taibai, is a resident of Qinglian. Li Bai (701-762), with the character of Taibai, is a resident of Qinglian. Li Bai (701-762), with the character of Taibai, is a resident of Qinglian. Li Bai (701-762), with the character of Taibai, is a resident of Qinglian. Li Bai (701-762), with the character of Taibai, is a resident of Qinglian. Li Bai (701-762), with the character of Taibai, is a resident of Qinglian. Li Bai (701-762), with the character of Taibai, is a resident of Qinglian. Li Bai (701-762), with the character of Taibai, is a resident of Qinglian. Li Bai (701-762), with the character of Taibai, is a resident of Qinglian. Li Bai (701-762), with the character of Taibai, is a resident of Qinglian. Li Bai (701-762), with the character of Taibai, is a resident of Qinglian. Li Bai (701-762), with the character of Taibai, is a resident of Qinglian. Li Bai (701-762), with the character of Taibai, is a resident of Qinglian. Li Bai (701-762), with the character of Taibai, is a resident of Qinglian. Li Bai (701-762), with the character of Taibai, is a resident of Qinglian. Li Bai (701-762), the word is Taibai, the number is Qinglian Ju Shi..
    </div>
</body>
</html>
3. Summary of three ways to clear floating
In the clear floating [clear document flow] section above, two methods have been described, i.e. the second method and the third method, so I won't go into details. In addition, I will add a case of the third method.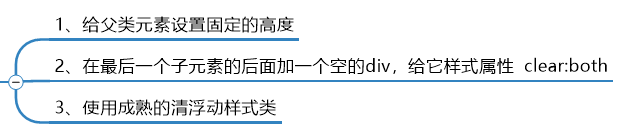
1. Set fixed height for parent element
Disadvantages: for example, the style and content size caused by the background color are not appropriate
<!DOCTYPE html>
<html lang="en">
<head>
    <meta charset="UTF-8">
    <title>Title</title>
    <style>
        #div1 {
            background-color: red;
            color: white;
            /*height: 40px;*/
        }
        #div2 {
            float: left;
        }
    </style>
</head>
<body>
    <div id="div1">
        <div id="div2">
            Hello, hello
        </div>
    </div>
</body>
</html>
Can see nothing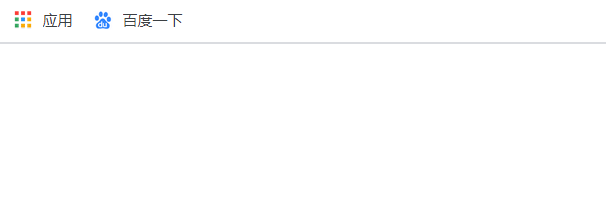
Modify the code to set the height of the outer box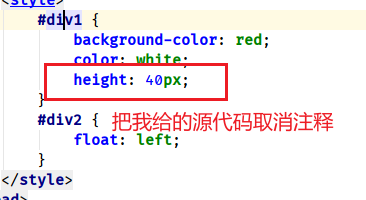
You can see it. Disadvantages: for example, the style and content size caused by the background color are not appropriate
2. By writing selectors
By writing selector, add clear:both
This method has been mentioned before, the Three Kingdoms killing case
It is to write class selectors where floats need to be cleared. Disadvantage: if multiple boxes need to write many selectors.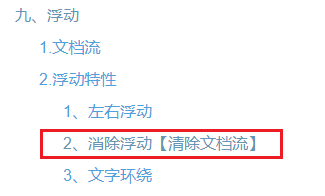
3. Use the mature clear floating style
There are two kinds. The first one is to write a div box, and the selector contents are as follows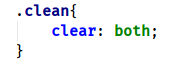
Just add the box to the place where you need to clear the float. Refer to the case of Three Kingdoms killing, which is also described in detail in the previous section.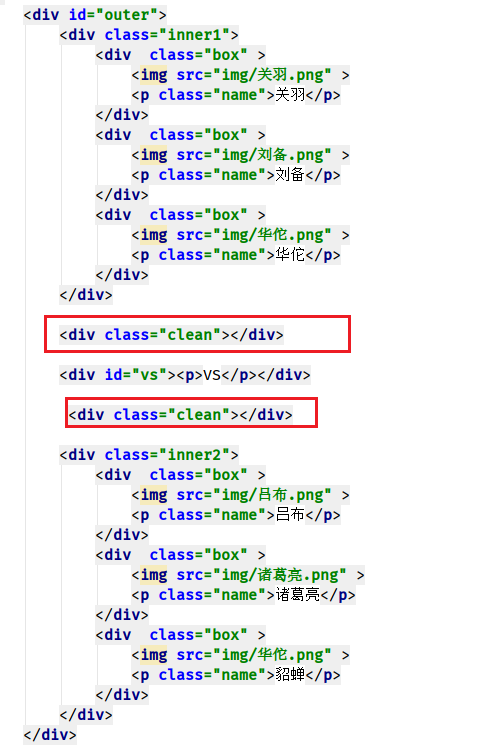
Second, a more mature way
<!DOCTYPE html>
<html lang="en">
<head>
    <meta charset="UTF-8">
    <title>Title</title>
    <style>
        *{
            padding: 0px;
            margin: 0px;
        }
        ul {
            list-style: none;
            width: 800px;
            margin: 0 auto;
            background-color: chartreuse;

        }

        li {
            width: 100px;
            height: 30px;
            line-height: 30px;
            border: 1px solid red;
            float: left;
        }

        /*Clear influence of child float on parent height 0*/
        /*.clearfix:after{
            content: "";
            display: table;
            clear: both;
        }*/
    </style>
</head>
<body>
<ul class="clearfix">
    <li>home page</li>
    <li>Sign in</li>
    <li>register</li>
</ul>
</body>
</html>
You can see the code. We set the li tag to float, which has a document flow effect
The ul label box loaded with li label. Both are block level elements. li is set, but ul does not enable floating. This should be the case. The background color cannot be seen
Because of the floating effect.
So, you want to clear the floating influence. You can set the parent element of floating influence to set a height. That's the first method
Well, let's set a height
Modification code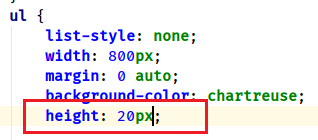
It is found that the background color doesn't match the one inside, isn't it that you need to debug for half a day?????
So fixed format is introduced
Cancel comment code here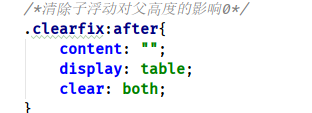
Look at the code here, the two collocations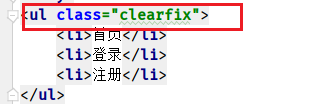

Find the perfect fit
Comparing the two methods, in fact, the first way to set up an empty div code is more tedious, but it is easy to understand. It can be used to divide two camps
In the second, the more mature method, pseudo class selector, is more mature, but it is difficult to understand.
4. Summary method [application scenario]
Be sure to understand the document flow and three ways to understand the influence of floating document flow
The scene can refer to my Three Kingdoms killing case
It took 4 hours to write this article, but the mind map hasn't been written yet. I hope you all like it! QAQ
10, Positioning
We know that floating can solve the problem of left and right layout, but in the process of page layout, we will encounter a specific location, which requires positioning. In the past, you can use background position to locate the background. Now you can use general position and css to locate the background.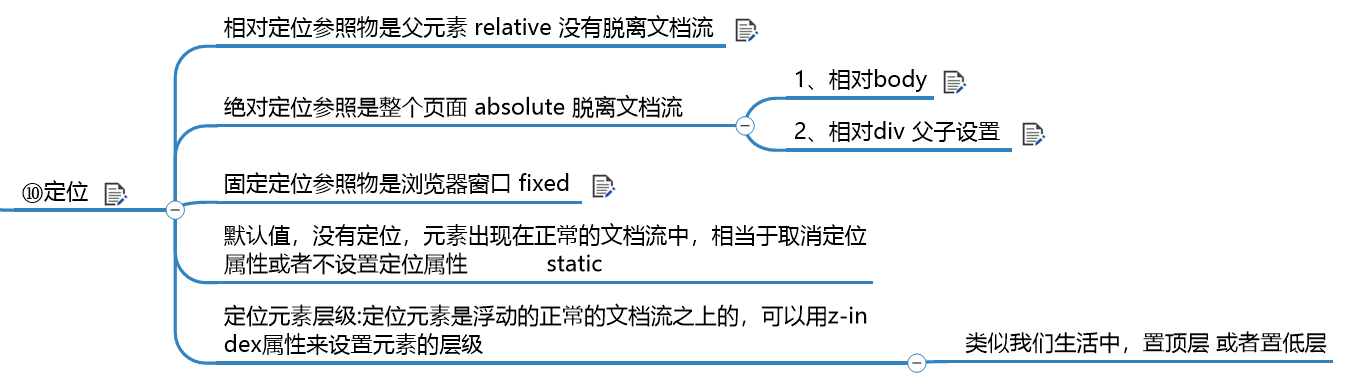
| Positioning options | explain |
|---|---|
| relative | Relative positioning, the reference is the parent element |
| absolute | Absolute positioning, reference is the whole page |
| fixed | Fixed positioning, reference is browser window |
| static | Default, no location, follow document flow |
1. Relative positioning
Relative positioning reference is the parent element relative does not break away from the document flow
<!DOCTYPE html>
<html lang="en">
<head>
    <meta charset="UTF-8">
    <title>Title</title>
    <style>
        div{
            width: 500px;
            height: 500px;
            margin:  0 auto;
            border: 1px solid red;
        }
        div img{
            position: relative;
            left: 100px;
            top: 100px;
        }
    </style>

</head>
<body>
    <div>
        <img src="../toudianping.jpg">
        <p>I can't work......</p>
    </div>
</body>
</html>
See the following code description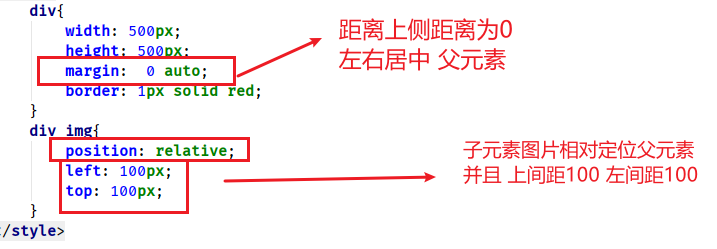
It can be seen that it is indeed centered. Only when positioning is turned on in the picture of child elements, can specific positioning be generated by using top and left. The child element is now relative to the red box of the parent element, and the left margin can be set. And upper spacing.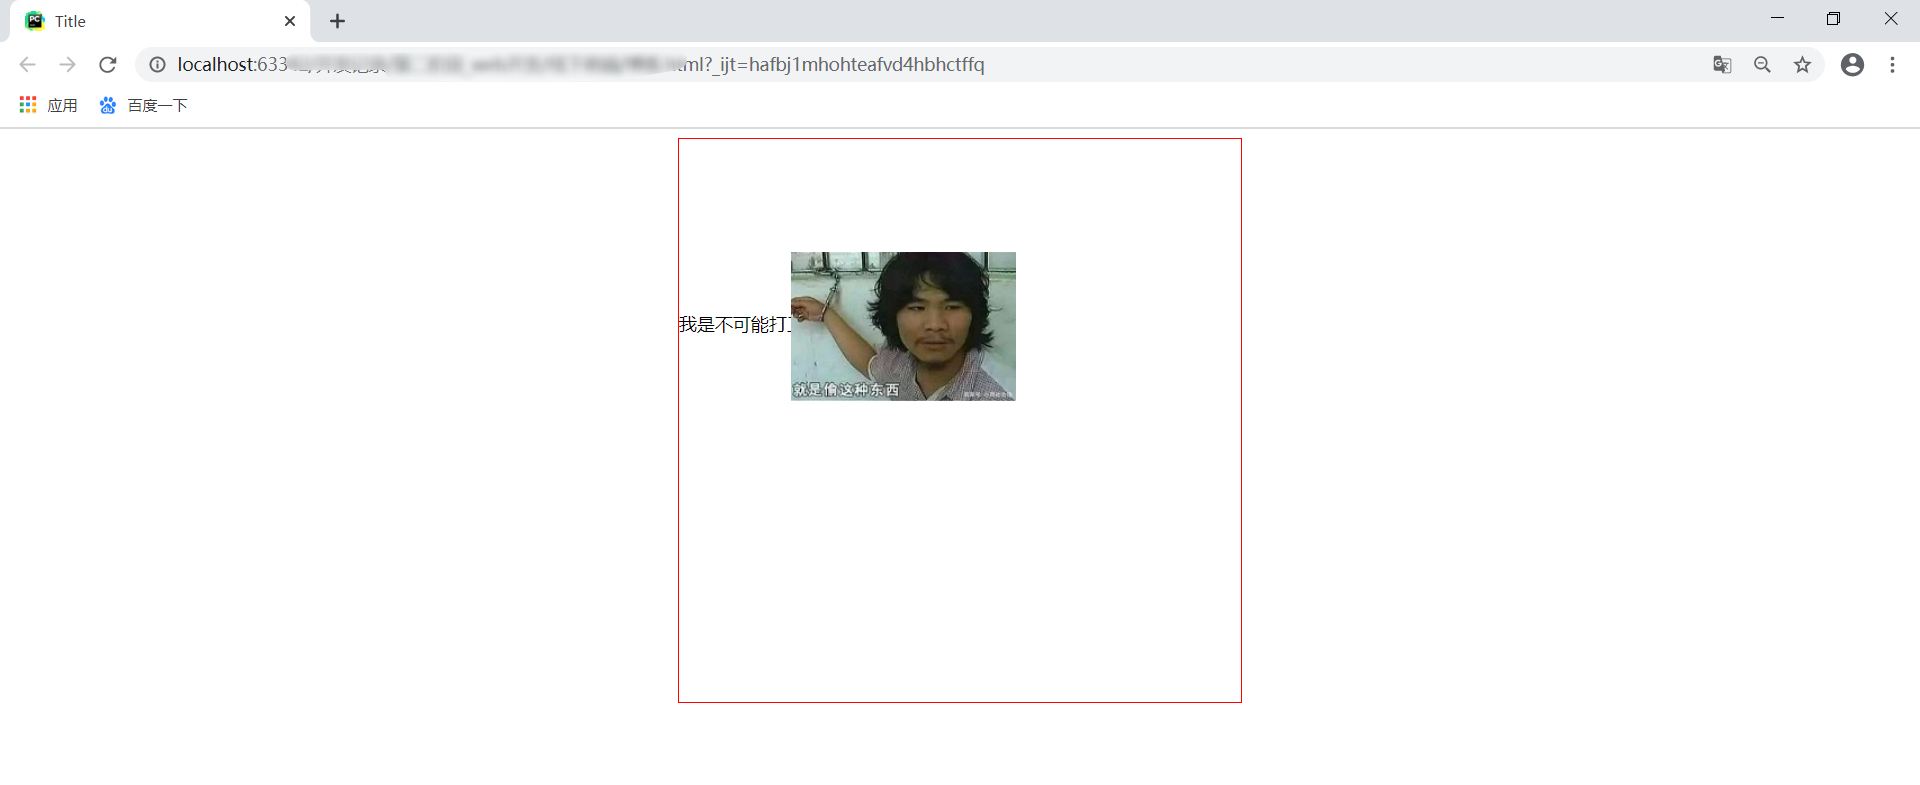
2. Absolute positioning
Absolute positioning reference is the absolute separation of the whole page from the document flow
Out of document flow, text goes straight to the first line
1. Relative body
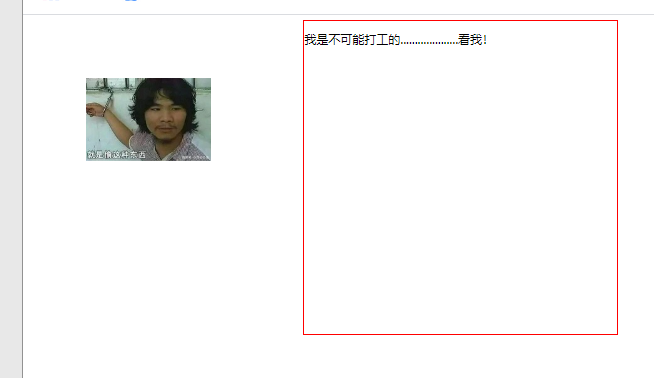
<!DOCTYPE html>
<html lang="en">
<head>
    <meta charset="UTF-8">
    <title>Title</title>
    <style>
        div{
            width: 500px;
            height: 500px;
            margin:  0 auto;
            border: 1px solid red;
        }
        div img{
            position: absolute;
            left: 100px;
            top: 100px;
        }
    </style>

</head>
<body>
    <div>
        <img src="../toudianping.jpg">
        <p>I can't work....................Look at me!</p>
    </div>
</body>
</html>
2. Relative div parent-child settings
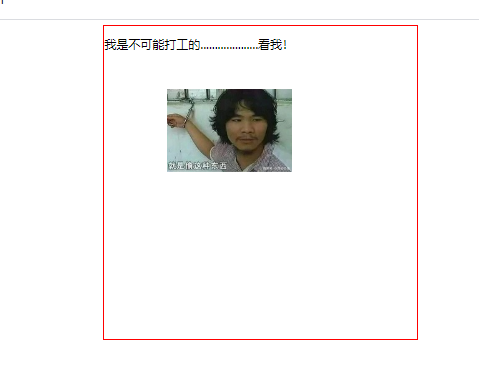
<!DOCTYPE html>
<html lang="en">
<head>
    <meta charset="UTF-8">
    <title>Title</title>
    <style>
        div{
            width: 500px;
            height: 500px;
            margin:  0 auto;
            border: 1px solid red;
            position: relative;
        }
        div img{
            position: absolute;
            left: 100px;
            top: 100px;
        }
    </style>

</head>
<body>
    <div>
        <img src="../toudianping.jpg">
        <p>I can't work....................Look at me!</p>
    </div>
</body>
</html>
3. Fixed positioning
Fixed positioning reference is fixed in browser window
<!DOCTYPE html>
<html lang="en">
<head>
    <meta charset="UTF-8">
    <title>Title</title>
    <style>
        div{
            width: 500px;
            height: 5000px;
            margin:  0 auto;
            border: 1px solid red;
            /*position: relative;*/
        }
        div img{
            position: fixed;
            left: 100px;
            top: 100px;
        }
    </style>

</head>
<body>
    <div>
        <img src="../toudianping.jpg">
        <p>I can't work....................Look at me!</p>
    </div>
</body>
</html>
It's not easy to explain. You can try it. It's like we usually browse the web page. There are advertisements in the lower right corner. How can we slide up and down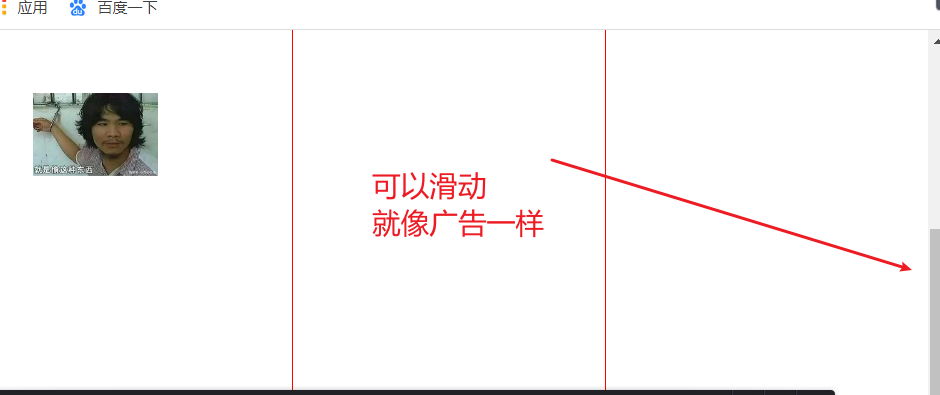
4. Default positioning static and z-index
The default value, no location, and the element appears in the normal document flow. It's equivalent to canceling the location attribute or not setting the location attribute static. There's nothing to say
Location element level: the location element is floating above the normal document flow. You can use the z-index attribute to set the level of the element, which will be used later, such as picture switching. Can we set a z-index attribute, which can be placed at the top level in turn.
End
CSS, the necessary knowledge of back-end engineer, has been written here. I will keep updating the article. HTML, CSS, next Javascript
If there is something wrong in this article, please comment and correct