preface
This paper mainly introduces HDFS distributed file system, including HDFS characteristics, command line and API operation, HDFS, HDFS read-write mechanism analysis, HDFS metadata management mechanism, Hadoop quota, archiving and cluster security mode and log collection cases.
1.HDFS features
HDFS (full name: Hadoop distributed file system, Hadoop distributed file system) is a core component of Hadoop and a distributed storage service.
Distributed file systems span multiple computers and have broad application prospects in the era of big data. They provide the required expansion ability for storing and processing large-scale data.
HDFS is a kind of distributed file system.
HDFS locates files through a unified namespace directory tree; In addition, it is distributed, and many servers combine to realize their functions. The servers in the cluster have their own roles (the essence of distribution is to split and perform their own duties).
Common features of HDFS are as follows:
- Typical Master/Slave architecture
The architecture of HDFS is a typical Master/Slave structure.
NameNode is the master node of the cluster, and DataNode is the slave node of the cluster. They work together to complete the distributed data storage task.
HDFS clusters are often composed of one NameNode (except HA architecture and Federation mechanism. HA architecture has two namenodes, and Federation mechanism has multiple namenodes) + multiple datanodes.
- Block storage (block mechanism)
Files in HDFS are physically stored in blocks, and the size of blocks can be specified through configuration parameters;
In the Hadoop 2. X version, the default block size is 128M. When the file size is greater than 128block, HDFS performs automatic segmentation, which is insensitive to us.
- NameSpace
HDFS supports the traditional hierarchical file organization structure. Users or applications can create directories and save files in these directories. The file system namespace hierarchy is similar to most existing file systems: users can create, delete, move, or rename files.
Namenode is responsible for maintaining the file system namespace. Any changes to the file system namespace or attributes will be recorded by namenode.
That is, HDFS provides customers with a separate (Linux like) Abstract directory tree in the form of hdfs://NameNode The hostname:port / directory of, for example hdfs://node01:9000/test/input .
- NameNode metadata management
The directory structure and file block location information are called metadata.
The metadata of NameNode records the block information corresponding to each file (the id of the block and the information of the DataNode where it is located).
- DataNode datastore
The specific storage management of each block of the file is undertaken by the DataNode node.
A block will have multiple datanodes to store, and the DataNode will regularly report the block information it holds to the NameNode, so that the NameNode can timely control the status information of the cluster to ensure the security of data and the timeliness of task execution.
- Replica mechanism
For fault tolerance, all blocks of the file will have copies. The block size and copy factor of each file are configurable. The application can specify the number of copies of a file. The copy factor can be specified when the file is created or changed later.
The default number of copies is 3 (including the original block).
- Write once, read many times
HDFS is designed to adapt to the scenario of one write and multiple reads, and does not support random modification of files( Support additional write, not only random update).
Because of this, HDFS is suitable for the underlying storage service for big data analysis, but not for network disk and other applications (inconvenient modification, large delay, large network overhead and high cost).
The HDFS architecture is as follows:

The roles of each role are as follows:
(1) NameNode(nn) - manager of HDFS cluster, Master
-
Maintain and manage the NameSpace of HDFS
-
Maintain replica policy
When a problem occurs, the replica data is read from different racks.
-
Record the mapping information of the file Block
-
Responsible for processing client read and write requests
(2) DataNode - the NameNode issues a command, the DataNode executes the actual operation, and the Slave node
-
Save actual data block
-
Responsible for reading and writing data blocks
(3) Client -- client
-
When uploading files to HDFS, the Client is responsible for dividing the files into blocks and then uploading them
-
The main purpose of requesting NameNode interaction is to obtain the location information of the file block
-
Fetch or write files and interact with DataNode
-
The Client can use some commands to manage HDFS or access HDFS
2. Command line and API operation HDFS
(1) Shell command line client
There are two modes of HDFS client operation: Shell command line and Java API.
First, use the Shell command line to operate HDFS.
The basic syntax format is:
hadoop fs -order of the day / hdfs dfs -order of the day
View the complete list of commands as follows:
[root@node01 ~]$ hadoop fs
Usage: hadoop fs [generic options]
        [-appendToFile <localsrc> ... <dst>]
        [-cat [-ignoreCrc] <src> ...]
        [-checksum <src> ...]
        [-chgrp [-R] GROUP PATH...]
        [-chmod [-R] <MODE[,MODE]... | OCTALMODE> PATH...]
        [-chown [-R] [OWNER][:[GROUP]] PATH...]
        [-copyFromLocal [-f] [-p] [-l] [-d] <localsrc> ... <dst>]
        [-copyToLocal [-f] [-p] [-ignoreCrc] [-crc] <src> ... <localdst>]
        [-count [-q] [-h] [-v] [-t [<storage type>]] [-u] [-x] <path> ...]
        [-cp [-f] [-p | -p[topax]] [-d] <src> ... <dst>]
        [-createSnapshot <snapshotDir> [<snapshotName>]]
        [-deleteSnapshot <snapshotDir> <snapshotName>]
        [-df [-h] [<path> ...]]
        [-du [-s] [-h] [-x] <path> ...]
        [-expunge]
        [-find <path> ... <expression> ...]
        [-get [-f] [-p] [-ignoreCrc] [-crc] <src> ... <localdst>]
        [-getfacl [-R] <path>]
        [-getfattr [-R] {-n name | -d} [-e en] <path>]
        [-getmerge [-nl] [-skip-empty-file] <src> <localdst>]
        [-help [cmd ...]]
        [-ls [-C] [-d] [-h] [-q] [-R] [-t] [-S] [-r] [-u] [<path> ...]]
        [-mkdir [-p] <path> ...]
        [-moveFromLocal <localsrc> ... <dst>]
        [-moveToLocal <src> <localdst>]
        [-mv <src> ... <dst>]
        [-put [-f] [-p] [-l] [-d] <localsrc> ... <dst>]
        [-renameSnapshot <snapshotDir> <oldName> <newName>]
        [-rm [-f] [-r|-R] [-skipTrash] [-safely] <src> ...]
        [-rmdir [--ignore-fail-on-non-empty] <dir> ...]
        [-setfacl [-R] [{-b|-k} {-m|-x <acl_spec>} <path>]|[--set <acl_spec> <path>]]
        [-setfattr {-n name [-v value] | -x name} <path>]
        [-setrep [-R] [-w] <rep> <path> ...]
        [-stat [format] <path> ...]
        [-tail [-f] <file>]
        [-test -[defsz] <path>]
        [-text [-ignoreCrc] <src> ...]
        [-touchz <path> ...]
        [-truncate [-w] <length> <path> ...]
        [-usage [cmd ...]]

Generic options supported are:
-conf <configuration file>        specify an application configuration file
-D <property=value>               define a value for a given property
-fs <file:///|hdfs://namenode:port> specify default filesystem URL to use, overrides 'fs.defaultFS' property from configurations.
-jt <local|resourcemanager:port>  specify a ResourceManager
-files <file1,...>                specify a comma-separated list of files to be copied to the map reduce cluster
-libjars <jar1,...>               specify a comma-separated list of jar files to be included in the classpath
-archives <archive1,...>          specify a comma-separated list of archives to be unarchived on the compute machines

The general command line syntax is:
command [genericOptions] [commandOptions]
It can be seen that many HDFS commands are similar to those in Linux, but - needs to be added in front of the command as the option of HDFS command, and there are many optional parameters to select;
There are also some general options supported, such as - conf can specify the number of copies, - D can specify the configuration item in the form of key value, - fs can specify the file system, and so on;
The hdfs dfs command has the same effect as hadoop fs, but the former is recommended.
Now use the HDFS command as follows:
(1) - help: output help information for command parameters
[root@node01 ~]$ hdfs dfs -help mv
-mv <src> ... <dst> :
  Move files that match the specified file pattern <src> to a destination <dst>.
  When moving multiple files, the destination must be a directory.
(2) - ls: display directory information
[root@node01 ~]$ hdfs dfs -ls /
Found 4 items
drwxr-xr-x   - root supergroup          0 2021-08-25 20:23 /test
drwx------   - root supergroup          0 2021-08-26 00:36 /tmp
drwxr-xr-x   - root supergroup          0 2021-08-25 22:33 /wcinput
drwxr-xr-x   - root supergroup          0 2021-08-26 00:37 /wcoutput
[root@node01 ~]$ ls
anaconda-ks.cfg  lxDemo  test.txt  wc.txt
It can be seen that hdfs dfs -ls / is the file system operating HDFS, and ls is the local operating system operating Linux. The two are different. At the same time, the ls command in HDFS is equivalent to the ll command or ls -l command in Linux.
(3) - mkdir: create directory on HDFS
[root@node01 ~]$ hdfs dfs -mkdir -p /cl/bigdata
[root@node01 ~]$ hdfs dfs -ls /
Found 5 items
drwxr-xr-x   - root supergroup          0 2021-08-26 19:22 /cl
drwxr-xr-x   - root supergroup          0 2021-08-25 20:23 /test
drwx------   - root supergroup          0 2021-08-26 00:36 /tmp
drwxr-xr-x   - root supergroup          0 2021-08-25 22:33 /wcinput
drwxr-xr-x   - root supergroup          0 2021-08-26 00:37 /wcoutput
[root@node01 ~]$ hdfs dfs -ls /cl/
Found 1 items
drwxr-xr-x   - root supergroup          0 2021-08-26 19:22 /cl/bigdata
(4) - moveFromLocal: cut and paste from local to HDFS
[root@node01 ~]$ vim hadoop.txt
# The input content is:
# hadoop new file
[root@node01 ~]$ ll
 Total consumption 20
-rw-------. 1 root root 1259 8 March 19:28 anaconda-ks.cfg
-rw-r--r--  1 root root   16 8 June 26-19:37 hadoop.txt
drwxr-xr-x. 3 root root 4096 8 April 24-21:07 lxDemo
-rw-r--r--  1 root root   12 8 May 25-20:26 test.txt
-rw-r--r--  1 root root  967 8 May 25-22:26 wc.txt
[root@node01 ~]$ hdfs dfs -moveFromLocal hadoop.txt /cl/bigdata
[root@node01 ~]$ ll
 Total consumption 16
-rw-------. 1 root root 1259 8 March 19:28 anaconda-ks.cfg
drwxr-xr-x. 3 root root 4096 8 April 24-21:07 lxDemo
-rw-r--r--  1 root root   12 8 May 25-20:26 test.txt
-rw-r--r--  1 root root  967 8 May 25-22:26 wc.txt
[root@node01 ~]$ hdfs dfs -ls /cl/bigdata
Found 1 items
-rw-r--r--   3 root supergroup         16 2021-08-26 19:37 /cl/bigdata/hadoop.txt
As you can see, after the operation, the local files are moved to the HDFS file system.
(5) - cat: displays the contents of the file
[root@node01 ~]$ hdfs dfs -cat /cl/bigdata/hadoop.txt
hadoop new file
(6) - appendToFile: append a file to the end of an existing file
[root@node01 ~]$ vim hdfs.txt
[root@node01 ~]$ hdfs dfs -appendToFile hdfs.txt /cl/bigdata/hadoop.txt
[root@node01 ~]$ hdfs dfs -cat /cl/bigdata/hadoop.txt
hadoop new file
namenode datanode block replication
[root@node01 ~]$ ll
 Total consumption 20
-rw-------. 1 root root 1259 8 March 19:28 anaconda-ks.cfg
-rw-r--r--  1 root root   36 8 June 26-19:41 hdfs.txt
drwxr-xr-x. 3 root root 4096 8 April 24-21:07 lxDemo
-rw-r--r--  1 root root   12 8 May 25-20:26 test.txt
-rw-r--r--  1 root root  967 8 May 25-22:26 wc.txt
You can see that the contents of the local file are appended to the end of the file in HDFS, and the local file is not deleted.
(7) - chgrp, - chmod, - chown: modify the permissions of the file. The usage is the same as that in the Linux file system
[root@node01 ~]$ hdfs dfs -ls /cl/bigdata/
Found 1 items
-rw-r--r--   3 root supergroup         52 2021-08-26 19:41 /cl/bigdata/hadoop.txt
[root@node01 ~]$ hdfs dfs -chmod 777  /cl/bigdata/hadoop.txt
[root@node01 ~]$ hdfs dfs -ls /cl/bigdata/
Found 1 items
-rwxrwxrwx   3 root supergroup         52 2021-08-26 19:41 /cl/bigdata/hadoop.txt
[root@node01 ~]$ hdfs dfs -chown root:root /cl/bigdata/hadoop.txt
[root@node01 ~]$ hdfs dfs -ls /cl/bigdata/
Found 1 items
-rwxrwxrwx   3 root root         52 2021-08-26 19:41 /cl/bigdata/hadoop.txt
(8) - copyFromLocal: copy files from the local file system to the HDFS path
[root@node01 ~]$ ll
 Total consumption 20
-rw-------. 1 root root 1259 8 March 19:28 anaconda-ks.cfg
-rw-r--r--  1 root root   36 8 June 26-19:41 hdfs.txt
drwxr-xr-x. 3 root root 4096 8 April 24-21:07 lxDemo
-rw-r--r--  1 root root   12 8 May 25-20:26 test.txt
-rw-r--r--  1 root root  967 8 May 25-22:26 wc.txt
[root@node01 ~]$ cat test.txt
hello, hdfs
[root@node01 ~]$ hdfs dfs -copyFromLocal test.txt /cl/bigdata
[root@node01 ~]$ ll
 Total consumption 20
-rw-------. 1 root root 1259 8 March 19:28 anaconda-ks.cfg
-rw-r--r--  1 root root   36 8 June 26-19:41 hdfs.txt
drwxr-xr-x. 3 root root 4096 8 April 24-21:07 lxDemo
-rw-r--r--  1 root root   12 8 May 25-20:26 test.txt
-rw-r--r--  1 root root  967 8 May 25-22:26 wc.txt
[root@node01 ~]$ hdfs dfs -ls /cl/bigdata
Found 2 items
-rwxrwxrwx   3 root root               52 2021-08-26 19:41 /cl/bigdata/hadoop.txt
-rw-r--r--   3 root supergroup         12 2021-08-26 19:56 /cl/bigdata/test.txt
[root@node01 ~]$ hdfs dfs -cat /cl/bigdata/test.txt
hello, hdfs
You can see that the - copyFromLocal mode will retain the original data file.
(9) - copyToLocal: copy from HDFS to local
[root@node01 ~]$ ll
 Total consumption 20
-rw-------. 1 root root 1259 8 March 19:28 anaconda-ks.cfg
-rw-r--r--  1 root root   36 8 June 26-19:41 hdfs.txt
drwxr-xr-x. 3 root root 4096 8 April 24-21:07 lxDemo
-rw-r--r--  1 root root   12 8 May 25-20:26 test.txt
-rw-r--r--  1 root root  967 8 May 25-22:26 wc.txt
[root@node01 ~]$ hdfs dfs -copyToLocal /cl/bigdata/hadoop.txt .
[root@node01 ~]$ hdfs dfs -ls /cl/bigdata
Found 2 items
-rwxrwxrwx   3 root root               52 2021-08-26 19:41 /cl/bigdata/hadoop.txt
-rw-r--r--   3 root supergroup         12 2021-08-26 19:56 /cl/bigdata/test.txt
[root@node01 ~]$ ll
 Total consumption 24
-rw-------. 1 root root 1259 8 March 19:28 anaconda-ks.cfg
-rw-r--r--  1 root root   52 8 June 26-20:01 hadoop.txt
-rw-r--r--  1 root root   36 8 June 26-19:41 hdfs.txt
drwxr-xr-x. 3 root root 4096 8 April 24-21:07 lxDemo
-rw-r--r--  1 root root   12 8 May 25-20:26 test.txt
-rw-r--r--  1 root root  967 8 May 25-22:26 wc.txt
[root@node01 ~]$ cat hadoop.txt
hadoop new file
namenode datanode block replication
It can be seen that HDF is the data file reserved in, and the local file is also copied.
(10) - cp: copy from one path of HDFS to another path of HDFS
[root@node01 ~]$ hdfs dfs -ls /
Found 5 items
drwxr-xr-x   - root supergroup          0 2021-08-26 19:22 /cl
drwxr-xr-x   - root supergroup          0 2021-08-25 20:23 /test
drwx------   - root supergroup          0 2021-08-26 00:36 /tmp
drwxr-xr-x   - root supergroup          0 2021-08-25 22:33 /wcinput
drwxr-xr-x   - root supergroup          0 2021-08-26 00:37 /wcoutput
[root@node01 ~]$ hdfs dfs -cp /cl/bigdata/hadoop.txt /
[root@node01 ~]$ hdfs dfs -ls /
Found 6 items
drwxr-xr-x   - root supergroup          0 2021-08-26 19:22 /cl
-rw-r--r--   3 root supergroup         52 2021-08-26 20:07 /hadoop.txt
drwxr-xr-x   - root supergroup          0 2021-08-25 20:23 /test
drwx------   - root supergroup          0 2021-08-26 00:36 /tmp
drwxr-xr-x   - root supergroup          0 2021-08-25 22:33 /wcinput
drwxr-xr-x   - root supergroup          0 2021-08-26 00:37 /wcoutput
(11) - mv: move files in HDFS directory
[root@node01 ~]$ hdfs dfs -ls /test
Found 1 items
drwxr-xr-x   - root supergroup          0 2021-08-25 20:24 /test/input
[root@node01 ~]$ hdfs dfs -mv /hadoop.txt /test
[root@node01 ~]$ hdfs dfs -ls /test
Found 2 items
-rw-r--r--   3 root supergroup         52 2021-08-26 20:07 /test/hadoop.txt
drwxr-xr-x   - root supergroup          0 2021-08-25 20:24 /test/input
(12) - get: equivalent to copyToLocal, which is to download files from HDFS to local
[root@node01 ~]$ ll
 Total consumption 24
-rw-------. 1 root root 1259 8 March 19:28 anaconda-ks.cfg
-rw-r--r--  1 root root   52 8 June 26-20:14 hadoop.txt
-rw-r--r--  1 root root   36 8 June 26-19:41 hdfs.txt
drwxr-xr-x. 3 root root 4096 8 April 24-21:07 lxDemo
-rw-r--r--  1 root root   12 8 May 25-20:26 test.txt
-rw-r--r--  1 root root  967 8 May 25-22:26 wc.txt
[root@node01 ~]$ rm -f hadoop.txt
[root@node01 ~]$ ll
 Total consumption 20
-rw-------. 1 root root 1259 8 March 19:28 anaconda-ks.cfg
-rw-r--r--  1 root root   36 8 June 26-19:41 hdfs.txt
drwxr-xr-x. 3 root root 4096 8 April 24-21:07 lxDemo
-rw-r--r--  1 root root   12 8 May 25-20:26 test.txt
-rw-r--r--  1 root root  967 8 May 25-22:26 wc.txt
[root@node01 ~]$ hdfs dfs -get /cl/bigdata/hadoop.txt .
[root@node01 ~]$ ll
 Total consumption 24
-rw-------. 1 root root 1259 8 March 19:28 anaconda-ks.cfg
-rw-r--r--  1 root root   52 8 June 26-20:15 hadoop.txt
-rw-r--r--  1 root root   36 8 June 26-19:41 hdfs.txt
drwxr-xr-x. 3 root root 4096 8 April 24-21:07 lxDemo
-rw-r--r--  1 root root   12 8 May 25-20:26 test.txt
-rw-r--r--  1 root root  967 8 May 25-22:26 wc.txt
[root@node01 ~]$ cat hadoop.txt
hadoop new file
namenode datanode block replication
(13) - put: equivalent to copyFromLocal, upload files locally to HDFS
[root@node01 ~]$ vim yarn.txt
[root@node01 ~]$ hdfs dfs -mkdir -p /user/root/test/
[root@node01 ~]$ ll
 Total consumption 28
-rw-------. 1 root root 1259 8 March 19:28 anaconda-ks.cfg
-rw-r--r--  1 root root   52 8 June 26-20:15 hadoop.txt
-rw-r--r--  1 root root   36 8 June 26-19:41 hdfs.txt
drwxr-xr-x. 3 root root 4096 8 April 24-21:07 lxDemo
-rw-r--r--  1 root root   12 8 May 25-20:26 test.txt
-rw-r--r--  1 root root  967 8 May 25-22:26 wc.txt
-rw-r--r--  1 root root   28 8 June 26-20:18 yarn.txt
[root@node01 ~]$ hdfs dfs -put yarn.txt /user/root/test/
[root@node01 ~]$ hdfs dfs -ls /user/root/test/
Found 1 items
-rw-r--r--   3 root supergroup         28 2021-08-26 20:21 /user/root/test/yarn.txt
(14) - tail: displays the end of a file
[root@node01 ~]$ hdfs dfs -tail /user/root/test/yarn.txt
resourcemanager nodemanager
(15) - rm: delete a file or folder
[root@node01 ~]$ hdfs dfs -rm /user/root/test/yarn.txt
Deleted /user/root/test/yarn.txt
[root@node01 ~]$ hdfs dfs -ls /user/root/test/
You can see that you can delete it without prompting.
(16) - rmdir: delete empty directory
[root@node01 ~]$ hdfs dfs -rmdir /user/root/test/
[root@node01 ~]$ hdfs dfs -ls /user/root/
(17) - du statistics folder size information
[root@node01 ~]$ hdfs dfs -put wc.txt /test/input/
[root@node01 ~]$ hdfs dfs -du /test/
52   /test/hadoop.txt
979  /test/input
[root@node01 ~]$ hdfs dfs -du -s -h /test/
1.0 K  /test
[root@node01 ~]$ hdfs dfs -du -h /test/
52   /test/hadoop.txt
979  /test/input
Among them, hdfs dfs -du -s -h /test / counts the size of folders under the specified directory and displays them in a user-friendly form;
hdfs dfs -du -h /test / counts the size of all contents in the specified directory and displays them in a user-friendly form.
(18) - setrep: sets the number of copies of files in HDFS
Before setting the copy of / test/hadoop.txt, the default number of copies is 3, as follows:

Now set:
[root@node01 ~]$ hdfs dfs -setrep 5 /test/hadoop.txt
Replication 5 set: /test/hadoop.txt
Now review it again as follows:
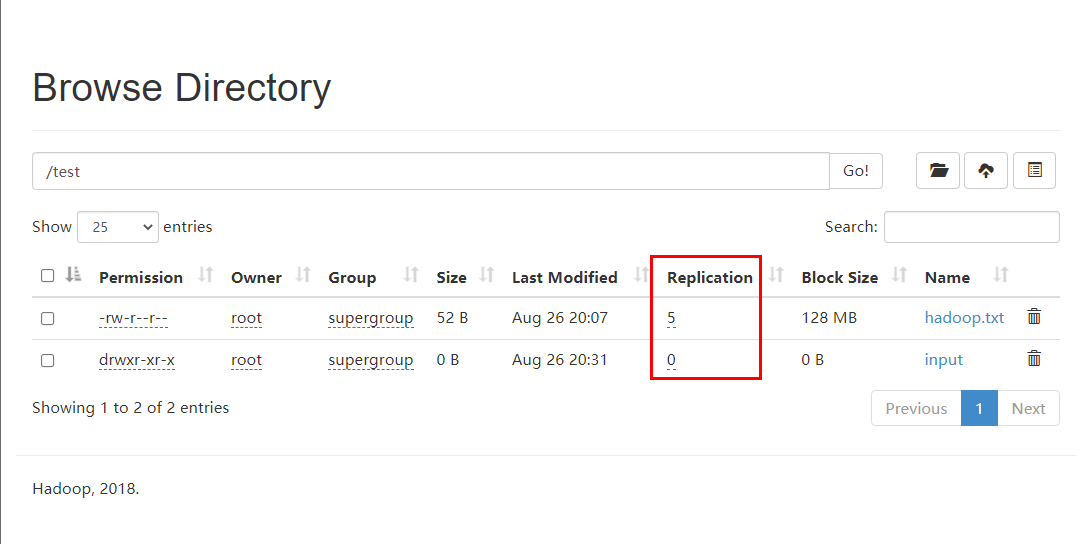
You can see that the number of copies has been set to 5;
However, it is meaningless that the number of replicas is greater than the number of nodes, because when the number of replicas is greater than the number of nodes, it means that at least one node has multiple replicas, because the role of replicas is fault tolerance, that is, when an error occurs at a node, the replicas of other nodes can be used, so no matter how many nodes there are in the error node;
The number of true copies of a file depends on the number of datanodes. At present, there are only 3 devices, up to 3 copies. The number of copies can reach 5 only when the number of nodes increases to 5.
(2) There are two ways for API clients to connect to HDFS
Now use the API to manipulate HDFS.
Before using, you need to prepare the client environment:
(1) Extract the Hadoop-2.9.2 installation package to a non Chinese path
Extract the Hadoop installation package uploaded to the virtual machine to the local. You need to select a non Chinese path and then extract it.
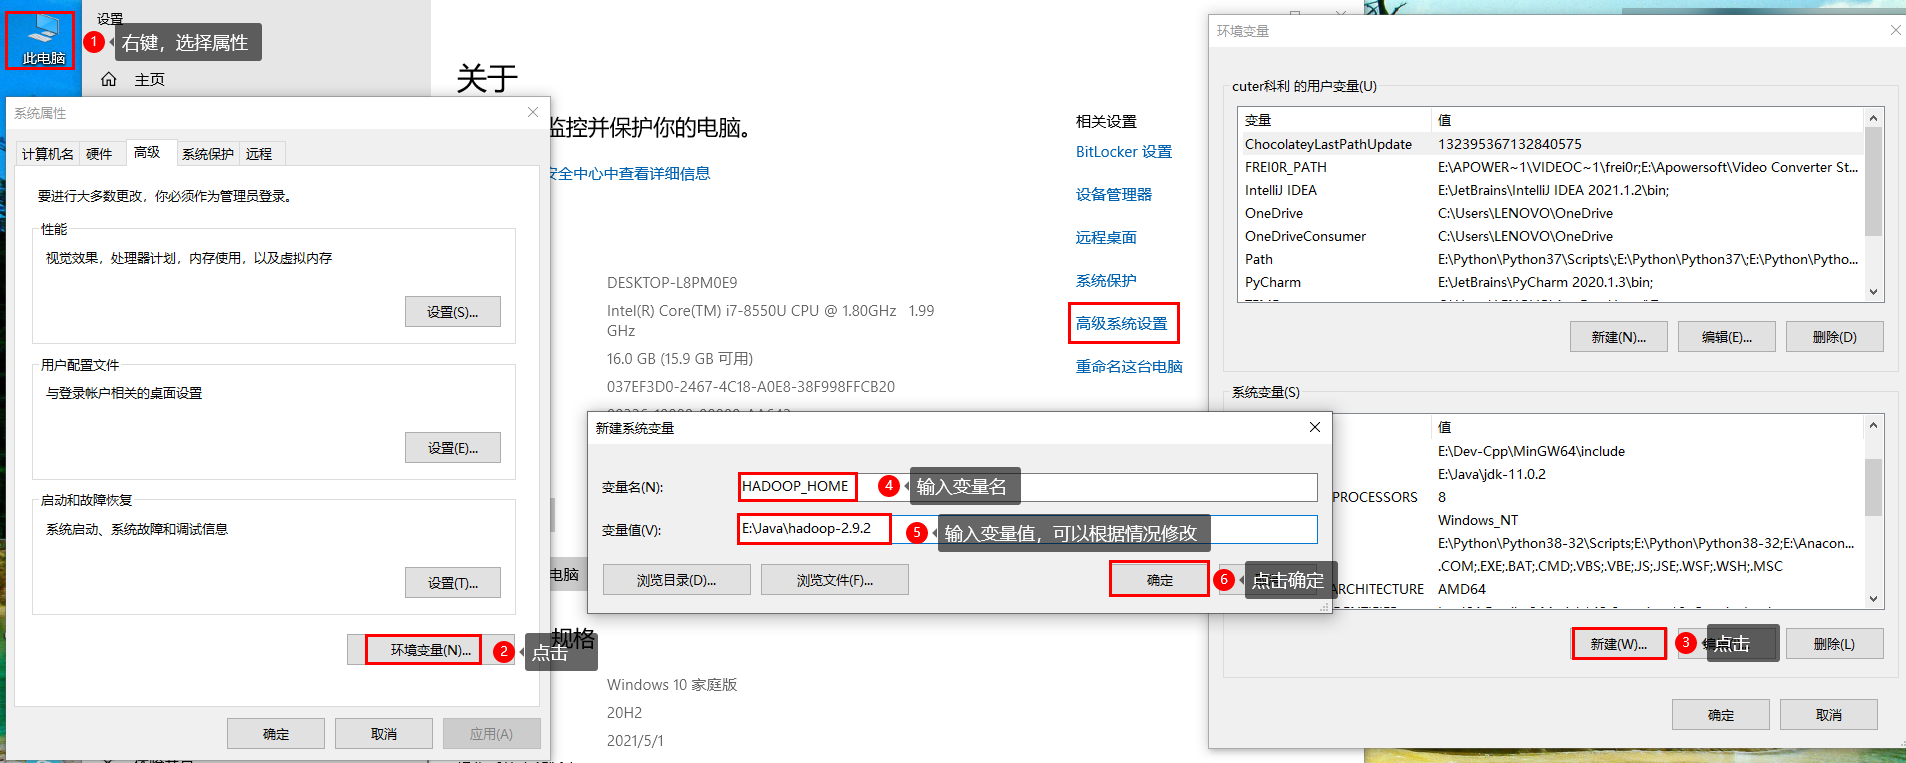
(2) Configure environment variables
Configure Hadoop first_ The home environment variable is the path to configure the Hadoop decompression package, such as E:\Java\hadoop-2.9.2. The configuration is as follows:
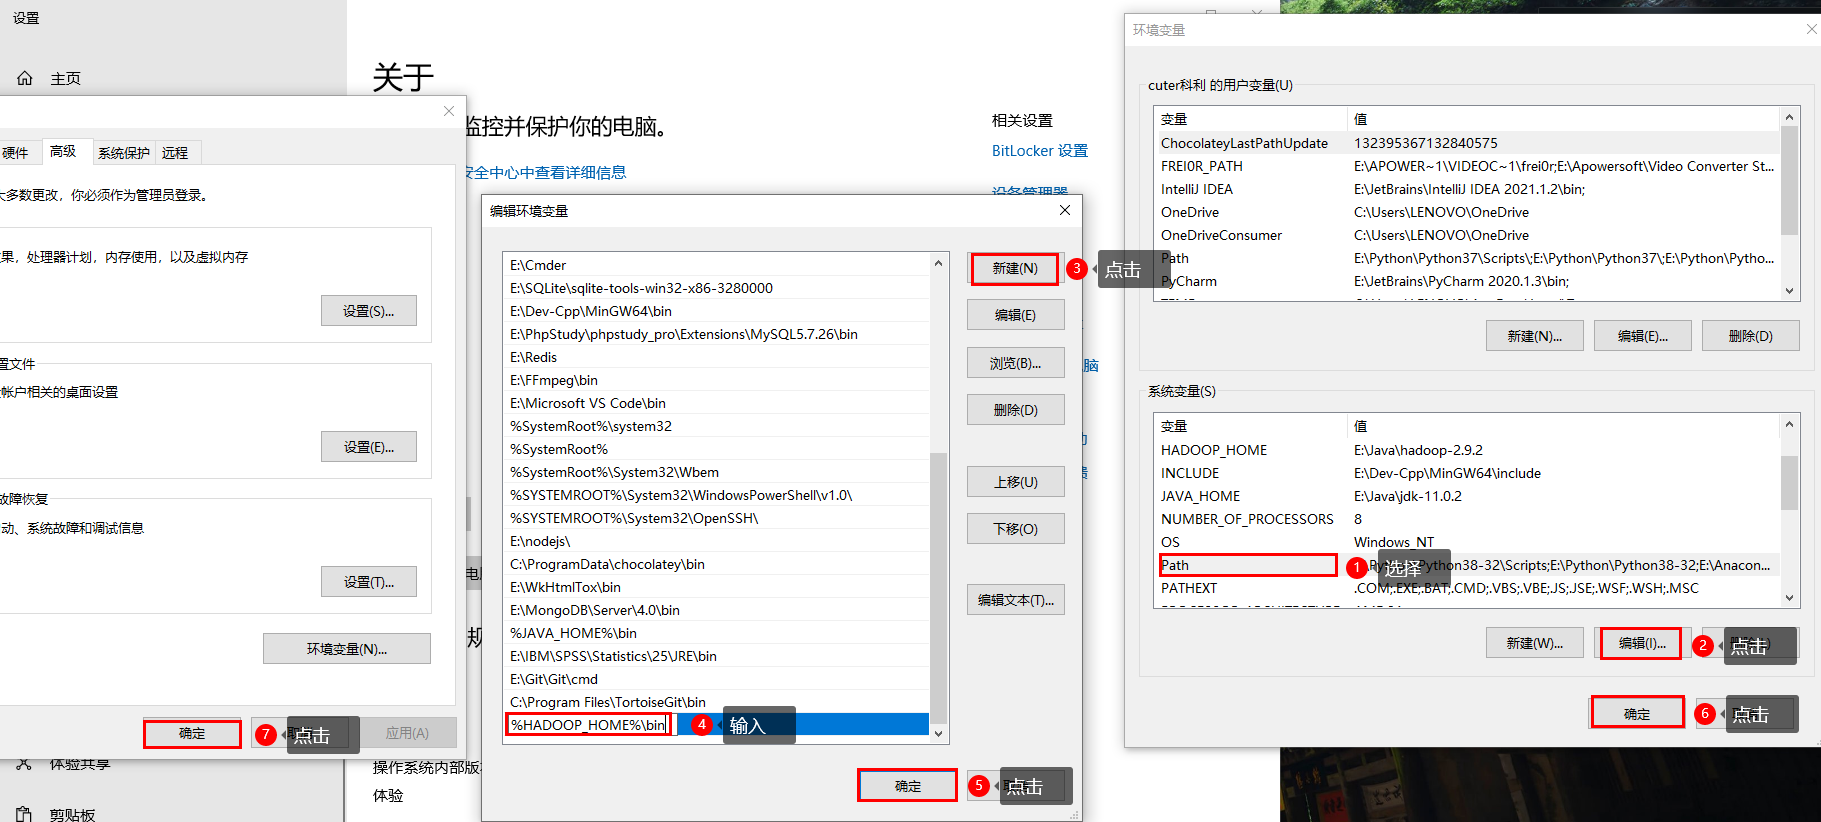
Configure the Path environment variable as follows:
(3) Create a Maven project ClientDemo
Create a Maven Project in IDEA as follows:

Enter Project Name and other information:

Click Finish to create.
(4) Import the corresponding dependent coordinates and log configuration file
The configuration items of Hadoop in Maven project include Hadoop common, Hadoop client and Hadoop HDFS. The specific configuration can be found in https://www.mvnrepository.com/ Query in.
Configure pom.xml:
<?xml version="1.0" encoding="UTF-8"?>
<project xmlns="http://maven.apache.org/POM/4.0.0"
         xmlns:xsi="http://www.w3.org/2001/XMLSchema-instance"
         xsi:schemaLocation="http://maven.apache.org/POM/4.0.0 http://maven.apache.org/xsd/maven-4.0.0.xsd">
    <modelVersion>4.0.0</modelVersion>

    <groupId>com.bigdata.hdfs</groupId>
    <artifactId>HDFSClientDemo</artifactId>
    <version>1.0-SNAPSHOT</version>

    <!-- hadoop-common, hadoop-client, hadoop-hdfs -->
    <dependencies>
        <dependency>
            <groupId>junit</groupId>
            <artifactId>junit</artifactId>
            <version>4.13.2</version>
        </dependency>

        <dependency>
            <groupId>org.apache.logging.log4j</groupId>
            <artifactId>log4j-core</artifactId>
            <version>2.8.2</version>
        </dependency>

        <!-- https://mvnrepository.com/artifact/org.apache.hadoop/hadoop-common -->
        <dependency>
            <groupId>org.apache.hadoop</groupId>
            <artifactId>hadoop-common</artifactId>
            <version>2.9.2</version>
        </dependency>

        <!-- https://mvnrepository.com/artifact/org.apache.hadoop/hadoop-client -->
        <dependency>
            <groupId>org.apache.hadoop</groupId>
            <artifactId>hadoop-client</artifactId>
            <version>2.9.2</version>
        </dependency>

        <!-- https://mvnrepository.com/artifact/org.apache.hadoop/hadoop-hdfs -->
        <dependency>
            <groupId>org.apache.hadoop</groupId>
            <artifactId>hadoop-hdfs</artifactId>
            <version>2.9.2</version>
        </dependency>
        <dependency>
            <groupId>junit</groupId>
            <artifactId>junit</artifactId>
            <version>4.13.1</version>
            <scope>compile</scope>
        </dependency>

    </dependencies>

    <properties>
        <maven.compiler.source>11</maven.compiler.source>
        <maven.compiler.target>11</maven.compiler.target>
    </properties>

</project>
Because it is the first time to use it, you need to download the dependency after editing, as follows:

Select Import Changes in the lower right corner of the IDEA to download the dependency, or click synchronize Maven dependency. The download may take a long time. You need to wait for the download and solve the related dependency;
At the same time, for the convenience of later statistics and verification code, it is also necessary to use junit test and log4j to control the log printout level.
In order to control the number of logs printed by the program, a new file named log4j.properties needs to be created in the src/main/resources directory of the project. The contents of the file are as follows:
log4j.rootLogger=INFO, stdout
log4j.appender.stdout=org.apache.log4j.ConsoleAppender
log4j.appender.stdout.layout=org.apache.log4j.PatternLayout
log4j.appender.stdout.layout.ConversionPattern=%d %p [%c] - %m%n
log4j.appender.logfile=org.apache.log4j.FileAppender
log4j.appender.logfile.File=target/spring.log
log4j.appender.logfile.layout=org.apache.log4j.PatternLayout
log4j.appender.logfile.layout.ConversionPattern=%d %p [%c] - %m%n
You can modify the value of log4j.rootLogger according to the log output.
(5) Create packages and client classes
Create com.cl.hdfs package in src/main/java directory of the project;
Create the HdfsClientDemo class under the package, as follows:
package com.bigdata.hdfs;

import org.apache.hadoop.fs.FileSystem;
import org.apache.hadoop.fs.Path;
import org.junit.Test;
import org.apache.hadoop.conf.Configuration;

import java.io.IOException;
import java.net.URI;
import java.net.URISyntaxException;

/**
 * @author Corley
 * @date 2021/8/29 19:02
 * @description HDFSClientDemo-com.bigdata.hdfs
 */
public class HdfsClientDemo {

    @Test
    public void testMkdirs() throws URISyntaxException, IOException, InterruptedException {
        // 1. Get the Configuration object of Hadoop cluster
        Configuration configuration = new Configuration();

        // 2. Get the file system object according to the Configuration object
        FileSystem fileSystem = FileSystem.get(new URI("hdfs://node01:9000"), configuration, "root");

        // 3. Create a test directory using the FileSystem object
        fileSystem.mkdirs(new Path("/api_test"));

        // 4. Release the file system object
        fileSystem.close();

    }
}
After execution, view the file system:
[root@node01 ~]$ hdfs dfs -ls /
Found 7 items
drwxr-xr-x   - root supergroup          0 2021-09-01 17:59 /api_test
drwxr-xr-x   - root supergroup          0 2021-08-26 19:22 /cl
drwxr-xr-x   - root supergroup          0 2021-08-26 20:11 /test
drwx------   - root supergroup          0 2021-08-26 00:36 /tmp
drwxr-xr-x   - root supergroup          0 2021-08-26 20:19 /user
drwxr-xr-x   - root supergroup          0 2021-08-25 22:33 /wcinput
drwxr-xr-x   - root supergroup          0 2021-08-26 00:37 /wcoutput
You can see that the API has been created in the root directory_ Test directory.
Note:
After Windows decompresses and installs Hadoop, an error may be reported when calling relevant API s to operate HDFS cluster, as shown in the following figure:

This is due to the lack of Windows operating system related files in Hadoop installation. Windows reads Linux files as a client, but the client does not have Hadoop environment. Therefore, Hadoop needs to be recompiled on windows to compile the client of Windows version.
The solution is to copy winutils.exe into the bin directory of the Hadoop installation directory of the Windows system;
At the same time, hadoop.dll also needs to be copied to the same directory.
If you need winutils.exe and hadoop.dll files, you can click below to download them:
bin files required for Windows installation of Hadoop. zip
If Hadoop is encountered_ Home and hadoop.home.dir are unset problems, you can refer to https://www.136.la/nginx/show-147746.html Solve it.
The previous step is to call the public static FileSystem get (final URI, final configuration conf, string user) method of the FileSystem class to generate the FileSystem object.
You can also generate a FileSystem object in another way, as follows:
package com.bigdata.hdfs;

import org.apache.hadoop.fs.FileSystem;
import org.apache.hadoop.fs.Path;
import org.junit.Test;
import org.apache.hadoop.conf.Configuration;

import java.io.IOException;
import java.net.URI;
import java.net.URISyntaxException;

/**
 * @author Corley
 * @date 2021/8/29 19:02
 * @description HDFSClientDemo-com.bigdata.hdfs
 */
public class HdfsClientDemo {

    @Test
    public void testMkdirs() throws URISyntaxException, IOException, InterruptedException {
        // 1. Get the Configuration object of Hadoop cluster
        Configuration configuration = new Configuration();
        configuration.set("fs.defaultFS", "hdfs://node01:9000");

        // 2. Get the file system object according to the Configuration object
        // FileSystem fileSystem = FileSystem.get(new URI("hdfs://node01:9000"), configuration, "root");
        FileSystem fileSystem = FileSystem.get(configuration);

        // 3. Create a test directory using the FileSystem object
        fileSystem.mkdirs(new Path("/api_test1"));

        // 4. Release the file system object
        fileSystem.close();

    }
}
If the execution fails, an error will be reported:
org.apache.hadoop.security.AccessControlException: Permission denied: user=cuter¿ÆÀ, access=WRITE, inode="/":root:supergroup:drwxr-xr-x
  at org.apache.hadoop.hdfs.server.namenode.FSPermissionChecker.check(FSPermissionChecker.java:350)
  at org.apache.hadoop.hdfs.server.namenode.FSPermissionChecker.checkPermission(FSPermissionChecker.java:251)
...
Obviously, there is a problem with access control.
Because the HDFS file system has file access control, the owner and array are root and supergroup, but the second method does not specify the user information for operating the HDFS cluster. By default, the user information of the current operating system is obtained. Here, the login user of Windows is used, and the permission is denied.
HDFS file system permission problem:
The file permission mechanism of HDFS is similar to the file permission mechanism of Linux system. They are r:read, w:write and x:execute. Permission x means ignore for files and whether you have permission to access their contents for folders.
If the Linux system user Corley uses the HDFS command to create a file, the owner of the file in HDFS is Corley. The purpose of HDFS file permission is to prevent good people from doing wrong, not bad people from doing bad things. HDFS believes that "you tell me who you are, you are who", so the permission access has no high binding force and security, and can not be used directly in production.
There are three solutions:
- Specify the user information to get the FileSystem object
This is the first way to generate FileSystem objects.
- Turn off HDFS cluster permission verification
Edit hdfs-site.xml and add the following attributes:
<property>
    <name>dfs.permissions</name>
    <value>true</value>
</property>
After modification, distribute to other nodes and restart the HDFS cluster.
- Discard HDFS permission verification
Based on the weak characteristics of HDFS permission itself, HDFS permission verification can be completely abandoned. In the production environment, we can consider using Kerberos, Sentry and other security frameworks to manage the security of big data clusters.
The specific method is to directly modify the root directory permission of HDFS to 777, that is, execute hdfs dfs -chmod -R 777 /.
Now use the third method to solve the problem as follows:
[root@node01 ~]$ hdfs dfs -chmod -R 777 /
[root@node01 ~]$ hdfs dfs -ls /
Found 7 items
drwxrwxrwx   - root supergroup          0 2021-09-01 17:59 /api_test
drwxrwxrwx   - root supergroup          0 2021-08-26 19:22 /cl
drwxrwxrwx   - root supergroup          0 2021-08-26 20:11 /test
drwxrwxrwx   - root supergroup          0 2021-08-26 00:36 /tmp
drwxrwxrwx   - root supergroup          0 2021-08-26 20:19 /user
drwxrwxrwx   - root supergroup          0 2021-08-25 22:33 /wcinput
drwxrwxrwx   - root supergroup          0 2021-08-26 00:37 /wcoutput
As you can see, all permissions have been changed to executable permissions.
At this time, execute the previous code and no error is reported. Check again as follows:
[root@node01 ~]$ hdfs dfs -ls /
Found 8 items
drwxrwxrwx   - root     supergroup          0 2021-09-01 17:59 /api_test
drwxr-xr-x   - cuter¿ÆÀ supergroup          0 2021-09-01 19:43 /api_test1
drwxrwxrwx   - root     supergroup          0 2021-08-26 19:22 /cl
drwxrwxrwx   - root     supergroup          0 2021-08-26 20:11 /test
drwxrwxrwx   - root     supergroup          0 2021-08-26 00:36 /tmp
drwxrwxrwx   - root     supergroup          0 2021-08-26 20:19 /user
drwxrwxrwx   - root     supergroup          0 2021-08-25 22:33 /wcinput
drwxrwxrwx   - root     supergroup          0 2021-08-26 00:37 /wcoutput
The API was successfully created_ Test1 directory, but the user is the login user of Windows system.
To sum up, in order to ensure that all users in the HDFS file system are root users, the first method is recommended.
(3) API client upload and download files
Optimize the previous code first, as follows:
package com.bigdata.hdfs;

import org.apache.hadoop.fs.FileSystem;
import org.apache.hadoop.fs.Path;
import org.junit.After;
import org.junit.Before;
import org.junit.Test;
import org.apache.hadoop.conf.Configuration;

import java.io.IOException;
import java.net.URI;
import java.net.URISyntaxException;

/**
 * @author Corley
 * @date 2021/8/29 19:02
 * @description HDFSClientDemo-com.bigdata.hdfs
 */
public class HdfsClientDemo {

    FileSystem fileSystem = null;
    Configuration configuration = null;

    @Before
    public void init() throws URISyntaxException, IOException, InterruptedException {
        // 1. Get the Configuration object of Hadoop cluster
        configuration = new Configuration();
        configuration.set("fs.defaultFS", "hdfs://node01:9000");

        // 2. Get the file system object according to the Configuration object
        fileSystem = FileSystem.get(new URI("hdfs://node01:9000"), configuration, "root");
    }

    @After
    public void destroy() throws IOException {
        // Release FileSystem object
        fileSystem.close();
    }

    @Test
    public void testMkdirs() throws URISyntaxException, IOException, InterruptedException {
        // Create a test directory using the FileSystem object
        fileSystem.mkdirs(new Path("/api_test2"));

    }

}
Use junit's Before and After to extract common code.
After execution, view HDFS as follows:
[root@node01 ~]$ hdfs dfs -ls /
Found 9 items
drwxrwxrwx   - root     supergroup          0 2021-09-01 17:59 /api_test
drwxr-xr-x   - cuter¿ÆÀ supergroup          0 2021-09-01 19:43 /api_test1
drwxr-xr-x   - root     supergroup          0 2021-09-01 22:06 /api_test2
drwxrwxrwx   - root     supergroup          0 2021-08-26 19:22 /cl
drwxrwxrwx   - root     supergroup          0 2021-08-26 20:11 /test
drwxrwxrwx   - root     supergroup          0 2021-08-26 00:36 /tmp
drwxrwxrwx   - root     supergroup          0 2021-08-26 20:19 /user
drwxrwxrwx   - root     supergroup          0 2021-08-25 22:33 /wcinput
drwxrwxrwx   - root     supergroup          0 2021-08-26 00:37 /wcoutput
As you can see, the directory API_ The successful creation of test2 indicates that the code optimization is successful.
Now the test client uploads files as follows:
package com.bigdata.hdfs;

import org.apache.hadoop.fs.FileSystem;
import org.apache.hadoop.fs.Path;
import org.junit.After;
import org.junit.Before;
import org.junit.Test;
import org.apache.hadoop.conf.Configuration;

import java.io.IOException;
import java.net.URI;
import java.net.URISyntaxException;

/**
 * @author Corley
 * @date 2021/8/29 19:02
 * @description HDFSClientDemo-com.bigdata.hdfs
 */
public class HdfsClientDemo {

    FileSystem fileSystem = null;
    Configuration configuration = null;

    @Before
    public void init() throws URISyntaxException, IOException, InterruptedException {
        // 1. Get the Configuration object of Hadoop cluster
        configuration = new Configuration();

        // 2. Get the file system object according to the Configuration object
        fileSystem = FileSystem.get(new URI("hdfs://node01:9000"), configuration, "root");
    }

    @After
    public void destroy() throws IOException {
        // Release FileSystem object
        fileSystem.close();
    }

    @Test
    public void testMkdirs() throws URISyntaxException, IOException, InterruptedException {
        // Create a test directory using the FileSystem object
        fileSystem.mkdirs(new Path("/api_test2"));

    }

    @Test
    public void testCopyFromLocalToHdfs() throws URISyntaxException, IOException, InterruptedException {
        // Upload file
        // void copyFromLocalFile(Path src, Path dst)
        fileSystem.copyFromLocalFile(new Path("E:/Test/tmp.txt"), new Path("/tmp.txt"));

    }

}
The src parameter of the copyFromLocalFile(Path src, Path dst) method represents the source file directory, that is, the local path, and the dstc eucalyptus tree represents the target file directory, that is, the HDFS path.
After running, check the HDFS as follows:

You can see that when uploading files to HDFS in this way, the default number of copies is 3.
There are two ways to change the number of copies:
(1) Set by Configuration object
You can specify the number of replicas in the Configuration object, as follows:
package com.bigdata.hdfs;

import org.apache.hadoop.fs.FileSystem;
import org.apache.hadoop.fs.Path;
import org.junit.After;
import org.junit.Before;
import org.junit.Test;
import org.apache.hadoop.conf.Configuration;

import java.io.IOException;
import java.net.URI;
import java.net.URISyntaxException;

/**
 * @author Corley
 * @date 2021/8/29 19:02
 * @description HDFSClientDemo-com.bigdata.hdfs
 */
public class HdfsClientDemo {

    FileSystem fileSystem = null;
    Configuration configuration = null;

    @Before
    public void init() throws URISyntaxException, IOException, InterruptedException {
        // 1. Get the Configuration object of Hadoop cluster
        configuration = new Configuration();
        configuration.set("dfs.replication", "2");

        // 2. Get the file system object according to the Configuration object
        fileSystem = FileSystem.get(new URI("hdfs://node01:9000"), configuration, "root");
    }

    @After
    public void destroy() throws IOException {
        // Release FileSystem object
        fileSystem.close();
    }

    @Test
    public void testMkdirs() throws IOException {
        // Create a test directory using the FileSystem object
        fileSystem.mkdirs(new Path("/api_test2"));

    }

    @Test
    public void testCopyFromLocalToHdfs() throws IOException {
        // Upload file
        // void copyFromLocalFile(Path src, Path dst)
        fileSystem.copyFromLocalFile(new Path("E:/Test/tmp.txt"), new Path("/tmp.txt"));

    }

}
Display:

Modification succeeded.
(2) Setting by creating a new XML profile
Create the hdfs-site.xml file in the resources directory, as follows:
<?xml version="1.0" encoding="UTF-8"?>
<?xml-stylesheet type="text/xsl" href="configuration.xsl"?>
<configuration>
    <property>
        <name>dfs.replication</name>
        <value>1</value>
    </property>
</configuration>
Note out the Configuration object in the code and set the number of copies as follows:
package com.bigdata.hdfs;

import org.apache.hadoop.fs.FileSystem;
import org.apache.hadoop.fs.Path;
import org.junit.After;
import org.junit.Before;
import org.junit.Test;
import org.apache.hadoop.conf.Configuration;

import java.io.IOException;
import java.net.URI;
import java.net.URISyntaxException;

/**
 * @author Corley
 * @date 2021/8/29 19:02
 * @description HDFSClientDemo-com.bigdata.hdfs
 */
public class HdfsClientDemo {

    FileSystem fileSystem = null;
    Configuration configuration = null;

    @Before
    public void init() throws URISyntaxException, IOException, InterruptedException {
        // 1. Get the Configuration object of Hadoop cluster
        configuration = new Configuration();
        // configuration.set("dfs.replication", "2");

        // 2. Get the file system object according to the Configuration object
        fileSystem = FileSystem.get(new URI("hdfs://node01:9000"), configuration, "root");
    }

    @After
    public void destroy() throws IOException {
        // Release FileSystem object
        fileSystem.close();
    }

    @Test
    public void testMkdirs() throws IOException {
        // Create a test directory using the FileSystem object
        fileSystem.mkdirs(new Path("/api_test2"));

    }

    @Test
    public void testCopyFromLocalToHdfs() throws IOException {
        // Upload file
        // void copyFromLocalFile(Path src, Path dst)
        fileSystem.copyFromLocalFile(new Path("E:/Test/tmp.txt"), new Path("/tmp.txt"));

    }

}
After execution, view:

You can see that the settings are also successful at this time.
You can also view the default value of HDFS server. The file is XXX \ ORG \ Apache \ Hadoop \ Hadoop HDFS \ 2.9.2 \ hadoop-hdfs-2.9.2.jar\ Hdfs-default.xml, as follows:
<property>
  <name>dfs.replication</name>
  <value>3</value>
  <description>Default block replication.
  The actual number of replications can be specified when the file is created.
  The default is used if replication is not specified in create time.
  </description>
</property>
As you can see, the default value is 3.
It can be obtained that the parameter priority is as follows:
generation code in set up Set of value > use household since set righteousness match Set writing piece > clothes Affairs implement of Silence recognize match Set Values set in code > user defined profile > default configuration for server Values set in code > user defined profile > default configuration for server
Retest the downloaded files as follows:
package com.bigdata.hdfs;

import org.apache.hadoop.fs.FileSystem;
import org.apache.hadoop.fs.Path;
import org.junit.After;
import org.junit.Before;
import org.junit.Test;
import org.apache.hadoop.conf.Configuration;

import java.io.IOException;
import java.net.URI;
import java.net.URISyntaxException;

/**
 * @author Corley
 * @date 2021/8/29 19:02
 * @description HDFSClientDemo-com.bigdata.hdfs
 */
public class HdfsClientDemo {

    FileSystem fileSystem = null;
    Configuration configuration = null;

    @Before
    public void init() throws URISyntaxException, IOException, InterruptedException {
        // 1. Get the Configuration object of Hadoop cluster
        configuration = new Configuration();
        // configuration.set("dfs.replication", "2");

        // 2. Get the file system object according to the Configuration object
        fileSystem = FileSystem.get(new URI("hdfs://node01:9000"), configuration, "root");
    }

    @After
    public void destroy() throws IOException {
        // Release FileSystem object
        fileSystem.close();
    }

    @Test
    public void testMkdirs() throws IOException {
        // Create a test directory using the FileSystem object
        fileSystem.mkdirs(new Path("/api_test2"));

    }

    @Test
    public void testCopyFromLocalToHdfs() throws IOException {
        // Upload file
        // void copyFromLocalFile(Path src, Path dst)
        fileSystem.copyFromLocalFile(new Path("E:/Test/tmp.txt"), new Path("/tmp.txt"));

    }

    @Test
    public void testCopyFromHdfsToLocal() throws IOException {
        // Download File
        fileSystem.copyToLocalFile(true, new Path("/tmp.txt"), new Path("E:/Test/tmp-2.txt"));

    }

}
The first parameter of void copyToLocalFile(boolean delSrc, Path src, Path dst) method indicates whether to delete the source file. Here, true indicates to delete.
After execution, view HDFS as follows:
[root@node01 ~]$ hdfs dfs -ls /
Found 9 items
drwxrwxrwx   - root     supergroup          0 2021-09-01 17:59 /api_test
drwxr-xr-x   - cuter¿ÆÀ supergroup          0 2021-09-01 19:43 /api_test1
drwxr-xr-x   - root     supergroup          0 2021-09-01 22:06 /api_test2
drwxrwxrwx   - root     supergroup          0 2021-08-26 19:22 /cl
drwxrwxrwx   - root     supergroup          0 2021-08-26 20:11 /test
drwxrwxrwx   - root     supergroup          0 2021-08-26 00:36 /tmp
drwxrwxrwx   - root     supergroup          0 2021-08-26 20:19 /user
drwxrwxrwx   - root     supergroup          0 2021-08-25 22:33 /wcinput
drwxrwxrwx   - root     supergroup          0 2021-08-26 00:37 /wcoutput
As you can see, the source file disappears.
In the view local, see the following:
λ ls -a | grep tmp-2
.tmp-2.txt.crc
tmp-2.txt
As you can see, the file is copied locally.
(4) API client file details and file type judgment
Delete the file first, as follows:
@Test
public void testDeleteFile() throws IOException {
    // Delete file or folder
    fileSystem.delete(new Path("/api_test1"), true);

}
After execution, view HDFS:
[root@node01 ~]$ hdfs dfs -ls /
Found 8 items
drwxrwxrwx   - root supergroup          0 2021-09-01 17:59 /api_test
drwxr-xr-x   - root supergroup          0 2021-09-01 22:06 /api_test2
drwxrwxrwx   - root supergroup          0 2021-08-26 19:22 /cl
drwxrwxrwx   - root supergroup          0 2021-08-26 20:11 /test
drwxrwxrwx   - root supergroup          0 2021-08-26 00:36 /tmp
drwxrwxrwx   - root supergroup          0 2021-08-26 20:19 /user
drwxrwxrwx   - root supergroup          0 2021-08-25 22:33 /wcinput
drwxrwxrwx   - root supergroup          0 2021-08-26 00:37 /wcoutput
As you can see, the deletion was successful.
Then view the file name, permission, length and block information, as follows:
@Test
public void testListFiles() throws IOException {
    // Traverse the HDFS root directory to obtain the information of files and folders (name, permission, length, etc.)
    // Get iterator
    RemoteIterator<LocatedFileStatus> remoteIterator = fileSystem.listFiles(new Path("/"), true);
    // Traversal iterator
    while (remoteIterator.hasNext()) {
        LocatedFileStatus fileStatus = remoteIterator.next();
        String name = fileStatus.getPath().getName();                       // file name
        long len = fileStatus.getLen();                                     // file length
        FsPermission permission = fileStatus.getPermission();               // jurisdiction
        String owner = fileStatus.getOwner();                               // user
        String group = fileStatus.getGroup();                               // grouping
        BlockLocation[] blockLocations = fileStatus.getBlockLocations();    // Block information
        System.out.println(name + "\t" + len + "\t" + permission + "\t" + owner + "\t" + group);
        for (BlockLocation blockLocation : blockLocations) {
            String[] hosts = blockLocation.getHosts();                      // Host information of the block
            for (String host : hosts) {
                System.out.println("Host name:" + host);
            }
        }
    }

}
Output:
hadoop.txt  52  rwxrwxrwx  root  root
 Host name: node01
 Host name: node03
 Host name: node02
test.txt  12  rwxrwxrwx  root  supergroup
 Host name: node02
 Host name: node03
 Host name: node01
hadoop.txt  52  rwxrwxrwx  root  supergroup
 Host name: node03
 Host name: node02
 Host name: node01
test.txt  12  rwxrwxrwx  root  supergroup
 Host name: node02
 Host name: node01
 Host name: node03
wc.txt  967  rwxrwxrwx  root  supergroup
 Host name: node02
 Host name: node03
 Host name: node01
job_1629895298908_0001-1629902194007-root-word+count-1629902239441-1-1-SUCCEEDED-default-1629902211805.jhist  33621  rwxrwxrwx  root  supergroup
 Host name: node01
 Host name: node03
 Host name: node02
job_1629895298908_0001_conf.xml  196008  rwxrwxrwx  root  supergroup
 Host name: node01
 Host name: node03
 Host name: node02
job_1629908848730_0001-1629909395692-root-word+count-1629909435182-1-1-SUCCEEDED-default-1629909411945.jhist  33635  rwxrwxrwx  root  supergroup
 Host name: node01
 Host name: node03
 Host name: node02
job_1629908848730_0001_conf.xml  196175  rwxrwxrwx  root  supergroup
 Host name: node01
 Host name: node02
 Host name: node03
node02_39947  103139  rwxrwxrwx  root  root
 Host name: node01
 Host name: node03
 Host name: node02
wc.txt  967  rwxrwxrwx  root  supergroup
 Host name: node02
 Host name: node01
 Host name: node03
_SUCCESS  0  rwxrwxrwx  root  supergroup
part-r-00000  624  rwxrwxrwx  root  supergroup
 Host name: node03
 Host name: node02
 Host name: node01
The return value type of the public remoteiterator < locatedfilestatus > listfiles (final path F, final Boolean recursive) method is iterator, which contains all file (folder) information in the specified directory.
Then judge the file or folder, as follows:
@Test
public void testIsFile() throws IOException {
    // Judge files or folders
    FileStatus[] fileStatuses = fileSystem.listStatus(new Path("/"));
    for (FileStatus fileStatus : fileStatuses) {
        boolean flag = fileStatus.isFile();
        if (flag) {
            System.out.println("File: " + fileStatus.getPath().getName());
        } else {
            System.out.println("Dir: " + fileStatus.getPath().getName());
        }
    }

}
Output:
Dir: api_test
Dir: api_test2
Dir: cl
Dir: test
Dir: tmp
Dir: user
Dir: wcinput
Dir: wcoutput
You can see that the FileStatus[] listStatus(Path var1) method can only obtain all file (folder) information under the current path;
There are some differences between the FileStatus[] listStatus(Path var1) method and the remoteiterator < locatedfilestatus > listfiles (final path F, final Boolean recursive) method. The former only supports traversing the current directory, does not support recursion of all contents under the current directory, and the return value is array. The latter supports recursion of all contents under the directory, and the return value is iterator.
(5) API client IO stream operation
The API operations previously used are encapsulated by the HDFS system framework. You can also upload and download files by using IO stream.
Upload files first, as follows:
@Test
public void testUploadFileIO() throws IOException {
    // Operating HDFS with IO stream -- uploading files
    // 1. Input stream reads local file
    FileInputStream inputStream = new FileInputStream("E:/Test/tmp.txt");
    // 2. Output stream write data to HDFS
    FSDataOutputStream outputStream = fileSystem.create(new Path("/tmp.txt"));
    // 3. Copy input stream data to output stream
    IOUtils.copyBytes(inputStream, outputStream, configuration);
    // 4. Close the flow object
    IOUtils.closeStream(outputStream);
    IOUtils.closeStream(inputStream);

}
The process of using IO stream to operate HDFS is to use input stream to read local files, and then use HDFS output stream to write data to HDFS file system;
Among them, the void copyBytes(InputStream in, OutputStream out, Configuration conf) method of IOUtils tool class is used to upload files, the copyBytes(in, out, conf.getInt("io.file.buffer.size", 4096), true) method is called, the default buffer size is set to 4096, and the stream object is closed. Therefore, the step of closing the stream object in step 4 can be omitted.
After execution, view:
[root@node01 ~]$ hdfs dfs -ls /
Found 9 items
drwxrwxrwx   - root supergroup          0 2021-09-01 17:59 /api_test
drwxr-xr-x   - root supergroup          0 2021-09-01 22:06 /api_test2
drwxrwxrwx   - root supergroup          0 2021-08-26 19:22 /cl
drwxrwxrwx   - root supergroup          0 2021-08-26 20:11 /test
drwxrwxrwx   - root supergroup          0 2021-08-26 00:36 /tmp
-rw-r--r--   1 root supergroup         30 2021-09-02 10:59 /tmp.txt
drwxrwxrwx   - root supergroup          0 2021-08-26 20:19 /user
drwxrwxrwx   - root supergroup          0 2021-08-25 22:33 /wcinput
drwxrwxrwx   - root supergroup          0 2021-08-26 00:37 /wcoutput
You can see that the file was uploaded successfully.
Then download the file as follows:
@Test
public void testDownloadFileIO() throws IOException {
    // Operating HDFS with IO streams -- downloading files
    // 1. Read HDFS file from input stream
    FSDataInputStream inputStream = fileSystem.open(new Path("/tmp.txt"));
    // 2. Save the output stream locally
    FileOutputStream outputStream = new FileOutputStream("E:/Test/tmp-3.txt");
    // 3. Copy input stream data to output stream
    IOUtils.copyBytes(inputStream, outputStream, configuration);

}
After execution, view:
λ ls -a | grep tmp
.tmp-2.txt.crc
tmp/
tmp.txt
tmp1/
tmp-2.txt
tmp-3.txt
You can see that tmp-3.txt is copied locally;
Obviously, there is more flexibility through IO streaming.
(6) seek read of API client IO stream
You can locate the read through seek, that is, read the file from an offset.
Now you can output the contents of tmp.txt on HDFS on the console twice, as follows:
@Test
public void testSeekReadfile() throws IOException {
    // Use the IO stream seek location to read the HDFS specified file and output the content twice
    // 1. Create an input stream for reading HDFS files
    FSDataInputStream inputStream = fileSystem.open(new Path("/tmp.txt"));
    // 2. Console output, stream copy, input stream → console output
    // IOUtils.copyBytes(inputStream, System.out, configuration);
    IOUtils.copyBytes(inputStream, System.out, 4096, false);
    System.out.println("\n---------------------------------------");
    // 3. Read the file again
    // Locate to 0, that is, read from the file header again
    inputStream.seek(0);
    IOUtils.copyBytes(inputStream, System.out, 4096, false);
    // 4. Close the flow object
    IOUtils.closeStream(inputStream);

}
Output:
hadoop
hdfs
seek
---------------------------------------
hadoop
hdfs
seek
You can see that the content is read twice;
IOUtils.copyBytes(inputStream, System.out, 4096, false) means to transfer the contents of HDFS input stream to console output, that is, print it out without closing the stream object;
seek location reading is related to MapReduce block reading data, which can realize logical block division.
3. Analysis of HDFS read / write mechanism
Take the downloaded file as an example to illustrate the HDFS data reading process, as follows:
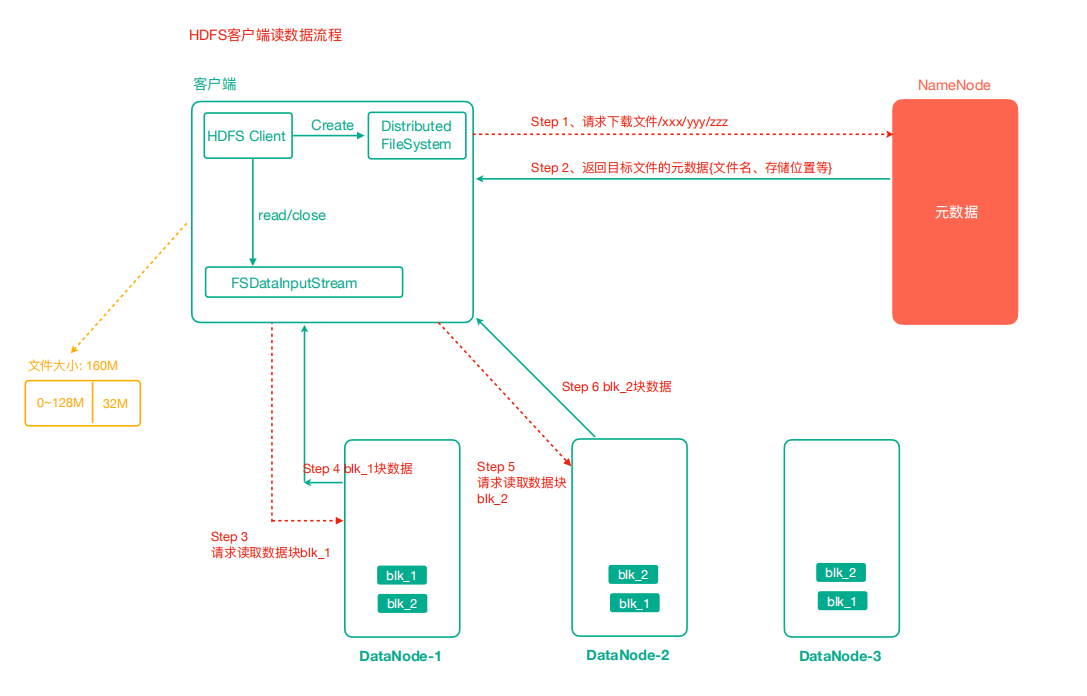
- The client requests the NameNode to download the file through the distributed file system. The NameNode finds the DataNode address where the file block is located by querying the metadata, and returns the fast information of the target file and the node where the block is located to the client.
When there are many data blocks, they are not returned at one time, but obtained and returned in batches.
- Select a DataNode (proximity principle, then random) server and request to read data.
Select the DataNode server of the data block copy according to the principle of proximity according to the network distance.
-
The DataNode starts transmitting data to the client (read the data input stream from the disk and verify it in packets).
-
The client receives the data in packets, first caches it locally, then writes it to the target file, and finally splices all data blocks to obtain a complete data block.
The HDFS data writing process is described in the uploaded file, as follows:

-
The client requests the NameNode to upload files through the distributed file system module. The NameNode checks whether the target file exists and whether the parent directory exists.
-
NameNode returns whether it can be uploaded.
Chunking is completed on the client side, and each file is processed and chunked separately, rather than all files are accumulated and then chunked.
-
The client requests which DataNode servers the first Block is uploaded to.
-
NameNode returns three DataNode nodes, namely dn1, dn2 and dn3.
-
The client requests dn1 to upload data through the FSDataOutputStream module. After receiving the request, dn1 will continue to call dn2, and then dn2 will call dn3 to complete the establishment of this communication pipeline.
-
dn1, dn2 and dn3 answer the client level by level.
-
The client starts to upload the first Block to dn1 (first read the data from the disk and put it into a local memory cache). With packets as the unit, dn1 will send a packet to dn2 and dn2 to dn3; Every packet transmitted by dn1 will be put into a confirmation queue for confirmation.
-
After the transmission of a Block is completed, the client again requests the NameNode to upload the server of the second Block, and repeat steps 3-7.
You can see that when data is written, a copy is created and distributed directly to all data blocks, rather than generating a copy after the data transfer is completed.
Now verify the Packet as follows:
@Test
public void testUploadPacket() throws IOException {
    // Upload files from local file system to HDFS
    // 1. Input stream reads local file
    FileInputStream inputStream = new FileInputStream("E:/Test/packet.txt");
    // 2. Write data from output stream to HDFS
    FSDataOutputStream outputStream = fileSystem.create(new Path("/packet.txt"), new Progressable() {
        int i = 0;
        @Override
        public void progress() {
            System.out.println("Packet " + i++);
        }
    });
    // 3. Copy the contents of the input stream to the output stream
    IOUtils.copyBytes(inputStream, outputStream, configuration);
}
Output:
Packet 0
Packet 1
Packet 2
Packet 3
Packet 4
Packet 5
The third parameter of the public fsdataoutputstream create (path F, progressive progress) method belongs to the interface type. Therefore, the implementation class is obtained by anonymous internal class. The void progress() method executes every 64KB (one Packet size) transmitted, so the transmission of each Packet can be monitored;
When the size of the file to be transmitted is not 0, it needs to establish a transmission channel, and the void progress() method will be executed once. At the same time, the file size is 275KB, 275 / 64 = 4.3, there are five packets in total, so it needs to be transmitted five times, plus establishing a transmission channel once, a total of six times.
4.HDFS metadata management mechanism
(1) Namenode, Fsimage and Edits edit log
NameNode management and storage metadata analysis:
There are two ways to store data in a computer: memory or disk:
If the metadata storage disk, the storage disk cannot face any fast and low latency response of the client to the metadata information, but the security is high;
If the metadata is stored in memory, the metadata is stored in memory, which can efficiently query and quickly respond to the query request of the client. The data is stored in memory. If the breakpoint occurs, all the data in memory will be lost.
Therefore, HDFS adopts the method of memory + disk, that is, NameNode memory + FsImage file (disk, similar to the snapshot of virtual machine).
At this time, the division of metadata in disk and memory needs to be considered:
- Memory is as like as two peas in disk.
If the client adds, deletes or modifies metadata, the consistency of the two data needs to be ensured;
Moreover, FsImage file operation efficiency is not high.
- The data in memory and disk are combined to form complete data
After the two are merged to form complete data, NameNode introduces an edits file.
The edits file is a normal log file and can only be appended at the same time.
The edits file records the addition, deletion and modification operations of the client. The NameNode will no longer dump the data to form an FsImage file, because this operation consumes resources.
HDFS also chose the second mode.
The metadata management flow chart is as follows:

Phase 1: NameNode startup
-
After the NameNode formatting is started for the first time, the Fsimage and Edits files are created. If it is not the first time to start, directly load the editing log and image file into memory.
-
The client requests to add, delete or modify metadata.
-
NameNode records the operation log and updates the rolling log.
-
NameNode adds, deletes and modifies data in memory.
After the NameNode is started, the edits file will gradually accumulate and become larger, which has the characteristics of fast generation and slow recovery;
When the fsimage file is dump ed from memory to disk, it has the characteristics of slow generation and fast recovery.
In order to make good use of the advantages of generating blocks and fast recovery of edits and fsimage files and overcome the disadvantages, we need to use the Secondary NameNode.
(2) 2NN and CheckPoint checkpoints
Phase II: Secondary NameNode works
-
The Secondary NameNode asks the NameNode if it needs a CheckPoint. Directly bring back the result of whether the NameNode performs CheckPoint operation.
-
Secondary NameNode requests CheckPoint.
-
NameNode scrolls the Edits log being written.
-
Copy the editing log and image files before scrolling to the Secondary NameNode.
-
The Secondary NameNode loads the edit log and image files into memory and merges them.
-
Generate a new image file fsimage.chkpoint.
-
Copy fsimage.chkpoint to NameNode.
-
NameNode renames fsimage.chkpoint to fsimage.
(3) Analysis of Fsimage and Edits files
After NameNode performs formatting, FsImage and edits files will be generated in / data/tmp/dfs/name/current directory. Check the files generated by the virtual machine as follows:
[root@node01 ~]$ ll /opt/software/hadoop-2.9.2/data/tmp/dfs/name/current/
Total consumption 3224
-rw-r--r-- 1 root root 1048576 8 November 25:47 edits_0000000000000000001-0000000000000000001
-rw-r--r-- 1 root root      42 8 May 25-20:01 edits_0000000000000000002-0000000000000000003
-rw-r--r-- 1 root root 1048576 8 May 25-20:24 edits_0000000000000000004-0000000000000000012
-rw-r--r-- 1 root root      42 8 May 25-20:42 edits_0000000000000000013-0000000000000000014
-rw-r--r-- 1 root root      42 8 May 25-21:56 edits_0000000000000000015-0000000000000000016
...
-rw-r--r-- 1 root root      42 9 February 12:41 edits_0000000000000000417-0000000000000000418
-rw-r--r-- 1 root root 1048576 9 February 12:43 edits_inprogress_0000000000000000419
-rw-r--r-- 1 root root    3253 9 February 11:41 fsimage_0000000000000000416
-rw-r--r-- 1 root root      62 9 February 11:41 fsimage_0000000000000000416.md5
-rw-r--r-- 1 root root    3253 9 February 12:41 fsimage_0000000000000000418
-rw-r--r-- 1 root root      62 9 February 12:41 fsimage_0000000000000000418.md5
-rw-r--r-- 1 root root       4 9 February 12:41 seen_txid
-rw-r--r-- 1 root root     219 8 June 25-19:59 VERSION
Among them, the meanings of each document are as follows:
- Fsimage file
It is the image of metadata in NameNode and the data from memory dump. It is generally called checkpoint.
It contains all directories of HDFS file system and file related information (number of blocks, number of copies, permissions, etc.).
However, there are some differences between fsimage file data and in memory data.
The. md5 file is used to verify the file transfer fsimage file between the Secondary NameNode and the NameNode.
- Edits file
It stores all the update operation records of the Client on the HDFS file system, and all the update operations of the Client on the HDFS file system (addition, deletion and modification operations, excluding query operations) will be recorded in the Edits file.
- seen_txid
This file saves a number and records the end number of the last edits file name in the current NamNode, mainly for NameNode to manage edits files and verify whether metadata is lost.
- VERSION
This file records some version number information of namenode, including ClusterId (cluster number), namespace ID (namespace number), blockpool ID (block pool number), etc.
The contents are as follows:
[root@node01 current]$ cat VERSION
#Wed Aug 25 19:59:59 CST 2021
namespaceID=1128684891
clusterID=CID-22adc4b2-cf44-4b8a-abd8-2e48b5bb9a05
cTime=1629862615839
storageType=NAME_NODE
blockpoolID=BP-1336715332-192.168.31.155-1629862615839
layoutVersion=-63
ClusterId is the unique number of the current cluster and is generated after formatting. It is used to distinguish which cluster the DataNode belongs to.
Because the Fsimage and Edits files are binary files and cannot be viewed directly, you can view them with the help of the commands provided by HDFS. You can refer to https://hadoop.apache.org/docs/r2.9.2/hadoop-project-dist/hadoop-hdfs/HdfsImageViewer.html.
Use oiv and oev commands to view the contents of the file. The meanings are as follows:
| command | Complete expression | meaning |
|---|---|---|
| oiv | Offline Image Viewer | View the Hadoop fsimage file using the specified processor and save the results in the output file |
| oev | Offline edits viewer | Parse the Hadoop edits log file input file and save the results in the output file |
The syntax format of viewing fsimage file is:
hdfs oiv -p file type(xml) -i Mirror file -o Converted file output path
Use the following:
[root@node01 current]$ hdfs oiv -p XML -i fsimage_0000000000000000427 -o /root/img0427.xml
21/09/02 14:11:37 INFO offlineImageViewer.FSImageHandler: Loading 4 strings
After the extraction, download the generated img0427.xml locally, and then paste the file content into the online XML formatting website for formatting for easy viewing, as follows:
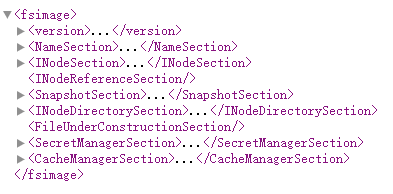
The INodeSection node stores the main file information, including file (folder) name, creation time, permission, file size, number of copies, etc., which is consistent with that in the HDFS file system;
At the same time, the block information is included in the information, but there is no node information, that is, the DataNode corresponding to the block is not recorded in fsimage. In fact, there is dn information corresponding to the record block in the memory metadata, but this information is excluded from the fsimage because:
When the HDFS cluster starts, it will load the image and edits files. The dn information corresponding to the block is not recorded. When the cluster starts, it will start in safe mode. The safe mode is to enable dn to report the block information it currently holds to nn to supplement the metadata, and dn will report the block information it holds every other period of time. The reason for this design is that some nodes may have abnormal downtime during the shutdown of the cluster. In this way, even if these nodes are recorded and cannot be started when the cluster is started again, it is meaningless. On the contrary, choose not to record the node information, but let the node actively report the block information of its own node, This can ensure that the obtained node information is also the most effective.
The syntax format for viewing the edits file is:
hdfs oev -p file type -i edits journal -o Converted file output path
Use the following:
[root@node01 current]$ hdfs oev -p XML -i edits_0000000000000000419-0000000000000000427 -o /root/edits0427.xml
Process the generated file as before, as follows:
<?xml version="1.0" encoding="UTF-8"?>
<EDITS>
    <EDITS_VERSION>-63</EDITS_VERSION>
    <RECORD>
        <OPCODE>OP_START_LOG_SEGMENT</OPCODE>
        <DATA>
            <TXID>419</TXID>
        </DATA>
    </RECORD>
    <RECORD>
        <OPCODE>OP_ADD</OPCODE>
        <DATA>
            <TXID>420</TXID>
            <LENGTH>0</LENGTH>
            <INODEID>16478</INODEID>
            <PATH>/packet.txt</PATH>
            <REPLICATION>1</REPLICATION>
            <MTIME>1630557817304</MTIME>
            <ATIME>1630557817304</ATIME>
            <BLOCKSIZE>134217728</BLOCKSIZE>
            <CLIENT_NAME>DFSClient_NONMAPREDUCE_-638007174_1</CLIENT_NAME>
            <CLIENT_MACHINE>192.168.31.1</CLIENT_MACHINE>
            <OVERWRITE>true</OVERWRITE>
            <PERMISSION_STATUS>
                <USERNAME>root</USERNAME>
                <GROUPNAME>supergroup</GROUPNAME>
                <MODE>420</MODE>
            </PERMISSION_STATUS>
            <RPC_CLIENTID>658555cc-4d7d-4920-8ab2-00ff3c26abde</RPC_CLIENTID>
            <RPC_CALLID>0</RPC_CALLID>
        </DATA>
    </RECORD>
    <RECORD>
        <OPCODE>OP_ALLOCATE_BLOCK_ID</OPCODE>
        <DATA>
            <TXID>421</TXID>
            <BLOCK_ID>1073741860</BLOCK_ID>
        </DATA>
    </RECORD>
    <RECORD>
        <OPCODE>OP_SET_GENSTAMP_V2</OPCODE>
        <DATA>
            <TXID>422</TXID>
            <GENSTAMPV2>1037</GENSTAMPV2>
        </DATA>
    </RECORD>
    <RECORD>
        <OPCODE>OP_ADD_BLOCK</OPCODE>
        <DATA>
            <TXID>423</TXID>
            <PATH>/packet.txt</PATH>
            <BLOCK>
                <BLOCK_ID>1073741860</BLOCK_ID>
                <NUM_BYTES>0</NUM_BYTES>
                <GENSTAMP>1037</GENSTAMP>
            </BLOCK>
            <RPC_CLIENTID></RPC_CLIENTID>
            <RPC_CALLID>-2</RPC_CALLID>
        </DATA>
    </RECORD>
    <RECORD>
        <OPCODE>OP_CLOSE</OPCODE>
        <DATA>
            <TXID>424</TXID>
            <LENGTH>0</LENGTH>
            <INODEID>0</INODEID>
            <PATH>/packet.txt</PATH>
            <REPLICATION>1</REPLICATION>
            <MTIME>1630557817462</MTIME>
            <ATIME>1630557817304</ATIME>
            <BLOCKSIZE>134217728</BLOCKSIZE>
            <CLIENT_NAME></CLIENT_NAME>
            <CLIENT_MACHINE></CLIENT_MACHINE>
            <OVERWRITE>false</OVERWRITE>
            <BLOCK>
                <BLOCK_ID>1073741860</BLOCK_ID>
                <NUM_BYTES>281214</NUM_BYTES>
                <GENSTAMP>1037</GENSTAMP>
            </BLOCK>
            <PERMISSION_STATUS>
                <USERNAME>root</USERNAME>
                <GROUPNAME>supergroup</GROUPNAME>
                <MODE>420</MODE>
            </PERMISSION_STATUS>
        </DATA>
    </RECORD>
    <RECORD>
        <OPCODE>OP_DELETE</OPCODE>
        <DATA>
            <TXID>425</TXID>
            <LENGTH>0</LENGTH>
            <PATH>/test</PATH>
            <TIMESTAMP>1630560908262</TIMESTAMP>
            <RPC_CLIENTID></RPC_CLIENTID>
            <RPC_CALLID>-2</RPC_CALLID>
        </DATA>
    </RECORD>
    <RECORD>
        <OPCODE>OP_DELETE</OPCODE>
        <DATA>
            <TXID>426</TXID>
            <LENGTH>0</LENGTH>
            <PATH>/api_test2</PATH>
            <TIMESTAMP>1630560908267</TIMESTAMP>
            <RPC_CLIENTID></RPC_CLIENTID>
            <RPC_CALLID>-2</RPC_CALLID>
        </DATA>
    </RECORD>
    <RECORD>
        <OPCODE>OP_END_LOG_SEGMENT</OPCODE>
        <DATA>
            <TXID>427</TXID>
        </DATA>
    </RECORD>
</EDITS>
It can be seen that the file records the information of ADD, DELETE and other operations;
Edits only records operations related to updates, and queries or downloads of files are not recorded.
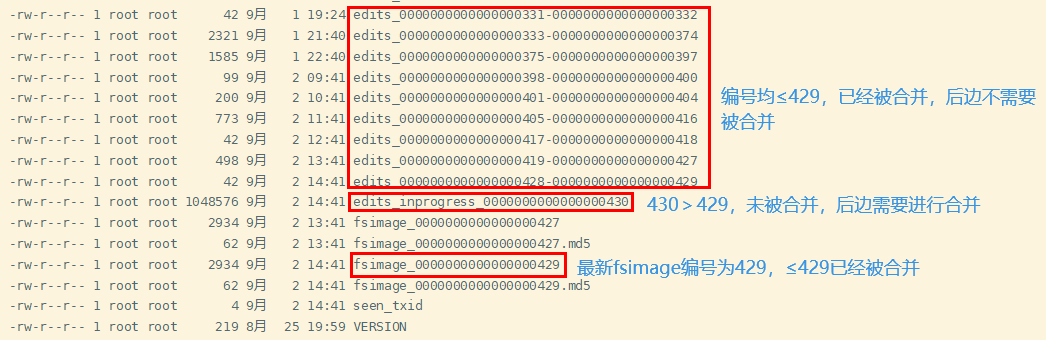
When the NameNode is started, all edits files will not be loaded. Meanwhile, the Secondary NameNode has merged most of the previous data. The method to determine the need to load edits files is as follows:
NN needs to load fsimage files and edits files that have not been merged by 2nn. NN can determine which edits have been merged by the number of fsimage file itself.
Examples are as follows:
(4) CheckPoint cycle and NameNode fault handling
HDFS has two default processing methods:
-
Timing 1 hour
-
Check the number of operations once a minute. When the number of operations reaches 1 million, the SecondaryNameNode executes once
This is set through the hdfs-default.xml file, as follows:
<!-- One hour at a time -->
<property>
    <name>dfs.namenode.checkpoint.period</name>
    <value>3600</value>
</property>
<!-- Check the number of operations once a minute. When the number of operations reaches 1 million, SecondaryNameNode Execute once -->
<property>
    <name>dfs.namenode.checkpoint.txns</name>
    <value>1000000</value>
    <description>Operation action times</description>
</property>
<property>
    <name>dfs.namenode.checkpoint.check.period</name>
    <value>60</value>
    <description>1 Number of operations per minute</description>
</property>
You can also modify it according to your own needs.
After the NameNode fails, the HDFS cluster cannot work normally, because the metadata of the HDFS file system needs to be managed and maintained by the NameNode and interact with the Client. If the metadata is damaged or lost, the NameNode cannot work normally, and the HDFS file system cannot provide services to the outside normally.
If metadata is lost or damaged, there are two recovery methods:
- Copy the metadata of 2NN to the node of NN
In this way, metadata will be lost. The lost data is the edits that have not been merged since the last CheckPoint.
- Build the HA (high availability) cluster of HDFS to solve the single point of failure of NN
Realize HA (High Availability) with Zookeeper, including an Active NameNode and a Standby NameNode. As a backup NameNode, the latter is mainly responsible for metadata and failed handover with the Active NameNode.
5.Hadoop quota, archiving and cluster security mode
The quota configuration of HDFS files allows to limit the number of files uploaded in a directory or the total amount of file content by file size or number of files, so as to reach the maximum number of files allowed to be uploaded by each user limited by applications such as network disk.
The quantity limit order is as follows:
# Set directory quota for directory directory
hdfs dfsadmin -setQuota count directory
# Cancel directory quota for directory directory
hdfs dfsadmin -clrQuota directory
You need to use the dfsadmin command of HDFS for quota, as follows:
[root@node01 ~]$ hdfs dfsadmin -help
hdfs dfsadmin performs DFS administrative commands.
Note: Administrative commands can only be run with superuser permission.
The full syntax is:

hdfs dfsadmin
        [-report [-live] [-dead] [-decommissioning] [-enteringmaintenance] [-inmaintenance]]
        [-safemode <enter | leave | get | wait>]
        [-saveNamespace]
        [-rollEdits]
        [-restoreFailedStorage true|false|check]
        [-refreshNodes]
        [-setQuota <quota> <dirname>...<dirname>]
        [-clrQuota <dirname>...<dirname>]
        [-setSpaceQuota <quota> [-storageType <storagetype>] <dirname>...<dirname>]
        [-clrSpaceQuota [-storageType <storagetype>] <dirname>...<dirname>]
        [-finalizeUpgrade]
        [-rollingUpgrade [<query|prepare|finalize>]]
        [-refreshServiceAcl]
        [-refreshUserToGroupsMappings]
        [-refreshSuperUserGroupsConfiguration]
        [-refreshCallQueue]
        [-refresh <host:ipc_port> <key> [arg1..argn]
        [-reconfig <namenode|datanode> <host:ipc_port> <start|status|properties>]
        [-printTopology]
        [-refreshNamenodes datanode_host:ipc_port]
        [-getVolumeReport datanode_host:ipc_port]
        [-deleteBlockPool datanode_host:ipc_port blockpoolId [force]]
        [-setBalancerBandwidth <bandwidth in bytes per second>]
        [-getBalancerBandwidth <datanode_host:ipc_port>]
        [-fetchImage <local directory>]
        [-allowSnapshot <snapshotDir>]
        [-disallowSnapshot <snapshotDir>]
        [-shutdownDatanode <datanode_host:ipc_port> [upgrade]]
        [-evictWriters <datanode_host:ipc_port>]
        [-getDatanodeInfo <datanode_host:ipc_port>]
        [-metasave filename]
        [-triggerBlockReport [-incremental] <datanode_host:ipc_port>]
        [-listOpenFiles]
        [-help [cmd]]

-report [-live] [-dead] [-decommissioning] [-enteringmaintenance] [-inmaintenance]:
        Reports basic filesystem information and statistics.
        The dfs usage can be different from "du" usage, because it
        measures raw space used by replication, checksums, snapshots
        and etc. on all the DNs.
        Optional flags may be used to filter the list of displayed DNs.

-safemode <enter|leave|get|wait|forceExit>:  Safe mode maintenance command.
                Safe mode is a Namenode state in which it
                        1.  does not accept changes to the name space (read-only)
                        2.  does not replicate or delete blocks.
                Safe mode is entered automatically at Namenode startup, and
                leaves safe mode automatically when the configured minimum
                percentage of blocks satisfies the minimum replication
                condition.  Safe mode can also be entered manually, but then
                it can only be turned off manually as well.

-saveNamespace: Save current namespace into storage directories and reset edits log.
                Requires safe mode.

-rollEdits:     Rolls the edit log.

-restoreFailedStorage:  Set/Unset/Check flag to attempt restore of failed storage replicas if they become available.

-refreshNodes:  Updates the namenode with the set of datanodes allowed to connect to the namenode.

                Namenode re-reads datanode hostnames from the file defined by
                dfs.hosts, dfs.hosts.exclude configuration parameters.
                Hosts defined in dfs.hosts are the datanodes that are part of
                the cluster. If there are entries in dfs.hosts, only the hosts
                in it are allowed to register with the namenode.

                Entries in dfs.hosts.exclude are datanodes that need to be
                decommissioned. Datanodes complete decommissioning when
                all the replicas from them are replicated to other datanodes.
                Decommissioned nodes are not automatically shutdown and
                are not chosen for writing new replicas.

-finalizeUpgrade: Finalize upgrade of HDFS.
                Datanodes delete their previous version working directories,
                followed by Namenode doing the same.
                This completes the upgrade process.

-rollingUpgrade [<query|prepare|finalize>]:
     query: query the current rolling upgrade status.
   prepare: prepare a new rolling upgrade.
  finalize: finalize the current rolling upgrade.
-metasave <filename>:   Save Namenode's primary data structures
                to <filename> in the directory specified by hadoop.log.dir property.
                <filename> is overwritten if it exists.
                <filename> will contain one line for each of the following
                        1. Datanodes heart beating with Namenode
                        2. Blocks waiting to be replicated
                        3. Blocks currrently being replicated
                        4. Blocks waiting to be deleted

-setQuota <quota> <dirname>...<dirname>: Set the quota <quota> for each directory <dirName>.
                The directory quota is a long integer that puts a hard limit
                on the number of names in the directory tree
                For each directory, attempt to set the quota. An error will be reported if
                1. quota is not a positive integer, or
                2. User is not an administrator, or
                3. The directory does not exist or is a file.
                Note: A quota of 1 would force the directory to remain empty.

-clrQuota <dirname>...<dirname>: Clear the quota for each directory <dirName>.
                For each directory, attempt to clear the quota. An error will be reported if
                1. the directory does not exist or is a file, or
                2. user is not an administrator.
                It does not fault if the directory has no quota.
-setSpaceQuota <quota> [-storageType <storagetype>] <dirname>...<dirname>: Set the space quota <quota> for each directory <dirName>.
                The space quota is a long integer that puts a hard limit
                on the total size of all the files under the directory tree.
                The extra space required for replication is also counted. E.g.
                a 1GB file with replication of 3 consumes 3GB of the quota.

                Quota can also be specified with a binary prefix for terabytes,
                petabytes etc (e.g. 50t is 50TB, 5m is 5MB, 3p is 3PB).
                For each directory, attempt to set the quota. An error will be reported if
                1. quota is not a positive integer or zero, or
                2. user is not an administrator, or
                3. the directory does not exist or is a file.
                The storage type specific quota is set when -storageType option is specified.
                Available storageTypes are
                - RAM_DISK
                - DISK
                - SSD
                - ARCHIVE
-clrSpaceQuota [-storageType <storagetype>] <dirname>...<dirname>: Clear the space quota for each directory <dirName>.
                For each directory, attempt to clear the quota. An error will be reported if
                1. the directory does not exist or is a file, or
                2. user is not an administrator.
                It does not fault if the directory has no quota.
                The storage type specific quota is cleared when -storageType option is specified.
                Available storageTypes are
                - RAM_DISK
                - DISK
                - SSD
                - ARCHIVE
-refreshServiceAcl: Reload the service-level authorization policy file
                Namenode will reload the authorization policy file.

-refreshUserToGroupsMappings: Refresh user-to-groups mappings

-refreshSuperUserGroupsConfiguration: Refresh superuser proxy groups mappings

-refreshCallQueue: Reload the call queue from config

-refresh: Arguments are <hostname:ipc_port> <resource_identifier> [arg1..argn]
        Triggers a runtime-refresh of the resource specified by <resource_identifier> on <hostname:ipc_port>.
        All other args after are sent to the host.
        The ipc_port is determined by 'dfs.datanode.ipc.address',default is DFS_DATANODE_IPC_DEFAULT_PORT.

-reconfig <namenode|datanode> <host:ipc_port> <start|status|properties>:
        Starts or gets the status of a reconfiguration operation,
        or gets a list of reconfigurable properties.
        The second parameter specifies the node type

-printTopology: Print a tree of the racks and their
                nodes as reported by the Namenode

-refreshNamenodes: Takes a datanodehost:ipc_port as argument,For the given datanode
                reloads the configuration files,stops serving the removed
                block-pools and starts serving new block-pools.
                The ipc_port is determined by 'dfs.datanode.ipc.address',default is DFS_DATANODE_IPC_DEFAULT_PORT.

-deleteBlockPool: Arguments are datanodehost:ipc_port, blockpool id and an optional argument
                "force". If force is passed,block pool directory for
                the given blockpool id on the given datanode is deleted
                along with its contents,otherwise the directory is deleted
                only if it is empty.The command will fail if datanode is
                still serving the block pool.Refer to refreshNamenodes to
                shutdown a block pool service on a datanode.
                The ipc_port is determined by 'dfs.datanode.ipc.address',default is DFS_DATANODE_IPC_DEFAULT_PORT.

-setBalancerBandwidth <bandwidth>:
        Changes the network bandwidth used by each datanode during
        HDFS block balancing.

                <bandwidth> is the maximum number of bytes per second
                that will be used by each datanode. This value overrides
                the dfs.balance.bandwidthPerSec parameter.

                --- NOTE: The new value is not persistent on the DataNode.---

-getBalancerBandwidth <datanode_host:ipc_port>:
        Get the network bandwidth for the given datanode.
        This is the maximum network bandwidth used by the datanode
        during HDFS block balancing.

        --- NOTE: This value is not persistent on the DataNode.---

-fetchImage <local directory>:
        Downloads the most recent fsimage from the Name Node and saves it in    the specified local directory.

-allowSnapshot <snapshotDir>:
        Allow snapshots to be taken on a directory.

-disallowSnapshot <snapshotDir>:
        Do not allow snapshots to be taken on a directory any more.

-shutdownDatanode <datanode_host:ipc_port> [upgrade]
        Submit a shutdown request for the given datanode. If an optional
        "upgrade" argument is specified, clients accessing the datanode
        will be advised to wait for it to restart and the fast start-up
        mode will be enabled. When the restart does not happen in time,
        clients will timeout and ignore the datanode. In such case, the
        fast start-up mode will also be disabled.

-evictWriters <datanode_host:ipc_port>
        Make the datanode evict all clients that are writing a block.
        This is useful if decommissioning is hung due to slow writers.

-getDatanodeInfo <datanode_host:ipc_port>
        Get the information about the given datanode. This command can
        be used for checking if a datanode is alive.

-triggerBlockReport [-incremental] <datanode_host:ipc_port>
        Trigger a block report for the datanode.
        If 'incremental' is specified, it will be an incremental
        block report; otherwise, it will be a full block report.

-listOpenFiles
        List all open files currently managed by the NameNode along
        with client name and client machine accessing them.

-help [cmd]:    Displays help for the given command or all commands if none
                is specified.


Generic options supported are:
-conf <configuration file>        specify an application configuration file
-D <property=value>               define a value for a given property
-fs <file:///|hdfs://namenode:port> specify default filesystem URL to use, overrides 'fs.defaultFS' property from configurations.
-jt <local|resourcemanager:port>  specify a ResourceManager
-files <file1,...>                specify a comma-separated list of files to be copied to the map reduce cluster
-libjars <jar1,...>               specify a comma-separated list of jar files to be included in the classpath
-archives <archive1,...>          specify a comma-separated list of archives to be unarchived on the compute machines

The general command line syntax is:
command [genericOptions] [commandOptions]
Contains complete administrative commands.
Use the following:
# Create HDFS folder
[root@node01 ~]$ hdfs dfs -mkdir /test
# Set a maximum of two files to be uploaded under this folder
[root@node01 ~]$ hdfs dfsadmin -setQuota 2 /test
[root@node01 ~]$ hdfs dfs -put test.txt /test
# Upload files. Only one file can be uploaded
[root@node01 ~]$ hdfs dfs -put test.txt /test/test-2.txt
put: The NameSpace quota (directories and files) of directory /test is exceeded: quota=2 file count=3
# Clear file limit
[root@node01 ~]$ hdfs dfsadmin -clrQuota /test
[root@node01 ~]$ hdfs dfs -put test.txt /test/test-2.txt
You can see that the quantity limit is set to 2, so you can upload up to 1 file. After clearing the quantity limit, you can upload multiple files.
The commands for setting the space size limit are as follows:
# Set the space quota for the directory to size
hdfs dfsadmin -setSpaceQuota size directory
# Clear space quota
hdfs dfsadmin -clrSpaceQuota directory
# View file quota quantity
hdfs dfs -count -q -h directory
Use the following:
# The limited space size is 30KB
[root@node01 ~]$ hdfs dfsadmin -setSpaceQuota 30k /test
# Uploading a file larger than 30KB will prompt that the file exceeds the limit
[root@node01 ~]$ hdfs dfs -put img0427.xml /test
put: The DiskSpace quota of /test is exceeded: quota = 30720 B = 30 KB but diskspace consumed = 402653256 B = 384.00 MB
# View hdfs file quota quantity
[root@node01 ~]$ hdfs dfs -count -q -h /test
        none             inf            30 K          29.9 K            1            2                 24 /test
# Clear space quota
[root@node01 ~]$ hdfs dfsadmin -clrSpaceQuota /test
[root@node01 ~]$ hdfs dfs -put test.txt /test/test-3.txt
[root@node01 ~]$ hdfs dfs -ls /
Found 9 items
drwxrwxrwx   - root supergroup          0 2021-09-01 17:59 /api_test
drwxrwxrwx   - root supergroup          0 2021-08-26 19:22 /cl
-rw-r--r--   1 root supergroup     281214 2021-09-02 12:43 /packet.txt
drwxr-xr-x   - root supergroup          0 2021-09-02 17:34 /test
drwxrwxrwx   - root supergroup          0 2021-08-26 00:36 /tmp
-rw-r--r--   1 root supergroup         18 2021-09-02 11:12 /tmp.txt
drwxrwxrwx   - root supergroup          0 2021-08-26 20:19 /user
drwxrwxrwx   - root supergroup          0 2021-08-25 22:33 /wcinput
drwxrwxrwx   - root supergroup          0 2021-08-26 00:37 /wcoutput
[root@node01 ~]$ hdfs dfs -ls /test
Found 3 items
-rw-r--r--   3 root supergroup         12 2021-09-02 17:15 /test/test-2.txt
-rw-r--r--   3 root supergroup         12 2021-09-02 17:34 /test/test-3.txt
-rw-r--r--   3 root supergroup         12 2021-09-02 17:13 /test/test.txt
[root@node01 ~]$
It can be seen that files cannot be uploaded successfully after setting the space quota. Files can be uploaded after canceling the space quota.
When the HDFS cluster starts, the Fsimage and edits files need to be loaded, and neither of these files records the datanode node node information corresponding to the block. Therefore, if the Client requests to upload files at this time, the cluster cannot work. At this time, you need to use safe mode.
Security mode is a special state of HDFS, which belongs to HDFS self-protection mode. In this state, the file system only accepts data read requests, but does not accept change requests such as deletion and modification. When the NameNode master node is started, HDFS first enters the safe mode. When the DataNode is started, it will report the available block and other status to the NameNode. When the whole system meets the safety standard, HDFS will automatically leave the safe mode. If the HDFS is in the safe mode, the file block cannot replicate any copies. Therefore, the minimum number of copies is determined based on the state when the DataNode is started. No replication will be made when the DataNode is started (so as to meet the minimum number of copies). When the HDFS cluster is just started, the default time of 30S is for the safe period, Only after 30S, the cluster is out of the security period, and then the cluster can be operated.
The commands related to safe mode are as follows:
hdfs dfs -safemode <enter|leave|get|wait|forceExit>
Use the following:
[root@node01 ~]$ hdfs dfsadmin -safemode enter
Safe mode is ON
[root@node01 ~]$ hdfs dfs -get /tmp.txt
[root@node01 ~]$ hdfs dfs -put hadoop.txt /test
put: Cannot create file/test/hadoop.txt._COPYING_. Name node is in safe mode.
[root@node01 ~]$ hdfs dfsadmin -safemode leave
Safe mode is OFF
[root@node01 ~]$ hdfs dfs -put hadoop.txt /test
[root@node01 ~]$ hdfs dfs -ls /test
Found 4 items
-rw-r--r--   3 root supergroup         52 2021-09-02 18:14 /test/hadoop.txt
-rw-r--r--   3 root supergroup         12 2021-09-02 17:15 /test/test-2.txt
-rw-r--r--   3 root supergroup         12 2021-09-02 17:34 /test/test-3.txt
-rw-r--r--   3 root supergroup         12 2021-09-02 17:13 /test/test.txt
It can be seen that after entering the security mode, only files are allowed to be read and not written. Files can be written only after the security mode is turned off.
Hadoop archiving technology is mainly to solve the problem of a large number of small files in HDFS cluster.
Since a large number of small files will occupy the memory of the NameNode, for HDFS, storing a large number of small files will cause a waste of memory resources of the NameNode.
Hadoop archive file HAR file is a more efficient file archiving tool. HAR file is created by a group of files through the archive tool. Multiple files only need one piece of metadata to store. While reducing the memory use of NameNode, it can access files transparently. Generally speaking, The HAR file is a file for NameNode, which reduces the waste of memory. For actual operation, the file is still multiple independent files. As shown below:

Now test Archive:
(1) Start the Yarn cluster
Because archiving requires computing tasks, you need to start the Yarn cluster. If the Yarn cluster is not started, you need to start Yarn first and execute the command start-yarn.sh.
(2) Archive file
Archive all files in the / test directory into an archive called test.har, and store the archived files in the / test path, as follows:
[root@node01 ~]$ hadoop archive -help
usage: archive <-archiveName <NAME>.har> <-p <parent path>> [-r <replication factor>] <src>* <dest>

 -archiveName <arg>   Name of the Archive. This is mandatory option
 -help                Show the usage
 -p <arg>             Parent path of sources. This is mandatory option
 -r <arg>             Replication factor archive files
[root@node01 ~]$ hadoop archive -archiveName test.har -p /test /output
21/09/02 18:29:13 INFO client.RMProxy: Connecting to ResourceManager at node03/192.168.31.157:8032
21/09/02 18:29:14 INFO mapreduce.JobSubmissionFiles: Permissions on staging directory /tmp/hadoop-yarn/staging/root/.staging are incorrect: rwxrwxrwx. Fixing permissions to correct value rwx------
21/09/02 18:29:14 INFO client.RMProxy: Connecting to ResourceManager at node03/192.168.31.157:8032
21/09/02 18:29:14 INFO client.RMProxy: Connecting to ResourceManager at node03/192.168.31.157:8032
21/09/02 18:29:15 INFO mapreduce.JobSubmitter: number of splits:1
21/09/02 18:29:15 INFO Configuration.deprecation: yarn.resourcemanager.system-metrics-publisher.enabled is deprecated. Instead, use yarn.system-metrics-publisher.enabled
21/09/02 18:29:16 INFO mapreduce.JobSubmitter: Submitting tokens for job: job_1629908848730_0002
21/09/02 18:29:16 INFO impl.YarnClientImpl: Submitted application application_1629908848730_0002
21/09/02 18:29:16 INFO mapreduce.Job: The url to track the job: http://node03:8088/proxy/application_1629908848730_0002/
21/09/02 18:29:16 INFO mapreduce.Job: Running job: job_1629908848730_0002
21/09/02 18:29:27 INFO mapreduce.Job: Job job_1629908848730_0002 running in uber mode : false
21/09/02 18:29:27 INFO mapreduce.Job:  map 0% reduce 0%
21/09/02 18:29:40 INFO mapreduce.Job:  map 100% reduce 0%
21/09/02 18:29:54 INFO mapreduce.Job:  map 100% reduce 100%
21/09/02 18:29:54 INFO mapreduce.Job: Job job_1629908848730_0002 completed successfully
21/09/02 18:29:54 INFO mapreduce.Job: Counters: 49
        File System Counters
                FILE: Number of bytes read=390
                FILE: Number of bytes written=401295
                FILE: Number of read operations=0
                FILE: Number of large read operations=0
                FILE: Number of write operations=0
                HDFS: Number of bytes read=611
                HDFS: Number of bytes written=465
                HDFS: Number of read operations=18
                HDFS: Number of large read operations=0
                HDFS: Number of write operations=11
        Job Counters
                Launched map tasks=1
                Launched reduce tasks=1
                Other local map tasks=1
                Total time spent by all maps in occupied slots (ms)=9066
                Total time spent by all reduces in occupied slots (ms)=10903
                Total time spent by all map tasks (ms)=9066
                Total time spent by all reduce tasks (ms)=10903
                Total vcore-milliseconds taken by all map tasks=9066
                Total vcore-milliseconds taken by all reduce tasks=10903
                Total megabyte-milliseconds taken by all map tasks=9283584
                Total megabyte-milliseconds taken by all reduce tasks=11164672
        Map-Reduce Framework
                Map input records=5
                Map output records=5
                Map output bytes=374
                Map output materialized bytes=390
                Input split bytes=116
                Combine input records=0
                Combine output records=0
                Reduce input groups=5
                Reduce shuffle bytes=390
                Reduce input records=5
                Reduce output records=0
                Spilled Records=10
                Shuffled Maps =1
                Failed Shuffles=0
                Merged Map outputs=1
                GC time elapsed (ms)=269
                CPU time spent (ms)=2460
                Physical memory (bytes) snapshot=340410368
                Virtual memory (bytes) snapshot=4169043968
                Total committed heap usage (bytes)=140947456
        Shuffle Errors
                BAD_ID=0
                CONNECTION=0
                IO_ERROR=0
                WRONG_LENGTH=0
                WRONG_MAP=0
                WRONG_REDUCE=0
        File Input Format Counters
                Bytes Read=407
        File Output Format Counters
                Bytes Written=0
[root@node01 ~]$ hdfs dfs -ls /output
Found 1 items
drwxr-xr-x   - root supergroup          0 2021-09-02 18:29 /output/test.har
[root@node01 ~]$ hdfs dfs -ls /output/test.har
Found 4 items
-rw-r--r--   3 root supergroup          0 2021-09-02 18:29 /output/test.har/_SUCCESS
-rw-r--r--   3 root supergroup        354 2021-09-02 18:29 /output/test.har/_index
-rw-r--r--   3 root supergroup         23 2021-09-02 18:29 /output/test.har/_masterindex
-rw-r--r--   3 root supergroup         88 2021-09-02 18:29 /output/test.har/part-0
You can see that the archive file test.har directory is generated, which contains four files:
_ SUCCESS indicates that the status is successful;
part-0 saves the merged file;
_ Index and_ Master index represents the start and end index files respectively, and records the distribution of original files in part-0 files.
(3) View Archive
As follows:
[root@node01 ~]$ hdfs dfs -ls -R /output/test.har
-rw-r--r--   3 root supergroup          0 2021-09-02 18:29 /output/test.har/_SUCCESS
-rw-r--r--   3 root supergroup        354 2021-09-02 18:29 /output/test.har/_index
-rw-r--r--   3 root supergroup         23 2021-09-02 18:29 /output/test.har/_masterindex
-rw-r--r--   3 root supergroup         88 2021-09-02 18:29 /output/test.har/part-0
[root@node01 ~]$ hdfs dfs -ls -R har:///output/test.har
-rw-r--r--   3 root supergroup         52 2021-09-02 18:14 har:///output/test.har/hadoop.txt
-rw-r--r--   3 root supergroup         12 2021-09-02 17:15 har:///output/test.har/test-2.txt
-rw-r--r--   3 root supergroup         12 2021-09-02 17:34 har:///output/test.har/test-3.txt
-rw-r--r--   3 root supergroup         12 2021-09-02 17:13 har:///output/test.har/test.txt
You can see that the HAR protocol is required to view the source file corresponding to the archive file.
(4) Solution Archive
De archiving files is equivalent to copying HAR files. As follows:
[root@node01 ~]$ hdfs dfs -cp har:///output/test.har/* /demo
[root@node01 ~]$ hdfs dfs -ls /demo
Found 4 items
-rw-r--r--   3 root supergroup         52 2021-09-02 18:37 /demo/hadoop.txt
-rw-r--r--   3 root supergroup         12 2021-09-02 18:37 /demo/test-2.txt
-rw-r--r--   3 root supergroup         12 2021-09-02 18:37 /demo/test-3.txt
-rw-r--r--   3 root supergroup         12 2021-09-02 18:37 /demo/test.txt
6. Log collection cases
(1) Demand analysis
The business structure of the company is as follows:

The business system consists of multiple servers. Each server has a log. With the extension of time, the log will gradually increase. At this time, it is necessary to scroll the log. The logs of each server will scroll to generate a large number of logs, which have a small amount of value, but will occupy a large amount of disk space. At this time, HDFS can be used for processing:
Write the rolled logs to the HDFS file system. At the same time, in order to distinguish the uploaded logs from the non uploaded logs and avoid affecting the business system, a temporary directory needs to be created, and a backup directory needs to be created to save the logs in the recent period of time, so that the server can view the latest log files without reading them from HDFS.
Therefore, the functions to be realized are as follows:
-
Scheduled collection has finished scrolling log files
-
Upload the files to be collected to the temporary directory
-
Backup log files
(2) Realization of scheduling function
Create a new project LogCollector, pom.xml as follows:
<?xml version="1.0" encoding="UTF-8"?>
<project xmlns="http://maven.apache.org/POM/4.0.0"
         xmlns:xsi="http://www.w3.org/2001/XMLSchema-instance"
         xsi:schemaLocation="http://maven.apache.org/POM/4.0.0 http://maven.apache.org/xsd/maven-4.0.0.xsd">
    <modelVersion>4.0.0</modelVersion>

    <groupId>com.bigdata.collectlog</groupId>
    <artifactId>collect_log</artifactId>
    <version>1.0-SNAPSHOT</version>

    <properties>
        <maven.compiler.source>8</maven.compiler.source>
        <maven.compiler.target>8</maven.compiler.target>
    </properties>

    <dependencies>
        <dependency>
            <groupId>junit</groupId>
            <artifactId>junit</artifactId>
            <version>4.13.2</version>
        </dependency>

        <dependency>
            <groupId>org.apache.logging.log4j</groupId>
            <artifactId>log4j-core</artifactId>
            <version>2.8.2</version>
        </dependency>

        <!-- https://mvnrepository.com/artifact/org.apache.hadoop/hadoop-common -->
        <dependency>
            <groupId>org.apache.hadoop</groupId>
            <artifactId>hadoop-common</artifactId>
            <version>2.9.2</version>
        </dependency>

        <!-- https://mvnrepository.com/artifact/org.apache.hadoop/hadoop-client -->
        <dependency>
            <groupId>org.apache.hadoop</groupId>
            <artifactId>hadoop-client</artifactId>
            <version>2.9.2</version>
        </dependency>

        <!-- https://mvnrepository.com/artifact/org.apache.hadoop/hadoop-hdfs -->
        <dependency>
            <groupId>org.apache.hadoop</groupId>
            <artifactId>hadoop-hdfs</artifactId>
            <version>2.9.2</version>
        </dependency>
        <dependency>
            <groupId>junit</groupId>
            <artifactId>junit</artifactId>
            <version>4.13.1</version>
            <scope>compile</scope>
        </dependency>

    </dependencies>

</project>
Create a new package com.bigdata.collectlog. The new classes under collectlog are as follows:
package com.bigdata.collectlog;

import java.util.Timer;

/**
 * @author Corley
 * @date 2021/9/2 19:01
 * @description LogCollector-com.bigdata.collectlog
 * Scheduled collection has finished scrolling log files
 * Upload the files to be collected to the temporary directory
 * Backup log files
 */
public class LogCollector {

    public static void main(String[] args) {

        // Background daemon thread
        Timer timer = new Timer();
        // Scheduled acquisition task scheduling
        timer.schedule(new LogCollectorTask(), 0, 3600*1000);


    }

}
Among them, the public void schedule(TimerTask task, long delay, long period) method of Timer class is used to realize the scheduling of timed collection tasks. The three parameters represent the collected task logic, delay time and cycle time respectively. TimerTask class is an abstract class and implements the Runnable interface. It needs to inherit from TimerTask class and implement the timed business logic in void run() method.
The customized LogCollectorTask class framework is as follows:
package com.bigdata.collectlog;

import java.util.TimerTask;

/**
 * @author Corley
 * @date 2021/9/2 19:07
 * @description LogCollector-com.bigdata.collectlog
 */
public class LogCollectorTask extends TimerTask {
    @Override
    public void run() {
        // Collected task logic
        // 1. Scan the specified directory to find the file to be uploaded

        // 2. Transfer the files to be uploaded to the temporary directory

        // 3. Use HDFS API to upload files to the specified directory

        // 4. Backup directory of uploaded files

    }
}
(3) Realization of collection and upload function
The improvement methods in the LogCollectorTask class are as follows:
package com.bigdata.collectlog;

import org.apache.hadoop.conf.Configuration;
import org.apache.hadoop.fs.FileSystem;
import org.apache.hadoop.fs.Path;

import java.io.File;
import java.io.FilenameFilter;
import java.io.IOException;
import java.net.URI;
import java.net.URISyntaxException;
import java.time.LocalDateTime;
import java.time.format.DateTimeFormatter;
import java.util.TimerTask;

/**
 * @author Corley
 * @date 2021/9/2 19:07
 * @description LogCollector-com.bigdata.collectlog
 */
public class LogCollectorTask extends TimerTask {
    @Override
    public void run() {
        // Collected task logic
        // 1. Scan the specified directory to find the file to be uploaded
        File logDir = new File("E:/Test/logs");
        File[] uploadFiles = logDir.listFiles(new FilenameFilter() {
            @Override
            public boolean accept(File dir, String name) {
                return name.startsWith("access.log.");
            }
        });

        // 2. Transfer the files to be uploaded to the temporary directory
        // Determine and create temporary directory
        File tmpFile = new File("E:/Test/tmp");
        if (!tmpFile.exists()) {
            tmpFile.mkdirs();
        }
        assert uploadFiles != null;
        for (File file : uploadFiles) {
            file.renameTo(new File(tmpFile.getPath() + "/" + file.getName()));
        }

        // 3. Use HDFS API to upload files to the specified directory
        Configuration configuration = new Configuration();
        FileSystem fileSystem = null;
        // format date
        DateTimeFormatter timeFormatter = DateTimeFormatter.ofPattern("yyyy-MM-dd");
        LocalDateTime dateTime = LocalDateTime.now();
        String timeString = dateTime.format(timeFormatter);
        // Determine whether the backup directory exists and create it
        File logBakDir = new File("E:/Test/log_bak/" + timeString);
        if (!logBakDir.exists()) {
            logBakDir.mkdirs();
        }
        // Determine whether the HDFS path exists and create it
        Path logPath = new Path("/collect_log/" + timeString);
        try {
            fileSystem = FileSystem.get(new URI("hdfs://node01:9000"), configuration, "root");
            if (!fileSystem.exists(logPath)) {
                fileSystem.mkdirs(logPath);
            }
            File[] files = tmpFile.listFiles();
            for (File file : files) {
                // Store by date
                fileSystem.copyFromLocalFile(new Path(file.getPath()),
                        new Path(logPath.getParent() + "/" + logPath.getName() + "/" + file.getName()));

                // 4. Backup directory of uploaded files
                file.renameTo(new File(logBakDir.getPath() + "/" + file.getName()));
            }
        } catch (IOException | URISyntaxException | InterruptedException e) {
            try {
                if (null != fileSystem) {
                    fileSystem.close();
                }
            } catch (IOException ioException) {
                ioException.printStackTrace();
            }
            e.printStackTrace();
        }

    }
}
To test, prepare log files as follows:
λ ls logs\
access.log  access.log.1  access.log.2  access.log.3  access.log.4  access.log.5  access.log.6
If necessary, click below to download:
Now test and execute the main method in the LogCollector class, as follows:
log4j:WARN No appenders could be found for logger (org.apache.hadoop.metrics2.lib.MutableMetricsFactory).
log4j:WARN Please initialize the log4j system properly.
log4j:WARN See http://logging.apache.org/log4j/1.2/faq.html#noconfig for more info.
Because the program is a scheduled task, it will be blocked;
Check the logs directory first:
λ ls logs\
access.log
As you can see, only access.log is left;
View tmp Directory:
λ ls tmp/
tmp directory is empty;
Check the log again_ Bak directory, as follows:
λ tree /f log_bak\
Folder PATH listing for volume file
Volume serial number is C0000100 10EF:7240
E:\TEST\LOG_BAK
└───2021-09-02
        access.log.1
        access.log.2
        access.log.3
        access.log.4
        access.log.5
        access.log.6
You can see that the scrolled logs are saved to the log bak directory.
Finally, check the HDFS file system as follows:
[root@node01 ~]$ hdfs dfs -ls /
Found 12 items
drwxrwxrwx   - root supergroup          0 2021-09-01 17:59 /api_test
drwxrwxrwx   - root supergroup          0 2021-08-26 19:22 /cl
drwxr-xr-x   - root supergroup          0 2021-09-02 22:01 /collect_log
drwxr-xr-x   - root supergroup          0 2021-09-02 18:37 /demo
drwxr-xr-x   - root supergroup          0 2021-09-02 18:29 /output
-rw-r--r--   1 root supergroup     281214 2021-09-02 12:43 /packet.txt
drwxr-xr-x   - root supergroup          0 2021-09-02 18:14 /test
drwxrwxrwx   - root supergroup          0 2021-08-26 00:36 /tmp
-rw-r--r--   1 root supergroup         18 2021-09-02 11:12 /tmp.txt
drwxrwxrwx   - root supergroup          0 2021-09-02 21:06 /user
drwxrwxrwx   - root supergroup          0 2021-08-25 22:33 /wcinput
drwxrwxrwx   - root supergroup          0 2021-08-26 00:37 /wcoutput
[root@node01 ~]$ hdfs dfs -ls /collect_log
Found 1 items
drwxr-xr-x   - root supergroup          0 2021-09-02 22:03 /collect_log/2021-09-02
[root@node01 ~]$ hdfs dfs -ls /collect_log/2021-09-02
Found 6 items
-rw-r--r--   3 root supergroup     179822 2021-09-02 22:03 /collect_log/2021-09-02/access.log.1
-rw-r--r--   3 root supergroup     251115 2021-09-02 22:03 /collect_log/2021-09-02/access.log.2
-rw-r--r--   3 root supergroup       6037 2021-09-02 22:03 /collect_log/2021-09-02/access.log.3
-rw-r--r--   3 root supergroup     149080 2021-09-02 22:03 /collect_log/2021-09-02/access.log.4
-rw-r--r--   3 root supergroup     314855 2021-09-02 22:03 /collect_log/2021-09-02/access.log.5
-rw-r--r--   3 root supergroup       1571 2021-09-02 22:03 /collect_log/2021-09-02/access.log.6
As you can see, the log file is uploaded to HDFS.
(4) Program tuning
There are many areas where the program can be optimized:
(1) There are many parameters in the LogCollectorTask class, such as each path, which are written directly in the code. Obviously, it is not scalable and can be extracted into the configuration file;
(2) After the task is started, multiple threads are executed each time, but the configuration file only needs to be loaded once, so you can use the singleton design pattern to obtain the Properties object
Create a new configuration file collector.properties under src/main/resources as follows:
LOG.DIR=E:/Test/logs
LOG.PREFIX=access.log.
LOG.TMP.FILE=E:/Test/tmp
HDFS.TARGET.DIR=/collect_log/
LOG.BAK.DIR=E:/Test/log_bak/
Create a new package com.bigdata.common, and a new Constant class Constant class under the common package is as follows:
package com.bigdata.common;

/**
 * @author Corley
 * @date 2021/9/2 22:16
 * @description LogCollector-com.bigdata.common
 */
public class Constant {

    public static final String LOG_DIR = "LOG.DIR";
    public static final String LOG_PREFIX = "LOG.PREFIX";
    public static final String LOG_TMP_FILE = "LOG.TMP.FILE";
    public static final String LOG_TARGET_DIR = "HDFS.TARGET.DIR";
    public static final String LOG_BAK_DIR = "LOG.BAK.DIR";

}
Create a new package com.bigdata.singleton. Create a singleton class under the singleton package. The singleton mode includes hungry man type and lazy man type.
The hungry Han style is as follows:
package com.bigdata.singleton;

import com.bigdata.collectlog.LogCollectorTask;

import java.io.IOException;
import java.util.Properties;

/**
 * @author Corley
 * @date 2021/9/3 10:34
 * @description LogCollector-com.bigdata.singleton
 * Hungry Han single case mode
 */
public class HungryPropertiesTool {

    private static Properties properties = null;

    // Class can be initialized and executed once when loading
    static {
        properties = new Properties();
        try {
            properties.load(LogCollectorTask.class.getClassLoader().getResourceAsStream("collector.properties"));
        } catch (IOException e) {
            e.printStackTrace();
        }
    }

    private static Properties getProperties() {
        return properties;
    }
}
The lazy form is as follows:
package com.bigdata.singleton;

import com.bigdata.collectlog.LogCollectorTask;

import java.io.IOException;
import java.util.Properties;

/**
 * @author Corley
 * @date 2021/9/3 10:46
 * @description LogCollector-com.bigdata.singleton
 * Lazy singleton mode
 */
public class LazyPropertiesTool {

    private static volatile Properties properties = null;

    public static Properties getProperties() throws IOException {
        if (null == properties) {
            synchronized ("Lock") {
                if (null == properties) {
                    properties = new Properties();
                    properties.load(LogCollectorTask.class.getClassLoader().getResourceAsStream("collector.properties"));
                }
            }
        }

        return properties;
    }
}
Among them, volatile keyword is a keyword that prohibits instruction reordering in Java. Instruction reordering will occur in multithreading. Volatile keyword can ensure order and visibility.
The log collection task classes are as follows:
package com.bigdata.collectlog;

import com.bigdata.common.Constant;
import com.bigdata.singleton.LazyPropertiesTool;
import org.apache.hadoop.conf.Configuration;
import org.apache.hadoop.fs.FileSystem;
import org.apache.hadoop.fs.Path;

import java.io.File;
import java.io.FilenameFilter;
import java.io.IOException;
import java.net.URI;
import java.net.URISyntaxException;
import java.time.LocalDateTime;
import java.time.format.DateTimeFormatter;
import java.util.Properties;
import java.util.TimerTask;

/**
 * @author Corley
 * @date 2021/9/2 19:07
 * @description LogCollector-com.bigdata.collectlog
 */
public class LogCollectorTask extends TimerTask {
    @Override
    public void run() {

        // Properties properties = new Properties();
        // try {
        //     properties.load(LogCollectorTask.class.getClassLoader().getResourceAsStream("collector.properties"));
        // } catch (IOException e) {
        //     e.printStackTrace();
        // }

        Properties properties = null;
        try {
            properties = LazyPropertiesTool.getProperties();
        } catch (IOException e) {
            e.printStackTrace();
        }

        // Collected task logic
        // 1. Scan the specified directory to find the file to be uploaded
        File logDir = new File(properties.getProperty(Constant.LOG_DIR));
        Properties finalProperties = properties;
        File[] uploadFiles = logDir.listFiles(new FilenameFilter() {
            @Override
            public boolean accept(File dir, String name) {
                return name.startsWith(finalProperties.getProperty(Constant.LOG_PREFIX));
            }
        });

        // 2. Transfer the files to be uploaded to the temporary directory
        // Determine and create temporary directory
        File tmpFile = new File(properties.getProperty(Constant.LOG_TMP_FILE));
        if (!tmpFile.exists()) {
            tmpFile.mkdirs();
        }
        assert uploadFiles != null;
        for (File file : uploadFiles) {
            file.renameTo(new File(tmpFile.getPath() + "/" + file.getName()));
        }

        // 3. Use HDFS API to upload files to the specified directory
        Configuration configuration = new Configuration();
        FileSystem fileSystem = null;
        // format date
        DateTimeFormatter timeFormatter = DateTimeFormatter.ofPattern("yyyy-MM-dd");
        LocalDateTime dateTime = LocalDateTime.now();
        String timeString = dateTime.format(timeFormatter);
        // Determine whether the backup directory exists and create it
        File logBakDir = new File(properties.getProperty(Constant.LOG_BAK_DIR) + timeString);
        if (!logBakDir.exists()) {
            logBakDir.mkdirs();
        }
        // Determine whether the HDFS path exists and create it
        Path logPath = new Path(properties.getProperty(Constant.LOG_TARGET_DIR) + timeString);
        try {
            fileSystem = FileSystem.get(new URI("hdfs://node01:9000"), configuration, "root");
            if (!fileSystem.exists(logPath)) {
                fileSystem.mkdirs(logPath);
            }
            File[] files = tmpFile.listFiles();
            for (File file : files) {
                // Store by date
                fileSystem.copyFromLocalFile(new Path(file.getPath()),
                        new Path(logPath.getParent() + "/" + logPath.getName() + "/" + file.getName()));

                // 4. Backup directory of uploaded files
                file.renameTo(new File(logBakDir.getPath() + "/" + file.getName()));
            }
        } catch (IOException | URISyntaxException | InterruptedException e) {
            try {
                if (null != fileSystem) {
                    fileSystem.close();
                }
            } catch (IOException ioException) {
                ioException.printStackTrace();
            }
            e.printStackTrace();
        }

    }
}
After running, the same effect as before can be achieved, but the performance is optimized.