 // Clear request

void clear();


// Pause request

void pause();
}
The request class has been designed, so in Request of begin Start getting pictures when you're ready;


After the picture request is completed, or the loading fails, the booth map needs to be loaded. Therefore, a class needs to be designed to set the picture control;


So Xiao Ming designed one ImageViewTarget,For setting picture control, please see the pseudo code below;
public class ImageViewTarget {
public void onLoadStarted(@Nullable Drawable placeholder) {

    // Start loading and set the picture booth map

}


public void onLoadFailed(@Nullable Drawable errorDrawable) {

    // Failed to load, failed to set the picture booth map

}


public void onResourceReady(@NonNull Drawable resource) {

    // Loading succeeded, set picture

}
}
Then simply combine this into a small "framework" with the function of obtaining pictures for loading; Of course, I have omitted some code here. You only need to know the general loading process without going into details; 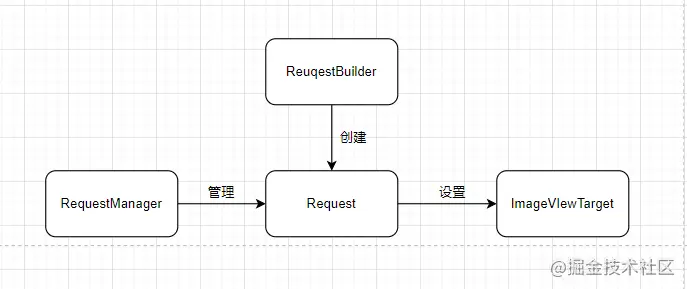 (1)adopt RequestBuilder Build request Request; (2)adopt RequestManager Administration Request; (3)Request Request success or failure callback ImageViewTarget Set to picture control; Very simple, three steps to achieve a small picture "framework"; []( )3,Implementation of the third version ---------------------------------------------------------------------- The first step we have simply implemented is to load the picture and set it to the control through the network request; But it is very unreasonable to get pictures from the network every time; Because every time you get it from the network, it will not only lead to a waste of network resources, but also affect the loading speed. In case of bad network, it is easy to load it for a long time; Then we will further transform the above framework; How to transform it? Very simple, the introduction of caching mechanism; as everyone knows, Android There are several cache mechanisms, one is network disk cache, one is disk cache, and the other is memory cache; Then we can design a picture loading mechanism with three-level cache according to these three situations; 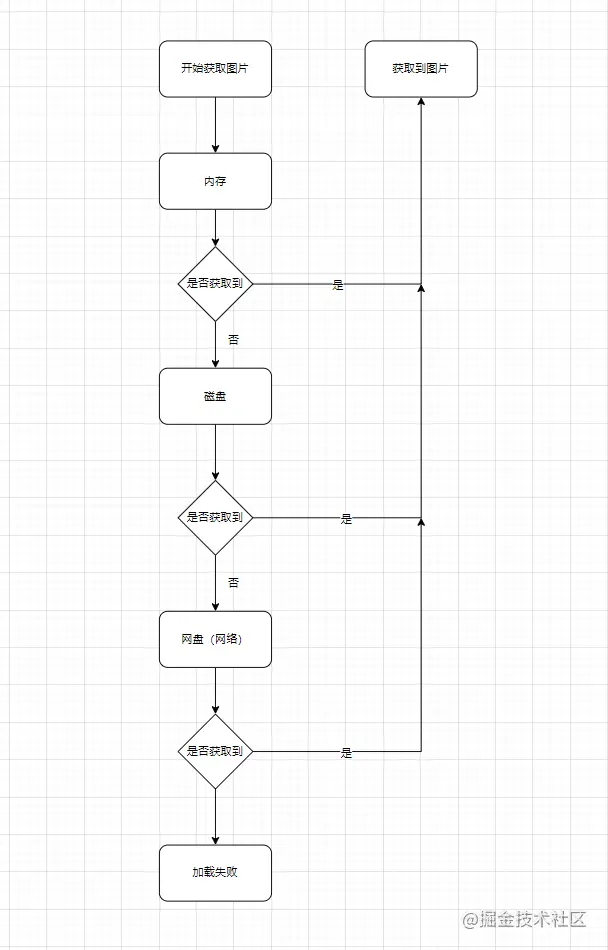 A simple caching mechanism is designed, and then the code is implemented; To load the image caching mechanism, we can first design an engine class Engine,A three-level cache used to load pictures; After the design, it will look like this:
public class Engine {
public void load() {

    // Load pictures from L3 cache


}


private Bitmap loadFromMemory() {

    // Get pictures from cache

    return null;

}


private Bitmap loadFromCache() {

    // Get pictures from disk

    return null;

}


private Bitmap loadFromNetWork() {

    // Get pictures from the Internet

    return null;

}
}
#### [] () 3.1. Design of memory cache


The first is memory cache. The design of memory cache is very important because it involves the recycling of pictures;


If the recovery is early, the memory cache will not play a practical role. If the recovery is slow, it will occupy memory and waste memory space;


So how to design the image caching algorithm?


There is a famous algorithm, the least recently used algorithm, which is very suitable for memory cache recycling;


What is the least recently used algorithm? Of course, the word is as its name;


That is, data that has not been used for a long time is unlikely to be used in the future. Therefore, when the memory occupied by data reaches a certain threshold, the least recently used data should be removed.


The specific algorithm logic can be seen as follows:[What is? LRU(Least recently used) algorithm?]( )


Then we can use this algorithm to design image cache;
public class LruResourceCache<T, Y> {
private final Map<T, Y> cache = new LinkedHashMap<>(100, 0.75f, true);


public synchronized Y put(@NonNull T key, @Nullable Y item) {

    // Cache picture

    return null;

}


public synchronized Y get(@NonNull T key) {

    // Get picture

    return null;

}


public void clearMemory() {

    // Clear all caches

    trimToSize(0);

}


protected synchronized void trimToSize(long size) {

    // Reclaim the memory to the specified size and remove the least recently used memory to the specified size

}
}
Several methods are designed here, including the operation of saving and fetching, as well as the operation of clearing the cache and reclaiming the picture memory;


At this time, do you have any questions about how I access the pictures key What about that?


Very simple, with pictures url,Because every picture url All are different, so you can take this as the only one key;


Then this simple memory cache is designed;


Next, let's take a look at how to design disk cache;


#### [] () 3.2. Design of disk cache


In fact, the design of disk cache is not so complex. It is nothing more than storing picture files in the mobile phone memory card and reading from the memory card;


Different from the memory, the speed of reading and writing from the disk is slow. The advantage is that the disk can store more and larger picture files than the memory;


Because compared with memory, the capacity of memory card is much higher than the size of memory;


And memory meaning, we design a read and a write operation; Read: be responsible for reading picture files from disk; write: be responsible for writing picture files to disk
public class DiskLruCache {
public synchronized <T> T get(String key){

    // Get disk data

    return null;

}


public synchronized <T> void put(String key, T value){

    // Store picture data to disk

}
}
#### [] () 3.3. Design of network cache


The design of network cache is very simple, that is, directly access and obtain image files;
public class NetWorkLruCache {
public synchronized <T> T request(String url){

    // Get network data

    return null;

}
}
So here, a simple caching mechanism is designed; #### [] (3.4) summary Then a simple picture framework is implemented. Compared with the previous framework, there is more caching mechanism, which greatly improves the utilization of pictures; 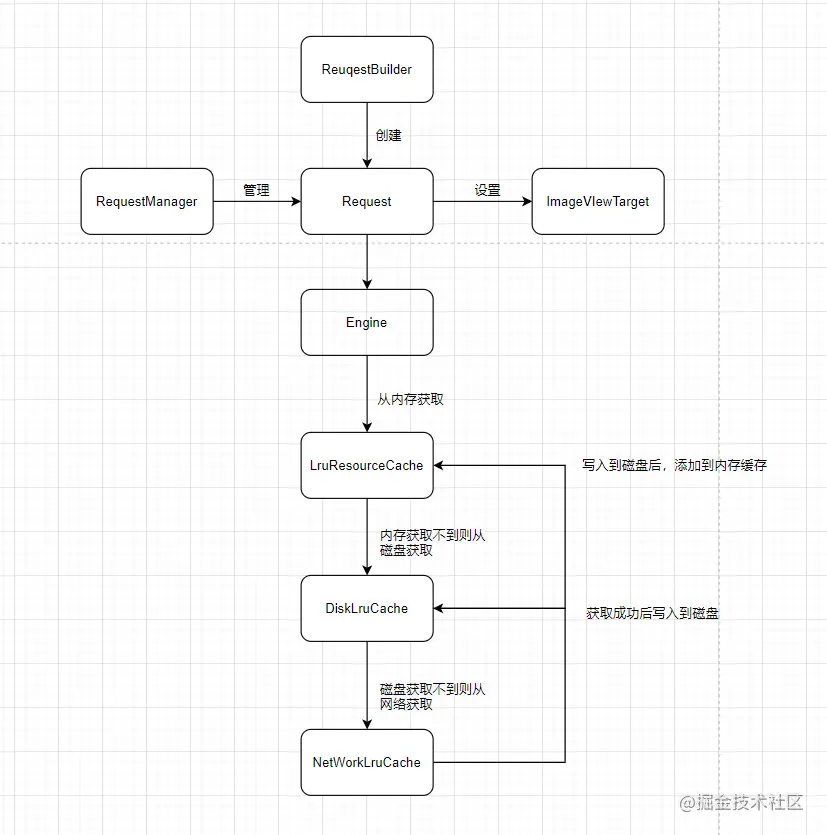 If I tell you, Congratulations, you have successfully mastered it Glide For the implementation of the source code, I think I may be flattened by a slap; But what I want to tell you is that the above principle is one Glide Simplified source code, understand the logic above, basically Glide You will understand the basic process of the source code; The rest is basically more detailed implementation; In fact, the implementation of a picture framework is basically inseparable from these steps. The more detailed implementation is nothing more than expansion and encapsulation based on these steps; Understand the basic principles, and then in-depth study of the source code will be meaningful; []( )4,Glide Version implementation ------------------------------------------------------------------------- We implemented a simple picture framework through extraction above. Although we have all the functions, we always feel that something is missing! What's missing? Lack of more details, such as the encapsulation of design patterns, how to decouple and better reuse! There is also performance optimization. Although the above framework introduces caching mechanism, there are still more performance optimization points to be mined; Now I'll talk about it according to the simple picture frame above Glide The details of the implementation of the framework, compared with our framework, what are the further optimization points; ### []( )4.1,RequestManager We are implementing it above RequestManager When I was, I mentioned RequestManager Implementation ideas, manually in Activity perhaps Fragment Callback inside; and Glide The implementation is more ingenious by creating an invisible Fragment To realize the callback of life cycle; Glide In call Glide.with(this)Method will return a created RequestManager,Creating RequestManager An invisible is created Fragment,And set it to RequestManager,Let it have life-cycle monitoring; establish Fragment The implementation logic is RequestManagerRetriever of ragmentGet In this method; Take a look at the general implementation;
private RequestManager fragmentGet(
@NonNull Context context,

@NonNull android.app.FragmentManager fm,

@Nullable android.app.Fragment parentHint,

boolean isParentVisible) {

// Create an invisible RequestManagerFragment through the passed in fragment manager
RequestManagerFragment current = getRequestManagerFragment(fm, parentHint);
//Get RequestManager through RequestManagerFragment
RequestManager requestManager = current.getRequestManager();
if (requestManager == null) {
Glide glide = Glide.get(context);

// If the RequestManager is empty, the RequestManger is created through the abstract factory

requestManager =

    factory.build(

        glide, current.getGlideLifecycle(), current.getRequestManagerTreeNode(), context);

// Judge whether the current page is visible. If yes, call back the start method;

if (isParentVisible) {

  requestManager.onStart();

}

// Set RequestManager to fragment

current.setRequestManager(requestManager);
}
return requestManager;
}
The implementation is not very complex, so we do two things to create an invisible RequestManagerFragment,establish RequestManager,And will RequestManger Set to RequestManagerFragment,and RequestManagerFragment The callback of the life cycle will be called back to RequestManager Li;


So let RequestManager With life cycle monitoring;


there Lifecycle no Jectpack of Lifecycle Component, but a listener defined by itself, which is used to callback the life cycle;


What optimization details are worth discussing here?


The detail is RequestManagerFragment Creation of;


RequestManagerFragment The creation of is not always recreated every time it is acquired;


There are three steps in logic. Please see the source code below
private RequestManagerFragment getRequestManagerFragment(
@NonNull final android.app.FragmentManager fm, @Nullable android.app.Fragment parentHint) {

// First, get the corresponding fragment through the fragment manager
RequestManagerFragment current = (RequestManagerFragment) fm.findFragmentByTag(FRAGMENT_TAG);
//If the acquisition is empty, it is obtained from a HashMap collection;
if (current == null) {
current = pendingRequestManagerFragments.get(fm);

// If it is empty from the collection, create a new Fragment and add it to the page, then put it into the HashMap, and send a message to remove the Fragment from the HashMap;

if (current == null) {

  current = new RequestManagerFragment();

  current.setParentFragmentHint(parentHint);

  ...

  fm.beginTransaction().add(current, FRAGMENT_TAG).commitAllowingStateLoss();

  ...

}
}
return current;
}
There are two steps: Step 1: Pass FragmentManager To find Fragment,If obtained, return; Step 2: the first step is not obtained Fragment,Then create a new one Fragment,Add it to the page; stay RequestManagerFragment In the life cycle approach, through lifecycle Callback, and RequestManger After registering this listener, you can obtain the life cycle; 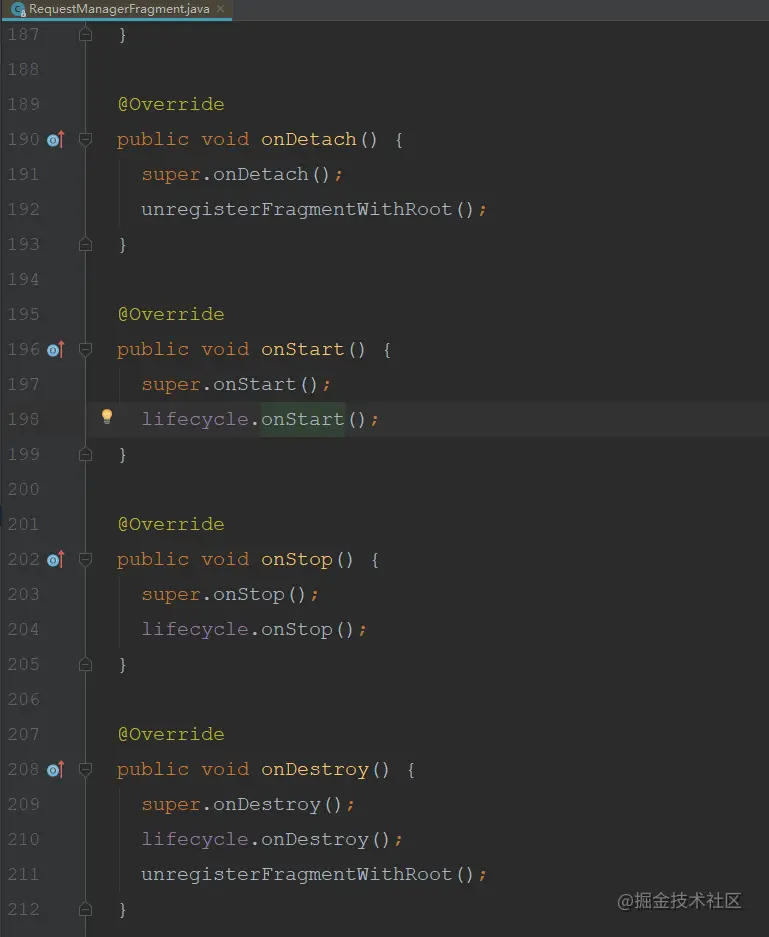 Finally in RequestManger In the life cycle of, the operation of loading and stopping pictures is started; 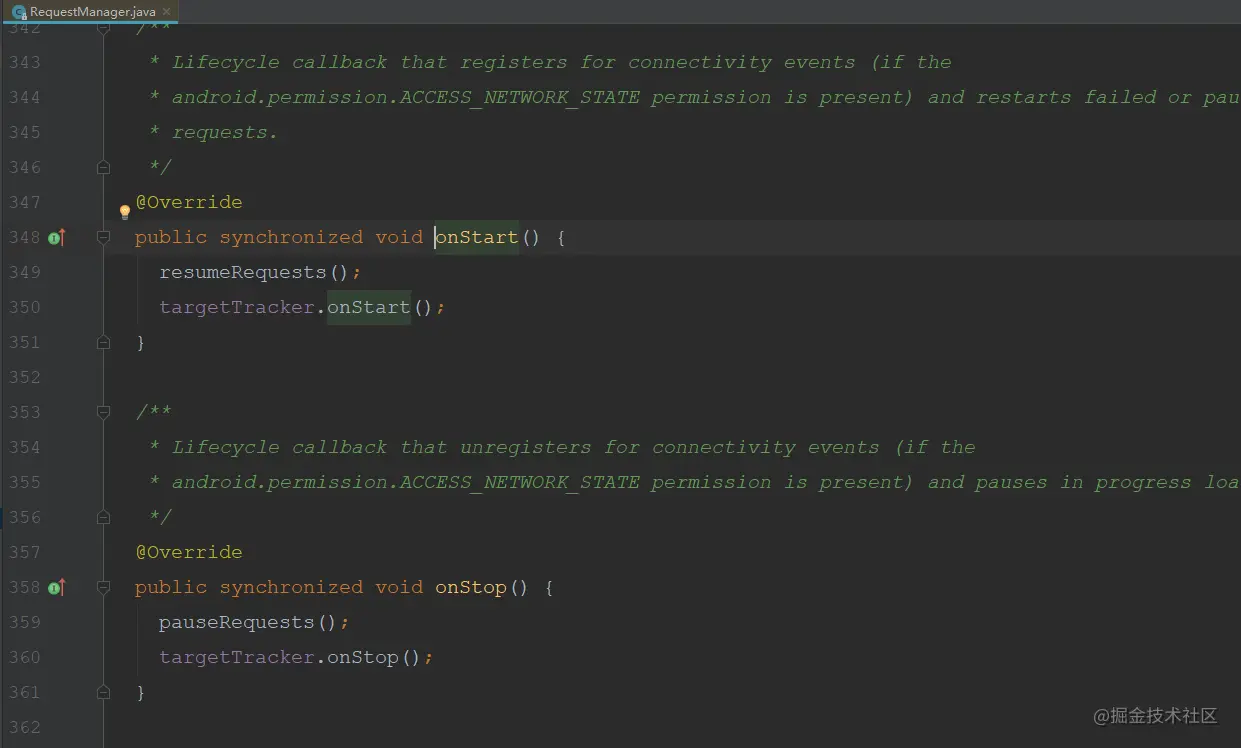 ### []( )4.2,RequestBuilder RequestBuilder The responsibility of is very clear, which is used to create requests to obtain pictures; This class uses the builder pattern to build parameters. One advantage is that it can easily add a variety of complex parameters; this RequestBuilder No, build Methods, but there are into In fact, the method and principle are the same. It is not said that it must be written build; Finally, the logic of loading pictures is into Method;
private <Y extends Target> Y into(
@NonNull Y target,

@Nullable RequestListener<TranscodeType> targetListener,

BaseRequestOptions<?> options,

Executor callbackExecutor) {
...
//Create picture request
Request request = buildRequest(target, targetListener, options, callbackExecutor);
//Gets whether the current picture control has been requested to set the picture. If so, and the loading has not been completed,
//Or if the loading is completed but the loading fails, call begin again for the request and make the request again;
Request previous = target.getRequest();
if (request.isEquivalentTo(previous)
&& !isSkipMemoryCacheWithCompletePreviousRequest(options, previous)) {
...
if (!Preconditions.checkNotNull(previous).isRunning()) {

  ...

  previous.begin();

}

return target;
}
//Clear the picture request for the current picture control
requestManager.clear(target);
//Set request to control
target.setRequest(request);
//Then add the request to the request manager
requestManager.track(target, request);
return target;
}
**Here are two details:**


**First detail:**


Before starting the request, the previous request will be obtained. If the previous request has not been loaded, or the loading is completed but the loading fails, the request will be retried again;


**Second detail:**


Set the request to the that encapsulates the picture control target,What are the benefits of doing so?


Most of our pages are list pages, so we will basically use them RecycleView This list control is used to load data, and when this list loads pictures, it will have the problem of loading disorder when sliding quickly. The reason is RecycleView of Item Reuse problem;


and Glide It is here to avoid such problems through such operations;


In call setRequest The current Request As tag Set to View,So in getting Request When loading, there will be no confusion;
private void setTag(@Nullable Object tag) {
...
view.setTag(tagId, tag);
}
### []( )4.3,Engine


From the above we know that all requests are Request of begin Started in, and its implementation is in SingleRequest of begin Inside, eventually SingleRequest of onSizeReady Inside, through Engine of load To load picture data;


this load The method is mainly divided into two steps:


Step 1: load data from memory


Step 2: load data from disk or network
public LoadStatus load(...) {
...
synchronized (this) {
//First step
memoryResource = loadFromMemory(key, isMemoryCacheable, startTime);
//Step 2
if (memoryResource == null) {

  return waitForExistingOrStartNewJob(

      glideContext,

      model,

      signature,

      width,

      height,

      resourceClass,

      transcodeClass,

      priority,

      diskCacheStrategy,

      transformations,

      isTransformationRequired,

      isScaleOnlyOrNoTransform,

      options,

      isMemoryCacheable,

      useUnlimitedSourceExecutorPool,

      useAnimationPool,

      onlyRetrieveFromCache,

      cb,

      callbackExecutor,

      key,

      startTime);

}
}
...
return null;
}
For a brief review, I designed one above LruResourceCache Class to do memory cache, which uses LRU Algorithm;


Compared with the logic we designed above to load data from memory, Glide Where are the details here?
private EngineResource<?> loadFromMemory(
EngineKey key, boolean isMemoryCacheable, long startTime) {
...
//Get image resources from weak references
EngineResource<?> active = loadFromActiveResources(key);
if (active != null) {
...

return active;
}
//Get picture resources from LRU cache
EngineResource<?> cached = loadFromCache(key);
if (cached != null) {
...

return cached;
}
return null;
}
**First, the first detail:**


Glide A weak reference cache is designed. When loading from memory, the image resources will be obtained from the weak reference first;


Why design an extra layer of weak reference cache?


Let's talk about the mechanism of weak reference in memory. Weak reference objects are in memory Java Virtual machine trigger GC The weakly referenced object will be recycled, regardless of whether the memory is sufficient at this time!


So the advantage of designing a weak reference cache is that there is no trigger GC During this period of time, image resources can be reused to reduce LruCache Operation in the;


Take a look at the final call of the source code:
synchronized EngineResource<?> get(Key key) {
//A weak reference object was obtained according to the Key
ResourceWeakReference activeRef = activeEngineResources.get(key);
if (activeRef == null) {
return null;
}
EngineResource<?> active = activeRef.get();
...
return active;
}
**Second detail:**


from LruCache After obtaining the picture resources in, and storing them in the weak reference cache;
private EngineResource<?> loadFromCache(Key key) {
//
EngineResource<?> cached = getEngineResourceFromCache(key);
if (cached != null) {
cached.acquire();

activeResources.activate(key, cached);
}
return cached;
}
Another operation is that after the picture is loaded, the picture resources will be stored in the weak reference cache for subsequent reuse;


Its source code location is called here: Engine of onEngineJobComplete;


This method is called in the callback of image loading, that is EngineJob of onResourceReady
public synchronized void onEngineJobComplete(
EngineJob<?> engineJob, Key key, EngineResource<?> resource) {
...
if (resource != null && resource.isMemoryCacheable()) {
//Store in weak reference cache
activeResources.activate(key, resource);
}
...
}
In fact, these two details are introduced by the weak reference cache. It is precisely because of the addition of a weak reference cache that the picture loading performance can be squeezed to the extreme;


Some people will say, what's the use of adding this? Not much faster.


As the saying goes: the performance is squeezed step by step. Optimize a little where it can be optimized, and gradually accumulate, it will become a river!


If the above picture resources cannot be obtained, then the data will be loaded from the disk or network;


### []( )4.4,DecodeJob


Reading from disk or network must be a time-consuming task, so it must be executed in the sub thread, and Glide This is how it is achieved in the;


Let's look at the general source code:


Eventually, a file called DecodeJob Asynchronous tasks, take a look at this DecordJob of run What does the method do?
public void run() {
...
runWrapped();
...
}
run There is one main method runWrapped Method, which is the place of final execution;


In this com.bumptech.glide.load.engine.DecodeJob#In the getNextGenerator method, the memory producer Generator will be obtained, and these content producers correspond to different cached data respectively;
private DataFetcherGenerator getNextGenerator() {
switch (stage) {
case RESOURCE_CACHE:

  return new ResourceCacheGenerator(decodeHelper, this);

case DATA_CACHE:

  return new DataCacheGenerator(decodeHelper, this);

case SOURCE:

  return new SourceGenerator(decodeHelper, this);

case FINISHED:

  return null;

...
}
}
### []( )4.5,DataCacheGenerator


ResourceCacheGenerator: Corresponding to the transformed picture resource producer;


DataCacheGenerator: Corresponding to the original image resource producer without transformation;


SourceGenerator: Corresponding to the content producer of network resources;


Here we only care about the data obtained from the disk, so it corresponds to this ResourceCacheGenerator And this DataCacheGenerator Producers of;


The implementation of these two methods is almost the same, both by obtaining one File Object, and then according to File Object to load the corresponding picture data;


As we can see from above, Glide The disk cache is from DiskLruCache From inside;


Let's take a look at this DataCacheGenerator of startNext method;
public boolean startNext() {
while (modelLoaders == null || !hasNextModelLoader()) {
sourceIdIndex++;

...

Key originalKey = new DataCacheKey(sourceId, helper.getSignature());

// Obtain the File object from DiskLruCache through the generated key

cacheFile = helper.getDiskCache().get(originalKey);

if (cacheFile != null) {

  this.sourceKey = sourceId;

  modelLoaders = helper.getModelLoaders(cacheFile);

  modelLoaderIndex = 0;

}
}
...
while (!started && hasNextModelLoader()) {
ModelLoader<File, ?> modelLoader = modelLoaders.get(modelLoaderIndex++);

loadData =

    modelLoader.buildLoadData(

        cacheFile, helper.getWidth(), helper.getHeight(), helper.getOptions());

if (loadData != null && helper.hasLoadPath(loadData.fetcher.getDataClass())) {

  started = true;

  loadData.fetcher.loadData(helper.getPriority(), this);

}
}
return started;
}
There are two main steps: The first step is through generation key from DiskLruCache Get inside File Object; The second step is to File Object, by LoadData take File Object to Bitmap Object; **Step 1: get File object** Glide Loading DiskLruCache When called, the path information corresponding to all pictures will be loaded into memory DiskLruCache of get Method is actually from DiskLruCache One maintained inside Lru Directly obtained from the memory cache; So the first step is get The method is actually from LruCache Get from memory cache File Of the object; The processing logic is DiskLruCache of open Method, which will trigger an operation to read local files, that is DiskLruCache of readJournal method; Finally readJournalLine method; 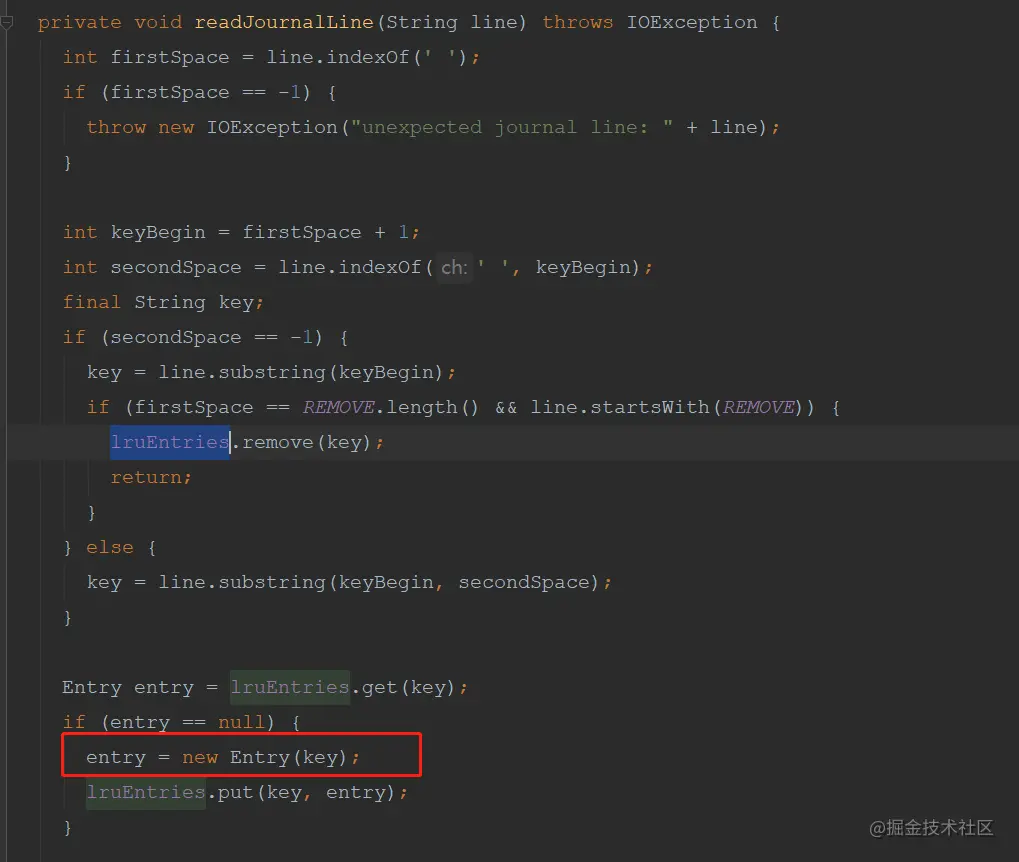 This file mainly stores the image resources key,A file used to obtain the local picture path; In the end DiskLruCache of readJournalLine Method, a Entry Object, in Entry Object is created in the constructor File Object;
private Entry(String key) {
...
for (int i = 0; i < valueCount; i++) {
  // Create a picture File object

  cleanFiles[i] = new File(directory, fileBuilder.toString());

  fileBuilder.append(".tmp");

  dirtyFiles[i] = new File(directory, fileBuilder.toString());

  ...
}
}
Will you have any questions here if I'm here DiskLruCache What about the pictures downloaded after initialization? At this time DiskLruCache of Lru There must be no data in the memory. Where did the data come from?


I'm sure you've guessed that even the picture files will be added when they are saved locally DiskLruCache of Lru In memory;


Its implementation is in DiskLruCache of edit()method;
private synchronized Editor edit(String key, long expectedSequenceNumber) throws IOException {
...
Entry entry = lruEntries.get(key);
...
if (entry == null) {
entry = new Entry(key);

lruEntries.put(key, entry);
}
...
Editor editor = new Editor(entry);
entry.currentEditor = editor;
...
return editor;
}
Here, the generated Entry Object is added to memory and then passed through Editor Write the picture file locally through IO Operation, which will not be repeated here;


There's a way to save it. Let's have a look DiskLruCache of get Method;
public synchronized Value get(String key) throws IOException {
...
//Get the Entry object directly from memory;
Entry entry = lruEntries.get(key);
...
return new Value(key, entry.sequenceNumber, entry.cleanFiles, entry.lengths);
}
 **Step 2: File Object transformation** When based key Get File Object, the next step is to File Convert file to bitmap Data; The design of this code is very interesting. Let's see how it is implemented! DataCacheGenerator of startNext method:
public boolean startNext() {
while (modelLoaders == null || !hasNextModelLoader()) {
  ...

  modelLoaders = helper.getModelLoaders(cacheFile);

  ...
}
while (!started && hasNextModelLoader()) {
//Traverse to get ModelLoader
ModelLoader<File, ?> modelLoader = modelLoaders.get(modelLoaderIndex++);
//Get LoadData
loadData =
  modelLoader.buildLoadData(

      cacheFile, helper.getWidth(), helper.getHeight(), helper.getOptions());
if (loadData != null && helper.hasLoadPath(loadData.fetcher.getDataClass())) {
//Load data
started = true;

loadData.fetcher.loadData(helper.getPriority(), this);
}
}
return started;
}
### []( )4.6,ModelLoader Here through the design ModelLoader Class to load data logic; This code is implemented based on the interface and does not depend on the specific implementation. The advantage is that it is very decoupled and flexible. The disadvantage is that the code reading ability is reduced, because it is very difficult for you to find out which implementation class is here for a while and a half! this ModelLoader What exactly does the class do? We can look at the notes first;  The factory interface that converts any complex data model into a specific data type; How do you understand this sentence? It can be understood as the adapter mode, which converts one type of data into another type of data;
public interface ModelLoader<Model, Data> {
epilogue
Due to space constraints, the detailed information of the document is too comprehensive and there are too many details, so only the screenshots of some knowledge points are roughly introduced. There are more detailed contents in each small node! The following is a screenshot of the directory:

As the whole document is relatively comprehensive and has a lot of content, the length is not allowed. It is shown in the form of screenshots below.
Another part of Android Architecture Interview Video explanation is attached:
olean startNext() {
while (modelLoaders == null || !hasNextModelLoader()) {
  ...

  modelLoaders = helper.getModelLoaders(cacheFile);

  ...
}
while (!started && hasNextModelLoader()) {
//Traverse to get ModelLoader
ModelLoader<File, ?> modelLoader = modelLoaders.get(modelLoaderIndex++);
//Get LoadData
loadData =
  modelLoader.buildLoadData(

      cacheFile, helper.getWidth(), helper.getHeight(), helper.getOptions());
if (loadData != null && helper.hasLoadPath(loadData.fetcher.getDataClass())) {
//Load data
started = true;

loadData.fetcher.loadData(helper.getPriority(), this);
}
}
return started;
}
### []( )4.6,ModelLoader Here through the design ModelLoader Class to load data logic; This code is implemented based on the interface and does not depend on the specific implementation. The advantage is that it is very decoupled and flexible. The disadvantage is that the code reading ability is reduced, because it is very difficult for you to find out which implementation class is here for a while and a half! this ModelLoader What exactly does the class do? We can look at the notes first;  The factory interface that converts any complex data model into a specific data type; How do you understand this sentence? It can be understood as the adapter mode, which converts one type of data into another type of data;
public interface ModelLoader<Model, Data> {
epilogue
Due to space constraints, the detailed information of the document is too comprehensive and there are too many details, so only the screenshots of some knowledge points are roughly introduced. There are more detailed contents in each small node! The following is a screenshot of the directory:
[external chain picture transferring... (img-MxTLVY98-1630930020261)]
As the whole document is relatively comprehensive and has a lot of content, the length is not allowed. It is shown in the form of screenshots below.
Another part of Android Architecture Interview Video explanation is attached:
[external chain picture transferring... (img-xdSw0Qvl-1630930020265)]