1. Usage of QT
pyqt5 is the python version of qt. It mainly exists in the form of objects. It cannot be visualized in the process of programming, which brings a lot of inconvenience. To simplify pyqt5's interface design, we can use qt Designer (C: \ qt \ 5.12.11 \ mingw73)_ 32 \ bin \ designer. Exe). The generated graphical interface is usually saved in the file with *. ui suffix.
pyqt5 can directly call the. ui file, or convert the designed. ui file into pyqt5 class in. py format through pyuic.exe provided with pyqt5 for other modules to call.
there are many QT installation tutorials on the CSDN forum, which will not be repeated here. It is recommended to use Qt5. At present, the higher version of Qt6 has not been included in the back-end support by matplotlib.
2. Pychart setting
first of all, Amway Yibo has high convenience in code color theme, function interface, python environment switching, terminal opening, Jupiter notebook support, variable viewing, Markdown support, console multi opening, etc. Therefore, I mainly use pychrm for relevant code development and recommend it.
2.1 installing Pyqt5 and pyinstaller packages
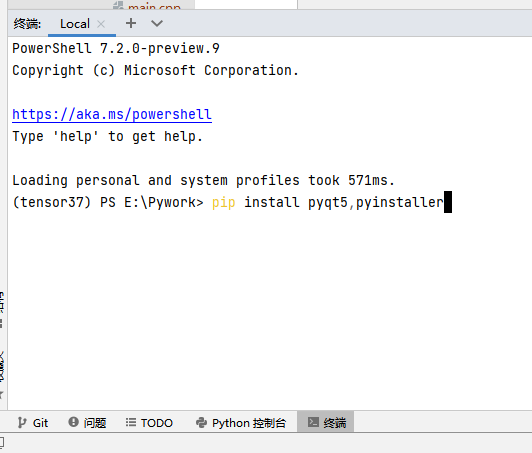
open the terminal at the bottom of pycharm and enter the following code to install pyqt5 package and pyinstaller package. Pyuninstaller package is a tool used to package pyqt5GUI design into exe executable file. With this tool, you can copy the program to other windows computers.
pip install pyqt5,pyinstaller
the matplotlib package needs to be installed in a similar way. I won't repeat it. After installing pyqt5, matplotlib will automatically use pyqt5 as the back end. The drawn image effect is better and the toolbar is more practical. It is recommended for daily use.
2.2 pychar pyqt tool configuration
when using Qt for interface design, you can configure several tools of Qt software as external tools in pycharm (this is one of pycharm's many advantages), which is convenient to call at any time. Pycharm and click file - Settings - tools - external tools (self reference in English version) to enter the external tool addition interface.
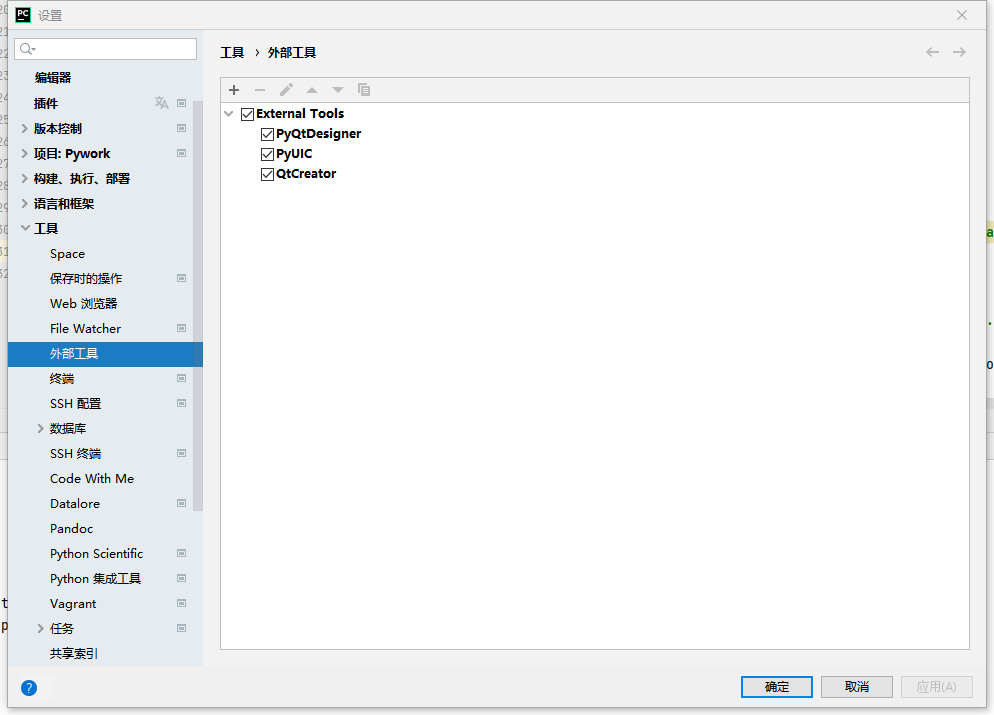
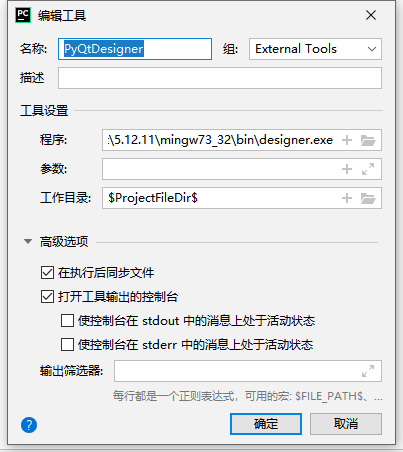
- Qt Designer tool (design Qt interface)
Program path:
C:\Qt\5.12.11\mingw73_32\bin\designer.exe
Working directory:
$ProjectFileDir$
- Qt Creator tool (design Qt interface)
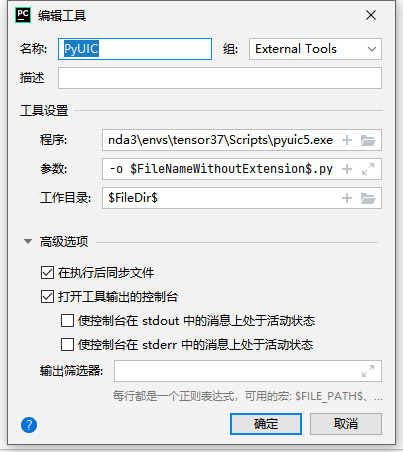
the program path is in the Script directory of the corresponding environment:
C:\Anaconda3\envs\tensor37\Scripts\pyuic5.exe
parameter settings are as follows:
$FileName$ -o $FileNameWithoutExtension$.py
working directory:
$ProjectFileDir$
- PyUI tool (convert Qt UI interface to python code)
program path:
C:\Qt\Tools\QtCreator\bin\qtcreator.exe
working directory:
$ProjectFileDir$
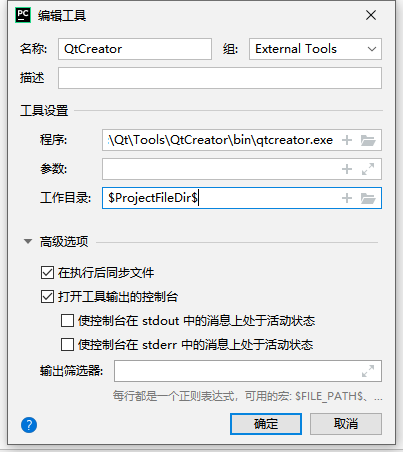
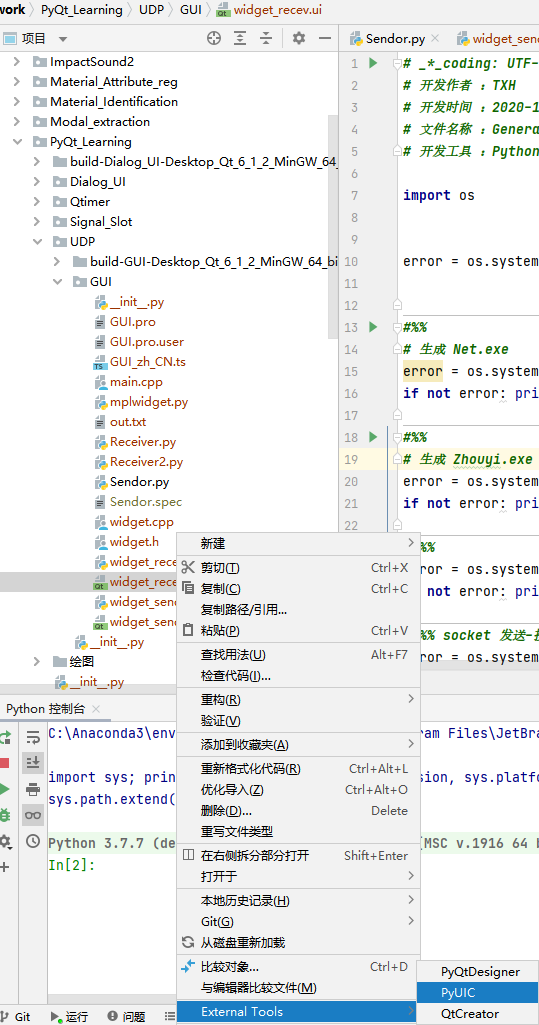
after completing the above settings, you can open designer.exe and creator.exe GUI design applications in the right-click menu. Select the. ui file and right-click pyuic.exe to generate a. py file with the same name, which contains pyqt5 classes that can generate the same GUI.
3 UDP graphical interface design
3.1 GUI design
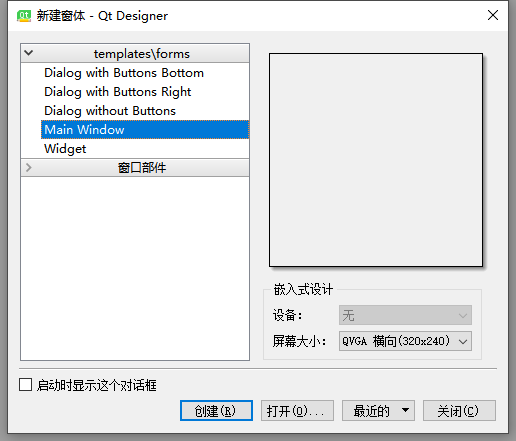
right click in the blank space of pycharm, select external tools, open designer, and create a new Main Window.
as needed, I designed a UDP network programming interface. The main function is to receive sinusoidal data sent by UDP client, save the data to txt file and draw it in the widget (form part) at the bottom.
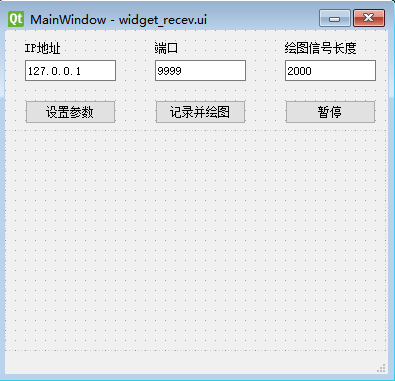
the target operation interface is as follows:
3.2 converting GUI files to py files
after designing the interface, save the widget_recev.ui graphic file. In the Project Explorer on the left, you can select the UI file and right-click to use external pyuic tools to convert it into widgets_ Recev.py file for program call. This operation is often used in subsequent debugging. Change the GUI at any time and generate new py files at any time. The new py file will overwrite the original content, so it is recommended to build another python module to call the module to avoid information loss.
3.3 widget form promotion and integration of matplotlib functions
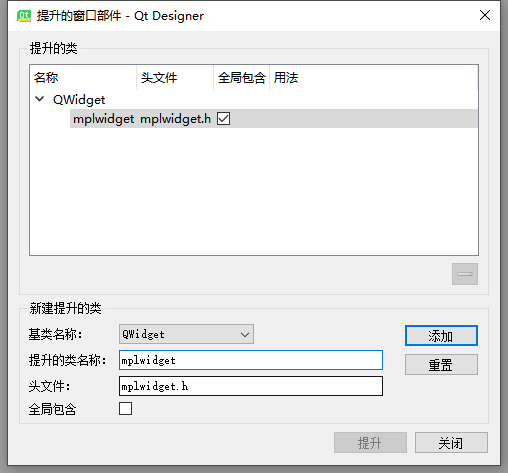
it should be noted here that figure canvas in matplotlib and widgets in GUI are subclasses of Qwidget. matplotlib cannot draw directly in widgets. It is necessary to promote widgets to Qwidget class in Designer. Select the widget in the GUI, right-click to select the promotion widget, select Qwidget, and give the promoted class a memorable name. Here I use mplwidget.
generated widget_recev.py will generate a sentence at the end:
from mplwidget import mplwidget
put it at the beginning of the class file, otherwise an error will be reported.
the mplwidget.py module needs to be built by itself. Create a mplwidget.py file under the corresponding path. Its main function is to create a class that inherits both FigureCanvas and QWidget, and name it mplwidget class according to the predefined above. This operation makes the original widget form have the function of matplotlib canvas, and you can draw on it. The contents of mplwidget.py file are as follows:
# _*_coding: UTF-8_*_
# Developed by: TXH
# Development time: 2021-09-05 14:42
# File name: mplwidget.py
# Development tool: Python 3.7 + pychar IDE

from PyQt5 import QtGui,QtWidgets
from matplotlib.backends.backend_qt5agg \
 import FigureCanvasQTAgg as FigureCanvas
from matplotlib.figure import Figure
from PyQt5.QtCore import QThread

class MplCanvas(FigureCanvas,QThread):
    def __init__(self):
        self.fig = Figure()
        FigureCanvas.__init__(self, self.fig)
        FigureCanvas.setSizePolicy(self,
        QtWidgets.QSizePolicy.Expanding,
        QtWidgets.QSizePolicy.Expanding)
        FigureCanvas.updateGeometry(self)

class mplwidget(QtWidgets.QWidget):
    def __init__(self, parent=None):
        QtWidgets.QWidget.__init__(self, parent)
        self.canvas = MplCanvas()
        self.vbl = QtWidgets.QVBoxLayout()
        self.vbl.addWidget(self.canvas)
        self.setLayout(self.vbl)
3.4 GUI design results
generated pyqt5 UI (widget)_ Recev. Py) is as follows. This file is automatically generated according to the Qt ui file, so you generally only need to know which components are in it. You don't need to pay attention to the details of size and location settings, because it has been done well in GUI design.
from PyQt5 import QtCore, QtGui, QtWidgets
from PyQt_Learning.UDP.GUI.mplwidget import mplwidget  # Change according to the location of MPL widget

class Ui_Widget(object):
    def setupUi(self, Widget):
        Widget.setObjectName("Widget")
        Widget.resize(280, 165)
        self.label_2 = QtWidgets.QLabel(Widget)
        self.label_2.setGeometry(QtCore.QRect(110, 10, 55, 16))
        self.label_2.setObjectName("label_2")
        self.lineEdit_2 = QtWidgets.QLineEdit(Widget)
        self.lineEdit_2.setGeometry(QtCore.QRect(110, 30, 61, 21))
        self.lineEdit_2.setObjectName("lineEdit_2")
        self.pushButton = QtWidgets.QPushButton(Widget)
        self.pushButton.setGeometry(QtCore.QRect(10, 120, 71, 24))
        self.pushButton.setObjectName("pushButton")
        self.label = QtWidgets.QLabel(Widget)
        self.label.setGeometry(QtCore.QRect(12, 10, 55, 16))
        self.label.setObjectName("label")
        self.lineEdit = QtWidgets.QLineEdit(Widget)
        self.lineEdit.setGeometry(QtCore.QRect(12, 30, 81, 21))
        self.lineEdit.setObjectName("lineEdit")
        self.pushButton_2 = QtWidgets.QPushButton(Widget)
        self.pushButton_2.setGeometry(QtCore.QRect(180, 120, 75, 24))
        self.pushButton_2.setObjectName("pushButton_2")
        self.lineEdit_5 = QtWidgets.QLineEdit(Widget)
        self.lineEdit_5.setGeometry(QtCore.QRect(190, 80, 61, 21))
        self.lineEdit_5.setObjectName("lineEdit_5")
        self.label_3 = QtWidgets.QLabel(Widget)
        self.label_3.setGeometry(QtCore.QRect(190, 60, 71, 16))
        self.label_3.setObjectName("label_3")
        self.label_4 = QtWidgets.QLabel(Widget)
        self.label_4.setGeometry(QtCore.QRect(10, 60, 71, 16))
        self.label_4.setObjectName("label_4")
        self.lineEdit_3 = QtWidgets.QLineEdit(Widget)
        self.lineEdit_3.setGeometry(QtCore.QRect(10, 80, 51, 21))
        self.lineEdit_3.setObjectName("lineEdit_3")
        self.label_5 = QtWidgets.QLabel(Widget)
        self.label_5.setGeometry(QtCore.QRect(110, 60, 71, 16))
        self.label_5.setObjectName("label_5")
        self.lineEdit_4 = QtWidgets.QLineEdit(Widget)
        self.lineEdit_4.setGeometry(QtCore.QRect(110, 80, 51, 21))
        self.lineEdit_4.setObjectName("lineEdit_4")
        self.label_6 = QtWidgets.QLabel(Widget)
        self.label_6.setGeometry(QtCore.QRect(70, 80, 21, 16))
        self.label_6.setObjectName("label_6")

        self.retranslateUi(Widget)
        QtCore.QMetaObject.connectSlotsByName(Widget)

    def retranslateUi(self, Widget):
        _translate = QtCore.QCoreApplication.translate
        Widget.setWindowTitle(_translate("Widget", "Data sender"))
        self.label_2.setText(_translate("Widget", "port"))
        self.lineEdit_2.setText(_translate("Widget", "9999"))
        self.pushButton.setText(_translate("Widget", "Transmit sine"))
        self.label.setText(_translate("Widget", "IP address"))
        self.lineEdit.setText(_translate("Widget", "127.0.0.1"))
        self.pushButton_2.setText(_translate("Widget", "Stop sending"))
        self.lineEdit_5.setText(_translate("Widget", "8"))
        self.label_3.setText(_translate("Widget", "Number of sinusoidal channels"))
        self.label_4.setText(_translate("Widget", "Sinusoidal frequency"))
        self.lineEdit_3.setText(_translate("Widget", "50"))
        self.label_5.setText(_translate("Widget", "Sinusoidal amplitude"))
        self.lineEdit_4.setText(_translate("Widget", "1"))
        self.label_6.setText(_translate("Widget", "Hz"))
4 multi thread programming UDP communication
it is very convenient to use Qt for interface design. The difficulty of pyqt programming lies in the underlying signal slot function mechanism and multithreading programming. Let's put aside multithreaded UDP programming and give a simple example of the principle of signal slot function.
4.1 signal and slot functions
the signal is equivalent to an event in the GUI main loop. Once an event is triggered, the corresponding slot function (object method) will run.
the signal can be built-in or user-defined. Built in signals are generally directly associated with components, and corresponding slot functions can be constructed according to certain rules, such as:
def on_pushButtom_clicked(self):
    ...
def on_pushButtom_2_clicked(self):
    ...
def on_pushButtom_3_clicked(self):
    ...
Corresponding to pushbutton and pushbutton respectively_ 2,pushButtom_3. The three buttons are automatically associated with the slot function when the clicked() event is triggered. After the event is triggered, the corresponding slot function is run immediately. Similarly, check box_ 5 is triggered, the following slot functions are automatically associated by default to transmit chencked Boolean signals:
def on_checkBox_5_toggled(self,checked):
    ...
custom signals are more flexible. They send data through the emit() function when an event is triggered. In pyqt5, the data type of signal transmission can be any type supported by python. The current test shows that the data types such as numpy.array, list, str, int and float can be passed to the slot function through signal as the input of the slot function.
In the main thread (or GUI main loop), customize simple signal and slot function pairs as follows.
from PyQt5.QtCore import QObject
from PyQt5 import QtCore

class Test(QObject):
    test_signal = QtCore.pyqtSignal(list)  # Define test_signal signal
    def __init__(self, parent=None):
        super().__init__(parent)
        self.test_signal.connect(self.print_data)  # Associate the signal with the test slot function

    def toggle(self):
        a = list([1, 2, 3, 4, 5])
        self.test_signal.emit(a)  # Send signal to slot function

    @QtCore.pyqtSlot(list)
    def print_data(self, list_var):  # Define slot function
        # Once the slot function receives test_ For the data sent by signal, execute the subsequent content immediately
        print(list_var)

test = Test()
test.toggle()

>>> [1, 2, 3, 4, 5]
the signal is generally defined before the initialization method. As a member of Qt class, the data type of the transmitted signal is given when defining the signal. The list type is used in the following example. During initialization, the signal is associated with the corresponding slot function. Then, signals are sent to the slot function in different methods as needed, and the slot function executes the contents of the function immediately after receiving the data. The above example is relatively simple. It mainly triggers signals and slot functions in the main thread. The following paper will give a case of multi-threaded signal and slot function transmitting data.
4.2 multithreading
the main interface of pyqt uses the main thread, which can be regarded as an endless loop. Once a more time-consuming operation occurs in the main thread, the main thread will fake death, which is reflected in the GUI interface is no response and no operation.
GUI programming generally follows the principle of separate design of GUI interface and code interface. The main thread is only responsible for managing the actions of basic GUI, and the time-consuming operations are calculated through sub threads.
back to the topic of "multi thread UDP communication", on the basis of creating GUI, the main functions of UDP communication receiver are as follows. The code realizes three cases of data transmission from the main thread to the sub thread, from the sub thread to the sub thread and from the sub thread to the main thread.
Of course, all connections between signals and slot functions must be completed in the main thread.
The specific method is to create a sub thread instance in the main thread and take the sub thread as a member of the main thread. In this way, the signal transmission between the sub thread and the sub thread and between the sub thread and the main thread can be realized.
# _*_coding: UTF-8_*_
# Developed by: TXH
# Development time: 18:24, August 26, 2021
# File name: Receiver.py
# Development tool: Python 3.7 + pychar IDE

import socket
import sys
from PyQt5.QtWidgets import QApplication, QMainWindow
from PyQt_Learning.UDP.GUI.widget_recev import Ui_MainWindow
from PyQt5 import QtCore,uic
from PyQt5.QtCore import QThread,pyqtSlot

class QmyDialog(QMainWindow): # The main form itself occupies a main thread
    UDP_para = QtCore.pyqtSignal(list)
    sender_para = QtCore.pyqtSignal(list)
    def __init__(self, parent=None):
        super().__init__(parent)
        self.pause=False
        self.statusBar().showMessage('Load UI...')
        if 0:
            self.ui = uic.loadUi('E:/Pywork/PyQt_Learning/UDP/GUI/widget_recev.ui',self) #
        else:
            self.ui = Ui_MainWindow()
            self.ui.setupUi(self)
        self.statusBar().showMessage('Init Canvas...')
        self.canvas = self.ui.widget.canvas # Drawing settings
        self.canvas.ax1 = self.canvas.fig.add_subplot(111)
        self.canvas.ax1.get_yaxis().grid(True)

        self.statusBar().showMessage('Init UDP...') # Status bar update
        self.UDP = UDPThread(self.para(1)) # Create child thread 1
        self.UDP_para.connect(self.UDP.UDP_para_update) # The main thread passes parameters to the UDP thread

        self.statusBar().showMessage('Init plot sender...')
        self.Plot_fig = Plot_Thread(self.para(2)) # Create child thread 2
        self.UDP.send_data.connect(self.Plot_fig.send) # UDP sub thread sends data to drawing sub thread
        self.sender_para.connect(self.Plot_fig.Sender_para_update) # The main thread passes parameters to the drawing child thread
        self.Plot_fig.plot_data.connect(self.plot_fig) # The drawing sub thread sends the data to the main thread plot_fig function, let it draw
        self.statusBar().showMessage('Ready!')

    def on_pushButton_clicked(self):  # Set parameters
        self.update_udp_para()
        self.update_sender_para()
        self.statusBar().showMessage('Para changed...')

    def on_pushButton_2_clicked(self):  # receive data
        self.update_udp_para()
        self.update_sender_para()
        self.UDP.pause = False
        self.Plot_fig.pause=False
        self.UDP.start()
        self.ui.lineEdit.setReadOnly(True)
        self.ui.lineEdit_2.setReadOnly(True)
        self.Plot_fig.start()
        self.statusBar().showMessage('Receiving data...')

    def on_pushButton_3_clicked(self):  # Stop receiving and drawing
        self.pause=True
        self.update_udp_para()
        self.update_sender_para()
        self.statusBar().showMessage('Receiving paused!')

    def plot_fig(self,temp): # Drawing function, not calculated, to avoid main thread blocking, drawing immediately after receiving data
        self.canvas.ax1.clear()
        self.canvas.ax1.plot(temp)
        self.canvas.fig.tight_layout()
        self.canvas.draw()

    def update_udp_para(self): # UPD sub thread parameter settings
        self.UDP_para.emit(self.para(1))

    def update_sender_para(self):# Drawing calculation sub thread parameter settings
        self.sender_para.emit(self.para(2))

    def para(self,flag):
        if flag==1:
            return list([self.ui.lineEdit.text(),int(self.ui.lineEdit_2.text()),self.pause])
        else:
            return list([int(self.ui.lineEdit_3.text()),self.pause])

# Define UDP receive thread class
class UDPThread(QThread):
    send_data = QtCore.pyqtSignal(str)
    def __init__(self,udp_para_list):
        super().__init__()
        self.IP,self.Port,self.pause = udp_para_list
        self.s = socket.socket(socket.AF_INET, socket.SOCK_DGRAM) # Set socket protocol to UDP
        self.s.setsockopt(socket.SOL_SOCKET, socket.SO_REUSEADDR, 1)

    def run(self) -> None: # Receive UDP data in an endless loop
        try:
            self.s.bind((self.IP, self.Port))
        except:pass
        i = 1
        with open('out.txt', 'w') as f: # Save the obtained UDP data to the local txt
            while True:
                temp = self.s.recv(1024).decode('utf-8')  # Receive socket data
                if i%11==1:
                    self.send_data.emit(temp)
                f.writelines(temp + '\n')
                i=(i+1)%2000
                if self.pause: # Determine whether to jump out of the loop
                    break

    def UDP_para_update(self,udp_para_list):
        self.Ip,self.Port,self.pause=udp_para_list

# Define drawing calculation sub thread class
class Plot_Thread(QThread):
    plot_data = QtCore.pyqtSignal(list)
    def __init__(self,para_list):
        super().__init__()
        self.pause = False
        self.data = []
        self.max_len = para_list[0]
        self.i=1

    def change_Len(self,len): # Drawing length setting
        if len<1000:
            self.max_len=1000
        else:
            self.max_len = len

    # Receive the data sent by UDP sub thread and forward it to the drawing method in GUI
    @pyqtSlot(str)
    def send(self,data):
        self.data.append(float(data))
        if len(self.data)>self.max_len:
            self.data=self.data[(len(self.data)-self.max_len):]
        self.i=(self.i+1)%(1000)
        if self.i==0:
            self.plot_data.emit(self.data)  # Send data to GUI for drawing every 1000 points received

    def Sender_para_update(self,para_list): # Update the drawing length according to the signal of the main thread
        self.max_len,self.pause=para_list

# if __name__ == "__main__":
app = QApplication(sys.argv)  # Call the parent constructor to create the form
form = QmyDialog()  # Create UI object
form.show()  #
sys.exit(app.exec())  #
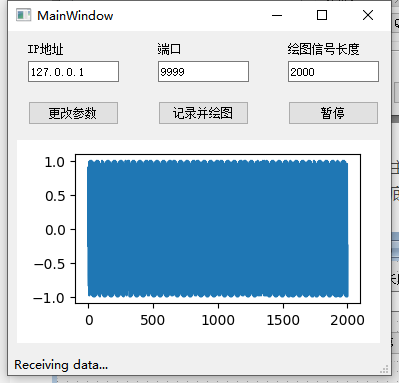
the effect is shown as follows:
Click record and draw. While saving the data received by UDP, the program sends some data to the GUI interface for drawing.
5 Pyinstaller packaged into exe
when pyinstaller packages the code into exe, it will face the situation that the generated exe is too large. The volume of exe with a very small function is up to 200M. In the final analysis, pyinstaller packages some interrelated installation packages into exe, but most installation packages are not really used in the current project.
after testing, you can use pipenv to create a clean virtual environment and reduce the size of exe. Only install the required pyinstaller, pyqt5, numpy, etc. in the environment. The pyqt5 exe executable file generated in the virtual environment is only tens of megabytes.
if you want to further compress, you can download upx.exe and put it into the Script folder in the pipenv virtual environment. pyinstaller will be called automatically when packaging. The compression amount is small, but it is somewhat effective. After all, there are no other remedial measures.
run the following code in the pipenv virtual environment:
# Gen_EXE.py
import os
error = os.system('pyinstaller --clean -Fw E:\\Pywork\PyQt_Learning\\UDP\\GUI\\Receiver.py  E:\\Pywork\\PyQt_Learning\\UDP\\GUI\\widget_recev.py E:\\Pywork\\PyQt_Learning\\UDP\\GUI\\mplwidget.py') # Add all relevant py files
if not error: print('Successfully generated exe File!')
the final size is about 44M, which is OK.

Automatically called. The compression amount is small, but it is somewhat effective. After all, there are no other remedial measures.
run the following code in the pipenv virtual environment:
# Gen_EXE.py
import os
error = os.system('pyinstaller --clean -Fw E:\\Pywork\PyQt_Learning\\UDP\\GUI\\Receiver.py  E:\\Pywork\\PyQt_Learning\\UDP\\GUI\\widget_recev.py E:\\Pywork\\PyQt_Learning\\UDP\\GUI\\mplwidget.py') # Add all relevant py files
if not error: print('Successfully generated exe File!')
the final size is about 44M, which is OK.
write at the end: due to interest, the level is limited. Welcome to communicate with each other.