This is an original joshua317 article, reprinted please note: Reprinted from joshua317 Blog SpringBoot 2.0 Getting Started Tutorial (1) Quick Start, Project Build Hello World Example - joshua317 Blog
1. Objectives
You can quickly start a Spring web project yourself.
2. Brief introduction
1. What is Spring Boot
Spring Boot is a new framework provided by the Pivotal team that is designed to simplify the initial setup and development of new Spring applications. The framework is configured in a specific way so that developers no longer need to define templated configurations. It uses a production-ready application perspective and takes precedence over configuration conventions.
2. What Spring Boot can do
With Spring Boot, you can create a stand-alone, product-level Spring app with a small amount of code, which in general is "out of the box".
With the Spring Boot framework, you can greatly simplify your development model, and it can help you with all the common frameworks you want to integrate.
3. Advantages of Spring Boot
-
Provide a fundamentally faster and widely used starter experience for all Spring development
-
Out of the box, but you can get rid of this by not using the default settings
-
Provides a series of non-functional features commonly used by large projects
-
Code generation and XML configuration are absolutely unnecessary to reduce redundancy
-
Simplify initial configuration to integrate with mainstream frameworks;
-
The built-in Servlet container eliminates the need to package War s;
-
Starter is used to manage dependencies and version control;
-
A large number of automatic configuration, simplify development, and facilitate integration with third parties;
-
Provide monitoring of quasi-production environment operation, such as indicators, health, external configuration, etc.
-
Low entry threshold, as long as you understand the program's java, c#, php, js can quickly start
-
Strong ecology, few functions need to be developed from scratch
-
Easy to deploy, stand-alone servers, cloud deployments, docker s
-
......
In a word: Advantages are beyond your imagination!
3. Environmental Preparation
Environment can be searched and handled by itself, which is not covered here.
1.java jdk environment installation
2.maven environment installation
3.IntelliJ IDEA (IJ) Editor Installation
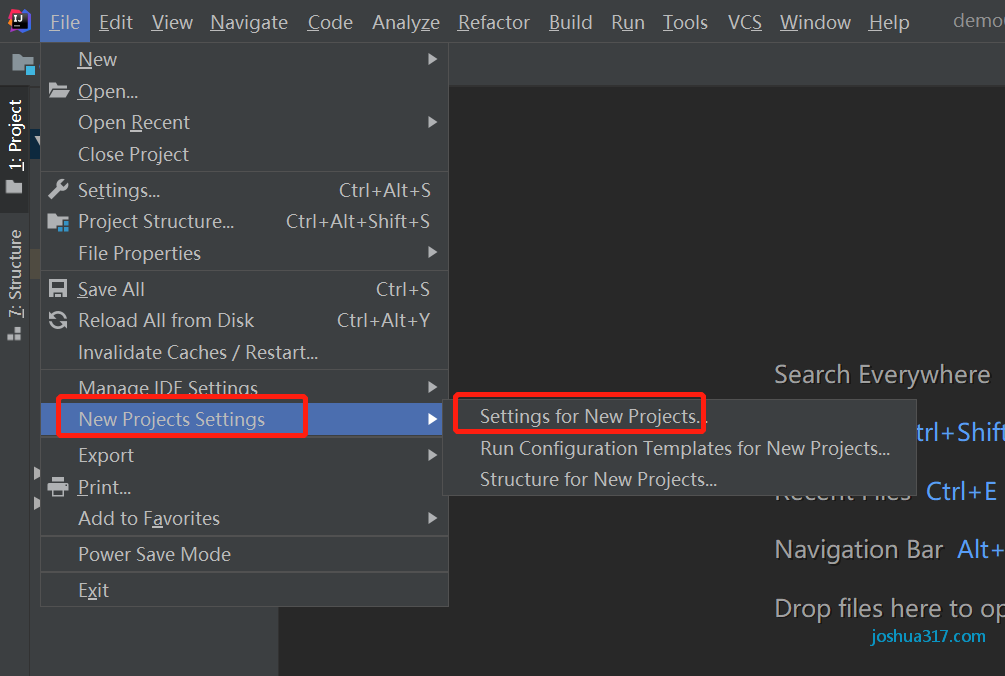
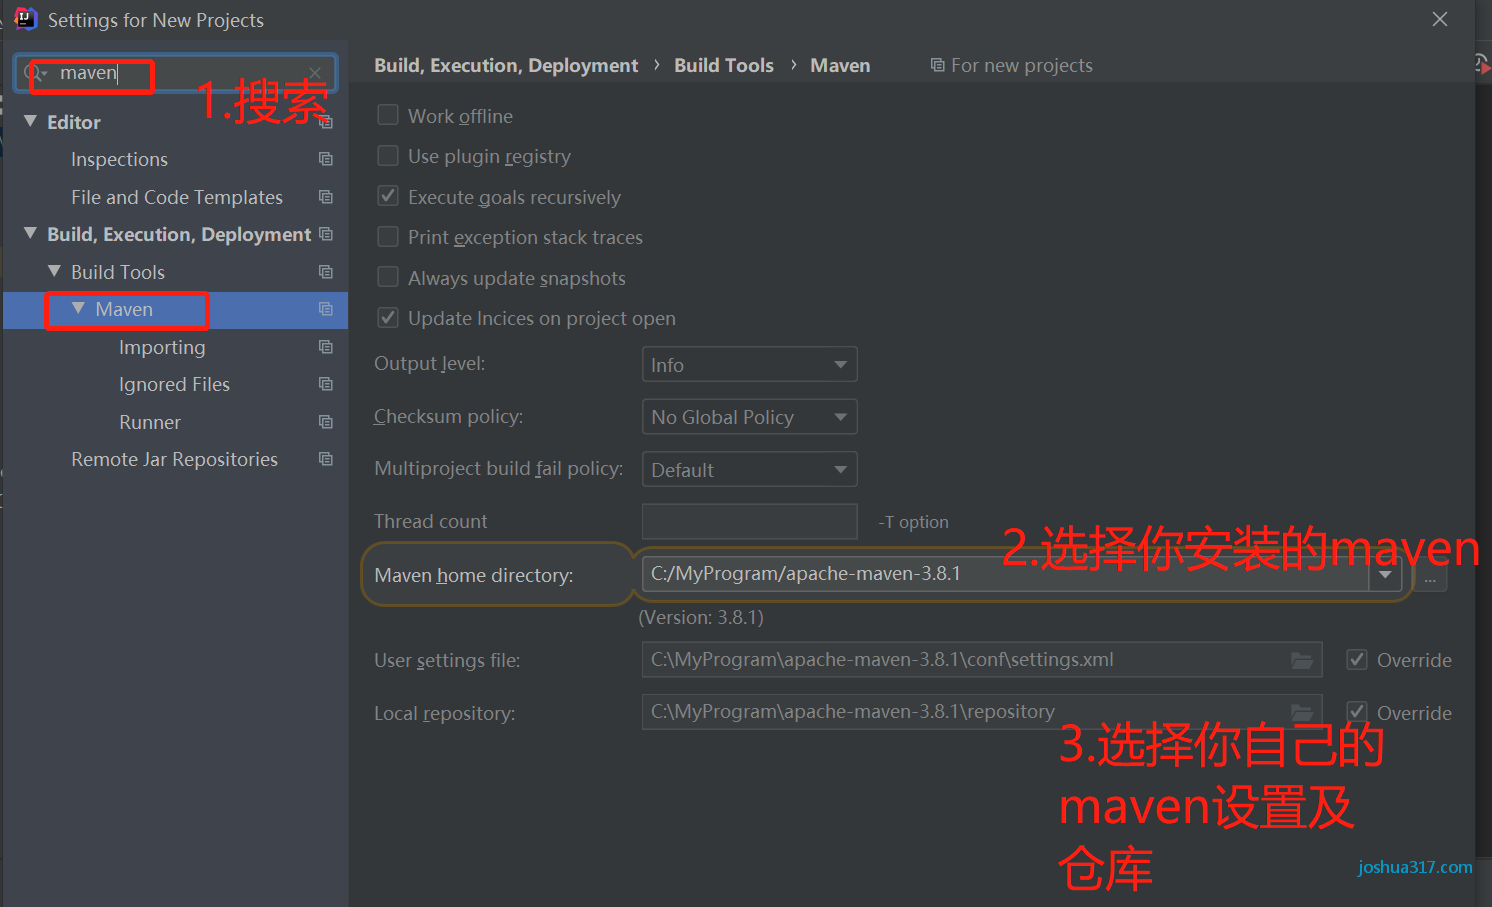
To prevent the editor from opening every time, maven's settings are initialized, so set up the new project ahead of time here
3. Getting Started Quickly
1. Create a Spring Boot project
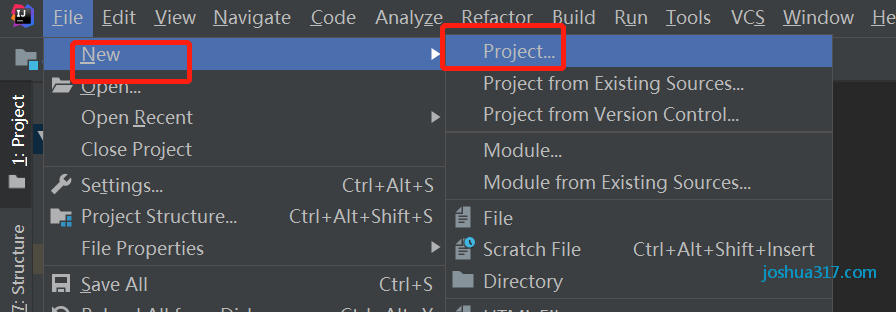
1.1 Open the editor and create a new project
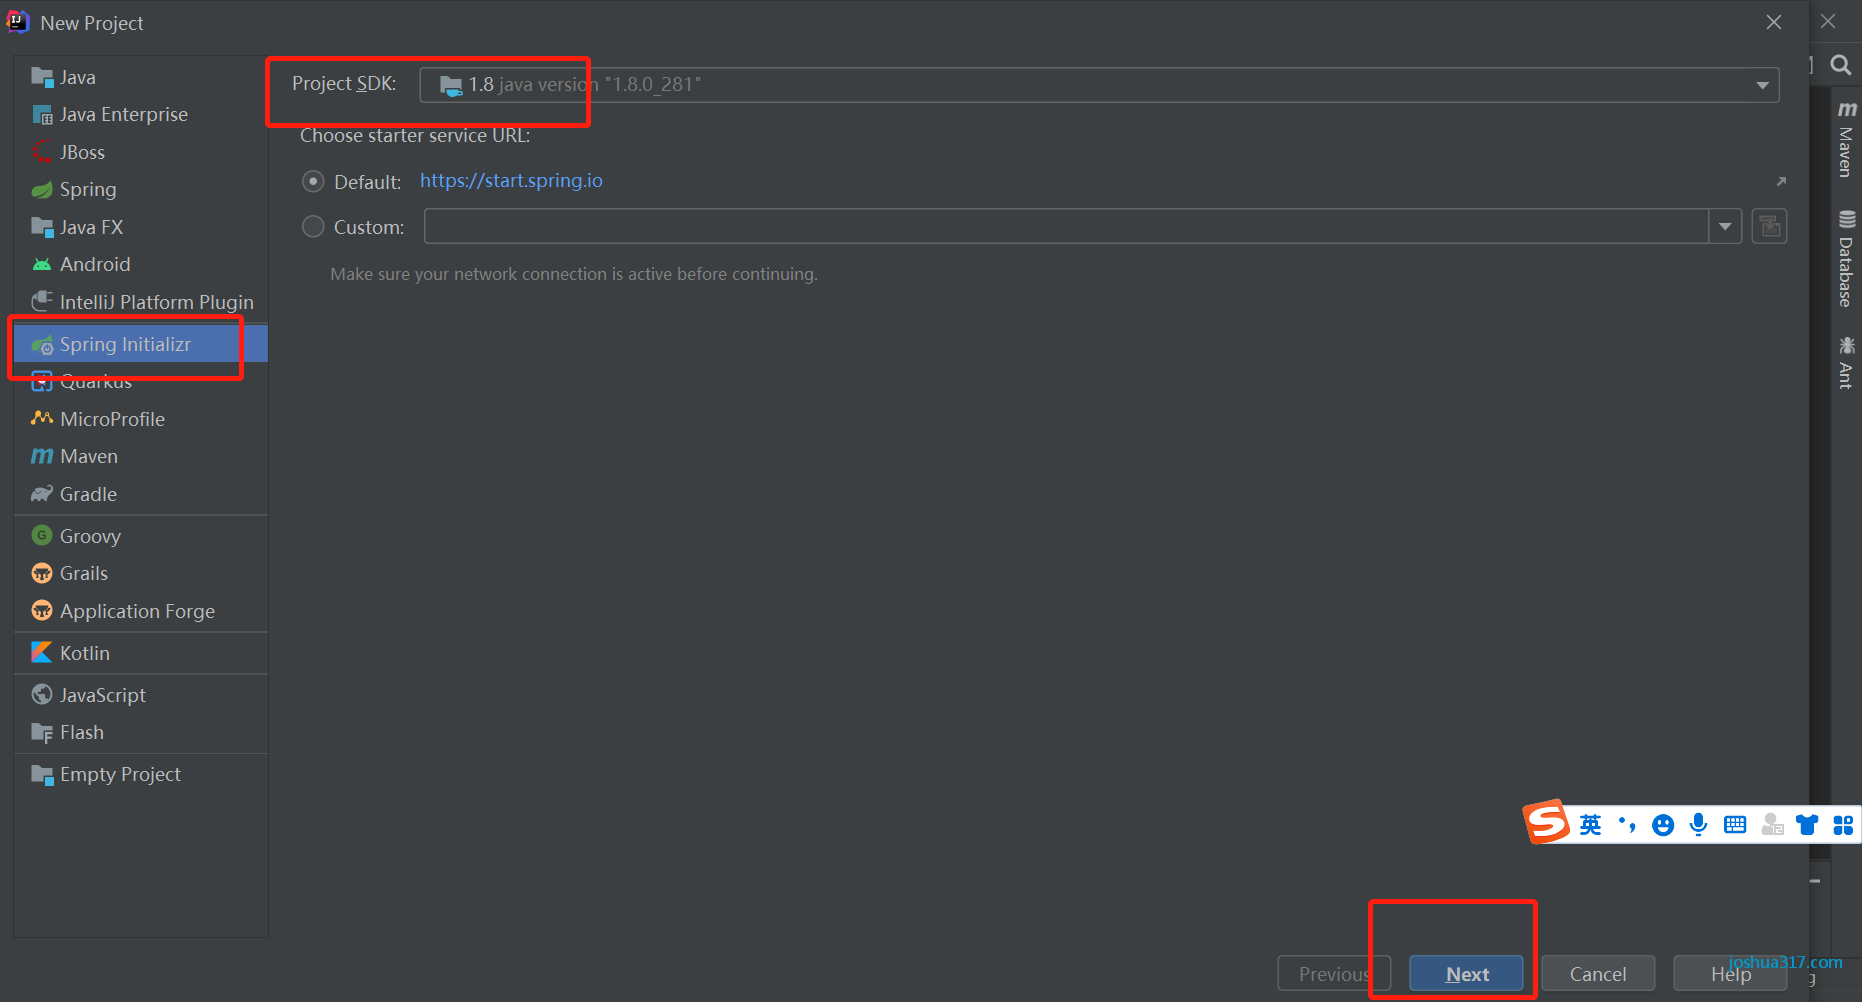
1.2 Select Spring Initalizr
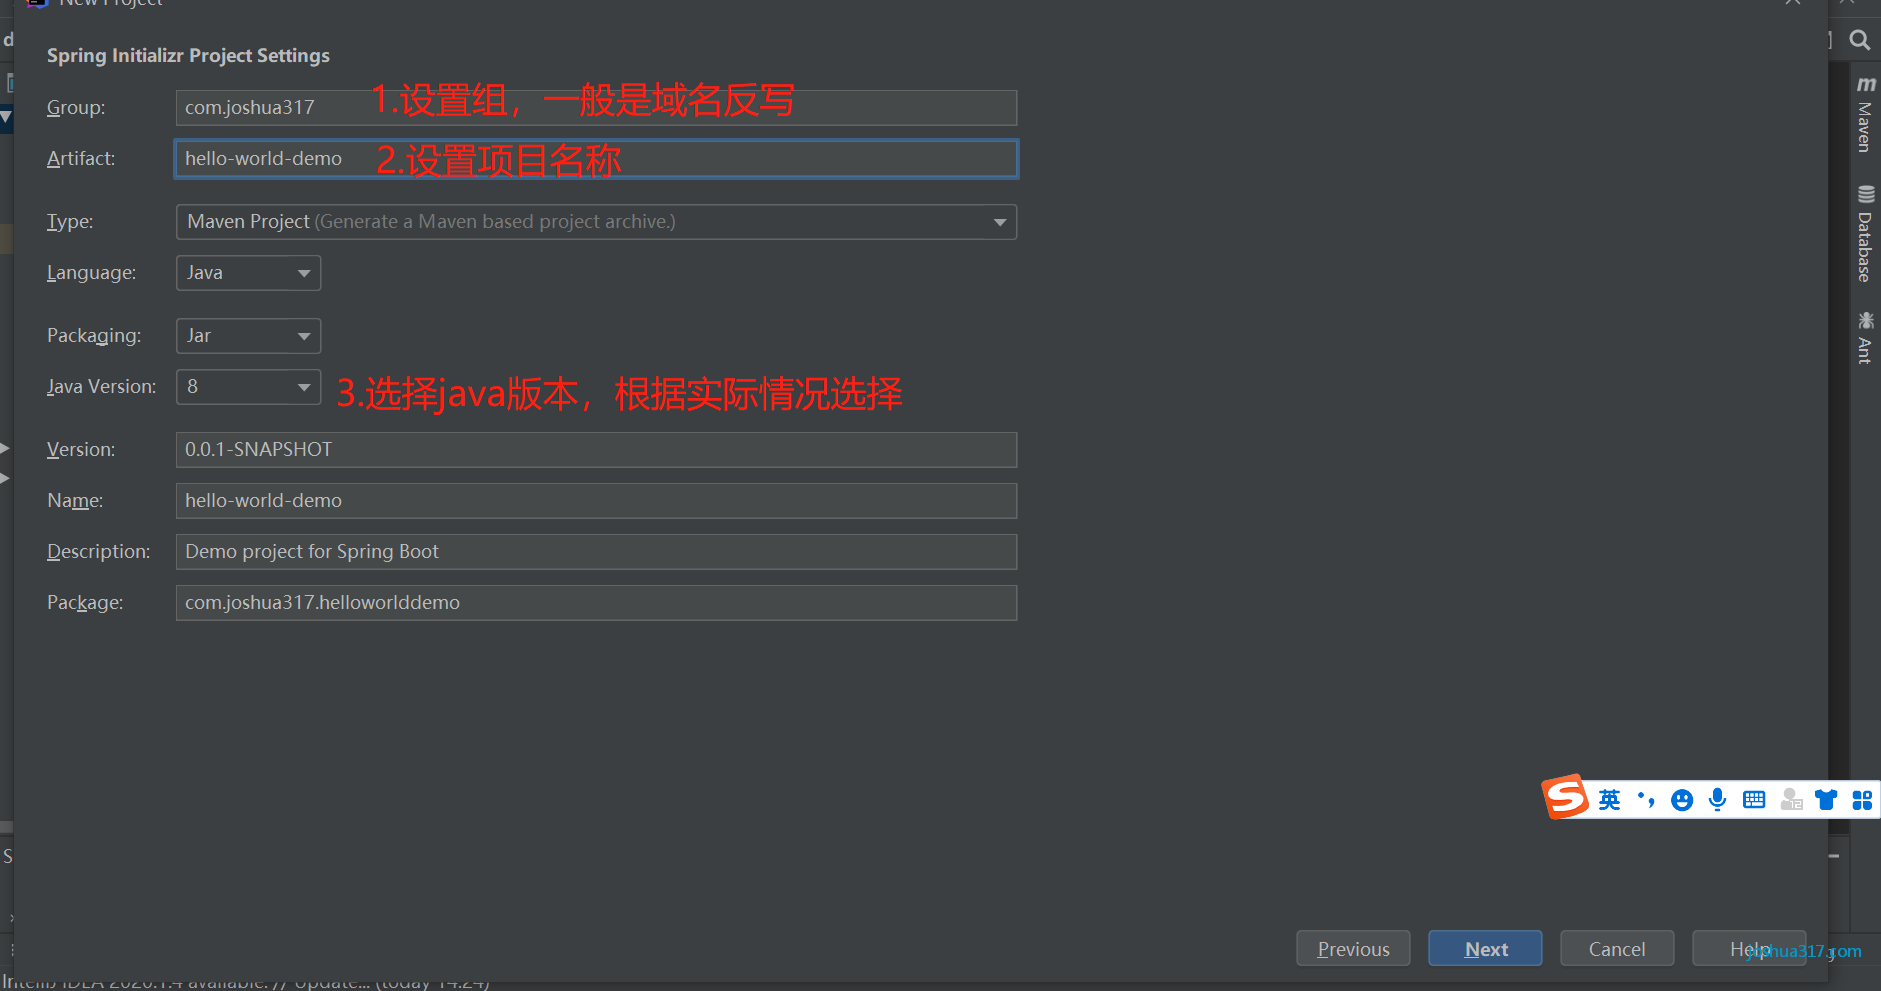
1.3 Set up some information about the project
Group: A unique identifier for a project organization, usually divided into segments, that you can set up on your own (I usually use com.zsr, which is my initials)
The usage of two paragraphs is described here.:First paragraph is domain,The second paragraph is the company name
 Domains are divided into org,com,cn etc.,among org For Non-Profit Organizations,com For business organizations,cn Represent China
 for example apache Company's tomcat project:org.apache.tomcat
- Group yes org.apache
- Domain is org(tomcat Non-profit Projects)
- The company name is apache
- Artifact yes tomcat
Artifact: The only identifier for a project is the name of the project (not capitalized, all lowercase!)
- for example com.joshua317.hello
- Artifact yes hello,Is the name of the project
Grounp+Artifact is equivalent to the coordinates of the project, ensuring the uniqueness of the project
Name: By default, with Artifact, a more user-friendly project name is declared, which is not required
Description: Project Description
Package name: Specifies the package name under java in the main directory, defaulting to Group+Artifact
Packaging: Packaging method, default jar
Version: Specifies the current version of the project, SNAPSHOT means snapshot, indicating that the project is still under development and is an unstable version
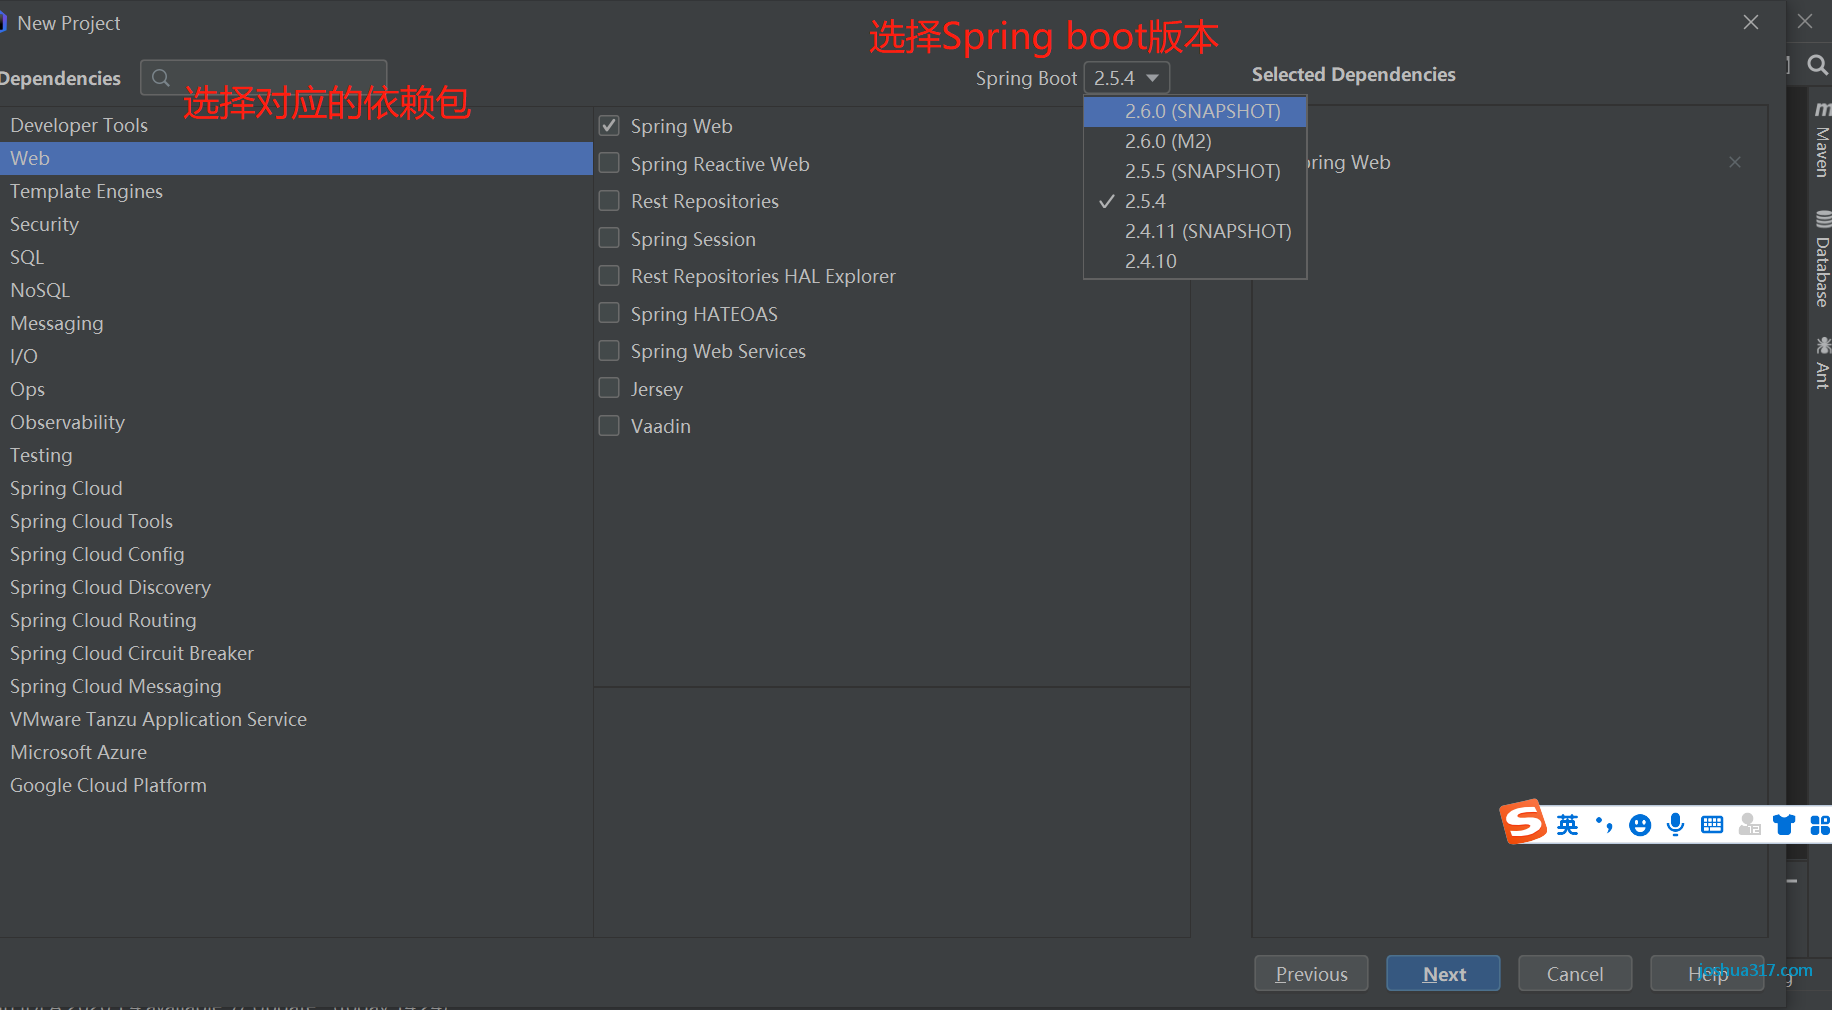
1.4 Select Spring boot version and dependent packages
In actual project development, depending on your needs, choose the appropriate dependent package
1.5 Set project name
Then click Finish to complete a simple project creation
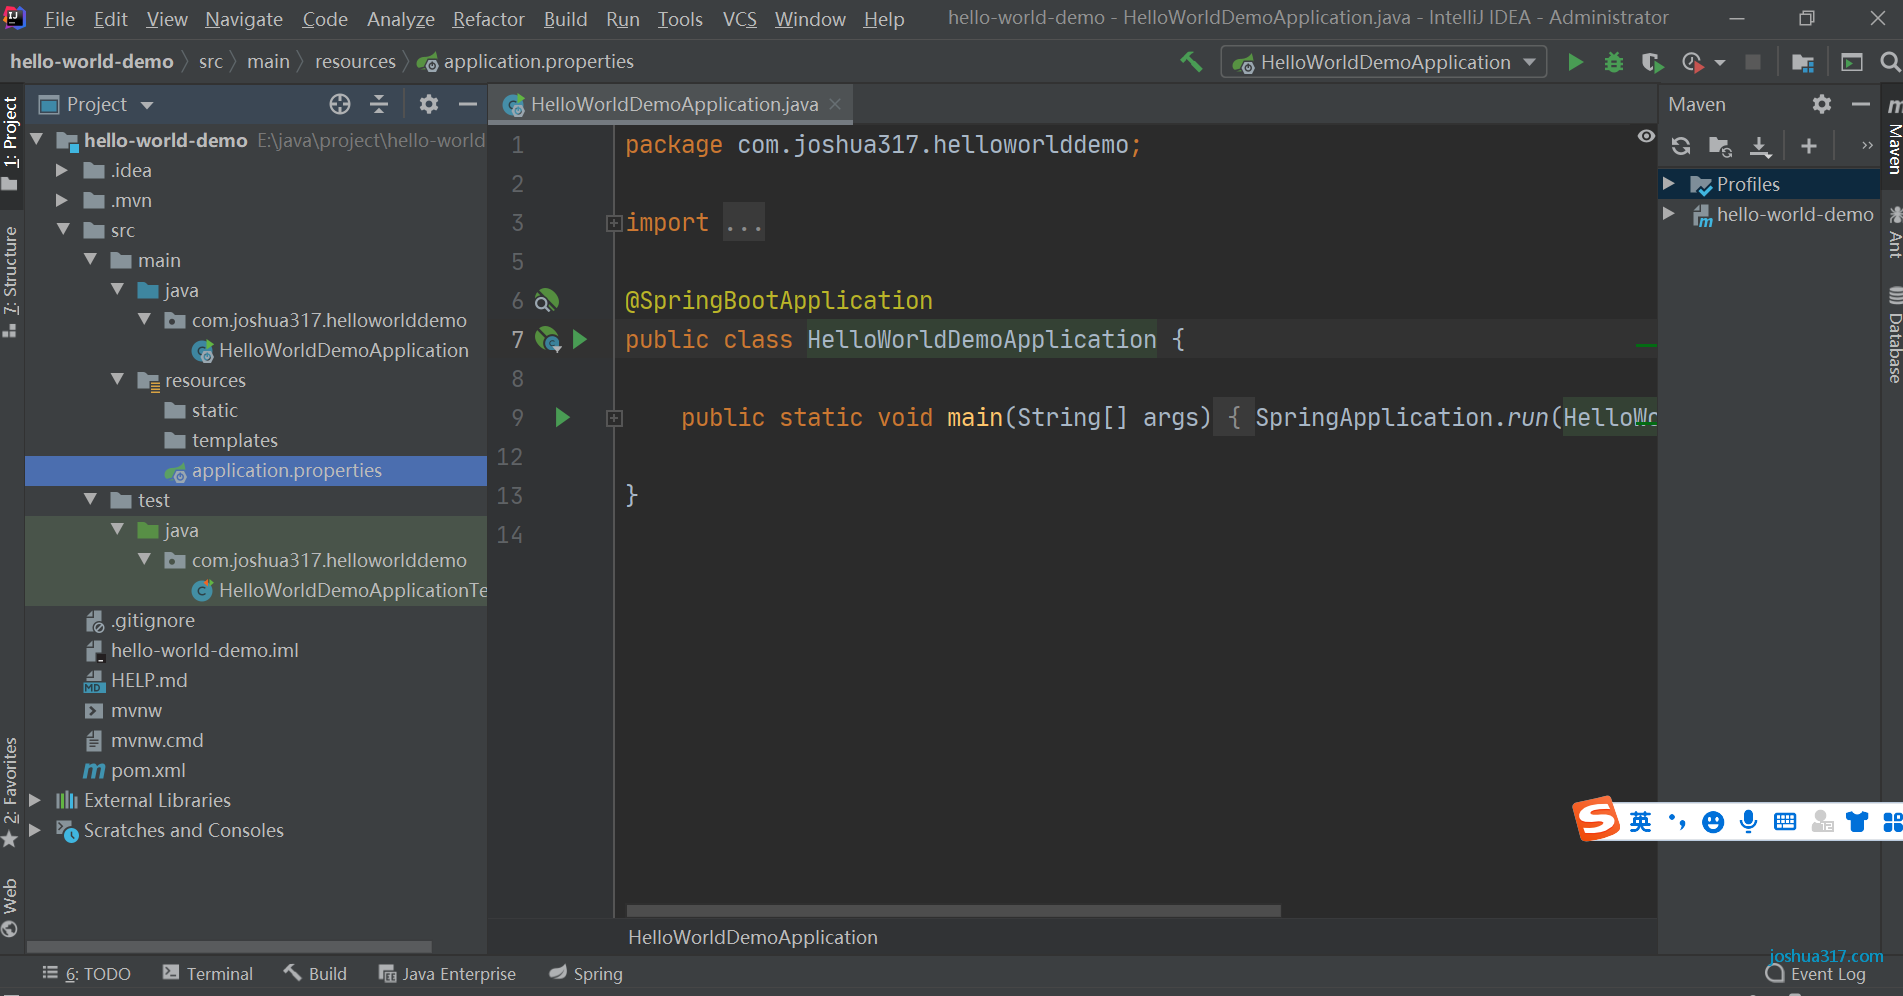
When the project is initialized, some of the jar packages that springboot relies on by default are automatically downloaded, which takes a while and we wait for it to finish downloading. Then we can see the structure of the project as follows:
A brief description of the project structure
Under src/main/java is the Java code store for the main program
src/resource is a resource file that includes static files such as pictures, Css, Javascript, and configuration files such as yml or properties
src/test/java test code
.idea #IDEA Software Specific Folder, Hide Files
.mvn #Maven Project Specific Files, Hide Files
src #Storing source code includes java code and configuration and resource files
     main #java code
       java
         com
           pringbook
             SpringstudyApplication #Start Class java File
        resource #Resource files include static files
           application.properties #Configuration files for projects, such as configuring server ports
     test #Test Folder
     mvnw #maven project auxiliary files, auto-generated
     mvnw.cmd #maven project auxiliary files, auto-generated
     pom.xml #maven Project configuration file, similar to C#web.config for
     study.iml #iml is a project identification file for IDEA software and is usually created automatically
  Externel Libraries #The lib file, which you don't care about, is automatic
By default, the @SpringBootApplication annotation is used above the class, which is a matching annotation equivalent to using both
@SpringBootConfiguration  Specify class as configuration class
@EnableAutoConfiguration  Turn on automatic configuration
@ComponentScan Specify Scan Path
2. Configure the Pom.xml file
Note that if you did not set Dependencies and choose the web when you built the project, you would set it here in Pom.xml and the Pom.xml setup dependency would be very simple, simply copying the nodes of to the pom dependency nodes.
Pom.xml is a project dependency profile that belongs to the maven project structure and primarily manages references to third-party packages.
spring-boot-starter: Core modules including automatic configuration support, logging, and YAML
spring-boot-starter-test: Test module, including JUnit, Hamcrest, Mockito.
The default project configures spring-boot-starter and spring-boot-starter-test, spring-boot-starter-web because the Dependent Web-"spring web is checked in the steps above, and the simple configuration is as follows:
<?xml version="1.0" encoding="UTF-8"?>
<project xmlns="http://maven.apache.org/POM/4.0.0" xmlns:xsi="http://www.w3.org/2001/XMLSchema-instance"
         xsi:schemaLocation="http://maven.apache.org/POM/4.0.0 https://maven.apache.org/xsd/maven-4.0.0.xsd">
    <modelVersion>4.0.0</modelVersion>
    <parent>
        <groupId>org.springframework.boot</groupId>
        <artifactId>spring-boot-starter-parent</artifactId>
        <version>2.5.4</version>
        <relativePath/> <!-- lookup parent from repository -->
    </parent>
    <groupId>com.joshua317</groupId>
    <artifactId>hello-world-demo</artifactId>
    <version>0.0.1-SNAPSHOT</version>
    <name>hello-world-demo</name>
    <description>Demo project for Spring Boot</description>
    <properties>
        <java.version>1.8</java.version>
    </properties>
    <dependencies>
        <dependency>
            <groupId>org.springframework.boot</groupId>
            <artifactId>spring-boot-starter-web</artifactId>
        </dependency>

        <dependency>
            <groupId>org.springframework.boot</groupId>
            <artifactId>spring-boot-starter-test</artifactId>
            <scope>test</scope>
        </dependency>
    </dependencies>

    <build>
        <plugins>
            <plugin>
                <groupId>org.springframework.boot</groupId>
                <artifactId>spring-boot-maven-plugin</artifactId>
            </plugin>
        </plugins>
    </build>

</project>
3. Configure the application.yml file
By default, when the project was initialized, a configuration file application.properties was generated.
But application.properties is a general key=value format configuration file, and when you have more parameters to configure, you will find that its level is not so clear and easy to read.
So let's create a file named application.yml in the YML format. Note that the name can't be arbitrarily named. It must be application.yml
yml (also called yaml): is a data-centric configuration file that is better suited for use as a configuration file than json,xml, etc. An article will be dedicated to the format of yml later.
The application.yml content is simply configured as follows:
server:
  port: 8080   #Port number
4. Write sample code
4.1 Common directory structure for Web projects
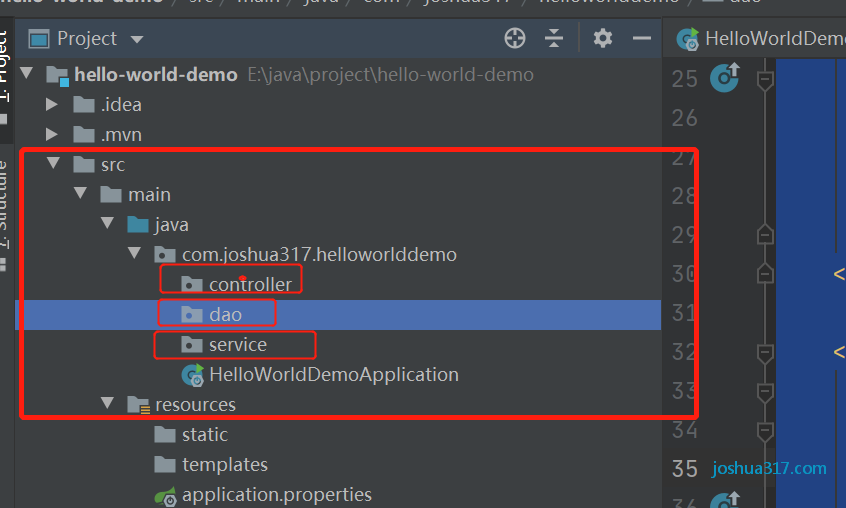
Typically, we write using a three-tier structure.
Application layer (Controller): responsible for page access control
Service layer is mainly business class code
Data Layer (Dao): Catalogs are primarily used in the Entity and Data Access Layer (Repository)
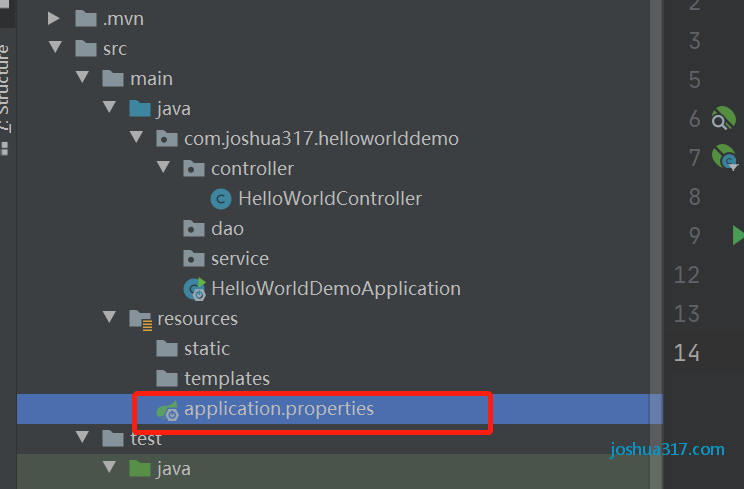
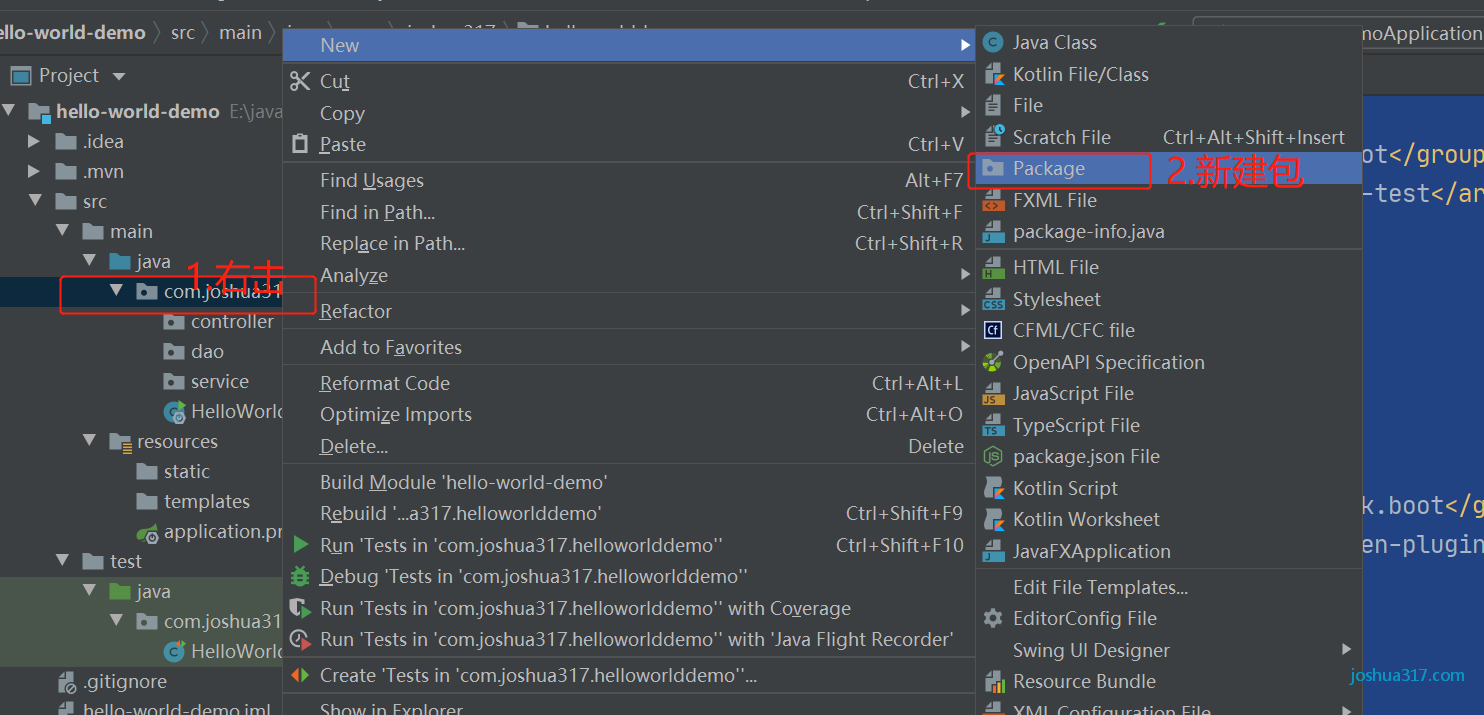
4.2 Increase the package directory
Build the following directory
4.3 Write Controller content
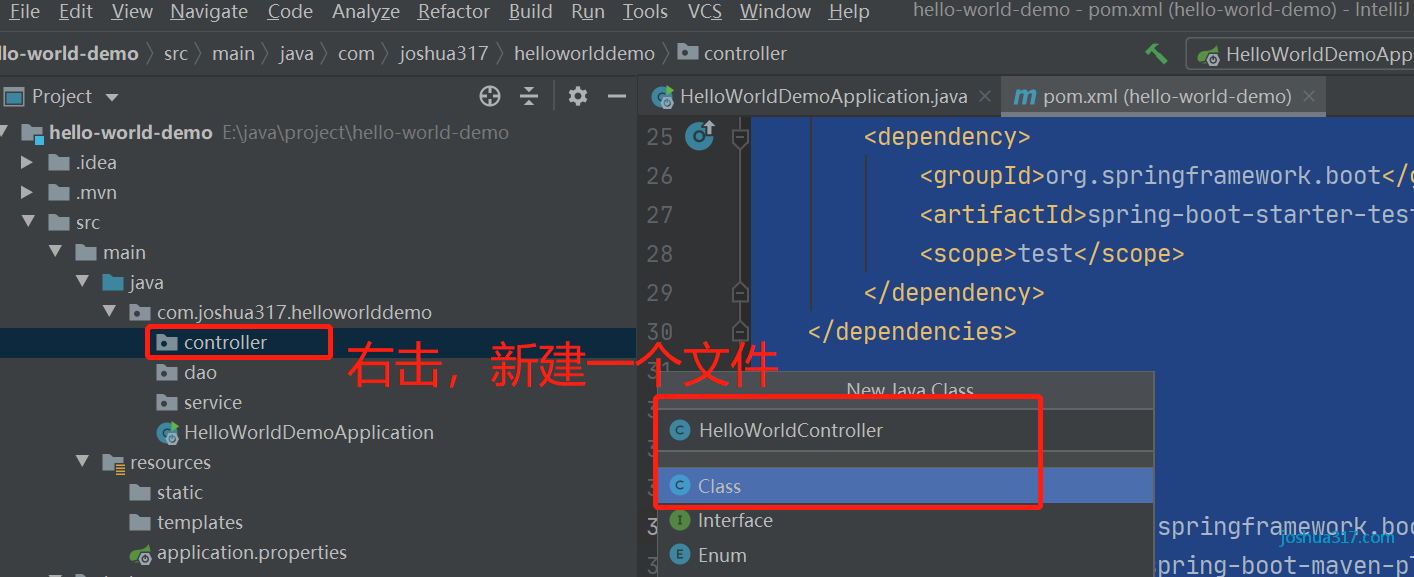
Create a new HelloWorldController.java under the controller (note capitalization)
Add java code to HelloWorldController
package com.joshua317.helloworlddemo.controller;

import org.springframework.web.bind.annotation.RequestMapping;
import org.springframework.web.bind.annotation.RestController;

@RestController
@RequestMapping("/hello")
public class HelloWorldController {
    @RequestMapping("/index")
    public String index(){
        return "Hello World";
    }
}
Java
Copy
The @RestController is a compound annotation, equivalent to using both the @Controller and @ResponseBody annotations. The methods inside the Controller are all output in json format, and there is no need to write any more jackjson configurations!
5. Run
Click Run, or use the shortcut shift+f10
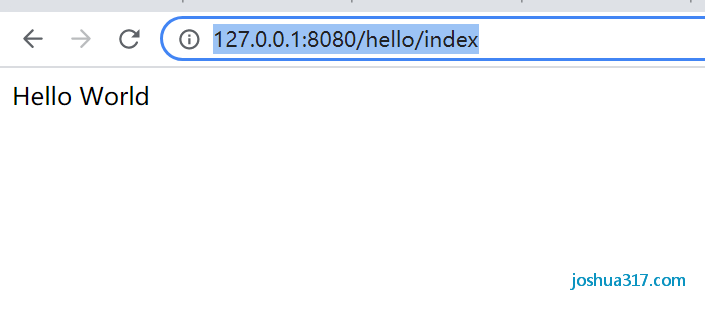
Then we visit:http://127.0.0.1:8080/hello/index
At this point, a web project environment has been successfully built and is easy to use. If you want to modify the port, you can adjust it in the application.yml file
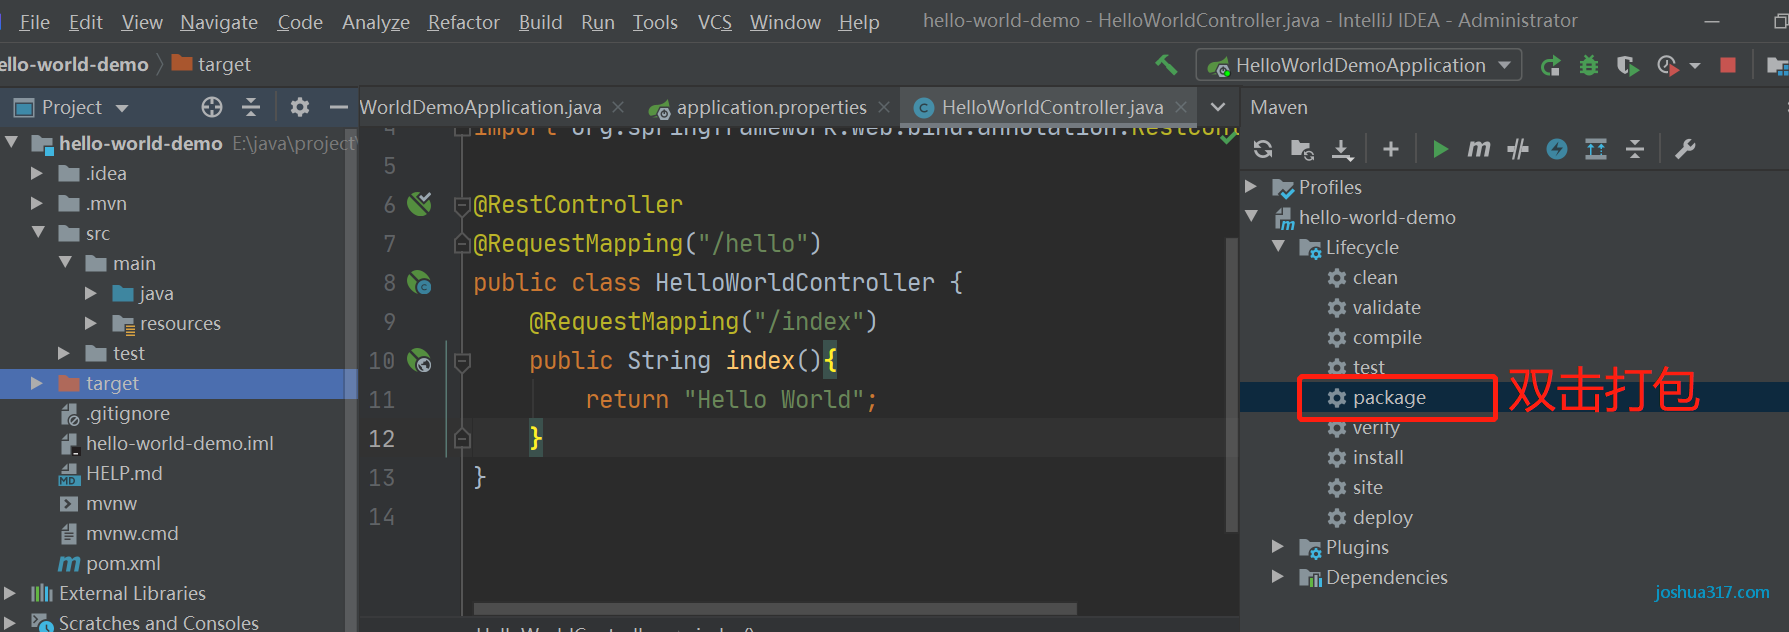
6. Package and Publish
6.1 Package and publish using jar
Or use the command line
1) Select View > Tool Windows > Terminal
2) Enter commands
mvn clean

mvn install
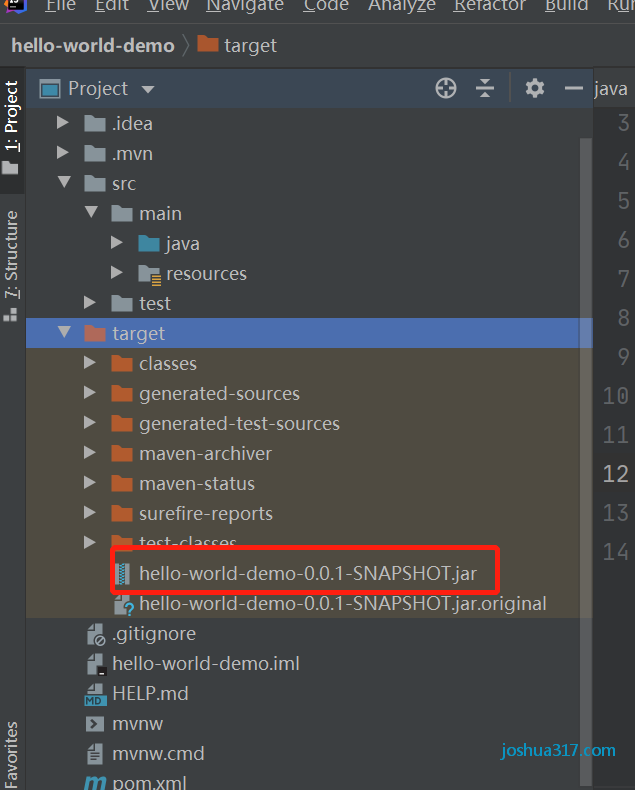
There is a target folder in the root directory
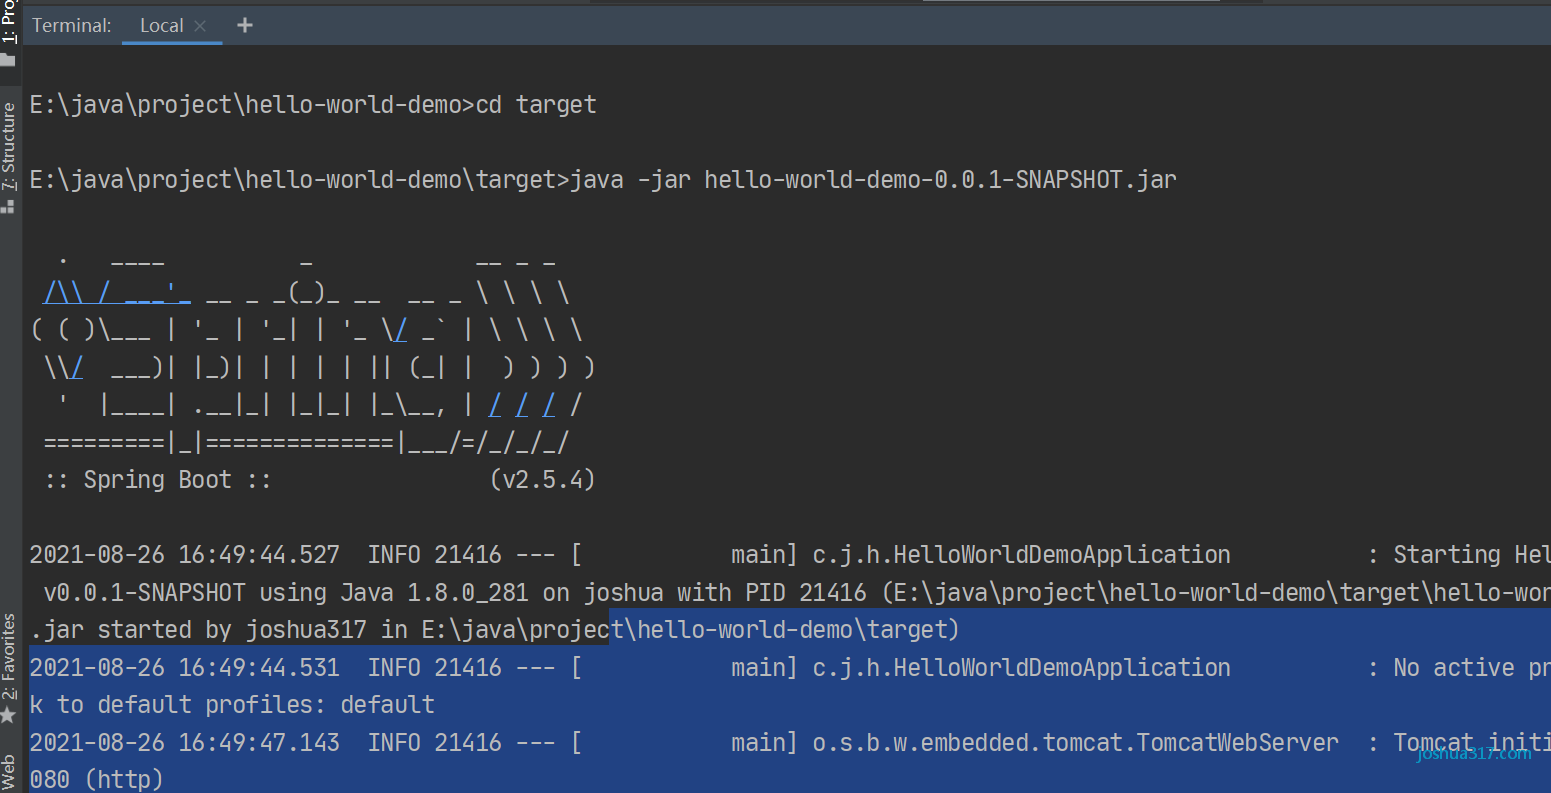
6.2 Simulate the server environment and run jar files
Enter a command that you can then access in your browser.
java -jar hello-world-demo-0.0.1-SNAPSHOT.jar
7. Problems encountered (continued organization)
1.Failed to read artifact descriptor for org.springframework.boot:spring-boot-starter-web:jar:2.1.4.RELEASE less... (⌘F1) Inspects a Maven model for resolution problems.
Failed to load spring-boot-starter-web:jar, this should be mvn manager load problem.
2. If the dependent package prompts red, indicating that maven's package is not loaded, you can see the warehouse settings and pull the dependent package again
3. Port issues
The default is port 8080. If the port is occupied (for example, mac's nginx defaults to 8080) and needs to be modified, set it in resourcesapplication.yml
This is an original joshua317 article, reprinted please note: Reprinted from joshua317 Blog SpringBoot 2.0 Getting Started Tutorial (1) Quick Start, Project Build Hello World Example - joshua317 Blog
