preface
What are GitHub Action and GitHub Page
-
Github Action can help you automatically complete tasks in the software development cycle. It is event driven and has been deeply integrated with GitHub. It can run many GitHub events, most commonly pushed to the master branch. But actions are not just deployment and release, they are containers. It's no exaggeration to say that you can do anything - there are endless possibilities! You can use them to compress and merge CSS and JavaScript, someone sends you information when creating an issue in your project warehouse, and more... There are no restrictions.
-
GitHub Page is a free ~, which is provided by Github. It is used to host personal static websites. You can use it to build private blogs. It also saves a series of complex operations such as buying servers, domain names and so on.
Rule: create a warehouse named user name. github.io, Official documents
Use: create an index.html file under the warehouse and access the website to view it quickly
What is Coding
-
CODING is a wholly-owned subsidiary of Tencent and its one-stop software R & D management platform - CODING( https://coding.net/ )It is a one-stop software R & D management collaboration platform, providing Git/SVN code hosting, project collaboration, test management, product library, CI/CD and a series of online tools to help R & D teams quickly implement agile development and DevOps development methods, improve R & D management efficiency and upgrade R & D Efficiency.
-
What Coding wants to do is to help developers efficiently complete software development in the cloud. Code hosting, project management, demonstration platform, quality management, etc. are all designed to help developers complete a series of difficult software development actions in the cloud. Provide developers with the ultimate cloud development experience, emphasizing private libraries, teamwork, integration experience and access speed.
-
Why use Coding?
In fact, the role of Coding is similar to that of Gitee. It belongs to domestic deployment. The speed improvement is very obvious, and it can also be included by Baidu. Due to well-known reasons, the speed of accessing GitHub in China is moving. I also tried to directly obtain the code of GitHub at the beginning, but the speed is too slow and the efficiency is very low. Therefore, I finally chose Coding as the warehouse image. Of course, it is the same to replace Gitee here.
What is Webhook
-
Webhook is an API concept. The term "network hook" is sometimes called "reverse API". Because it provides API rules, you need to design the API to use. Webhook will send http requests to your application, typically post requests. The application is driven by requests. The more things we can describe with events, the greater the scope of webhook.
-
To be exact, webhook is a web callback or http push API. It is a way to provide real-time information to APP or other applications. Webhook sends data immediately when data is generated, that is, you can receive data in real time. With webhooks, you can get push notifications when certain events occur on the server. You can use webhooks to "subscribe" to activities.
Requirements and scenarios
As we all know, GitHub, as the world's largest same-sex dating community, in order to have more convenient, friendly and positive exchanges with everyone 🐶, My source code storage address is stored in GitHub, including blog updates, some test cases, tutorials, demos, etc.
Because my blog is deployed on alicloud's personal server, sometimes the blog is updated frequently. At first, I link to the server through ssh, and then manually update it through the commands git clone, git pull and npm run build. There are several problems:
- Frequent login to the server is very cumbersome
- GitHub has a speed problem. You have to wait a long time for each update
- Server performance problems. It is difficult to perform npm run build packaging for low configuration servers
Idea and flow chart
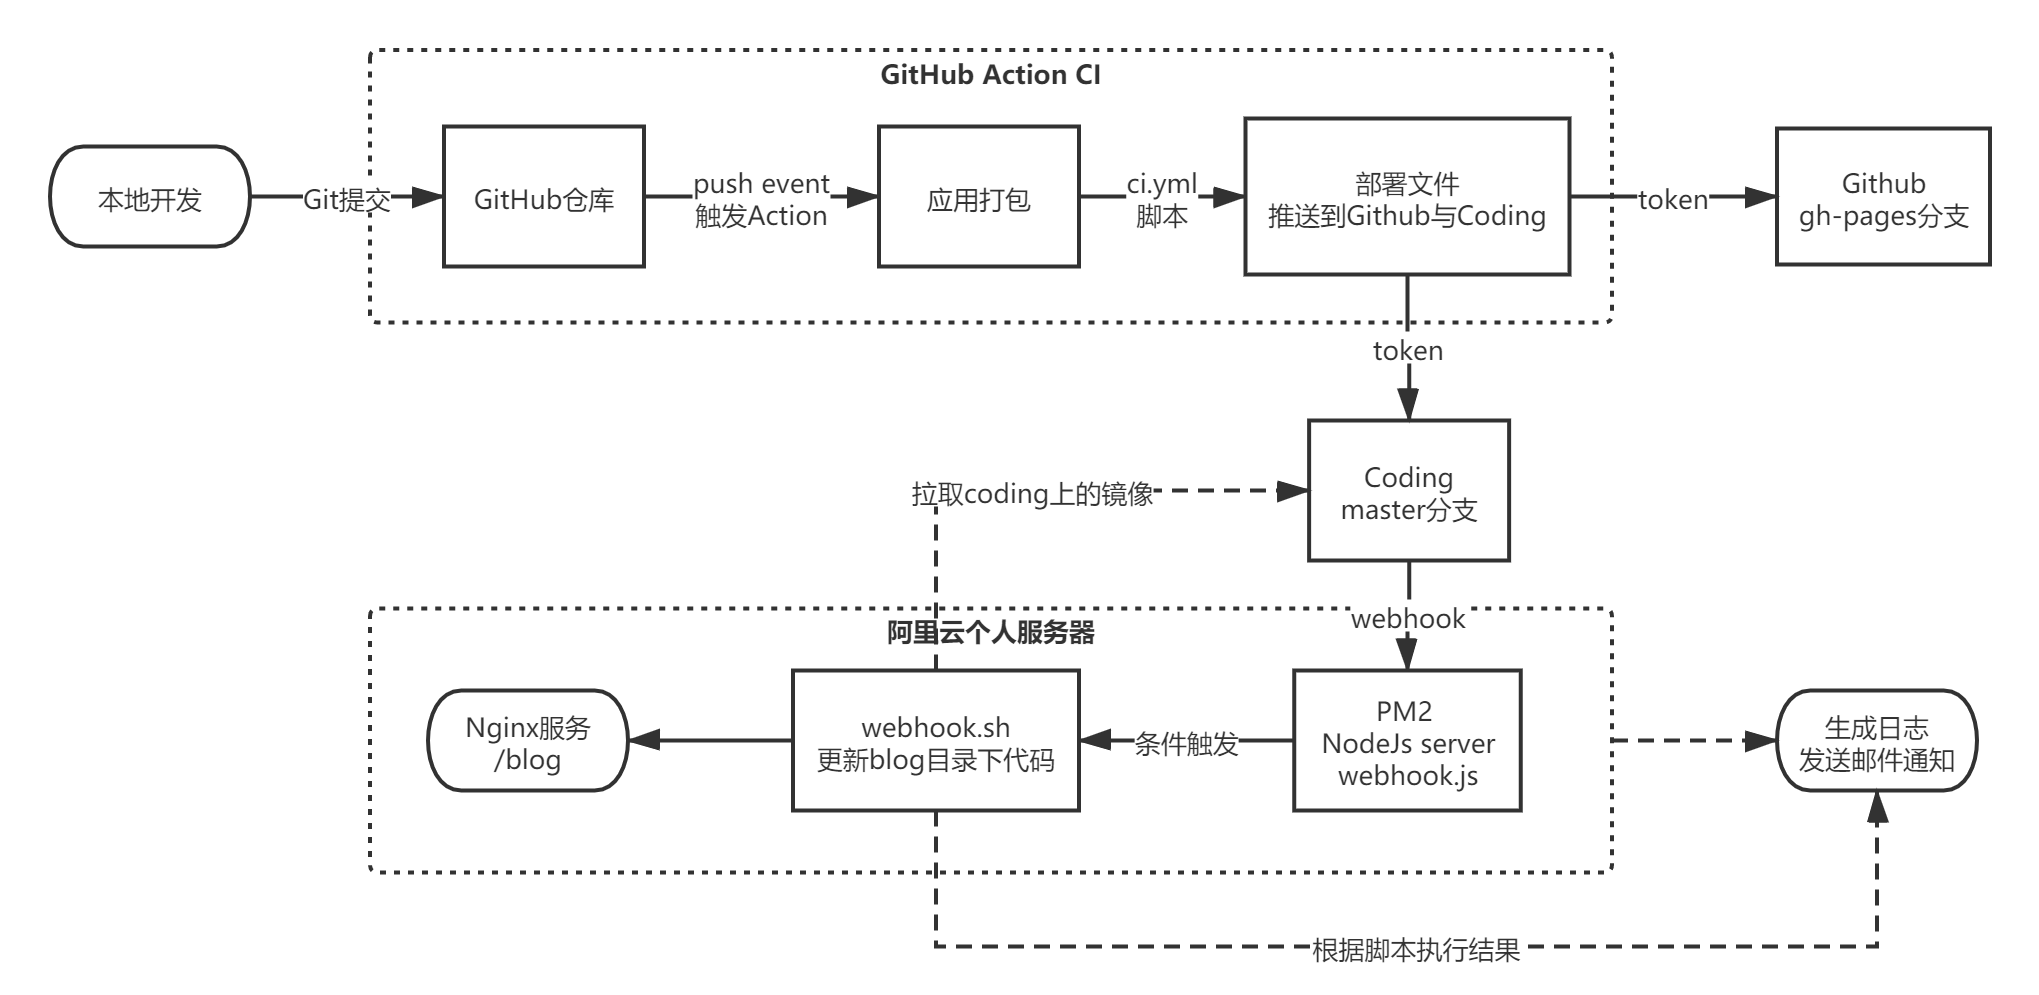
thinking
- The local computer is submitted to the GitHub warehouse through git
- GitHub Action listens to the push event event and triggers ci.yml to execute the script
- The build package generates deployment files and pushes them to the GitHub GH pages branch and the Coding master branch
- Coding sets webhook to listen to push event and trigger webhook hook
- The webhook hook communicates with the http server started in the personal server, verifies the identity and warehouse, and executes the webhook.sh script
- The webhook.sh script cd enters the blog deployment directory under nginx to update git pull
- Generate logs according to the results or add mail notification function (implemented in combination with Nodemailer Library)
flow chart
Create personal Access Token access token
Next, the automatic deployment and continuous integration will use the scheme of submitting code to the warehouse in the form of https. Here, you need to configure the access token and provide the personal access token to the Action and script as an environment variable.
GitHub Token
Step one, follow Official documents , generate a github token.
Step 2: store the key in Settings/Secrets of the current warehouse.
Settings/Secrets is where private environment variables are stored. The name of the environment variable can be used casually. Access is used here_ TOKEN. If you don't use this name, the variable name in the. GitHub / workflow / ci.yml script should also be changed.
Coding Token
Step one, follow Official documents , generate a coding token.
The second step is the same as GitHub
Several schemes
:::tip
Here are examples of several schemes I have tried. The following will carefully analyze and introduce the advantages and disadvantages of each scheme, as well as the methods I gradually improve and try, and the final implementation.
:::
scp commands are deployed directly to the server
Main ideas
Copy the local deployment file directly to the remote server by using the scp command
scp is short for secure copy. It is a secure remote file copy command based on ssh login in linux system. scp transmission is encrypted.
-
Package and compile npm run build locally to obtain the deployment file
-
Update directly by uploading the replacement source file
# 1. This command will traverse and upload the dist file in the current directory to the blog Directory: / blog/dist
scp -r ./dist root@ip/usr/local/app/blog/
# 2. Enter the server password and wait for the transmission to complete
# Of course, you can also upload without password through ssh, but this does not achieve my ultimate goal, so I won't repeat it here
Final effect
- Performance issues with server compilation have been resolved
- The problem of slow pulling speed of GitHub update has been solved
- The steps of packaging, compiling and logging in for each update are still cumbersome
GitHub Action Pages
Main ideas
Realize continuous integration and deployment of GH pages by using Page and Action services provided by GitHub
There are many tutorials for building GH pages online, and I won't repeat the specific implementation.
Here I offer a solution:
Multi address deployment is realized by dynamically generating GH pages branches and pushing them to github warehouse
For example, the GitHub address of my blog: https://JS-banana.github.io/vuepress
Scripting
-
Create. GitHub > workflows > ci.yml under the root directory
-
ci.yml file
jobs: # Workflow
  build: # Custom name
  runs-on: ubuntu-latest #Running in the virtual machine environment Ubuntu latest

  strategy:
    matrix:
    node-version: [14.x]

  steps: # step
    - name: Checkout # Step 1
    uses: actions/checkout@v1 # Action used. Format: userName/repoName.
    #Function: check out the warehouse and obtain the source code. Official actions Library: https://github.com/actions
    - name: Use Node.js ${{ matrix.node-version }} # Step 2
    uses: actions/setup-node@v1 # Function: install nodejs
    with:
      node-version: ${{ matrix.node-version }} # edition
    - name: Deploy # Step 3 deploy to GitHub GH pages
    env: # Setting environment variables
      GITHUB_TOKEN: ${{ secrets.ACCESS_TOKEN }} # token private variable
    run: |
      npm install
      npm run build
      cd ./dist
      git init
      git config user.name "name"
      git config user.email "email"
      git add .
      git commit -m "$(date) Update from Action"
      git push --force --quiet "https://JS-banana:${GITHUB_TOKEN}@github.com/JS-banana/vuepress.git" master:gh-pages
This page item can be used as an alternative address and directed to our own domain name server through CNAME.
CNAME: alias record. This record allows you to map multiple names to another domain name. -
Execute echo 'ssscode. Com' > CNAME command to generate CNAME file, and then put the CNAME file into the generated dist directory. This step can be processed through bash script
-
Let's adjust the above script
jobs: # Workflow build: # Custom name runs-on: ubuntu-latest #Running in the virtual machine environment Ubuntu latest strategy: matrix: node-version: [14.x] steps: # step - name: Checkout # Step 1 uses: actions/checkout@v1 # Action used. Format: userName/repoName. #Function: check out the warehouse and obtain the source code. Official actions Library: https://github.com/actions - name: Use Node.js ${{ matrix.node-version }} # Step 2 uses: actions/setup-node@v1 # Function: install nodejs with: node-version: ${{ matrix.node-version }} # edition - name: Deploy # Step 3 deploy to GitHub GH pages env: # Setting environment variables GITHUB_TOKEN: ${{ secrets.ACCESS_TOKEN }} # token private variable run: npm install && npm run deploy -
Create the deploy.sh file and add the "deploy": "bash deploy.sh" command under the package.json field scripts
#!/usr/bin/env sh

# Make sure the script throws the errors encountered
set -e

# date
nowDate=$(date "+%Y-%m-%d %H:%M:%S")

# Generate static file
npm run build

# Enter the generated folder
cd ./dist

# CNAME
echo 'www.ssscode.com\ssscode.com' > CNAME  # Custom domain name

# github url
githubUrl=https://JS-banana:${GITHUB_TOKEN}@github.com/JS-banana/vuepress.git

# Configure git user information
git config --global user.name "JS-banana"
git config --global user.email "sss213018@163.com"

# commit
git init
git add -A
git commit -m "deploy.sh===>update: ${nowDate}"
git push -f $githubUrl master:gh-pages # Push to github

cd - # Return to the directory where you started
rm -rf ./dist
- At this step, we have completed continuous integration through GitHub Action, packaged and generated deployment files and pushed them to the GH pages branch.
Synchronous deployment of Coding and GitHub
In fact, the principle of this step is the same as that of GitHub Action Pages above, and the most important step we need to do is to configure the Coding token into Settings/Secrets under GitHub warehouse. That is, add an environment variable CODING_TOKEN, this method is also applicable to Gitee. If you want to use Gitee, you can also try it yourself.
ci.yml file added
env: # Setting environment variables
  GITHUB_TOKEN: ${{ secrets.ACCESS_TOKEN }} # github token private variable
+ CODING_TOKEN: ${{ secrets.CODING_TOKEN }} # coding token private variable
Adjust the deploy.sh file to
  # github url
  githubUrl=https://JS-banana:${GITHUB_TOKEN}@github.com/JS-banana/vuepress.git

+ # coding url
+ #be careful!!! Here, you need to use the user name and token of the personal token provided by coding (https://[name]:[token]@e.coding.net/xx)
+ codingUrl=https://ptzv1yuleer1:${CODING_TOKEN}@e.coding.net/ssscode/blog/vuepress.git

  git push -f $githubUrl master:gh-pages # Push to github

- cd - # Return to the directory where you started
- rm -rf ./dist

+ git push -f $codingUrl master # Push to coding

+ cd - # Return to the directory where you started
+ rm -rf ./dist
Continuous deployment of Webhook and Coding
Realization idea
First, a nodejs http server is implemented to receive requests, that is, the webhook.js hook service. Here, I suggest domain name resolution. A secondary domain name is used exclusively by webhook, such as webhook.ssscode.com. Of course, you can directly use the / webhook path as the trigger route under the current project. Here, we take the first scheme as an example, start webhook.js using the pm2 daemon of nodejs, and then map the locally started service to webhook.ssscode.com through nginx reverse proxy.
Create webhook.js
It mainly uses the NodeJs module http (create server) and child_process (execute bash script)
No more nonsense, go straight to the code
// webhook.js
const server = require('http');
const { spawn } = require('child_process');

server
  .createServer((req, res) => {
    // accept request
    console.log(`accept request: ${new Date()}`);
    // Receive POST request
    if (req.method === 'POST') {
      //TODO: secret validation

      let data = '';

      req.on('data', chunk => {
        data += chunk;
      });

      req.on('end', () => {
        // console.log(JSON.parse(data));
        try {
          const reqData = JSON.parse(data);
          // Identify
          if (reqData.pusher.username !== 'xxx') { // coding personal Access Token access token user name
            res.writeHead(400);
            res.end('noooo!');
            return;
          }
          // Determine branch master
          if (reqData.ref === 'refs/heads/master') {
            // Determine warehouse
            const repository_name = reqData.repository.name;
            runCommand('sh', [`${repository_name}.sh`], console.log);
          }
          // response
          res.writeHead(200);
          res.end('ok');
        } catch (error) {
          console.log('error: ', error);
          res.writeHead(500);
          res.end('error!');
        }
      });
    } else {
      res.writeHead(404);
      res.end('no info!');
    }
  })
  .listen(3010); // port

// run command
function runCommand(cmd, args, callback) {
  let response = '';
  const child = spawn(cmd, args);
  child.stdout.on('data', buffer => {
    response += buffer.toString();
  });
  child.stdout.on('end', () => callback(response));
}
The core code is the runCommand function. The server service receives the request parameters, verifies the identity and warehouse information, and executes the corresponding script if the conditions are met. The key is not processed and verified like the github webhook handler package, but the identity and conditions are simply verified. (the authentication key can be set when configuring webhook such as github and coding)
Next, write our bash script, which can be optimized to execute the corresponding script under the corresponding project (that is, if there are multiple projects or blogs, the relevant script is created under the corresponding project and executed by bash).
Create bash script
vuepress.sh core code
#!/usr/bin/env sh
# Make sure the script throws the errors encountered
set -e

cd /usr/local/app/vuepress-blog/dist

echo 'start===>git'

# Overwrite update
git fetch --all
git reset --hard origin/master
# git clean -f
# git pull

cd - # Return to the directory where you started
In order to facilitate recording, viewing and expanding notification messages, exception judgment processing and log output are added here
- cd - # Return to the directory where you started

+ function log_info (){
+   DATE_N=`date "+%Y-%m-%d %H:%M:%S"`
+   USER_N=`whoami`
+   echo "${DATE_N} ${USER_N} execute $0 [INFO] $@" >> /usr/local/app/webhook/logInfo.txt #Execution success log print path
+ }

+ function log_error (){
+   DATE_N=`date "+%Y-%m-%d %H:%M:%S"`
+   USER_N=`whoami`
+   echo -e "\033[41;37m ${DATE_N} ${USER_N} execute $0 [ERROR] $@ \033[0m"  >> /usr/local/app/webhook/logError.txt #Execution failure log print path
+ }

+ if [  $? -eq 0  ]
+ then
+   log_info "$@ sucessed."
+   echo -e "\033[32m $@ sucessed. \033[0m"
+ else
+   log_error "$@ failed."
+   echo -e "\033[41;37m $@ failed. \033[0m"
+   exit 1
+ fi

+ trap 'fn_log "DO NOT SEND CTR + C WHEN EXECUTE SCRIPT !!!! "'  2

+ cd - # Return to the directory where you started
Create nginx configuration
nginx configuration
server {
  #Extranet
  listen 80;
  server_name webhook.ssscode.com; #domain name

  # Listening to local services
  location / {
    # Turn on reverse proxy
    proxy_pass http://127.0.0.1:3010/;
  }
}
Execute node. / webhook.js to start the test~
pm2
PM2 is a node process management tool, which can be used to simplify many cumbersome tasks of node application management, such as performance monitoring, automatic restart, load balancing, etc. PM2 easy to use manual
To facilitate the management of NodeJs programs and monitoring, it is recommended to use pm2 start webhook.js to start the service
Github or Gitee combined with webhook
Because I use the method of combining Coding with webhook. If a small partner is interested in other methods, they can also build their own. The principle is similar. At present, Github and Gitee also have open source npm packages to provide fast webhook communication services. github-webhook-handler,gitee-webhook-handler
epilogue
It's done~
Generally speaking, I tried many methods repeatedly, explored and found ideas, and then made continuous improvement. Finally, I realized my original idea, but I did take a lot of detours. Here, I will record the whole process for my own reference. In order to deepen my understanding, I hope I can help my partners in need and avoid detours~
If you configure all kinds of services and codes and business logic, it really takes time and energy, and the technical points involved are relatively complex. Many places can only be barely used, which is far from enough. The whole process is also trying while learning. However, after all, it is also very helpful for your technical growth and business understanding~
A quick blog framework like Hexo can save a lot of things. You can try it if you are interested. I'm also working on it, but it hasn't achieved my expected effect. Let's see if there is anything to write and share it later
After that, it is also necessary to learn more about Docker~
Supplement on June 8, 2021
Use Travis and sshpass tools to upload local files to remote servers.
.travis.yml
language: node_js
node_js:
  - 12
branchs:
  - master
addons:
  apt:
    packages:
    - sshpass
install:
  "npm install"
script:
  - "npm run build"
after_success:
  - ./deploy.sh
deploy.sh
#!/usr/bin/env sh

# Make sure the script throws the errors encountered
set -e

# Package static resources
npm run build

# Send dist file to remote
sshpass -p ${serverPass} scp -o stricthostkeychecking=no -r dist/ root@${serverIP}:/home/web/movie-trailer
Advantages: convenient and fast
Disadvantages: using sshpass is the least secure, because users on all systems can see the password through a simple "ps" command on the command line.
reference resources
https://docs.github.com/cn/actions
https://xugaoyi.com/pages/6b9d359ec5aa5019/
https://docs.github.com/cn/github/authenticating-to-github/creating-a-personal-access-token
https://help.coding.net/docs/member/tokens.html
http://www.ruanyifeng.com/blog/2016/07/yaml.html
https://juejin.cn/post/6844903710037016584