1, Build mysql container service
1. Pull image
docker pull mysql:8.0.20
2. Create any container (just to copy the mount directory)
docker run -p 3306:3306 --name mysql -e MYSQL_ROOT_PASSWORD=123456 -d mysql:8.0.20
Check whether the startup is successful:
docker ps -a

3. After successful startup, enter the container and copy the configuration file to the host
docker cp mysql:/etc/mysql /usr/software/docker_dir/mysql8.0.20_1

Copy the / etc/mysql directory of the container to the host directory / usr/software/docker_dir/mysql8.0.20_1 .
4. Delete the mysql container and recreate the container
You need to stop the container before deleting it
docker stop mysql

docker rm mysql
5. Re create the mysql container, mount the configuration file, and persist the data to the host
docker run \
-p 3306:3306 \
--name mysql_1 \
--privileged=true \
--restart=always \
-v /usr/software/docker_dir/mysql8.0.20_1/mysql:/etc/mysql \
-v /usr/software/docker_dir/mysql8.0.20_1/logs:/logs \
-v /usr/software/docker_dir/mysql8.0.20_1/data:/var/lib/mysql \
-v /etc/localtime:/etc/localtime \
-e MYSQL_ROOT_PASSWORD=123456 \
-d mysql:8.0.20
Command interpretation:
- -p port mapping
- – privileged=true mount file permission settings
- – restart unless stopped set to automatically restart the container after startup
- -v /usr/software/docker_dir/mysql8.0.20_1/mysql:/etc/mysql mount configuration file
- -v/usr/software/docker_dir/mysql8.0.20_1/logs:/logs mount log
- -v /usr/software/docker_dir/mysql8.0.20_1/data:/var/lib/mysql mount the data file and persist it to the host
- -v /etc/localtime:/etc/localtime container time is synchronized with the host
- -e MYSQL_ROOT_PASSWORD=123456 set password
- -d mysql:8.0.20 start mysql in the background
Mounting is divided into file mounting and directory mounting:
1. When attaching files, the host computer needs to create files in advance, otherwise there will be problems. If you don't create a file yourself, it will be created into a directory after executing the command
2. When you mount a directory, you do not need to create a directory yourself. The folders under the directory in the container will be copied according to the mounting path of the directory
3. After the mount is successful, if the contents of the mounted file are modified, the files in the container will not be updated in real time, and the container needs to be restarted. If you modify the files in the mount directory, they will be updated in real time, so it is recommended to mount the directory
Check whether the container is started successfully:
docker ps

6. Enter the container to log in to the MySql service
Login daemon container mode:
docker exec -it mysql_1 bash

mysql -uroot -p
Enter the password 123456 and successfully log in to the mysql service!

Yes, the mysql service is built.
Note that at this time, the database configuration, data, logs and other information are mounted on the host computer. We can check:

7. Remote Navicat connection test

An error occurred while discovering the remote connection! Because only local connections are allowed by default.
8. Turn on remote login
After connecting to the mysql client in the container, first view the user and connectable host information:
Note that when I query with "select user,host from user;", I find that:
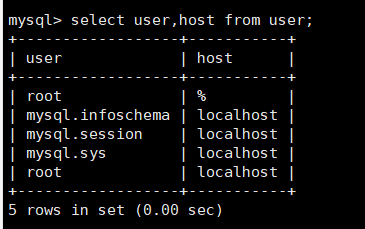
You can see that the host corresponding to the root user is actually localhost and%. This means that the remote user should be able to connect to the service using the root user!
So we don't need to execute the following sql first.
use mysql;
update user set host='%' where user='root';
flush privileges;
Let's try to change the root user password.
9. Modify user password
Let's execute the following sql:
select host,user,plugin,authentication_string from mysql.user;

remarks:
- host% means unlimited ip
- localhost indicates native use
- plugin is not mysql_native_password, you need to change the password
It's strange here. The host and user of the message corresponding to% of the root user seem to be garbled. However, through comparison, we should still be able to determine that the first item listed should be root ~%. Therefore, we still do not need to modify the remote login.
According to the third remark, the plugin is not mysql_native_password needs to be changed. We try to change the root user password (equivalent to changing to the original password):
ALTER USER 'root'@'%' IDENTIFIED WITH mysql_native_password BY '123456';

After the modification is successful, we will query again:

It is found that the information of the last random code has become normal. At this time, the plugin corresponding to root% has become mysql_native_password.
Let's try Navicat connection again:

As you can see, you can connect normally and successfully!!!
2, Modify the configuration file and test the directory mount
Modify the my.cnf configuration file, open the binlog log, and specify severId.
[mysqld]
server-id=47
#Enable binlog
log_bin=master-bin
log_bin-index=master-bin.index
skip-name-resolve
# Set connection port
port=3306
# Set mysql installation directory
# basedir=/usr/local/mysql
# Set the storage directory of mysql database data
# datadir=/usr/local/mysql/mysql-files
# Maximum connections allowed
max_connections=200
# Number of connection failures allowed.
max_connect_errors=10
# The character set used by the server is UTF8 by default
character-set-server=utf8
# The default storage engine that will be used when creating new tables
default-storage-engine=INNODB
# The "mysql_native_password" plug-in authentication is used by default
#mysql_native_password
default_authentication_plugin=mysql_native_password
1. Modify the configuration on the host
We first enter the host * * / usr/software/docker_dir/mysql8.0.20_1/mysql * * Directory:

Let's modify my.cnf file and add the above content after the original configuration file:
vim my.cnf

2. Restart container
docker restart mysql_1
Then, we need to assign a replication slave permission to the root user.
#Log in to the master database
mysql -u root -p
GRANT REPLICATION SLAVE ON *.* TO 'root'@'%';
flush privileges;
#To view the master node synchronization status:
show master status;
