Docker
Refer to learning video: [crazy God talking about Java] Docker's latest super detailed tutorial is easy to understand
1, Docker overview
1.1 why does Docker appear?
One product: development – online two sets of environments! Application environment, application configuration!
Development - operation and maintenance. Question: I can allow it on my computer! Service unavailable due to version update! Is it a big test for operation and maintenance?
The environment configuration is very troublesome. Every machine needs to deploy the environment (cluster Redis, ES, Hadoop...)! It takes a lot of trouble.
Publish a project (jar + (Redis MySQL JDK ES)). Can the project be installed and packaged with the environment!
Previously, configuring an application environment Redis, MySQL, JDK, ES and Hadoop on the server was too cumbersome to cross platform. Development environment Windows, finally released to Linux!
Tradition: development jar, operation and maintenance to do!
Now: development, packaging, deployment and launch, and a set of processes are completed!
Android process: java apk publishing (app store) - Zhang San can use apk as soon as he installs it!
Docker process: Java jar (environment) - package the project with environment (image) - (docker warehouse: store) --- download the image we released - just run it directly!
Docker has proposed solutions to the above problems!
Docker's idea comes from the container!
JRE – multiple applications (Port conflict) – they are all cross!
Isolation: the core idea of Docker! Packing and packing! Each box is isolated from each other.
Docker can make full use of the server through the isolation mechanism!
Essence: all technologies are learned because there are some problems that we need to solve!
1.2 history of Dcoker
In 2010, several young people engaged in IT set up a company dotcloud in the United States
Do some pass cloud computing services! Container technology related to LXC (Linux Container)!
- Linux Container is a kernel virtualization technology that can provide lightweight virtualization to isolate processes and resources.
They named their technology (container technology) Docker.
When Docker was just born, it didn't attract the attention of the industry! dotCloud can't live!
- Open Source
In 2013, Docker was open source!
More and more people find the advantages of docker! It's popular. Docker will update a version every month!
Docker1.0 was released on April 9, 2014!
**Why is docker so hot? * * very light!
Before container technology came out, we all used virtual machine technology!
Virtual machine: install a VMware in the window. Through this software, we can virtual one or more computers! Bulky!
Virtual machine also belongs to virtualization technology. Docker container technology is also a virtualization technology!
- VM: Linux CentOS native image (one computer!) is isolated, and multiple virtual machines need to be turned on! A few G's and a few minutes
- docker: isolation. The image (the core environment 4m + jdk + mysql) is very compact. Just run the image!
A few M seconds to start!
Docker is an open source project based on Go language!
Docker official website: https://www.docker.com/
file: https://docs.docker.com/ Docker's documentation is super detailed!
Warehouse: https://hub.docker.com/ Equivalent to github
1.3 what can Docker do?
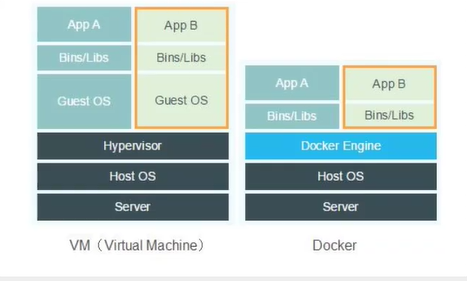
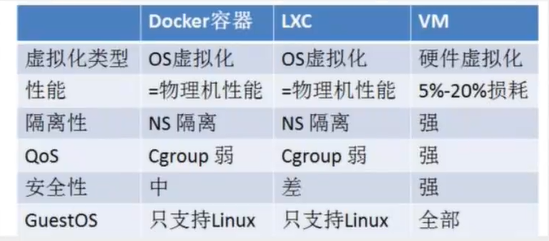
Compare Docker and virtual machine technologies:
- The traditional virtual machine virtualizes a piece of hardware, runs a complete operating system, and then installs and runs software on this system
- The applications in the container run directly on the content of the host. The container does not have its own kernel or virtual hardware, so
It's light - Each container is isolated from each other. Each container has its own file system, which does not affect each other
1.4 DevOps (development, operation and maintenance)
- Faster delivery and deployment of applications
Traditional: a pair of help documents, installer.
Docker: the packaged image publishing test runs with one click.
- More convenient upgrade and capacity expansion
After using Docker, we deploy applications just like building blocks
The project is packaged as an image to expand server A and server B
- Simpler system operation and maintenance
After containerization, our development and test environments are highly consistent
- More efficient utilization of computing resources
Docker is kernel level virtualization, which can run many container instances on a physical machine! The performance of the server can be squeezed
To the extreme.
2, Installation
2.1 basic composition of Docker
- Image:
The docker image is like a target. Container services can be created through this target. The tomcat image = = > Run = = > container (providing server). Multiple containers can be created through this image (the final service run or project run is in the container).
- Container:
Docker uses container technology to run one or a group of applications independently and create them through image
Start, stop, delete, basic commands
At present, this container can be understood as a simple Linux system.
- Repository:
The warehouse is where the image is stored!
Warehouses are divided into public warehouses and private warehouses. (very similar to git)
Docker Hub is foreign.
Alicloud... All have container servers (configure image acceleration!)
2.2. Installing Docker
Environmental preparation
- Linux requires kernel 3.0 or above
[root@iZwz99sm8v95sckz8bd2c4Z ~]# uname -r
3.10.0-957.21.3.el7.x86_64
- View system configuration
[root@iZwz99sm8v95sckz8bd2c4Z ~]# cat /etc/os-release
NAME="CentOS Linux"
VERSION="7 (Core)"
ID="centos"
ID_LIKE="rhel fedora"
VERSION_ID="7"
PRETTY_NAME="CentOS Linux 7 (Core)"
ANSI_COLOR="0;31"
CPE_NAME="cpe:/o:centos:centos:7"
HOME_URL="https://www.centos.org/"
BUG_REPORT_URL="https://bugs.centos.org/"

CENTOS_MANTISBT_PROJECT="CentOS-7"
CENTOS_MANTISBT_PROJECT_VERSION="7"
REDHAT_SUPPORT_PRODUCT="centos"
REDHAT_SUPPORT_PRODUCT_VERSION="7"
- uninstall
yum remove docker \
                  docker-client \
                  docker-client-latest \
                  docker-common \
                  docker-latest \
                  docker-latest-logrotate \
                  docker-logrotate \
                  docker-engine
Understanding: uninstalling Docker
#1. Uninstall dependency
yum remove docker-ce docker-ce-cli containerd.io
#2. Delete resources
rm -rf /var/lib/docker
# /var/lib/docker is the default working path of docker!
- install
Help documentation: docker help documentation
- Download the required installation package
yum install -y yum-utils
- Set up a mirrored warehouse
yum-config-manager \
    --add-repo \
    https://download.docker.com/linux/centos/docker-ce.repo # foreign address

    # Set up Alibaba cloud Docker image warehouse
yum-config-manager \
    --add-repo \
    https://mirrors.aliyun.com/docker-ce/linux/centos/docker-ce.repo # foreign address
- Update yum package index
yum makecache fast
- Install the configuration related to docker. Docker CE is the community version and docker EE is the enterprise version
yum install docker-ce docker-ce-cli containerd.io
When completed appears, the installation is successful.
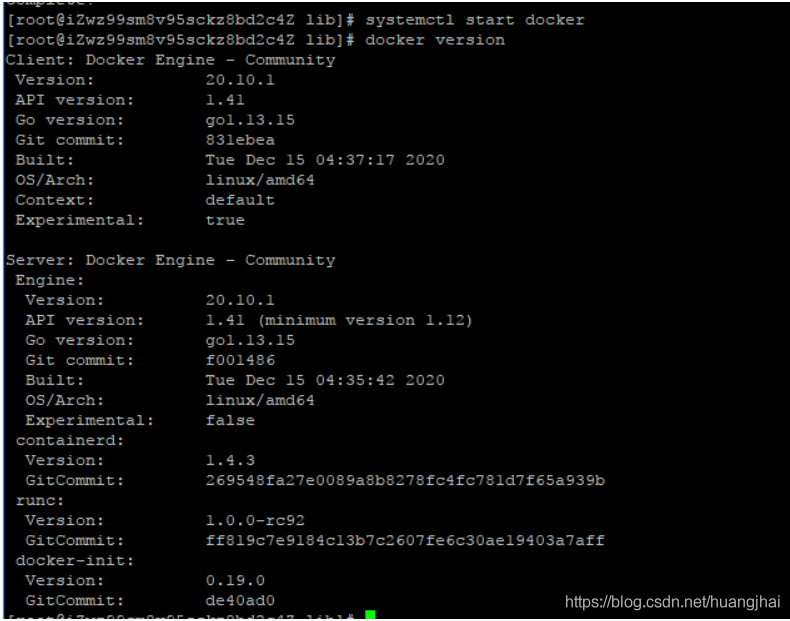
5. Start Docker
systemctl start docker
# Check the current version number to see if it is started successfully
docker version
# Set startup and self startup
systemctl enable docker
Download a hello world image to test:
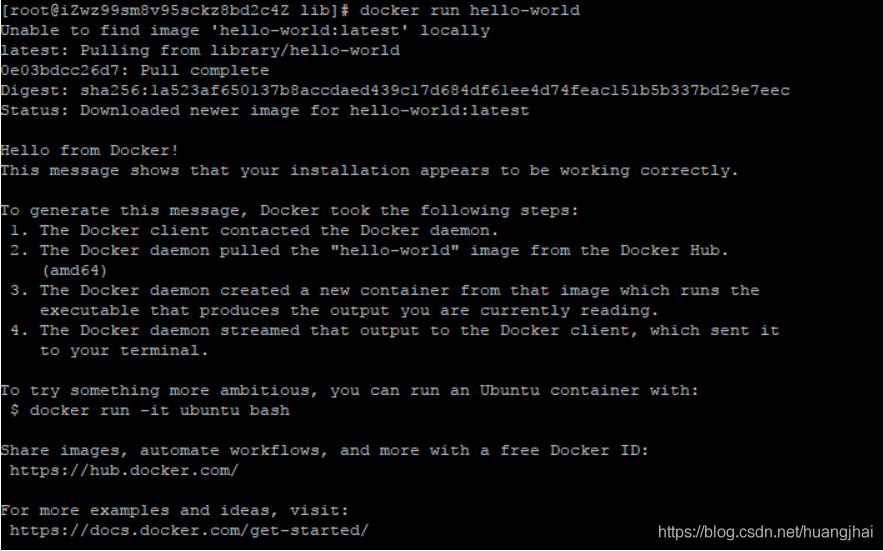
View the downloaded hello world image:
[root@iZwz99sm8v95sckz8bd2c4Z lib]# docker images
REPOSITORY    TAG       IMAGE ID       CREATED         SIZE
hello-world   latest    bf756fb1ae65   11 months ago   13.3kB
- Uninstallation of Docker
# 1. Uninstall dependency
yum remove docker-ce docker-ce-cli containerd.io
# 2. Delete resources. / var/lib/docker is the default working path of docker
rm -rf /var/lib/docker
2.3 Alibaba cloud image acceleration
1. Log in to alicloud and find the container service
2. Mirror accelerator found
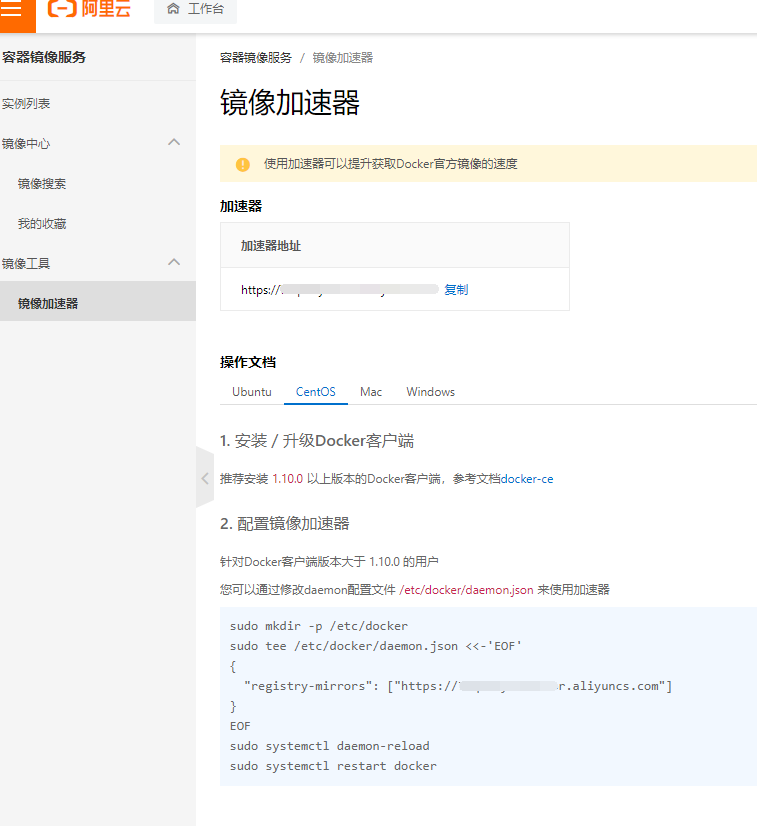
3. Configuration use
Execute the four official orders in turn:
sudo mkdir -p /etc/docker
sudo tee /etc/docker/daemon.json <<-'EOF'
{
  "registry-mirrors": ["https://axvfsf7e.mirror.aliyuncs.com"]
}
EOF
sudo systemctl daemon-reload
sudo systemctl restart docker
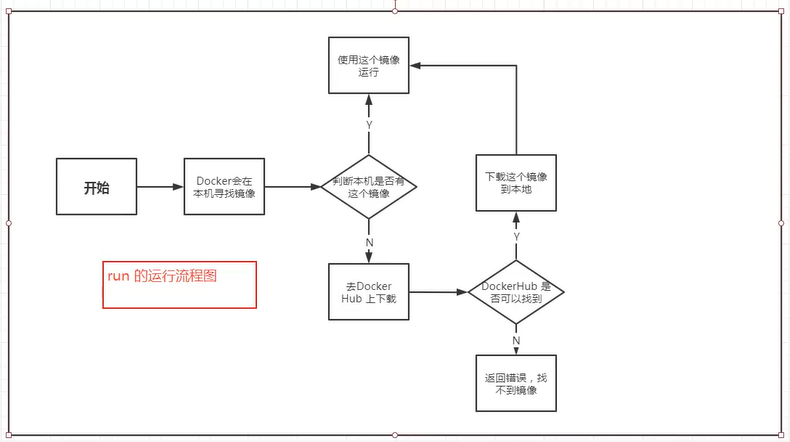
Review the HelloWorld process
2.4 bottom layer principle
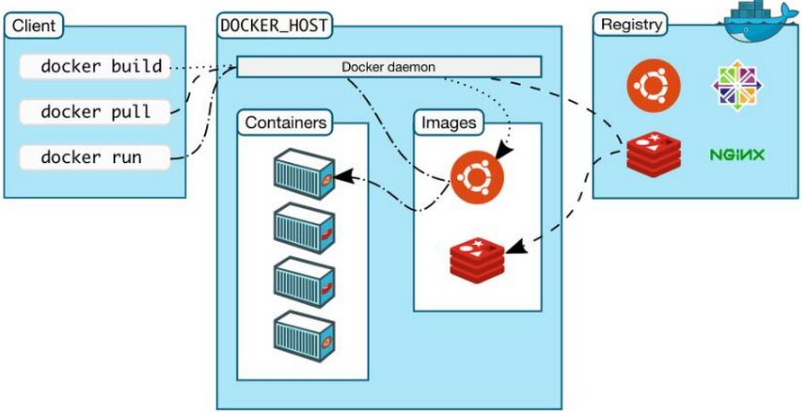
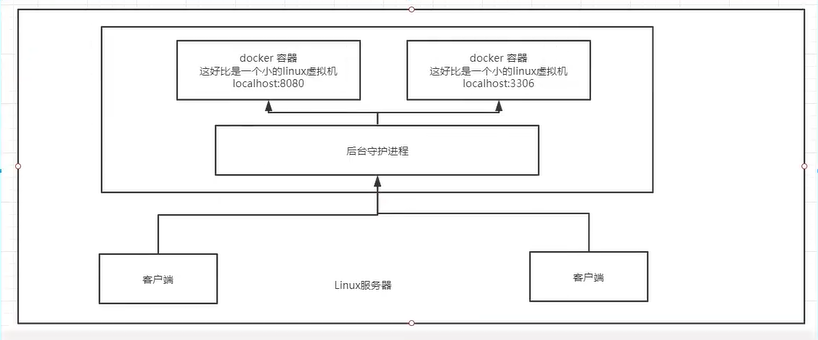
How does Docker work?
Docker is a client server system. The daemon of docker runs on the host. It is accessed from the client through the Socket
Ask!
When docker server receives the docker client instruction, it will execute this command!
Why is Docker faster than VM?
1. Dokcer has fewer layers of abstraction than virtual machines. Because docker does not need Hypervisor to realize hardware resource virtualization, the programs running on the docker container directly use the hardware resources of the actual physical machine. Therefore, docker will have obvious advantages in CPU and memory utilization.
2. docker uses the kernel of the host, and the vm needs to be the Guest OS
Therefore, when creating a new container, docker does not need to reload an operating system kernel like a virtual machine to avoid booting. The virtual machine loads the Guest OS at the minute level, while docker uses the host operating system, omitting this complex process at the second level!
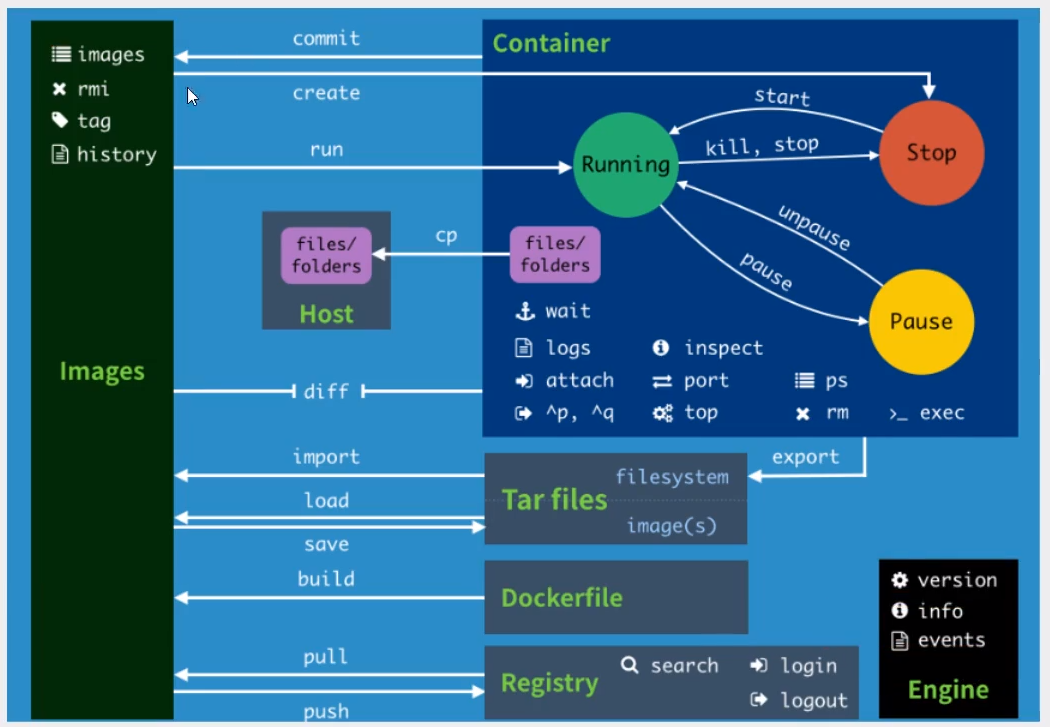
3, Common commands of Docker
3.1 help command
docker version          #View the version information of docker
docker info             #View the system information of docker, including the number of images and containers
docker command --help       #Help command (optional parameters can be viewed)
docker COMMAND --help
Address of help document: https://docs.docker.com/engine/reference/commandline/docker/
3.2. Image command
[root@iZwz99sm8v95sckz8bd2c4Z ~]# docker images
REPOSITORY    TAG       IMAGE ID       CREATED         SIZE
hello-world   latest    bf756fb1ae65   11 months ago   13.3kB

#Explanation:
1.REPOSITORY  Mirrored warehouse source

2.TAG  Mirrored label

3.IMAGE ID mirrored  id

4.CREATED Creation time of the image

5.SIZE Mirror size


# Optional parameters

-a/--all List all mirrors

-q/--quiet Show only mirrored id
docker search search image
[root@iZwz99sm8v95sckz8bd2c4Z ~]# docker search mysql
NAME                              DESCRIPTION                                     STARS     OFFICIAL   AUTOMATED
mysql                             MySQL is a widely used, open-source relation...   10308     [OK]
mariadb                           MariaDB is a community-developed fork of MyS...   3819      [OK]
mysql/mysql-server                Optimized MySQL Server Docker images. Create...   754                  [OK]
percona                           Percona Server is a fork of the MySQL relati...   517       [OK]
centos/mysql-57-centos7           MySQL 5.7 SQL database server                   86
mysql/mysql-cluster               Experimental MySQL Cluster Docker images. Cr...   79
centurylink/mysql                 Image containing mysql. Optimized to be link...   60                   [OK]


#Optional parameters

Search the Docker Hub for images

Options:
 -f, --filter filter   Filter output based on conditions provided
     --format string   Pretty-print search using a Go template
     --limit int       Max number of search results (default 25)
     --no-trunc        Don't truncate output


#Search for images with more than 3000 collections
[root@iZwz99sm8v95sckz8bd2c4Z ~]# docker search mysql --filter=STARS=3000
NAME      DESCRIPTION                                     STARS     OFFICIAL   AUTOMATED
mysql     MySQL is a widely used, open-source relation...   10308     [OK]
mariadb   MariaDB is a community-developed fordockerk of MyS...   3819      [OK]
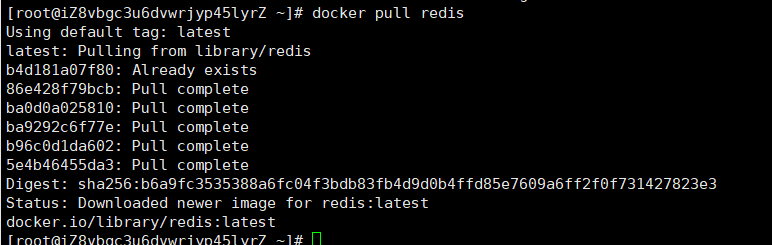
docker pull Download Image
[root@iZwz99sm8v95sckz8bd2c4Z ~]# docker pull mysql
Using default tag: latest            #If you do not write tag, the default is latest
latest: Pulling from library/mysql
6ec7b7d162b2: Pull complete          #Layered download, the core of docker image - federated file system
fedd960d3481: Pull complete
7ab947313861: Pull complete
64f92f19e638: Pull complete
3e80b17bff96: Pull complete
014e976799f9: Pull complete
59ae84fee1b3: Pull complete
ffe10de703ea: Pull complete
657af6d90c83: Pull complete
98bfb480322c: Pull complete
6aa3859c4789: Pull complete
1ed875d851ef: Pull complete
Digest: sha256:78800e6d3f1b230e35275145e657b82c3fb02a27b2d8e76aac2f5e90c1c30873 #autograph
Status: Downloaded newer image for mysql:latest
docker.io/library/mysql:latest
#The real address of the download source  #docker pull mysql is equivalent to docker pull docker.io/library/mysql:latest
Specified version download:
[root@iZwz99sm8v95sckz8bd2c4Z ~]# docker pull mysql:5.7
5.7: Pulling from library/mysql
6ec7b7d162b2: Already exists
fedd960d3481: Already exists
7ab947313861: Already exists
64f92f19e638: Already exists
3e80b17bff96: Already exists
014e976799f9: Already exists
59ae84fee1b3: Already exists
7d1da2a18e2e: Pull complete
301a28b700b9: Pull complete
529dc8dbeaf3: Pull complete
bc9d021dc13f: Pull complete
Digest: sha256:c3a567d3e3ad8b05dfce401ed08f0f6bf3f3b64cc17694979d5f2e5d78e10173
Status: Downloaded newer image for mysql:5.7
docker.io/library/mysql:5.7
docker rmi delete image
#1. Delete the specified image id
[root@iZwz99sm8v95sckz8bd2c4Z ~]# docker rmi -f image id
#2. Delete multiple image IDS
[root@iZwz99sm8v95sckz8bd2c4Z ~]# docker rmi -f image id image id
#3. Delete all image IDs
[root@iZwz99sm8v95sckz8bd2c4Z ~]# docker rmi -f  $(docker images -aq)
3.3 container command
docker run image id Create a new container and start
docker ps Listing all running containers is equivalent to  docker container list
docker rm container id Delete specified container
docker start container id #Start container
docker restart container id #Restart container
docker stop container id #Stop the currently running container
docker kill container id #Force stop of current container
Note: only when we have an image can we create a container. For linux, download a centos image to test and learn
docker pull centos
Run container:
docker run [Optional parameters] image

#Parameter description
--name="name"           Specify container name
-d                     Run in background mode
-it                    Run interactively,Enter the container to view the contents
-p                     Specifies the port of the container
(
-p ip:Host port:Container port configuration host ports are mapped to container ports
-p Host port:Container port
-p Container port
)
-P                     Randomly assigned port(Capitalized P)
Enter container
[root@iZwz99sm8v95sckz8bd2c4Z ~]# docker run -it centos /bin/bash
[root@bd1b8900c547 /]# ls
bin  dev  etc  home  lib  lib64  lost+found  media  mnt  opt  proc  root  run  sbin  srv  sys  tmp  usr  var
Exit container
exit # Direct container stop and exit Ctrl + P + Q # The container does not stop exiting
Delete container
docker rm container id                # Delete the specified container. You cannot delete the running container. If you want to forcibly delete rm -f
docker rm -f $(docker ps -aq)  # Delete all containers
docker ps -a -qlxargs docker rm  # Delete all containers
Start and stop container operation
docker start container id	 #Start container
docker restart container id  #Restart container
docker stop container id 	 #Stop the currently running container
docker kill container id 	 #Force stop of current container
3.4. Other common commands
View the log and the operation of the container
[root@iZwz99sm8v95sckz8bd2c4Z ~]# docker logs --help

Usage:  docker logs [OPTIONS] CONTAINER

Fetch the logs of a container

Options:
      --details        Show extra details provided to logs
  -f, --follow         Follow log output
      --since string   Show logs since timestamp (e.g. 2013-01-02T13:23:37Z) or relative (e.g. 42m for 42 minutes)
  -n, --tail string    Number of lines to show from the end of the logs (default "all")
  -t, --timestamps     Show timestamps
      --until string   Show logs before a timestamp (e.g. 2013-01-02T13:23:37Z) or relative (e.g. 42m for 42 minutes)

Common:
docker logs -tf container id
docker logs --tail number container id #num is the number of log entries to display


#The docker container runs in the background. There must be a foreground process, otherwise it will stop automatically
#Write a shell script to execute circularly to keep the centos container running
[root@iZwz99sm8v95sckz8bd2c4Z ~]# docker run -d centos /bin/sh -c "while true;do echo hi;sleep 5;done"
c703b5b1911ff84d584390263a35707b6024816e1f46542b61918a6327a570dc
[root@iZwz99sm8v95sckz8bd2c4Z ~]# docker ps
CONTAINER ID   IMAGE     COMMAND                  CREATED          STATUS          PORTS     NAMES
c703b5b1911f   centos    "/bin/sh -c 'while t..."   13 seconds ago   Up 10 seconds             pedantic_banach
[root@iZwz99sm8v95sckz8bd2c4Z ~]# docker logs -tf --tail 10 c703b5b1911f
2020-12-27T03:34:07.255599560Z hi
2020-12-27T03:34:12.257641517Z hi
2020-12-27T03:34:17.259706294Z hi
2020-12-27T03:34:22.261693707Z hi
2020-12-27T03:34:27.262609289Z hi
2020-12-27T03:34:32.267862677Z hi
2020-12-27T03:34:37.270382873Z hi
2020-12-27T03:34:42.272414182Z hi
2020-12-27T03:34:47.274823243Z hi
2020-12-27T03:34:52.277419274Z hi
View the process information in the container ps
# Command docker top container id
[root@iZwz99sm8v95sckz8bd2c4Z ~]# docker top c703b5b1911f
UID                 PID                 PPID                C                   STIME               TTY                 TIME                CMD
root                11156               11135               0                   11:31               ?                   00:00:00            /bin/sh -c while true;do echo hi;sleep 5;done
root                11886               11156               0                   11:43               ?                   00:00:00            /usr/bin/coreutils --coreutils-prog-shebang=sleep /usr/bin/sleep 5
View the metadata of the image
# Command docker inspect container id
[root@iZwz99sm8v95sckz8bd2c4Z ~]# docker inspect container id
Enter the currently running container
We usually run the container in the background mode. We need to enter the container and modify some configurations
- Method 1: after docker exec enters the container, open a new terminal, which can be operated inside
[root@iZwz99sm8v95sckz8bd2c4Z ~]# docker exec -it c703b5b1911f /bin/bash
[root@c703b5b1911f /]# ls
bin  dev  etc  home  lib  lib64  lost+found  media  mnt  opt  proc  root  run  sbin  srv  sys  tmp  usr  var
[root@c703b5b1911f /]# ps -ef
UID        PID  PPID  C STIME TTY          TIME CMD
root         1     0  0 03:31 ?        00:00:00 /bin/sh -c while true;do echo hi;sleep 5;done
root       279     0  0 03:54 pts/0    00:00:00 /bin/bash
root       315     1  0 03:56 ?        00:00:00 /usr/bin/coreutils --coreutils-prog-shebang=sleep /usr/bin/sleep 5
root       316   279  0 03:56 pts/0    00:00:00 ps -ef
- Mode 2: docker attach enters the terminal where the container is executing and will not start a new process
[root@iZwz99sm8v95sckz8bd2c4Z ~]# docker attach c703b5b1911f
Copy from container to host
docker cp container id:Host path for in container destination
# View the current host directory
[root@iZ8vbgc3u6dvwrjyp45lyrZ home]# ls
kuangshen.java
[root@iZ8vbgc3u6dvwrjyp45lyrZ home]# docker ps
CONTAINER ID   IMAGE     COMMAND       CREATED              STATUS              PORTS     NAMES
0b308ba7528d   centos    "/bin/bash"   About a minute ago   Up About a minute             jovial_kepler

# Enter the docker container
[root@iZ8vbgc3u6dvwrjyp45lyrZ home]# docker attach 0b308ba7528d
[root@0b308ba7528d /]# cd /home
[root@0b308ba7528d home]# ls

# Create a new file in the container
[root@0b308ba7528d home]# touch test.java
[root@0b308ba7528d home]# exit
[root@iZ8vbgc3u6dvwrjyp45lyrZ home]# docker ps
CONTAINER ID   IMAGE     COMMAND   CREATED   STATUS    PORTS     NAMES
[root@iZ8vbgc3u6dvwrjyp45lyrZ home]# docker ps -a
CONTAINER ID   IMAGE     COMMAND       CREATED         STATUS                     PORTS     NAMES
0b308ba7528d   centos    "/bin/bash"   4 minutes ago   Exited (0) 2 minutes ago             jovial_kepler

# Copy this file to the host
[root@iZ8vbgc3u6dvwrjyp45lyrZ home]# docker cp 0b308ba7528d:/home/test.java /home
[root@iZ8vbgc3u6dvwrjyp45lyrZ home]# ls
kuangshen.java  test.java
# Copying is a manual process, which can be realized in the future by using -v volume technology
4, Summary
practice
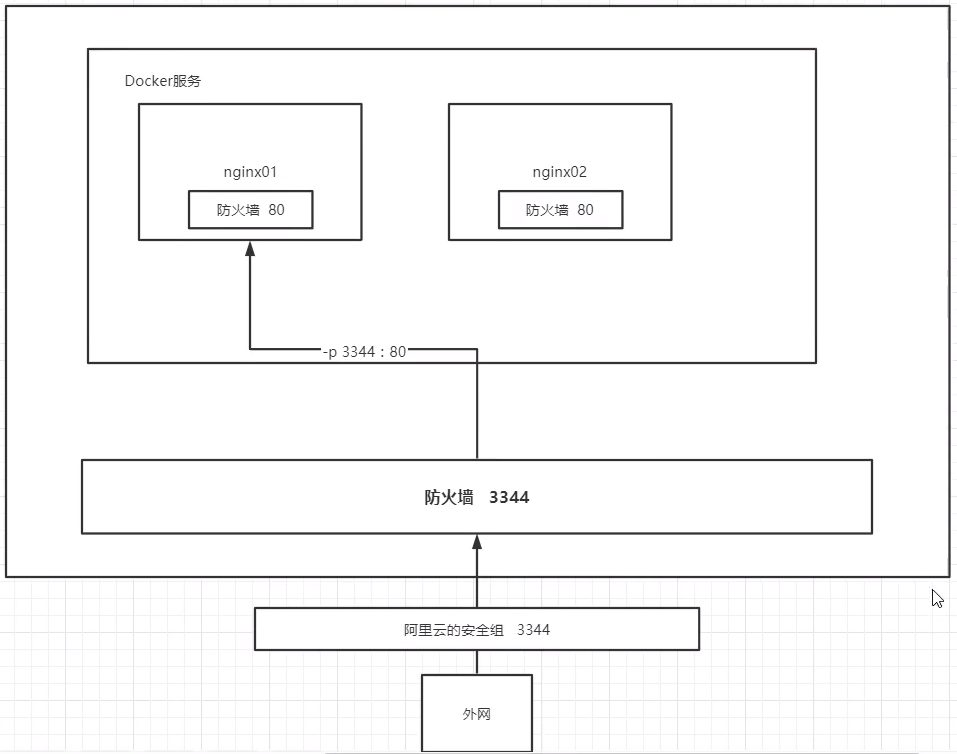
1. Install nginx
[root@iZwz99sm8v95sckz8bd2c4Z ~]# docker search nginx
NAME                               DESCRIPTION                                     STARS     OFFICIAL   AUTOMATED
nginx                              Official build of Nginx.                        14207     [OK]
jwilder/nginx-proxy                Automated Nginx reverse proxy for docker con...   1932                 [OK]
richarvey/nginx-php-fpm            Container running Nginx + PHP-FPM capable of...   797                  [OK]
linuxserver/nginx                  An Nginx container, brought to you by LinuxS...   137
jc21/nginx-proxy-manager           Docker container for managing Nginx proxy ho...   123
tiangolo/nginx-rtmp                Docker image with Nginx using the nginx-rtmp...   107                  [OK]
[root@iZwz99sm8v95sckz8bd2c4Z ~]# docker pull nginx
Using default tag: latest
latest: Pulling from library/nginx
6ec7b7d162b2: Already exists
cb420a90068e: Pull complete
2766c0bf2b07: Pull complete
e05167b6a99d: Pull complete
70ac9d795e79: Pull complete
Digest: sha256:4cf620a5c81390ee209398ecc18e5fb9dd0f5155cd82adcbae532fec94006fb9
Status: Downloaded newer image for nginx:latest
docker.io/library/nginx:latest
[root@iZwz99sm8v95sckz8bd2c4Z ~]# docker images
REPOSITORY   TAG       IMAGE ID       CREATED       SIZE
mysql        5.7       f07dfa83b528   5 days ago    448MB
nginx        latest    ae2feff98a0c   11 days ago   133MB
centos       latest    300e315adb2f   2 weeks ago   209MB
You can view the detailed version information of Nginx on the official website of dockerhub: Detailed version information of Nginx
Run test
docker run -d --name nginx01 -p 3334:80 nginx

-d Background operation
--name Name the container
-p 3334:80 Map port 3334 of the host to port 80 of the container
Operation results:
[root@iZwz99sm8v95sckz8bd2c4Z ~]# docker exec -it nginx01 /bin/bash
Error: No such container: nginx01
[root@iZwz99sm8v95sckz8bd2c4Z ~]# docker run -d --name nginx01 -p 3334:80 nginx
20c896637ff5de8be835797109d62ee2465e28d9d716be5a8d550ef7d547fcf5
[root@iZwz99sm8v95sckz8bd2c4Z ~]# docker ps
CONTAINER ID   IMAGE     COMMAND                  CREATED         STATUS         PORTS                  NAMES
20c896637ff5   nginx     "/docker-entrypoint...."   7 seconds ago   Up 5 seconds   0.0.0.0:3334->80/tcp   nginx01
Port exposure diagram:
Modify profile
Enter the container and customize the configuration file:
[root@iZwz99sm8v95sckz8bd2c4Z ~]# docker exec -it nginx01 /bin/bash

root@20c896637ff5:/# whereis nginx
nginx: /usr/sbin/nginx /usr/lib/nginx /etc/nginx /usr/share/nginx

root@20c896637ff5:/# cd /etc/nginx
root@20c896637ff5:/etc/nginx# ls
conf.d	fastcgi_params	koi-utf  koi-win  mime.types  modules  nginx.conf  scgi_params	uwsgi_params  win-utf

root@20c896637ff5:/# cd /etc/nginx
root@20c896637ff5:/etc/nginx# ls
conf.d	fastcgi_params	koi-utf  koi-win  mime.types  modules  nginx.conf  scgi_params	uwsgi_params  win-utf
Access test:
For the local host access test, the curl command initiates a request. If you use Alibaba cloud server, you need to set a security group.
[root@iZwz99sm8v95sckz8bd2c4Z ~]# docker ps
CONTAINER ID   IMAGE     COMMAND                  CREATED         STATUS         PORTS                  NAMES
20c896637ff5   nginx     "/docker-entrypoint...."   7 minutes ago   Up 7 minutes   0.0.0.0:3334->80/tcp   nginx01
[root@iZwz99sm8v95sckz8bd2c4Z ~]# curl localhost:3334
<!DOCTYPE html>
<html>
<head>
<title>Welcome to nginx!</title>
<style>
    body {
        width: 35em;
        margin: 0 auto;
        font-family: Tahoma, Verdana, Arial, sans-serif;
    }
</style>
</head>
<body>
<h1>Welcome to nginx!</h1>
<p>If you see this page, the nginx web server is successfully installed and
working. Further configuration is required.</p>

<p>For online documentation and support please refer to
<a href="http://nginx.org/">nginx.org</a>.<br/>
Commercial support is available at
<a href="http://nginx.com/">nginx.com</a>.</p>

<p><em>Thank you for using nginx.</em></p>
</body>
</html>
Thinking question: every time we change the nginx configuration file, we need to enter the container? It's very troublesome. If I can provide a mapping path outside the container to modify the file name in the container, it can be automatically modified inside the container- v data volume!
2. Install tomcat
Download and run
[root@iZwz99sm8v95sckz8bd2c4Z ~]# docker pull tomcat
Using default tag: latest
latest: Pulling from library/tomcat
6c33745f49b4: Pull complete
ef072fc32a84: Pull complete
c0afb8e68e0b: Pull complete
d599c07d28e6: Pull complete
e8a829023b97: Pull complete
d04be46a31d1: Pull complete
db6007c69c35: Pull complete
e4ad4c894bce: Pull complete
248895fda357: Pull complete
277059b4cba2: Pull complete
Digest: sha256:57dae7dfb9b62a413cde65334c8a18893795cac70afc3be589c8336d8244655d
Status: Downloaded newer image for tomcat:latest
docker.io/library/tomcat:latest
[root@iZwz99sm8v95sckz8bd2c4Z ~]# docker run -d -p 3335:8080 --name tomcat01 tomcat
7136295a6082cb0f805b025a1471bde02ead4864be3e2c9dcd337b1dde0a3113
Enter container:
-
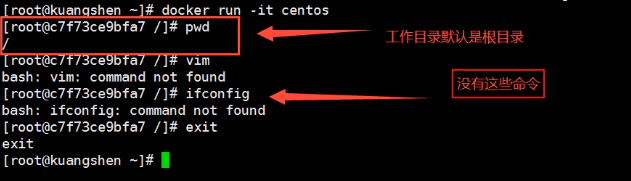
There are fewer commands in the container
-
There is no webapps, the reason for Alibaba cloud image. The default is the smallest image. All unnecessary images are eliminated to ensure the smallest operating environment.
[root@iZwz99sm8v95sckz8bd2c4Z ~]# docker exec -it tomcat01 /bin/bash

root@7136295a6082:/usr/local/tomcat# ls
BUILDING.txt  CONTRIBUTING.md  LICENSE	NOTICE	README.md  RELEASE-NOTES  RUNNING.txt  bin  conf  lib  logs  native-jni-lib  temp  webapps  webapps.dist  work

root@7136295a6082:/usr/local/tomcat# cd webapps.dist

root@7136295a6082:/usr/local/tomcat/webapps.dist# ls
ROOT  docs  examples  host-manager  manager

root@7136295a6082:/usr/local/tomcat/webapps.dist# cd ROOT

root@7136295a6082:/usr/local/tomcat/webapps.dist/ROOT# ls
RELEASE-NOTES.txt  WEB-INF  asf-logo-wide.svg  bg-button.png  bg-middle.png  bg-nav.png  bg-upper.png  favicon.ico  index.jsp  tomcat.css  tomcat.svg

root@7136295a6082:/usr/local/tomcat/webapps.dist/ROOT# cd ../../

root@7136295a6082:/usr/local/tomcat# cd webapps

root@7136295a6082:/usr/local/tomcat/webapps# ls
# After entering the container, we can also find a folder webapps.dist. After entering, we find that there are items in it, so we can copy the items into the webapps folder, so we can visit it again to see the home page of tomcat
root@7136295a6082:/usr/local/tomcat/webapps# cp -r /usr/local/tomcat/webapps.dist/* /usr/local/tomcat/webapps/

root@7136295a6082:/usr/local/tomcat/webapps# ls   # After copying, check the content under webapps
ROOT  docs  examples  host-manager  manager
root@7136295a6082:/usr/local/tomcat/webapps# exit
exit
Access test
[root@iZwz99sm8v95sckz8bd2c4Z ~]# curl localhost:3335

<!DOCTYPE html>
<html lang="en">
    <head>
        <meta charset="UTF-8" />
        <title>Apache Tomcat/9.0.41</title>
        <link href="favicon.ico" rel="icon" type="image/x-icon" />
        <link href="tomcat.css" rel="stylesheet" type="text/css" />
    </head>

    <body>
        <div id="wrapper">
            <div id="navigation" class="curved container">
                <span id="nav-home"><a href="https://tomcat.apache.org/">Home</a></span>
                <span id="nav-hosts"><a href="/docs/">Documentation</a></span>
                <span id="nav-config"><a href="/docs/config/">Configuration</a></span>
                <span id="nav-examples"><a href="/examples/">Examples</a></span>
                <span id="nav-wiki"><a href="https://wiki.apache.org/tomcat/FrontPage">Wiki</a></span>
                <span id="nav-lists"><a href="https://tomcat.apache.org/lists.html">Mailing Lists</a></span>
                <span id="nav-help"><a href="https://tomcat.apache.org/findhelp.html">Find Help</a></span>
                <br class="separator" />
            </div>
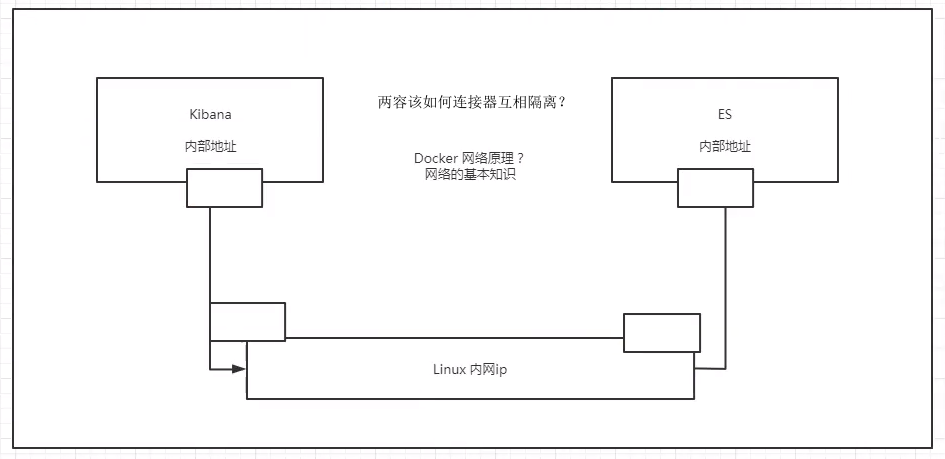
3. Deploy es+kibana
# es exposes many ports
# It's very memory intensive
# es data generally needs to be placed in the security directory! mount
# -- net somenetwork ?  network configuration

# Start elasticsearch
[root@hyu ~]# docker run -d --name elasticsearch --net somenetwork -p 9200:9200 -p 9300:9300 -e "discovery.type=single-node" elasticsearch:7.6.2
# docker stats: check the cpu status

# Is the test successful
[root@hyu ~]# curl localhost:9200
{
  "name" : "4312005f806d",
  "cluster_name" : "docker-cluster",
  "cluster_uuid" : "cP69XdDdSSSnTATKs_RCLw",
  "version" : {
    "number" : "7.6.2",
    "build_flavor" : "default",
    "build_type" : "docker",
    "build_hash" : "ef48eb35cf30adf4db14086e8aabd07ef6fb113f",
    "build_date" : "2020-03-26T06:34:37.794943Z",
    "build_snapshot" : false,
    "lucene_version" : "8.4.0",
    "minimum_wire_compatibility_version" : "6.8.0",
    "minimum_index_compatibility_version" : "6.0.0-beta1"
  },
  "tagline" : "You Know, for Search"
}

# Increase the memory limit and modify the configuration file -e environment configuration
[root@hyu ~]# docker run -d --name elasticsearch02 -p 9200:9200 -p 9300:9300 -e "discovery.type=single-node" -e ES_JAVA_OPTS="-Xms64m -Xmx512m" elasticsearch:7.6.2
dae35d256b40f9d74a448ab087dc5e168b66ca16654ecc4ced28f2bc961e3ced

# View cpu status, docker stats
CONTAINER ID   NAME              CPU %     MEM USAGE / LIMIT   MEM %     NET I/O   BLOCK I/O    PIDS
dae35d256b40   elasticsearch02   1.00%     356.1MiB / 3.7GiB   9.40%     0B / 0B   0B / 700kB   42
Job: using kibana to connect es? Think about how the network can connect.
Docker visualization
What is a portal?
Docker graphical interface management tool! Provide a background panel for us to operate!
# Run the following command to open the visualization service
[root@localhost conf]# docker run -d -p 8088:9000 --restart=always -v /var/run/docker.sock:/var/run/docker.sock --privileged=true portainer/portainer

Unable to find image 'portainer/portainer:latest' locally
latest: Pulling from portainer/portainer
94cfa856b2b1: Pull complete
49d59ee0881a: Pull complete
a2300fd28637: Pull complete
Digest: sha256:fb45b43738646048a0a0cc74fcee2865b69efde857e710126084ee5de9be0f3f
Status: Downloaded newer image for portainer/portainer:latest
8c525a0137be22965bd1e3944da622a2c4248f8ad20883f4b3ea4f8a6b11e163

[root@iZwz99sm8v95sckz8bd2c4Z ~]# docker ps
CONTAINER ID   IMAGE                 COMMAND        CREATED         STATUS         PORTS                    NAMES
7789d4505a00   portainer/portainer   "/portainer"   6 seconds ago   Up 5 seconds   0.0.0.0:8088->9000/tcp   quirky_sinoussi
visit: http://ip:8080/
Set the password of admin user for the first login:
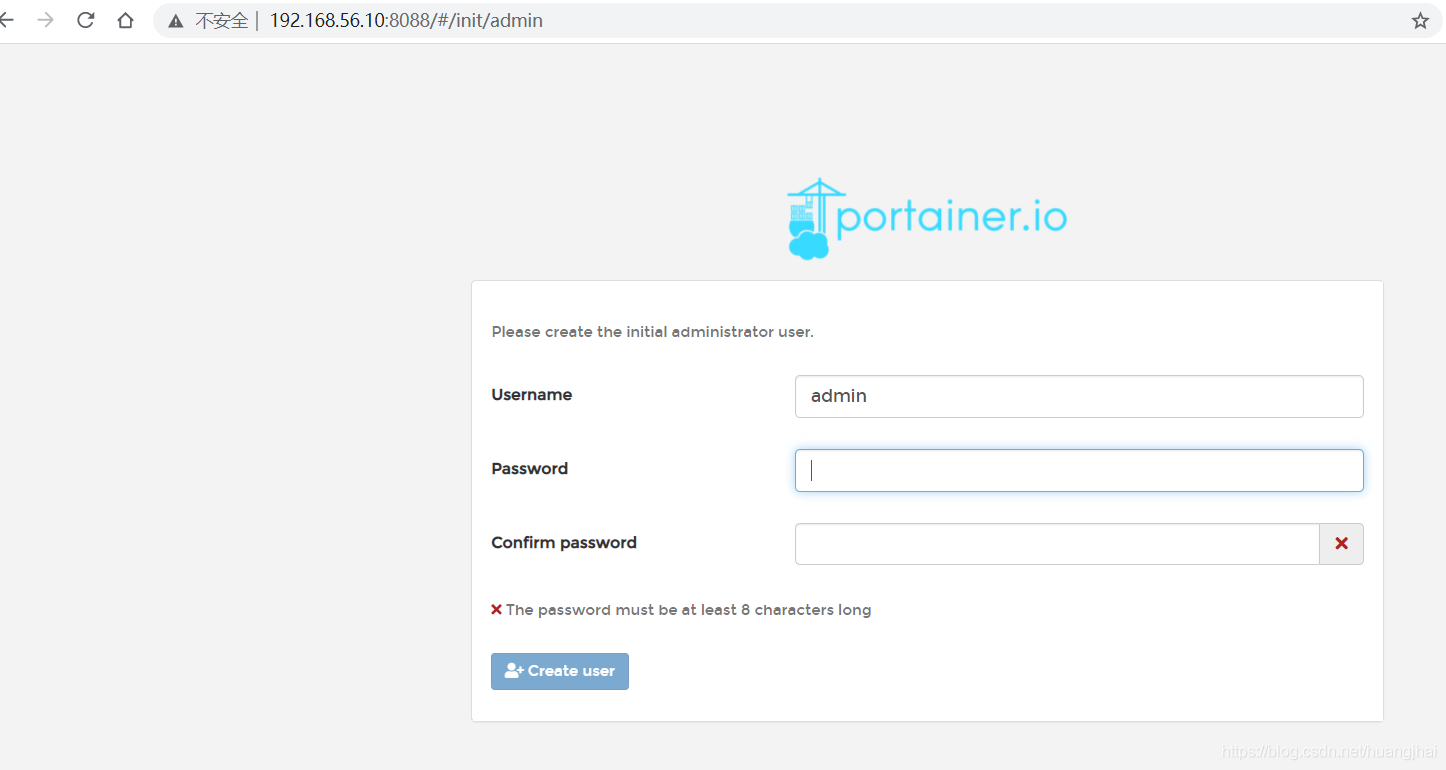
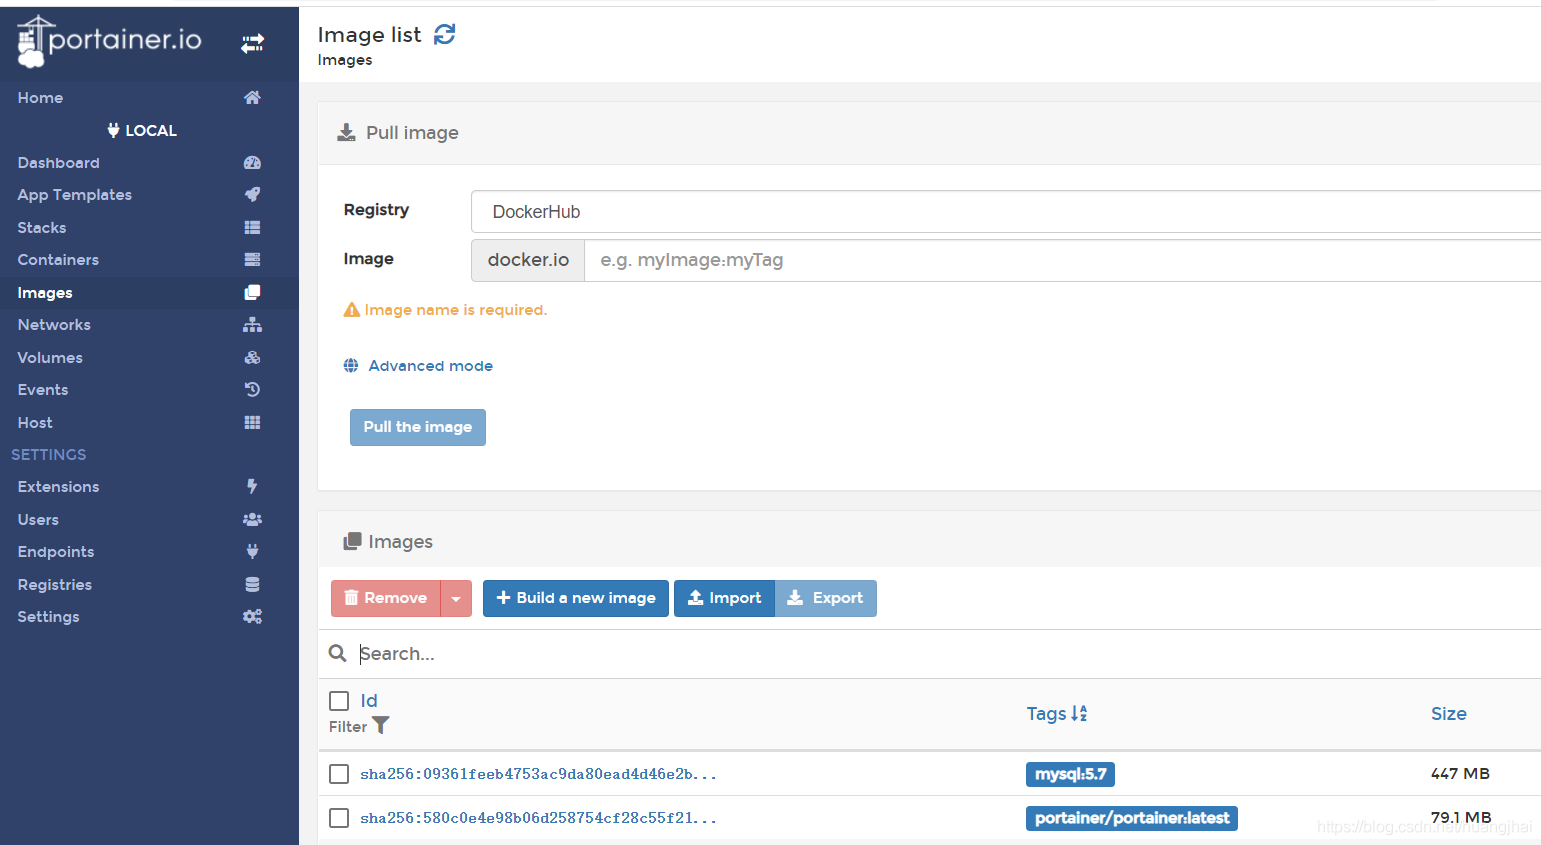
If it is an alicloud server, remember to set a security group and select the local Docker. The overall interface preview is shown in the figure below:
5, Docker image explanation
5.1 what is a mirror image
Image is a lightweight and executable independent software package, which is used to package the software running environment and the software developed based on the running environment. It contains all the contents required to run a software, including code, runtime, library, environment variables and configuration files.
All applications can run directly by directly packaging the docker image!
How to get the image:
- Download from remote warehouse
- Friend copy to you
- Make an image DockerFile by yourself
5.2. Docker image loading principle
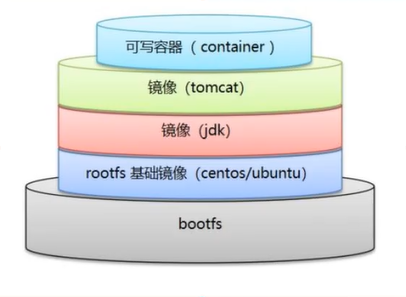
Union fs (Federated file system): Union file system (Union FS) is a layered, lightweight and high-performance file system. It supports the superposition of file system modifications from one submission to another. At the same time, different directories can be mounted into a single virtual file system. The union file system is the foundation of Docker image. Images can be inherited through layering. Based on the basic image (without parent image), various specific application images can be made.
Features: multiple file systems are loaded at the same time, but from the outside, only one file system can be seen. Joint loading will superimpose the file system and, so that the final file system contains all underlying files and directories
Dcoker image loading principle
The image of docker is actually composed of a layer by layer file system, which is called UnionFS.
Bootfs (boot file system) mainly includes bootloader and kernel. Bootloader is mainly used to boot and load the kernel. Bootfs file system will be loaded when Linux starts up. Bootfs is at the bottom of Docker image. This layer is the same as the Linux/Unix system of our electric box, including boot loader and kernel. After the boot is loaded, the whole kernel is in memory. At this time, the right to use the memory has been transferred from bootfs to the kernel. At this time, the system will also unload bootfs.
rootfs (root file system), above bootfs. It contains standard directories and files such as / dev, / proc, / bin, / etc in a typical Linux system. rootfs is a variety of operating system distributions, such as Ubuntu, Centos and so on.
- Usually, the CentOS installed into the virtual machine is several G, why is Docker only 200M?
For a thin OS,rootfs can be very small. You only need to package the most basic commands, tools and program libraries. Because the underlying layer directly uses the Host kernel, you only need to provide rootfs. It can be seen that for different Linux distributions, boots are basically the same, and rootfs will be different. Therefore, different distributions can share bootfs.
The virtual machine is at the minute level and the container is at the second level!
5.3 layered understanding
We can download an image and pay attention to the log output of the download. We can see that it is downloading layer by layer.
Thinking: why does Docker image adopt this hierarchical structure?
The biggest benefit, I think, is resource sharing! For example, if multiple images are built from the same base image, the host only needs to keep one base image on the disk, and only one base image needs to be loaded in memory, so that it can serve all containers, and each layer of the image can be shared.
You can view the image hierarchy through the docker image inspect command
[root@iZ8vbgc3u6dvwrjyp45lyrZ ~]# docker image inspect redis:latest
Hierarchical information is indicated here:
        "RootFS": {
            "Type": "layers",
            "Layers": [
                "sha256:87c8a1d8f54f3aa4e05569e8919397b65056aa71cdf48b7f061432c98475eee9",
                "sha256:5c4e5adc71a82a96f02632433de31c998c5a9e2fccdcbaee780ae83158fac4fa",
                "sha256:7d2b207c26790f693ab1942bbe26af8e2b6a14248969e542416155a912fec30d",
                "sha256:2c7498eef94aef8c40d106f3e42f7da62b3eee8fd36012bf7379becc4cd639a2",
                "sha256:4eaf0ea085df254fd5d2beba4e2c11db70a620dfa411a8ad44149e26428caee4"
            ]
        },
understand:
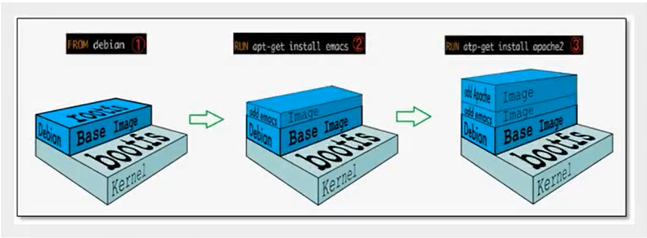
All docker images start from a basic image layer. When modifying or adding new content, a new image layer will be created on top of the current image layer.
For a simple example, add a new image based on Ubuntu Linux 16.04, which is the first layer of the new image; If a Python package is added to the image, a second image layer will be inserted above the basic image layer; If you continue to add a security patch, a third mirror layer will be created.
The image currently contains three image layers, as shown in the figure below (this is only a very simple example for demonstration).

It is important to understand that while adding additional mirror layers, mirroring always maintains the combination of all current mirrors. The following figure shows a simple example. Each mirror layer contains 3 files, while the mirror layer contains 6 files from two mirror layers.
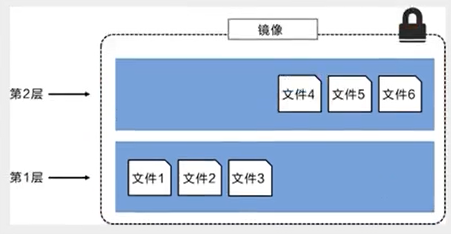
The image layer in the above figure is slightly different from that in the previous figure. The main purpose is to facilitate the display of files.
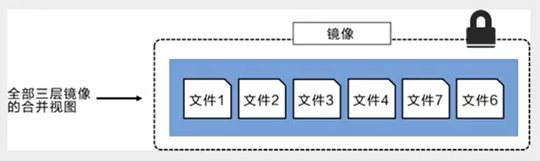
The following figure always shows a slightly complex three-tier image. Externally, there are only 6 files in the entire image, because the top-level file 7 is an updated version of file 5.

In this case, the files in the upper mirror layer overwrite the files in the lower mirror layer. In this way, the updated version of the file is added to the image as a new image layer.
Docker uses the storage engine (the new version adopts the snapshot mechanism) to solid the image layer stack and ensure that multiple image layers are displayed as a unified file system.
Available storage engines on Linux include AUFS, Overlay2, device mapper, Btrfs and ZFS. As the name suggests, each storage engine is based on the corresponding file system or block device technology in Linux, and each storage engine has its unique performance characteristics.
Docker only supports a Windows filer storage engine on windows, which implements layering and cow based on NTFS file system [1].
The following figure shows the same three-tier image as the system display. All mirror layers are stacked and merged to provide a unified view.
characteristic
Docker images are read-only. When the container opens, a new writable layer is loaded on the top of the image!
This layer is what we usually call the container layer. What is under the container is called the mirror layer.
5.4. commit image
use docker commit The command submission container becomes a new version

docker commit -m=""Submitted description"  -a="author" container id Target image name:[TAG]
Since there is nothing in the webapps folder of the default Tomcat image, you need to copy the file from webapps.dist to the webapps folder. Make your own image: copy the file from webapps.dist to the webapps folder, and submit the image as a new image. Make the image have files in the default webapps folder.
The specific commands are as follows:
#1. Copy folder

[root@iZwz99sm8v95sckz8bd2c4Z ~]# docker run -it tomcat /bin/bash
root@2a3bf3eaa2e4:/usr/local/tomcat# cd webapps
root@2a3bf3eaa2e4:/usr/local/tomcat/webapps# ls
root@2a3bf3eaa2e4:/usr/local/tomcat/webapps# cd ../
root@2a3bf3eaa2e4:/usr/local/tomcat# cp -r webapps.dist/* webapps
root@2a3bf3eaa2e4:/usr/local/tomcat# cd webapps
root@2a3bf3eaa2e4:/usr/local/tomcat/webapps# ls
ROOT  docs  examples  host-manager  manager
[root@iZwz99sm8v95sckz8bd2c4Z ~]# docker ps
CONTAINER ID   IMAGE                 COMMAND        CREATED         STATUS         PORTS                    NAMES
2a3bf3eaa2e4   tomcat                "/bin/bash"    4 minutes ago   Up 4 minutes   8080/tcp                 competent_torvalds
7789d4505a00   portainer/portainer   "/portainer"   24 hours ago    Up 24 hours    0.0.0.0:8088->9000/tcp   quirky_sinoussi
[root@iZwz99sm8v95sckz8bd2c4Z ~]# docker exec -it 2a3bf3eaa2e4 /bin/bash
root@2a3bf3eaa2e4:/usr/local/tomcat# cd webapps
root@2a3bf3eaa2e4:/usr/local/tomcat/webapps# ls
ROOT  docs  examples  host-manager  manager
root@2a3bf3eaa2e4:/usr/local/tomcat/webapps# cd ../
root@2a3bf3eaa2e4:/usr/local/tomcat# read escape sequence
[root@iZwz99sm8v95sckz8bd2c4Z ~]# docker ps
CONTAINER ID   IMAGE                 COMMAND        CREATED         STATUS         PORTS                    NAMES
2a3bf3eaa2e4   tomcat                "/bin/bash"    8 minutes ago   Up 8 minutes   8080/tcp                 competent_torvalds
7789d4505a00   portainer/portainer   "/portainer"   24 hours ago    Up 24 hours    0.0.0.0:8088->9000/tcp   quirky_sinoussi

#2. Commit the image as a new image

[root@iZwz99sm8v95sckz8bd2c4Z ~]# docker commit -m="add webapps" -a="Ethan" 2a3bf3eaa2e4 mytomcat:1.0
sha256:f189aac861de51087af5bc88a5f1de02d9574e7ee2d163c647dd7503a2d3982b
[root@iZwz99sm8v95sckz8bd2c4Z ~]# docker images
REPOSITORY            TAG       IMAGE ID       CREATED         SIZE
mytomcat              1.0       f189aac861de   7 seconds ago   653MB
mysql                 5.7       f07dfa83b528   6 days ago      448MB
tomcat                latest    feba8d001e3f   10 days ago     649MB
nginx                 latest    ae2feff98a0c   12 days ago     133MB
centos                latest    300e315adb2f   2 weeks ago     209MB
portainer/portainer   latest    62771b0b9b09   5 months ago    79.1MB
elasticsearch         7.6.2     f29a1ee41030   9 months ago    791MB

#3. Operation container

[root@iZwz99sm8v95sckz8bd2c4Z ~]# docker run -it mytomcat:1.0 /bin/bash
root@1645774d4605:/usr/local/tomcat# cd webapps
root@1645774d4605:/usr/local/tomcat/webapps# ls
ROOT  docs  examples  host-manager  manager
wz99sm8v95sckz8bd2c4Z ~]# docker images
REPOSITORY            TAG       IMAGE ID       CREATED         SIZE
mytomcat              1.0       f189aac861de   7 seconds ago   653MB
mysql                 5.7       f07dfa83b528   6 days ago      448MB
tomcat                latest    feba8d001e3f   10 days ago     649MB
nginx                 latest    ae2feff98a0c   12 days ago     133MB
centos                latest    300e315adb2f   2 weeks ago     209MB
portainer/portainer   latest    62771b0b9b09   5 months ago    79.1MB
elasticsearch         7.6.2     f29a1ee41030   9 months ago    791MB

If you want to save the state of the current container, you can commit through commit to obtain an image, just as we use the snapshot of the virtual machine.
It's only here that you can get started successfully!!!!
6, Container data volume
6.1 what is a container roll?
Review of docker's concept
Package the application and environment into an image!
data If the data is in the container, the data will be lost if we delete the container! Requirement: data can be persisted
Mysql, the container is deleted, delete the database and run! Requirement: MySQL data can be stored locally!
There can be a data sharing technology between containers! Synchronize the data generated in Docker container to the local!
This is volume technology! Directory mount, mount the directory in our container to Linux!
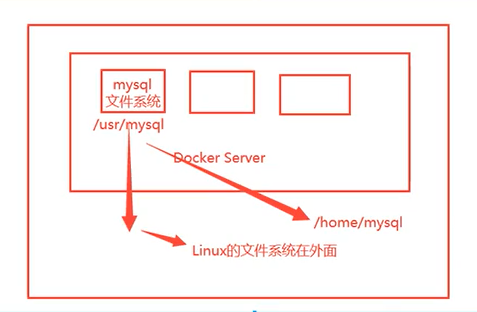
To sum up: container persistence and synchronization! Data can also be shared between containers!
6.2. Using data volumes
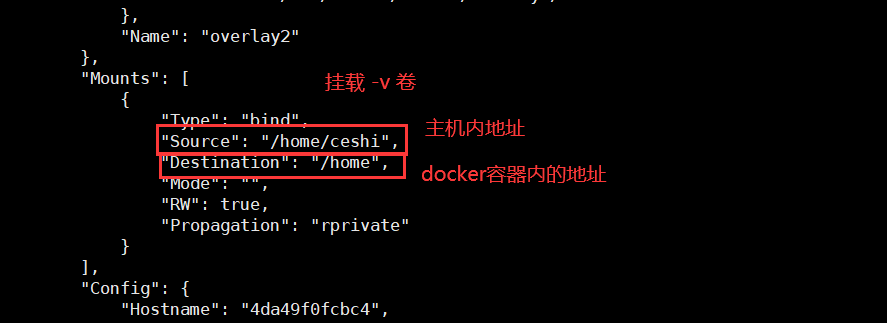
Method 1: directly use the command to mount - v
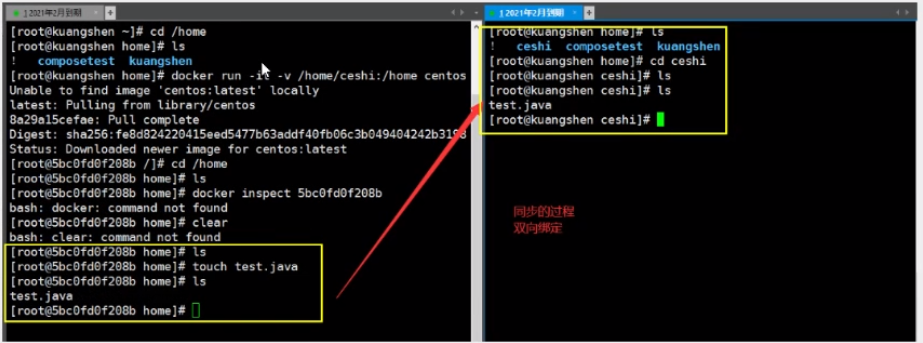
-v, --volume list 			Bind mount a volume

docker run -it -v Host Directory:In container directory

[root@iZ8vbgc3u6dvwrjyp45lyrZ home]# docker run -it -v /home/ceshi:/home centos /bin/bash
#View through docker inspect container id
Synchronization of test files (container synchronization to host):
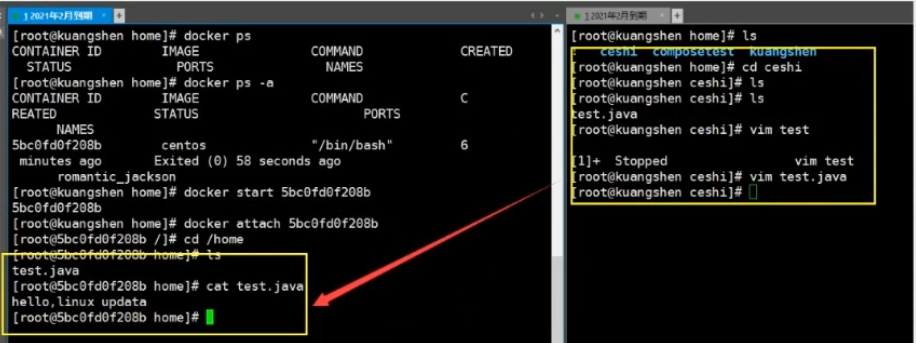
Then test the host synchronization to the container!
1. Stop container
2. Host modify file
3. Start container
4. The data in the container is still synchronized
6.3 actual combat: install MySQL
Thinking: the problem of data persistence in MySQL
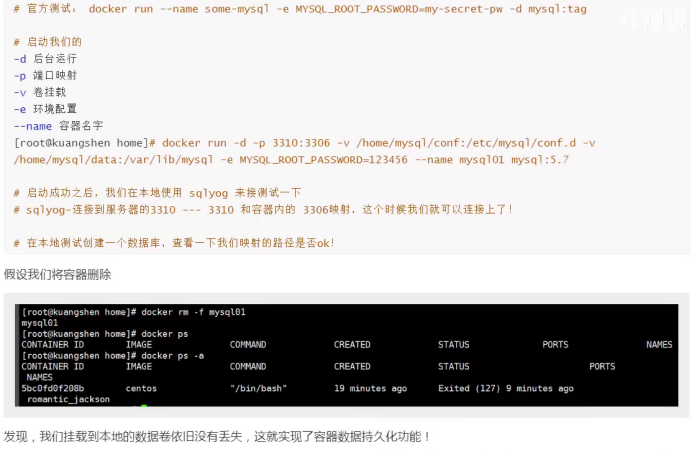
# Get mysql image 101(~ docker pull mysql:5.7
# To run the container, you need to mount the data
#To install and start mysql, you need to configure the password, which should be paid attention to!

# Refer to the official website hub
docker run --name some-mysql -e MYSQL_ROOT_PASSWORD=my-secret-pw -d mysql:tag
#Startup parameters: - d background operation - p port mapping - v volume mount - e environment configuration -- name container name

➜ ~ docker run -d -p 3306:3306 -v /home/mysql/conf:/e	tc/mysql/conf.d -v /home/mysql/data:/var/lib/mysql -e MYSQL_ROOT_PASSWORD=123456 --name mysql01 mysql:5.7

# After the startup is successful, let's test it locally with sqlyog
# sqlyog-3306 connected to server--And 3306 mapping in container# Create a database in the local test and check whether the mapped path is ok!
6.4 named and anonymous mount
# Anonymous mount -v container path!
docker run -d -P --name nginx01 -v /etc/nginx nginx
# -P port needs to be written, - P: no specific port is specified

# View all volume s
[root@iZ8vbgc3u6dvwrjyp45lyrZ lib]# docker volume ls
DRIVER    VOLUME NAME
local     3df3ebf883092323908b31e21c761b56c937ee04ed51d418eedcc10df8d5f20a

# It is found here that this is anonymous mount. In -v, we only write the path inside the container, not the path outside the container!
# Named mount
➜ ~ docker run -d -P --name nginx02 -v juming-nginx:/etc/nginx nginx

➜ ~ docker volume ls
DRIVER 		VOLUME NAME
local 		juming-nginx
# Via -v volume name: path within container
Let's take a look at this named mount volume:
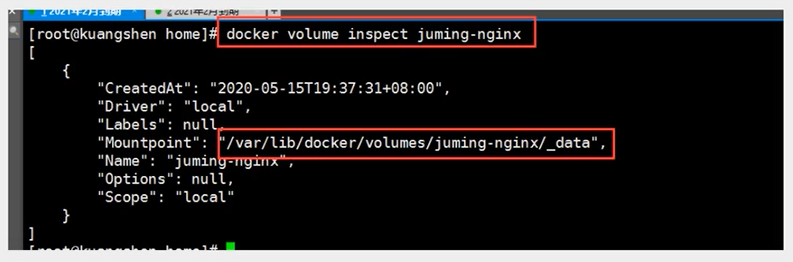
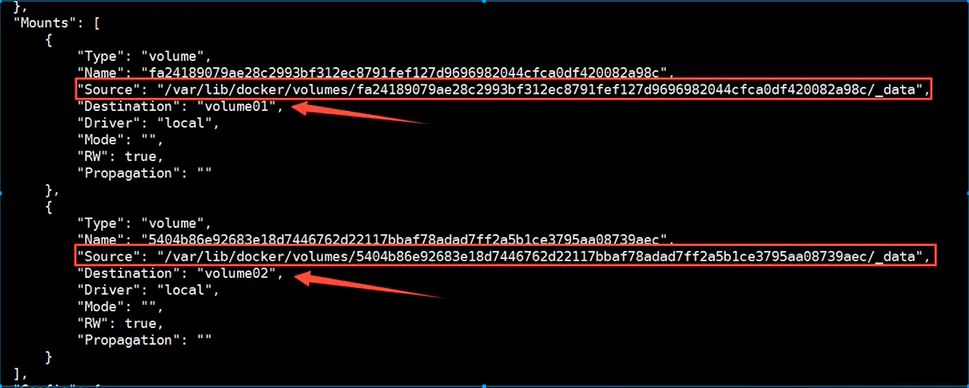
All volumes in the docker container are in / var / lib / docker / volumes / xxx without a specified directory/_ data
We can easily find one of our volumes through named mount. In most cases, named mount is used
# How to determine whether it is a named mount or an anonymous mount, or a specified path mount!
-v In container path          # Anonymous mount

-v Volume name:In container path      # Named mount

-v /Host path:Container path  # Specified path mount!
expand:
# Change read and write permissions through - v path in container: ro rw

ro readonly  # read-only
rw readwrite # Readable and writable
# Once the container permission is set, the container will limit the content we mount!

docker run -d -P --name nginx05 -v juming:/etc/nginx:ro nginxdocker run -d -P --name nginx05 -v juming:/etc/nginx:rw nginx
# As long as ro sees ro, it means that this path can only be operated through the host, and it cannot be operated inside the container!
6.5. Getting to know Dockerfile
Dockerfile is the build file used to build the docker image!
Through this script, you can generate images. Images are layer by layer. Scripts are commands one by one
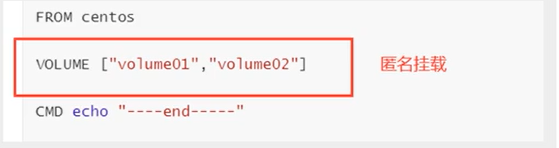
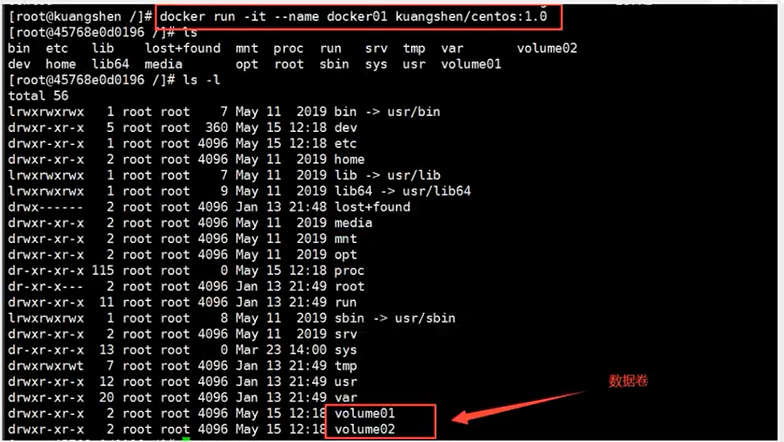
# Create a Dockerfile file whose name can be randomly recommended
# Content directive (uppercase) parameter in file

FROM centos

VOLUME ["/volume01", "/volume02"]

CMD echo  "----end----------"
CMD /bin/bash
# Each command here is a layer of image!
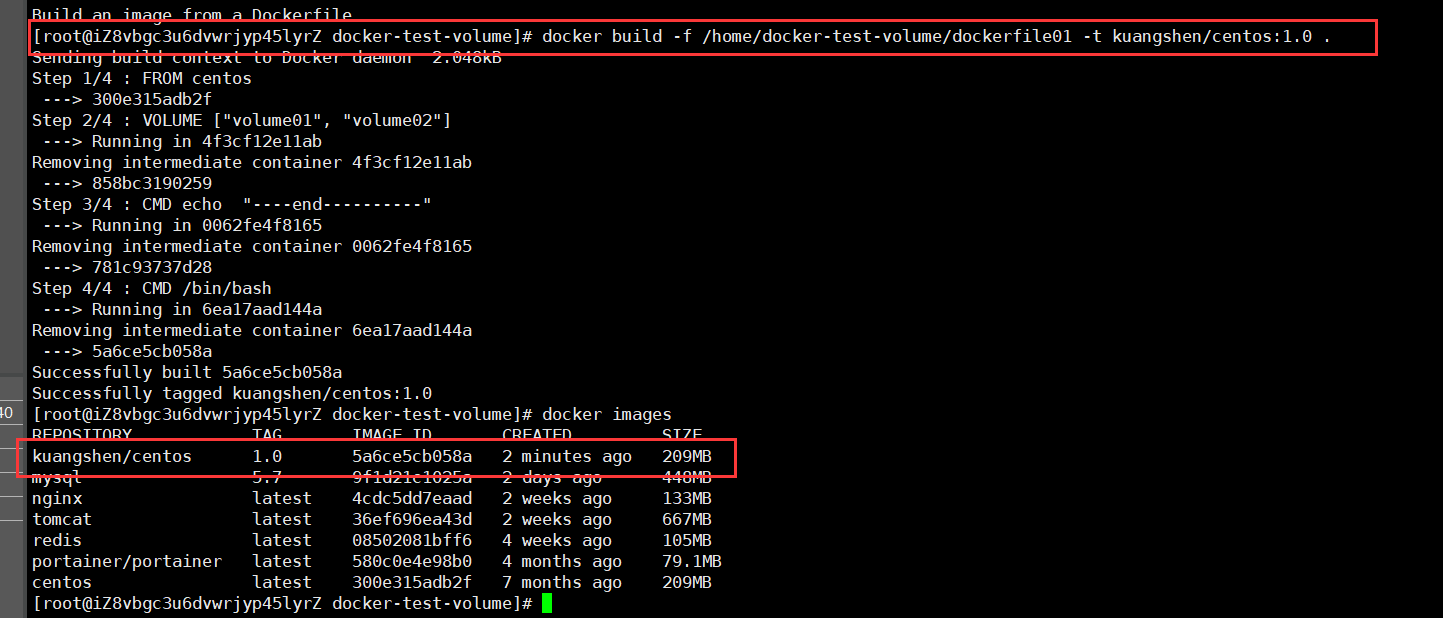
Start the self written image
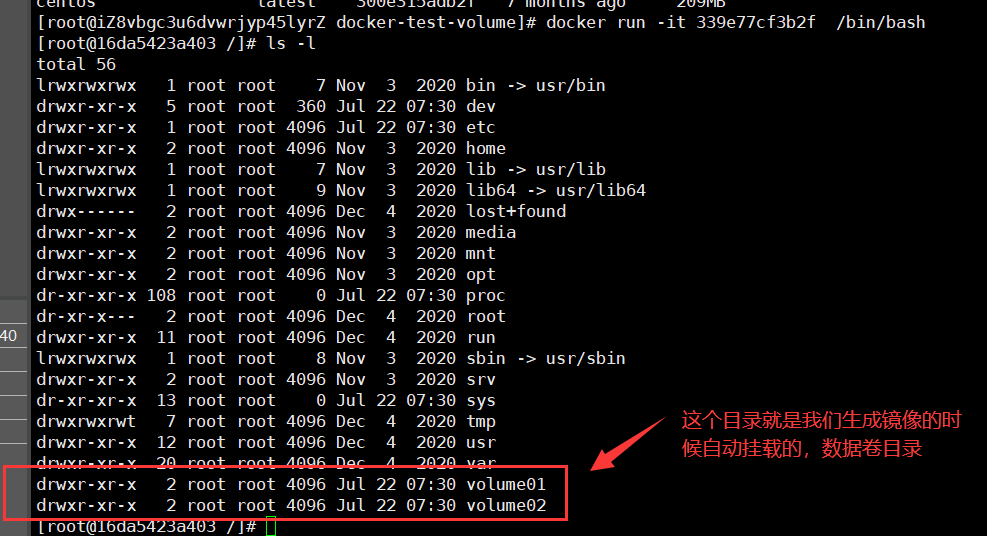
There must be a synchronized directory between this volume and the outside!
Check the path of the volume mount
docker inspect container id
Test whether the files just synced out!
This method is used a lot, because we usually build our own image!
Assuming that there is no mounted volume when building the image, manually mount -v volume name: path in container!
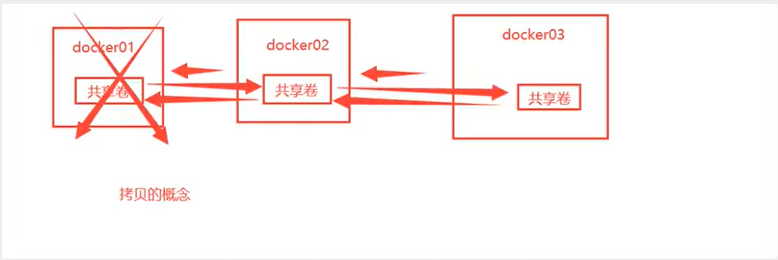
6.6 data volume container
Multiple MySQL synchronization data!
Mount data volume in named container!
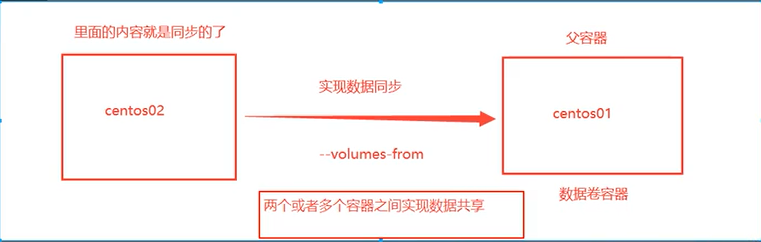
Start three containers and start through the image we just wrote
--volumes-from list Mount volumes from the specified container(s)
Test as follows:
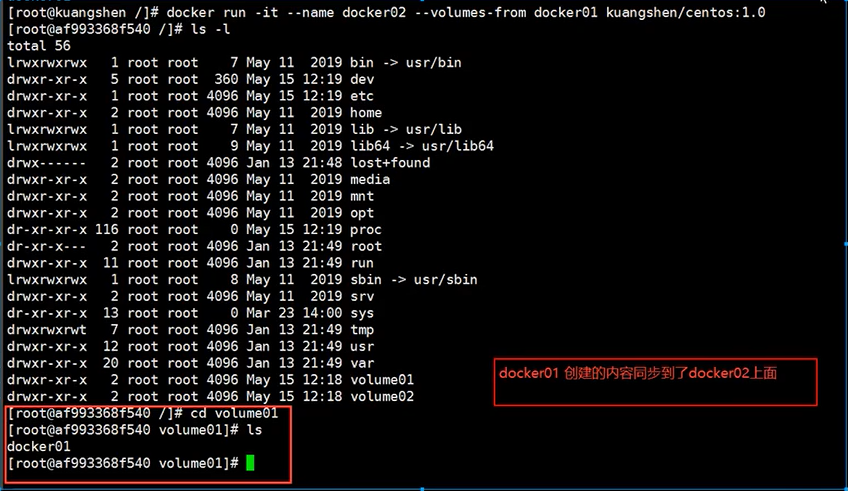
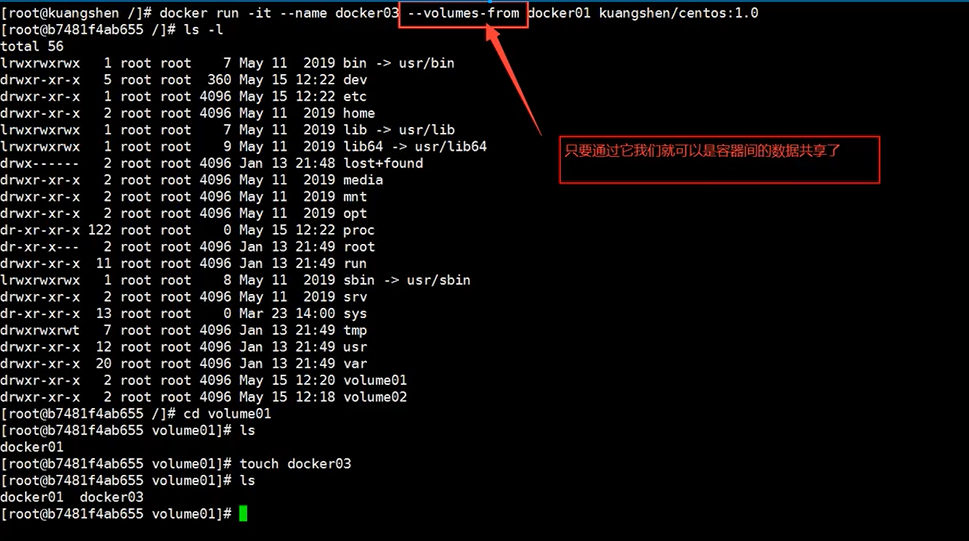
# After testing, you can delete docker01 and check whether docker02 and docker03 can still access this file
# The test is still accessible
Data sharing with multiple mysql
➜ ~ docker run -d -p 3306:3306 -v /home/mysql/conf:/etc/mysql/conf.d -v /home/mysql/data:/var/lib/mysql -e MYSQL_ROOT_PASSWORD=123456 --name mysql01 mysql:5.7

➜ ~ docker run -d -p 3307:3306 -e MYSQL_ROOT_PASSWORD=123456 --name mysql02 --volumes-from mysql01 mysql:5.7  # At this time, data synchronization between two containers can be realized!
Conclusion:
For the transfer of configuration information between containers, the life cycle of data volume containers continues until no containers are used.
But once you persist to the local, the local data will not be deleted at this time!
7, DockerFile
7.1 introduction to DockerFile
Before, we have generated our own image through commit, and building an image through dockerFile is the second way to generate an image!
dockerfile is the file used to build the docker image! Command parameter script!
Construction steps:
1. Write a dockerfile file
2. docker build is called an image
3. docker run run image
4. docker push publishing image (DockerHub, Alibaba cloud warehouse)
However, many official images are basic packages without many functions. We usually build our own images!
Since the official can make images, so can we!
7.2. DockerFile construction process
Basics:
1. Each reserved keyword (instruction) must be uppercase
2. Perform top-down sequence
3. # indicates a comment
4. Each instruction will create and submit a new image!
Dockerfile is development oriented. If we want to publish projects and mirror them in the future, we need to write a dockerfile file. This file is very simple!
Docker image has gradually become the standard of enterprise delivery, which must be mastered!
DockerFile: build a file that defines all the steps and source code
DockerImages: build the generated image through DockerFile, and finally release and run the product.
Docker container: a container is an image that runs to provide services.
7.3. DockerFile common instructions
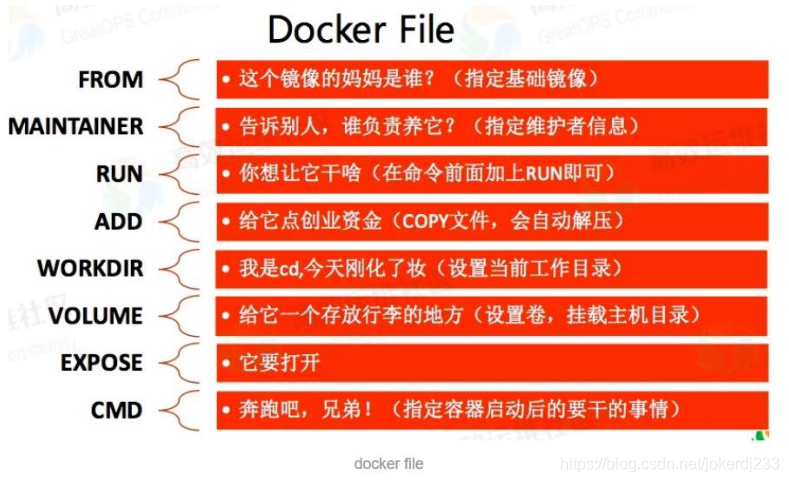
FROM 			# Basic image, everything starts from here
MAINTAINER		# Who wrote the image, name + email
RUN 			# Commands to run during image construction
ADD 			# Step, tomcat image, this tomcat compressed package! Add content and add the same directory
WORKDIR 		# Mirrored working directory
VOLUME 			# Mounted directory
EXPOSE 			# Reserved port configuration
CMD 			# Specify the command to run when the container starts. Only the last one will take effect and can be replaced.
ENTRYPOINT 		# Specify the command to run when the container starts, and you can append the command
ONBUILD 		# When an inherited DockerFile is built, the ONBUILD instruction will be run to trigger the instruction.
COPY 			# similar ADD,Copy our files to the image ENV 			# Set environment variables during construction!
7.4 actual test
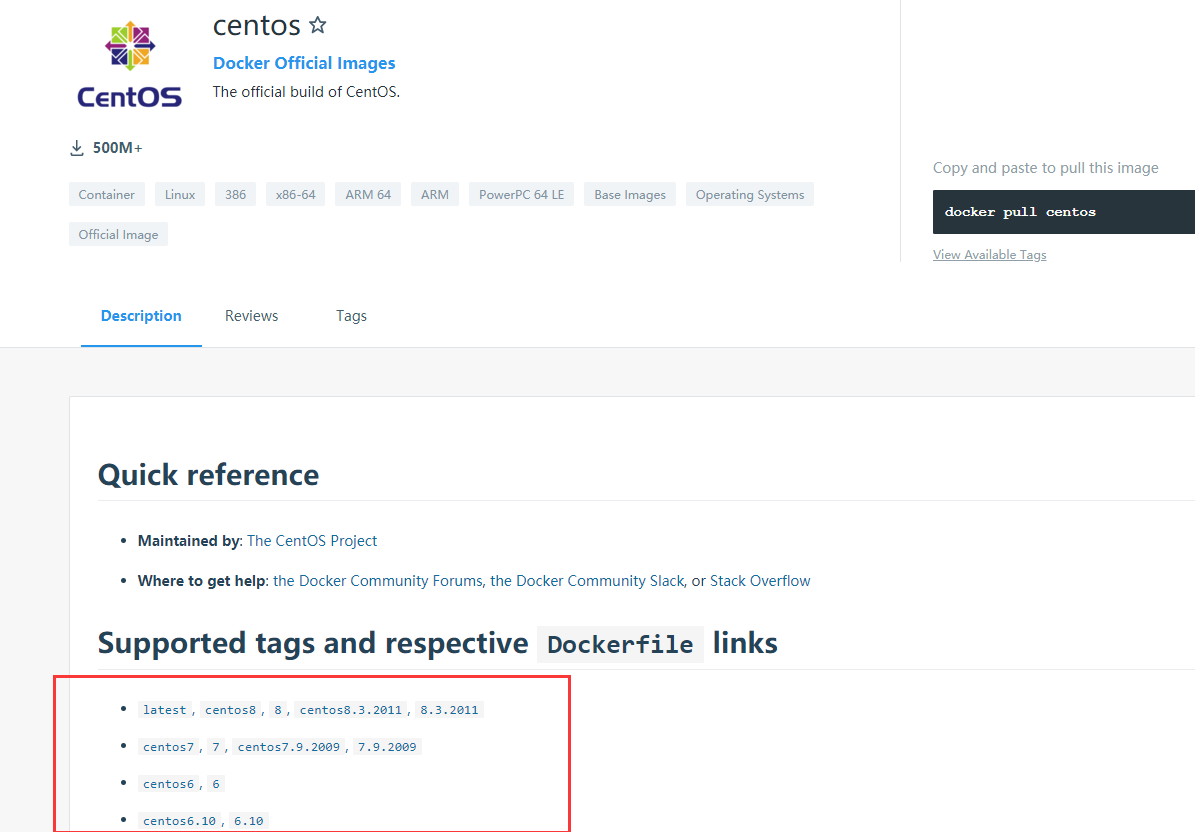
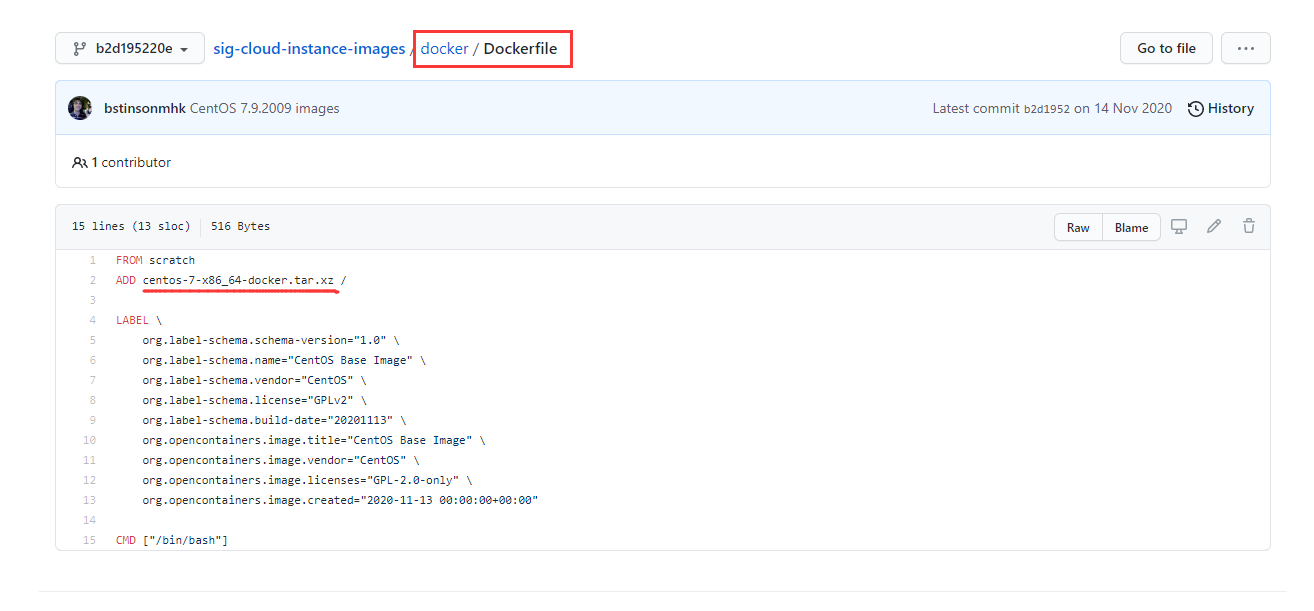
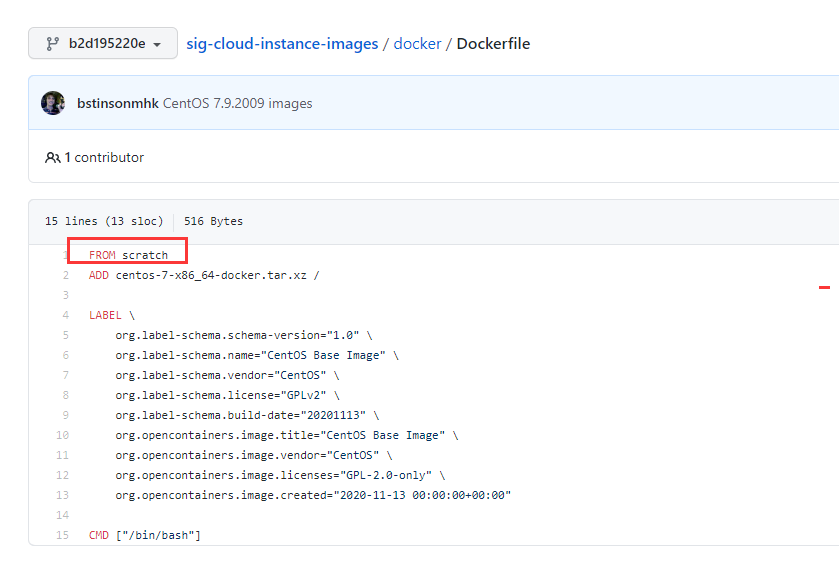
99% of the images in the Docker Hub are FROM scratch from this basic image, and then the required software and configuration are configured for construction
Create your own centos
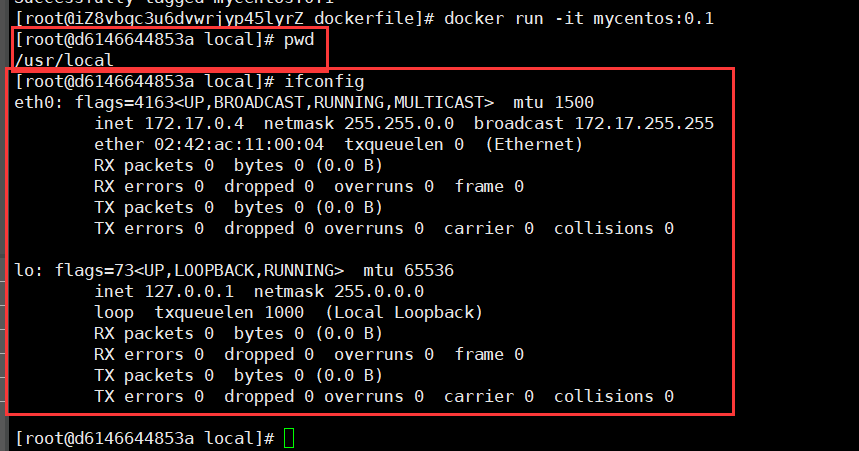
vim mydockerfile-centos

# 1. Write Dockerfile file
FROM centos   # Based on centos
MAINTAINER cheng<1204598429@qq.com>
ENV MYPATH /usr/local
WORKDIR $MYPATH
RUN yum -y install vim
RUN yum -y install net-tools
EXPOSE 80
CMD echo $MYPATHCMD
echo "-----end----"
CMD /bin/bash

# 2. Build an image from this file
# Command docker build -f file path - t image name: [tag]
docker build -f mydockerfile-centos -t mycentos:0.1 .
Successfully built f22b7b27d5d2
Successfully tagged mycentos:0.1

# 3. Test run
docker images
docker run -it mycentos:0.1
-f: Which file do you want to use to build the image, that is, the dockerfile address
-t: target, the generated target image
The last · (point) refers to the current directory
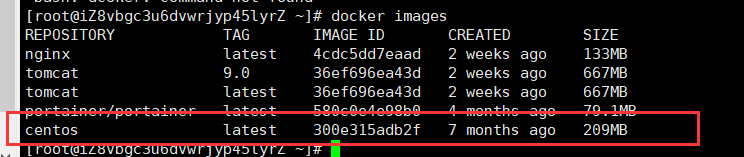
Let's compare the previous native centos with our enhanced centos,
This is the original centos:
Here are the images we added:
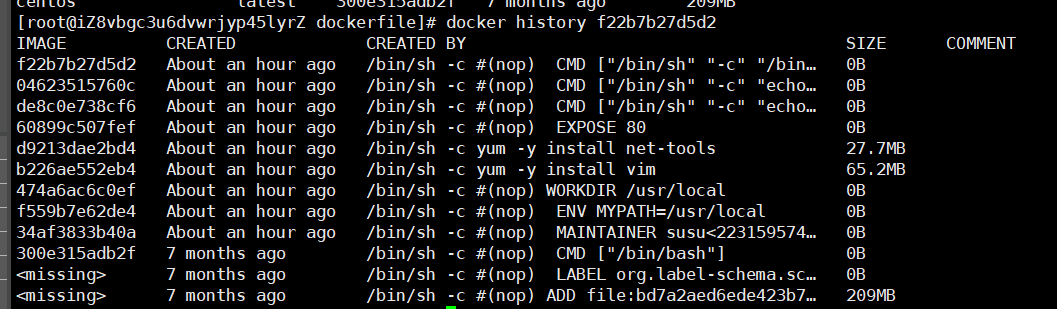
We usually get an image. We can study how it is done through the history command:
Difference between CMD and ENTRYPOINT
CMD 			# Specify the command to run when the container starts. Only the last one will take effect and can be replaced.

ENTRYPOINT	 	# Specify the command to run when the container starts, and you can append the command
- Test CMD
# Write dockerfile file
$ vim dockerfile-test-cmd

FROM centos
CMD ["ls","-a"]

# Build mirror
$ docker build -f dockerfile-test-cmd -t cmd-test:0.1 .

# Run mirror
$ docker run cmd-test:0.1

# Want to append a command - l to ls -al

$ docker run cmd-test:0.1 -l
docker: Error response from daemon: OCI runtime create failed:container_linux.go:349: starting container process caused "exec: \"-l\":executable file not found in $PATH": unknown.ERRO[0000] error waiting for container: context canceled

# If you want to add a command - l to docker run CMD test: 0.1, an error will be reported
# Because in the case of CMD, - l replaces the CMD["ls","-l"] command. And - l is not a command, so an error is reported
- Test ENTRYPOINT
# Write dockerfile file

$ vim dockerfile-test-entrypoint

FROM centos
ENTRYPOINT ["ls","-a"]

$ docker run entrypoint-test:0.1

# Our command is directly spliced after our ENTRYPOINT command
$ docker run entrypoint-test:0.1 -l

total 56
drwxr-xr-x 1 root root 4096 May 16 06:32 .
drwxr-xr-x 1 root root 4096 May 16 06:32 ..-
rwxr-xr-x 1 root root 0 May 16 06:32 .dockerenv
lrwxrwxrwx 1 root root 7 May 11 2019 bin -> usr/bind
rwxr-xr-x 5 root root 340 May 16 06:32 dev
drwxr-xr-x 1 root root 4096 May 16 06:32 etc
drwxr-xr-x 2 root root 4096 May 11 2019 home
lrwxrwxrwx 1 root root 7 May 11 2019 lib -> usr/lib
lrwxrwxrwx 1 root root 9 May 11 2019 lib64 -> usr/lib64 ....
Many commands in Dockerfile are very similar. We need to understand their differences. Our best learning is to compare them and test the effect!
7.5 actual combat: Tomcat image
1. Prepare mirror file
Prepare tomcat and jdk to the current directory and write README.
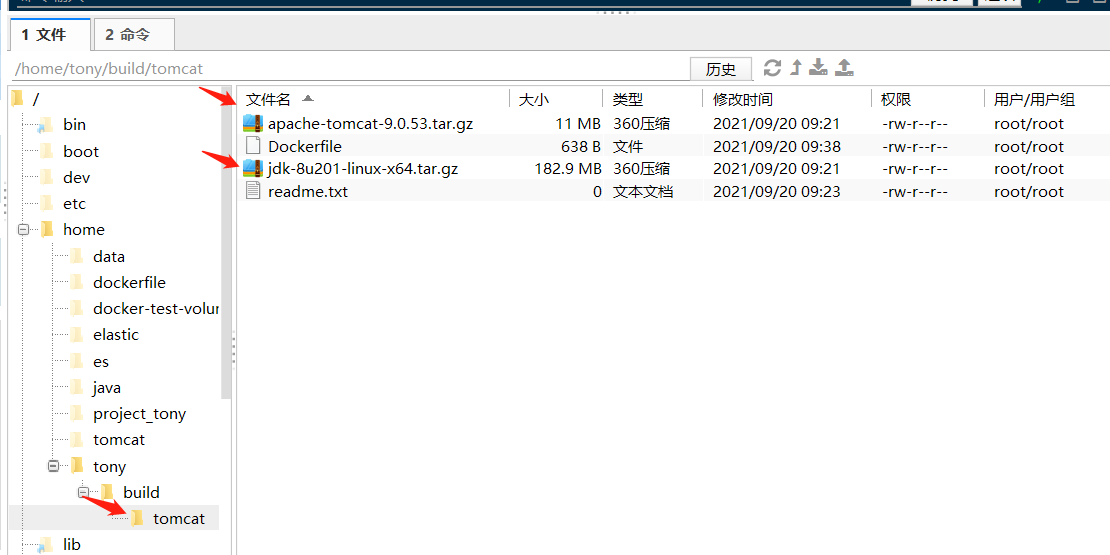
2. Write dokerfile
FROM centos
MAINTAINER  tony<1115031743@qq.com>

COPY readme.txt  /usr/local/readme.txt

ADD jdk-8u201-linux-x64.tar.gz /usr/local
ADD apache-tomcat-9.0.53.tar.gz /usr/local

RUN yum -y install vim

ENV MYPATH /usr/local
WORKDIR $MYPATH

ENV JAVA_HOME /usr/local/jdk1.8.0_201
ENV CLASSPATH $JAVA_HOME/lib/dt.jar:$JAVA_HOME/lib/tools.jar
ENV CATALINA_HOME /usr/local/apache-tomcat-9.0.53
ENV CATALINA_BASH /usr/local/apache-tomcat-9.0.53
ENV PATH $PATH:$JAVA_HOME/bin/:$CATALINA_HOME/lib:$CATALINA_HOME/bin

EXPOSE 8080

CMD /usr/local/apache-tomcat-9.0.53/bin/startup.sh && tail -F /usr/local/apache-tomcat-9.0.53/bin/logs/catalina.out
3. Build mirror
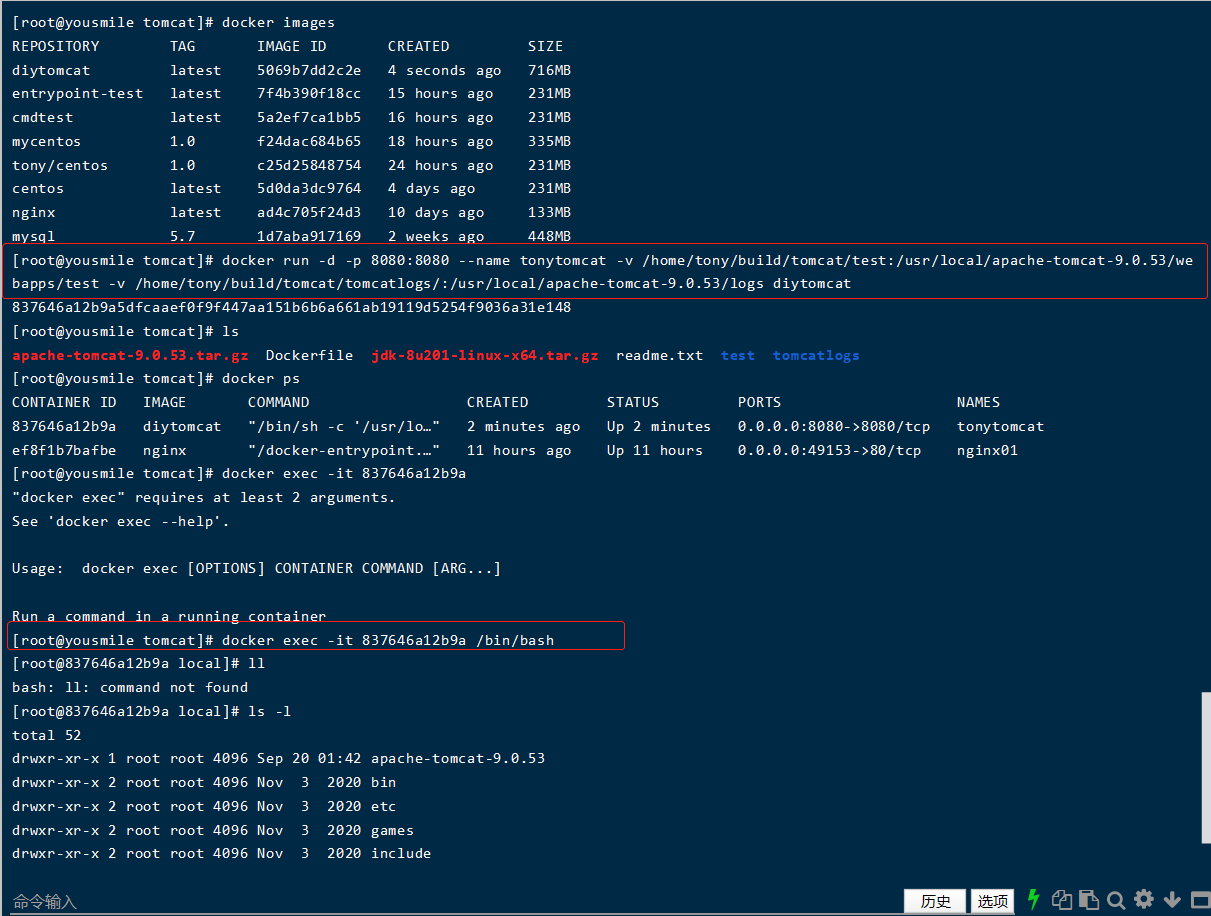
# Because the dockerfile is named by default, you do not need to use - f to specify the file
$ docker build -t diytomcat .

# docker build -t mytomcat:0.1 .
4. run image
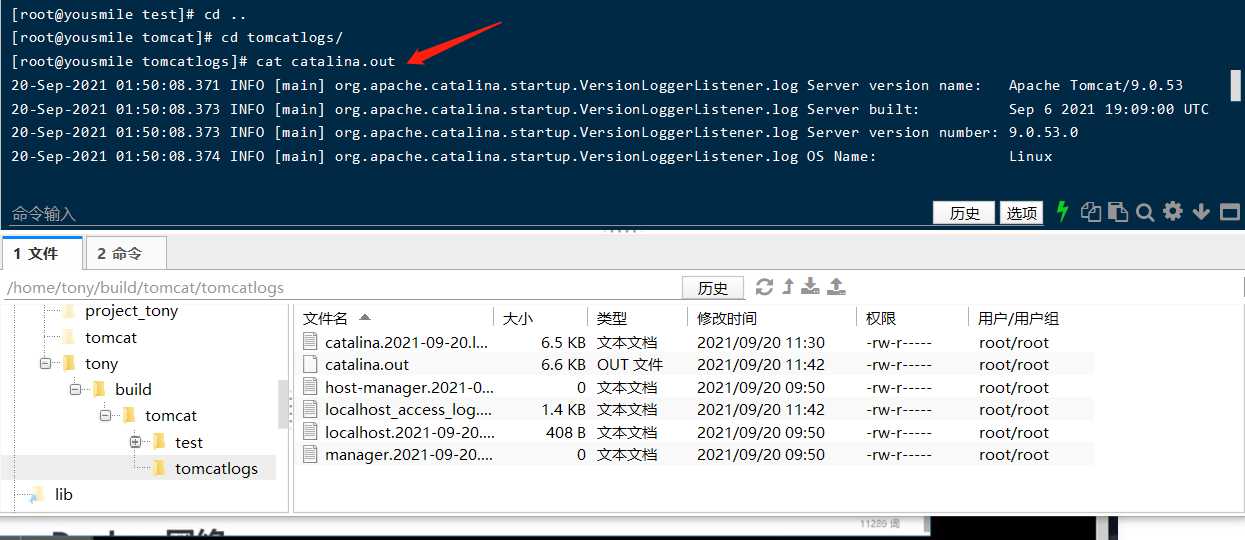
$ docker run -d -p 8080:8080 --name tonytomcat -v /home/tony/build/tomcat/test:/usr/local/apache-tomcat-9.0.53/webapps/test -v /home/tony/build/tomcat/tomcatlogs/:/usr/local/apache-tomcat-9.0.53/logs diytomcat
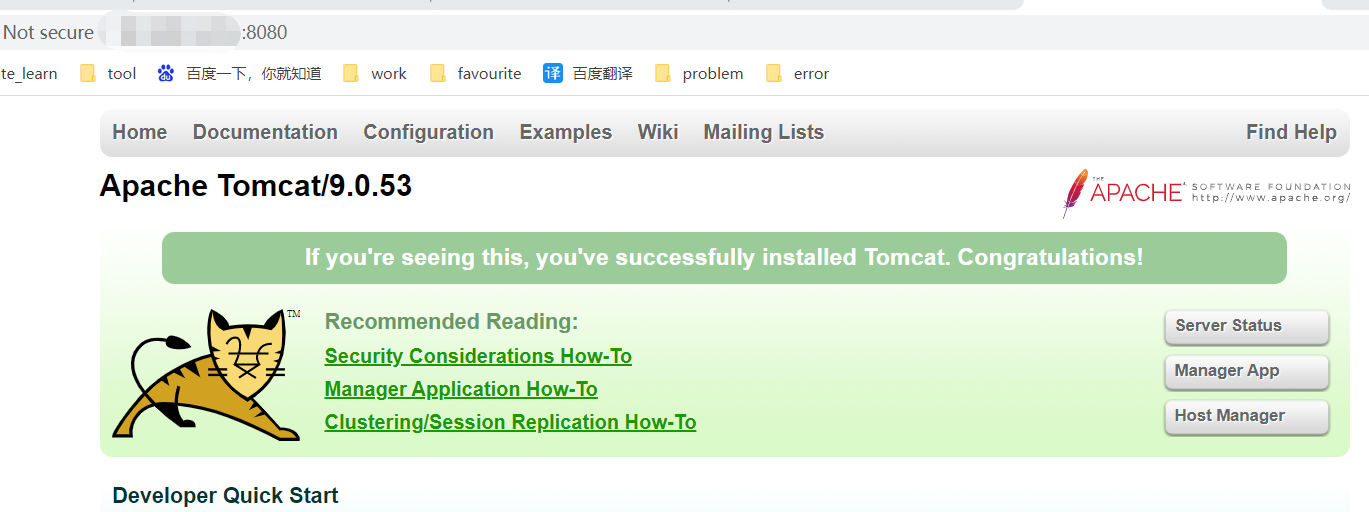
5. Access test
curl localhost:8080
Browser access:
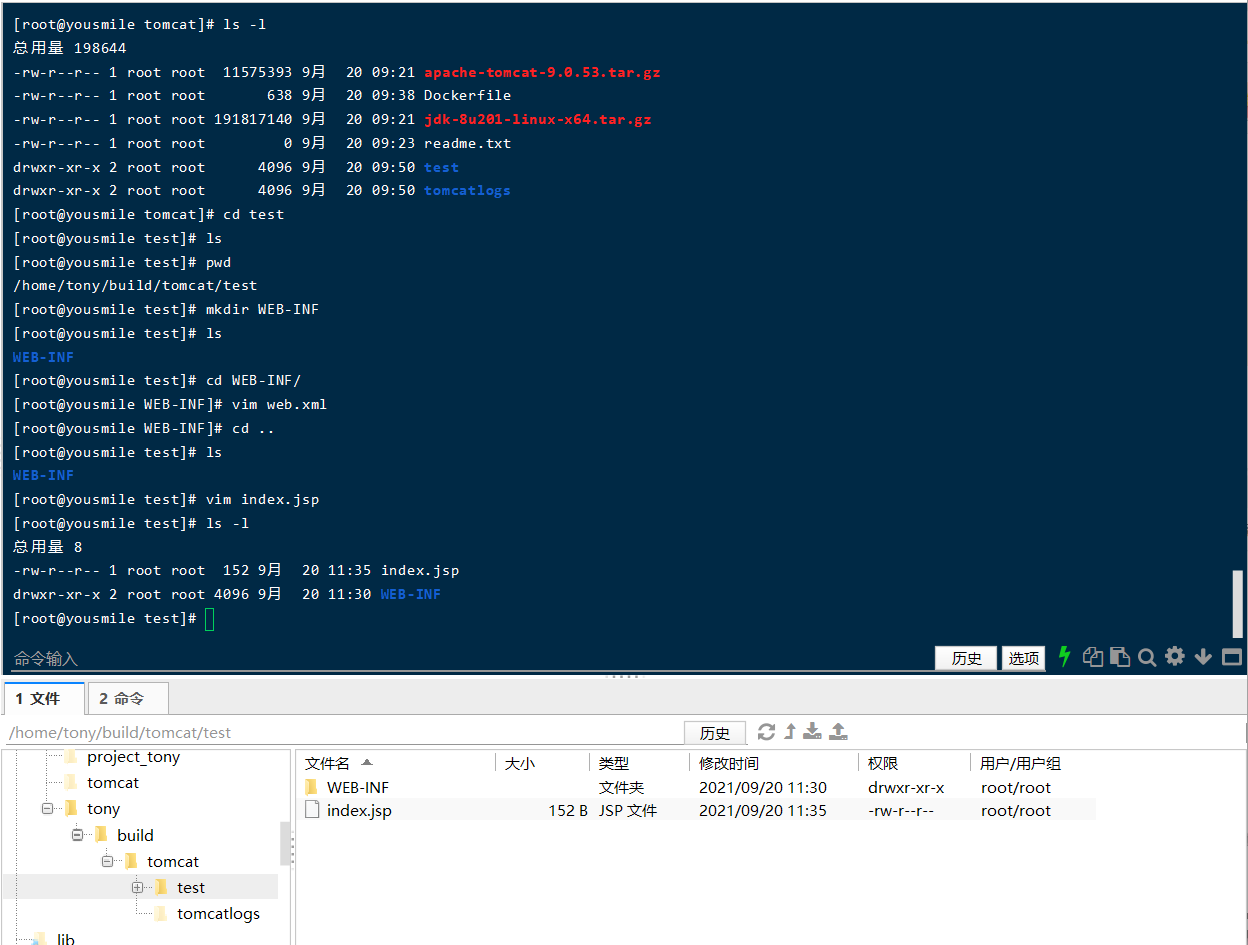
6. Publish the project (due to volume mounting, we can publish the project directly by writing the project locally!)
- Create a basic web project in the test directory
web.xml file:
<?xml version="1.0" encoding="UTF-8"?>
<web-app xmlns="http://xmlns.jcp.org/xml/ns/javaee"
         xmlns:xsi="http://www.w3.org/2001/XMLSchema-instance"
         xsi:schemaLocation="http://xmlns.jcp.org/xml/ns/javaee
                      http://xmlns.jcp.org/xml/ns/javaee/web-app_4_0.xsd"
         version="4.0"
         metadata-complete="true">
</web-app>
index.jsp file:
<html>
<head><title>Hello Tony</title></head>
<body>
Hello World!<br/>
<%
System.out.println("---------my test web logs--------");
%>
</body>
</html>
- Browser access: http://ip Address: 8080/test/
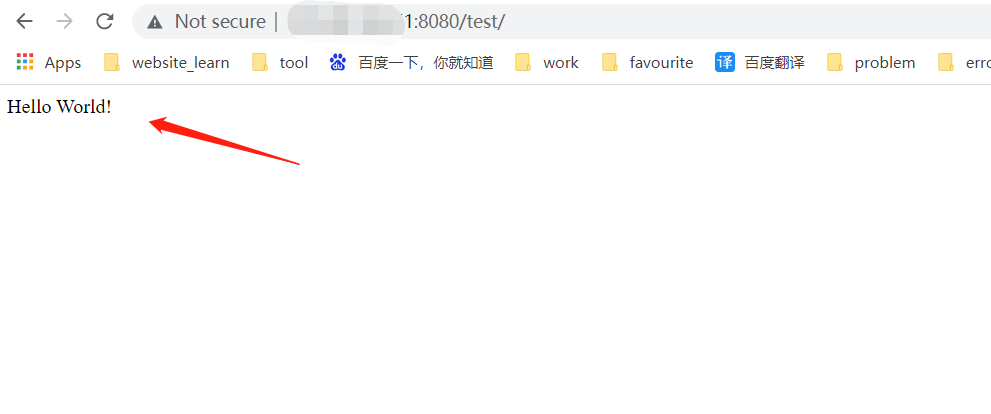
Discovery: the project is successfully deployed and can be accessed directly!
View the printed log below:

Our next development steps: we need to master the preparation of Dockerfile! Everything after us is published and run using the docker image!
7.6. Publish your own image
1. Address dockerhub official website
2. Make sure this account can log in
3. Login
[root@localhost local]# docker login --help

Usage:    docker login [OPTIONS] [SERVER]

Log in to a Docker registry.
If no server is specified, the default is defined by the daemon.

Options:
  -p, --password string   Password
      --password-stdin    Take the password from stdin
  -u, --username string   Username
[root@localhost local]#

docker login -u user name -p password
-u user name
-p password
4. Submit a push image
# push your own image to the server!

$ docker push diytomcat
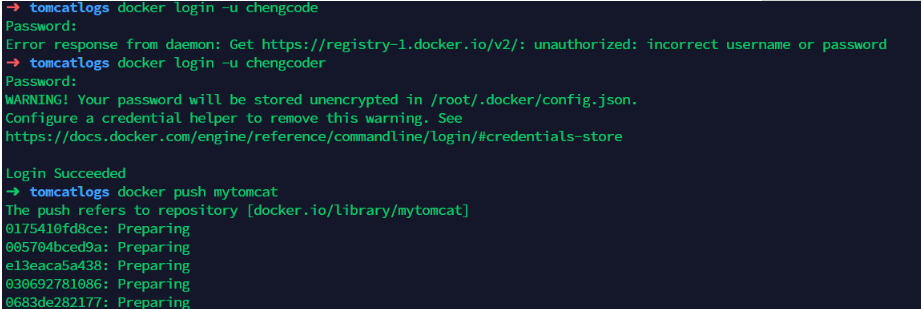
# You will find that push does not go up, because if there is no prefix, it is pushed to the official library by default

# resolvent

# In the first build, add your dockerhub user name, and then push it to your warehouse
$ docker build -t chengcoder/mytomcat:0.1 .

# The second method uses docker tag and then push es again
$ docker tag container id chengcoder/mytomcat:1.0
#Then push again
$ docker push kuangshen/tomcat:1.0

When submitting, it is also submitted according to the image level!
Alicloud image service
1. Log in to alicloud
2. Container mirroring service found
3. Create namespace
4. Create container image
See the official website for details: Alicloud container image service
$ sudo docker login --username=zchengx registry.cn-shenzhen.aliyuncs.com$ sudo docker tag [ImageId] registry.cn-shenzhen.aliyuncs.com/dsadxzc/cheng:[Mirror version number]# modify id And version sudo docker tag a5ef1f32aaae registry.cn-shenzhen.aliyuncs.com/dsadxzc/cheng:1.0# Modified version $sudo docker push registry.cn-shenzhen.aliyuncs.com/dsadxzc/cheng: [image version number]
7.7 summary
8, Docker network
8.1. Understand Docker 0
Clear all networks
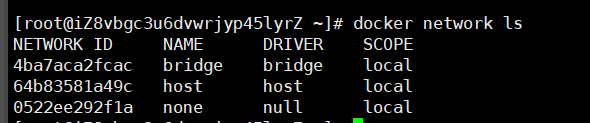
Three networks
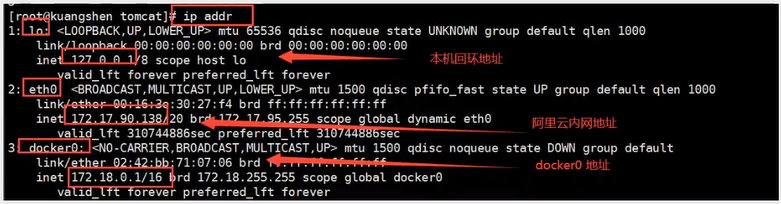
Question: how does docker handle container network access?
# Test run a tomcat$ docker run -d --name tomcat01 tomcat$ ip addr1: lo: <LOOPBACK,UP,LOWER_UP> mtu 65536 qdisc noqueue state UNKNOWN group default qlen 1000 link/loopback 00:00:00:00:00:00 brd 00:00:00:00:00:00 inet 127.0.0.1/8 scope host lo valid_lft forever preferred_lft forever2: eth0: <BROADCAST,MULTICAST,UP,LOWER_UP> mtu 1500 qdisc pfifo_fast state UP group default qlen 1000 link/ether 00:16:3e:13:78:90 brd ff:ff:ff:ff:ff:ff inet 172.23.104.112/20 brd 172.23.111.255 scope global dynamic eth0 valid_lft 314146894sec preferred_lft 314146894sec3: docker0: <BROADCAST,MULTICAST,UP,LOWER_UP> mtu 1500 qdisc noqueue state UP group default link/ether 02:42:c9:5a:27:6c brd ff:ff:ff:ff:ff:ff inet 172.17.0.1/16 brd 172.17.255.255 scope global docker0 valid_lft forever preferred_lft forever441: veth049f362@if440: <BROADCAST,MULTICAST,UP,LOWER_UP> mtu 1500 qdisc noqueue master docker0 state UP group default link/ether ea:55:6c:48:c4:7e brd ff:ff:ff:ff:ff:ff link-netnsid 0 $ docker exec -it container id$ ip addr# When you check the internal network address of the container and find that the container starts, you will get a eth0@if551 ip Address, docker Assigned! five hundred and fifty: eth0@if551: <BROADCAST,MULTICAST,UP,LOWER_UP> mtu 1500 qdisc noqueuestate UP group defaultlink/ether 02:42:ac:11:00:02 brd ff:ff:ff:ff:ff:ff link-netnsid 0inet 172.17.0.2/16 brd 172.17.255.255 scope global eth0valid_lft forever preferred_lft forever# reflection? linux can I ping Inside the container! Yes, inside the container ping To the outside world? sure! $ ping 172.17.0.2PING 172.17.0.2 (172.17.0.2) 56(84) bytes of data.64 bytes from 172.17.0.2: icmp_seq=1 ttl=64 time=0.069 ms64 bytes from 172.17.0.2: icmp_seq=2 ttl=64 time=0.074 ms# linux can ping through the docker container
principle
1. Every time we start a docker container, docker will assign an ip to the docker container. As long as we install docker, there will be a docker0 bridging mode. The technology used is Veth pair technology!
https://www.cnblogs.com/bakari/p/10613710.html
Test ip addr again
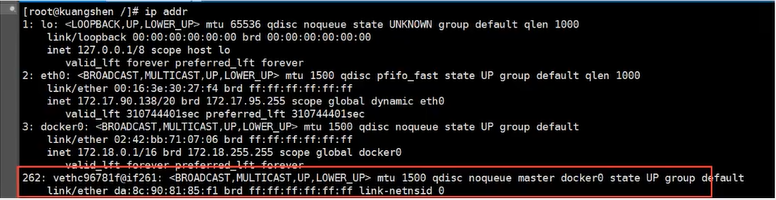
2. After starting a container test, another pair of networks was found
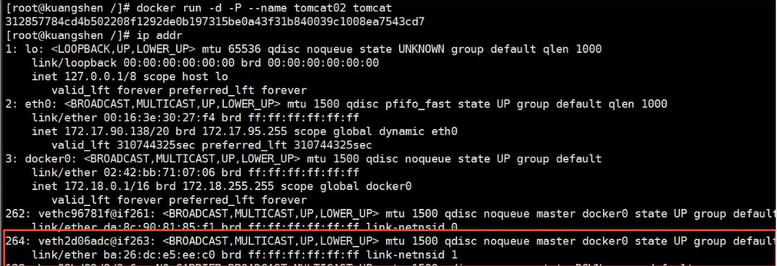
We found that the network card brought by this container is a pair
Veth pair is a pair of virtual device interfaces. They all appear in pairs. One end is connected to the protocol and the other end is connected to each other. Because of this feature, Veth pair acts as a bridge to connect OpenStac,Docker containers and OVS of various virtual network devices. Evth pair technology is used
3. Let's test whether tomcat01 and tomcat02 can ping
$ docker-tomcat docker exec -it tomcat01 ip addr #obtain tomcat01 of ip172.17.0.2550: eth0@if551: <BROADCAST,MULTICAST,UP,LOWER_UP> mtu 1500 qdisc noqueuestate UP group defaultlink/ether 02:42:ac:11:00:02 brd ff:ff:ff:ff:ff:ff link-netnsid 0inet 172.17.0.2/16 brd 172.17.255.255 scope global eth0valid_lft forever preferred_lft forever$ docker-tomcat docker exec -it tomcat02 ping 172.17.0.2 #Give Way tomcat02 ping tomcat01PING 172.17.0.2 (172.17.0.2) 56(84) bytes of data.64 bytes from 172.17.0.2: icmp_seq=1 ttl=64 time=0.098 ms64 bytes from 172.17.0.2: icmp_seq=2 ttl=64 time=0.071 ms# Conclusion: containers and containers can ping each other
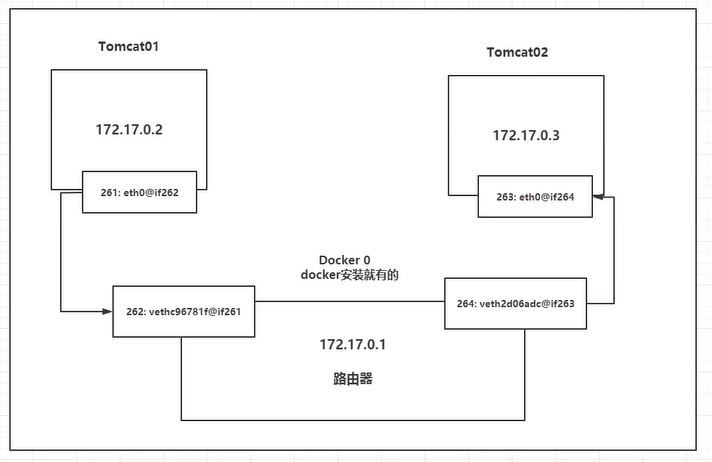
Conclusion: tomcat01 and tomcat02 share the same router, docker0.
When all containers do not specify a network, they are routed by docker0. Docker will assign a default available ip to our containers.
Summary: Docker uses the Linux bridge, and the host is a Docker container bridge docker0
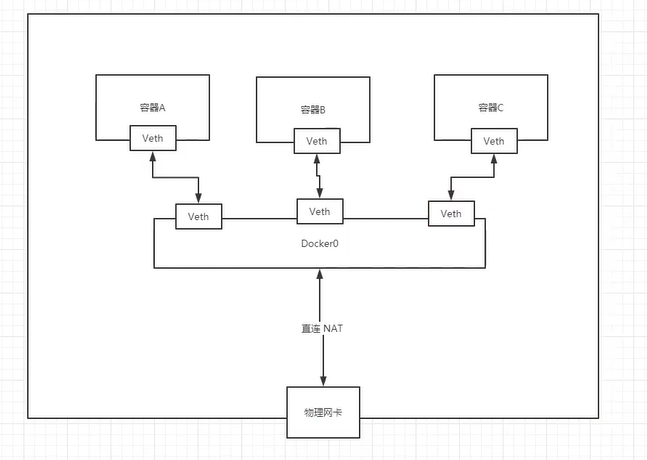
All network interfaces in Docker are virtual. Virtual forwarding efficiency is high!
As long as the container is deleted, the corresponding bridge pair is gone!

Think about a scenario: we write a microservice, database url=ip:, the project will not restart, and the database ip will change. We hope to solve this problem and access the container by name?
8.2,–link
$ docker exec -it tomcat02 ping tomca01 # ping Impassability ping: tomca01: Name or service not known# Run a tomcat03 --link tomcat02$ docker run -d -P --name tomcat03 --link tomcat02 tomcat5f9331566980a9e92bc54681caaac14e9fc993f14ad13d98534026c08c0a9aef# use tomcat03 ping tomcat02 sure ping through $ docker exec -it tomcat03 ping tomcat02PING tomcat02 (172.17.0.3) 56(84) bytes of data.64 bytes from tomcat02 (172.17.0.3): icmp_seq=1 ttl=64 time=0.115 ms64 bytes from tomcat02 (172.17.0.3): icmp_seq=2 ttl=64 time=0.080 ms# Ping tomcat03 with tomcat02 fails
Probe: docker network inspect the network id is the same as the network segment
docker inspect tomcat03
In fact, this tomcat03 is the local configuration of tomcat02?
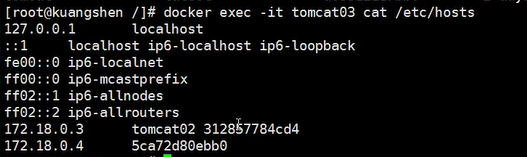
– link is essentially adding mappings to the hosts configuration
It is not recommended to use – link now when using Docker!
Custom network, do not use docker0!
docker0 problem: container name connection access is not supported!
8.3. User defined network
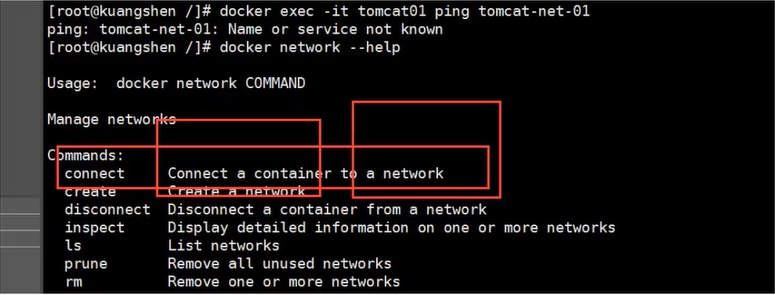
$ docker network --helpconnect -- Connect a container to a networkcreate -- Creates a new network with a name specified by thedisconnect -- Disconnects a container from a networkinspect -- Displays detailed information on a networkls -- Lists all the networks created by the userprune -- Remove all unused networksrm -- Deletes one or more networks
View all docker networks
Network mode
Bridge: Bridge docker (by default, the bridge mode is also used for self creation)
none: the network is not configured. Generally, it is not used
Host: share the network with the host
Container: container network connectivity (less used! Very limited)
test
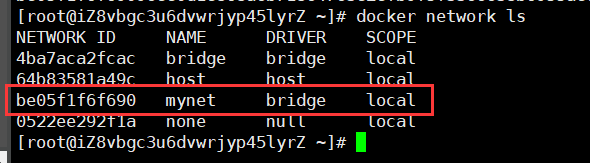
# We started the command directly --net bridge,And this is what we have to do docker0# bridge namely docker0$ docker run -d -P --name tomcat01 tomcat Equivalent to => docker run -d -P --name tomcat01 --net bridge tomcat# docker0,Features: by default, the domain name cannot be accessed. --link You can get through the connection, but it's very troublesome!# We can customize a network# --driver bridge# --subnet 192.168.0.0/16 Subnet# --Gateway 192.168.0.1 gateway $docker network create --driver bridge --subnet 192.168.0.0/16 --gateway 192.168.0.1 mynet
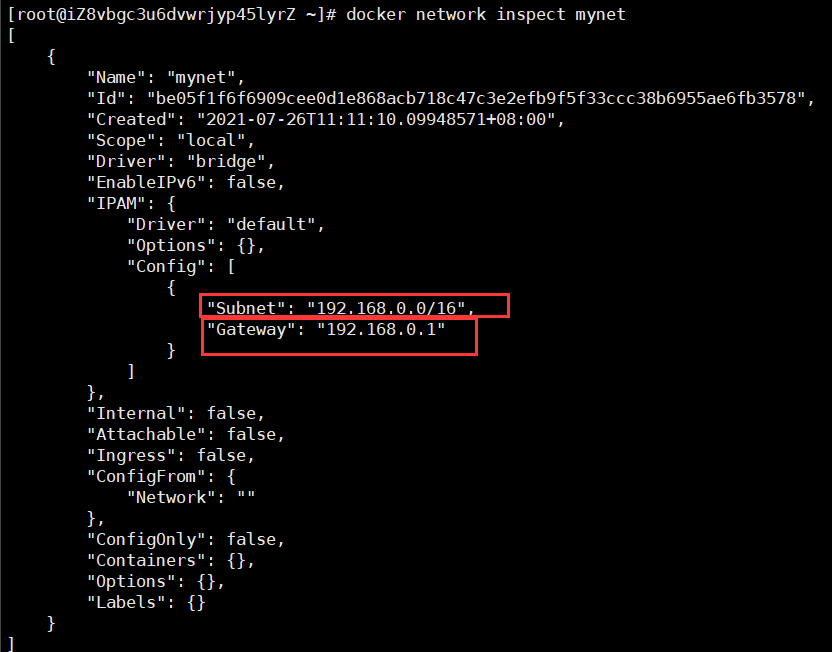
$ docker network inspect mynet
Start two tomcat and check the network again
[root@iZ8vbgc3u6dvwrjyp45lyrZ ~]# docker run -d -P --name tomcat-net-01 --net mynet tomcat8f3b8236b5d9d149612d1dbe6b533c21601cfd7392cb5bf226a8427b5fc1b3e3[root@iZ8vbgc3u6dvwrjyp45lyrZ ~]# docker run -d -P --name tomcat-net-02 --net mynet tomcat3279bc773cacaa51368f4417e42159732f046c0d300ce881fb0a598663e79779[root@iZ8vbgc3u6dvwrjyp45lyrZ ~]# docker network inspect mynet[ { "Name": "mynet", "Id": "be05f1f6f6909cee0d1e868acb718c47c3e2efb9f5f33ccc38b6955ae6fb3578", "Created": "2021-07-26T11:11:10.09948571+08:00", "Scope": "local", "Driver": "bridge", "EnableIPv6": false, "IPAM": { "Driver": "default", "Options": {}, "Config": [ { "Subnet": "192.168.0.0/16", "Gateway": "192.168.0.1" } ] }, "Internal": false, "Attachable": false, "Ingress": false, "ConfigFrom": { "Network": "" }, "ConfigOnly": false, "Containers": { "3279bc773cacaa51368f4417e42159732f046c0d300ce881fb0a598663e79779": { "Name": "tomcat-net-02", "EndpointID": "0d31467ee4bc86d1b55d1889a07b468b57aeb82a9b23bbb2e2df5632d158ac0f", "MacAddress": "02:42:c0:a8:00:03", "IPv4Address": "192.168.0.3/16", "IPv6Address": "" }, "8f3b8236b5d9d149612d1dbe6b533c21601cfd7392cb5bf226a8427b5fc1b3e3": { "Name": "tomcat-net-01", "EndpointID": "7ae56746e954749dfd52c5f2965cc667d307b198f792175cca80040aed59eb52", "MacAddress": "02:42:c0:a8:00:02", "IPv4Address": "192.168.0.2/16", "IPv6Address": "" } }, "Options": {}, "Labels": {} }]# Retest ping connect[root@iZ8vbgc3u6dvwrjyp45lyrZ ~]# docker exec -it tomcat-net-01 ping 192.168.0.3PING 192.168.0.3 (192.168.0.3) 56(84) bytes of data.64 bytes from 192.168.0.3: icmp_seq=1 ttl=64 time=0.135 ms64 bytes from 192.168.0.3: icmp_seq=2 ttl=64 time=0.099 ms# Not now--link it's fine too ping Name[root@iZ8vbgc3u6dvwrjyp45lyrZ ~]# docker exec -it tomcat-net-01 ping tomcat-net-02PING tomcat-net-02 (192.168.0.3) 56(84) bytes of data.64 bytes from tomcat-net-02.mynet (192.168.0.3): icmp_seq=1 ttl=64 time=0.095 ms64 bytes from tomcat-net-02.mynet (192.168.0.3): icmp_seq=2 ttl=64 time=0.108 ms64 bytes from tomcat-net-02.mynet (192.168.0.3): icmp_seq=3 ttl=64 time=0.093 ms
In a customized network, services can ping each other without using – link
Our customized network docker. When we maintain the corresponding relationship, we recommend that we use the network in this way!
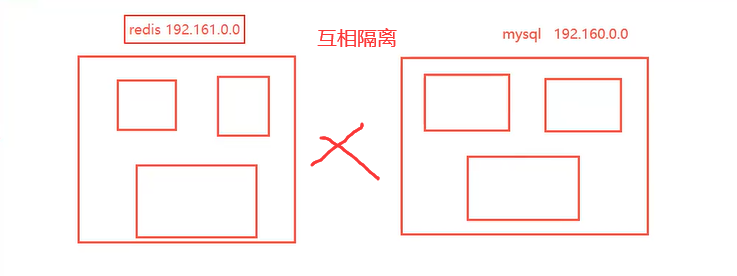
Benefits:
- redis - different clusters use different networks to ensure that the cluster is safe and healthy
- mysql - different clusters use different networks to ensure that the cluster is safe and healthy
8.4 network connectivity
# Test two different network connections and start two more tomcat Use the default network, i.e docker0$ docker run -d -P --name tomcat01 tomcat$ docker run -d -P --name tomcat02 tomcat# ping fails at this time
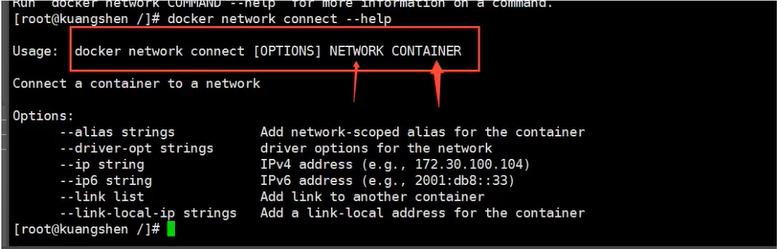
To connect tomcat01 to tomcat-net-01, the connection is to add tomcat01 to the mynet network
One container, two IPS (tomcat01)
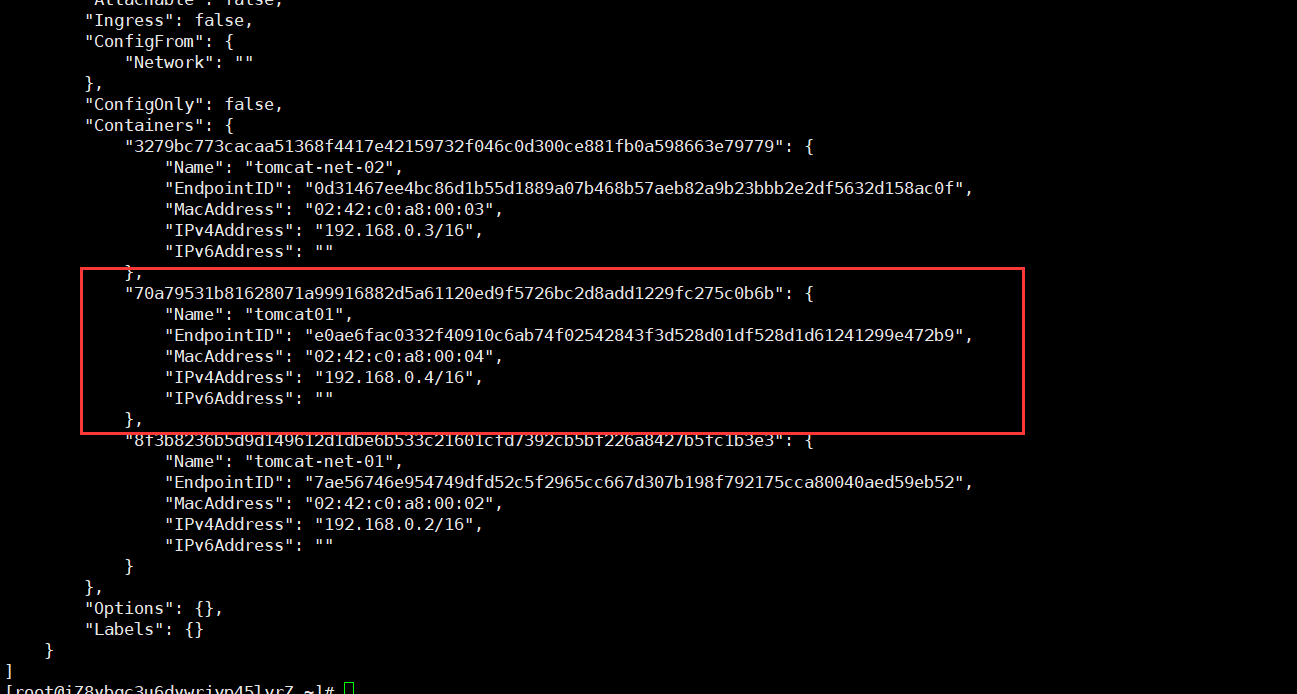
# 01 connected ok[root@iZ8vbgc3u6dvwrjyp45lyrZ ~]# docker exec -it tomcat01 ping tomcat-net-01PING tomcat-net-01 (192.168.0.2) 56(84) bytes of data.64 bytes from tomcat-net-01.mynet (192.168.0.2): icmp_seq=1 ttl=64 time=0.130 ms64 bytes from tomcat-net-01.mynet (192.168.0.2): icmp_seq=2 ttl=64 time=0.097 ms64 bytes from tomcat-net-01.mynet (192.168.0.2): icmp_seq=3 ttl=64 time=0.106 ms64 bytes from tomcat-net-01.mynet (192.168.0.2): icmp_seq=4 ttl=64 time=0.109 ms# 02 It still can't get through[root@iZ8vbgc3u6dvwrjyp45lyrZ ~]# docker exec -it tomcat02 ping tomcat-net-01ping: tomcat-net-01: Name or service not known
Conclusion: if you want to operate others across the network, you need to use docker network connect to connect!
8.5 actual combat: deploy Redis cluster
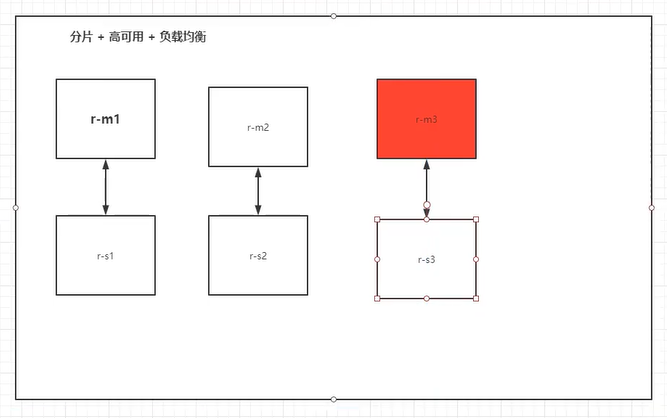
# Create network card docker network create redis --subnet 172.38.0.0/16# Create six by script redis to configure for port in $(seq 1 6);\do \mkdir -p /mydata/redis/node-${port}/conftouch /mydata/redis/node-${port}/conf/redis.confcat << EOF >> /mydata/redis/node-${port}/conf/redis.confport 6379bind 0.0.0.0cluster-enabled yescluster-config-file nodes.confcluster-node-timeout 5000cluster-announce-ip 172.38.0.1${port}cluster-announce-port 6379cluster-announce-bus-port 16379appendonly yesEOFdone# Run six scripts redisfor port in $(seq 1 6);\docker run -p 637${port}:6379 -p 1667${port}:16379 --name redis-${port} \-v /mydata/redis/node-${port}/data:/data \-v /mydata/redis/node-${port}/conf/redis.conf:/etc/redis/redis.conf \-d --net redis --ip 172.38.0.1${port} redis:5.0.9-alpine3.11 redis-server /etc/redis/redis.confdocker run -p 6371:6379 -p 16671:16379 --name redis-1 \-v /mydata/redis/node-1/data:/data \-v /mydata/redis/node-1/conf/redis.conf:/etc/redis/redis.conf \-d --net redis --ip 172.38.0.11 redis:5.0.9-alpine3.11 redis-server /etc/redis/redis.confdocker exec -it redis-1 /bin/sh #redis Default no bash# Create cluster redis cli -- cluster create 172.38.0.11:6379 172.38.0.12:6379 172.38.0.13:6379 172.38.0.14:6379 172.38.0.15:6379 172.38.0.16:6379 -- cluster replica 1
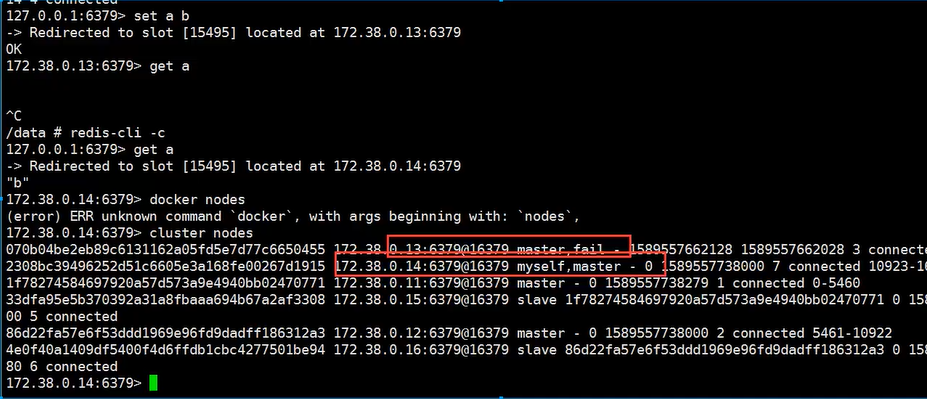
docker completes setting up the redis cluster!
After we use docker, all technologies will gradually become simpler!
9, SpringBoot project packaging Docker image
1. Building a SpringBoot project
2. Package run
mvn package
3. Write dockerfile
FROM java:8COPY *.jar /app.jarCMD ["--server.port=8080"]EXPOSE 8080ENTRYPOINT ["java","-jar","app.jar"]
4. Build mirror
# 1.copy jar and DockerFIle To server# 2. Build image $docker build - t xxxxx: XX. $docker build - t kuangshen666
5. Publish run
[root@iZ8vbgc3u6dvwrjyp45lyrZ idea]# docker imagesREPOSITORY TAG IMAGE ID CREATED SIZEkuangshen666 latest 1ce036c6030a 4 minutes ago 660MBdocker run -d -P --name kuangshen-springboot-web kuangshen666

After we use Docker, we can deliver it to others as an image!
10, Summary
10.1. Get to know docker
Docker definition: docker is an open source application container engine. It allows developers to package their applications and dependency packages into a lightweight and portable container, and then publish them to any popular Linux machine. It can also realize virtualization. The container completely uses the sandbox mechanism (the sandbox is a virtual system program, and the environment provided by the sandbox is independent of each running program, and will not affect the existing system). There will be no interface between them. More importantly, the performance overhead of the container is very low.
Advantages of Docker
Docker is an open platform for developing, delivering and running applications. Docker enables you to separate your applications from your infrastructure so that you can deliver software quickly. With docker, you can manage your infrastructure the same way you manage your applications. By using docker's method to quickly deliver, test and deploy code, you can greatly reduce the delay between writing code and running code in a production environment.
Docker application scenario
- Automated packaging and publishing of Web applications.
- Automated testing and continuous integration and release.
- Deploy and adjust databases or other background applications in a service-oriented environment.
- Compile or extend the existing OpenShift or Cloud Foundry platform from scratch to build your own PaaS environment.
10.2 Docker container and virtual machine
The traditional virtual machines we use, such as VMware, need to simulate the whole machine, including hardware. Each virtual machine needs to have its own operating system. Once the virtual machine is started, all the resources pre allocated to it will be occupied. Each virtual machine includes applications, necessary binaries and libraries, and a complete user operating system.
Container technology is to share hardware resources and operating system with our host computer, which can realize the dynamic allocation of resources. The container contains the application and all its dependent packages, but shares the kernel with other containers. The container runs as a separate process in user space in the host operating system.
Container technology is a way to realize operating system virtualization, which allows you to run applications and their dependencies in processes with isolated resources. By using containers, we can easily package the code, configuration and dependencies of applications and turn them into easy-to-use building blocks, so as to achieve many goals, such as environmental consistency, operational efficiency, developer productivity and version control. Containers can help ensure that applications are deployed quickly, reliably, and consistently without being affected by the deployment environment. Containers also give us more fine-grained control over resources and make our infrastructure more efficient.
**Docker is a kind of encapsulation of Linux container and provides a simple and easy-to-use container interface** It is currently the most popular Linux container solution.
Docker packages the application and its dependencies in a file. Running this file will generate a virtual container. The program runs in this virtual container as if it were running on a real physical machine. With docker, you don't have to worry about environmental problems.
Overall, Docker's interface is quite simple. Users can easily create and use containers and put their applications into containers. The container can also perform version management, copying, sharing and modification, just like managing ordinary code.
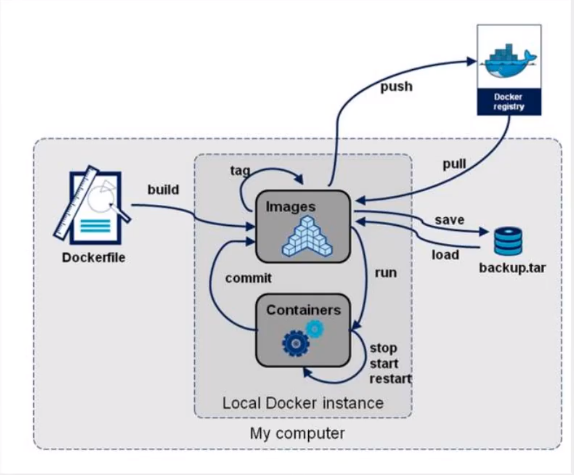
-
Several important concepts of Docker are shown in the following figure:
-
The image is similar to the system image files that need to be downloaded before creating the virtual machine, such as iso files, img files and other image files.
Mirror is Docker The premise of running the container is that the warehouse is the place to store the image, and the visible image is more important Docker The core of.
- A container can be analogous to a running virtual machine.
- You can save your image as a tar file, and others can get your image through load.
- Many common images are saved in the warehouse, such as JDK image, MySQL image, tomcat image, Ubuntu image, ngnix image and so on. You can pull these images through pull, or you can customize some images and push them to the warehouse through push.
- Dockerfile is a build image file that describes and specifies how to build an image.
Dockerfile Is auto build docker The mirrored configuration file can be used by the user Dockerfile Quickly create custom images. Dockerfile The commands in are very similar to linux Lower shell Command. Generally speaking, we can Dockerfile It is divided into four parts:- base image (Parent image)Information instruction FROM- Maintainer information instruction MAINTAINER- Mirror operation instruction RUN , EVN , ADD and WORKDIR etc.- Container start command CMD , ENTRYPOINT and USER etc.
10.3 Docker command
1.Docker container usage
Get image
Start container
View container
Start a container that has stopped
Background operation
Stop a container
Enter container
Exit container
Export container
Import container
Container snapshot
Delete container
Clean up all containers in the terminated state
2.Docker Web application
Run a web application
Open port with port 5000
Close web app
Restart web application
Remove web app
3.Docker image application
List mirrors
Get image
4.Dockerfile
Build mirror
10.4. Containerization steps of SpringBoot project
Step 1: add the maken plug-in of Docker and configure the path of Dockerfile;
<!-- Docker maven plugin --><plugin> <groupId>com.spotify</groupId> <artifactId>docker-maven-plugin</artifactId> <version>0.4.13</version> <configuration> <imageName>${docker.image.prefix}/${project.artifactId} </imageName> <dockerDirectory>${project.basedir}/src/main/docker</dockerDirectory> <resources> <resource> <targetPath>/</targetPath> <directory>${project.build.directory}</directory> <include>${project.build.finalName}.jar</include> </resource> </resources> </configuration></plugin>
Step 2: add a Dockerfile file at the path of the configured Dockerfile;
Step3: add configuration to file:
FROM openjdk:8-jdk-alpine
VOLUME /tmp
#Change the name of dockertest-0.0.1-SNAPSHOT.jar under the current project to test.jar and add it to the image
ADD web-app-template-1.0.0.jar test.jar
#Specify the port, preferably the port configured by the project
EXPOSE 8080
#Run the / test.jar package in the image so that test.jar can be started when the image is run
ENTRYPOINT ["java","-Djava.security.egd=file:/dev/./urandom","-jar","/test.jar"]
Step4: mvn clean package -Dmaven.test.skip=true (indicates that the test case is not executed and the test case class is not compiled.)
step5: mvn package docker:build image
step6: docker images view images
step7: docker run - P 8081:8081 - t springboot / web app template run
step8: view running results: http://localhost:8081/ …
step9: docker push