Introduction to Android basic controls (EditText, Button) and layout (constraint layout)
1, EditText
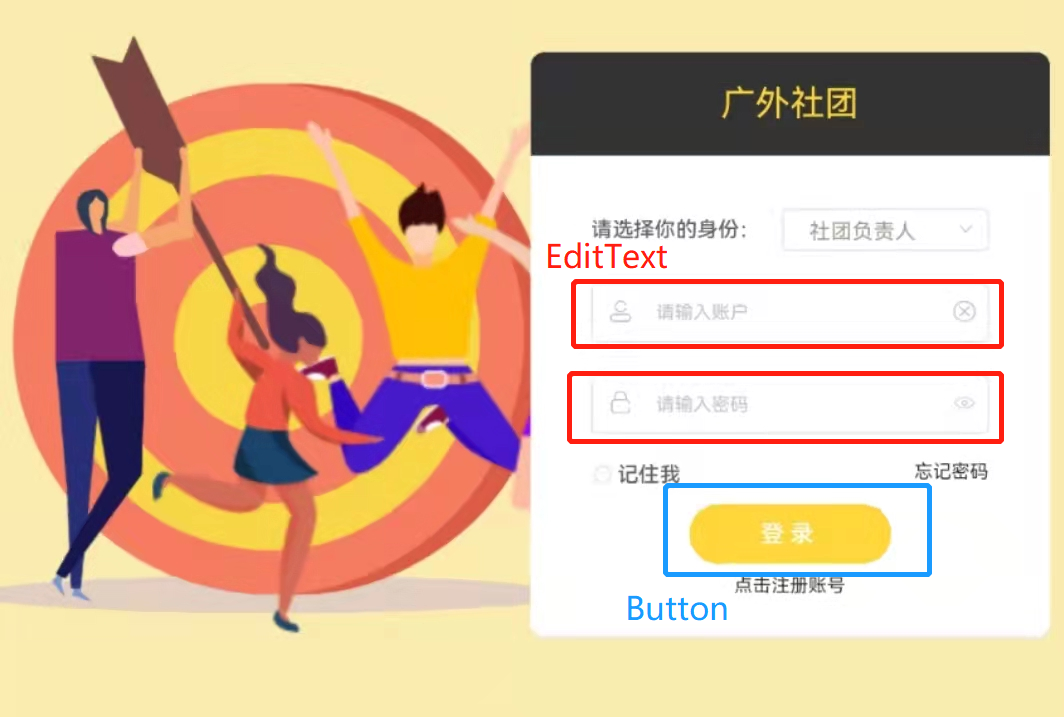
EditText is a text box that allows users to enter and edit content, and these content can be processed in the program. The application scenario of EditText is very common in web search 💻, Send wechat chat 📱, EditText must be used in login page, account input and other operations. For example:
Code display
So let's see how to add EditText to the interface.
Step 1: modify the activity_ The code in main.xml can define an id for EditText according to your needs, and then modify the width and height of the control.
<LinearLayout xmlns:android="http://schemas.android.com/apk/res/android"
    xmlns:app="http://schemas.android.com/apk/res-auto"
    xmlns:tools="http://schemas.android.com/tools"
    android:layout_width="match_parent"
    android:layout_height="match_parent"
    tools:context=".MainActivity">

    <EditText
        android:id="@+id/edit_text"
        android:layout_width="match_parent"
        android:layout_height="wrap_content"
        />

</LinearLayout>
Step 2: you can add suggestive text to the input box. When the user enters the content, the suggestive text will disappear. Add the hint attribute in the code of EditText.
<EditText
        android:id="@+id/edit_text"
        android:layout_width="match_parent"
        android:layout_height="wrap_content"
        android:hint="Type something here"
        />
However, when we input more and more content, EditText will be elongated and the interface will become ugly. We can use the maxLines attribute to solve this problem.
Step 3: add the android:maxLines attribute.
<EditText
        android:id="@+id/edit_text"
        android:layout_width="match_parent"
        android:layout_height="wrap_content"
        android:hint="Type something here"
        android:maxLines="2"
        />
This specifies that the maximum number of lines of EditText is two. When more than two lines are exceeded, the text will scroll upward, and the input box will not continue to stretch.
2, Button
Button is a button that users can click. It is also a common control.
For example, there are many buttons in wechat. After clicking, you can jump to the corresponding page.

Code display
In fact, the attribute of Button is similar to TextView. It has id, length and width. You can write text on it, that is, text attribute.
<Button
    	android:id="@+id/button"
        android:layout_width="wrap_content"
        android:layout_height="wrap_content"
        android:text="button"
        android:textAllCaps="false"
        >
 </Button>
Note: all English letters in the Button will be converted to uppercase automatically. If you want to convert to lowercase, you need to set the android:textAllCaps property to false.
3, Application examples
Next, let's combine Button's knowledge to write an interface for ordering coffee ☕.
When the "+" and "-" buttons are pressed, the number of coffee cups ordered will change, and the Price "Price" will be recalculated.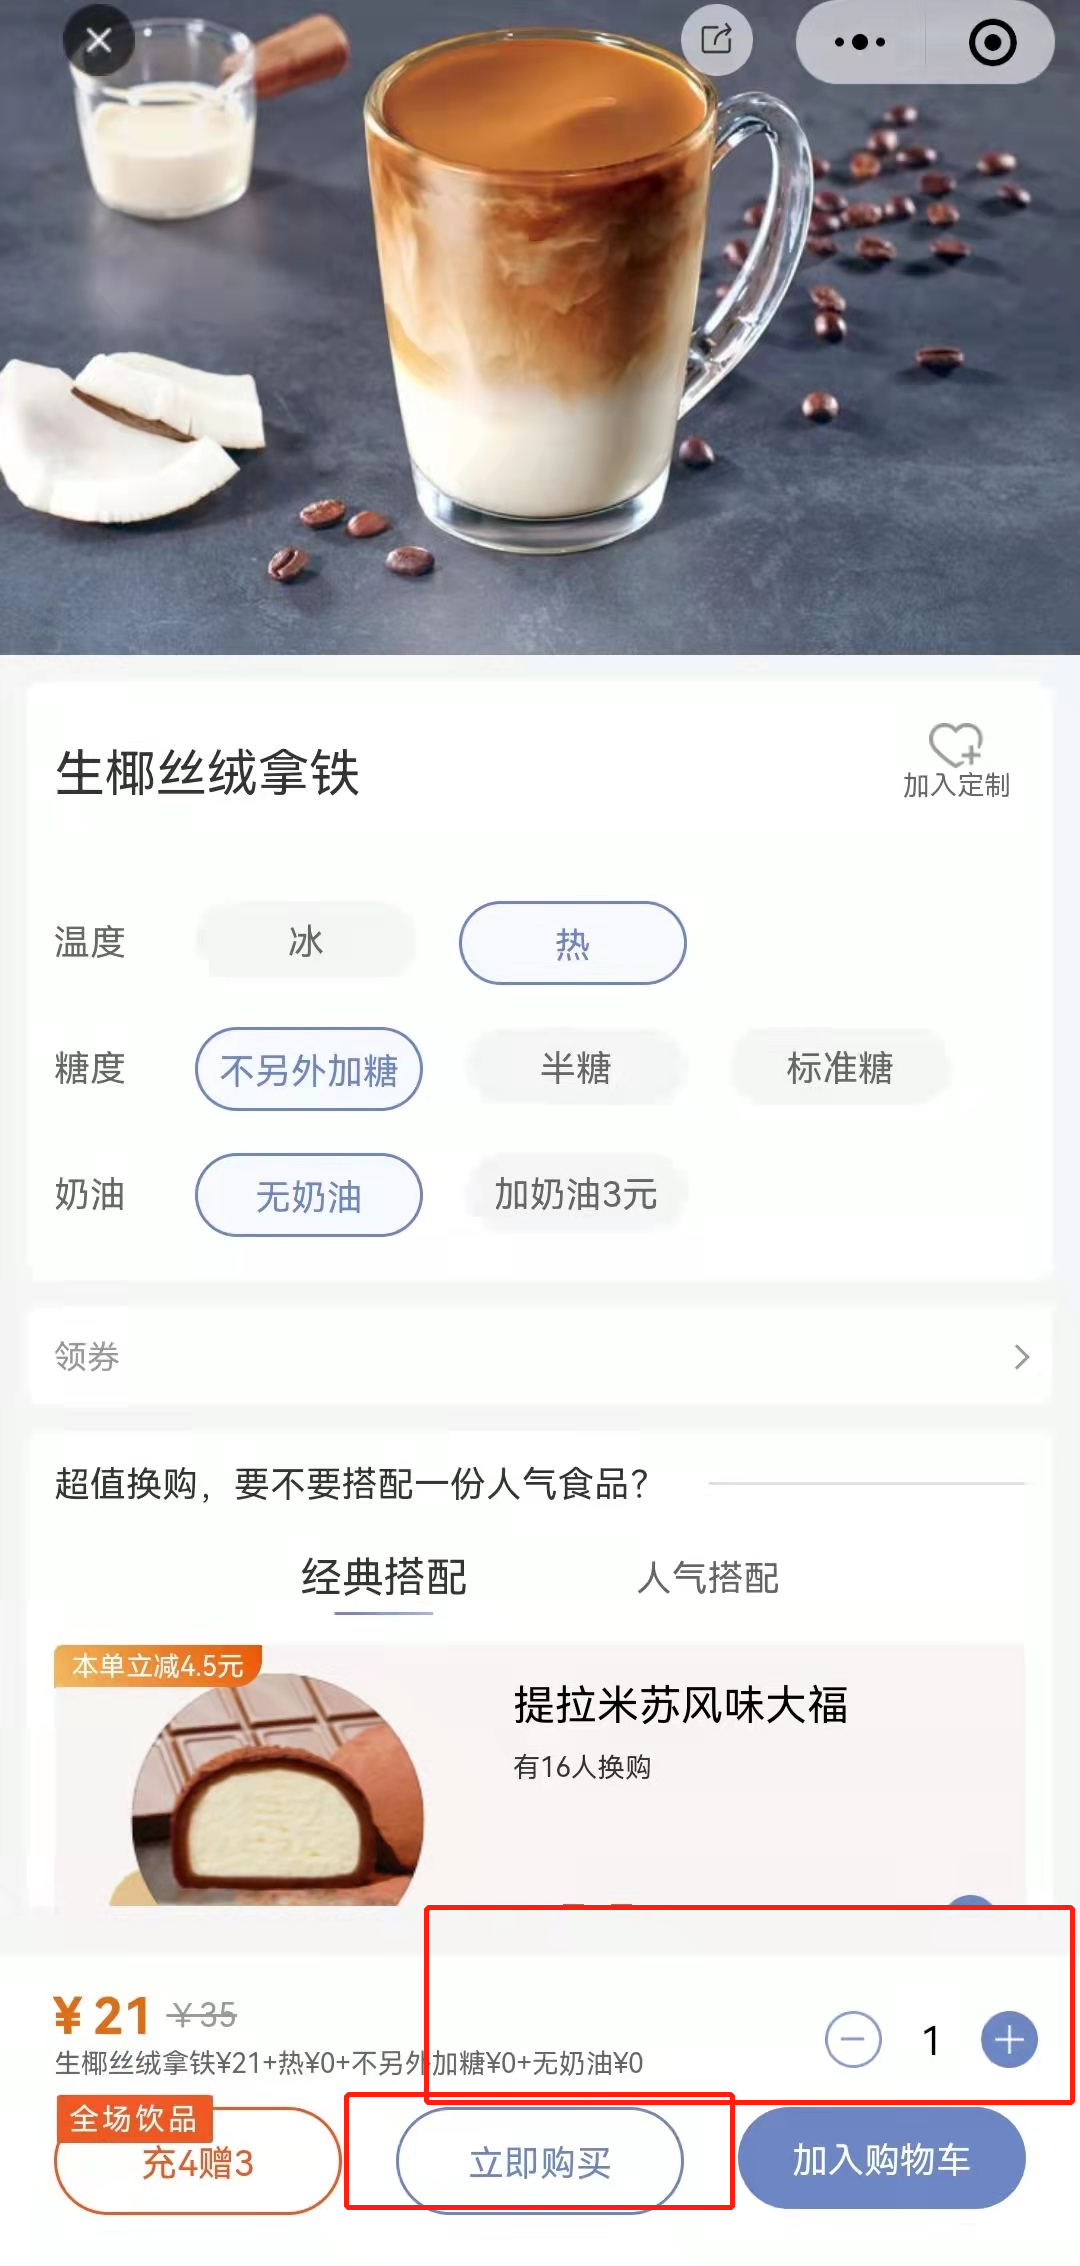
Let's learn how to make and implement some of the interfaces and functions.
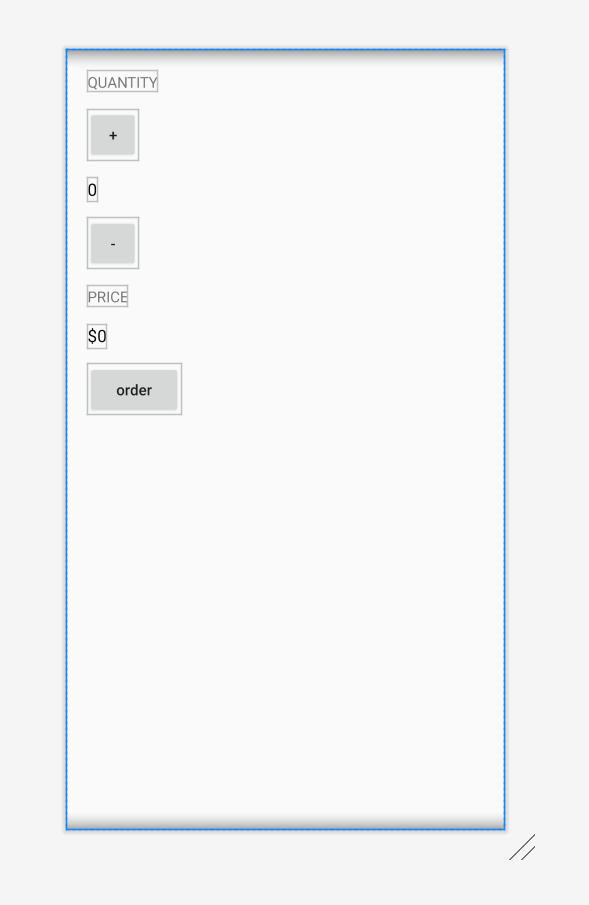
The page to be manufactured is shown in the figure:
(1) Layout code display
In activity_ Add the following code to main.xml.
<?xml version="1.0" encoding="utf-8"?>
<LinearLayout xmlns:android="http://schemas.android.com/apk/res/android"
    xmlns:app="http://schemas.android.com/apk/res-auto"
    xmlns:tools="http://schemas.android.com/tools"
    android:layout_width="match_parent"
    android:layout_height="match_parent"
    tools:context=".MainActivity"
    android:orientation="vertical"
    android:padding="20dp">

	<TextView
	    android:layout_width="wrap_content"
	    android:layout_height="wrap_content"
	    android:text="quantity"
	    android:layout_marginBottom="16dp"
	    android:textAllCaps="true">
	    </TextView>
	<Button
	    android:layout_width="48dp"
	    android:layout_height="48dp"
	    android:text="+"
	    android:layout_marginBottom="16dp"></Button>
    <TextView
        android:id="@+id/quantity_text_view"
        android:layout_width="wrap_content"
        android:layout_height="wrap_content"
        android:textSize="16sp"
        android:text="0"
        android:layout_marginBottom="16dp"
        android:textColor="@android:color/black"></TextView>
    <Button
        android:layout_width="48dp"
        android:layout_height="48dp"
        android:text="-"
        android:layout_marginBottom="16dp"></Button>
    <TextView
        android:layout_width="wrap_content"
        android:layout_height="wrap_content"
        android:layout_marginBottom="16dp"
        android:text="price"
        android:textAllCaps="true"></TextView>
    <TextView
        android:id="@+id/price_text_view"
        android:layout_width="wrap_content"
        android:layout_height="wrap_content"
        android:text="$0"
        android:textSize="16sp"
        android:textColor="@android:color/black"></TextView>
    <Button
        android:layout_width="wrap_content"
        android:layout_height="wrap_content"
        android:layout_marginTop="16dp"
        android:text="order"
        android:textAllCaps="false"
        ></Button>

</LinearLayout>
There are four textviews and three buttons in this interface.
android:orientation = "vertical" means that the controls are arranged linearly in the vertical direction.
Because multiple controls are too tight to look good, we can adjust the properties:
layout_marginTop represents the minimum value of the control closest to the top. We can leave 16dp blank space between each view, which can be realized by setting the inner margin or outer margin parameters.
layout_marginBottom can specify the minimum value of the control where the property is located closest to the lower control.
When android:textAllCaps is set to true, the text becomes uppercase. For example, "quality" here is all uppercase. When we want to change lowercase, we don't need to change the text, just delete the attribute.
android:id="@+id/quantity_text_view", android:id="@+id/price_text_view" we add ID to the button here to facilitate us to add corresponding functions to the button later. (the current button is only an interface, and there is no response after clicking)
(2) Method
Next, we want to add functions to the button, so we need to learn how to write.
Let's first learn the concept of java methods. (~ ̄▽ ̄)~
Method: it is an orderly combination of codes used to solve a class of problems. It is a functional module.
Definition method:
Method definition consists of method name, parameter, return value type and method body
The syntax for defining methods is as follows:
Access modifier return value type method name (parameter list){
//Method body
}
1. Access modifier: the permission range allowed to be accessed by the method, which can be public, protected, private, or even omitted. Public means that it can be called by any other code. The other modifiers can be accessed by themselves without detailed explanation.
2. Return value type: the return value type of the method. If the method does not return any value, the return value type is specified as void; if the method has a return value, the return value type needs to be specified and the return statement is used in the method body to return the value.
3. Method name: the name of the defined method, which must use a legal identifier,
4. Parameter list is the parameter list passed to the method. There can be multiple parameters. Multiple parameters are separated by commas. Each parameter is composed of parameter type and parameter name, separated by spaces.
Code example
1.	Parameterless return value method
	public void print(){ //void means no return value, and print is the method name
    System.out.print("Hello world"); //Output Hello world on the console
}
2.	Nonparametric method with return value: since a result will be returned after the method is executed, the return value will generally be received and processed when calling a method with return value
    public int getSum(){ //int means to return an integer
        int a = 5;
        int b = 6;
        int sum = a+b;
        return sum; //Use return to return 11
    }
    int a = getSum(); //If getSum() of the method in the above code returns 11, a=11
3.	Methods with parameters and no return value: the syntax of calling methods with parameters is similar to that of calling methods without parameters, but the actual parameter value must be passed in when calling
	public void show(String name){  //The parameter name is a string type
        System.out.print("Hello!"+name);
}
	show("Quanta Android"); //Output Hello! Quanta Android
4.	Method with parameter and return value: similar to the above.
(3) Function realization
Next, we go to MainActivity.java and add the following code.
(Note: add the code to the public class mainactivity extensions appcompatactivity {} outside the onCreate method)
First step
The function we want to achieve is: after clicking order, the QUANTITY becomes 1.
/**
*The method that will be executed when you click order
*/
    public void submitOrder(View view){
        display(1);
    }
/**
*Show quantity
*/

    private void display(int number){
        TextView quantityTextView = (TextView)findViewById(R.id.quantity_text_view);
        quantityTextView.setText(""+number);
    }
Don't understand the code? It's OK. Don't worry about it for the time being. Copy it directly first, and you'll learn it in depth later. Then you can write it yourself ~ (• ̀ ω •́ ) ✧
Then we go back to activity_main and add an attribute on the Button of order: android:onClick = "submitOrder"
  <Button
        android:layout_width="wrap_content"
        android:layout_height="wrap_content"
        android:layout_marginTop="16dp"
        android:text="order"
        android:textAllCaps="false"
        android:onClick="submitOrder"
        ></Button>
When you click order, you will find that the number in quantity changes from 0 to 1. Because the Button adds an additional attribute: Android: onClick=submitOrder [the value of the attribute is the name of the method you want to call in response to the click event] , when clicked, the method named submitOrder will be executed, because the function of this method is to display the text of TextView with id of quantity_text_view as the value in parentheses, so it becomes quantity and becomes 1. Similarly, if it is changed to 2, it will become 2. Of course, in addition to numbers, mathematical expressions can be written in parentheses, such as 22183 + 5.
Step 2
Next: Click to display the quantity and price.
We paste this code into the public class mainactivity extensions appcompatactivity {} outside the onCreate method.
/**
 * The price is displayed on the screen
 */
private void displayPrice(int number) {
       TextView priceTextView = (TextView) findViewById(R.id.price_text_view);
       priceTextView.setText(NumberFormat.getCurrencyInstance().format(number));
}
To display the price, we need to call the displayPrice method in the submitOrder method. We assume that it is a cup of five yuan (of course, the quantity and price can be set by yourself), so the parameter is written as 1*15.
public void submitOrder(View view){
    display(1);
    displayPrice(1*15);
}
Now run it and click order to see the results.
(4) Variable
What we have just shown are fixed values. Now let's try to use the button to change the quantity~
(the contents of variables will be covered in the following booklet 📔 If you don't remember what happened in Chapter 3, go back and look at the naming and definition of variables)
First step
Try to express the quantity of coffee with a variable
Change the submitOrder method to
    public void submitOrder(View view){
        int numberOfCoffee = 2;  //Set a variable to represent the amount of coffee and initialize it to 2.
        display(numberOfCoffee);
        displayPrice(numberOfCoffee*5);
}
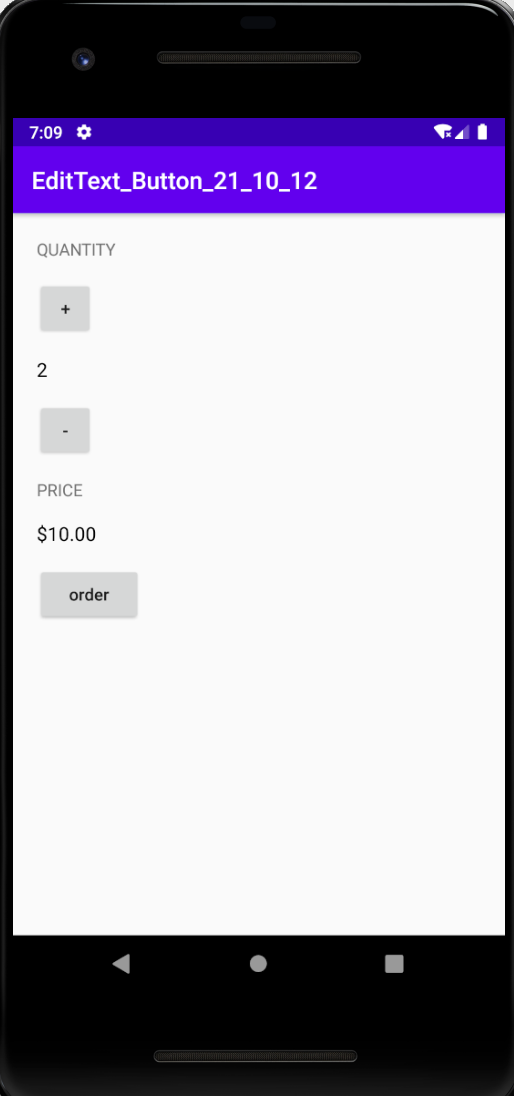
The above defines a local variable numberOfCoffee, and then initializes it with a value of 2.
After running, it is like this
Step 2
Make a quantity selector, click "+" to increase the quantity, click "-" to decrease the quantity, and then click order to modify the price.
Add the following two methods to MainActivity:
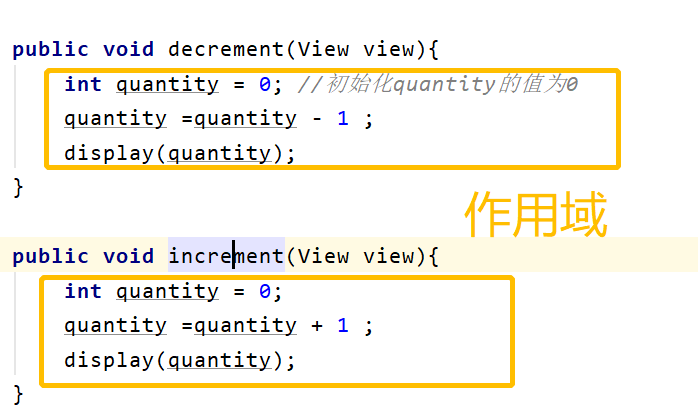
public void decrement(View view){
    int quantity = 0; //The value of initialization quantity is 0
    quantity =quantity - 1 ;
    display(quantity);
}

public void increment(View view){
    int quantity = 0;
    quantity =quantity + 1 ;
    display(quantity);
}
In the increment method, first initialize a quantity variable quantity to 0, then let quantity+1, then assign the new value 1 to the quantity variable, and finally pass the new quantity value as a parameter to the display method. The same is true for the increment method.
Step 3
Add the onClick attribute to the corresponding button.
<Button
    android:layout_width="48dp"
    android:layout_height="48dp"
    android:text="+"
    android:layout_marginBottom="16dp"
    android:onClick="increment"></Button>

<Button
    android:layout_width="48dp"
    android:layout_height="48dp"
    android:text="-"
    android:layout_marginBottom="16dp"
    android:onClick="decrement"></Button>
However, we will find that the functions of such methods are not perfect. We always click the plus sign but stay at 1. This is because the two methods always create a new quantity variable with an initial value of 0. So how to modify it? This involves the concept of variable scope.
(5) Variable scope (supplementary knowledge points)
1. Local variable: a variable defined inside a function. Its scope is limited to the inside of the function. It is invalid after leaving the function. If it is used again, an error will be reported.
2. Global variable: a variable defined outside all functions. Its scope is the whole program by default, that is, all source files.
In the coffee order application example studied here, we declared a local variable quantity in the increment method and a local variable quantity in the increment method. The reason why we can declare a variable with the same name twice is that they are in different variable scopes.
If a variable is defined in a method, it can only be used in the method. When the method is executed, these variables will be destroyed.
This is the scope in the increment method and increment method in the code:
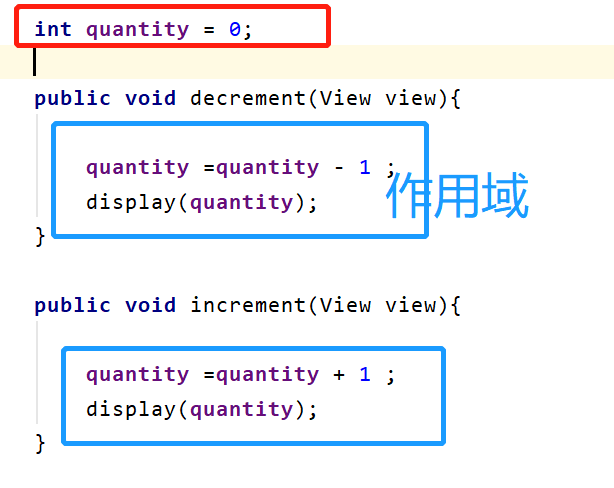
Therefore, we need a global variable. The global variable can be called by any piece of code (method) in the application. When a method is executed, it will not be destroyed. Declared in the starting and ending braces of MainActivity, the quantity variable can be called in MainActivity, and the quantity can be stored as a global variable. Calling the increase or decrease method will not destroy this value. At this time, the scope of quantity is shown in the following figure:
Code display
The modified code is as follows:
int quantity = 0;
public void increment(View view){
    quantity =quantity + 1;
    display(quantity);
}
public void decrement(View view){
    quantity =quantity - 1 ;
    display(quantity);
}

public void submitOrder(View view){
    display(quantity);
    displayPrice(quantity *5);
}
After running, you can click plus or minus to select the quantity, and click order to display the price. Just a simple coffee order APP! There are still many areas that can be improved, which can be improved slowly in the future~ 🤪
4, Constraint layout
1. Concept
Constraint layout constraint layout is a ViewGroup. It mainly aims to solve the problem of too many nested layouts and locate and adjust widgets in a flexible way. From Android Studio 2.3, the official template uses ConstraintLayout by default.
Official documents
2. How to use constraint layout?
Add dependency: (generally available by default)
Add dependencies in the brackets of dependencies in the app/build.gradle file. As follows:
implementation 'androidx.constraintlayout:constraintlayout:2.0.4'
Here are some common properties of relative positioning:
layout_constraintLeft_toLeftOf
layout_constraintLeft_toRightOf
layout_constraintRight_toLeftOf
layout_constraintRight_toRightOf
layout_constraintTop_toTopOf
layout_constraintTop_toBottomOf
layout_constraintBottom_toTopOf
layout_constraintBottom_toBottomOf
layout_constraintBaseline_toBaselineOf
layout_constraintStart_toEndOf
layout_constraintStart_toStartOf
layout_constraintEnd_toStartOf
layout_constraintEnd_toEndOf
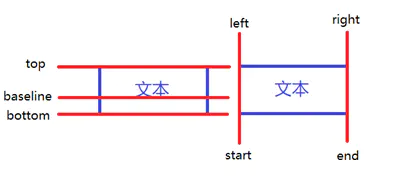
Attribute details
Summarize the above attributes with this picture:
Example of relative positioning:
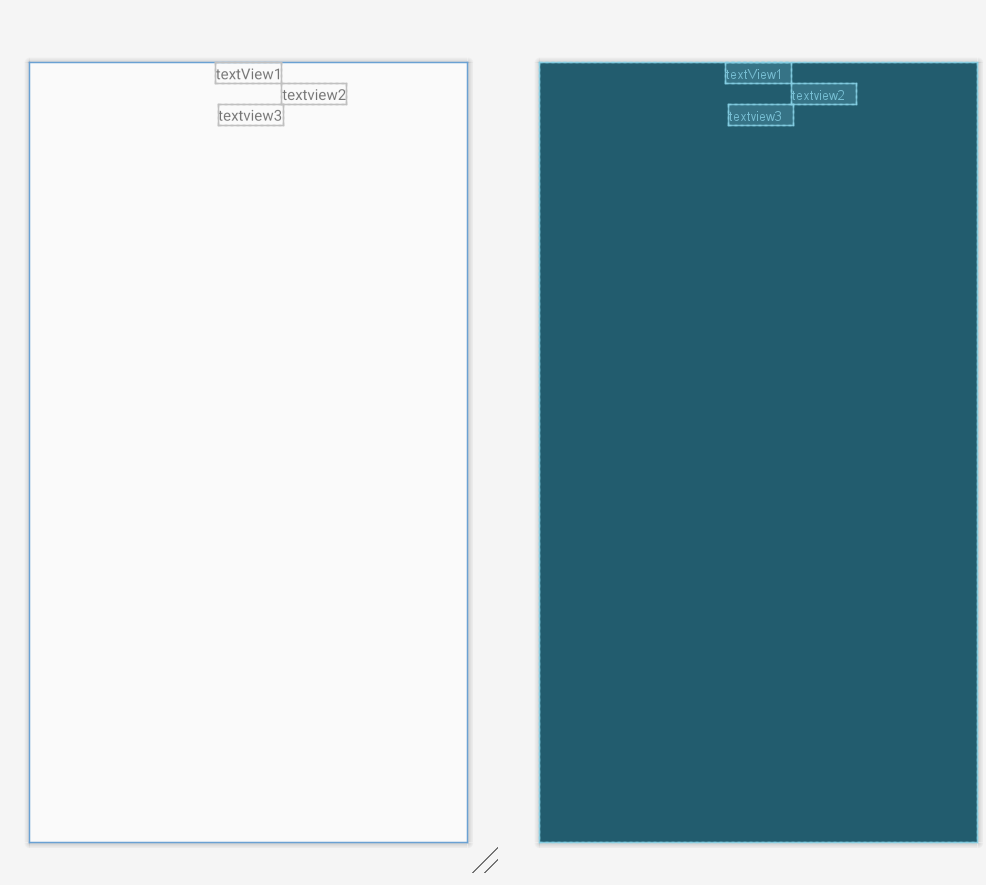
If you want to place TextView1 in the center, TextView2 in the lower right of TextView1 and TextView3 in the lower left of TextView2, the layout file should be written as follows:
  <!--Center placement-->
    <TextView
        android:id="@+id/textview1"
        android:layout_width="wrap_content"
        android:layout_height="wrap_content"
        app:layout_constraintTop_toTopOf="parent"
        app:layout_constraintStart_toStartOf="parent"
        app:layout_constraintEnd_toEndOf="parent"
        android:text="textView1">

    </TextView>

    <!--Placed in textview1 Bottom right of-->
    <TextView
        android:id="@+id/textView2"
        android:layout_width="wrap_content"
        android:layout_height="wrap_content"
        android:text="textview2"
        app:layout_constraintTop_toBottomOf="@id/textview1"
        app:layout_constraintLeft_toRightOf="@+id/textview1"/>

    <!--Placed in textview2 Lower left of-->
    <TextView
        android:id="@+id/textView3"
        android:layout_width="wrap_content"
        android:layout_height="wrap_content"
        app:layout_constraintTop_toBottomOf="@id/textView2"
        app:layout_constraintRight_toLeftOf="@id/textView2"
        android:text="textview3"/>
ConstraintLayout also provides another offset attribute:
layout_constraintHorizontal_bias horizontal offset
layout_constraintVertical_bias vertical offset
For example: TextView1 just entered is placed in the center. Now let's add layout_constraintHorizontal_bias attribute: (the assignment can take the number of 0 ~ 1)
<TextView
        android:id="@+id/textview1"
        android:layout_width="wrap_content"
        android:layout_height="wrap_content"
        app:layout_constraintTop_toTopOf="parent"
        app:layout_constraintStart_toStartOf="parent"
        app:layout_constraintEnd_toEndOf="parent"
        app:layout_constraintHorizontal_bias="0.3"
        android:text="textView1">
    </TextView>
The effect is like this:

Absolute coordinates
I saw that some children use the following two attributes when writing their homework:
app:layout_editor_absoluteX represents the absolute coordinate point of the X axis of this control in the layout
app:layout_editor_absoluteY represents the absolute coordinate point of the Y axis of this control in the layout
Then there was a red report
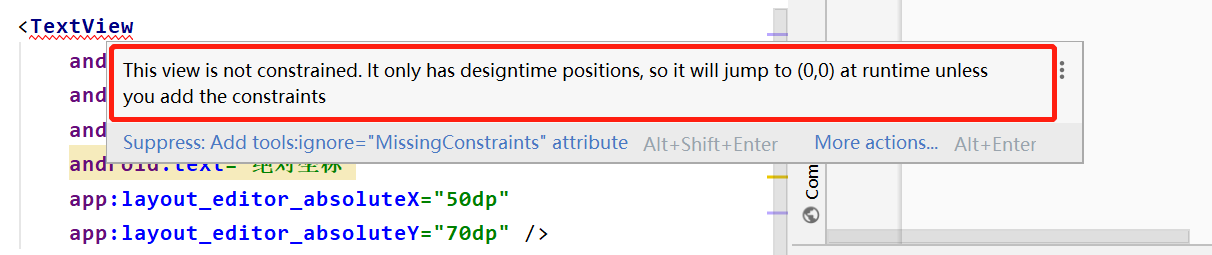
This is because the constrained layout is clearly used but no constraints are added. At this time, check whether the constraints in the ConstraintLayout are complete. The so-called integrity means that there should be horizontal and vertical constraints.
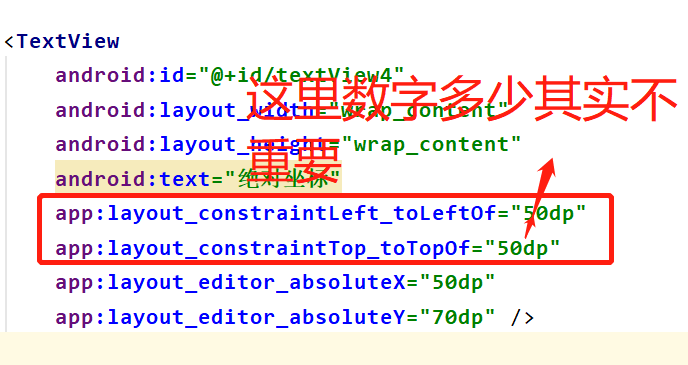
Change the code so that no error will be reported:
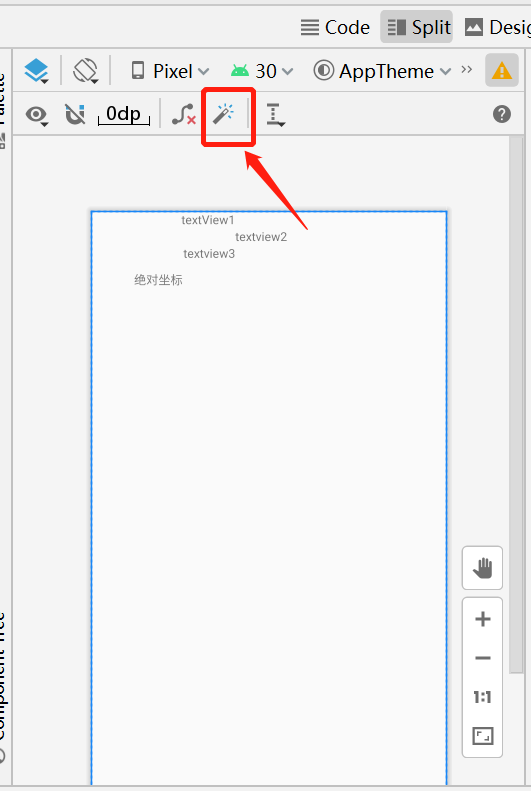
Or click this button (let the system automatically add horizontal and vertical attributes for you)
Margin
The common properties of the margins of the ConstraintLayout are as follows:
android:layout_marginStart
android:layout_marginEnd
android:layout_marginLeft
android:layout_marginTop
android:layout_marginRight
android:layout_marginBottom
This actually looks no different from RelativeLayout, but in the ConstraintLayout, the position of the control in the ConstraintLayout should be constrained first. As mentioned above, check whether the constraints in the ConstraintLayout are complete.
It can be written as follows:
<android.support.constraint.ConstraintLayout
    android:layout_width="match_parent"
    android:layout_height="match_parent">

    <TextView
        android:id="@+id/TextView1"
        android:layout_width="wrap_content"
        android:layout_height="wrap_content"
        android:layout_marginLeft="10dp"
        android:layout_marginTop="10dp"
        app:layout_constraintLeft_toLeftOf="parent"
        app:layout_constraintTop_toTopOf="parent"
        android:text="hello world"/>

</android.support.constraint.ConstraintLayout>
You can also do this:
<TextView
        android:id="@+id/TextView1"
        android:layout_width="wrap_content"
        android:layout_height="wrap_content"
        app:layout_constraintStart_toStartOf="parent"
        app:layout_constraintTop_toTopOf="parent"
        android:text="hello world"/>
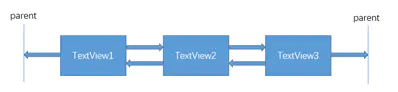
chain
If two or more controls are constrained together by the following figure, they can be considered as a chain (the figure shows a horizontal chain, and the same is true for the vertical).
Code display
 <TextView
        android:id="@+id/TextView1"
        android:layout_width="wrap_content"
        android:layout_height="wrap_content"
        android:text="Text box 1"
        app:layout_constraintLeft_toLeftOf="parent"
        app:layout_constraintRight_toLeftOf="@+id/TextView2"
        app:layout_constraintTop_toTopOf="parent"/>

    <TextView
        android:id="@+id/TextView2"
        android:layout_width="wrap_content"
        android:layout_height="wrap_content"
        android:text="Text box 2"
        app:layout_constraintLeft_toRightOf="@+id/TextView1"
        app:layout_constraintRight_toLeftOf="@+id/TextView3"
        app:layout_constraintRight_toRightOf="parent"
        app:layout_constraintTop_toTopOf="parent" />

    <TextView
        android:id="@+id/TextView3"
        android:layout_width="wrap_content"
        android:layout_height="wrap_content"
        android:text="Text box 3"
        app:layout_constraintLeft_toRightOf="@+id/TextView2"
        app:layout_constraintRight_toRightOf="parent"
        app:layout_constraintTop_toTopOf="parent" />
(the attribute app: layout_constrainthhorizontal_weight can be added here to adjust the proportion of the three controls. You can try it yourself. It will not be shown here.)
Layout can be added to the chain head_ constraintHorizontal_ Chainstyle to change the style of the whole chain. (the so-called chain head refers to the leftmost control in the horizontal chain and the topmost control in the vertical chain) chains provides three styles, as follows:

application
When do you usually use constraint layout?
1. There are multiple pictures in the news headlines, such as:

2. Placement of avatars and nicknames:
Here are two examples. In fact, there are many situations where constrained layout can be used. You can dig it yourself~
The above is some basic knowledge of constraint layout. If you want to learn more usage, you can baidu~