catalogue
2. Cluster architecture diagram:
5. Modify the hosts configuration file:
10. Software k8s/docker/dashboard version:
11. Install docker environment:
① To uninstall an older version of docker:
(2) Offline rpm installation docker:
③ Execute the installation package:
④ Write the docker service script:
⑤ Upload service script and authorization:
(4) Modify the Cgroup Driver of docker:
12. To install kubedm / kubelet / kubectl:
(2) Official website installation tutorial:
① Add alicloud YUM software source:
② To install kubedm / kubelet / kubectl:
② Get kubedm / kubelet / kubectl offline package:
③ Upload kubedm / kubelet / kubectl offline package:
④ Execute the installation package:
⑤ Write kubelet service script:
⑥ Upload service script and authorization:
(5) Operation kubelet service:
① To enable the self starting kubelet service:
13. Cluster k8s required image and software version:
14. Configure nginx load balancing:
(1) Online installation nginx:
⑨ Upload service script and authorization:
(2) Offline installation nginx:
① Download the rpm package of nginx:
② Upload rpm package to server:
③ Execute the rpm installation command:
④ Modify the nginx.conf configuration file:
⑥ Upload service script and authorization:
(3) Configure master node load balancing:
① Startup and self startup nginx service:
15. First master deployed k8s:
(3) Generate kubelet environment configuration file:
16. To install the pod network plug-in (CNI):
(1) Download the yml configuration file for flannel:
(5) To delete an old flannel image:
(1) To view token information:
③ Query the discovery token CA cert hash value:
④ Create a certificate key value:
(4) Generate kubelet environment configuration file:
(1) If you are joining offline, you need to:
(4) To delete an old flannel image:
(5) To add a new node to the cluster:
③ Query the discovery token CA cert hash value:
④ Add a new node to the cluster:
(6) To install the pod network plug-in (CNI):
19. Test validation k8s cluster:
(2) To create an nginx container:
(4) Query whether nginx runs successfully:
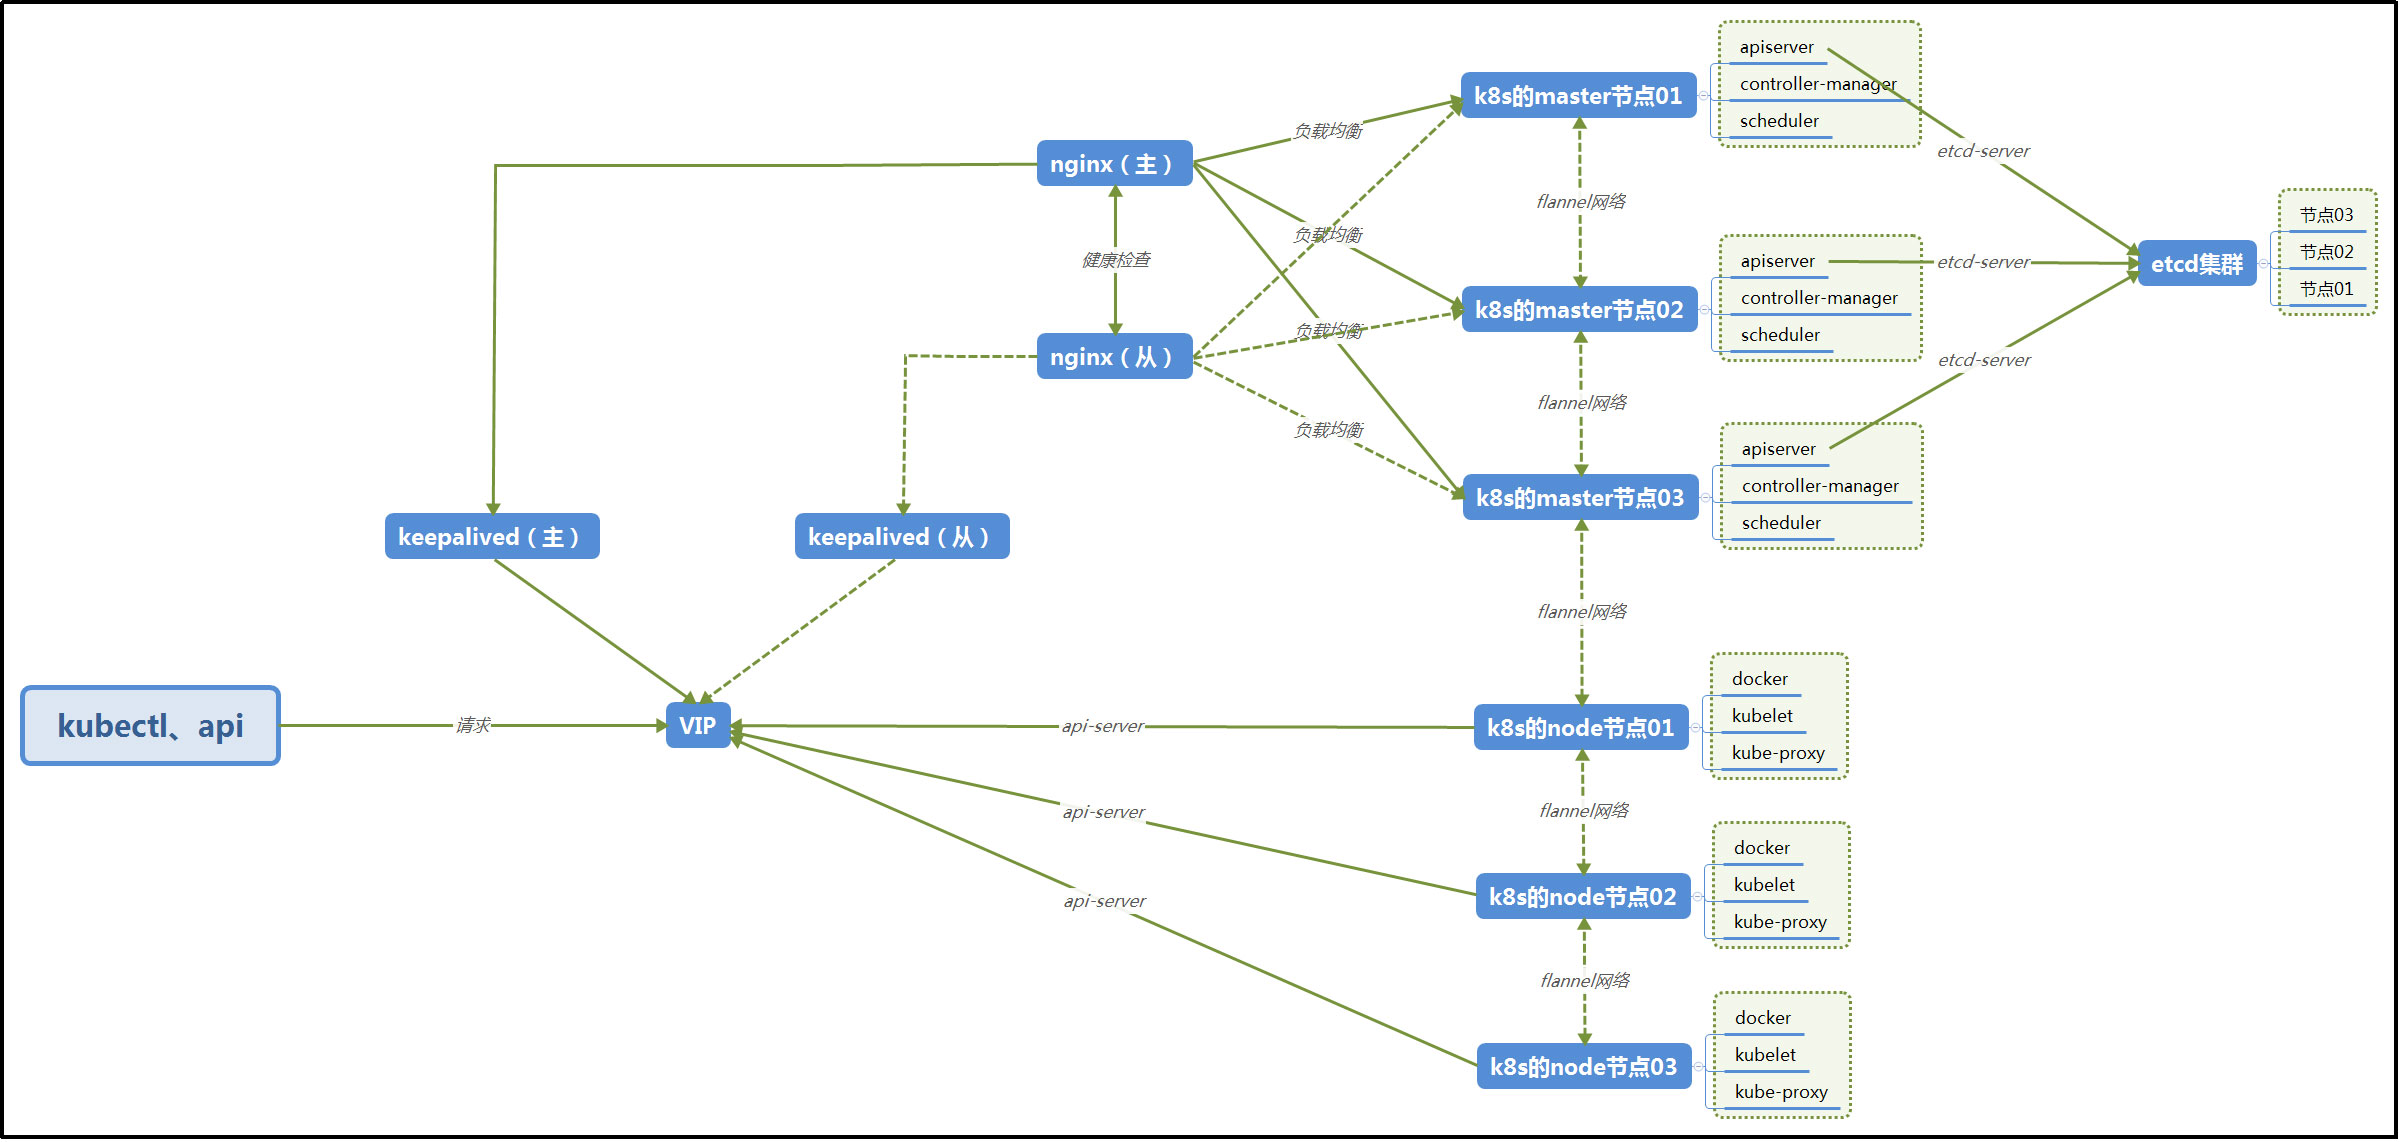
1. Architecture introduction:
A K8S cluster consists of two parts: a master node and a node node. The master node is mainly responsible for cluster control, pod scheduling, token management and other functions. The node node is mainly responsible for working, starting containers and managing containers. Generally, the master node and node node should not be deployed on the same machine. In actual production, considering high availability, multiple master nodes need to be deployed. Abstract this diagram, which looks like this:

2. Cluster architecture diagram:
Kubernetes high availability cluster architecture is as follows:
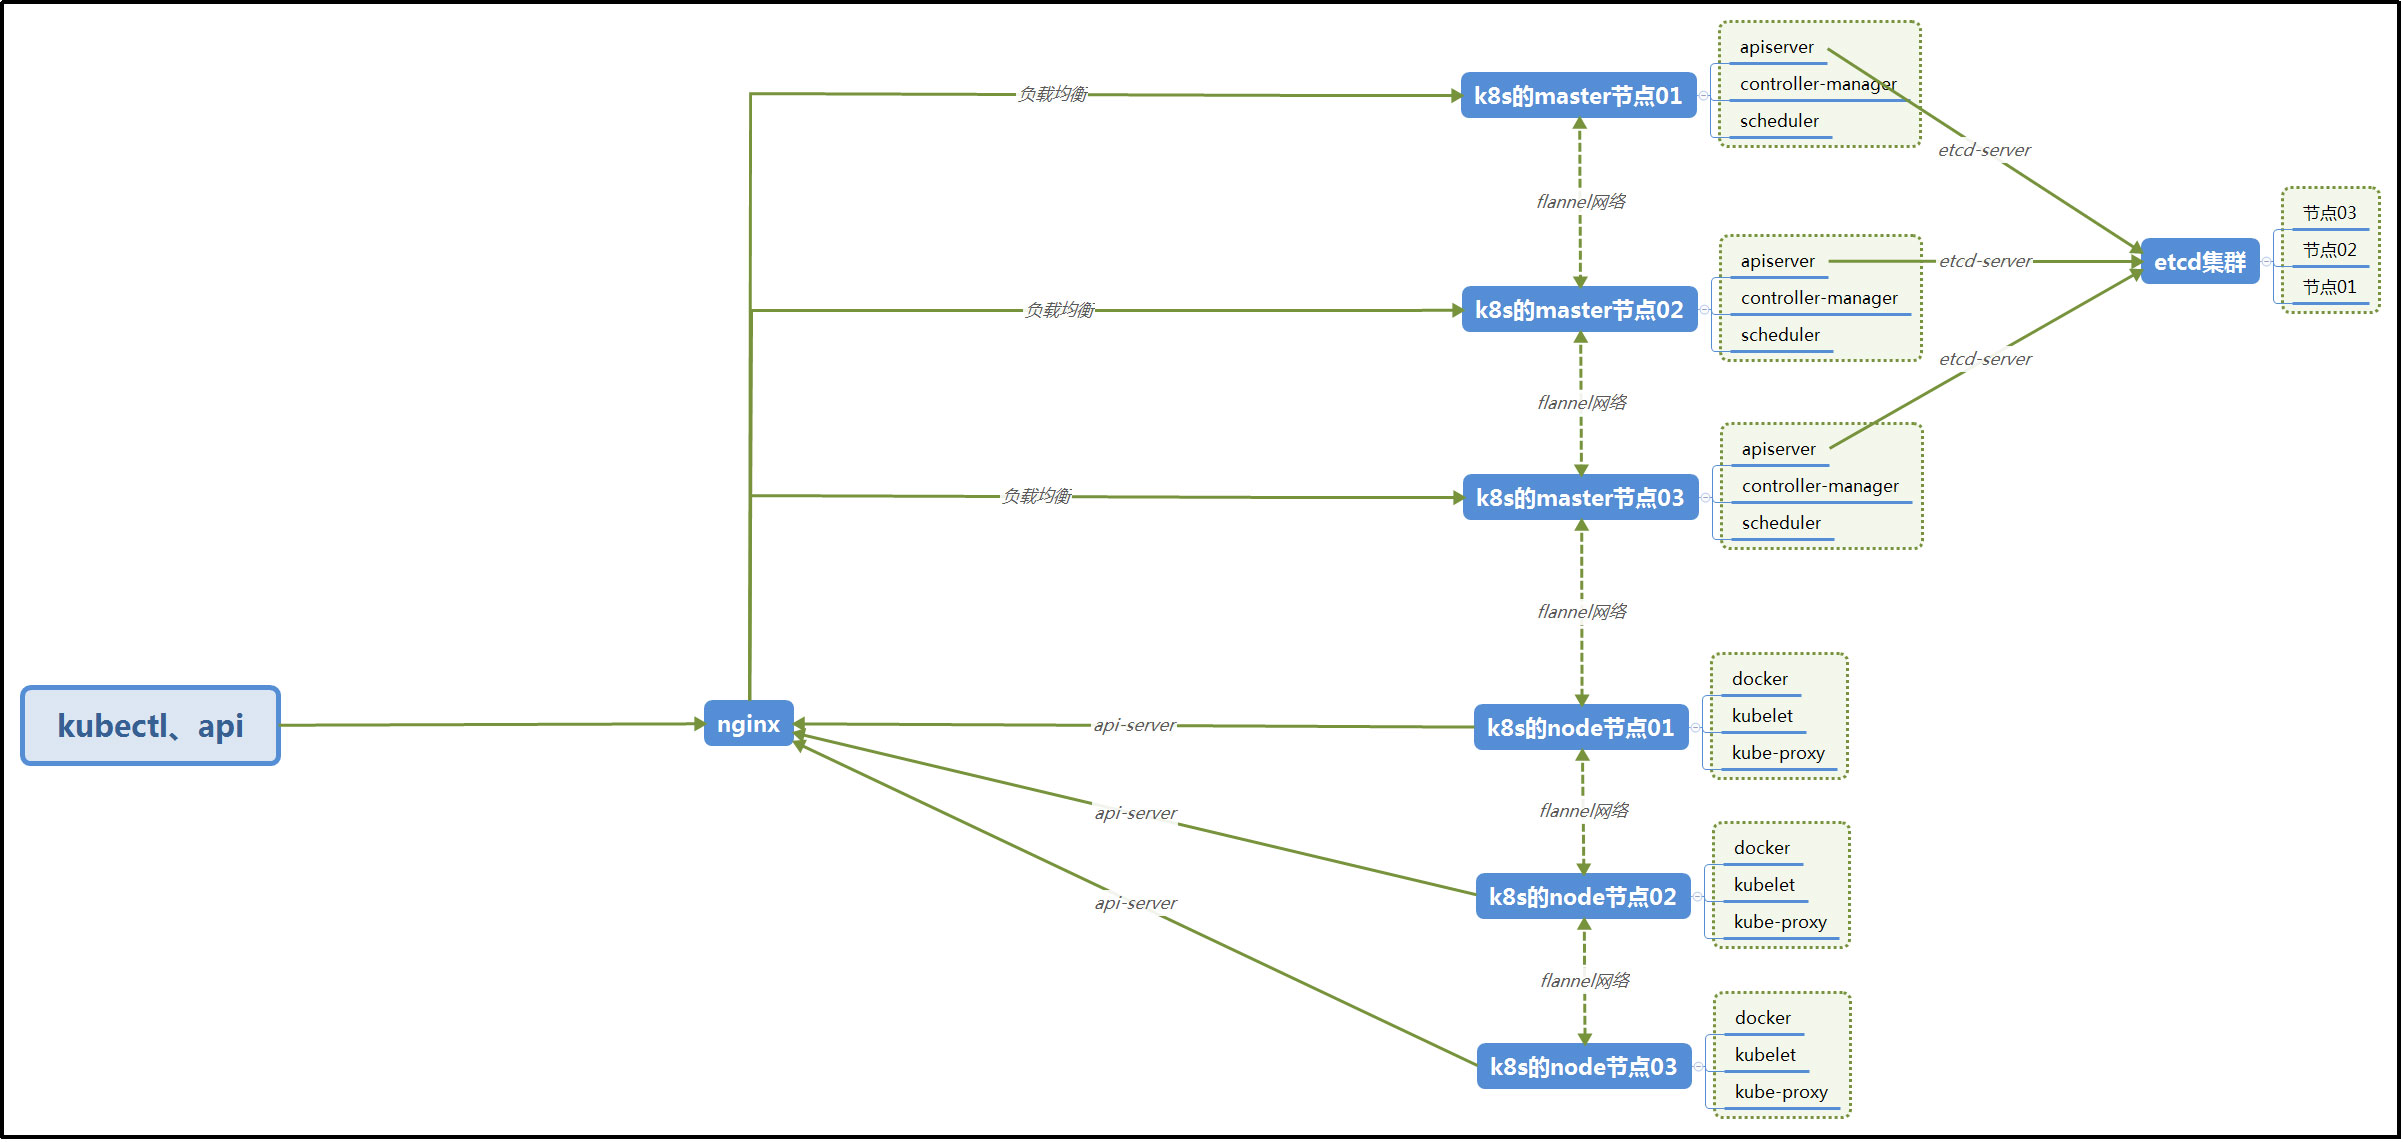
Note: the local building does not use keepalived, and only one nginx is used for load balancing requests to the master node. The architecture adopted in this construction is as follows:
3. Cluster server:
The kubernetes cluster built locally adopts four virtual machines, three of which are master and one is node.
| Cluster role | Host name | IP address | CPU / memory | Software |
| master | k8s-master-01 | 192.168.137.129 VIP: 192.168.137.200 | 2 cores / 2GB | Docker Kubelet Etcd kube-apiserver kube-controller-manager kube-scheduler |
| master | k8s-master-02 | 192.168.137.130 VIP: 192.168.137.200 | 2 cores / 2GB | Docker Kubelet Etcd kube-apiserver kube-controller-manager kube-scheduler |
| master | k8s-master-03 | 192.168.137.131 VIP: 192.168.137.200 | 2 cores / 2GB | Docker Kubelet Etcd kube-apiserver kube-controller-manager kube-scheduler |
| node | k8s-node-01 | 192.168.137.132 | 2 cores / 2GB | Docker Kubelet kube-proxy Flannel |
Note: the server where the master node is located must be at least 2-core, otherwise the installation will report an error.
4. Modify host name:
Note: the following operations are required for all servers in the cluster:
Modify the / etc/hostname file and change the corresponding name to the host name.
Then restart the server.
5. Modify the hosts configuration file:
Note: the following operations are required for all servers in the cluster:
Modify the / etc/hosts file and add the mapping relationship between host name and IP:

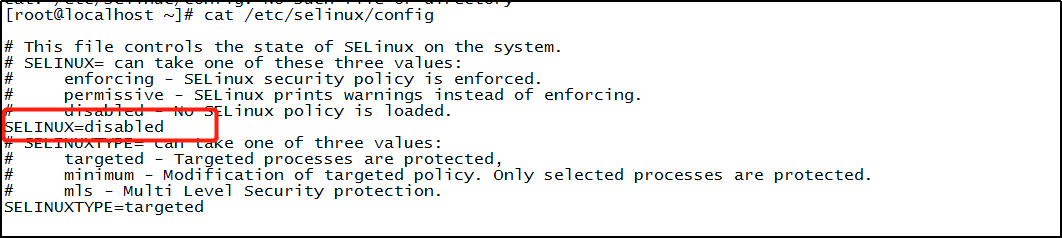
6. Close selinux:
Note: the following operations are required for all servers in the cluster:
Modify the value of SELINUX = in the / etc/selinux/config file to: disabled, and then restart the server:
7. Turn off the firewall:
Note: the following operations are required for all servers in the cluster:
Execute the following command:
Turn off the firewall:
systemctl stop firewalld.service
Turn off firewall startup:
systemctl disable firewalld.service
8. Close swap:
Note: the following operations are required for all servers in the cluster:
Edit the / etc/fstab configuration file, annotate the line containing swap with # and save the configuration file. Finally, restart the server.

9. Set iptables bridge:
Note: the following operations are required for all servers in the cluster:
Execute command:
cat > /etc/sysctl.d/k8s.conf << EOF

net.bridge.bridge-nf-call-ip6tables = 1

net.bridge.bridge-nf-call-iptables = 1

EOF
Execute command:
sysctl --system
10. Software k8s/docker/dashboard version:
The software k8s, docker and dashboard are compatible with each other in version:
| K8s version | Docker version | Dashboard version |
| V1.22 | Compatible with the latest version 20.10 | No version found at this time |
| V1.21 | Compatible with the latest version 20.10 | V2.3.1/V2.3.0 |
| V1.20 | Changes are not understood yet, which should be the same as V1.17 | V2.3.1/V2.3.0/V2.2.0/V2.1.0 |
| V1.19 | Changes are not understood yet, which should be the same as V1.17 | V2.0.5/V2.0.4 |
| V1.18 | I don't have a clear explanation. It should be the same as V1.17 | V2.0.3/V2.0.2/V2.0.1/V2.0.0 |
| V1.17 | V1.13.1/V17.03/V17.06/V17.09/ V18.06/V18.09/V19.03 | V2.0.0-rc7/V2.0.0-rc6/V2.0.0-rc5/V2.0.0-rc4 |
| V1.16 | V1.13.1/V17.03/V17.06/V17.09/ V18.06/V18.09 | V2.0.0-rc3/V2.0.0-rc2/V2.0.0-rc1/ V2.0.0-beta8/V2.0.0-beta7/V2.0.0-beta6/ V2.0.0-beta5 |
| V1.15 | V1.13.1/V17.03/V17.06/V17.09/ V18.06/V18.09 | V2.0.0-beta4/V2.0.0-beta3/V2.0.0-beta2 |
| V1.14 | V1.13.1/V17.03/V17.06/V17.09/ V18.06/V18.09 | V2.0.0-beta1 |
| V1.13 | V1.11.1/V1.12.1/V1.13.1/ V17.03/V17.06/V17.09/V18.06 | No version found at this time |
| V1.12 | V1.11.1/V1.12.1/V1.13.1/ V17.03/V17.06/V17.09/V18.06 | No version found at this time |
| V1.11 | V1.11.x/V1.12.x/V1.13.x/V17.03.x | No version found at this time |
| V1.10 | V1.11.x/V1.12.x/V1.13.x/V17.03.x | V1.10.1/V1.10.0 |
| V1.9 | V1.11.x/V1.12.x/V1.13.x/V17.03.x | V1.10.1/V1.10.0/V1.8.3 |
| V1.8 | V1.11.2/V1.12.6/V1.13.1/V17.03.2 | V1.10.1/V1.10.0/V1.8.3 |
Steps to view k8s and docker version compatibility:
The k8s built this time is 1.17.0, and the corresponding docker versions need 1.13.1, 17.03, 17.06, 17.09, 18.06 and 18.09. The locally installed docker version is 18.06.1.
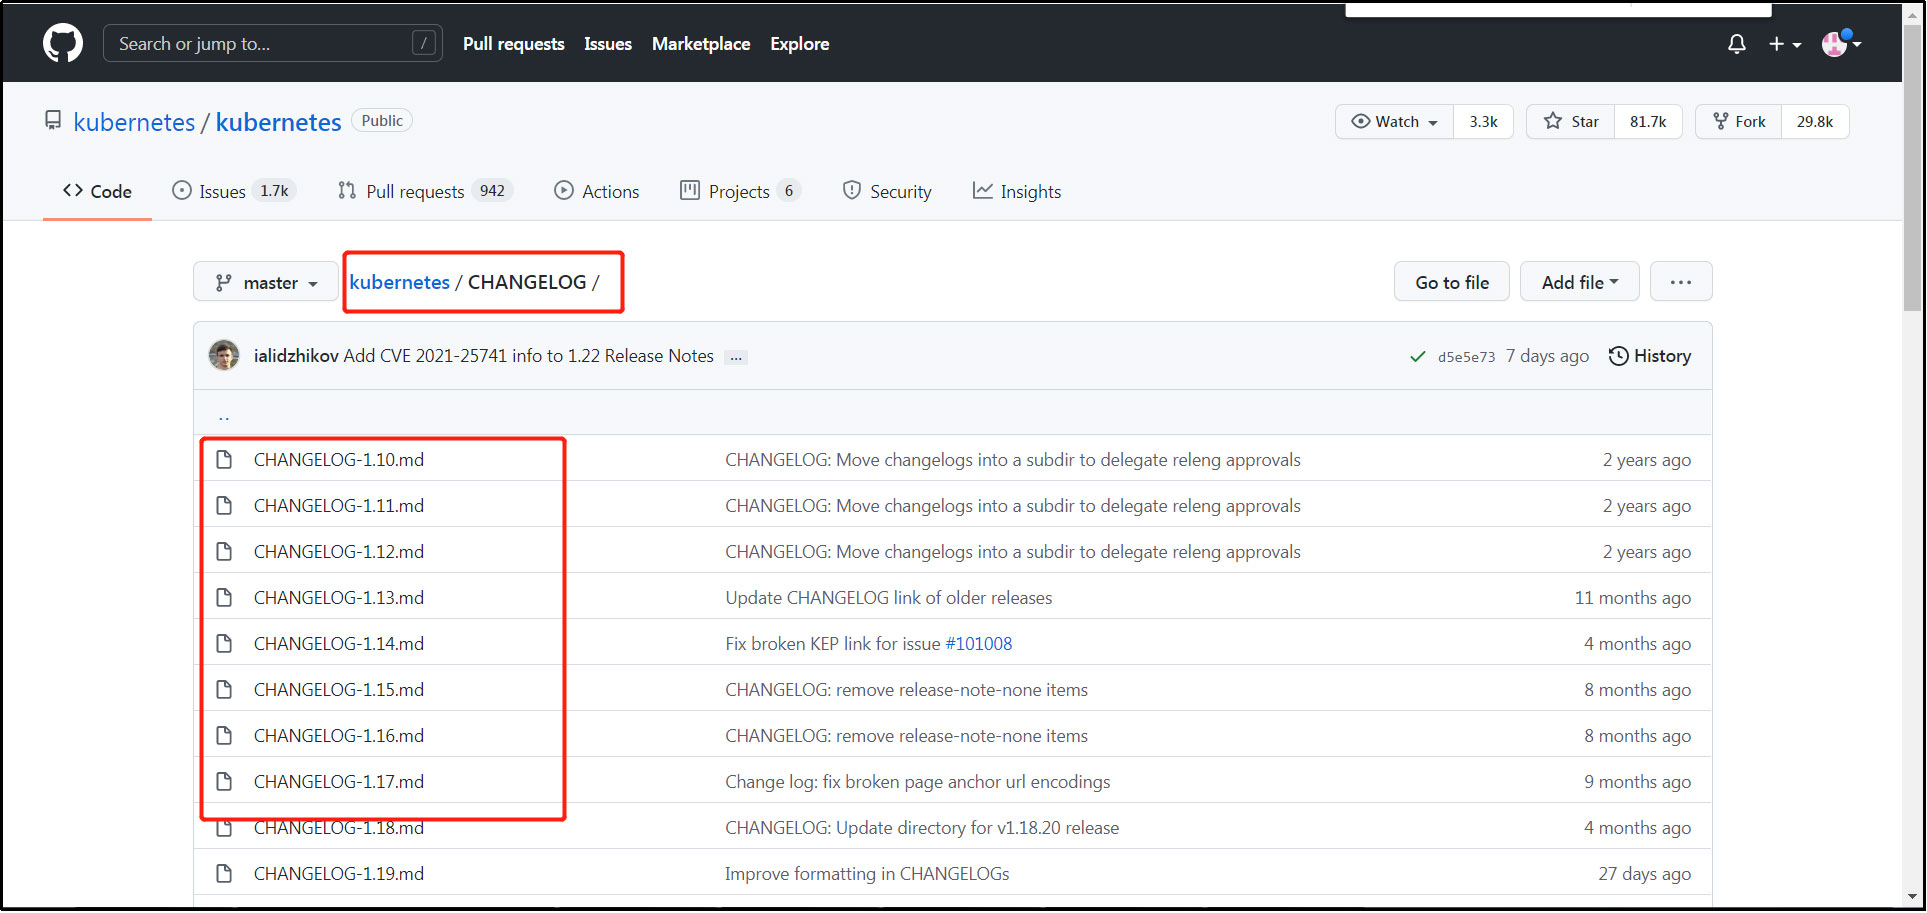
github address of software k8s: https://github.com/kubernetes/kubernetes , through CHANGELOG, click the low version log, such as: 14, 15, etc., and search: docker version to view the docker version compatible with the current k8s version.

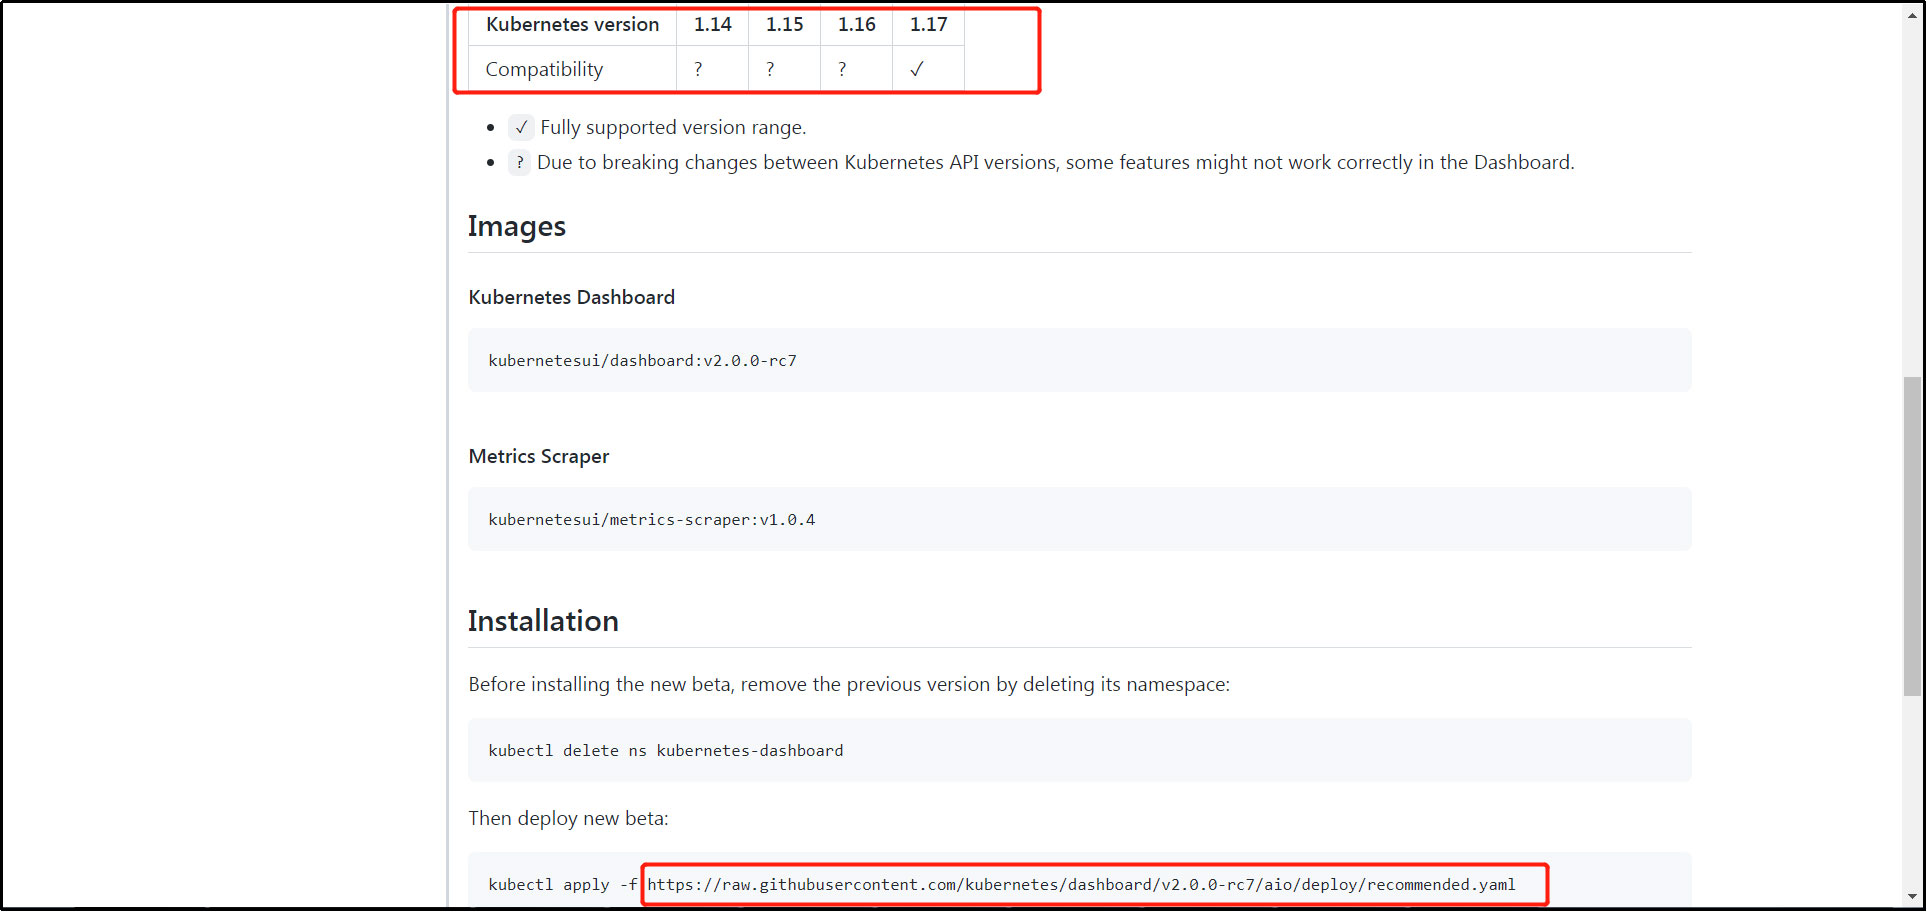
To view k8s the compatibility relationship with dashboard version:
Note to check k8s compatible dashboard versions. The k8s version built this time is 1.17.0. You can find the corresponding version of the dashboard by checking the corresponding k8s version compatible with different versions of the dashboard software package on the dashboard official website. This version of the dashboard uses v2.0.0-rc7.
Official website dashboard address: https://github.com/kubernetes/dashboard/releases
11. Install docker environment:
Note: the following operations are required for all servers in the cluster:
(1) To install docker online:
The locally installed docker version is 18.06.1.
① To uninstall an older version of docker:
Execute command:
yum remove docker docker-client docker-client-latest docker-common docker-latest docker-latest-logrotate docker-logrotate docker-selinux docker-engine-selinux docker-engine
② Installation dependency:
Execute command:
yum install -y yum-utils device-mapper-persistent-data lvm2
③ To configure a repository:
Execute command:
yum-config-manager --add-repo https://download.docker.com/linux/centos/docker-ce.repo
④ To install docker:
The commands for online installation are:
yum -y install docker-ce-18.06.1.ce-3.el7
(2) Offline rpm installation docker:
Execute the yum command on a server with a network and no docker installed, and download the required installation package in rpm format to the specified folder of the server, so as to install it in a server without a network:
① Get offline package:
Create rpm software storage directory:
mkdir -p /wocloud/soft/docker_rpm
Install rpm dependent packages:
yum install -y yum-utils device-mapper-persistent-data lvm2
To configure a repository:
yum-config-manager --add-repo https://download.docker.com/linux/centos/docker-ce.repo
Get the rpm package of docker:
yum -y install docker-ce-18.06.1.ce-3.el7 --downloadonly --downloaddir /wocloud/soft/docker_rpm
When other netless servers need to be installed, use / wocloud / soft / docker_ Compress all rpm files in rpm into a package, upload them to the target server, and execute the following installation command.
② Upload offline package:
Upload the obtained rpm offline package of docker to the target server.
③ Execute the installation package:
Enter the folder of rpm offline package in docker and execute the following installation command:
Execute command:
rpm -ivh *.rpm --force --nodeps
④ Write the docker service script:
Prepare docker.service service file;
[Unit]

Description=Docker Application Container Engine

Documentation=https://docs.docker.com

After=network-online.target firewalld.service

Wants=network-online.target


[Service]

Type=notify

# the default is not to use systemd for cgroups because the delegate issues still

# exists and systemd currently does not support the cgroup feature set required

# for containers run by docker

ExecStart=/usr/bin/dockerd

ExecReload=/bin/kill -s HUP $MAINPID

# Having non-zero Limit*s causes performance problems due to accounting overhead

# in the kernel. We recommend using cgroups to do container-local accounting.

LimitNOFILE=infinity

LimitNPROC=infinity

LimitCORE=infinity

# Uncomment TasksMax if your systemd version supports it.

# Only systemd 226 and above support this version.

#TasksMax=infinity

TimeoutStartSec=0

# set delegate yes so that systemd does not reset the cgroups of docker containers

Delegate=yes

# kill only the docker process, not all processes in the cgroup

KillMode=process

# restart the docker process if it exits prematurely

Restart=on-failure

StartLimitBurst=3

StartLimitInterval=60s


[Install]

WantedBy=multi-user.target
⑤ Upload service script and authorization:
Upload the docker.service file to the server / etc/systemd/system / and authorize:
chmod 777 /etc/systemd/system/docker.service
⑥ Reload system services:
Execute command:
systemctl daemon-reload
(3) Operation docker service:
① Auto start docker service:
Execute command:
systemctl enable docker
② Start docker service:
Execute command:
systemctl start docker
(4) Modify the Cgroup Driver of docker:
Execute command:
cat > /etc/docker/daemon.json <<EOF

{

 "exec-opts": ["native.cgroupdriver=systemd"]

}

EOF
(5) Restart docker:
Execute command:
systemctl daemon-reload
Execute command:
systemctl restart docker.service
12. To install kubedm / kubelet / kubectl:
Note: the following operations are required for all servers in the cluster:
(1) Introduction:
Kubedm: the instruction used to initialize the cluster.
Kubelet: used to start pods, containers, etc. on each node in the cluster.
Kubectl: command line tool used to communicate with the cluster.
Kubedm cannot install or manage kubelet or kubectl for you, so you need to ensure that they match the version of the control plane installed through kubedm. If this is not done, there is a risk of version deviation, which may lead to some unexpected errors and problems. However, a minor version inconsistency between the control plane and kubelet is supported, but the version of kubelet cannot exceed the version of API server. For example, kubelet version 1.7.0 can be fully compatible with API server version 1.8.0, otherwise it cannot.
(2) Official website installation tutorial:
Official website installation tutorial address: https://kubernetes.io/zh/docs/setup/production-environment/tools/kubeadm/install-kubeadm/
(3) Online installation:
① Add alicloud YUM software source:
Execute command:
cat > /etc/yum.repos.d/kubernetes.repo << EOF

[kubernetes]

name=Kubernetes

baseurl=https://mirrors.aliyun.com/kubernetes/yum/repos/kubernetes-el7-x86_64

enabled=1

gpgcheck=0

repo_gpgcheck=0

gpgkey=https://mirrors.aliyun.com/kubernetes/yum/doc/yum-key.gpg https://mirrors.aliyun.com/kubernetes/yum/doc/rpm-package-key.gpg

EOF
② To install kubedm / kubelet / kubectl:
Execute command:
yum install -y kubelet-1.17.0 kubeadm-1.17.0 kubectl-1.17.0
(4) Offline installation:
① To install crictl:
The software crictl is required by the kubedm / kubelet container runtime interface (CRI).
Software download: Download crictl of V1.17.0, which is consistent with k8s version. The download address is: https://github.com/kubernetes-sigs/cri-tools/releases

Software upload: upload the downloaded crictl software package to the customized folder of the server.
Software decompression: decompress the crictl software package.
File Movement: move the crictl files extracted by the crictl software to / usr/bin.
② Get kubedm / kubelet / kubectl offline package:
Execute the yum command on a server that has a network and has not installed k8s. Download the required installation package in rpm format to the specified folder of the server to install in a server without a network:
Add alicloud YUM software source:
Execute command:
cat > /etc/yum.repos.d/kubernetes.repo << EOF

[kubernetes]

name=Kubernetes

baseurl=https://mirrors.aliyun.com/kubernetes/yum/repos/kubernetes-el7-x86_64

enabled=1

gpgcheck=0

repo_gpgcheck=0

gpgkey=https://mirrors.aliyun.com/kubernetes/yum/doc/yum-key.gpg https://mirrors.aliyun.com/kubernetes/yum/doc/rpm-package-key.gpg

EOF
Download offline installation package:
Create rpm software storage directory:
mkdir -p /wocloud/soft/kubeadm
Execute command:
yum install -y kubelet-1.17.0 kubeadm-1.17.0 kubectl-1.17.0 --downloadonly --downloaddir /wocloud/soft/kubeadm
When other netless servers need to be installed, compress all rpm files in / wocloud / soft / kubedm into a package, upload them to the target server, and execute the following installation command.
③ Upload kubedm / kubelet / kubectl offline package:
Upload the obtained kubedm / kubelet / kubectl offline package to the target server.
④ Execute the installation package:
Enter the folder of kubedm / kubelet / kubectl offline package and execute the following installation commands:
Execute command:
rpm -ivh *.rpm --force --nodeps
⑤ Write kubelet service script:
Write kubelet.service service file;
[Unit]

Description=kubelet: The Kubernetes Node Agent

Documentation=https://kubernetes.io/docs/


[Service]

ExecStart=/usr/bin/kubelet

Restart=always

StartLimitInterval=0

RestartSec=10


[Install]

WantedBy=multi-user.target
⑥ Upload service script and authorization:
Upload the kubelet.service file to the server / etc/systemd/system / and authorize:
chmod 777 /etc/systemd/system/kubelet.service
⑦ Reload system services:
Execute command:
systemctl daemon-reload
(5) Operation kubelet service:
① To enable the self starting kubelet service:
Execute the command: systemctl enable kubelet
13. Cluster k8s required image and software version:
The images and software required to build a k8s cluster through kubedm are compatible with the k8s version. View the images and software versions required by different versions of k8s, as follows:
github address of software k8s: https://github.com/kubernetes/kubernetes , through CHANGELOG, click the log of the lower version, such as: 17, 18, etc., and search the keywords: coredns, etcd, etc., to view the corresponding image version compatible with the current k8s version.
| K8s edition | Coredns version | Etcd edition | api edition | controller edition | proxy edition | scheduler edition | Pause edition | Cri-ctl edition |
| V1.22 | V1.8.4 | V3.5.0 | V1.22.0 | V1.22.0 | V1.22.0 | V1.22.0 | V3.5 | V1.21.0 |
| V1.21 | V1.8.0 | V3.4.13 | V1.21.0 | V1.21.0 | V1.21.0 | V1.21.0 | V3.4.1 | V1.20.0 |
| V1.20 | V1.7.0 | V3.4.13 | V1.20.0 | V1.20.0 | V1.20.0 | V1.20.0 | V3.4 | V1.19.0 |
| V1.19 | V1.7.0 | V3.4.9 | V1.19.0 | V1.19.0 | V1.19.0 | V1.19.0 | V3.2 | V1.18.0 |
| V1.18 | V1.6.7 | V3.4.3 | V1.18.0 | V1.18.0 | V1.18.0 | V1.18.0 | V3.2 | V1.17.0 |
| V1.17 | V1.6.5 | V3.4.3 | V1.17.0 | V1.17.0 | V1.17.0 | V1.17.0 | V3.1 | V1.17.0 |
| V1.16 | V1.6.2 | V3.3.15 | V1.16.0 | V1.16.0 | V1.16.0 | V1.16.0 | - | V1.14.0 |
| V1.15 | V1.3.1 | V3.3.10 | V1.15.0 | V1.15.0 | V1.15.0 | V1.15.0 | - | V1.14.0 |
| V1.14 | V1.3.1 | V3.3.10 | V1.14.0 | V1.14.0 | V1.14.0 | V1.14.0 | - | - |
| V1.13 | V1.2.6 | V3.2.24 | V1.13.0 | V1.13.0 | V1.13.0 | V1.13.0 | - | - |
| V1.12 | V1.2.2 | V3.2.24 | V1.12.0 | V1.12.0 | V1.12.0 | V1.12.0 | - | - |
| V1.11 | V1.1.3 | V3.2.18 | V1.11.0 | V1.11.0 | V1.11.0 | V1.11.0 | - | - |
| V1.10 | - | V3.1.12 | V1.10.0 | V1.10.0 | V1.10.0 | V1.10.0 | V3.1 | - |
| V1.9 | - | V3.1.10 | V1.9.0 | V1.9.0 | V1.9.0 | V1.9.0 | - | V1.0.0 |
| V1.8 | - | - | V1.8.0 | V1.8.0 | V1.8.0 | V1.8.0 | - | V1.0.0 |
14. Configure nginx load balancing:
Note: keepalived is not used in the local building. Only one nginx is used in k8s-master-01 for load balancing requests to the master node.
Note: perform the following operations on the k8s-master-01 server in the cluster:
(1) Online installation nginx:
① Installation dependency:
Installing gcc dependencies:
yum -y install gcc
Install PCRE devel dependencies:
yum -y install pcre-devel
Install zlib zlib devel dependencies:
yum -y install zlib zlib-devel
To install OpenSSL devel dependencies:
yum -y install openssl openssl-devel
② Download package:
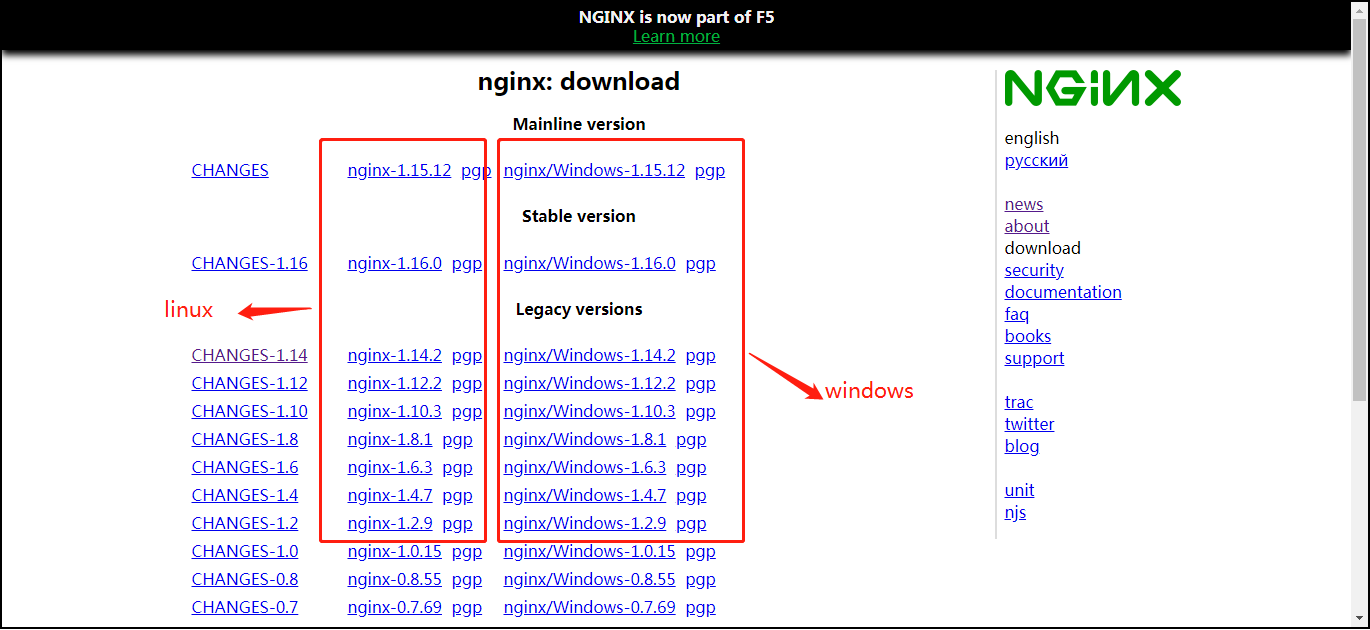
Download address: http://nginx.org/en/download.html
③ Upload package:
Create the folder where nginx is installed on the server, and then upload the package.
④ Unzip the package:
Unzip the uploaded nginx package.
⑤ Monitor configure:
Enter the extracted file of nginx, execute the configure command, and set the nginx installation path through the prefix parameter:
./configure --prefix=/home/work/nginx1 --with-stream
⑥ Compile make:
Enter the extracted file of nginx and execute the make command:
make
⑦ To install make install:
Enter the extracted file of nginx and execute the make install command:
make install
⑧ Script nginx service:
Write nginx service file:
[Unit]

Description=nginx - high performance web server

Documentation=http://nginx.org/en/docs/

After=network.target remote-fs.target nss-lookup.target


[Service]

Type=forking

# The path corresponds to the installation path

Type=forking

ExecStartPre=/home/work/nginx1/sbin/nginx -t -c /home/work/nginx1/conf/nginx.conf

ExecStart=/home/work/nginx1/sbin/nginx -c /home/work/nginx1/conf/nginx.conf

ExecReload=/home/work/nginx1/sbin/nginx -s reload

ExecStop=/home/work/nginx1/sbin/nginx -s stop

PrivateTmp=true


[Install]

WantedBy=multi-user.target
⑨ Upload service script and authorization:
Upload the nginx.service file to the server / etc/systemd/system / and authorize:
chmod 777 /etc/systemd/system/nginx.service
⑩ Reload system services:
Execute command:
systemctl daemon-reload
(2) Offline installation nginx:
① Download the rpm package of nginx:
Find the installation package version you need and download it:
http://nginx.org/packages/rhel/7/x86_64/RPMS
② Upload rpm package to server:
Upload the downloaded nginx rpm offline installation package to the server.
③ Execute the rpm installation command:
In the folder where the server's rpm offline installation package is located, execute the rpm command:
rpm -ivh nginx-1.10.3-1.el7.ngx.x86_64.rpm
④ Modify the nginx.conf configuration file:
After installing nginx, the location of nginx installation files is as follows:
Start command location:
You can view through the command:
which nginx
/usr/sbin/nginx
Profile location:
/etc/nginx/nginx.conf this configuration file only configures simple parameters. The specific monitoring information server configuration is in the document's conf file, which is only referenced through include.
Default server profile location:
/etc/nginx/conf.d/default.conf this configuration file is configured with specific server monitoring information.
Default html storage file location:
/usr/share/nginx/html
Modify the configuration file of nginx.conf:
Amendment I:
Modify the configuration file path referenced by include in / etc/nginx/nginx.conf to the path where you store the conf configuration file;
⑤ Script nginx service:
Write nginx service file:
[Unit]

Description=nginx - high performance web server

Documentation=http://nginx.org/en/docs/

After=network.target remote-fs.target nss-lookup.target


[Service]

Type=forking

# The path corresponds to the installation path

Type=forking

ExecStartPre=/usr/sbin/nginx -t -c /etc/nginx/nginx.conf

ExecStart=/usr/sbin/nginx -c /etc/nginx/nginx.conf

ExecReload=/usr/sbin/nginx -s reload

ExecStop=/usr/sbin/nginx -s stop

PrivateTmp=true


[Install]

WantedBy=multi-user.target
⑥ Upload service script and authorization:
Upload the nginx.service file to the server / etc/systemd/system / and authorize:
chmod 777 /etc/systemd/system/nginx.service
⑦ Reload system services:
Execute command:
systemctl daemon-reload
(3) Configure master node load balancing:
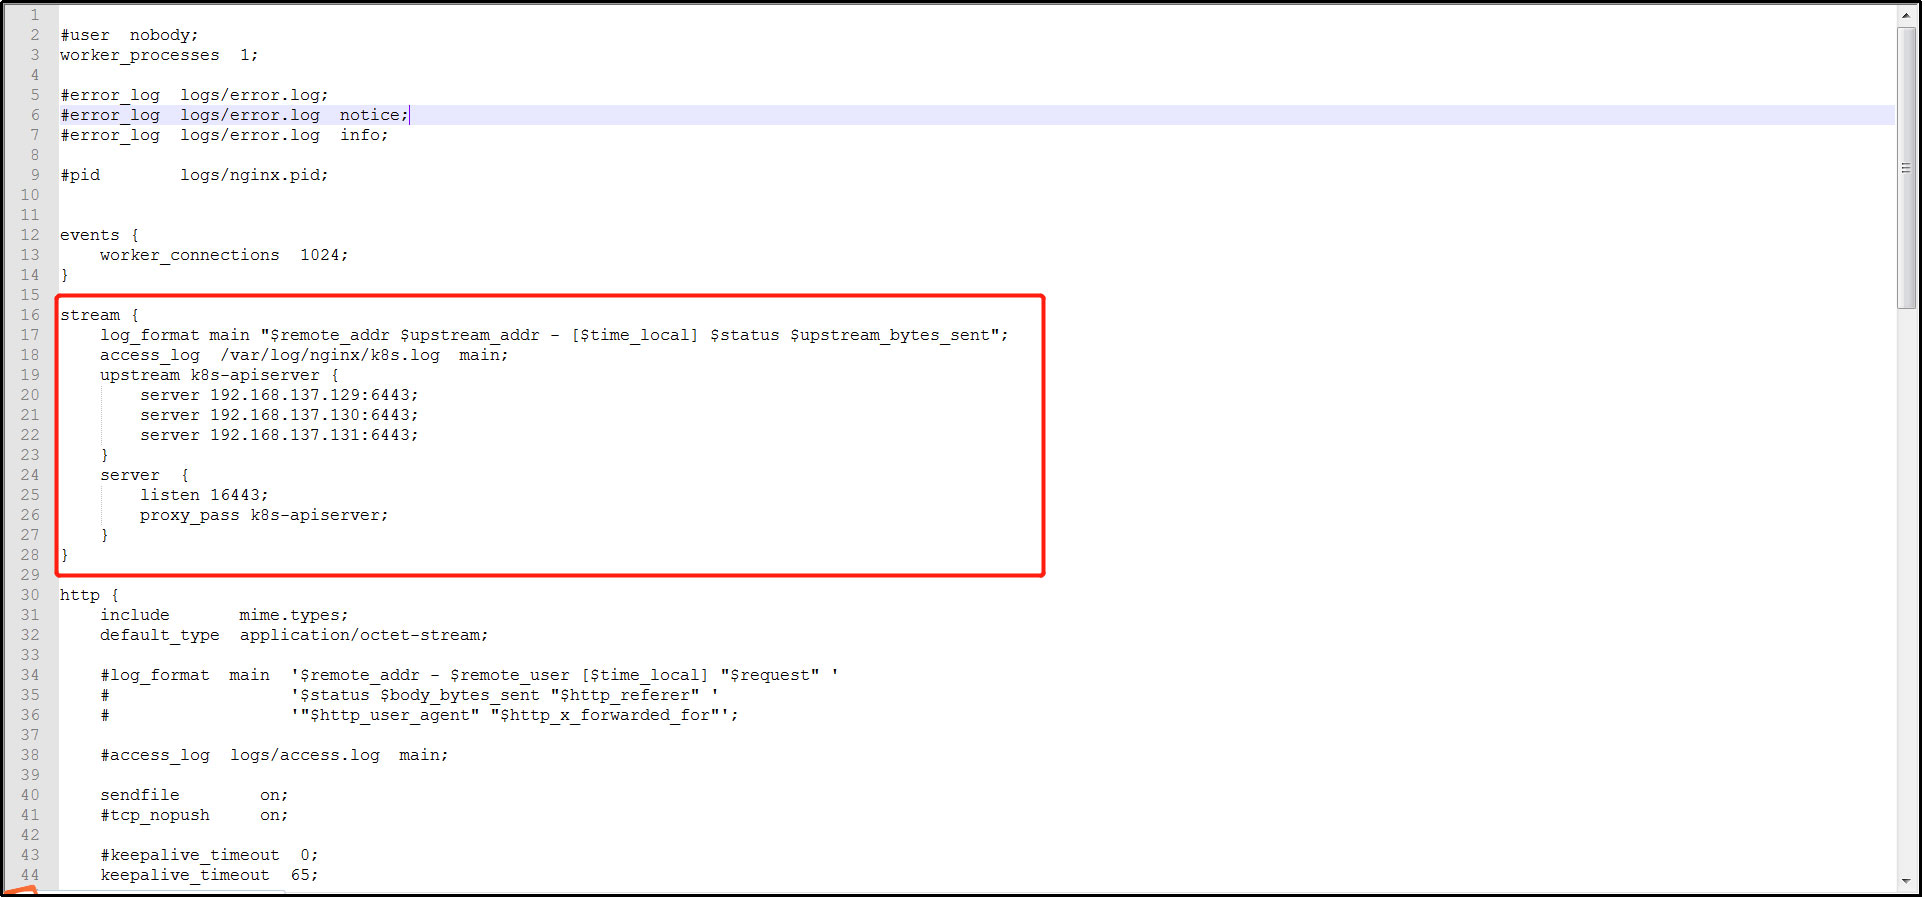
Edit the / etc/nginx/nginx.conf configuration file, configure the load balancing of the master node, add the stream module, and do not configure it in the http module. All local building nodes communicate through https, so 6443 port is configured.
Create log file: / var/log/nginx/k8s.log
stream {

    log_format main "$remote_addr $upstream_addr - [$time_local] $status $upstream_bytes_sent";

    access_log  /var/log/nginx/k8s.log  main;

    upstream k8s-apiserver {

        server 192.168.137.129:6443;

        server 192.168.137.130:6443;

server 192.168.137.131:6443;

  }

  server  {

        listen 16443;

        proxy_pass k8s-apiserver;

  }

}
(4) Operation nginx service:
① Startup and self startup nginx service:
Execute command:
systemctl enable nginx
② Start nginx service:
Execute command:
systemctl start nginx
15. First master deployed k8s:
Note: perform the following operations on the k8s-master-01 server in the cluster:
(1) Online installation:
Execute command:
kubeadm init \

--control-plane-endpoint "192.168.137.129:16443" \

--image-repository registry.aliyuncs.com/google_containers \

--kubernetes-version v1.17.0 \

--service-cidr=172.16.0.0/16 \

--pod-network-cidr=10.244.0.0/16 \

--token "abcdef.0123456789abcdef" \

--token-ttl "0" \

--upload-certs
Parameter Description:
| parameter | Default value | Parameter description |
| --control-plane-endpoint | nothing | Specify a stable IP address or DNS name for the control plane. |
| --image-repository | "k8s.gcr.io" | Select the container warehouse used to pull the control plane mirror. |
| --kubernetes-version | "stable-1" | Select a specific version of Kubernetes for the control plane. |
| --service-cidr | "10.96.0.0/12" | Specify an additional IP address segment for the virtual IP address of the service |
| --pod-network-cidr | nothing | Indicates the IP address segment that can be used by the pod network. If this parameter is set, the control plane will automatically assign CIDRs to each node. |
| --token | nothing | This token is used to establish two-way communication between the control plane node and the work node. Format is [a-z0-9]{6}\.[a-z0-9]{16} - example: abcdef.0123456789abcdef |
| --token-ttl | 24h0m0s | The duration before the token is automatically deleted (e.g. 1 s, 2 m, 3 h). If set to '0', the token will never expire |
| --upload-certs | nothing | Upload the control plane certificate to kubedm certs secret. |
(2) Offline installation:
Download k8s the required images on the networked server and export the corresponding images to the specified folder of the server, so that the images can be imported and used in the non networked server:
① Download k8s image:
Download images from domestic image sources:
docker pull registry.aliyuncs.com/google_containers/kube-proxy:v1.17.0

docker pull registry.aliyuncs.com/google_containers/kube-apiserver:v1.17.0

docker pull registry.aliyuncs.com/google_containers/kube-controller-manager:v1.17.0

docker pull registry.aliyuncs.com/google_containers/kube-scheduler:v1.17.0

docker pull registry.aliyuncs.com/google_containers/pause:3.1

docker pull registry.aliyuncs.com/google_containers/coredns:1.6.5

docker pull registry.aliyuncs.com/google_containers/etcd:3.4.3-0
② Export image:
Import the image modified to the official tag into the tar compressed package and execute the command:
docker save -o kube-proxy-v1.17.0.tar kube-proxy image ID registry.aliyuncs.com/google_containers/kube-proxy:v1.17.0

docker save -o kube-apiserver-v1.17.0.tar kube-apiserver image ID registry.aliyuncs.com/google_containers/kube-apiserver:v1.17.0

docker save -o kube-controller-manager-v1.17.0.tar kube-controller-manager image ID registry.aliyuncs.com/google_containers/kube-controller-manager:v1.17.0

docker save -o kube-scheduler-v1.17.0.tar kube-scheduler image ID registry.aliyuncs.com/google_containers/kube-scheduler:v1.17.0

docker save -o pause-3.1.tar pause image ID registry.aliyuncs.com/google_containers/pause:3.1

docker save -o coredns-1.6.5.tar coredns image ID registry.aliyuncs.com/google_containers/coredns:1.6.5

docker save -o etcd-3.4.3-0.tar etcd image ID registry.aliyuncs.com/google_containers/etcd:3.4.3-0
③ Import mirror:
Transfer the above exported image package tar to the required server, and then import the image package tar into the docker local warehouse through the docker command. Command example:
docker image load -i image package tar file name
④ Check the mirror list:
View the image list in the docker local warehouse and execute the command:
docker images
⑤ Deploy master node:
Execute command:
kubeadm init \

--control-plane-endpoint "192.168.137.129:16443" \

--image-repository registry.aliyuncs.com/google_containers \

--kubernetes-version v1.17.0 \

--service-cidr=172.16.0.0/16 \

--pod-network-cidr=10.244.0.0/16 \

--token "abcdef.0123456789abcdef" \

--token-ttl "0" \

--upload-certs

Parameter Description:
| parameter | Default value | Parameter description |
| --control-plane-endpoint | nothing | Specify a stable IP address or DNS name for the control plane. |
| --image-repository | "k8s.gcr.io" | Select the container warehouse used to pull the control plane mirror. |
| --kubernetes-version | "stable-1" | Select a specific version of Kubernetes for the control plane. |
| --service-cidr | "10.96.0.0/12" | Specify an additional IP address segment for the virtual IP address of the service |
| --pod-network-cidr | nothing | Indicates the IP address segment that can be used by the pod network. If this parameter is set, the control plane will automatically assign CIDRs to each node. |
| --token | nothing | This token is used to establish two-way communication between the control plane node and the work node. Format is [a-z0-9]{6}\.[a-z0-9]{16} - example: abcdef.0123456789abcdef |
| --token-ttl | 24h0m0s | The duration before the token is automatically deleted (e.g. 1 s, 2 m, 3 h). If set to '0', the token will never expire |
| --upload-certs | nothing | Upload the control plane certificate to kubedm certs secret. |
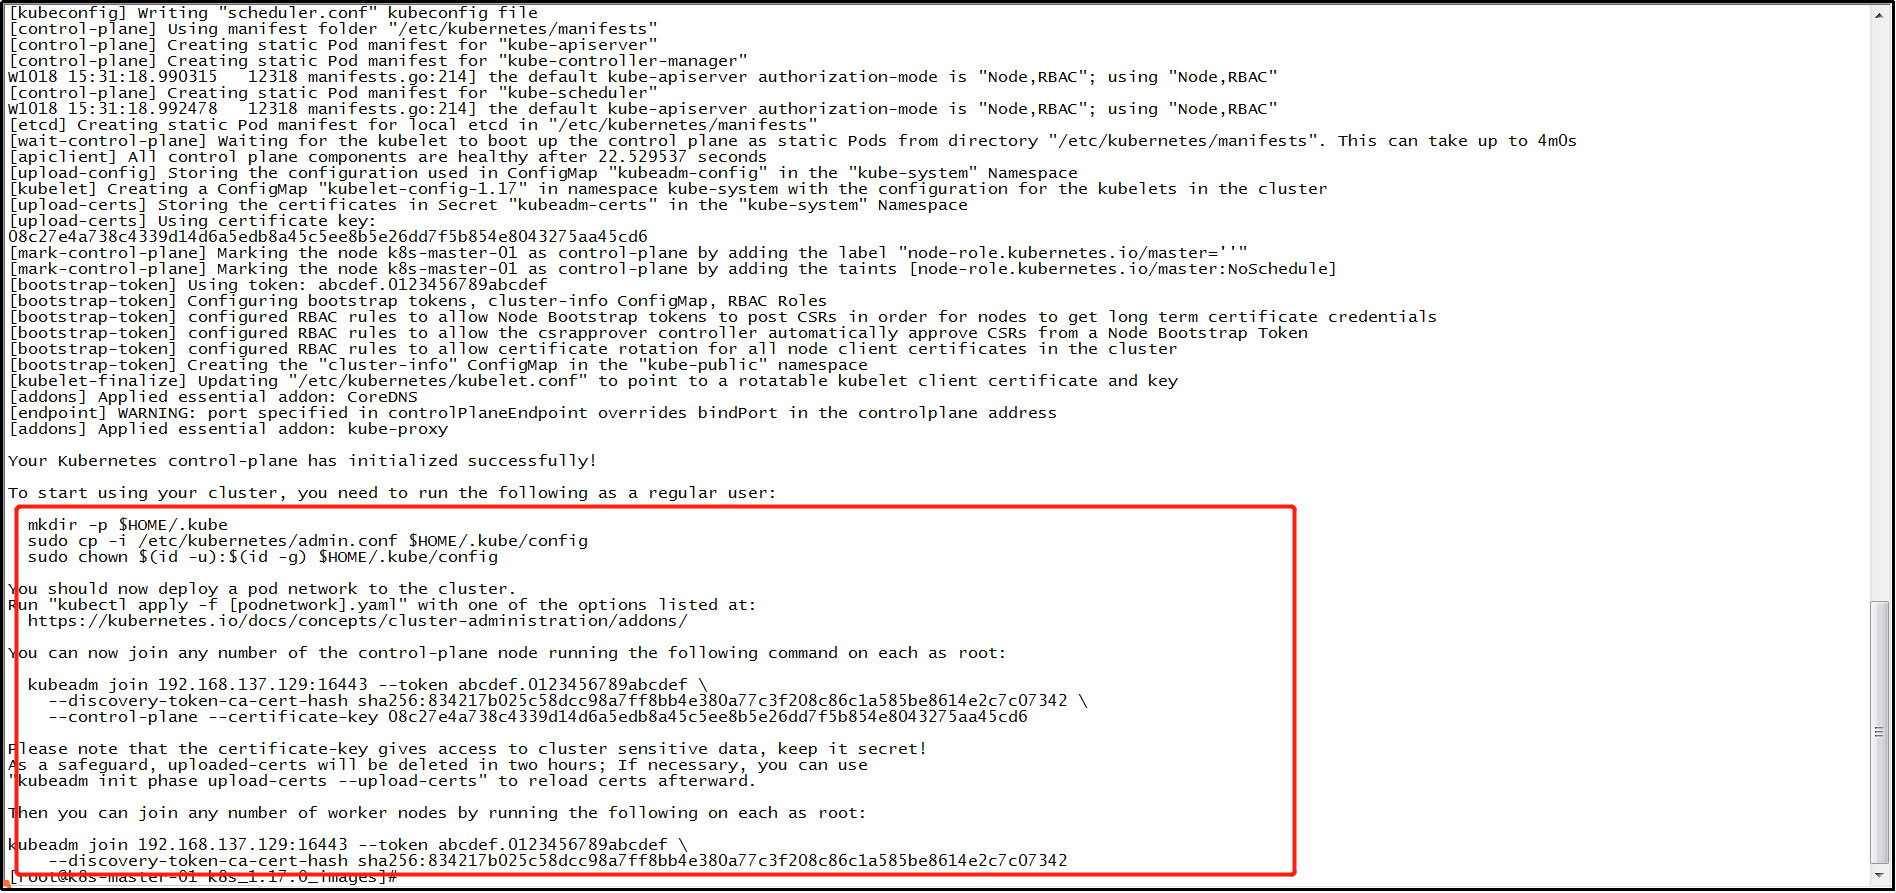
⑥ View deployment results:
The following prompt message appears, indicating that k8s the master node has been deployed.
(3) Generate kubelet environment configuration file:
Execute command:
mkdir -p $HOME/.kube
Execute command:
sudo cp -i /etc/kubernetes/admin.conf $HOME/.kube/config
Execute command:
sudo chown $(id -u):$(id -g) $HOME/.kube/config
16. To install the pod network plug-in (CNI):
Note: perform the following operations on the k8s-master-01 server in the cluster:
(1) Download the yml configuration file for flannel:
yml file address of online flannel: https://github.com/caoran/kube-flannel.yml/blob/master/kube-flannel.yml , download the yml file through this address.
(2) Upload yml profile:
Upload the yml configuration file to the required server.
(3) Pull the flannel image:
Execute command:
docker pull registry.cn-shanghai.aliyuncs.com/leozhanggg/flannel:v0.12.0-amd64
(4) Rename the flannel image:
Execute command:
docker tag flannel image ID quay.io/coreos/flannel:v0.12.0-amd64
(5) To delete an old flannel image:
Execute command:
docker rmi registry.cn-shanghai.aliyuncs.com/leozhanggg/flannel:v0.12.0-amd64
(6) Effective yml profile:
On the required server, enter the folder where the YML configuration file is located, and execute the command to take effect: kubectl apply -f kube-flannel.yml
17. Add k8s other Masters:
Note: perform the following operations on other master servers except k8s-master-01 in the cluster:
(1) To view token information:
① Query token value:
Note: on the server of the master in the cluster, perform the following operations:
Execute command:
kubeadm token list
② Create a new token:
Note: on the server of the master in the cluster, perform the following operations:
After initialization through kubedm, the token added by node will be provided. The default valid period of a token is 24 hours. When it expires, the token will not be available, so a new token will be created.
Execute command:
kubeadm token create
③ Query the discovery token CA cert hash value:
Note: on the server of the master in the cluster, perform the following operations:
Execute command:
openssl x509 -pubkey -in /etc/kubernetes/pki/ca.crt | openssl rsa -pubin -outform der 2>/dev/null | openssl dgst -sha256 -hex | sed 's/^.* //'
④ Create a certificate key value:
Note: on the server of the master in the cluster, perform the following operations:
Execute command:
kubeadm init phase upload-certs --upload-certs
, after the command is executed, a string will be returned and recorded.
After initialization through kubedm, certificate keys added by other master s will be provided. The default valid period of the token is 2 hours. When it expires, the certificate key will not be available, so a new certificate key will be created.
(2) Join online:
Execute command:
kubeadm join 192.168.137.129:16443 \

--token abcdef.0123456789abcdef \

--discovery-token-ca-cert-hash sha256:8c371e3470ed423a139c7a5879ee4820878c3766232a699da8925392b416390d \

--control-plane \

--certificate-key 91fb332bdece28872755bfd4a7b5a37d4e159f8d228e050b53b0b15d1bad9fc4
Parameter Description:
| parameter | Default value | Parameter description |
| --token | nothing | This token is used to establish two-way communication between the control plane node and the work node. Format is [a-z0-9]{6}\.[a-z0-9]{16} - example: abcdef.0123456789abcdef |
| --discovery-token-ca-cert-hash | nothing | For token based discovery, verify whether the root CA public key matches this hash (Format: "< type >: < value >"). |
| --control-plane | nothing | Create a new control plane instance on this node |
| --certificate-key | nothing | Use this key to decrypt the certificate secret uploaded by init. |
(3) Join offline:
① Download k8s image:
Download images from domestic image sources:
docker pull registry.aliyuncs.com/google_containers/kube-proxy:v1.17.0

docker pull registry.aliyuncs.com/google_containers/kube-apiserver:v1.17.0

docker pull registry.aliyuncs.com/google_containers/kube-controller-manager:v1.17.0

docker pull registry.aliyuncs.com/google_containers/kube-scheduler:v1.17.0

docker pull registry.aliyuncs.com/google_containers/pause:3.1

docker pull registry.aliyuncs.com/google_containers/coredns:1.6.5

docker pull registry.aliyuncs.com/google_containers/etcd:3.4.3-0
② Export image:
Import the image modified to the official tag into the tar compressed package and execute the command:
docker save -o kube-proxy-v1.17.0.tar kube-proxy image ID registry.aliyuncs.com/google_containers/kube-proxy:v1.17.0

docker save -o kube-apiserver-v1.17.0.tar kube-apiserver image ID registry.aliyuncs.com/google_containers/kube-apiserver:v1.17.0

docker save -o kube-controller-manager-v1.17.0.tar kube-controller-manager image ID registry.aliyuncs.com/google_containers/kube-controller-manager:v1.17.0

docker save -o kube-scheduler-v1.17.0.tar kube-scheduler image ID registry.aliyuncs.com/google_containers/kube-scheduler:v1.17.0

docker save -o pause-3.1.tar pause image ID registry.aliyuncs.com/google_containers/pause:3.1

docker save -o coredns-1.6.5.tar coredns image ID registry.aliyuncs.com/google_containers/coredns:1.6.5

docker save -o etcd-3.4.3-0.tar etcd image ID registry.aliyuncs.com/google_containers/etcd:3.4.3-0
③ Import mirror:
Transfer the above exported image package tar to the required server, and then import the image package tar into the docker local warehouse through the docker command. Command example:
docker image load -i Mirror package tar File name
④ Check the mirror list:
View the image list in the docker local warehouse and execute the command:
docker images
⑤ Join k8s cluster:
Execute command:
kubeadm join 192.168.137.129:16443 \

--token abcdef.0123456789abcdef \

--discovery-token-ca-cert-hash sha256:8c371e3470ed423a139c7a5879ee4820878c3766232a699da8925392b416390d \

--control-plane \

--certificate-key 91fb332bdece28872755bfd4a7b5a37d4e159f8d228e050b53b0b15d1bad9fc4
Parameter Description:
| parameter | Default value | Parameter description |
| --token | nothing | This token is used to establish two-way communication between the control plane node and the work node. Format is [a-z0-9]{6}\.[a-z0-9]{16} - example: abcdef.0123456789abcdef |
| --discovery-token-ca-cert-hash | nothing | For token based discovery, verify whether the root CA public key matches this hash (Format: "< type >: < value >"). |
⑥ View deployment results:
The following prompt message appears, indicating that you have joined the k8s cluster.
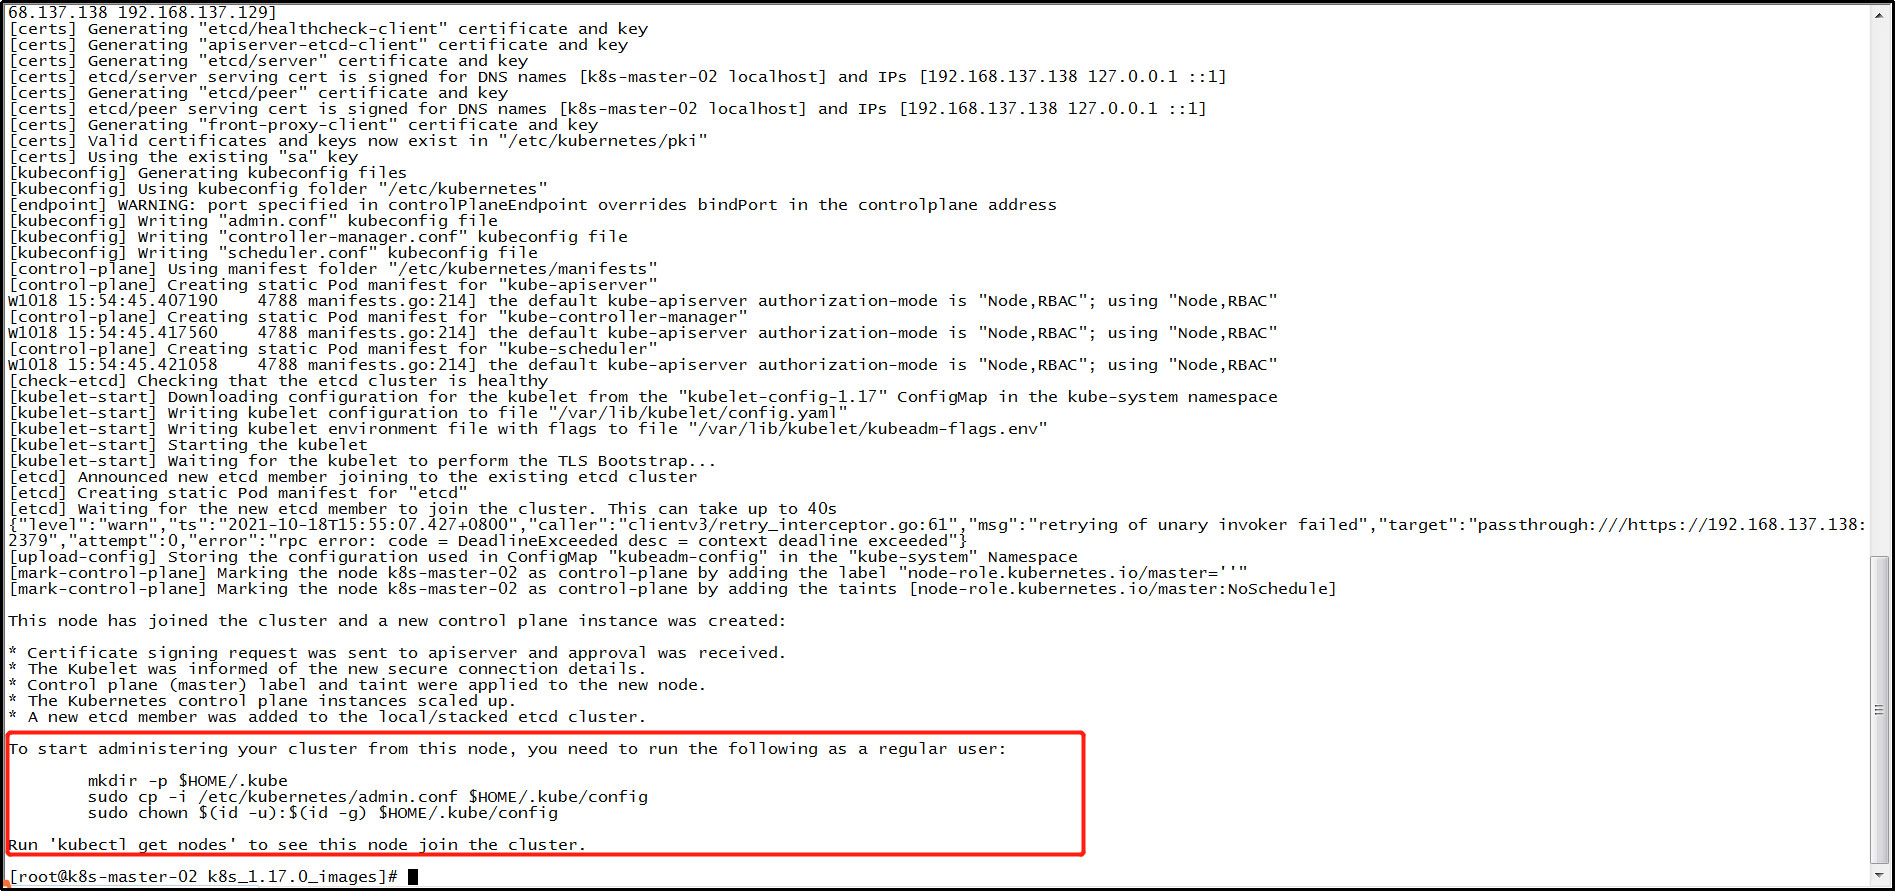
(4) Generate kubelet environment configuration file:
Execute command:
mkdir -p $HOME/.kube
Execute command:
sudo cp -i /etc/kubernetes/admin.conf $HOME/.kube/config
Execute command:
sudo chown $(id -u):$(id -g) $HOME/.kube/config
18. Added k8s node:
Note: on the server where the node is located in the cluster, perform the following operations:
(1) If you are joining offline, you need to:
① Pull Kube proxy image:
Execute command:
docker pull registry.aliyuncs.com/google_containers/kube-proxy:v1.17.0
(2) Pull the flannel image:
Execute command:
docker pull registry.cn-shanghai.aliyuncs.com/leozhanggg/flannel:v0.12.0-amd64
(3) Rename the flannel image:
Execute command:
docker tag flannel image ID quay.io/coreos/flannel:v0.12.0-amd64
(4) To delete an old flannel image:
Execute the command: docker rmi registry.cn-shanghai.aliyuncs.com/leozhanggg/flannel:v0.12.0-amd64
(5) To add a new node to the cluster:
① Query token value:
Note: on the server of the master in the cluster, perform the following operations:
Execute command:
kubeadm token list
② Create a new token:
Note: on the server of the master in the cluster, perform the following operations:
After initialization through kubedm, the token added by node will be provided. The default valid period of a token is 24 hours. When it expires, the token will not be available, so a new token will be created.
Execute command:
kubeadm token create
③ Query the discovery token CA cert hash value:
Note: on the server of the master in the cluster, perform the following operations:
Execute command:
openssl x509 -pubkey -in /etc/kubernetes/pki/ca.crt | openssl rsa -pubin -outform der 2>/dev/null | openssl dgst -sha256 -hex | sed 's/^.* //'
④ Add a new node to the cluster:
Note: on the server where the node is located in the cluster, perform the following operations:
Execute command:
kubeadm join 192.168.137.129:6443 --token zz5xc1.svx9tw1msbbd2v2l --discovery-token-ca-cert-hash sha256:2232ff536c7a272d52dfbce2ba07fa947fee7bcf6724095ef3c6def5dc34374e
Parameter Description:
| parameter | Default value | Parameter description |
| --token | nothing | This token is used to establish two-way communication between the control plane node and the work node. Format is [a-z0-9]{6}\.[a-z0-9]{16} - example: abcdef.0123456789abcdef |
| --discovery-token-ca-cert-hash | nothing | For token based discovery, verify whether the root CA public key matches this hash (Format: "< type >: < value >"). |
⑤ To view the node list:
Note: on the server of the master in the cluster, perform the following operations:
Execute command:
kubectl get node
(6) To install the pod network plug-in (CNI):
Note: if you install the pod network plug-in (CNI) on the master server after the node joins k8s, you don't need to manually install CNI on the node server, because CNI will be installed on the whole k8s cluster when you install CNI on the master server.
Check whether the current node server / etc/cni/net.d/10-flannel.conflist file exists. If it exists, the following operations do not need to be performed. If not, proceed as follows.
The following operations are only for adding node nodes to k8s cluster after CNI has been installed:
Since the pod network plug-in (CNI) is installed before the node joins k8s, CNI will not be installed on the node. You need to manually copy the / etc/cni/net.d/10-flannel.conflist file on the master server to the corresponding path on the current node server.
Then execute the command on the node node:
systemctl daemon-reload && systemctl restart kubelet
(7) To view the node list:
Note: on the server of the master in the cluster, perform the following operations:
Execute command:
kubectl get node
19. Test validation k8s cluster:
(1) Pull nginx image:
Since the private image library is not used in this build, the following nginx images need to be manually pulled on each node node. Execute command:
docker pull nginx
(2) To create an nginx container:
Execute command:
kubectl create deployment nginx --image=nginx
(3) Exposed external port:
Execute command:
kubectl expose deployment nginx --port=80 --type=NodePort
(4) Query whether nginx runs successfully:
Execute command:
kubectl get pod,svc
(5) Browser Test Access:
In the browser on the windows server connected to the network segment of the k8s cluster, enter the master or node node IP of the k8s cluster and the port number mapped by the corresponding nginx to access. Normally, you can access the nginx welcome page.
(6) Extended nginx replica:
Execute command:
kubectl scale deployment nginx --replicas=3
(7) View pod:
Expand the copy of nginx, and then check whether the pod s of nginx are effective. Execute the command:
kubectl get pods