🎍 0. Preface
-
🎅🎅 A few days ago, my younger martial sister suddenly called me in a hurry and said that when she was at the front of the school recruitment interview, she was asked to canvas for many times, but she wouldn't. I hope I can give her a quick answer! It can be seen that the position of canvas in the front end has become more and more important! 🎅🎅
-
🔆🔆 So I stayed up late to write this article so that everyone can quickly master canvas (I have only you in my heart, no younger martial sister)~ 🔆🔆
-
👙👙 I will try my best to make the technical articles easy to understand / vivid and interesting, so as to ensure that every reader who wants to learn knowledge && seriously read this article can get something. Of course, if you feel that this article is OK after reading and really learn something, I hope you can give me a "praise" and "collection", which is very important to me. Thank you! 👙👙
here comes the point! Here comes the point!! 💗💗💗 Now let's enter the magical world of canvas!
👝 1. Primary stage - Master leads in~
🎣 (1) What is canvas?
If we translate this word, we will find that it has The meaning of "canvas". Isn't canvas just for drawing graphics? But the difference is that the canvas element draws graphics on the web page!
in fact, the canvas element uses JavaScript to draw images on Web pages. The painted canvas area is a rectangular area. We can control each pixel to draw whatever we want. Canvas has many ways to draw paths, rectangles, circles, characters and add images.
🍶 (2) How to use?
The canvas element mentioned above is to use JavaScript to draw images on Web pages! Therefore, the use of canvas can be divided into two steps:
step 1: create canvas element on HTML5 page;
step 2: draw through JavaScript.
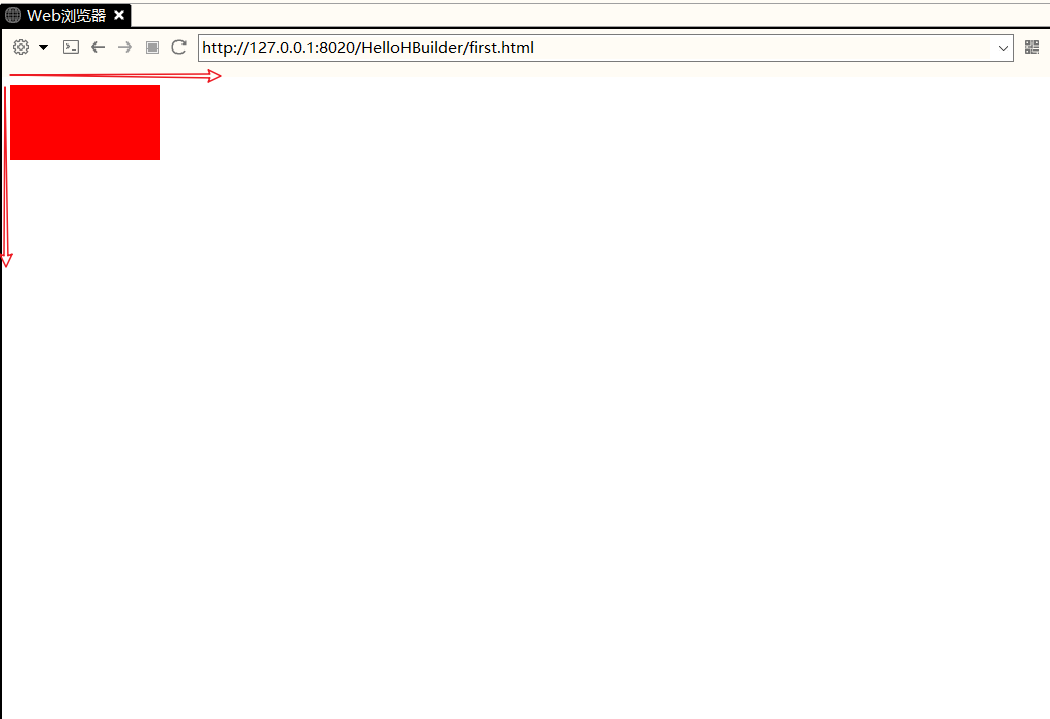
one ️⃣ To create a Canvas element:
Add canvas element to HTML5 page!
Specify the id, width and height of this canvas element (width and height are the size of the specified canvas!):
<!--canvas Default size: 300 wide px,Height 150 px-->
<canvas id="myCanvas" width="200" height="100"></canvas>
two ️⃣ Draw with JavaScript:
The canvas element itself has no drawing ability. All drawing work must be completed in JavaScript:
<script type="text/javascript">
	//The first step is to match the canvas object.
	var c=document.getElementById("myCanvas");
	//The second step is to get the context of canvas
	var cxt=c.getContext("2d");    //getContext("2d") object is a built-in HTML5 object, which has a variety of drawing paths, rectangles, circles, characters and methods to add images.

	// Draw a red rectangle:
	cxt.fillStyle="red";
	// fillRect method is used to draw rectangle parameters: draw the x coordinate, y coordinate, x direction length and Y direction length of the upper left corner of the rectangle
	cxt.fillRect(0,0,150,75);	// Draw a 150x75 rectangle on the canvas, starting from the upper left corner (0,0).
</script>
three ️⃣ Effect achieved:
It should be noted that in the canvas area of canvas, the upper left corner is the coordinate origin (0,0), the right is the x axis and the down is the y axis.
🚧 2. Intermediate stage - draw some common basic graphics~
- You know, even the most complex graphics are composed of various basic graphics.
- So let's take a look at how to draw various common basic graphics.
- In this way, it will be easy to design some projects that need to use canvas!
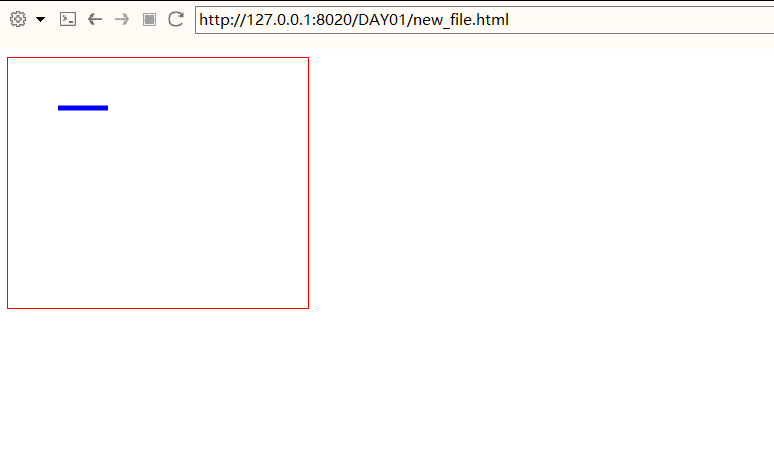
🚓 (1) Draw a line
- Specify the starting (x,y) coordinates;
- Specify thickness;
- Specifies the color.
Note: locate the canvas element through CSS and set a conspicuous border style for it to facilitate the following observation!
one ️⃣ Upper Code:
<!DOCTYPE html>
<html>
	<head>
		<meta charset="UTF-8">
		<title></title>
		<style type="text/css">
		  /*Set canvas style - canvas border thickness 1px; Solid line; gules*/
			#myCanvas{
				border: 1px solid red;
			}
		</style>
	</head>
	<body>
		<canvas id="myCanvas" width="300" height="250"></canvas>
	</body>
	<script type="text/javascript">
		var c=document.getElementById("myCanvas");
		var ctx=c.getContext("2d");

		// 1. First, position the brush to the starting point coordinate;
		ctx.moveTo(50,50);
		// 2. Then, connect a line from the current position to the end coordinate (Note: there is no real line at this time!)
		ctx.lineTo(100,50);
		ctx.strokeStyle = "blue";    // Line color
		ctx.lineWidth = "5";	     // Line thickness
		// 3. Finally, the function of drawing lines is to draw edges - this sentence is the real line drawing!
		ctx.stroke();		   	     // Students who study hard can annotate this line and see the effect again!

</script>
</html>
two ️⃣ Effect achieved:
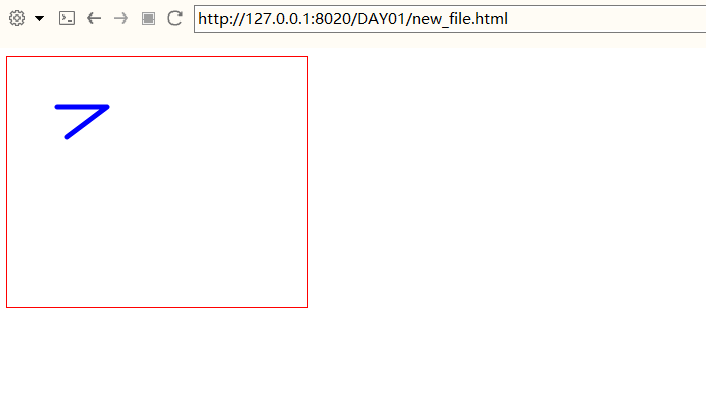
🚑 (2) Draw a polyline
- Specifies the shape at the break point;
- Specifies the shape of the line endpoint.
one ️⃣ Upper Code:
<!DOCTYPE html>
<html>
	<head>
		<meta charset="UTF-8">
		<title></title>
		<style type="text/css">
			#myCanvas{
				border: 1px solid red;
			}
		</style>
	</head>
	<body>
		<canvas id="myCanvas" width="300" height="250"></canvas>
	</body>
	<script type="text/javascript">
		var c=document.getElementById("myCanvas");
		var ctx=c.getContext("2d");

		// 1. First, position the brush at the starting point coordinate
		ctx.moveTo(50,50);
		// 2. Then, connect a line from the current position to the key coordinates [because now it is a broken line, so turn two turns] (Note: it is not a real line!)
		ctx.lineTo(100,50);
		ctx.lineTo(60,80);

		// 3. Specify the end shape of line segment -- round: circle; square: square; but: default
		ctx.lineCap = "round";

		// 4. Specify the shape of line intersection (polyline point) --- round: circle; miter: default; bevel: intercept part;
		ctx.lineJoin = "round";

		ctx.strokeStyle = "blue";  // Line color
		ctx.lineWidth = "5";	   // Line thickness

		// 5. Finally, draw lines, the function is to stroke the edge - this sentence is the real line drawing!
		ctx.stroke();

</script>
</html>
Serious study partners can try to change the values of lineCap and lineJoin many times to see the real implementation effect of various values!
two ️⃣ Effect achieved:
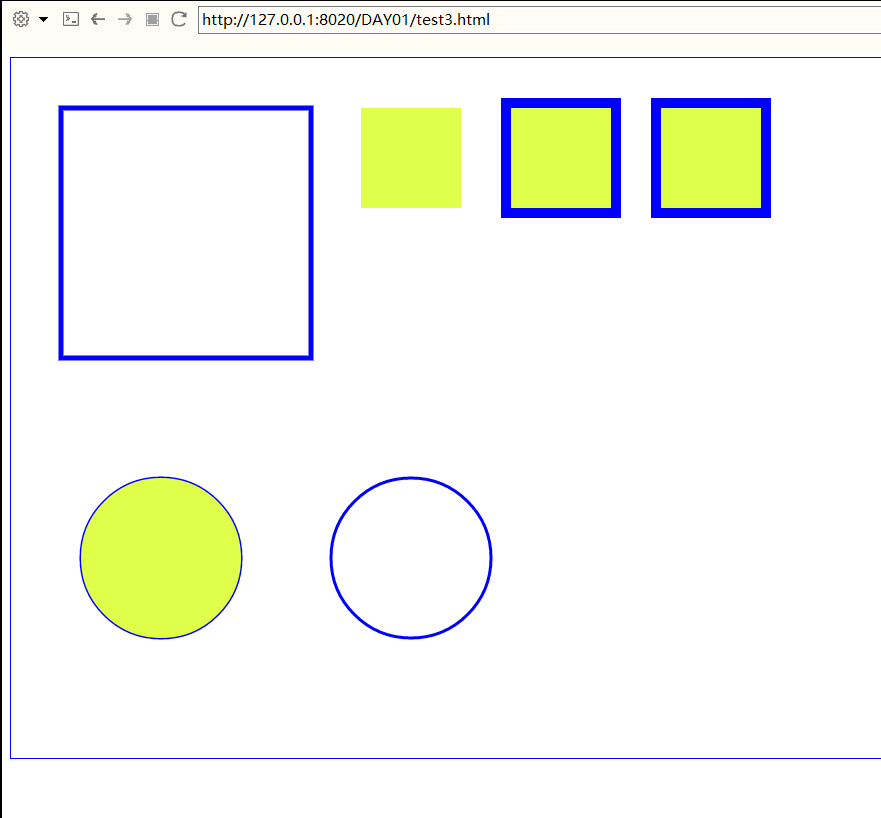
🚔 (3) Draw rectangles and circles
Try to draw solid and hollow respectively!
Draw several graphic knowledge points on the same drawing:
|
one ️⃣ Upper Code:
<!DOCTYPE html>
<html>
	<head>
		<meta charset="UTF-8">
		<title>Draw a square, draw a circle</title>

		<style type="text/css">
			#c1{
				border:1px solid blue;
			}
		</style>

	</head>
	<body>
		<canvas id="c1" width="1300" height="700"></canvas>
	</body>

	<script type="text/javascript">
		var c = document.getElementById("c1");
		var ctx = c.getContext("2d");

		//1. Draw a hollow rectangle
		ctx.strokeStyle = "blue";
		ctx.lineWidth = 5;					//Line thickness
		ctx.strokeRect(50,50,250,250);	//Parameters: upper left corner x,y coordinates, x,y direction length


		//2. Draw a solid rectangle
		ctx.fillStyle = "#DFFF4A "; / / specify the fill color
		ctx.fillRect(350,50,100,100);


		//3. Draw a rectangle that is both edged and filled
		//The first method: draw a hollow rectangle first, and then draw a solid rectangle inside it
		ctx.lineWidth = 20;
		ctx.strokeRect(500,50,100,100);
		ctx.fillRect(500,50,100,100);

		//The second method:. rect() method first draws a hollow rectangle and then fills it with. fill()
		ctx.rect(650,50,100,100);
		ctx.stroke();
		ctx.fill()


		//4. Draw a filled circle
		ctx.beginPath();
		ctx.lineWidth = 3;
		//Parameters: 150500 is the center of the circle, 80 is the radius, 0 is the starting angle of the arc, Math.PI/2 is the ending angle of the arc, true is counterclockwise; false is clockwise.
		ctx.arc(150,500,80,0,Math.PI*2,true);
		ctx.stroke();
		ctx.fill();			// Note: the filling patterns used are all set above!

		<center><font size=2>(I operate WeChat official account: lonely cold.</font></center>
		<center><font size=2>(Welcome to like Python,The attention of friends who like programming~)</font></center>


		// 5. Draw a hollow circle
		ctx.beginPath();
		ctx.lineWidth = 3;
		ctx.arc(400,500,80,0,Math.PI*2,true);
		ctx.stroke();

	</script>
</html>
two ️⃣ Effect achieved:
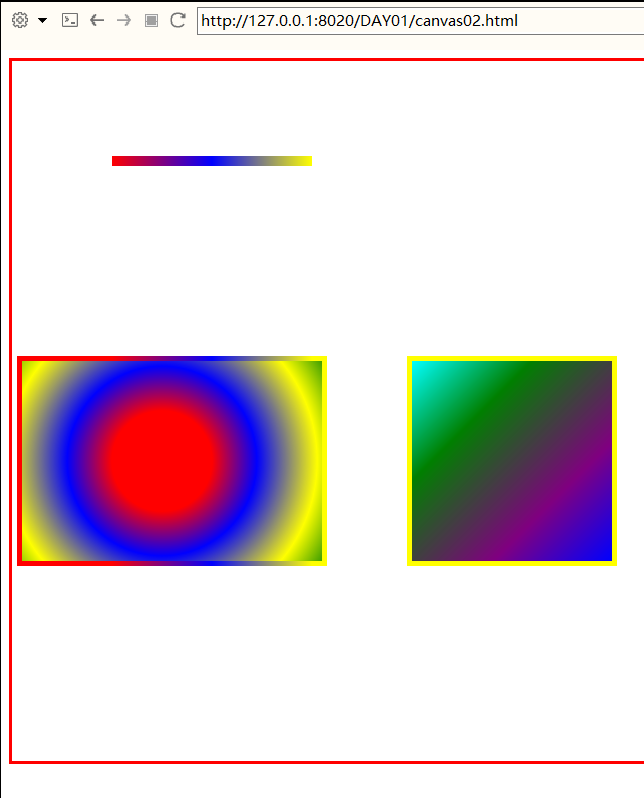
🚐 (4) Linear and divergent color gradients
| Gradient can be filled in rectangle, circle, line, text and other shapes. Its main function is to define different colors by itself. |
one ️⃣ Upper Code:
When we use gradient objects, we must use two or more stop colors.
The addColorStop() method specifies the color stop. The parameters are described in coordinates, which can be 0 to 1.
Using a gradient, set the value of fillStyle or strokeStyle to a gradient, and then draw a shape, such as a rectangle, text, or a line.
<!DOCTYPE html>
<html>
	<head>
		<meta charset="UTF-8">
		<title>Linear gradient and divergent gradient</title>
		<style type="text/css">
			#c1{
				border: 3px solid red;
			}
		</style>
	</head>
	<body>
		<canvas id="c1" width="1000" height="700"></canvas>
	</body>

	<script type="text/javascript">
		//The first step is to find the canvas object.
		var c = document.getElementById("c1");
		//The second step is to get the context of canvas
		var ctx = c.getContext("2d");

		//Then you can draw through ctx
		ctx.beginPath();

		// Implementation of linear gradient
		//The first one: vertical gradient, which carries out color gradient from the specified upper left corner coordinate to the upper right corner coordinate
		var jianbian = ctx.createLinearGradient(100,100,300,100);  // Upper left x,y coordinates, upper right x,y coordinates
		jianbian.addColorStop(0,"red");
		jianbian.addColorStop(0.5,"blue");
		jianbian.addColorStop(1,"yellow");
		ctx.strokeStyle = jianbian;
		ctx.lineWidth = 10;
		ctx.moveTo(100,100);
		ctx.lineTo(300,100);
		ctx.stroke();

		//The second type: oblique gradient. The color gradient is carried out from the specified upper left corner coordinate to the lower right corner coordinate
		ctx.beginPath();
		var jianbian2 = ctx.createLinearGradient(400,300,600,500);
		jianbian2.addColorStop(0,"cyan");
		jianbian2.addColorStop(0.3,"green");
		jianbian2.addColorStop(0.7,"purple");
		jianbian2.addColorStop(1,"blue");
		ctx.fillStyle = jianbian2;
		ctx.moveTo(400,300);
		ctx.lineTo(600,300);
		ctx.lineTo(600,500);
		ctx.lineTo(400,500);
		ctx.closePath();				//Use the. closePath() method to automatically close the drawing and close the end coordinate to the start coordinate!
		ctx.stroke();
		ctx.fill();


		// Implementation of divergent gradient
		//Specifies that the ring formed by two circles diverges and gradients around
		ctx.beginPath();
		var jianbian3 = ctx.createRadialGradient(150,400,50,150,400,200);  // Parameters: Center + radius of the first circle, center + radius of the second circle
		jianbian3.addColorStop(0,"red");
		jianbian3.addColorStop(0.3,"blue");
		jianbian3.addColorStop(0.7,"yellow");
		jianbian3.addColorStop(1,"green");
		ctx.fillStyle = jianbian3;
		ctx.moveTo(10,300);
		ctx.lineTo(310,300);
		ctx.lineTo(310,500);
		ctx.lineTo(10,500);
		ctx.closePath();
		ctx.stroke();
		ctx.fill();

	</script>
</html>
two ️⃣ Effect achieved:
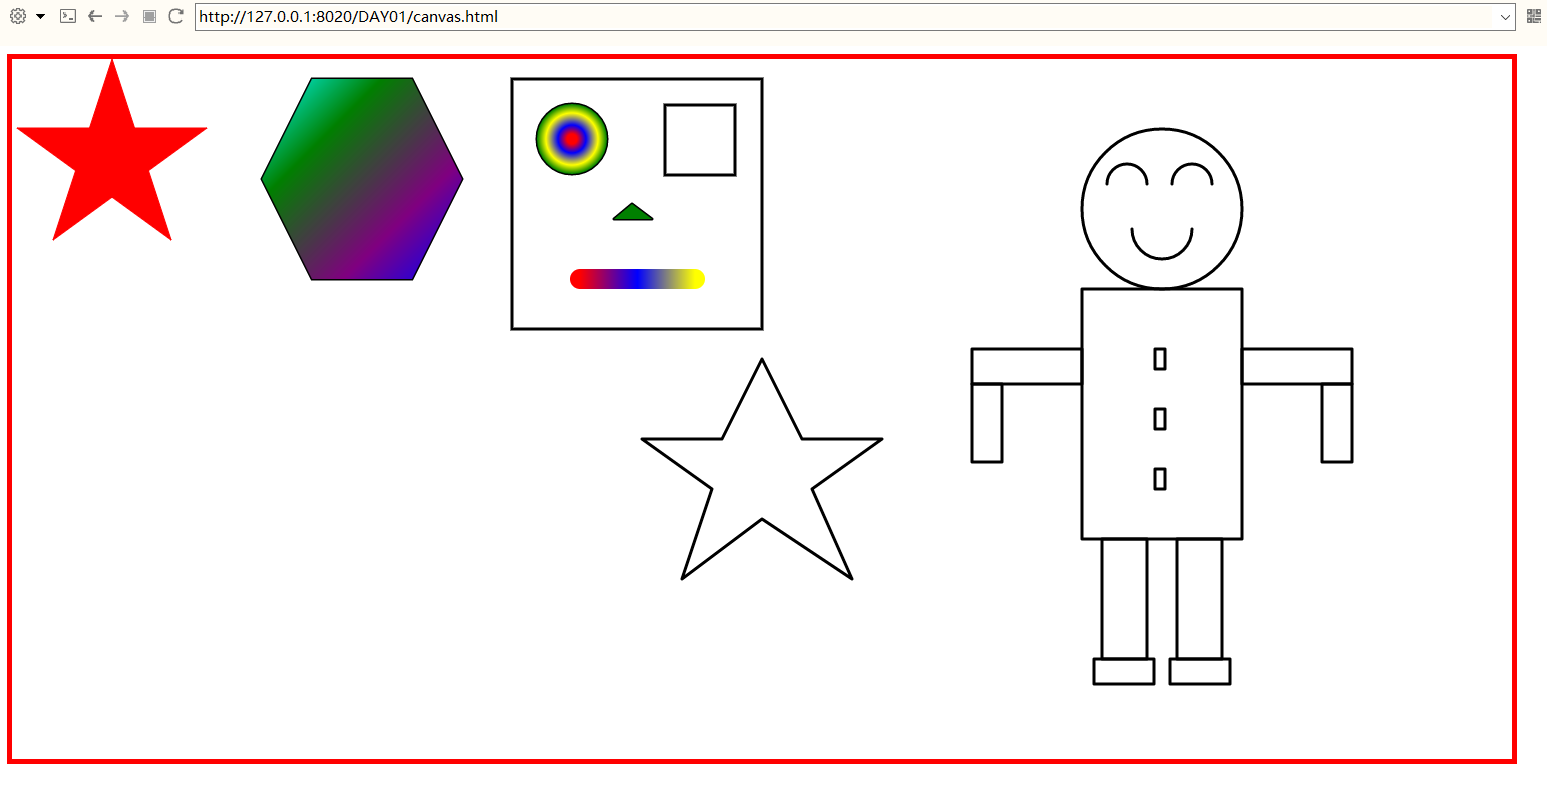
🚉 Extension -- drawing of several complex graphics
- The topic is the five listed below. Please play your cerebellar bag melon and draw it yourself first 🙄!
- The operations used have been explained in detail above, and none of the questions exceed the outline (practice is the only standard to test the truth 🤩)
- The finished partners can take a look at my code and implementation effect below. Maybe you do better than mine 😂!
- Five pointed star filled with red;
- Hexagon filled with gradient;
- Robot head (using linear gradient & & divergent gradient);
- A hollow five pointed star;
- Draw a little man with sound limbs.
one ️⃣ Upper Code:
<!DOCTYPE html>
<html>
	<head>
		<meta charset="UTF-8">
		<title>Five questions</title>
		<style type="text/css">
			#canvas_first{
				border: 5px solid red;
			}
		</style>
	</head>
	<body>
		<canvas id="canvas_first" width="1500" height="700"></canvas>
	</body>

	<script type="text/javascript">
		// To draw something on canvas, the first step is to find the canvas control
		var c = document.getElementById("canvas_first");
		//Get the context of drawing, which is simply understood as a brush (not actually a brush)
		var ctx = c.getContext("2d");	//This object is a built-in HTML5 object with a variety of drawing paths, rectangles, circles, characters, and methods of adding images.

		// 1. Five pointed star
		ctx.moveTo(100,0);		  // Moves the brush to the specified position
		ctx.fillStyle = "red";        // The color of the closed graphic fill is used with. fill()
		ctx.lineTo(159,181);      //Connect a line from the current position to the specified position (not a real line)
		ctx.lineTo(5,69);
		ctx.lineTo(195,69);
		ctx.lineTo(41,181);
		ctx.closePath();
		ctx.strokeStyle = "red";  // Line color
		ctx.stroke();			  //Draw lines for tracing.
		ctx.fill();			      //Fills the enclosed area with the specified fill pattern


		// 2. Hexagon
		ctx.beginPath();
		var jianbian2 = ctx.createLinearGradient(250,20,450,220);   // Linear gradient -- gradient from upper left corner to lower right corner
		jianbian2.addColorStop(0,"cyan");
		jianbian2.addColorStop(0.3,"green");
		jianbian2.addColorStop(0.7,"purple");
		jianbian2.addColorStop(1,"blue");
		ctx.fillStyle = jianbian2;
		ctx.moveTo(300, 20);
		ctx.lineTo(400,20);
		ctx.lineTo(450, 120);
		ctx.lineTo(400,220);
		ctx.lineTo(300,220);
		ctx.lineTo(250,120);
		ctx.closePath();
		ctx.strokeStyle = "black";
		ctx.lineWidth = "3";		// Sets the thickness of the line
		ctx.stroke();
		ctx.fill();


		// 3. Robot head
		ctx.beginPath();			// Open new path
		// Head contour
		ctx.strokeRect(500,20,250,250);
		//left eye
		var jianbian3 = ctx.createRadialGradient(560,80,5,560,80,35);    // Divergent gradient ------ specify two groups of center + radius: gradient in the ring
		jianbian3.addColorStop(0,"red");
		jianbian3.addColorStop(0.3,"blue");
		jianbian3.addColorStop(0.7,"yellow");
		jianbian3.addColorStop(1,"green");
		ctx.fillStyle = jianbian3;
		ctx.arc(560,80,35,0,Math.PI*2,true);    // 150500 is the center of the circle, 80 is the radius, 0 is the starting angle of the arc, Math.PI/2 is the ending angle of the arc, true is counterclockwise; false is clockwise
		//right eye
		ctx.strokeRect(653,46,70,70);
		//nose
		ctx.moveTo(620,145);
		ctx.lineTo(640,160);
		ctx.lineTo(602,160);
		ctx.closePath();			//Connect a line from the current position to the starting position to form a closed path
		ctx.lineJoin = "round"; 	//Line intersection drawing
		ctx.stroke();
		ctx.fill();
		//mouth
		ctx.beginPath();
		var jianbian = ctx.createLinearGradient(568,220,683,220);    // Linear gradient ---- if it is a straight line, it can be gradient directly from the starting point to the end point (Note:)
		jianbian.addColorStop(0,"red");
		jianbian.addColorStop(0.5,"blue");
		jianbian.addColorStop(1,"yellow");
		ctx.strokeStyle = jianbian;
		ctx.lineWidth = 20;
		ctx.moveTo(568,220);
		ctx.lineTo(683,220);
		ctx.lineCap = "round";		//Display of line endpoints
		ctx.stroke();


		// 4. Hollow Pentagon
		ctx.beginPath();
		ctx.lineWidth = 3;
		ctx.strokeStyle = "black";
		ctx.moveTo(750,300);
		ctx.lineTo(790,380);
		ctx.lineTo(870,380);
		ctx.lineTo(800,430);
		ctx.lineTo(840,520);
		ctx.lineTo(750,460);
		ctx.lineTo(670,520);
		ctx.lineTo(700,430);
		ctx.lineTo(630,380);
		ctx.lineTo(710,380)
		ctx.closePath();
		ctx.stroke()


		// 5. A little man with sound limbs
		ctx.beginPath();
		// head
		ctx.arc(1150,150,80,0,Math.PI*2,true);
		// body
		ctx.strokeRect(1070,230,160,250);
		// Body buttons
		ctx.strokeRect(1143,290,10,20);
		ctx.strokeRect(1143,350,10,20);
		ctx.strokeRect(1143,410,10,20);
		// leg
		ctx.strokeRect(1165,480,45,120);
		ctx.strokeRect(1090,480,45,120);
		// foot
		ctx.strokeRect(1158,600,60,25);
		ctx.strokeRect(1082,600,60,25);
		// Right arm + hand
		ctx.strokeRect(1230,290,110,35);
		ctx.strokeRect(1310,325,30,78);
		// Left arm + hand
		ctx.strokeRect(960,290,110,35);
		ctx.strokeRect(960,325,30,78);
		ctx.stroke();
		// Small face
		ctx.beginPath();
		// left eye
		ctx.arc(1115,125,20,0,Math.PI,true);
		// right eye
		ctx.moveTo(1200,125);
		ctx.arc(1180,125,20,0,Math.PI,true);
		// mouth
		ctx.moveTo(1180,170);
		ctx.arc(1150,170,30,0,Math.PI,false);
		ctx.stroke();

	</script>
</html>
two ️⃣ Effect achieved:
👝 3. Advanced stage - a small project to help you play through canvas~
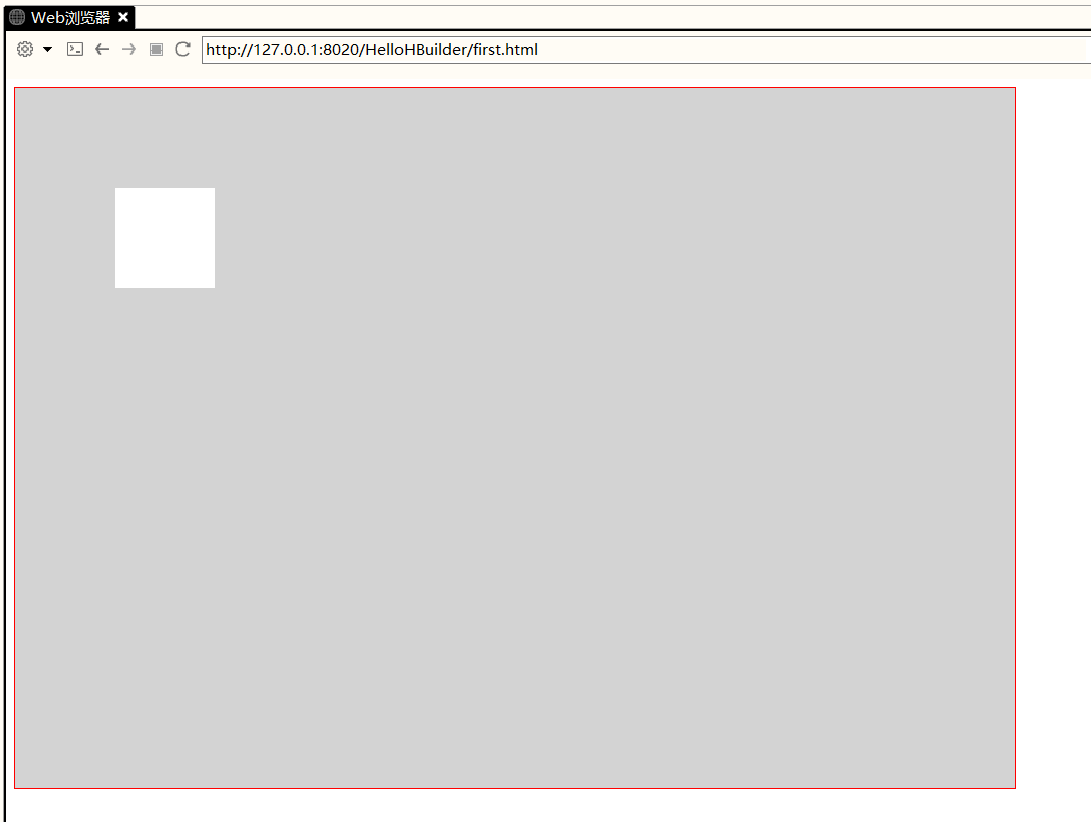
🏆 (1) Realize eraser
one ️⃣ Difficulty: how to clear the specified area on canvas:
Use the clearRect() method to empty the specified rectangular area.
JavaScript syntax:
context.clearRect(x,y,width,height)
| parameter | Parameter value |
|---|---|
| x | The x coordinate of the upper left corner of the rectangle to be cleared |
| y | The y coordinate of the upper left corner of the rectangle to be cleared |
| width | The width of the rectangle to clear |
| height | The height of the rectangle to clear |
⚠️ Difficulty solution - code implementation:
<!DOCTYPE html>
<html>
	<head>
		<meta charset="UTF-8">
		<title></title>
		<style type="text/css">
			#c{
				border: 1px solid red;
			}
		</style>
	</head>
	<body>
		<canvas id="c" width="1000" height="700"></canvas>
	</body>
	</body>

	<script type="text/javascript">
		var c = document.getElementById("c");
		var ctx = c.getContext("2d");

		// Fill the entire canvas with lightgray color
		ctx.fillStyle = "lightgray";
		ctx.fillRect(0,0,1000,700);

		// Clears the contents of the specified area
		ctx.clearRect(100,100,100,100)
	</script>
</html>
⚠️ Solution to difficulties - realization effect:
two ️⃣ Project - code implementation:
Achieve the effect - achieve the eraser, that is, the position where the mouse clicks and moves is erased, and the eraser is not cleared when the mouse is released.
-
During the implementation of the project, attention should be paid to:
-
When listening to the onmousemove event of canvas:
-
c.onmousemove = function(e){ e.clientX; e.pageX; c.offsetLeft; }
-
Several quantities of mouse movement information obtained e.clientX; e.pageX; and c.offsetLeft; cannot be directly used to judge the clearing of the area where the mouse clicks:
-
The first reason is that the meanings of the above quantities are as follows: (their meanings determine that they are not the real coordinates of the mouse relative to the canvas!)
- e.clientX is the distance between the mouse and the left edge of the web page window, so it cannot be used as the amount to locate the mouse position, because the window can slide up, down, left and right, and the canvas position will change relative to the window;
- e.pageX is the distance from the mouse to the left edge of the web content;
- c.offsetLeft is the distance of the canvas to the left of the browser
- Therefore, we can locate the real coordinates of the mouse by combining e.pageX and c.offsetLeft. Here we need to understand that the coordinate axis of the canvas does not directly coincide with the coordinate axis of the web page! Therefore, there are e.pageX (taking the coordinate axis of the web page as the reference system) and c.offsetLeft (taking the coordinate system of the canvas as the reference system) Two quantities. We only need to use e.pageX-c.offsetLeft (understood as translating the coordinate axis of the canvas to the left and the coordinate axis of the upper web page until it coincides) to locate the real coordinates of the mouse.
- The second reason is: context.clearRect(x,y,w,h); the method clears the rectangular area with specified coordinates (x,y), width w and height h.
- Note: this width refers to the length of the right X axis in (x,y) coordinates; this height refers to (x,y) The length of the coordinate down the Y axis. Therefore, the mouse coordinate we locate should be w/2 and h/2 pixels long at the origin of the canvas canvas on the left at the same time of the X axis and Y axis. That is e.pageX-c.offsetLeft - w/2, which is the reasoning process of clearing the X coordinate of the area. The Y coordinate is similar, so little friends should think more!
<!DOCTYPE html>
<html>
	<head>
		<meta charset="UTF-8">
		<title></title>
		<style type="text/css">
			#c{
				border: 1px solid red;
			}
		</style>
		<center><font size=2>(I operate WeChat official account: lonely cold.</font></center>
<center><font size=2>(Welcome to like Python,The attention of friends who like programming~)</font></center>

	</head>
	<body>
		<canvas id="c" width="1000" height="700"></canvas>
	</body>

	<script type="text/javascript">
		var c = document.getElementById("c");
		var ctx = c.getContext("2d");

		// Fill the entire canvas with lightgray color
		ctx.fillStyle = "lightgray";
		ctx.fillRect(0,0,1000,700);

		// Clears the contents of the specified area
		//ctx.clearRect(100,100,100,100)

		// Listen for onmousedown event of canvas (mouse click event)
		c.onmousedown = function(ev){
		c.onmousemove = function(e){  // . onmousemove is a mouse movement event
			console.log(e);  // Console printing e will find that it is an amount of all information moved by the mouse
			// e.clientX is the distance between the mouse and the left edge of the web page window, so it cannot be used as the amount to locate the mouse position, because the window can slide up, down, left and right, and the canvas position will change relative to the window!
			// e.clientY is the distance of the mouse from the top edge of the web page window

			// e.pageX is the distance of the mouse from the left edge of the web page content
			// e.pageY is the distance of the mouse from the top edge of the web page content

			// c.offsetLeft is the distance of the canvas to the left of the browser
			// c.offsetTop is the distance of the canvas above the browser
			var w = 20;			// Width of cleared area
			var h = 20;			// Height of cleared area
			var x = e.pageX-c.offsetLeft - w/2;        // Clear the x position of the area
			var y = e.pageY-c.offsetTop - h/2;		// Clear the y position of the area
			ctx.clearRect(x,y,w,h);
		}
		}
		<center><font size=2>(I operate WeChat official account: lonely cold.</font></center>
<center><font size=2>(Welcome to like Python,The attention of friends who like programming~)</font></center>

		c.onmouseup = function(ev){   // . onmouseup is the mouse release event
		// Cancel onmousemove event
		c.onmousemove = null;
		}

	</script>

</html>
three ️⃣ Project - achieving results:
canvas eraser
🔆 4.In The End - Chicken Soup for the soul~
| From now on, stick to it and make progress a little bit a day. In the near future, you will thank you for your efforts! |
the blogger will continue to update the crawler basic column and crawler actual combat column. After reading this article carefully, you can praise the collection and comment on your feelings after reading it. And you can pay attention to this blogger and read more crawler articles in the future!
If there are mistakes or inappropriate words, you can point them out in the comment area. Thank you!
If you reprint this article, please contact me for my consent, and mark the source and the blogger's name. Thank you!
