GIT
Here are the most complete strategies about GIT in the whole network. Please praise it before you see it to prevent getting lost
01. What is GIT
concept
Git (pronounced / g) ɪ t /) is an open source distributed version control system, which can effectively and quickly deal with project version management from very small to very large. It is also an open source version control software developed by Linus Torvalds to help manage Linux kernel development.
Version control tool is a link in implementing the concept of devops and CI/CD. It is an indispensable technology for automatic test engineers.
The difference between GitHub, gitee and gitlab
- GitHub is a hosting platform for open source and private software projects. It is named GitHub because it only supports Git as the only version library format.
- Gitee is a Git based code hosting service launched by open source China. It is a domestic GitHub.
- GitLab is an open source project for code warehouse management system. It uses Git as a code management tool and builds a Web service on this basis.
02. Use of GIT
Local operation
2.1 installation
Installing on Linux
If you want to use the binary installer to install the basic Git tools on Linux, you can use the basic package management tools included in the distribution to install them. Take Fedora as an example. If you are using it, you can use dnf:
$ sudo dnf install git-all
If you are on a Debian based distribution, such as Ubuntu, use apt:
$ sudo apt install git-all
For more options, Git's official website has installation steps on various Unix distribution systems at https://git-scm.com/download/linux .
Installing on macOS
There are several ways to install Git on a Mac. The easiest way is to install Xcode Command Line Tools. On Mavericks (10.9) or later systems, try running the Git command for the first time in Terminal.
$ git --version
If you have not installed the command line developer tool, you will be prompted to install it.
Install on Windows
There are several ways to install Git on Windows. The official version can be downloaded from Git's official website. Open https://git-scm.com/download/win , the download will start automatically. Double click the downloaded installation file and install it according to the boot program.
2.2 initial configuration
After installing Git, the first thing to do is to set up your user name and email address. This is very important because each Git submission will use this information, which will be written into each submission and cannot be changed. Run the following command on the terminal:
git config --global user.name "xinlan"
git config --global user.email "xinlan@example.com"
The addition of -- global indicates global settings, which only need to be set once.
2.3 initialize warehouse
If you have a project directory that has not been versioned and want to control it with Git, you need to enter the project directory first. Then execute the command:
$ git init
This command will create a subdirectory named. Git. This subdirectory contains all the necessary files in the Git warehouse you initialized. These files are the backbone of the Git warehouse. Please do not modify it.
2.4 add files for tracking
In the above operation, we just did an initialization operation, and the files in the project have not been tracked.
If you are versioning in a folder of existing files (not an empty folder), it is time to start tracking these files. You can specify the required files for tracking through the git add command.
$ git add *.py
$ git add LICENSE
2.5 submit documents to warehouse
To submit the files tracked in the previous step to the repository, run the command git commit. This launches a text editor to enter the submission instructions.
# Please enter the commit message for your changes. Lines starting
# with '#' will be ignored, and an empty message aborts the commit.
#
# On branch master
#
# Initial commit
#
# Changes to be committed:
#       new file:   LICENSE
#       new file:   test.py
#
~
~
~
~
~
~
~
~
~
~
<sers/men85/Desktop/study/.git/COMMIT_EDITMSG [unix] (21:15 13/09/2021)1,0-1 All
"C:/Users/men85/Desktop/study/.git/COMMIT_EDITMSG" [unix] 12L, 251C
You can also add the - m option after the commit command to put the submitted information on the same line as the command
git commit -m "init"
2.6 three states of GIT
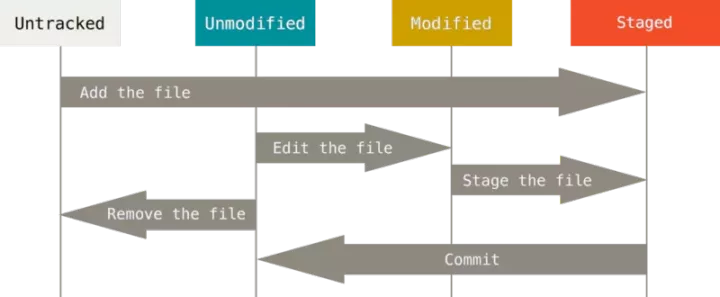
Git has three states, and your file may be in one of them: committed, modified, and staged.
- Modified indicates that the file has been modified but has not been saved to the database.
- Staged indicates that the current version of a modified file is marked for inclusion in the next committed snapshot.
- Submitted indicates that the data has been safely stored in the local database.
This will make our Git project have three phases: workspace, staging area and Git directory.
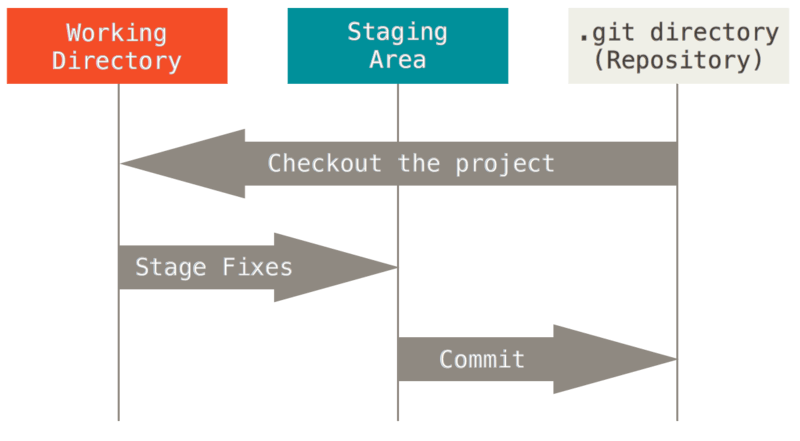
- The workspace is the root directory of the project, the area where you work, and the content extracted independently from a version of the project. These files extracted from the compressed database of Git warehouse are put on disk for you to use or modify.
- The staging area is a file that holds the list of files to be submitted next time. It is generally in the Git warehouse directory. According to Git's terminology, it is called "index", but it is generally called "staging area".
- The Git repository directory is where Git stores the metadata and object database of the project. This is the most important part of Git. When cloning the warehouse from other computers, the data here is copied.
The basic Git workflow is as follows:
- Modify the file in the workspace.
- Selectively stage the changes you want to commit next time, which will only add the changed parts to the staging area. git add
- Commit the update, find the file in the staging area, and permanently store the snapshot in the Git directory. git commit
2.7 check current file status
Every file in your working directory is in these two states: tracked or untracked. Tracked files refer to those files that have been included in version control. They are recorded in the last snapshot. After working for a period of time, their status may be unmodified, modified or put into the staging area. In short, tracked files are files that Git already knows.
After editing some files, Git marks them as modified files because you have modified them since the last submission. At work, you can selectively put these modified files into the temporary storage area, and then submit all the temporary modifications, and so on.
You can use the git status command to see which files are in what state. If all files have not been modified and have been submitted to the local database, and are consistent with the workspace, staging area and Git warehouse in time, you will see outputs like this:
$ git status
On branch master
nothing to commit, working tree clean
Now, let's create a new README file under the project. If the file does not exist before, use the git status command and you will see a new untracked file:
$ git status
On branch master
Untracked files:
  (use "git add <file>..." to include in what will be committed)
        README


nothing added to commit but untracked files present (use "git add" to track)
Now let's modify a file that has been tracked. If you modify a tracked file named test.py and run the git status command, you will see the following:
$ git status
On branch master
Changes not staged for commit:
  (use "git add <file>..." to update what will be committed)
  (use "git restore <file>..." to discard changes in working directory)
        modified:   test.py


Untracked files:
  (use "git add <file>..." to include in what will be committed)
        README


no changes added to commit (use "git add" and/or "git commit -a")
Let's practice Git's workflow and submit the added files and modified contents to Git warehouse.
$ git add .
$ git commit -m "practice"
[master 2852e80] Group member
 2 files changed, 1 insertion(+)
 create mode 100644 README
When you want to track all the files in the directory, you can run the command git add
2.8 viewing submission records
After submitting several updates, you may want to review the submission history. The simplest and most effective tool to accomplish this task is the git log command. For example, when running the git log command in my previous project, you can see the following output:
$ git log
commit 304b472cab3fcff5c220bf3e8e91a2e2fa642003 (HEAD -> master, origin/master)
Author: xinlan <117220100@qq.com>
Date:   Thu Aug 28 14:05:00 2021 +0800


    daily


commit 65f23a537366f35bd99047438c40547278294028
Author: xinlan <117220100@qq.com>
Date:   Fri Aug 6 21:18:35 2021 +0800


    haha


commit eca023381f42ce0428ab45c0a8b33621dd2cc6f8
Author: xinlan <117220100@qq.com>
Date:   Sat May 29 19:19:24 2021 +0800


    py38 day43
Without passing in any parameters, by default, git log will list all submissions in chronological order, with the latest updates at the top. The git log command also has many parameters for searching and displaying.
One of the most useful parameters is -- pretty. This parameter can display the submission history in a way different from the default format. This option has some built-in sub options for you to use. For example, oneline will display each submission on one line, which is very useful when browsing a large number of submissions. In addition, there are short, full and fuller options, which basically have the same format but different levels of detail:
$ git log --pretty=oneline
304b472cab3fcff5c220bf3e8e91a2e2fa642003 (HEAD -> master, origin/master) daily
65f23a537366f35bd99047438c40547278294028 haha
eca023381f42ce0428ab45c0a8b33621dd2cc6f8 py38 day43
1b174b1486bae0554ff8a79acca55369387480f9 py41 day2
5ae08fa293a9a6bd7eddf8cb365e07cc221f0c07 py38day42
6fe8725de1151455f25e069ad80357edf5c4d6b0 'py38day41'
2effcc5dc6670a23cdbf4049321923b735ae3f16 add 41
03. Remote operation
3.1 creating a remote warehouse
A remote repository is a repository of your project hosted on the Internet or other networks.
The easiest way to create your own remote warehouse is to create a remote warehouse on gitee (code cloud) or GitHub. Code cloud is recommended here. It is Chinese and fast. Take code cloud as an example. Code cloud address https://gitee.com/ , please take care of your registered account.
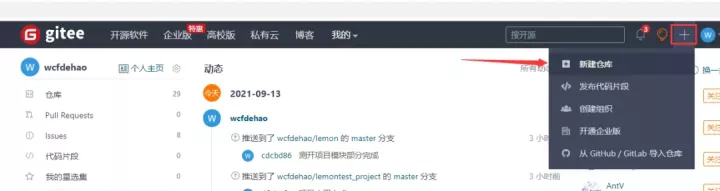
After registering and logging in the code cloud, click the plus sign in the upper right corner and select new warehouse
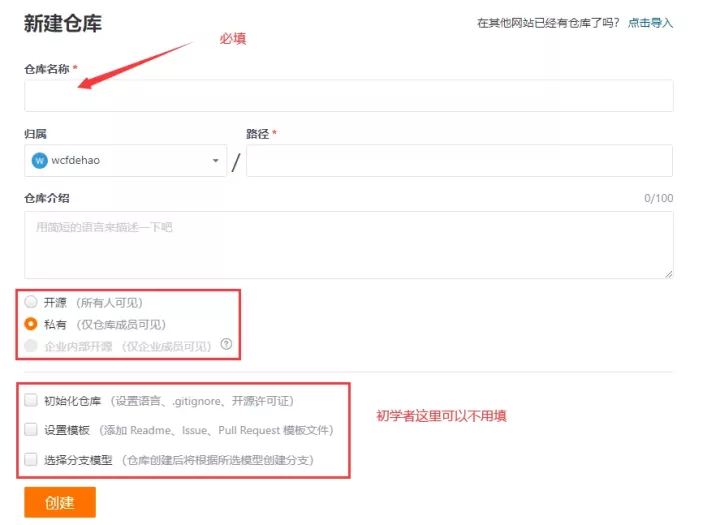
Enter the new warehouse page, fill in the necessary options and click create
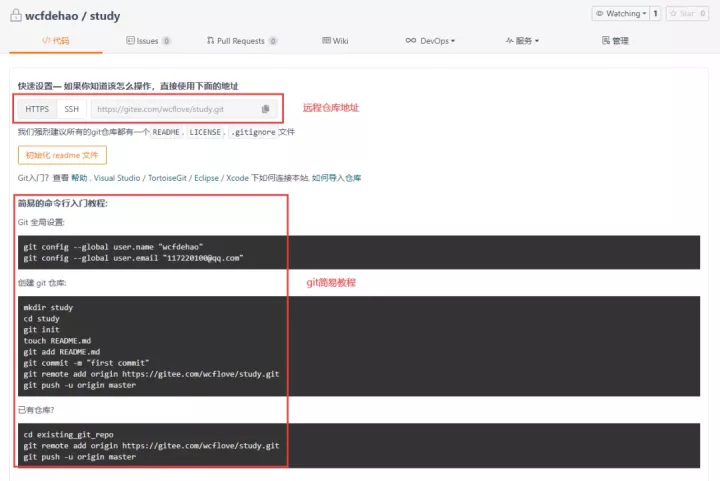
After the warehouse is created successfully, the following page will appear, including the address of the warehouse and some help information
3.2 add remote warehouse
Run Git remote add < shortname > < URL > to add a new remote Git repository and specify a convenient abbreviation. function
$ git remote add origin git@gitee.com:wcflove/study.git
This will add a remote warehouse to the current local warehouse at git@gitee.com : wcflow / study.git, the abbreviation of the remote warehouse address is origin (you can take the name you want).
Run git remote -v command to view remote warehouse information. A local warehouse can have multiple remote warehouses
$ git remote -v
gitee   git@gitee.com:wcflove/study.git (fetch)
gitee   git@gitee.com:wcflove/study.git (push)
3.3 push to remote warehouse
You can push your local project to a remote warehouse by using the command git push < remote > < Branch >. When you want to push the master branch (which we will discuss in detail later) to the origin server (again, the two names will be automatically set for you during cloning), you can back up your work to the server by running this command:
$ git push origin master
Enumerating objects: 6, done.
Counting objects: 100% (6/6), done.
Delta compression using up to 8 threads
Compressing objects: 100% (4/4), done.
Writing objects: 100% (6/6), 481 bytes | 481.00 KiB/s, done.
Total 6 (delta 0), reused 0 (delta 0), pack-reused 0
remote: Powered by GITEE.COM [GNK-6.1]
To gitee.com:wcflove/study.git
 * [new branch]      master -> master
Note: your permission needs to be verified in this step. If the address of https protocol is used when adding the remote warehouse, you need to enter the user name and password. If you use an ssh protocol address, you need to configure the ssh public key (see the code cloud help document for details).
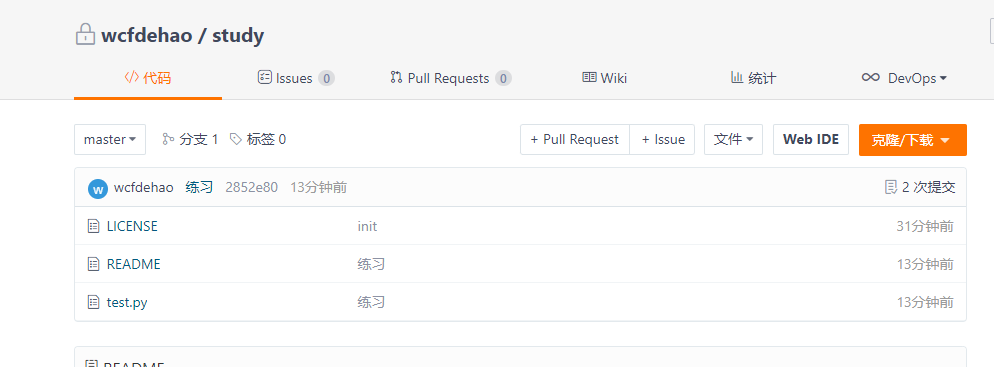
After the push is successful, refresh your remote warehouse, and you will see the file just pushed.
3.4 pull from remote warehouse
To obtain data from a remote warehouse, you can:
$ git pull <remote>
This command will access the remote warehouse, pull all the data you don't have, and automatically merge the remote branch to the current branch.
3.5 clone remote warehouse
Running the command git clone < URL > will download the remote repository to the current directory. For example:
git clone git@gitee.com:wcflove/study.git
This will create a study folder in the current directory, and initialize a. Git folder in this directory to automatically change the address git@gitee.com : wcflow / study.git is added as a remote warehouse and is abbreviated as "origin" by default. The local master branch is automatically set to track the master branch of the cloned remote warehouse, Pull all the data under the master branch from the remote warehouse into the. Git folder, and then read the copy of the latest version of the file from it.
04. Branch operation
4.1 branch introduction
Almost all version control systems support branching in some form. Using branches means that you can separate your work from the development main line so as not to affect the development main line.
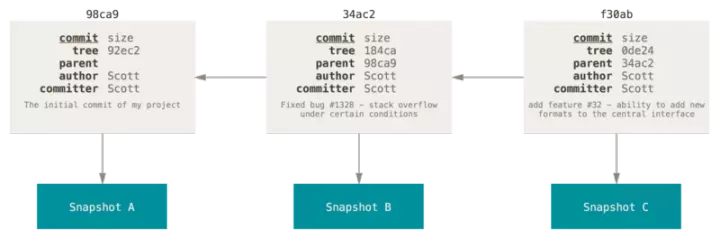
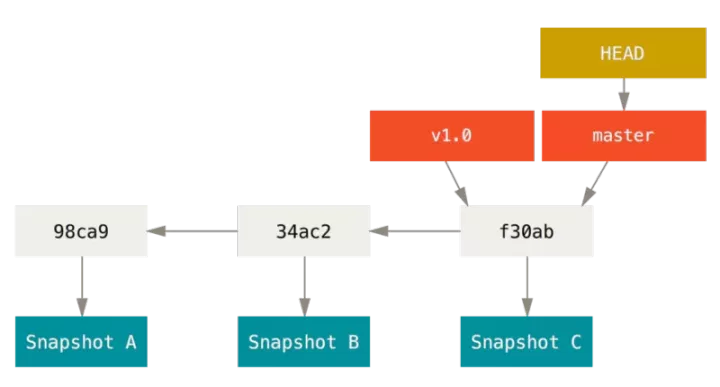
To really understand how git handles branching, we need to review how git saves data. Git saves not changes or differences in files, but a series of snapshots at different times. When committing, GIT will save a commit object. The submission object will contain a pointer to the temporary content snapshot, the author's name and mailbox, the information entered at the time of submission, and a pointer to its parent object. The submission object generated by the first submission has no parent object. The submission object generated by the ordinary submission operation has one parent object, while the submission object generated by the merger of multiple branches has multiple parent objects.
The branch of Git is essentially just a variable pointer to the submitted object. The default branch name of Git is master. After multiple commit operations, you actually have a master branch pointing to the last commit object. The master branch automatically moves forward each time it is submitted.
4.2 create branch
Creating a branch is very simple. It just creates a new pointer that can be moved for you. For example, to create a testing branch, you need to use the git branch command:
$ git branch testing
This creates a pointer on the commit object where it is currently located.
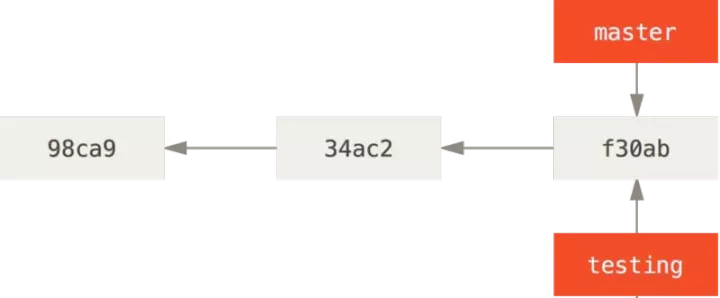
Git has a special pointer called HEAD, which points to the current local branch. In this case, you are still on the master branch. Because the git branch command only creates a new branch and does not automatically switch to the new branch.
4.3 switching branches
To switch to an existing branch, you need to use the git checkout command. Let's switch to the newly created testing branch:
$ git checkout testing
xxxxxxxxxxbr $ git checkout testing
So HEAD points to the testing branch.
4.4 consolidated branches
After we work on the testing branch and form some columns for submission, we can switch back to the master branch and run the git merge command:
$ git checkout master
$ git merge testing
xxxxxxxxxxbr $ git checkout masterbr$ git merge testing
Merge it into the master branch.
4.5 conflict resolution
Sometimes the merge operation does not go so smoothly. If you make different changes to the same part of the same file in two different branches, Git can't merge them cleanly.
$ git merge testing
Auto-merging test.py
CONFLICT (content): Merge conflict in index.html
Automatic merge failed; fix conflicts and then commit the result.
xxxxxxxxxxbr $ git merge testingbrAuto-merging test.pybrCONFLICT (content): Merge conflict in index.htmlbrAutomatic merge failed; fix conflicts and then commit the result.
At this point, GIT makes a merge, but does not automatically create a new merge submission. Git will pause and wait for you to resolve the conflict arising from the merger. You can use the git status command at any time after the merge conflict to view those files that are in the unmerged state because they contain the merge conflict:
$ git status
On branch master
You have unmerged paths.
  (fix conflicts and run "git commit")


Unmerged paths:
  (use "git add <file>..." to mark resolution)


    both modified:      test.py


no changes added to commit (use "git add" and/or "git commit -a")
xxxxxxxxxxbr $ git statusbrOn branch masterbrYou have unmerged paths.br (fix conflicts and run "git commit")brbrbrUnmerged paths:br (use "git add <file>..." to mark resolution)brbrbr both modified: test.pybrbrbrno changes added to commit (use "git add" and/or "git commit -a")
Any files to be resolved because they contain merge conflicts are identified as unmerged. Git will add standard conflict resolution tags to files with conflicts, so that you can open these files with conflicts and resolve them manually. The conflicting file will contain some special sections, which look like the following:
<<<<<<< HEAD:test.py
print('hello world!')
=======
print("hello world!")
>>>>>>> dev:test.py
xxxxxxxxxxbr <<<<<<< HEAD:test.pybrprint('hello world!')br=======brprint("hello world!")br>>>>>>> dev:test.pyThis indicates that the version indicated by the HEAD (that is, the location of your master branch, because you have switched to this branch when running the merge command) is in the upper half of the section (= = = = = = =), and the version indicated by the dev branch is in the lower half of = = = = = = =). In order to resolve the conflict, you must choose to use one of the two parts separated by = = = = = = = = = = = = = = = = = = = = = = = = = = = = = = = = = = = = = = = = = = = = = = = = = = = = = = = = = = = = = = = =.
For example, you can resolve the conflict by changing this paragraph to look like the following
print("hello world!")xxxxxxxxxxbr print("hello world!")The above conflict resolution solution only retains the modification of one branch, and < < < <, =========, and > > > > > > these lines are completely deleted. After you have resolved the conflicts in all files, use the git add command for each file to mark it as resolved. Once these conflicting files are staged, Git marks them as resolved.
You can run git status again to confirm that all merge conflicts have been resolved:
$ git status
On branch master
All conflicts fixed but you are still merging.
  (use "git commit" to conclude merge)


Changes to be committed:


    modified:   test.py
xxxxxxxxxxbr $ git statusbrOn branch masterbrAll conflicts fixed but you are still merging.br (use "git commit" to conclude merge)brbrbrChanges to be committed:brbrbr modified: test.py
If you are satisfied with the result and you are sure that the previously conflicting files have been temporarily saved, you can enter git commit to complete the merge submission.
05. Benefits
If you need the following information, you can click below to get it for free
[Test Architect] system junior test engineer - the way for test architects to learn