2021-10-28 SpringBoot+ajax+mysql8 to send mobile phone verification code
To realize the above functions, we must first think about what we need. After sorting, we will subdivide the verification code - ① the function of sending verification code ② random 6-digit verification code (several are your favorite).
Well, the functional segmentation is completed, and then we will start the practical operation.
First, introduce the required dependencies. I won't explain them bit by bit. I attach several important..
    <!-- -Alicloud SMS interface-->
    <dependency>
        <groupId>com.aliyun</groupId>
        <artifactId>aliyun-java-sdk-core</artifactId>
        <version>4.1.0</version>
    </dependency>
    <dependency>
        <groupId>com.alibaba</groupId>
        <artifactId>fastjson</artifactId>
        <version>1.2.67</version>
    </dependency>
    <dependency>
        <groupId>org.springframework.boot</groupId>
        <artifactId>spring-boot-starter-thymeleaf</artifactId>
    </dependency>
    <!--springboot Integrated alicloud connection pool-->
    <dependency>
        <groupId>com.alibaba</groupId>
        <artifactId>druid-spring-boot-starter</artifactId>
        <version>1.1.17</version>
    </dependency>
    <!--MySQL rely on -->
    <dependency>
        <groupId>mysql</groupId>
        <artifactId>mysql-connector-java</artifactId>
        <version>8.0.25</version>
    </dependency>
    <dependency>
        <groupId>org.springframework.boot</groupId>
        <artifactId>spring-boot-starter-jdbc</artifactId>
    </dependency>
After introducing dependency, we started to write the front-end page. We just wrote a simple play. I won't be difficult or good-looking. Ha ha.
 <form action="registWithPhone" method="post">
 user name:<input type="text"  id="fphoneNumber" name="phoneNumber" placeholder="Please enter your mobile phone number" ><br/>
 password:<input type="password"  id="password" name="passWord" placeholder="Please input a password" ><br/>
 <input th:type="text" id="fverifyCode" placeholder="Please enter the verification code" name="verifyCode" >
 <button type="button" onclick="getVerifyCode()">obtain</button><br/>
 <input type="submit" value="register"/>
</form>
After writing the front-end page, we first get the verification code. I use ajax to go to the background instead of RequestMapping. After all, there was a lot of code for Mapping with parameters in the past. After all, I may have to write two form s separately (this is my own idea, ha, it may be low-level). After using Ajax to obtain the verification code filled in the front-end page (first judge whether it is empty or whether it complies with the rules of telephone number), start to transfer the parameters. Here, the url is the RequestMapping map
    function getVerifyCode() {
        var phoneNumber = $("#fphoneNumber");
        if($.trim(phoneNumber.val())==""){
            alert("Phone number cannot be empty");
            fphoneNumber.val("");
            fphoneNumber.focus();
        }else{
            $.ajax({
                url: "testY",
                type: "POST",
                dataType: "json",
                data: {"phoneNumber":phoneNumber.val()},
                success: function (data) {
                    if(data == 'fail'){
                        alert("Failed to send verification code");
                        return ;
                    }else{
                        alert("Verification code sent successfully")
                    }
                }
            });
        }
    }
    Write a 6-digit random number in the background
     public static String getCode2(){
	StringBuilder ss = new StringBuilder();
	for(int i=0;ss.length()<6;i++){
		int num = new Random().nextInt(10);
		ss.append(num);
	}
	return ss.toString();

}
After implementing the alicloud interface, you can go to the alicloud SMS platform and follow their process. It's very simple. Click AccessKey to obtain your accessKeyId and accessKeySecret. This is an important voucher for calling the SMS interface. Just register the SMS signature and SMS template. There is a debugging platform, and then click to generate it.
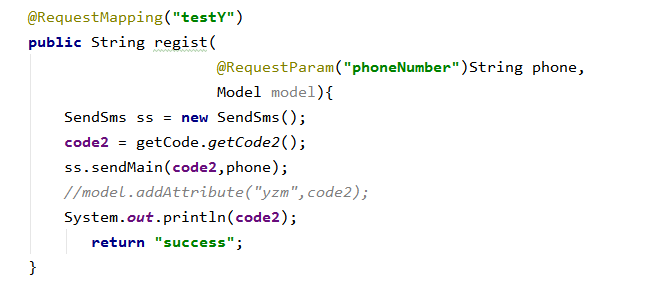
Then, the control layer receives the front-end request and calls the generated template (change it to your own method, and use the verification code you just wrote in it).

The model in that method can be deleted regardless. The output is convenient for my own test, and can also be deleted directly.