Welcome to personal blog http://www.jkraise.top
This case project is based on MySQL and Redis in the dark horse headlines
Database optimization
Slice
effect
- Sharding is also called data sharing. Its main work is to split a single database and a single table. Multiple databases and tables together form a complete data set
- Sharding can improve throughput, complete more data reading and writing at the same time, and expand the capacity / upper limit of read and write speed of single machine storage
classification
- There are two main types of slicing:
- Split Vertically
- split horizon
Attention
- Don't divide databases and tables easily, because fragmentation will bring many distributed problems and greatly increase the complexity of applications
- We should avoid "over design" and "premature optimization", and try our best to do other optimization first, such as upgrading hardware, upgrading network, read-write separation, index optimization, cache design, etc.
- When the data volume reaches the bottleneck of a single table (reference value: single table record 1000W + / hard disk 100G +), separate databases and tables shall be considered
- If it is necessary to divide databases and tables, vertical splitting is preferred
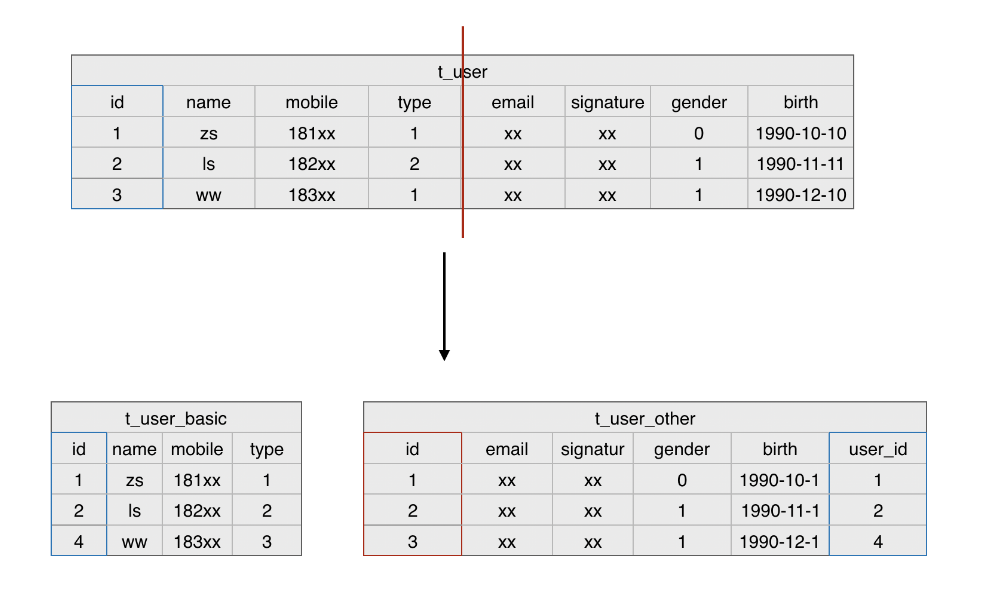
Vertical split table & & split rules
-
relevance
- Fields can be divided into tables according to business logic and relevance
- For example, the user name and password are often used together and assigned to the user authentication table. Personal information such as birthday and email are often accessed together and assigned to the user information table
-
Frequency of use
-
Fields can be divided according to common and uncommon, and processed by table
-
For example, the original user table contains multiple fields, including commonly used fields such as nickname and mobile phone number, as well as infrequently used fields such as mailbox and birthday. It can be divided into two tables according to usage frequency: user basic information table and user other information table
-
Vertical sub database
-
Split multiple tables in a database into multiple databases (server nodes)
-
Note:
-
Because local transactions do not support cross database operations, tables with associativity should be placed in the same database
-
# default
 database   t_user  t_article

# Vertical sub table
 database   t_user_basic    t_user_detail      t_article_basic    t_article_detail

# Vertical sub database
 Database 1   t_user_basic          t_user_detail
Database 2   t_article_detail      t_article_basic
-
Sub database access
- In fact, it has been introduced in the previous course of separation of reading and writing. Flash Sqlalchemy configures Sqlalchemy_ Bindings allows multiple database URI s to be set, and each model class can__ bind_key__ Property to set the database you want to access
split horizon
Horizontal sub table
- Split records from one table into multiple tables
- For tables with many records, problems such as index expansion and query timeout will occur, affecting the user experience
Horizontal sub database
- After horizontal table splitting, the table splitting is distributed in multiple database nodes
Split rule
- time
- Segmentation according to time is to cut out the data six months ago or even a year ago and put it in another table. As time goes by, the probability of the data in these tables being queried becomes smaller, so it is not necessary to put it together with "hot data". This is also "hot and cold data separation".
- business
- Classify and split the data according to the business. For example, the article contains multiple classifications such as finance, science and technology, and the data of each classification can be split into one table.
- ID range
- A table from 0 to 100W and a table from 100W+1 to 200W.
- HASH modular discretization
- Take the user ID, then hash the module and allocate it to different databases. In this way, data can be inserted into multiple tables at the same time to improve the concurrency. At the same time, because the user ID is discretized, there will be no ID conflict
- Geographical area
- For example, businesses are differentiated according to East China, South China and North China, and this should be the case for some cloud services.
Data oriented query
- If horizontal splitting is performed, you may need to query the target data in multiple databases in turn without accurate filtering conditions
- RoutingSession can be redeveloped to provide methods for database oriented query
- The example scenario is as follows: the user table is horizontally divided into databases and tables, and the user data is saved in db1.t_user and DB2. T_ In user, other data of the project is saved in the database test
import random
from flask import Flask
from flask_sqlalchemy import SQLAlchemy, SignallingSession, get_state
from sqlalchemy import orm

app = Flask(__name__)

# Set a single database URI (used to create tables and add test data)
app.config['SQLALCHEMY_DATABASE_URI'] = 'mysql://root:mysql@192.168.105.140:3306/db1'

# Set the URI of multiple databases (for data operations)
app.config['SQLALCHEMY_BINDS'] = {
    'db1': 'mysql://root:mysql@192.168.105.140:3306/db1',
    'db2': 'mysql://root:mysql@192.168.105.140:3306/db2',
    'master': 'mysql://root:mysql@192.168.105.140:3306/test',
    'slave': 'mysql://root:mysql@192.168.105.140:3306/test'
}

# Other configurations
app.config['SQLALCHEMY_TRACK_MODIFICATIONS'] = False
app.config['SQLALCHEMY_ECHO'] = True


# 1. Customize the Session class, inherit signalingsession, and override get_bind method
class RoutingSession(SignallingSession):
    def get_bind(self, mapper=None, clause=None):
        """Every database operation(Add, delete, modify, query and transaction operations)Will be called, To get the corresponding database engine(Database accessed)"""

        state = get_state(self.app)
        if self._bind:  # If the query specifies a database to access, the specified database is used
            print('query data base:', self._bind)
            return state.db.get_engine(self.app, bind=self._bind)

        elif mapper is not None:  # If the model class has a database specified, use the specified database
            info = getattr(mapper.mapped_table, 'info', {})
            bind_key = info.get('bind_key')
            if bind_key is not None:
                return state.db.get_engine(self.app, bind=bind_key)

        if self._flushing:  # If the model class does not specify a database, judge whether it is a write operation
            print('Write operation')
            return state.db.get_engine(self.app, bind='master')

        else:

            print('Read operation')
            return state.db.get_engine(self.app, bind='slave')

    _bind = None  # Define the database that the class property records will access

    def using_bind(self, bind):
        """Specify the database to access"""
        self._bind = bind
        return self


# 2. Customize SQLALchemy class and override create_session method
class RoutingSQLAlchemy(SQLAlchemy):
    def create_session(self, options):
        return orm.sessionmaker(class_=RoutingSession, db=self, **options)


# Create component object
db = RoutingSQLAlchemy(app)


# Build model class
class User(db.Model):
    __tablename__ = 't_user'
    id = db.Column(db.Integer, primary_key=True)
    name = db.Column('username', db.String(20), unique=True)
    age = db.Column(db.Integer, default=0, index=True)


@app.route('/')
def index():

    for db_bind in ['db1', 'db2']:  # Traverse each database node to query user data
        user = db.session().using_bind(db_bind).query(User).filter(User.name == 'zs').first()
        print(user)
        if user:
            print(user.id, user.name, user.age)

    return "index"


if __name__ == '__main__':
    # Reset all tables inherited from db.Model
    db.drop_all()
    db.create_all()

    # Adding test data requires adding a piece of data to db1 and db2 respectively
    user1 = User(name='zs', age=20)
    db.session.add(user1)
    db.session.commit()

    app.run(debug=True)
Distributed problem
-
Once distributed is introduced into database design, it will bring many distributed problems. Here are two main problems:
- Distributed transaction problem
- Cross node Join / sorting / paging problem
1. Distributed transaction issues
- Cross database operations are not supported for local transactions
- There are three solutions from simple to complex
Option 1
- Put the associated tables in a database
- One transaction can be used for the same library operation
- Such as user table & user channel table, article basic information table & article content table
Option 2
-
Mysql has supported distributed transactions since 5.6
-
The core is the two-stage submission protocol (2PC protocol / XA protocol for short)
-
Distributed transactions will provide a transaction manager to uniformly manage the local transactions of each database. The transaction manager will uniformly execute the commit processing only after all local transactions are successfully pre committed to the manager. Otherwise, the transaction manager will uniformly rollback the transaction

-
SQL alchemy also supports distributed transactions
- You only need to set the parameter session when creating the SQLAlchemy object_ Options = {'twophase': true}
-
After setting, all operations of the whole session will be put into a distributed transaction, and atomicity will be guaranteed within the scope of the whole distributed transaction
Note:
- Distributed transactions will not be formally committed until all transactions are "successfully committed". If some participating nodes get stuck, the performance of the whole transaction will be affected
Option 3
-
Final consistency scheme based on status / message
- For large projects with multiple subsystems, it is necessary to ensure the data consistency between subsystems
- A single subsystem often does not operate all databases, but each subsystem can record the operation status by defining fields, and update the corresponding status every stage
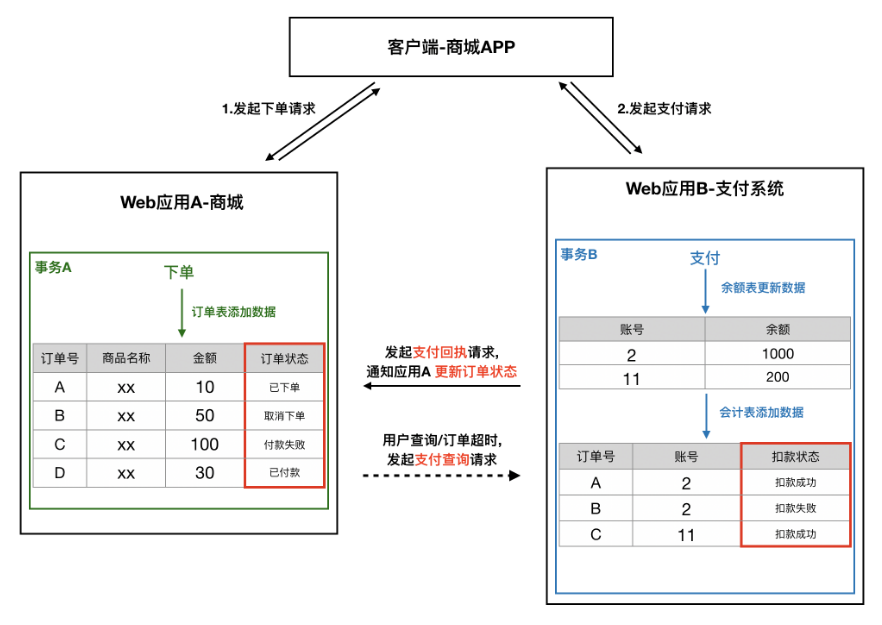
- For example, in the order - payment process, after the order placing transaction of application A is completed, the order status is updated to order. After the payment transaction of application B is completed, application A is notified to update the order status through the payment callback interface
- Application B also needs to provide A payment query interface so that application A can query the payment status of the order when the user queries or the order times out
2. Cross node Join / sorting / paging
- Unsupported cross library operations include join / group / aggregate / sort
- There are two solutions
Option 1
- Query twice and merge at the application side
Option 2
- Use some third-party solutions (Database Middleware)
- The open source framework has few functions except Mycat
- It requires a certain learning cost, and the secondary development requires the company to have a certain technical strength
redis stand alone
- 1. Common commands
- 2.Redis transaction
- 3.Redis optimistic lock
- 4.Redis pessimistic lock
- 5. Non transactional pipeline
1. Common commands
String
- Record string / integer / floating point number
- command
- set add / modify data
- Get get data
- mset add multiple data
- mget gets multiple data
- incr count plus 1
- decr count minus 1
- incrby count plus n
Key command
- Applicable to all types
- command
- del delete data
- Exists determines whether the data exists
- expire set expiration time
- ttl get remaining time
- Keys query the keys that meet the criteria
hash
- Dictionary like structure
- command
- hset add field
- hget get field
- hmset add multiple fields
- hmget get multiple fields
- hdel delete field
list
- Is a two-way linked list
- command
- lpush appends the element from the left
- lrange traverses the elements from the left
- rpush appends elements from the right
- lset modifies the element from the left
- lpop deletes the element from the left
- rpop deletes the element from the right
zset
- Ordered set, sorted by score
- command
- zadd add / modify elements
- zrange traversal elements (from small to large by score)
- zrevrange traverses elements in reverse (from large to small)
- zrangebyscore traverses the elements of the specified score range
- zscore the score of the query element
- zrem delete element
- The fraction count of the zincrby element plus n
set
- Unordered set unordered + de duplication
- command
- sadd add element
- smembers traversal elements
- sismember determines whether to include
- srem delete element
Redis transaction
Basic grammar
- MULTI
- When a transaction is started, subsequent commands will be added to the same transaction
- The operations in the transaction will be sent to the server, but will not be executed immediately. Instead, they are placed in a queue corresponding to the transaction, and the server returns QUEUED
- EXEC
- After EXEC is executed, the commands in the transaction will be executed
- When a command in a transaction has an error, it will not roll back or stop the transaction, but continue to execute
- DISCARD
- When the transaction is cancelled, the transaction queue will be cleared and the client will exit the transaction state
$ redis-cli
127.0.0.1:6379> set user1 zs  # Set the key user1 of type string
OK
127.0.0.1:6379> type user1  # View user1 type
string
127.0.0.1:6379> multi  # Open transaction
OK
127.0.0.1:6379> set age 20  # Set the key age of string type, and the operations in the transaction will not be executed immediately, but will be listed
QUEUED
127.0.0.1:6379> hset user1 name zs  # Set the key user1 of hash type. Since user1 already exists and is of string type, an error will be reported when the command is actually executed. Here, it is only listed
QUEUED
127.0.0.1:6379> set height 1.8  # Set the key height of string type
OK
127.0.0.1:6379> exec  # Commit the transaction, even if some operations fail, do not roll back and continue to execute
1) OK
2) (error) WRONGTYPE Operation against a key holding the wrong kind of value
3) OK
ACID
- Atomicity
- I won't support it
- Will not roll back and continue execution
- Isolation
- support
- The commands in the transaction are executed sequentially and will not be interrupted by other clients (EXEC first)
- Single process and single thread are used for stand-alone redis read and write operations
- persistence
- Yes, but compared with Mysql, redis data is easy to be lost
- uniformity
- I won't support it
from redis import StrictRedis

# Create redis client
redis_client = StrictRedis()

# Creating a pipe object turns on transactions by default
pipe = redis_client.pipeline()

# Subsequent operations of pipe will be put into the transaction and will not be executed immediately
a = pipe.set('name', 'zhangsan')
b = pipe.get('name')

# The command in the transaction will not be executed until the transaction is committed
c = pipe.execute()

print(a)
print(b)
print(c)
Note:
- After the pipeline is created, the transaction is turned on by default
- The command put into the transaction will not be executed until the execute method is executed
Redis optimistic lock
Basic grammar
- watch
- Optimistic lock implemented by redis
- mechanism
- Before the transaction is started, set the data listening. During EXEC, if it is found that the data has been modified, the transaction will be automatically cancelled (DISCARD)
- After transaction EXEC, the listener will be removed regardless of success or failure
WATCH mykey  # Monitor the value of mykey
MULTI  # Open transaction
SET mykey 10
EXEC  # If the value of mykey has changed before exec is executed, the transaction will be cancelled (the client can retry after collision)
- Application scenario
- Avoid resource grabbing caused by concurrency
# Requirement: use redis to realize the second kill function (prevent oversold)
from redis import StrictRedis, WatchError

# 1. Create client
redis_client = StrictRedis()

# 2. Create pipe objects
pipe = redis_client.pipeline()

while True:
    try:

        # 3. Listen to data. If listening is enabled, the default transaction will not be enabled, and subsequent pipe operations will be executed immediately
        pipe.watch('reserve_count')

        # 4. Read inventory quantity
        count = pipe.get('reserve_count')

        # Judge inventory quantity
        if int(count) > 0:  # In stock, stock-1
            # Start transaction manually
            pipe.multi()

            # Inventory minus one
            pipe.decr('reserve_count')

            # Commit transaction
            pipe.execute()
            print('checkout success ')

        else:  # No inventory
            print('The goods have been sold out')
            # Remove listener
            pipe.reset()

        break

    except WatchError:  # This exception indicates that the monitored data has been modified by other clients. At this time, you should retry / cancel the operation
        print('Data modified, retry ')
        continue
Note:
- If listening is enabled, the default transaction will not be enabled, and subsequent pipe operations will be executed immediately
- If the pipe.execute() operation is not executed, you need to manually remove the listening pipe.reset()
Redis pessimistic lock
Basic grammar
- SETNX command
- The key cannot be set until it does not exist
- Multiple clients snatch, and only one can be set successfully (obtain the lock and obtain the permission to operate the data)
SETNX lock1  1   # Key does not exist before it can be set successfully
$ 1
SETNX lock1  1   # Key exists, cannot be set, return 0
$ 0
from redis import StrictRedis

# Create redis connection
redis_client = StrictRedis(decode_responses=True)

# Design redis pessimistic lock to deal with second kill oversold problem

# Get lock first
while True:
    order_lock = redis_client.setnx('lock:order', 1)
    if order_lock:
        redis_client.expire('lock:order', 5)  # Set the expiration time for the lock. If it exceeds 5 seconds, the lock will be automatically deleted

        reserve_count = redis_client.get('count:reserve')
        if int(reserve_count) > 0:
            redis_client.decr('count:reserve')
            print("Generate order")
        else:
            print("Sold out")
        # Finish processing and remove the lock
        redis_client.delete('lock:order')
        break
Note:
- Set the expiration time for the lock. If it exceeds 5 seconds, the lock will be automatically deleted to avoid deadlock
Non transactional pipeline
-
redis's transaction and pipeline can be separated, and the pipeline can be used separately without using transactions
-
The pipeline can send multiple commands to the redis server at one time to improve the transmission efficiency
-
Create pipe object settings transaction Parameter is False, A non transactional pipeline is created(Open pipe only, No transaction)
pipe = redis_client.pipeline(transaction=False)
from redis import StrictRedis

# Create redis client
redis_client = StrictRedis()

# Create a pipeline object. If the transaction parameter is set to False, a non transactional pipeline will be created (only open the pipeline and no transaction)
pipe = redis_client.pipeline(transaction=False)

# Subsequent operations of the pipe are in the pipe
a = pipe.set('name', 'zhangsan')
b = pipe.get('name')

# Executing the pipeline will make the pipeline package the commands and send them to the redis server
c = pipe.execute()

print(a)
print(b)
print(c)
Redis distributed
primary coverage
Database master-slave
Basic introduction
- effect
- Data backup
- Read write separation
- characteristic
- Only one master and multiple slaves can be used (mysql can have multiple masters and multiple slaves)
- Cannot write from the database (mysql can write)
Related configuration
# The master-slave database is configured with IP / port respectively. If it is not set, it will accept requests from any IP (including external network, local area network and local computer)
# bind 127.0.0.1
port 6379
# Configure slaveof parameter from database: primary database ip primary database port
slaveof 192.168.105.140 6378

# Connect the following two items: write operations are allowed in the master database only when at least two slave databases can be replicated and the response delay is within 10 seconds
min-slaves-to-write 2
min-slaves-max-lag 10


# The redis installation directory of ubuntu, which contains the configuration templates of redis and sentinal
/usr/local/redis/

# Start / restart / stop the default redis service in ubuntu
/etc/init.d/redis-server start/restart/stop
Sentinel mode
1. Basic introduction
- effect
- Monitor the running status of the redis server and perform automatic failover to achieve high availability
- Mechanism used with database master-slave
- characteristic
- For independent processes, each redis server should be configured with at least one sentinel program
- Monitor the running status of the redis master server
- The administrator / other programs can be notified of a failure
- For failure, automatic transfer can be carried out and a new access address can be provided to the client
Internal mechanism (understanding)
- Rumor agreement
- When a sentinel program ping finds that the monitored primary server is offline (heartbeat detection), it will ask other sentinels listening to the server whether to confirm that the primary server is offline. When the number of confirmed sentinels meets the requirements (set in the configuration file), it will confirm that the primary server is offline (objective offline), and then enter the voting phase
- Voting agreement
- After confirming that the primary server is offline objectively, the sentinel will authorize one of the sentinels to lead the failover process by voting
- Authorization can only be granted if most sentinels vote. For example, if there are five sentinels, it can only be authorized if at least three sentinels vote
- The purpose is to avoid erroneous failover
- Recommended minimum configuration
- Start at least one sentry on at least three servers
- If there is only one server, the failover cannot be performed after the server is down
- If there are only two, once a sentry hangs up, the vote will fail
2. Related configuration
- Sentinel mode is the official tool of Redis. It is installed by default
- The configuration template of sentinel mode is in the Redis installation package. The default name is sentinel.conf
# bind 127.0.0.1  # The sentinel bound IP. If annotated, it means that it accepts the request from any IP
port 26381  # The port number monitored by the sentry. The redis client needs to access the sentry's ip and port number
sentinel monitor mymaster 192.168.105.140 6381 2  # Set sentinel (primary database alias primary database ip primary database port confirm the minimum number of sentinels offline)

sentinel down-after-milliseconds mymaster 60000  # Server disconnection timeout
daemonize yes  # Setting up background services
logfile "/var/log/redis-sentinel-26379.log"  # Sentinel generated log file path
- Start sentinel mode
sudo redis-sentinel sentinel.conf
Configure sentinel mode for virtual machines
- Three sentinel configuration files have been configured in the CentOS virtual machine and stored in the / etc/redis directory. They are sentinel_26380.conf to sentinel_26382.conf 3 files
- However, students need to modify the bound master database ip according to the ip address of their virtual machine, otherwise they will not be able to access Redis master-slave through sentinel LAN
- The startup script of master-slave + sentinel is also configured in the virtual machine and stored in redis-replication-start.sh
- The specific operations are as follows:
# First use the master-slave + sentry stop script to close Redis master-slave and sentry
$ cd /opt
$ sudo ./redis-replication-stop.sh


# Modify sentry profile
$ sudo vi /etc/redis/sentinel_26380.conf
# Replace the ip part in "sentinel monitor mymaster 192.168.105.140 6381 2" with its own LAN ip
$ sudo vi /etc/redis/sentinel_26381.conf
# Replace the ip part in "sentinel monitor mymaster 192.168.105.140 6381 2" with its own LAN ip
$ sudo vi /etc/redis/sentinel_26382.conf
# Replace the ip part in "sentinel monitor mymaster 192.168.105.140 6381 2" with its own LAN ip

# Start sentinel using master-slave + sentinel startup script
$ sudo ./redis-replication-start.sh


# Access Redis master / slave
redis-cli -p 6381
3. python accesses Redis through sentry
- The sentinel function is integrated in the redis py package
Code example
from redis.sentinel import Sentinel

sentinels = [  # Set the Sentinel's IP and port
    ('192.168.105.140', 26380),
    ('192.168.105.140', 26381),
    ('192.168.105.140', 26382),
]

# Create sentinel client
sentinel_client = Sentinel(sentinels)

# Primary database alias
service_name = 'mymaster'

# Get master database
redis_master = sentinel_client.master_for(service_name, decode_responses=True)
# Get from database
redis_slave = sentinel_client.slave_for(service_name, decode_responses=True)

# print(type(redis_master))

redis_master.zadd('movies', 8, 'dahuaxiyou')
redis_master.zincrby('movies', 'dahuaxiyou', 2)
print(redis_master.zscore('movies', 'dahuaxiyou'))

# The master database performs data operations
# redis_master.set('name', 'zhangsan123')
# print(redis_master.get('name'))

# Data operation from database
# print(redis_slave.get('name'))
# redis_slave.set('name', 'lisi')  # Can't write

# Write operation, direct use of master
# Read operation, directly from
# Read and write, it is recommended to use the master, and the pipe / optimistic lock can be used
4. Project integration
- Redis master-slave is used in subsequent redis persistence chapters. At present, only integration can be completed
- Set the sentry configuration in the app/settings/config.py file
# app/settings/config.py

class DefaultConfig:
    """Default configuration"""
    # mysql configuration
    ...

    # Set the ip and port of the sentry
    SENTINEL_LIST = [
        ('192.168.105.140', 26380),
        ('192.168.105.140', 26381),
        ('192.168.105.140', 26382),
    ]

    SERVICE_NAME = 'mymaster'  # Primary database alias for sentry configuration
- In app/__init__.py file, create sentinel and master-slave client objects
# app/__init__.py

...

from redis.sentinel import Sentinel

...

# redis master-slave database
redis_master = None  # type: StrictRedis
redis_slave = None  # type: StrictRedis


...

def register_extensions(app):
    """Component initialization"""

    ...

    # Sentinel client
    global redis_master, redis_slave
    sentinel = Sentinel(app.config['SENTINEL_LIST'])
    redis_master = sentinel.master_for(app.config['SERVICE_NAME'], decode_responses=True)
    redis_slave = sentinel.slave_for(app.config['SERVICE_NAME'], decode_responses=True)
colony
1. Basic introduction
- Multiple nodes save data together
- effect
- Expand storage space
- Improve throughput and write performance
- Differences between and single machine
- The database is no longer distinguished. There is only library 0. The single machine defaults to 0-15
- Transaction / pipeline / multi value operation is not supported
- characteristic
- At least three masters and three slaves are required
- AOF persistence must be enabled
- Automatically select cluster nodes for storage
- Default integration sentry, automatic failover
2. Related configuration
- The Redis cluster configuration has been explained in the previous course. Here we will focus on the review
# Each node is configured with an ip / port. The comment indicates that all requests are accepted
# bind 127.0.0.1
port 6379
# Cluster configuration
cluster-enabled yes   # Start cluster
cluster-config-file nodes-7000.conf  # Node log file
cluster-node-timeout 15000  # Node timeout duration: 15 seconds
# Enable AOF and related configurations
appendonly yes
Create cluster
- The configuration files of six cluster nodes (three master and three slave) have been configured in the CentOS virtual machine and stored in the / etc/redis directory, which are 7000.conf to 7005.conf files respectively
- The cluster startup script is also configured in the virtual machine and stored in / opt/redis-cluster-start.sh
- The redis installation package contains the redis-trib.rb command, which is used to create clusters
- The specific operations are as follows:
# Start the cluster node using the cluster startup script
$ cd /opt
$ sudo ./redis-cluster-start.sh

# Create cluster
$ cd ~/redis-4.0.13/src/
$ redis-trib.rb create --replicas 1 192.168.105.140:7000 192.168.105.140:7001 192.168.105.140:7002 192.168.105.140:7003 192.168.105.140:7004 192.168.105.140:7005

# Add the startup script path to the linux self startup file (the cluster will start automatically even if the system is restarted)
$ sudo vi /etc/rc.d/rc.local
# Add / opt/redis-cluster-start.sh to the end of the file

# To access a cluster, you must add the - c option, otherwise you cannot read or write
redis-cli -p 7000 -c
3. python operation Redis cluster
- To access the redis cluster through python, you need to install the dependency package redis py cluster
- Install dependency package PIP install redis py cluster
Code example
from rediscluster import RedisCluster

master_nodes = [  # Set the ip and port of the primary database
    {'host': '192.168.105.140', 'port': 7000},
    {'host': '192.168.105.140', 'port': 7001},
    {'host': '192.168.105.140', 'port': 7002},
]

# Create cluster client
cluster_client = RedisCluster(startup_nodes=master_nodes)

# Visit redis
cluster_client.set('name', 'lisi')
print(cluster_client.get('name'))

# The cluster cannot use pipes / transactions / optimistic locks / multivalued operations
# Clusters can still use pessimistic locks
- Note:
- redis clusters cannot support transactions and WATCH. Concurrency control can be achieved by designing pessimistic locks (setnx)
4. Project integration
- The Redis cluster client is integrated in the headline project to replace the Redis stand-alone storage of SMS verification code, which will be used in the subsequent cache design chapters
- Set the cluster configuration in the app/settings/config.py file
# app/settings/config.py

class DefaultConfig:
    """Default configuration"""

    ...

    # redis configuration
    # REDIS_HOST = '192.168.105.140'  # ip
    # REDIS_PORT = 6381  # port

    # redis cluster configuration
    CLUSTER_NODES = [  # ip and port number of the primary database in the cluster
        {'host': '192.168.105.140', 'port': 7000},
        {'host': '192.168.105.140', 'port': 7001},
        {'host': '192.168.105.140', 'port': 7002},
    ]
- In app/__init__.py file, create the cluster client object
# app/__init__.py

...

from rediscluster import RedisCluster

...

# Redis database operation object
# redis_client = None  # type: StrictRedis

# Create cluster client object
redis_cluster = None  # type: RedisCluster


...

def register_extensions(app):
    """Component initialization"""

    ...

    # Redis component initialization
    # global redis_client
    # redis_client = StrictRedis(host=app.config['REDIS_HOST'], port=app.config['REDIS_PORT'], decode_responses=True)

    ...

    # redis cluster component initialization
    global redis_cluster
    redis_cluster = RedisCluster(startup_nodes=app.config['CLUSTER_NODES'], decode_responses=True)
- Modify the function of obtaining SMS verification code & Registering login view in app/resources/user/passport.py file to access Redis in cluster mode
# app/resources/user/passport.py

...
# from app import redis_client
from app import redis_cluster

...


class SMSCodeResource(Resource):
    """Get SMS verification code"""
    def get(self, mobile):

        ...

        # Save redis app: Code: 18912341234 123456
        key = 'app:code:{}'.format(mobile)
        redis_cluster.set(key, rand_num, ex=SMS_CODE_EXPIRE)

        ...


class LoginResource(Resource):
    """Register login"""
    def post(self):

        ...

        # Verify SMS verification code
        key = 'app:code:{}'.format(mobile)
        real_code = redis_cluster.get(key)
        if not real_code or real_code != code:
            return {'message': 'Invalid Code', 'data': None}, 400

        # Delete verification code. Normal verification code can only be used once
        # redis_cluster.delete(key)

        ...
Expiration and obsolescence
1. Cache expiration
-
As long as it is a cache, the expiration time should be set. The advantages of setting the validity period are as follows:
- Save space
- Achieve weak consistency of data. After the validity period expires, the consistency of data can be guaranteed
-
There are three general expiration policies:
-
Timed expiration
Each key setting the expiration time creates a timer, which will be cleared immediately after the expiration time. This strategy can immediately clear the expired data and is very memory friendly; However, it will consume a lot of CPU resources for timing and processing expired data, which will affect the response time and throughput of the cache.
-
Inert expiration
Only when a key is accessed will it be judged whether the key has expired. If the key has expired, it will be cleared (return nil). This strategy can maximize CPU resource savings, but it is very memory unfriendly. In extreme cases, a large number of expired keys may not be accessed again, so they will not be cleared and occupy a lot of memory.
-
Periodic expiration
At regular intervals, scan the database for some keys with expiration dates, and clear the expired keys. This strategy is a compromise between the first two. By adjusting the time interval of timing scanning and the limited time consumption of each scanning, the optimal balance of CPU and memory resources can be achieved under different conditions.
Expiration policy of Redis
Two expiration strategies, lazy expiration and periodic expiration, are used in Redis.
- Periodic Expiration: it is detected every 100ms by default. Expired key s are deleted. The detection here is not sequential detection, but random detection.
- Lazy Expiration: when we read / write a key, Redis's lazy expiration policy will be triggered to delete the expired key directly
2. Cache obsolescence
- Assuming that a key has escaped periodic expiration and has not been used for a long time (that is, it has escaped lazy expiration), the memory of redis will be higher and higher. When the memory occupied by redis reaches the system upper limit, the memory elimination mechanism will be triggered.
- The so-called memory elimination mechanism refers to how to eliminate existing data and deal with new write requirements when the allowed memory of Redis reaches the upper limit.
- Redis itself provides a variety of cache elimination strategies, most commonly LRU and LFU
2.1 LRU (Least recently used)
- LRU algorithm eliminates data according to the historical access record of data, and gives priority to the data that has not been used recently.
- Basic ideas
- Insert new data into the list header;
- Whenever the cache hits (i.e. the cache data is accessed), move the data to the list header;
- When the list is full, the data at the end of the list is discarded.
- Existing problems
- If the data is eliminated according to the last use time alone, some frequently used data may be deleted. In the following example, although the last use time of data A is earlier than that of data B, it is used more times and is more likely to be used again in the future
data         Last use time       Usage times
data A        2020-03-15         100
 data B        2020-03-16         2
2.2 LFU (Least Frequently Used strategy)
- LFU policy is supported after redis 4.x
- It is based on the idea that "if a data is rarely used in the recent period, it is unlikely to be used in the future", and gives priority to the data with the lowest utilization rate.
- Considering that the newly added data is often used less than the old data, LFU also implements a periodic attenuation mechanism
- Disadvantages of LFU
- A usage count needs to be maintained for each data
- Periodic attenuation is also required
Elimination strategy of Redis
- Allkeys LFU: when the memory is not enough to hold the newly written data, the keys that are used the least times are preferentially removed from the key space.
- Volatile LFU: when the memory is insufficient to hold the newly written data, the key with the least number of uses is preferentially removed in the key space with the expiration time set.
- All keys LRU: when the memory is insufficient to accommodate the newly written data, the recently unused keys are preferentially removed from the key space.
- Volatile LRU: when the memory is insufficient to accommodate newly written data, priority is given to removing recently unused keys in the key space with expiration time set.
- All keys random: when the memory is insufficient to hold the newly written data, a key is randomly removed from the key space.
- Volatile random: when the memory is insufficient to hold the newly written data, a key is randomly removed from the key space with the expiration time set.
- Volatile TTL: when the memory is insufficient to accommodate the newly written data, the keys with earlier expiration time are removed first in the key space with expiration time set.
- noeviction: when the memory is insufficient to hold the newly written data, the new write operation will report an error.
Thinking questions
Question: there are 2000w data in mySQL and only 20w data in redis. How to ensure that all data in redis are hot data?
Headline project plan
- Set the validity period for all cached data
- Configure redis and use volatile LFU
Cache problem
1. Cache update
-
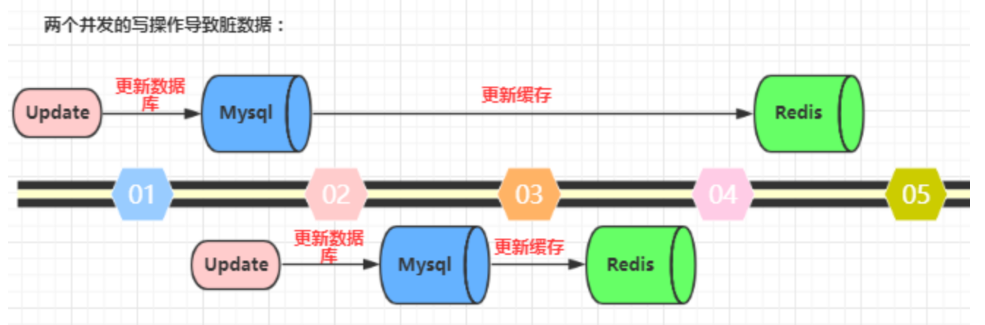
mysql and redis are two independent systems. In a concurrent environment, the consistency of updates cannot be guaranteed
-
As shown in the following figure (take Redis and Mysql as examples), two concurrent update operations: the database that is updated first updates the cache first, and the database that is updated later updates the cache first. This will result in inconsistent data in the database and cache, and dirty data is read in the application.
Solution
- Scheme 1: design distributed lock (redis setnx) / use message queue for sequential execution
- Disadvantages: poor concurrency
- Scheme 2: when updating data, write mysql first, and then delete the cache
- Mainly used for data objects (less updates)
- The data collection can consider updating the cache (the query cost of the collection is high, and the efficiency of frequent updating the cache is too low)
- Widely used, such as facebook
2. Cache penetration
- Cache is just a layer of protection added to relieve the pressure on the database. When we can't query the data we need from the cache, we have to query in the database. If hackers use it to frequently access the data not in the cache, the cache will lose its significance. In an instant, the pressure of all requests will fall on the database, which will lead to abnormal database connection.
Solution
- Scheme 1: for data that does not exist in the database, set the default value Null in the cache
- In order to avoid occupying resources, the expiration time is generally short

-
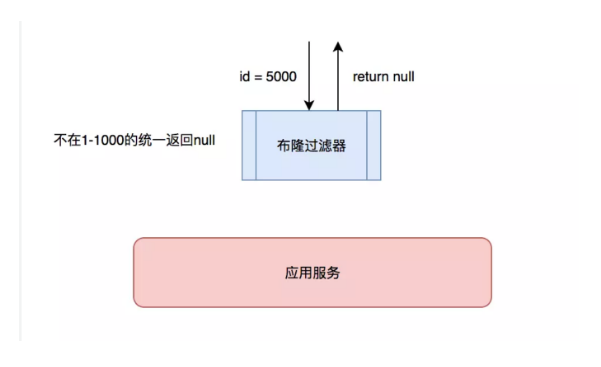
Scheme 2: some filtering rules can be set
- For example, bloom filter (an algorithm used to determine whether the data is included in the set), enter all possible values into the filter. If it is not included, it will directly return to None, and there will be a false kill probability·
Bloom filter (expansion)
- Installation package pip install pybloomfiltermmap3
import pybloomfilter

# Create filter
filter = pybloomfilter.BloomFilter(1000000, 0.01, 'words.bloom')

# Add data
filter.update(('bj', 'sh', 'gz'))

# Determine whether to include
if 'bj' in filter:
    print('contain')
else:
    print('Not included')
Extended reading: using Redis to implement bloom filter
3. Cache avalanche
- If a large number of cached data expire at the same time, it is likely that there will be collective cache failure, which will lead to direct access to the database by all requests, resulting in excessive pressure on the database

Solution
- Scheme 1: add a random value when setting the expiration time to disperse the expiration time to a certain extent to avoid collective failure at the same time.
- For example, in the past, a 10 minute timeout was set. Each Key can expire for 8-13 minutes at random. Try to make the expiration time of different keys different.
- Scheme 2: multi level cache is adopted. The timeout time set for different levels of cache is different. Even if one level of cache expires, there are other levels of cache.
Cache mode
- The core idea of cache design is to read the data in the cache first, and then read the data in the database when there is no cache, so as to solve the reading pressure of the database
- The specific cache design patterns can be mainly divided into the following two types:
- Cache Aside
- Read through
1. Cache Aside
- characteristic:
- The specific reading and writing operations are left to the application
- Disadvantages:
- Business and data operations are highly coupled, and technology upgrading is not used

2. Read through
- characteristic:
- The specific read and write operations are completed by the cache layer. Even if the storage scheme is modified later, the business code does not need to be modified,
- advantage:
- It is conducive to the reconstruction and architecture upgrading of the project
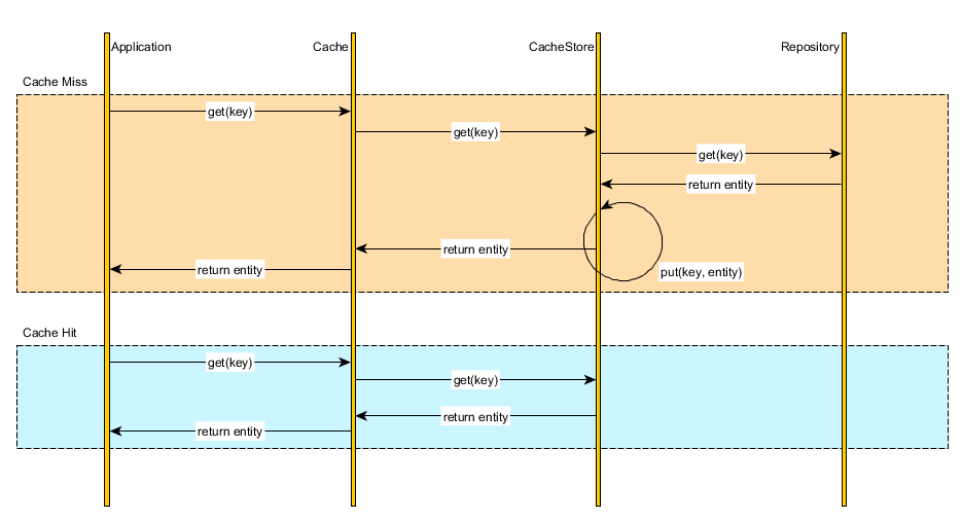
Headline project plan
-
use
Read-through
- Build an abstract cache operation layer, which is responsible for database query and Redis cache access, and directly operate the cache layer tools in the view logic of flash.
-
To update the data object, update the database first and then delete the cache; When updating the data set, update the database first and then the cache