preface
After so many days of basic project construction, the basic project configuration, project log, project management and database are finally established. You may encounter many problems. When you encounter a problem, you first think about how to solve it, rather than thinking that it is too difficult. I hope I can bring you some help. Recently, the update may be relatively slow, because there are still many things to do. I am also thinking about how to make this project more concise. If you can run, you will have a sense of achievement and your own motivation to learn. Well, I won't say much. You can have a private chat with me in the future. Let's start the functions of the user center.
The user center is mainly about our account management, user login account, etc. What I'm considering is not to do permission role management for the time being. Now, only users with one role can log in. Because it's their own blog system, it can only be developed by themselves. If there is time later, it will be done when the second version of the project is updated, The first version first builds the basic user management.
1, Introducing Lombok
1. Why use Lombok
Lombok official documents: https://projectlombok.org/features/all
In this project, we need to use the annotations in Lombok, which can help us save a lot of repeated coding work. It is the so-called: the emergence of any technology is to solve a certain kind of problem. When we learn the basics, we should all learn how to write getter/setter/toString and other codes. In fact, when we think about it carefully, we generated directly, which will lead to a large number of non content codes in a class. However, Lombok will help us omit these codes and just add an annotation, which is often used in current development projects.
2. Introduce the corresponding maven package
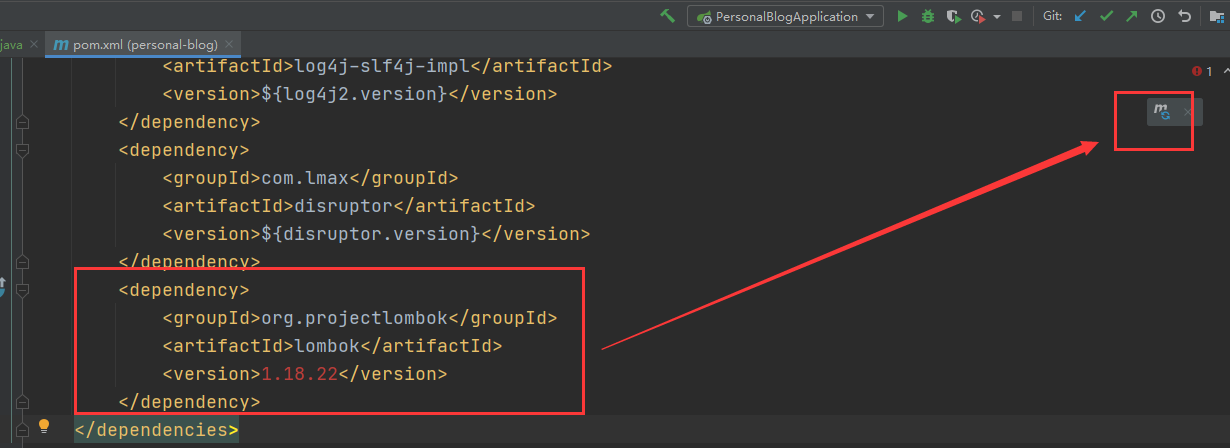
    <dependency>
        <groupId>org.projectlombok</groupId>
        <artifactId>lombok</artifactId>
        <version>1.18.22</version>
    </dependency>
We add this maven package in the pom.xml of the project. Then click refresh and wait for the loading to complete.
3. Add IDE tool support for Lombok
Next, we need to install the Lombok plug-in in the IDEA to facilitate our development and make our development tools support this function.
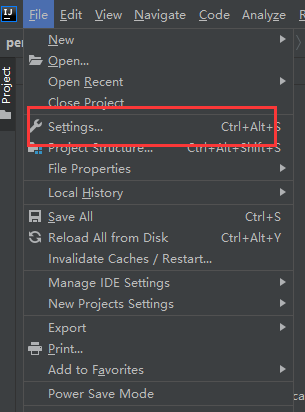
Click File in the upper left corner and select Settings
Then open and find Plugins, where you can search Lombok. If you don't find Lombok, it may be the reason of the network, or take a look at your IDEA version. After the last version in 2020, you can basically use it. In Chapter 3, the IDEA tool I provide can certainly be found.

After installation, you may need to restart IDEA.
4. Use of Lombok annotations
We first use the @ Data annotation, which contains the @ Getter/@Setter method. Specifically, we will implement it in the code and explain it in practice.
For some specific comments, please refer to the article I wrote:
Lombok core notes summary: https://blog.csdn.net/m0_37779600/article/details/120188115
2, The user function realizes addition, deletion, modification and query
First, realize the function of user list. This is to retrieve the data from the database and display it on the background management page. The search here will encounter the function of paging. Although we manage ourselves and have few accounts, it is basic project learning after all. We still use paging to display the list.
1. Add entity class
An @ Data annotation is added at the top of the class. This annotation is the Lombok we just introduced. It can help us omit the @ Getter/@Setter method. This is the user entity object we created.
Create a User.java class in the entity package we created, and then add the following code to the class.
package com.blog.personalblog.entity;

import lombok.Data;
import java.time.LocalDateTime;
import java.util.Date;

/**
 * @author: SuperMan
 * Welcome to the official account: code words.
 * @create: 2021-11-02
 */
@Data
public class User {

    /**
     * Primary key id
     */
    private Integer id;

    /**
     * user name
     */
    private String userName;

    /**
     * password
     */
    private String passWord;

    /**
     * mailbox
     */
    private String email;

    /**
     * Last login time
     */
    private Date lastLoginTime;

    /**
     * cell-phone number
     */
    private Integer phone;

    /**
     * nickname
     */
    private String nickname;

    /**
     * Creation time
     */
    private LocalDateTime createTime;

    /**
     * Update time
     */
    private LocalDateTime updateTime;
}
2. Add business interface
In the service package we created, create a UserService.java class, which is an interface class that exposes our business functions and can be called by the interface layer.

This class implements the user's add, delete, modify and query function interface. Adding, modifying and deleting only need to return a successful or failed information in the interface layer, and there is no need to return data.
package com.blog.personalblog.service;

import com.blog.personalblog.entity.User;

import java.util.List;

/**
 * @author: SuperMan
 * Welcome to my official account: code words.
 * @create: 2021-11-03
 */
public interface UserService {

    /**
     * Query all users list
     * @return
     */
    List<User> findAll();

    /**
     * Add user
     * @param user
     */
    void createUser(User user);

    /**
     * Modify user information
     * @param user
     */
    void updateUser(User user);

    /**
     * delete user
     * @param id
     */
    void deleteUser(int id);
}
3. Add business interface implementation class
The implementation class implements the function of the business interface and inherits this interface. The specific business logic will be written in this class. It is very important. At the same time, it is connected with the database interface to call the database interface and realize data processing.
Create a new UserServiceImpl.java class in the Impl package we created, inherit the UserService interface at the same time, and use the keyword implements to inherit the interface. The specific differences between extensions and implements can be understood in Baidu.
After creation, it looks like this. Next, I'll teach you a fast method to create interface implementation.
package com.blog.personalblog.service.Impl;
import com.blog.personalblog.service.UserService;
import org.springframework.stereotype.Service;
/**
* Business implementation layer
*
* @author: SuperMan
* Welcome to my official account: code words.
* @create: 2021-11-03
*
*/
@Service
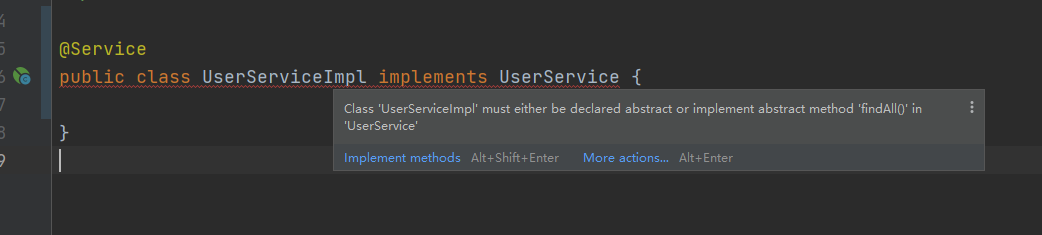
public class UserServiceImpl implements UserService {
}
Hover over the error reporting class, the following error reporting information will appear, and then click implementation methods.
This pop-up box will pop up, which is the method we just created in UserService.java, and then click OK.

Four implementation methods are generated below.
package com.blog.personalblog.service.Impl;

import com.blog.personalblog.entity.User;
import com.blog.personalblog.service.UserService;
import org.springframework.stereotype.Service;

import java.util.List;

/**
 * Business implementation layer
 *
 * @author: SuperMan
 * Welcome to my official account: code words.
 * @create: 2021-11-03
 *
 */

@Service
public class UserServiceImpl implements UserService {

    @Override
    public List<User> findAll() {
        return null;
    }

    @Override
    public void createUser(User user) {

    }

    @Override
    public void updateUser(User user) {

    }

    @Override
    public void deleteUser(int id) {

    }
}
Next, we deal with the database interface method. We need four interfaces for user database operation. Next, we deal with Mapper package, which is equivalent to dao layer.
4. Implementation of database query interface
In the Mapper package we created, create a UserMapper.java interface.
Here, we use an @ Param annotation when passing parameters. This annotation is generally used when passing multiple conditions. Of course, our business here is not so complex. We can also use it when passing one condition, so we use it here to broaden our knowledge.
@Param annotation is used to name parameters. After naming parameters, parameter values can be obtained according to the name, and parameters can be correctly passed into sql statements (generally, ${} will have sql injection problems through #{}).
package com.blog.personalblog.mapper;


import com.blog.personalblog.entity.User;
import org.apache.ibatis.annotations.Param;
import org.springframework.stereotype.Repository;

import java.util.List;

/**
 * @author: SuperMan
 * Welcome to my official account: code words.
 * @create: 2021-11-03
 */
@Repository
public interface UserMapper {

    /**
     * Query all user information
     *
     * @return
     */
    List<User> findAll();

    /**
     * Add user
     * @param user
     */
    void insert(@Param("user") User user);

    /**
     * Update user
     * @param user
     */
    void update(@Param("user")User user);

    /**
     * delete user
     * @param id
     * @return
     */
    int delete(@Param("id")int id);
}
At this time, you may see that an @ repository annotation is added to the UserMapper class. What is this annotation for? @ repository needs to configure the scanning package address in Spring, and then generate the bean of dao layer, which is injected into ServiceImpl. If the mapper class is not referenced in the implementation class to call the processing of dao layer, it is marked with a red line when using @ Autowired annotation, Bean not found.
After adding this, we also need to annotate the startup class and add the mapper package address, so that we can use the mapper interface normally.
You can also use @ mapper. You don't need to configure the scanning address on the springboot startup class. Instead, you use the namespace attribute in mapper.xml to correspond to the relevant mapper class. spring will dynamically generate beans and inject them into ServiceImpl.
5. Writing database xml
We create a new UserMapper.xml file in the mapper folder under the resources file, where we put our operations on the database and some SQL statements.
At this time, because @ Repository injection is used in UserMapper class, we need to add a package scanning annotation on the startup class to scan the interface class of mapper package.

Full code of startup class:
package com.blog.personalblog;

import org.mybatis.spring.annotation.MapperScan;
import org.springframework.boot.SpringApplication;
import org.springframework.boot.autoconfigure.SpringBootApplication;

@SpringBootApplication
@MapperScan("com.blog.personalblog.mapper")
public class PersonalBlogApplication {

    public static void main(String[] args) {
        SpringApplication.run(PersonalBlogApplication.class, args);
    }

}
Let's start writing the xml file.
I won't say why I want to write like this one by one. The official documents describe it in detail.
Mybatis document: https://mybatis.org/mybatis-3/sqlmap-xml.html#select
Then start writing sql statements. Note that the id on the sql statement should be consistent with the method name in mapper.
UserMapper.xml complete code:
<?xml version="1.0" encoding="UTF-8" ?>
<!DOCTYPE mapper
PUBLIC "-//mybatis.org//DTD Mapper 3.0//EN"
"http://mybatis.org/dtd/mybatis-3-mapper.dtd">
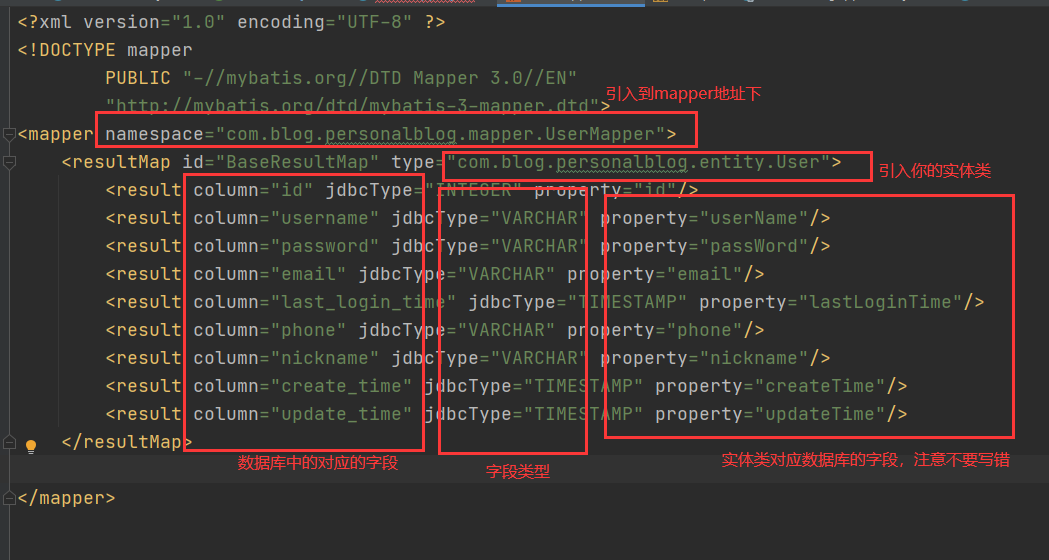
<mapper namespace="com.blog.personalblog.mapper.UserMapper">
<resultMap id="BaseResultMap" type="com.blog.personalblog.entity.User">
<result column="id" jdbcType="INTEGER" property="id"/>
<result column="username" jdbcType="VARCHAR" property="userName"/>
<result column="password" jdbcType="VARCHAR" property="passWord"/>
<result column="email" jdbcType="VARCHAR" property="email"/>
<result column="last_login_time" jdbcType="TIMESTAMP" property="lastLoginTime"/>
<result column="phone" jdbcType="VARCHAR" property="phone"/>
<result column="nickname" jdbcType="VARCHAR" property="nickname"/>
<result column="create_time" jdbcType="TIMESTAMP" property="createTime"/>
<result column="update_time" jdbcType="TIMESTAMP" property="updateTime"/>
</resultMap>
<select id="findAll" resultMap="BaseResultMap">
select * from person_user;
</select>
<insert id="insert" parameterType="com.blog.personalblog.entity.User" useGeneratedKeys="true" keyProperty="id">
INSERT INTO person_user (username, password, email, last_login_time, phone, nickname, create_time, update_time)
VALUES(#{userName}, #{passWord}, #{email}, #{lastLoginTime}, #{phone}, #{nickname}, #{createTime}, #{updateTime})
</insert>
<update id="update" parameterType="com.blog.personalblog.entity.User">
update person_user
<set>
username = #{userName},
password = #{passWord},
email = #{email},
last_login_time = #{lastLoginTime},
phone = #{phone},
nickname = #{nickname}
</set>
WHERE id = #{id}
</update>
<delete id="delete" parameterType="java.lang.Integer">
delete from person_user where id = #{id, jdbcType=INTEGER}
</delete>
</mapper>
The database interface has been basically completed. Next, the function of the method implementing the class has not been written. Next, return to the UserServiceImpl.java class. First, we need to introduce the Mapper interface class.
@Autowired annotation, which can label class member variables, methods and constructors to complete automatic assembly.
    @Autowired
    UserMapper userMapper;
Next, we use usermapper to call the function interface in usermapper.
package com.blog.personalblog.service.Impl;

import com.blog.personalblog.entity.User;
import com.blog.personalblog.mapper.UserMapper;
import com.blog.personalblog.service.UserService;
import org.springframework.beans.factory.annotation.Autowired;
import org.springframework.stereotype.Service;

import java.util.List;

/**
 * Business implementation layer
 *
 * @author: SuperMan
 * Welcome to my official account: code words.
 * @create: 2021-11-03
 *
 */

@Service
public class UserServiceImpl implements UserService {

    @Autowired
    UserMapper userMapper;

    @Override
    public List<User> findAll() {
        List<User> userList = userMapper.findAll();
        return userList;
    }

    @Override
    public void createUser(User user) {
        userMapper.insert(user);
    }

    @Override
    public void updateUser(User user) {
        userMapper.update(user);
    }

    @Override
    public void deleteUser(int id) {
        userMapper.delete(id);
    }
}
At this time, all the basic business functions have been completed, but how can the data we find be exposed? As mentioned earlier, our project is a front-end and back-end separate project, that is, our back-end services and front-end and back-end management pages are deployed separately, so we need to call them through interfaces. Each interface represents the realization of some functions, So let's start coding the Controller layer.
6. Write interface layer
Before writing the Controller class, we need to do one more thing, that is, we need to encapsulate a return class to be used as the type of data we return, and set the return format uniformly to facilitate the front-end call. I define a return class here. In the future, all interfaces will use this return class to return data and return error information for front-end reference.
Create a new JsonResult.java class in the util package we built, and put the unified return format in it. The returned three parameters are return data, error code and error information.
JsonResult.java complete code:
package com.blog.personalblog.util;

import java.io.Serializable;

/**
 * @author: SuperMan
 * Welcome to my official account: code words.
 * @create: 2021-11-06
 */
public class JsonResult<T> implements Serializable {
    private static final long serialVersionUID = 1L;
    /**
     * success
     */
    public static final int SUCCESS = 200;
    /**
     * fail
     */
    public static final int error = 500;
    private int code;
    private String msg;
    private T data;

    public static <T> JsonResult<T> success() {
        return jsonResult(null, SUCCESS, "Operation succeeded");
    }

    public static <T> JsonResult<T> success(T data) {
        return jsonResult(data, SUCCESS, "Operation succeeded");
    }


    public static <T> JsonResult<T> error() {
        return jsonResult(null, error, "operation failed");
    }

    public static <T> JsonResult<T> error(String msg) {
        return jsonResult(null, error, msg);
    }

    public static <T> JsonResult<T> error(T data) {
        return jsonResult(data, error, "operation failed");
    }

    private static <T> JsonResult<T> jsonResult(T data, int code, String msg) {
        JsonResult<T> result = new JsonResult<>();
        result.setCode(code);
        result.setData(data);
        result.setMsg(msg);
        return result;
    }

    public int getCode() {
        return code;
    }

    public void setCode(int code) {
        this.code = code;
    }

    public String getMsg() {
        return msg;
    }

    public void setMsg(String msg) {
        this.msg = msg;
    }

    public T getData() {
        return data;
    }

    public void setData(T data) {
        this.data = data;
    }
}
Then create a new UserController.java class in the controller package, and then introduce our Userservice class to call the business interface.
UserController.java complete code:
package com.blog.personalblog.controller;

import com.blog.personalblog.util.JsonResult;
import com.blog.personalblog.entity.User;
import com.blog.personalblog.service.UserService;
import org.springframework.beans.factory.annotation.Autowired;
import org.springframework.web.bind.annotation.*;

import javax.validation.Valid;
import java.util.List;

/**
 * @author: SuperMan
 * Welcome to my official account: code words.
 * @create: 2021-11-03
 */
@RestController
@RequestMapping("/user")
public class UserController {

    @Autowired
    UserService userService;

    /**
     * User list
     * @return
     */
    @PostMapping("/list")
    public JsonResult<Object> list() {
        List<User> userList = userService.findAll();
        return JsonResult.success(userList);
    }

    /**
     * Add user
     * @return
     */
    @PostMapping("/create")
    public JsonResult<Object> userCreate(@RequestBody @Valid User user) {
        userService.createUser(user);
        return JsonResult.success();
    }

    /**
     *
     * Modify user
     * @return
     */
    @PostMapping("/update")
    public JsonResult<Object> userUpdate(@RequestBody @Valid User user) {
        userService.updateUser(user);
        return JsonResult.success();
    }

    /**
     * delete
     * @return
     */
    @PostMapping("/delete/{id}")
    public JsonResult<Object> userDelete(@PathVariable(value = "id") int id) {
        userService.deleteUser(id);
        return JsonResult.success();
    }

}
We have used a lot of annotations in the above code. I have written a lot in the previous annotation article. Here I will introduce these two annotations.
● @ RequestBody: it is mainly used to receive the data in the json string passed from the front end to the back end (the data in the request body)
● @ Valid: it is used to verify whether the annotation meets the requirements. It is directly added before the variable user, and the requirement of adding verification information to the variable. When it does not meet the requirements, the error message of message will be returned in the method.
When we annotate with @ Valid, we need to add dependencies. As shown below, add dependencies to pom.xml.
 <dependency>
      <groupId>javax.validation</groupId>
      <artifactId>validation-api</artifactId>
      <version>2.0.1.Final</version>
 </dependency>
Well, the basic functions of the user center have been realized, but there is still a lot of work to be done. The writing is finished. Now can we operate the data through the interface, encrypt and store the user password, etc. later, we are slowly improving the interface. This space is a little long. We will test the interface later. Well, I've been busy recently and the update is slow. Let's understand more.
Previous: Spring Boot + Vue + mobile terminal project development practical tutorial (VII. Creating database tables)
Next: Spring Boot + Vue + mobile terminal project development practical tutorial (IX. Postman test interface and integration Swagger interface documents)