x,y parameters of place method
place() layout positioning method allows programmers to accurately specify the location and size of components. At first glance, it seems good, but in practice, it is not easy. We can accurately know the coordinates of other positions except x = 0 and y = 0 in the upper left corner of the screen. As for the component size, it is also difficult to control in pixels. If the components to be operated on the interface are good, the distance between components is also difficult to control.
In this way, it seems that the plaxe() method is useless. That's not true. If there are few components, the place() method can also be used. I find it very convenient and easy to use this method to locate all components in the middle of the form.
OK, now let's start with the grammar:
Place (parameter 1, parameter 2,...)
Parameters: x,y The horizontal and vertical coordinates of the upper left corner of the component on the interface, in pixels. (again, by default, the X and Y coordinates refer to the position of the upper left corner of the component on the interface)
from tkinter import *
root=Tk()

but1=Button(root,text="Wubi typing pass")
but1.place(x=0,y=0)  #  Line 4 code

root.mainloop()
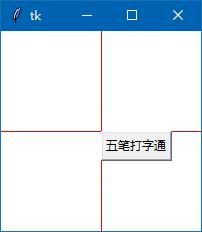
The above code is easy to understand, that is, the upper left corner of button 1 coincides with the coordinates (x=0,y=0) on the interface. The operation results are as follows:

This is a form with the default of 200x200. In order to make you understand my explanation better, I first add a label before the button appears. The figure on the label is a cross horizontal line and vertical line.
By default, the components located after the layout will be on the upper layer of the components located before the layout, so the label created first in the following code is under the button created later.
In the following code, I position the upper left corner of the button to the middle of the form (x=100,y=100).
from tkinter import *
root=Tk()

img1=PhotoImage(file='zb.gif')   #  Cross plot
la1=Label(root,image=img1,bd=0)
la1.place(x=0,y=0)

but1=Button(root,text="Wubi typing pass")
but1.place(x=100,y=100)  #  Line 4 code

root.mainloop()
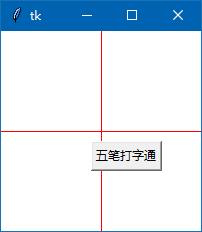
In line 4, I change the coordinates to x = 100 and y = 100, then the upper left corner of the button should be in the middle of the window. The operation results are as follows:
The operation result is that the upper left corner of the button coincides with the coordinates of x = 100 and y = 100
anchor explanation
If we want the middle point of the button to coincide with the center of the form, what should we do? We need to introduce another parameter:
Anchor is translated as "anchor", which determines which point of the component coincides with the coordinate.
By default, the upper left corner of the component coincides with the coordinates, that is, anchor=NW
You can also quote in lowercase, such as anchor = 'nw'
All options: anchor=NW/N/NE/W/CENTER/E/SW/S/SE The anchor point diagram is as follows:
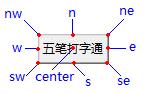
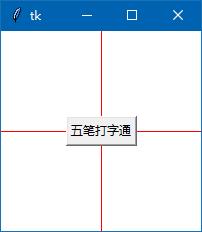
Therefore, we want the middle point of the button to coincide with the center of the form. As long as you add the parameter anchor = 'center', the component anchor, that is, the center of the button, will coincide with the coordinates. The code is as follows:
from tkinter import *
root=Tk()

img1=PhotoImage(file='zb.gif')
la1=Label(root,image=img1,bd=0)
la1.place(x=0,y=0)

but1=Button(root,text="Wubi typing pass")
but1.place(x=100,y=100,anchor='center')  #  Line 4 code

root.mainloop()
The operation is as follows:
Test other anchor points by yourself.
This article comes from wb98.com This site has tkinter's system tutorial.
relx/rely parameter of place method
relx/rely is also a coordinate value, but a relative coordinate is the coordinate relative to the parent component. The value range is 0-1, such as:
Coordinates in the upper left corner of the form interface: relx=0,rely=0
Coordinates in the upper right corner of the form interface: relx=1,rely=1
Positive and middle coordinates of form interface: relx=0.5,rely=0.5
Coordinates in the lower left corner of the form interface: relx=0,rely=1
Coordinates in the lower right corner of the form interface: relx=1,rely=1
... in fact, special positions are easy to calculate, but other positions are not easy to calculate.
With the relative coordinate parameter, the anchor point is center, and the code for positioning the component on the window should be written as follows:
but1.place(relx=0.5,rely=0.5,anchor='center') # Line 4 code
This is equivalent to the following code:
but1.place(x=100,y=100,anchor='center') # Line 4 code
However, the relative coordinates are more convenient. You can also point to the center of the form without knowing the actual height and width of the form.
width/height and relwidth/relheight parameters of the place method
Let's talk about the parameters of width and height and the parameters of relative width and height:
Width refers to the width of the component in pixels.
Height is the height of the component in pixels.
relwidth refers to the width of the component relative to the parent component. The value range is 0-1
If it is as wide as the parent component, take 1, if it is only half as wide, take 0.5, and so on
Height refers to the height of the component relative to the parent component. The value range is 0-1
If it is as high as the parent component, take 1, if it is only half as wide, take 0.5, and so on
In fact, the above concepts are easy to understand, but it is really difficult to control the operation. I have to repeatedly test the possible values of these two groups of parameters in order to make the components stay in the right position with the right size.
relx/rely And x/y Can be used together
If the two pairs of parameters are used together, the system will take the relx/rely value first. After locating the component position, take this position as the starting point, and then adjust to the new position according to the x/y value. x/y can take a negative value.
but1.place(relx=0.5,rely=0.5,x=25,y=25,anchor='center') # Line 4 code
The above code first locates the component to the center of the form according to relx = 0.5 and rely = 0.5, then moves the component to the right by 25 pixels according to x=25, and then moves the component down by 25 pixels according to y=25. The operation results are as follows:
Make the components of the form as a whole and display them in the center
I think the most practical use of place() is to position the components on the form as a whole in the middle of the form.
Remember? In the previous article, I used pack() and grid() as the login form. The code of grid() method is as follows:
from tkinter import *
root=Tk()
root.title('Sign in')

la1=Label(root,text='user name:')
la1.grid(row=0,column=0,padx=(10,0),pady=10) #  0 rows 0 columns

en1=Entry(root)  #  User name text box
en1.grid(row=0,column=1,columnspan=2,padx=(0,10),ipadx=60) #  0 rows, 1 columns, spanning 2 columns

la2=Label(root,text='dense Code:')
la2.grid(row=1,column=0,padx=(10,0))

en2=Entry(root)  #  Password text box
en2.grid(row=1,column=1,columnspan=2,padx=(0,10),ipadx=60) #  1 row and 1 column, spanning 2 columns

but1=Button(root,text="determine")
but1.grid(row=2,column=1,padx=(30,0),pady=10,ipadx=30)
but2=Button(root,text="cancel")
but2.grid(row=2,column=2,padx=(0,30),ipadx=30)

root.resizable(False,False)
root.mainloop()
In order to limit the user to adjust the size of the form, we can use the root.resizable(False,False) code to make the form unable to change the size.
However, if the size restriction on this form is removed, when the form is resized, too much white space will be left on the right side of the form, which is not good-looking, as shown in the following figure:
If you want the six components on the form as a whole to always be in the center of the form, what should you do? I can do it now with the just learned knowledge of place().
one Remove the penultimate line first root.resizable(False,False) code
two Add a code to create the frame under the root.title('login '). The frame uses the anchor point anchor =' center 'with relx/rely=0.5 to keep it always in the center of the form
fr1=Frame(root,relief='ridge',borderwidth=1)  #  The edge line width cannot be displayed without setting
fr1.place(relx=0.5,rely=0.5,anchor='center')
three Then, change the following code, the parent component of the six components from root to fr1. In this way, these six components are added to fr1. As a whole, no matter how the size of the form changes, they are always in the center of the form. All codes are as follows:
from tkinter import *
root=Tk()
root.title('Sign in')

fr1=Frame(root,relief='ridge',borderwidth=1) #  The edge line width cannot be displayed without setting
fr1.place(relx=0.5,rely=0.5,anchor='center')

la1=Label(fr1,text='user name:')
la1.grid(row=0,column=0,padx=(10,0),pady=10) #  0 rows 0 columns

en1=Entry(fr1)  #  User name text box
en1.grid(row=0,column=1,columnspan=2,padx=(0,10),ipadx=60) #  0 rows, 1 columns, spanning 2 columns

la2=Label(fr1,text='dense Code:')
la2.grid(row=1,column=0,padx=(10,0))

en2=Entry(fr1)  #  Password text box
en2.grid(row=1,column=1,columnspan=2,padx=(0,10),ipadx=60) #  1 row and 1 column, spanning 2 columns

but1=Button(fr1,text="determine")
but1.grid(row=2,column=1,padx=(30,0),pady=10,ipadx=30)
but2=Button(fr1,text="cancel")
but2.grid(row=2,column=2,padx=(0,30),ipadx=30)

root.mainloop()
After running, we found a small problem. The default size of the form is always 200x200, which is easy to solve. We set the size of the form to be larger than the frame, and let the form start in the middle of the screen. Add code under root.title('login ').
a,b=400,150
c=(root.winfo_screenwidth()-a)/2
d=(root.winfo_screenheight()-b)/2
root.geometry('%dx%d+%d+%d' % (a,b,c,d))
The added code is explained in the previous article on form properties. Have you forgotten?
After joining, the problem that the form is too small in the startup program is solved, but a problem is also found that the form can be adjusted to be smaller than the size of the frame, which is not very good-looking. We add code to limit the minimum size of the form. Add code:
root.minsize(400,150)
In this way, the form can no longer be resized to a smaller size than the frame.
All codes are modified as follows:
from tkinter import *
root=Tk() # Source code from wb98.com
root.title('Sign in')
a,b=400,150
c=(root.winfo_screenwidth()-a)/2
d=(root.winfo_screenheight()-b)/2
root.geometry('%dx%d+%d+%d' % (a,b,c,d))
root.minsize(400,150)
fr1=Frame(root,relief='ridge',borderwidth=1) # The edge line width cannot be displayed without setting
fr1.place(relx=0.5,rely=0.5,anchor='center')
la1=Label(fr1,text='user name:')
la1.grid(row=0,column=0,padx=(10,0),pady=10) # 0 rows 0 columns
en1=Entry(fr1) # User name text box
en1.grid(row=0,column=1,columnspan=2,padx=(0,10),ipadx=60) # 0 rows, 1 columns, spanning 2 columns
la2=Label(fr1,text='dense Code:')
la2.grid(row=1,column=0,padx=(10,0))
en2=Entry(fr1) # Password text box
en2.grid(row=1,column=1,columnspan=2,padx=(0,10),ipadx=60) # 1 row and 1 column, spanning 2 columns
but1=Button(fr1,text="determine")
but1.grid(row=2,column=1,padx=(30,0),pady=10,ipadx=30)
but2=Button(fr1,text="cancel")
but2.grid(row=2,column=2,padx=(0,30),ipadx=30)
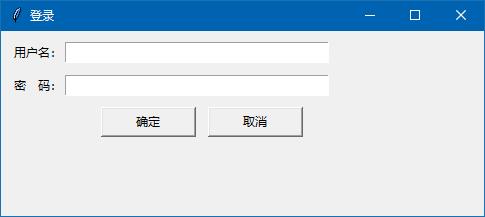
root.mainloop()As a result, no matter how the form is resized, the components on the form are always in the middle of the form.
I think the most practical use of the place() method is to make all the components of the form as a whole always live in the center of the form. You can write it down, or you can collect this article for a rainy day.
In the next article, we will explain the "about" window code of a notepad written in my own learning process. I think only by using my own knowledge and writing some small, practical and useful codes, can I consolidate my learning knowledge.
This article is from: wb98.com http://www.wb98.com The website also has a series of related course articles. Those interested can go to.