catalogue
1, Redis master-slave replication
partial resync (incremental replication)
2, Redis master-slave replication configuration
3, Sentinel mechanism principle
Tasks that each Sentinel needs to perform regularly
Automatically discover Sentinel and slave servers
4, Sentinel mechanism configuration
5, Sentry mechanism integration SpringBoot
1, Redis master-slave replication
Master slave replication refers to copying data from one Redis server to other Redis servers. The former is the master node, and the latter is called slave node. Data replication can only be performed from the master node to the slave node. Master slave replication ensures data backup, high availability (combined with sentinel mechanism) and load balancing (separate reading and writing to share the pressure of the master).
There are two methods for Redis master-slave data synchronization: (full resync) full replication and partial resync
full resync
Redis performs full replication through psync command as follows:
- If the slave node judges that partial replication cannot be performed, it sends a full replication request to the master node; or if the slave node sends a partial replication request, but the master node judges that partial replication cannot be performed, it performs full replication.
- After receiving the full copy command, the master node executes bgsave, generates RDB files in the background, and uses a buffer (called copy buffer) to record all write commands executed from now on
- After the bgsave execution of the master node is completed, the RDB file is sent to the slave node. The slave node first clears its old data, then loads the received RDB file, and updates the database status to the database status when the master node executes bgsave
- The master node sends all write commands in the above replication buffer to the slave node, and the slave node executes these write commands to update the database state to the latest state of the master node
- If AOF is enabled on the slave node, the execution of bgrewrite AOF will be triggered to ensure that the AOF file is updated to the latest state of the master node
partial resync (incremental replication)
The master-slave server is disconnected due to network reasons. After the master-slave server is reconnected, it does not need full replication, but only incremental replication. Because the master-slave server will maintain an offset. After the connection is restored, compare the offset between the two to synchronize different data.
In the command propagation phase, in addition to sending write commands to slave nodes, the master node also sends a copy to the backlog buffer as a backup of write commands. In addition to storing write commands, the backlog buffer also stores the copy offset (offset) corresponding to each byte. Due to the fixed length of the copy backlog buffer and first in first out (queue) Therefore, it saves the most recent write command executed by the master node; earlier write commands will be squeezed out of the buffer.
Because the length of the buffer is fixed and limited, the write commands that can be backed up are also limited. When the offset gap between the master and slave nodes is too large and exceeds the length of the buffer, partial replication cannot be performed and full replication can only be performed. Conversely, in order to improve the probability of partial replication in case of network interruption, the size of the replication backlog buffer can be increased as needed (by configuring repl backlog size 1m, the default is 1M);
- If the data after the offset is still in the copy backlog buffer, partial copy is performed;
- If the data after the offset is no longer in the copy backlog buffer (the data has been extruded), a full copy is performed.
Each Redis node (regardless of master and slave) will automatically generate a random ID (different for each startup), which is composed of 40 random hexadecimal characters; runid is used to uniquely identify a Redis node. You can view the runid of the node through the info Server command.
When the master-slave node replicates for the first time, the master node sends its own runid to the slave node, and the slave node saves the runid; when the line is disconnected and reconnected, the slave node sends the runid to the master node; the master node judges whether partial replication can be carried out according to the runid:
- If the runid saved by the slave node is the same as the current runid of the master node, it means that the master and slave nodes have been synchronized before, and the master node will continue to try to use partial replication (whether partial replication can be achieved depends on offset and replication backlog buffer);
- If the runid saved by the slave node is different from the current runid of the master node, it means that the Redis node synchronized by the slave node before disconnection is not the current master node and can only be copied in full.
2, Redis master-slave replication configuration
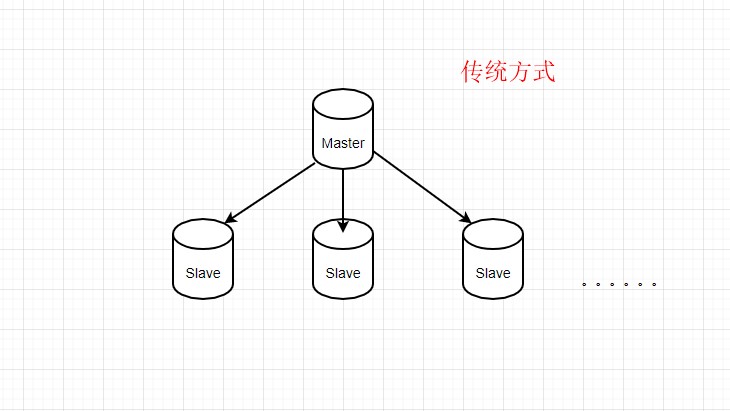
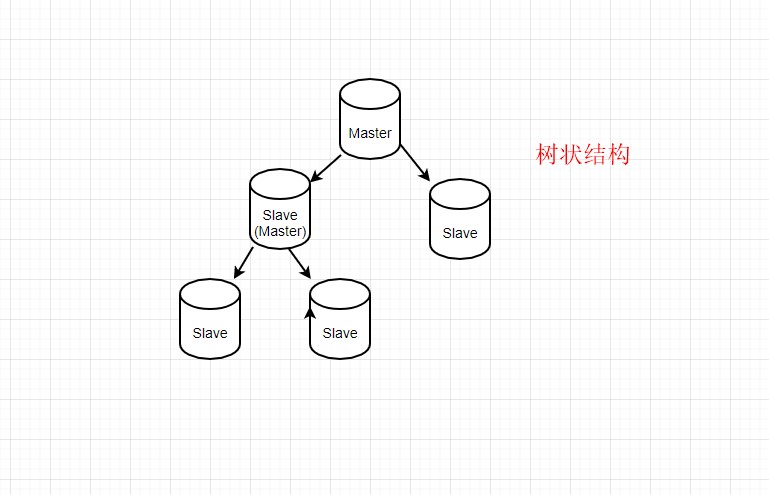
There are two configuration methods, which are not recommended. If there are too many slave servers, the data synchronization efficiency is very poor
Adopt tree structure
Set up Redis: https://blog.csdn.net/weixin_39555954/article/details/120071559
Configure master-slave replication
Since I am simulating on a virtual machine, the port number to be modified is 637963806381
Modify pidfile /var/run/redis_6379.pid, pidfile /var/run/redis_6380.pid, pidfile /var/run/redis_6381.pid of the response
Add a point to the master node in the 6380 configuration file
slaveof 192.168.139.154 6379
#password
masterauth xiaojie
Modify the configuration file on 6381 as follows
slaveof 192.168.139.154 6380
masterauth xiaojie
Start redis instance
#Since it is the same virtual machine, you need to specify the port when starting, otherwise it is 6379 by default
[root@bogon bin]# ./redis-cli -p 6379
[root@bogon bin]# ./redis-cli -p 6380
[root@bogon bin]# ./redis-cli -p 6381
Input instruction
127.0.0.1:6379> info replication
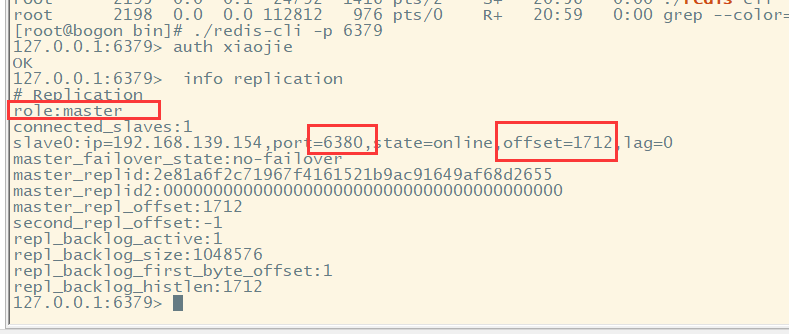
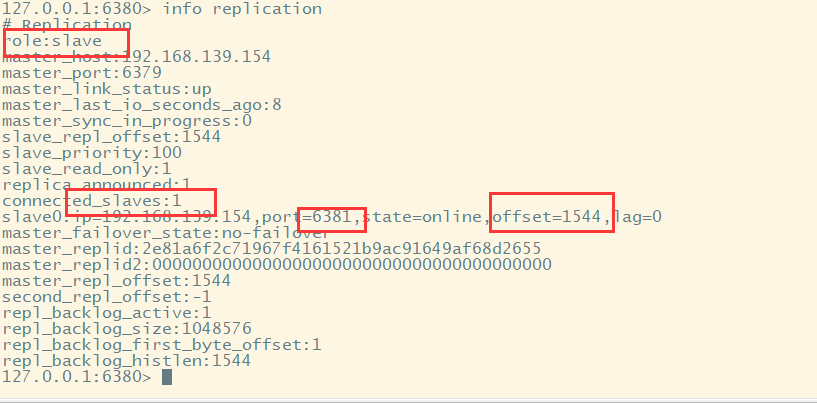
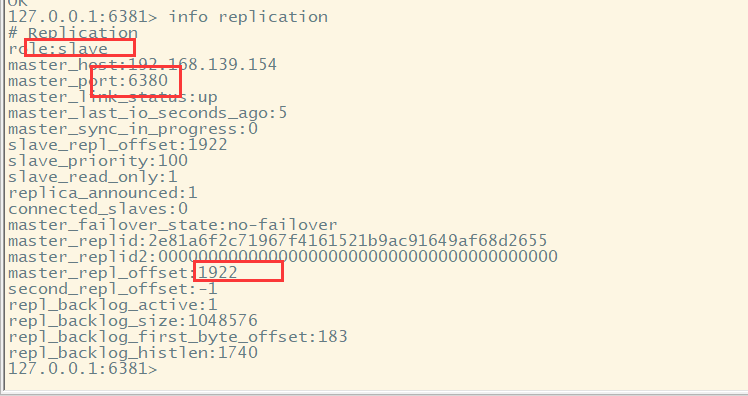
At this time, the master-slave replication of Redis has been set up. Data is written in 6379, and the other two nodes can synchronize data. After version 2.6, the slave node can only read but not write by default. Replica read only yes can be configured At this time, if the slave node cannot write after the master node goes down, and then the service cannot be used, the sentinel mechanism is introduced.
3, Sentinel mechanism principle
The Sentinel system of Redis is used to manage multiple Redis servers (instance s). The system performs the following three tasks:
- Monitoring: Sentinel will constantly check whether your master server and slave server are working normally.
- Notification: when a monitored Redis server has a problem, Sentinel can send a notification to the administrator or other applications through the API.
- Automatic failover : when a master server fails to work normally, Sentinel will start an automatic failover operation. It will upgrade one of the failed master servers from the server to a new master server, and change other slave servers of the failed master server to copy the new master server. When the client tries to connect to the failed master server, the cluster will also return to the client The address of the new master server, so that the cluster can use the new master server instead of the failed server.
Redis Sentinel is a distributed system. You can run multiple Sentinel processes (progress) in one architecture. These processes use gossip protocols to receive information about whether the master server is offline, and use agreement protocols To decide whether to perform automatic failover and which slave server to choose as the new master server.
Tasks that each Sentinel needs to perform regularly
- Each Sentinel sends a PING command once per second to the master server, slave server and other Sentinel instances it knows.
- If the time of an instance from the last valid reply to the PING command exceeds the value specified by the down after milliseconds option, the instance will be marked as subjectively down (SDOWN) by Sentinel. A valid reply can be: + PONG, - LOADING or - MASTERDOWN.
- If a master server is marked as subjective offline, all sentinels monitoring the master server should confirm that the master server has indeed entered the subjective offline state once per second.
- If a master server is marked as subjectively offline and a sufficient number of sentinels (at least up to the number specified in the configuration file) agree with this judgment within the specified time range, the master server is marked as objectively down (odown for short).
- In general, each Sentinel will send INFO commands to all its known master servers and slave servers every 10 seconds. When a master server is marked as offline objectively by Sentinel, the frequency of Sentinel sending INFO commands to all slave servers of the offline master server will be changed from once in 10 seconds to once per second.
- When not enough sentinel agree that the primary server has been offline, the objective offline status of the primary server will be removed. When the primary server returns a valid reply to Sentinel's PING command again, the subjective offline status of the primary server will be removed.
Automatically discover Sentinel and slave servers
A Sentinel can be connected with multiple other sentinels. Each Sentinel can check each other's availability and exchange information.
You do not need to set the addresses of other sentinels separately for each sentinel running, because sentinel can automatically discover other sentinels monitoring the same master server through the publish and subscribe function. This function is through the channel sentinel:hello sends information.
Similarly, you do not have to manually list all slave servers under the master server, because Sentinel can obtain the information of all slave servers by asking the master server (info).
- Each sentinel will publish and subscribe to all master and slave servers monitored by it once every two seconds Sentinel: the Hello channel sends a message containing Sentinel's IP address, port number, and runid.
- Each sentinel subscribes to all the master and slave servers it monitors sentinel:hello channel to find sentinel (looking for unknown sentinels) that has not appeared before. When a sentinel finds a new sentinel, it will add the new sentinel to a list, which saves all other sentinel known to sentinel and monitors the same master server.
- The information sent by Sentinel also includes the complete current configuration of the primary server. If one Sentinel contains an older configuration of the primary server than that sent by another Sentinel, the Sentinel will be upgraded to the new configuration immediately.
- Before adding a new Sentinel to the list of monitoring primary servers, Sentinel will check whether the list already contains the same running ID or the same address (including IP address and port number) as the Sentinel to be added If yes, Sentinel will first remove those Sentinel (self published messages) with the same running ID or address in the list, and then add a new Sentinel.
Sentinel select master rule
- Among the slave servers under the failed master server, those marked as subjective offline, disconnected, or last reply PING Slave servers with command time greater than five seconds will be eliminated.
- Among the slave servers under the failed master server, those slave servers that are disconnected from the failed master server for more than ten times the time specified in the down after option will be eliminated.
- Among the remaining slave servers after the above two rounds of elimination, we select the slave server with the largest replication offset as the new master server; if the replication offset is not available or the replication offset of the slave server is the same, the slave server with the smallest runid becomes the new master server.
4, Sentinel mechanism configuration
Copy the sentinel.conf file in the redis decompression file to the bin of the installation directory
[root@bogon bin]# cp /usr/local/redis-6.2.5/sentinel.conf /usr/local/redis6379/bin/
[root@bogon bin]# cp /usr/local/redis-6.2.5/sentinel.conf /usr/local/redis6380/bin/
[root@bogon bin]# cp /usr/local/redis-6.2.5/sentinel.conf /usr/local/redis6381/bin/
[root@bogon bin]#
Modify sentinel.conf
#Background start
daemonize yes
#Modify port
port 26379-26381
#Specify pid
 pidfile /var/run/redis-sentinel-6379.pid
#Specifies that the number of primary nodes 2 listening is the number that at least 2 sentinels consider to be down
sentinel monitor mymaster 192.168.139.154 6379 2
#Specify the master node password
sentinel auth-pass mymaster xiaojie
#Specify the guard's password
requirepass xiaojie
#Open this comment
protected-mode no
Start the sentry
./redis-sentinel sentinel.conf
Then manually shut down the 6379 service node.
Start node 6379 and check info replication
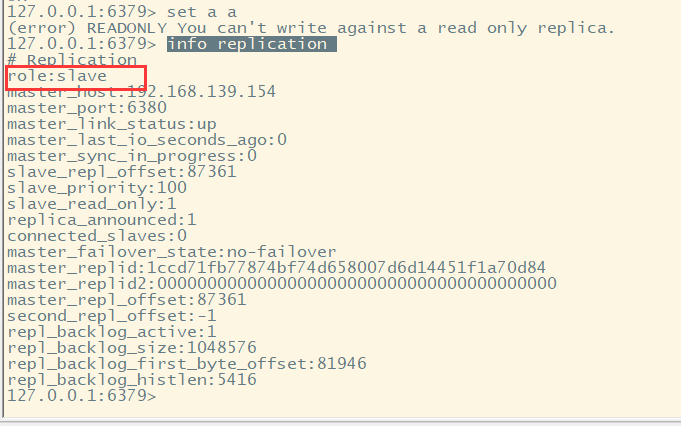
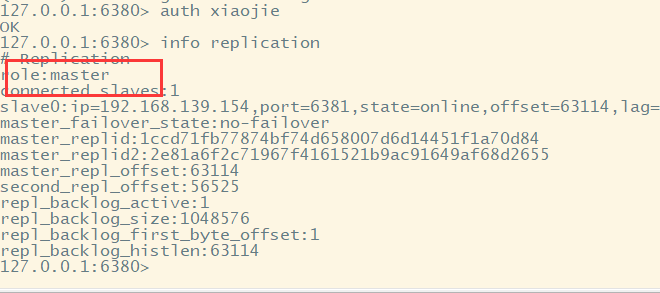
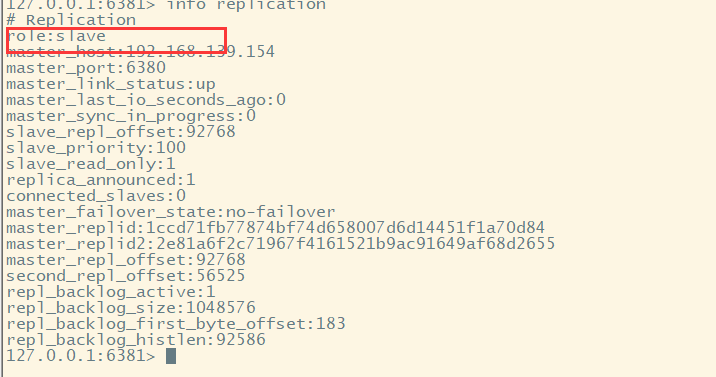 At this time, node 6380 is elected as the master, and the original master of node 6379 becomes the slave.
5, Sentry mechanism integration SpringBoot
Talent, no! Code

pom file
<?xml version="1.0" encoding="UTF-8"?>
<project xmlns="http://maven.apache.org/POM/4.0.0"
         xmlns:xsi="http://www.w3.org/2001/XMLSchema-instance"
         xsi:schemaLocation="http://maven.apache.org/POM/4.0.0 http://maven.apache.org/xsd/maven-4.0.0.xsd">
    <modelVersion>4.0.0</modelVersion>

    <groupId>com.xiaojie</groupId>
    <artifactId>springboot-redis</artifactId>
    <version>1.0-SNAPSHOT</version>

    <properties>
        <maven.compiler.source>8</maven.compiler.source>
        <maven.compiler.target>8</maven.compiler.target>
    </properties>
    <parent>
        <artifactId>spring-boot-starter-parent</artifactId>
        <groupId>org.springframework.boot</groupId>
        <version>2.4.2</version>
        <relativePath/>
    </parent>
    <dependencies>
        <dependency>
            <groupId>org.springframework.boot</groupId>
            <artifactId>spring-boot-starter-data-redis-reactive</artifactId>
        </dependency>
        <dependency>
            <groupId>org.springframework.boot</groupId>
            <artifactId>spring-boot-starter-web</artifactId>
        </dependency>
        <dependency>
            <groupId>org.mybatis.spring.boot</groupId>
            <artifactId>mybatis-spring-boot-starter</artifactId>
            <version>2.1.4</version>
        </dependency>
        <dependency>
            <groupId>mysql</groupId>
            <artifactId>mysql-connector-java</artifactId>
        </dependency>
        <dependency>
            <groupId>com.alibaba</groupId>
            <artifactId>druid</artifactId>
            <version>1.1.12</version>
        </dependency>
<!--serialize-->
        <dependency>
            <groupId>com.alibaba</groupId>
            <artifactId>fastjson</artifactId>
            <version>1.2.47</version>
        </dependency>
        <dependency>
            <groupId>com.fasterxml.jackson.core</groupId>
            <artifactId>jackson-databind</artifactId>
            <version>2.10.4</version>
        </dependency>
        <!--redis-->
        <dependency>
            <groupId>org.springframework.boot</groupId>
            <artifactId>spring-boot-starter-data-redis</artifactId>
        </dependency>
        <dependency>
            <groupId>org.springframework.boot</groupId>
            <artifactId>spring-boot-configuration-processor</artifactId>
            <version>2.2.7.RELEASE</version>
        </dependency>
        <!--lombok-->
        <!-- https://mvnrepository.com/artifact/org.projectlombok/lombok -->
        <dependency>
            <groupId>org.projectlombok</groupId>
            <artifactId>lombok</artifactId>
            <version>1.18.20</version>
            <scope>provided</scope>
        </dependency>
    </dependencies>

</project>
configuration file
spring:
  jackson:
    time-zone: GMT+8
    date-format: yyyy-MM-dd HH:mm:ss
  datasource:
    name: iot-home
    url: jdbc:mysql://127.0.0.1:3306/my_test?useUnicode=true&characterEncoding=UTF-8&rewriteBatchedStatements=true&allowMultiQueries=true&serverTimezone=Asia/Shanghai
    username: root
    password: root
    type: com.alibaba.druid.pool.DruidDataSource
    driver-class-name: com.mysql.cj.jdbc.Driver
  redis:
    password: xiaojie #This password must be added before you can connect to the redis server. If no password is configured, it is not required
    connect-timeout: 5000
    database: 0
    sentinel:
      master: mymaster
      nodes: 192.168.6.137:26379,192.168.6.137:26380,192.168.6.137:26381
      password: xiaojie #This password is the password of sentinel. If requirepass is not configured in sentinel.conf, it is not required
Core code
package com.xiaojie.config;

import com.fasterxml.jackson.annotation.JsonAutoDetect;
import com.fasterxml.jackson.annotation.JsonTypeInfo;
import com.fasterxml.jackson.annotation.PropertyAccessor;
import com.fasterxml.jackson.databind.ObjectMapper;
import com.fasterxml.jackson.databind.jsontype.impl.LaissezFaireSubTypeValidator;
import org.springframework.context.annotation.Bean;
import org.springframework.context.annotation.Configuration;
import org.springframework.data.redis.connection.RedisConnectionFactory;
import org.springframework.data.redis.core.RedisTemplate;
import org.springframework.data.redis.serializer.Jackson2JsonRedisSerializer;
import org.springframework.data.redis.serializer.StringRedisSerializer;

import java.net.UnknownHostException;

/*
 *
 * @param null
 * @redis to configure
 * @author xiaojie
 * @date 2021/9/8
 * @return
 */
@Configuration
public class RedisConfig {

    @Bean
    public RedisTemplate<String, Object> redisTemplate(RedisConnectionFactory redisConnectionFactory)
            throws UnknownHostException {
        RedisTemplate<String, Object> redisTemplate = new RedisTemplate<>();
        redisTemplate.setConnectionFactory(redisConnectionFactory);
        StringRedisSerializer stringRedisSerializer=new StringRedisSerializer();
        redisTemplate.setKeySerializer(stringRedisSerializer);
        redisTemplate.setHashKeySerializer(stringRedisSerializer);

        Jackson2JsonRedisSerializer jackson2JsonRedisSerializer=new Jackson2JsonRedisSerializer(Object.class);
        ObjectMapper objectMapper=new ObjectMapper();
        objectMapper.setVisibility(PropertyAccessor.ALL, JsonAutoDetect.Visibility.ANY);
        objectMapper.activateDefaultTyping(LaissezFaireSubTypeValidator.instance ,
                ObjectMapper.DefaultTyping.NON_FINAL, JsonTypeInfo.As.PROPERTY);
        jackson2JsonRedisSerializer.setObjectMapper(objectMapper);
        redisTemplate.setValueSerializer(jackson2JsonRedisSerializer);
        redisTemplate.afterPropertiesSet();
        return redisTemplate;
    }
}
   public User getUserByName(String name) {
        JSONObject obj= (JSONObject) redisUtil.get(USERKEY + ":" + name);
        if (null==obj){
            System.out.println("The value is not in the cache,query data base");
            User resultUser = userMapper.selectByName(name);
            if (null!= resultUser) {
                redisUtil.set(USERKEY+":"+resultUser.getName(), JSONObject.toJSON(resultUser),30);
                return resultUser;
            }
        }
        User user = JSONObject.toJavaObject(obj,User.class);
        return user;
    }
Test: stop the master node, then continue to write to the cache, and the setup is completed.
Full code: https://gitee.com/whisperofjune/springboot-redis.git
reference resources: