This series of articles is to explain Python OpenCV image processing knowledge. In the early stage, it mainly explains the introduction of image and the basic usage of OpenCV. In the middle stage, it explains various algorithms of image processing, including image sharpening operator, image enhancement technology and image segmentation. In the later stage, it studies the application of image recognition, image classification and target detection combined with in-depth learning.
In the previous article, Python called OpenCV to realize image smoothing, including five algorithms: mean filter, box filter, Gaussian filter, median filter and bilateral filter. This article will explain image fusion, image addition and subtraction, image logic operation and type conversion in detail. I hope the article is helpful to you. If there are deficiencies, please forgive me~
- 1, Image fusion
- 2, Image addition and subtraction 1. Addition operation 2. Subtraction
- 3, Image logic operation 1. And operation 2. Or operation 3. XOR operation 4. Non operation
- 4, Image type conversion
All source code of this series in github:
- https://github.com/eastmountyxz/ ImageProcessing-Python
1, Image fusion
Image fusion usually refers to the fusion of two or more image information into one image. The fused image contains more information and can be more convenient for people to observe or process by computer. As shown in the figure below, two unclear images are fused to obtain a clearer image.
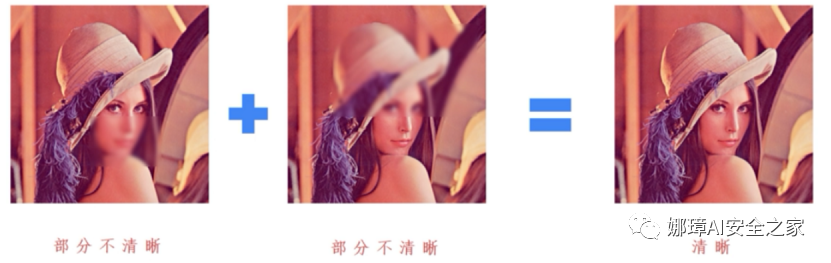
Image fusion adds coefficient and brightness adjustment on the basis of image addition. Its main differences from images are as follows:
- Image addition: target image = image 1 + image 2
- Image fusion: target image = image 1 × Coefficient 1 + image 2 × Factor 2 + brightness adjustment
In OpenCV, image fusion is mainly realized by calling addWeighted() function, and its prototype is as follows. It should be noted that the pixel size of the two fused images must be the same, and the parameter gamma cannot be omitted.
- dst = cv2.addWeighted(scr1, alpha, src2, beta, gamma)
- dst = src1 * alpha + src2 * beta + gamma
The following code is to fuse two images, and the coefficients of both images are 1.
#encoding:utf-8
# By: Eastmount CSDN 2021-01-26
import cv2
import numpy as np
import matplotlib.pyplot as plt

#Read picture
src1 = cv2.imread('lena-hd.png')
src2 = cv2.imread('na.png')

#Image fusion
result = cv2.addWeighted(src1, 1, src2, 1, 0)

#Display image
cv2.imshow("src1", src1)
cv2.imshow("src2", src2)
cv2.imshow("result", result)

#Wait for display
cv2.waitKey(0)
cv2.destroyAllWindows()
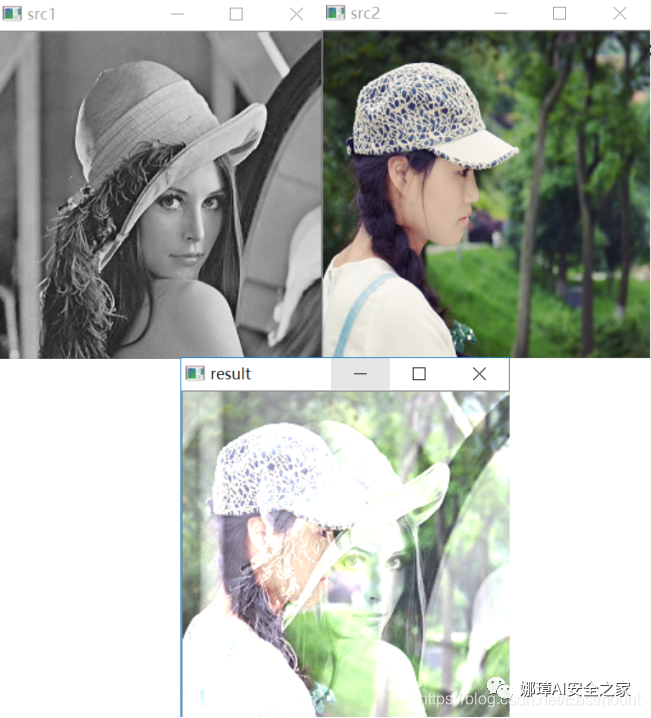
The output result is shown in the figure. It fuses the src1 image and src2 image according to the scale coefficient to generate the target result graph result.
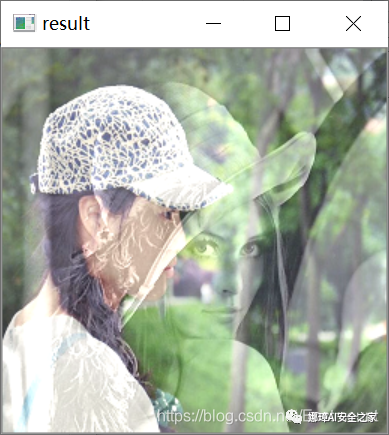
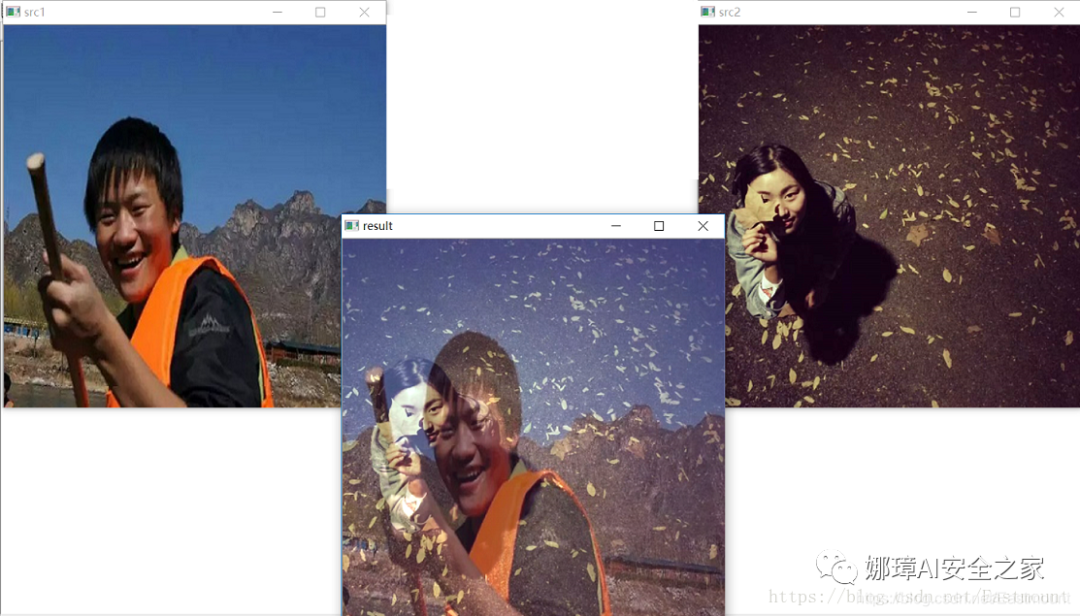
You can also set different fusion ratios. For example, if the function is set to cv2.addWeighted(src1, 0.6, src2, 0.8, 10), the output results are shown in the figure.
If you want to confess, you can try this part of the code.
2, Image addition and subtraction
1. Addition operation
(1) Numpy library addition The operation method is: target image = image 1 + image 2, and the operation result is subjected to modular operation.
- When the pixel value < = 255, the result is "image 1 + image 2", for example: 120 + 48 = 168
- When the pixel value > 255, the result is the result of modulo of 255, for example: (255 + 64)% 255 = 64
(2) OpenCV addition Another method is to directly call OpenCV library to realize image addition operation. The method is as follows:
- Target image = cv2.add (image 1, image 2)
At this time, the result is saturation operation, that is:
- When the pixel value < = 255, the result is "image 1 + image 2", for example: 120 + 48 = 168
- When the pixel value > 255, the result is 255, for example: (255 + 64) = 255
The codes corresponding to the two methods are as follows:
#encoding:utf-8
import cv2
import numpy as np
import matplotlib.pyplot as plt
#Read picture
img = cv2.imread('picture.bmp')
test = img
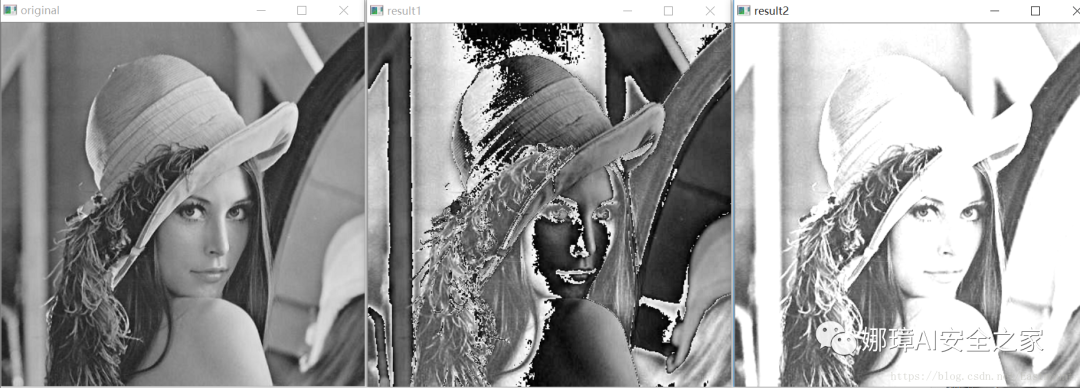
#Method 1: Numpy addition operation
result1 = img + test
#Method 2: OpenCV addition operation
result2 = cv2.add(img, test)
#Display image
cv2.imshow("original", img)
cv2.imshow("result1", result1)
cv2.imshow("result2", result2)
#Wait for display
cv2.waitKey(0)
cv2.destroyAllWindows()
The output results are as follows. result1 is the first method, result2 is the second method, and there are more white dots 255.
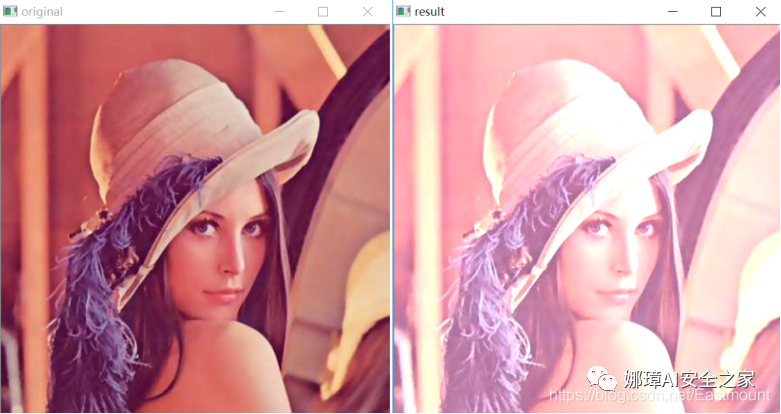
Note: the size and type of images involved in the operation must be consistent. The following is the result of the addition operation on the color image.

The following code implements the image addition operation. Note that if the addition value is greater than 255, the pixel result of the output image is set to 255.
#coding:utf-8
import cv2
import numpy as np

#Read picture
img = cv2.imread("Lena.png")

#Add 100 to each pixel of the image
m = np.ones(img.shape, dtype="uint8")*100

#OpenCV addition
result = cv2.add(img, m)

#Display image
cv2.imshow("original", img)
cv2.imshow("result", result)

#Wait for display
cv2.waitKey(0)
cv2.destroyAllWindows()
The output is as shown in the figure. The left is the original image, and the right is the image after the pixel value is increased by 100 pixels. The output image is more white.
2. Subtraction
The image subtraction operation is mainly realized by calling the subtract() function, and its prototype is as follows:
- dst = subtract(src1, src2[, dst[, mask[, dtype]]]) – src1 represents the pixel matrix of the first image – src2 represents the pixel matrix of the second image
See the following for the implementation code:
#coding:utf-8
# By: Eastmount CSDN 2021-02-24
import cv2
import numpy as np

#Read picture
img = cv2.imread("Lena.png")

#Image pixels minus 50
m = np.ones(img.shape, dtype="uint8")*50

#OpenCV subtraction
result = cv2.subtract(img, m)

#Display image
cv2.imshow("original", img)
cv2.imshow("result", result)

#Wait for display
cv2.waitKey(0)
cv2.destroyAllWindows()
The output is as shown in the figure. The left is the original image, and the right is the image after the pixel value is reduced by 50 pixels. The output image is darker.

3, Image logic operation
1. And operation
And operation is a basic logical operation mode in computer. The symbol is "&", and its operation rules are: 0 & 0 = 0, 0 & 1 = 0, 1 & 0 = 0, 1 & 1 = 1. The and operation of image refers to the binary "and" operation of each pixel value of two images (gray image or color image) to realize image clipping.
- dst = bitwise_and(src1, src2[, dst[, mask]]) – src1 represents the pixel matrix of the first image – src2 represents the pixel matrix of the second image – dst represents the output image, which must have the same size and number of channels as the input image – mask represents an optional operation mask (8-bit single channel array) that specifies the elements of the output array to be changed
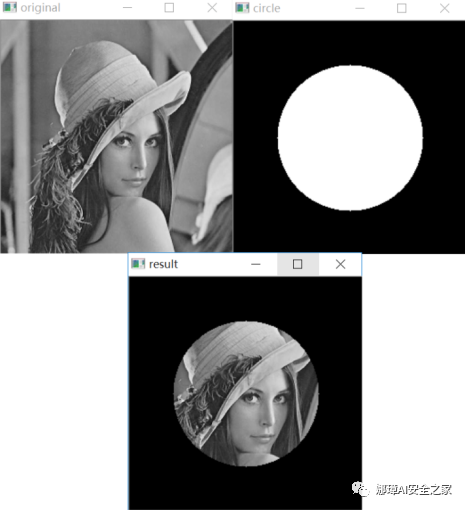
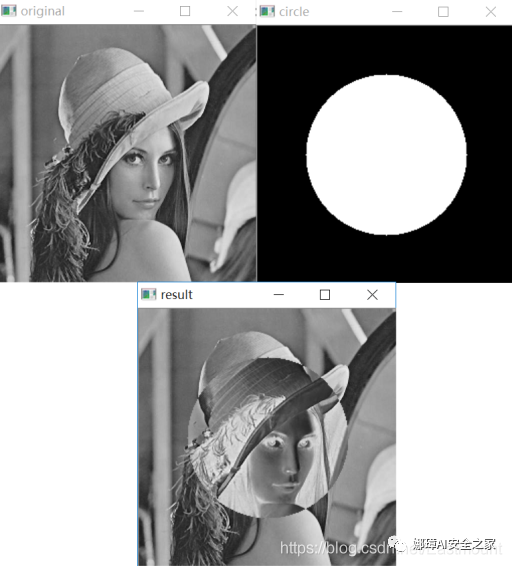
The following code realizes the function of image clipping through image and operation.
#coding:utf-8
# By: Eastmount CSDN 2021-02-24
import cv2
import numpy as np

#Read picture
img = cv2.imread("Lena.png", cv2.IMREAD_GRAYSCALE)

#Get image width and height
rows, cols = img.shape[:2]
print(rows, cols)

#Draw a circle
circle = np.zeros((rows, cols), dtype="uint8")
cv2.circle(circle, (int(rows/2.0), int(cols/2)), 80, 255, -1)
print(circle.shape)
print(img.size, circle.size)

#OpenCV image and operation
result = cv2.bitwise_and(img, circle)

#Display image
cv2.imshow("original", img)
cv2.imshow("circle", circle)
cv2.imshow("result", result)

#Wait for display
cv2.waitKey(0)
cv2.destroyAllWindows()
The output is as shown in the figure. After the and operation between the original image and the circle, its central contour is extracted. At the same time, the shape of the output image is 256 × 256, the image size is 65536 pixels. Note that the size and type of the two images for and operation must be the same.
2. Or operation
Logical or operation means that if one or more operands are true, the logical or operator returns the Boolean value true; The result is false only if all operands are false. The or operation of image refers to the binary "or" operation for each pixel value of two images (gray image or color image) to realize image clipping. Its function prototype is as follows:
- dst = bitwise_or(src1, src2[, dst[, mask]]) – src1 represents the pixel matrix of the first image – src2 represents the pixel matrix of the second image – dst represents the output image, which must have the same size and number of channels as the input image – mask represents an optional operation mask (8-bit single channel array) that specifies the elements of the output array to be changed
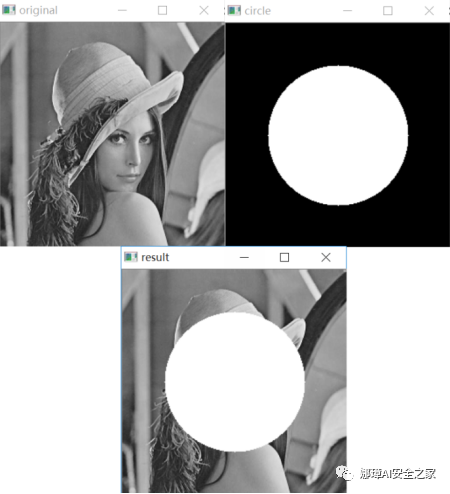
The following code realizes the function of image clipping through image or operation.
#coding:utf-8
# By: Eastmount CSDN 2021-02-24
import cv2
import numpy as np

#Read picture
img = cv2.imread("Lena.png", cv2.IMREAD_GRAYSCALE)

#Get image width and height
rows, cols = img.shape[:2]
print(rows, cols)

#Draw a circle
circle = np.zeros((rows, cols), dtype="uint8")
cv2.circle(circle, (int(rows/2), int(cols/2)), 80, 255, -1)
print(circle.shape)
print(img.size, circle.size)

#OpenCV image or operation
result = cv2.bitwise_or(img, circle)

#Display image
cv2.imshow("original", img)
cv2.imshow("circle", circle)
cv2.imshow("result", result)

#Wait for display
cv2.waitKey(0)
cv2.destroyAllWindows()
The output is as shown in the figure. After the original image and the circle are or calculated, the pixel values of the image other than the central prototype are extracted.
3. XOR operation
Logical xor operation (xor) is a mathematical operator. The mathematical symbol is "⊕" and the computer symbol is "xor". Its algorithm is: if the values of a and b are different, the xor result is 1; If the values of a and b are the same, the xor result is 0. Image xor operation refers to binary "xor" operation for each pixel value of two images (gray image or color image) to realize image clipping. Its function prototype is as follows:
- dst = bitwise_xor(src1, src2[, dst[, mask]]) – src1 represents the pixel matrix of the first image – src2 represents the pixel matrix of the second image – dst represents the output image, which must have the same size and number of channels as the input image – mask represents an optional operation mask (8-bit single channel array) that specifies the elements of the output array to be changed
The implementation code of image XOR operation is as follows.
#coding:utf-8
import cv2
import numpy as np

#Read picture
img = cv2.imread("Lena.png", cv2.IMREAD_GRAYSCALE)

#Get image width and height
rows, cols = img.shape[:2]
print(rows, cols)

#Draw a circle
circle = np.zeros((rows, cols), dtype="uint8")
cv2.circle(circle, (int(rows/2), int(cols/2)), 80, 255, -1)
print(circle.shape)
print(img.size, circle.size)

#OpenCV image XOR operation
result = cv2.bitwise_xor(img, circle)

#Display image
cv2.imshow("original", img)
cv2.imshow("circle", circle)
cv2.imshow("result", result)

#Wait for display
cv2.waitKey(0)
cv2.destroyAllWindows()
The original image is output after XOR operation with the circle, as shown in the figure.
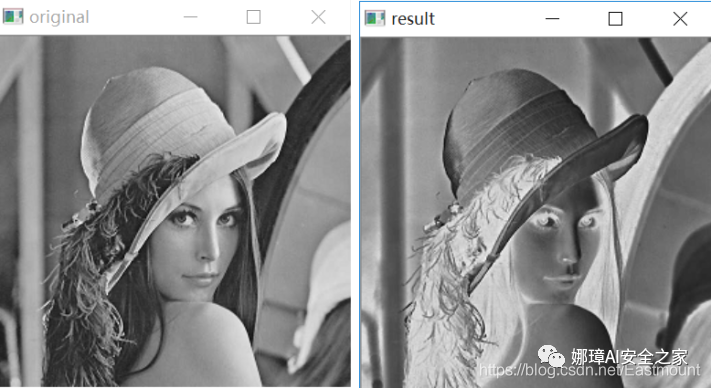
4. Image non operation
Image non operation is the pixel anti color processing of the image. It converts the black pixels of the original image into white pixels, and the white pixels into black pixels. Its function prototype is as follows:
- dst = bitwise_not(src1, src2[, dst[, mask]]) – src1 represents the pixel matrix of the first image – src2 represents the pixel matrix of the second image – dst represents the output image, which must have the same size and number of channels as the input image – mask represents an optional operation mask (8-bit single channel array) that specifies the elements of the output array to be changed
The implementation code of image non operation is as follows.
#coding:utf-8
import cv2
import numpy as np

#Read picture
img = cv2.imread("Lena.png", cv2.IMREAD_GRAYSCALE)

#OpenCV image non operation
result = cv2.bitwise_not(img)

#Display image
cv2.imshow("original", img)
cv2.imshow("result", result)

#Wait for display
cv2.waitKey(0)
cv2.destroyAllWindows()
The original image is output after non operation, as shown in the figure.
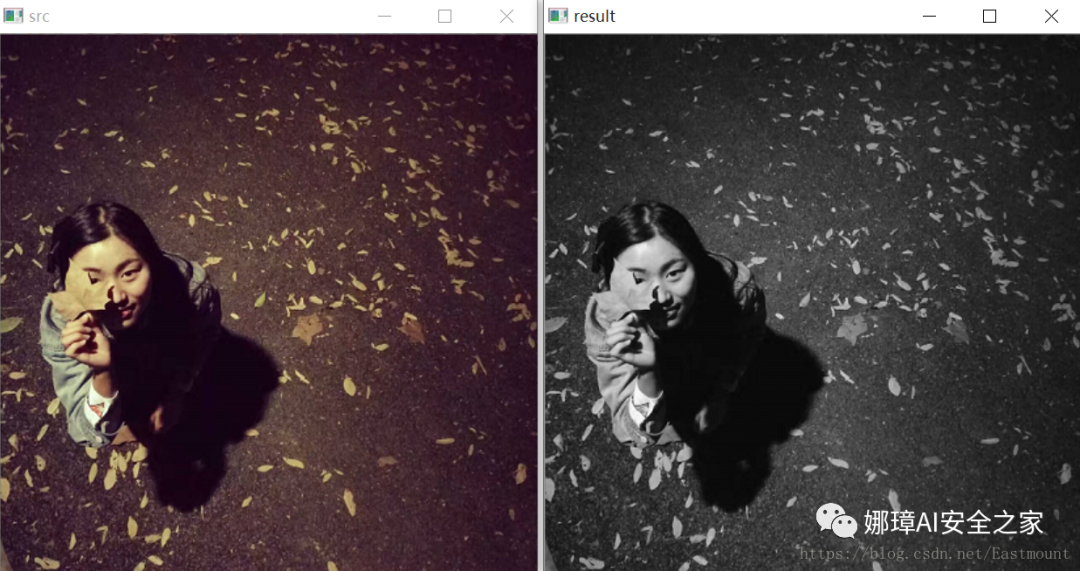
4, Image type conversion
Image type conversion refers to converting one type to another, such as color image to gray image and BGR image to RGB image. OPenCV provides conversion between more than 200 different types, of which the most commonly used include 3 types, as follows:
- cv2.COLOR_BGR2GRAY
- cv2.COLOR_BGR2RGB
- cv2.COLOR_GRAY2BGR
The code is as follows:
#encoding:utf-8
import cv2
import numpy as np
import matplotlib.pyplot as plt

#Read picture
src = cv2.imread('01.bmp')

#Image type conversion
result = cv2.cvtColor(src, cv2.COLOR_BGR2GRAY)

#Display image
cv2.imshow("src", src)
cv2.imshow("result", result)

#Wait for display
cv2.waitKey(0)
cv2.destroyAllWindows()
The output results are shown in the figure below:
If channel conversion is used, the results are shown in the following figure:
- result = cv2.cvtColor(src, cv2.COLOR_BGR2RGB)

5, Summary
This article mainly explains the basic image processing of Python and OpenCV, including:
- 1, Image fusion
- 2, Image addition and subtraction 1. Addition operation 2. Subtraction
- 3, Image logic operation 1. And operation 2. Or operation 3. XOR operation 4. Image non operation
- 4, Image type conversion
Source code download address, remember to help star and pay attention!
- https://github.com/eastmountyxz/ ImageProcessing-Python
References, I would like to thank these leaders for their encouragement!
- [1] Gonzalez. Digital image processing (3rd Edition) [M]. Electronic Industry Press, 2013
- [2] Mao Xingyun, Leng Xuefei. Introduction to OpenCV3 programming [M]. Electronic Industry Press, 2015
- [3] https://blog.csdn.net/Eastmount