🚀 Author: "big data Zen"
🚀 ** Introduction * *: This article is a series of spark articles. The column will record the contents from the basic to advanced spark, including the introduction of spark, cluster construction, core components, RDD, the use of operators, underlying principles, SparkCore, SparkSQL, SparkStreaming, etc, Spark column address Welcome to subscribe 💪
🚀 ** The source code is * *: the installation package related to this article, big data exchange group, buddies can pay attention to the official account at the bottom of the article, click "contact me" remarks, and get the corresponding content.
🚀 Welcome to praise 👍, Collection ⭐, Leaving a message. 💬
1. What is spark?
Apache Spark is a computing engine specially designed for large-scale data processing. Compared with Hadoop MapReduce, which saves the results on disk, spark uses memory to save intermediate results, which can perform operations in memory when the data has not been written to disk. Spark is just a computing framework. Unlike Hadoop, it includes distributed file system and complete scheduling system. If spark needs to be used, it needs to be equipped with other file systems, such as HDFS and more mature scheduling system for better computing.
2. History of spark
- In 2009, it was founded by AMPLab at the University of California, Berkeley
- Open source release through BSD license agreement in 2010
- In 2013, he donated to the Apache Software Foundation and switched the open source agreement to Apache 2.0
- In February 2014, Spark became the top project of Apache
- In November 2014, the Databricks team of Spark's parent company used spark to refresh the world record of data sorting
3. Cluster building for spark introduction
Before building Spark, you should build Hadoop cluster as much as possible. In the production environment, HDFS is also widely used. Cooperating with Spark can achieve higher work efficiency. For the construction process of Hadoop, please refer to my previous article, Hadoop cluster construction , the process is quite detailed, and more screenshots are attached to the steps to help the partners build.
Next, let's go to the construction of Spark cluster. First, we need to upload the installation package to our cluster. There are three machines in the cluster, namely node1, node2 and node3. Hadoop users are used for operation. The method of adding users, IP mapping and confidentiality are described in detail in the construction of Hadoop cluster. After uploading the installation package, use the tar command to decompress it and the mv command to rename it to facilitate subsequent operations. As shown below

Modify profile
It is easy to modify the spark configuration file. First enter the conf directory under the spark directory. Because the configuration file exists as a template by default, we need to modify it first, as shown in the following figure

After opening the spark-env.sh file, you need to add the following three configurations to the last few lines of the configuration file. The first line specifies the JAVA path of the host, and the second line specifies the MASTER_ The host address of host, and finally the port number of MASTER. As shown below

Then edit the slave file of the current directory and add the slave node address in it
node2
node2
After configuration, the cluster can be distributed and started. The cluster distribution command is as follows. Note that the environment of other machines should be the same as that of the primary node.
//Enter the installation package directory
scp -r spark node2:/app
scp -r spark node3:/app
Start cluster
//Enter the sbin directory of spark and run the following command
./start-all.sh
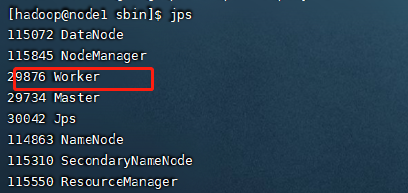
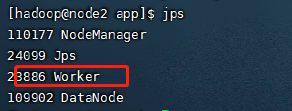
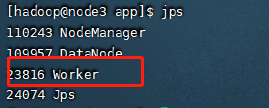
After normal startup, you can see that the following processes exist
4. Cluster access test
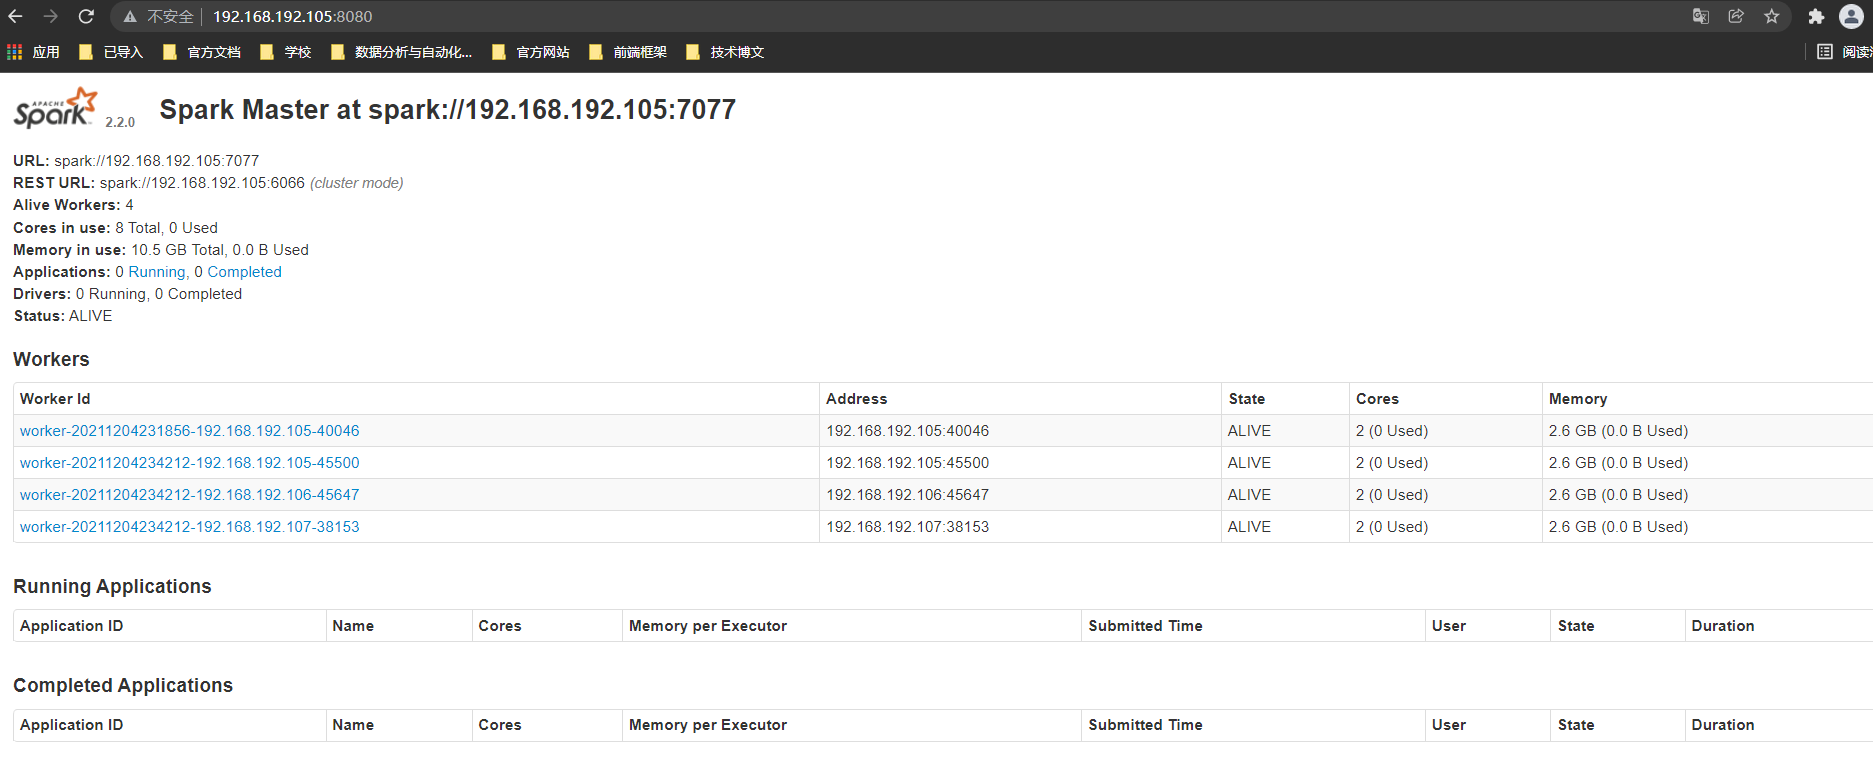
After the cluster is built, you can test whether it can be accessed in the local browser. Before accessing, you need to close the firewall. See the building of Hadoop cluster for specific operations. The local browser can be accessed through IP address plus 8080 port, as shown in the following figure
5. Cluster verification
After completing the above steps, in order to verify whether the cluster can work normally, we need to run a spark task to test. There is a jar package provided for us to test in the spark installation package. If it is successful, it means that our cluster can be used normally. Run the command as follows. Note that the location of the jar package needs to be modified according to the path where your machine spark is stored
bin/spark-submit --class org.apache.spark.examples.SparkPi --master spark://node1:7077,node2:7077,node3:7077 --executor-memory 1G --total-executor-cores 2 /app/spark-2.2.0/examples/jars/spark-examples_2.11-2.2.0.jar 100
After running in the bin directory of spark, you should see the following output

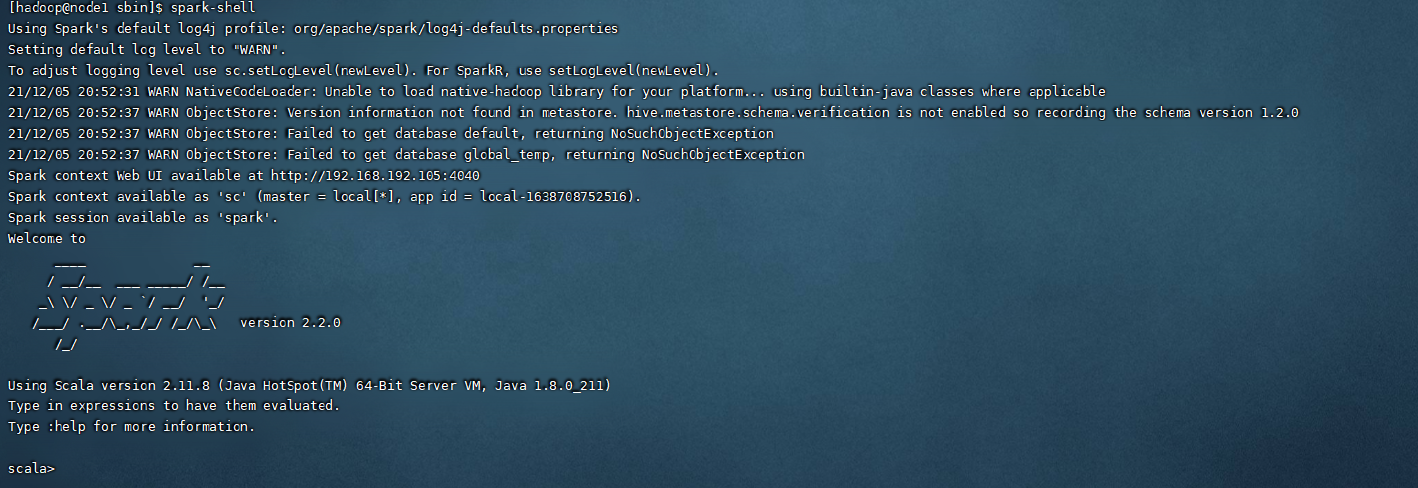
After the cluster is successfully built, configure the spark environment by referring to the hadoop cluster building file, and you can use the spark command in any directory. Let's try running the command line provided by spark, spark shell. You can see that you can also enter relevant commands here.
5. Write your first Spark application
I believe that students who have learned about the big data related framework will be familiar with a word called word frequency statistics, which means to make a relevant statistics according to the words in the text you provide and get the total number of each keyword. This can be said to be a small application that will be written when you start spark. In this column, we will write it in Scala language, The syntax of scala is relatively brief, which can improve our coding efficiency. Next, we write the first application word frequency statistics with spark.
6. Environmental construction
Before running the spark project locally, we need to build the local environment. The tool we use here is IDEA. We pour into the dependency and environment of spark by creating Maven project. Maven project has no other requirements. Just create an empty Maven project. The pop.xml dependency of the project is as follows for reference, It can be modified according to the version of the installation package corresponding to each person's computer. Normally, the version difference should not be too large to prevent problems when packaging to the cluster.
<properties>
    <project.build.sourceEncoding>UTF-8</project.build.sourceEncoding>
    <hadoop.version>2.7.5</hadoop.version>
    <scala.version>2.12.11</scala.version>
</properties>

 <!--Hadoop-->
    <dependency>
      <groupId>org.apache.hadoop</groupId>
      <artifactId>hadoop-client</artifactId>
      <version>${hadoop.version}</version>
    </dependency>
    <!--Scala-->
    <dependency>
      <groupId>org.scala-lang</groupId>
      <artifactId>scala-library</artifactId>
      <version>${scala.version}</version>
    </dependency>
    <!--Spark-->
    <!-- https://mvnrepository.com/artifact/org.apache.spark/spark-core -->
    <dependency>
      <groupId>org.apache.spark</groupId>
      <artifactId>spark-core_2.12</artifactId>
      <version>2.4.0</version>
    </dependency>
  </dependencies>
7. Coding
After the above work is completed, you can enter the code writing part. First, you need to establish a corresponding scala project. The word frequency statistics code reference is as follows. Small partners can write it against it first. The operators involved and related contents will be introduced later.
txt file content
xiaochan xiaochan xiaochan
hadoop sqoop
spark hello
workcount code
package cn.itcast.spark.xiaochan

import org.apache.spark.{SparkConf, SparkContext}

object wordcount_blog1 {

  def main(args: Array[String]): Unit = {
    val conf = new SparkConf().setMaster("local[4]").setAppName("workcount_blog")
    val sc = new SparkContext(conf)
    val work = sc.textFile("wordcount.txt Path address")
    val count = work.flatMap(word => word.split(" ")).map(word => (word, 1)).reduceByKey(_ + _).collect()
    count.foreach(println(_))
  }
}
The output results are shown in the figure below. You can see that the corresponding words will be split for statistics.

8. Summary
Here we have completed the establishment of the cluster and the operation of the first small case. If you encounter problems during the operation, you can confide in me, and the blogger will try his best to help you answer them 💪. Secondly, when the spark operator is involved in the preparation of the first case, the partners may be a little confused when knocking. Don't worry. Knock in and run the results first. The next column will explain the operators and usage methods of the code in detail, Spark column address . More data and installation packages can be obtained through the official account below. 🏘️ Big data technology community Exchange and study together, thank you for your support! 💪