
preface
In the process of network transmission, data needs to be serialized or and deserialized, which requires encoders and decoders. This article mainly discusses the codec in Netty and the use of Protobuf.
Encoding and decoding in Netty
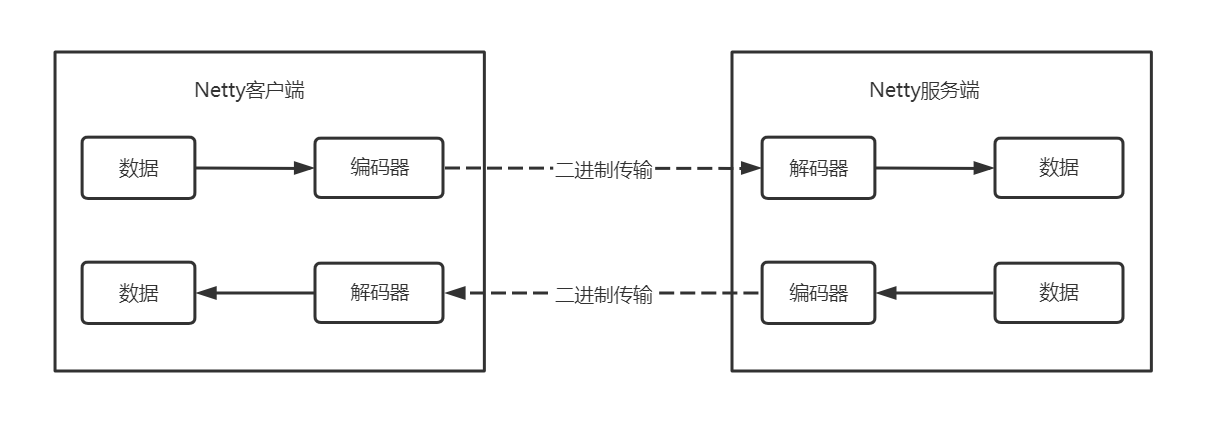
When our Netty client communicates with the server, the data needs to be serialized in the process of transmission, such as binary data transmission, then our business data needs to be encoded into binary data by a corresponding encoder. When the server gets the binary data, it needs to be decoded by a corresponding decoder to get the real business data. As shown below:
Some codecs are provided in Netty as follows:
- StringEncoder: encoder for strings
- StringDecoder: decoder for Strings
- ObjectEncoder: an encoder for Java objects
- ObjectDecoder: decoder for Java objects
For ObjectEncoder and ObjectDecoder, it is only for the encoding and decoding of Java objects. In other words, Java serialization technology is used at the bottom, and Java serialization has the following problems
- inefficiency
- Can't support language, can only support java
- After serialization, the volume is huge, which is much larger than binary coding
So we introduced google's protobuf to solve this problem
Protobuf know
Protobuf is an open source project of google. It is a flexible, efficient and automatic structural data serialization method; It is a cross language and extensible method of serializing structured data. It can be used for (data) communication protocol (RPC), data storage and so on. It has the following characteristics:
- Language independent and platform independent. That is, ProtoBuf supports Java, C + +, Python and other languages and multiple platforms
- Efficient. Compared with XML, it is smaller (3 ~ 10x), faster (20 ~ 100x) and simpler than XML
- Good expansibility and compatibility. You can update the data structure without affecting and destroying the original old program
You can define the data structure, and then use the specially generated source code to easily write and read the structure data in various languages in various data streams. You can even update the data structure without breaking the deployed program compiled by the old data structure
The encoder ProtobufEncoder and decoder ProtobufDecoder for protobuf are provided in Netty
Generating POJO s using Protobuf
Official documents: http://developers.google.com/protocol-buffers/docs/proto
To use protobuf, you need to use the protobuf compiler to generate Java code. The steps are as follows
- Define files ending in. proto
- Compile the. proto file with protoc.exe to generate java code
- Writing the Netty case
Step 1: write a. Proto file, which can be written in IDEA. The file name here is User.proto
//Define version
syntax = "proto3";
//The class name and file name of the generated code
option java_outer_classname = "UserPOJO";
//Manage data with Messenger, and pay attention to the name and java_outer_classname conflict
message User{
  //Define the ID attribute. int32 corresponds to java. Note that 1 here refers to the need rather than the value
  int64 id = 1;
  //Define a name attribute whose type is String. Note that 2 here refers to the required value rather than the value
  string name = 2;
  //Define an array, like
  repeated string   favorite = 3;
}
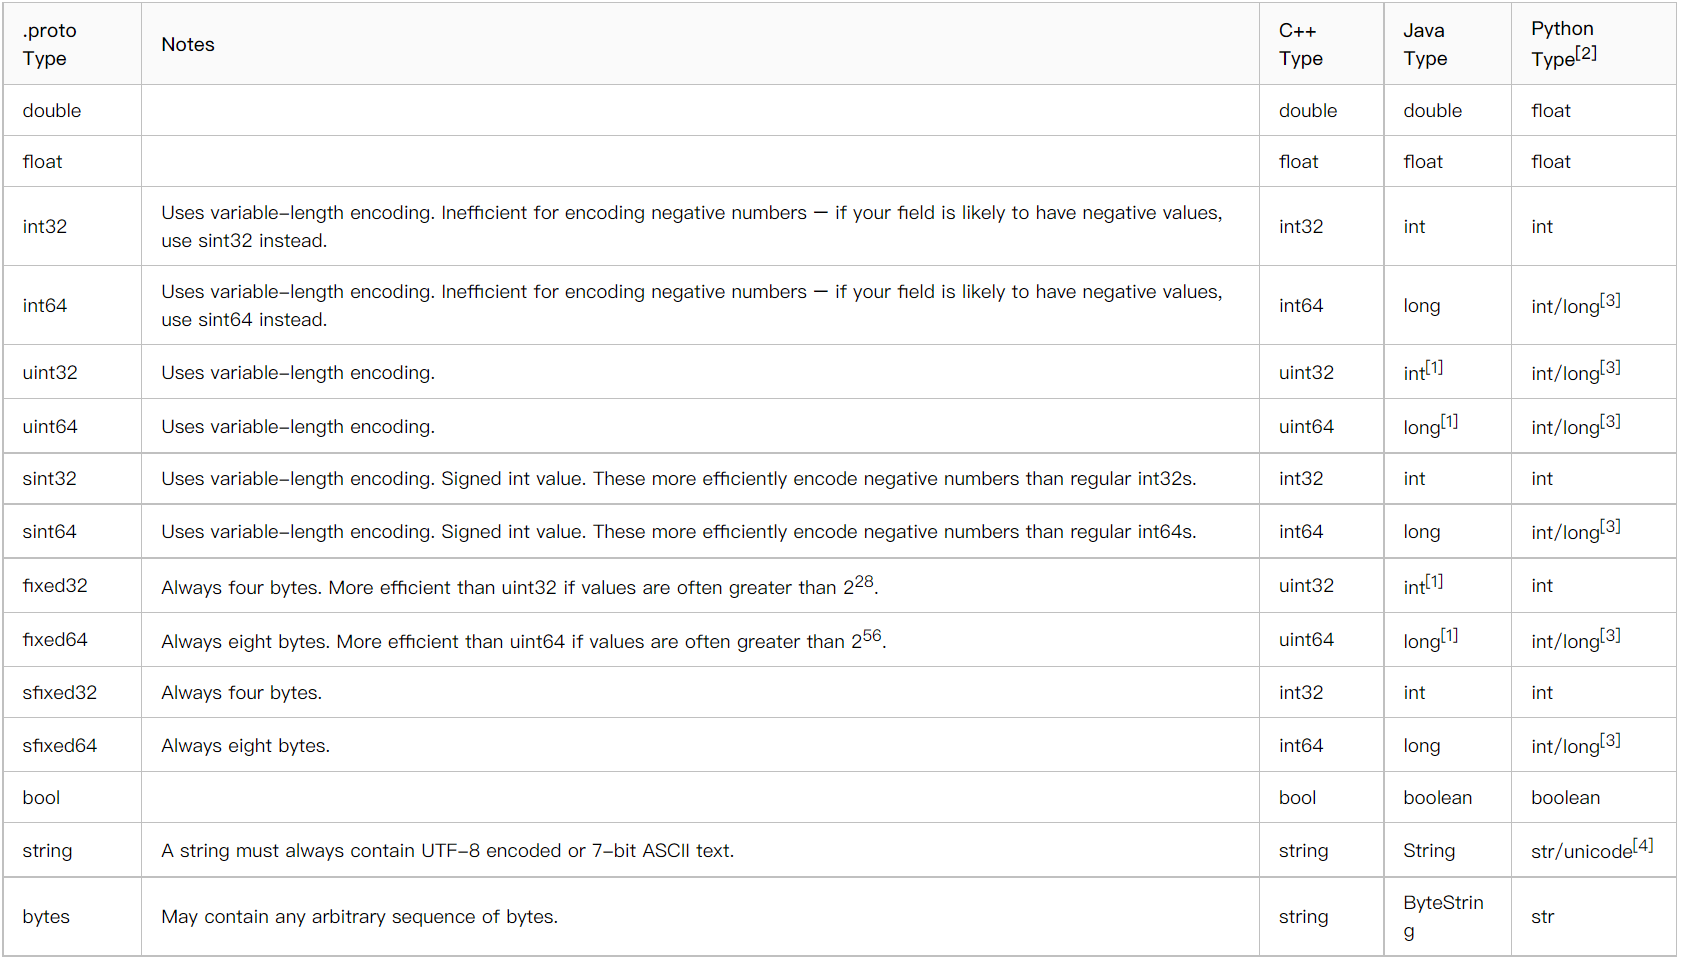
This table shows the types that can be specified in the. proto file and the relative types generated automatically!
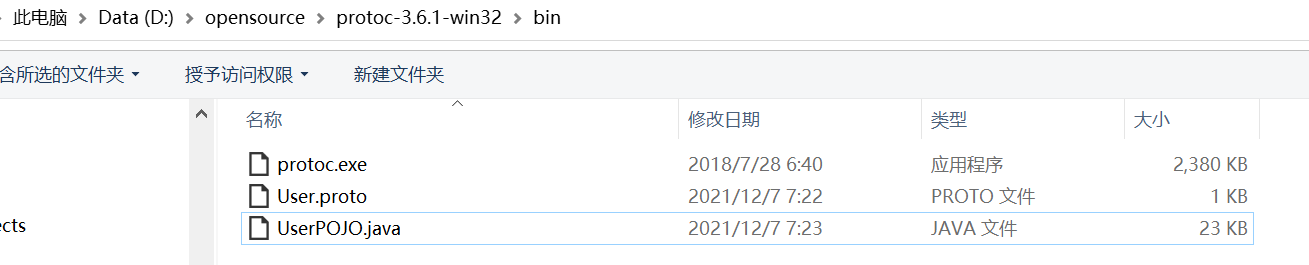
Step 2: install proto.exe, download address: https://github.com/protocolbuffers/protobuf/releases , unzip and enter the bin directory

Step 3: copy the user.proto file to the bin directory, use protoc.exe to produce java files, and execute the command protoc.exe --java_out=. User.proto

The generated files are as follows
Netty uses Protobuf codec
Take the Server/Client mode of Netty as an example, but the data here is encoded and decoded by protobuf.

Step 1: build the project and copy the UserPOJO.java file to the project. At this time, the class will report an error, which requires importing a dependency
<dependency>
  	<groupId>com.google.protobuf</groupId>
    <artifactId>protobuf-java</artifactId>
    <version>3.4.0</version>
</dependency>
<dependency>
   <groupId>io.netty</groupId>
   <artifactId>netty-all</artifactId>
   <version>4.1.42.Final</version>
</dependency>
Step 2: create a Netty server: NettyServer
public class NettyServer {
    public static void main(String[] args) {
        NioEventLoopGroup bossGroup = new NioEventLoopGroup();
        NioEventLoopGroup workGroup = new NioEventLoopGroup();
        ServerBootstrap bootstrap = new ServerBootstrap();

        try {
            bootstrap.group(bossGroup,workGroup)
                .channel(NioServerSocketChannel.class)
                .childHandler(new ChannelInitializer<SocketChannel>() {
                    @Override
                    protected void initChannel(SocketChannel ch) throws Exception {
                        ChannelPipeline pipeline = ch.pipeline();
                        //Server: when using protobuf decoder, you need to specify which type of decoder to decode
                        pipeline.addLast("decoder",new ProtobufDecoder(UserPOJO.User.getDefaultInstance()));
                        pipeline.addLast(new ServerHandler());
                    }
                });

            //Start the server
            ChannelFuture sync = bootstrap.bind(2000).sync();
            sync.channel().closeFuture().sync();
        } catch (InterruptedException e) {
            e.printStackTrace();
        }finally {
            bossGroup.shutdownGracefully();
            workGroup.shutdownGracefully();
        }
    }
}
Here we add a protobuf decoder through pipeline
Step 3: write the handler of the server
public class ServerHandler extends ChannelInboundHandlerAdapter {
    @Override
    public void channelRead(ChannelHandlerContext ctx, Object msg) throws Exception {
    	//Force the message to UserPOJO.User
        UserPOJO.User user = (UserPOJO.User) msg;
        System.out.println("Get the data:"+user.getName());
    }

    @Override
    public void exceptionCaught(ChannelHandlerContext ctx, Throwable cause) throws Exception {
        ctx.channel().close();
    }
}
Step 4: write the client: NettyClient
public class NettyClient {
    public static void main(String[] args) {
        NioEventLoopGroup eventLoopGroup = new NioEventLoopGroup();
        Bootstrap bootstrap = new Bootstrap();
        bootstrap.group(eventLoopGroup)
                .channel(NioSocketChannel.class)
                .handler(new ChannelInitializer<SocketChannel>() {
                    @Override
                    protected void initChannel(SocketChannel ch) throws Exception {
                        ChannelPipeline pipeline = ch.pipeline();
                        //Add an encoder to the client and use the ProtobufEncoder encoder
                        pipeline.addLast("encoder",new ProtobufEncoder());
                        pipeline.addLast(new ClientHandler());
                    }
                });
        try {
            ChannelFuture sync = bootstrap.connect("127.0.0.1", 2000).sync();
            sync.channel().closeFuture().sync();
        } catch (InterruptedException e) {
            e.printStackTrace();
        }finally {
            eventLoopGroup.shutdownGracefully();
        }
    }
}
The client has added a ProtobufEncoder encoder
Step 5: write the handler of the client
public class ClientHandler extends ChannelInboundHandlerAdapter {
    @Override
    public void channelRead(ChannelHandlerContext ctx, Object msg) throws Exception {
    }

    @Override
    public void channelActive(ChannelHandlerContext ctx) throws Exception {
        //When a connection is established, an object is sent to the server
        UserPOJO.User user = UserPOJO.User.newBuilder().setId(1).setName("zs").build();
        ctx.writeAndFlush(user);
        System.out.println("Client send user="+user.getName());
    }

    @Override
    public void exceptionCaught(ChannelHandlerContext ctx, Throwable cause) throws Exception {
        ctx.channel().close();
    }
}
The code is written, and the final project structure is as follows

Step 6: test. Start nettyserver and nettyclient successively. The results are as follows
client:

Server:

That's all for the content of protobuf. If you like it, give it a high praise.