Before installation, please explain a few points. Because you are not familiar with the installation method of linux, you can see that there are many installation methods, including source code compilation, dpkg, apt, etc. we all know the source code method here, compile through Makefile or cmake, and then install. The process is complex and error prone. Apt is used in conjunction with dpkg, Here is a brief introduction dpkg:
dpkg
linux developers compile the software to be installed on the fixed hardware platform and operating system platform, and then package all relevant files of the software into a special format file. This file also includes the pre detection system and dependent scripts, and provides all file information provided by the software. After the customer obtains the software package, as long as it is installed through a specific command, the software will detect the existence of the precursor software according to the internal script. If the installation environment meets the requirements, the installation will start. After installation, the information of the software will be written into the software management mechanism to complete future upgrades, deletions and other operations.
Here are dpkg some basic commands:
- dpkg -i package-name Install package
- dpkg -r package-name Delete package (keep configuration information)
- dpkg -P package-name Delete package (including configuration information)
- dpkg --configure package-name Configure software packages. If - a is added, all unconfigured software packages are configured
- dpkg --unpack package-name Unpack the software package to the system directory, but do not configure it
The following commands are used to query the software package
- dpkg -I filename View the software description (use dpkg -l directly) Query all installed packages. The filename can be regular. I usually use ` ` ` dpkg -l | grep "filename" because the software name will not be remembered)
- dpkg -L filename View the package installation files and directories corresponding to package name
- dpkg -s filename View the package information corresponding to package name
- dpkg -S filename-pattern Find the package name containing filename from the installed package
Introduction to dpkg software package related documents
/etc/dpkg/dpkg.cfg Configuration file of dpkg package management software
/var/log/dpkg.log Log file of dpkg package management software
/var/lib/dpkg/available Store all installed software package information of the system
/var/lib/dpkg/status Store the status information of all installed software in the system
/var/lib/dpkg/info Record the control information file of the installation package control directory
apt-get
Although we have solved a lot of problems in the software installation process when using dpkg, we still need to solve them manually when the dependencies are not satisfied. apt solves such problems. linux distribution first places the software in the corresponding server, then analyzes the software dependencies and records them, Then, when the client needs to install the software, compare the list with the existing software data of the local dpkg, and you can get all the required software with dependent attributes from the network.
Here are some basic commands of apt:
- apt-get update Update source
- apt-ge dist-upgrade Upgrade system
- apt-get upgrade Update all installed packages
- apt-get install package_name Install the package (plus -- reinstall)
- apt-get remove Remove package (retain configuration information)
- apt-get purge package_name Remove package (delete configuration information)
- apt show pack_name Get information about the package
- apt search page_name Search for information about packages
- apt-cache depends package Understanding usage dependencies
- apt-get check Check for damaged dependencies
Introduction to apt package related documents:
/etc/apt/sources.list Record the address of the software source
/var/cache/apt/archives The downloaded packages are placed here
The above are several installation methods of linux. What does it have to do with our installation of NVIDIA series? In fact, NVIDIA provides many installation methods. Each person adopts different methods, which makes people who don't know linux very prone to errors. Therefore, let's introduce it first and start installing this library
Installation by dpkg
cuda: 11.3.1
wget https://developer.download.nvidia.com/compute/cuda/repos/ubuntu1604/x86_64/cuda-ubuntu1604.pin
sudo mv cuda-ubuntu1604.pin /etc/apt/preferences.d/cuda-repository-pin-600
wget https://developer.download.nvidia.com/compute/cuda/11.3.1/local_installers/cuda-repo-ubuntu1604-11-3-local_11.3.1-465.19.01-1_amd64.deb
sudo dpkg -i cuda-repo-ubuntu1604-11-3-local_11.3.1-465.19.01-1_amd64.deb
sudo apt-key add /var/cuda-repo-ubuntu1604-11-3-local/7fa2af80.pub
sudo apt-get update
sudo apt-get -y install cuda
cudnn: 8.2.1
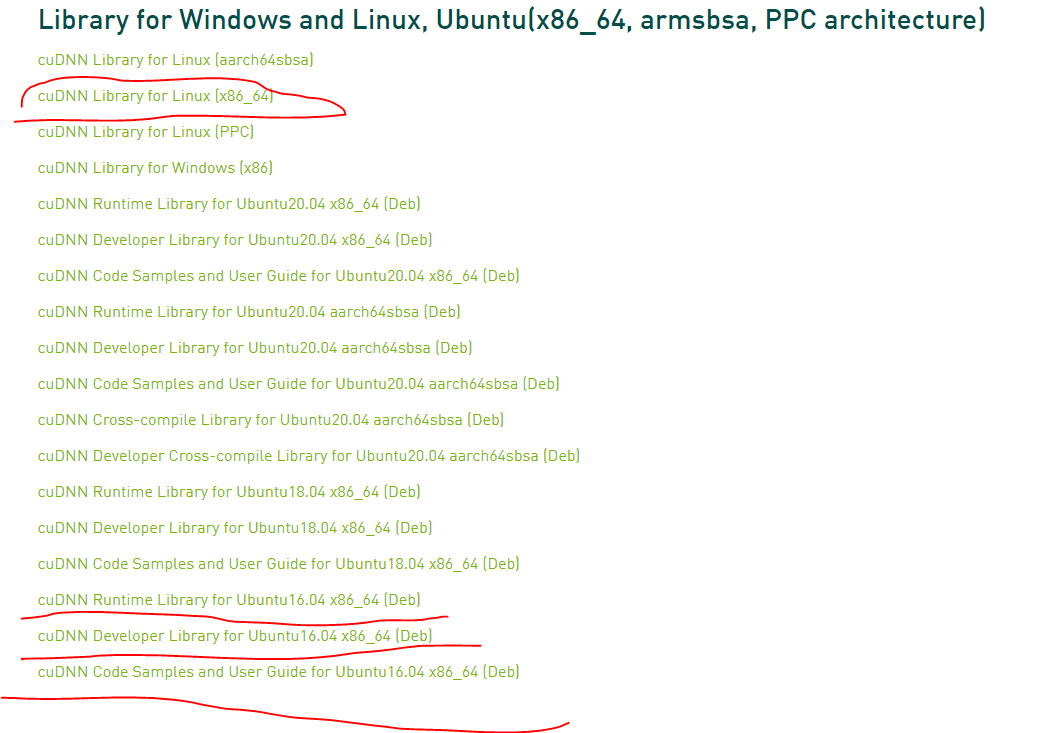
You need to download these four files, otherwise you will not be able to install successfully
- Install runtime libraries, for example:
sudo dpkg -i libcudnn8_x.x.x-1+cudax.x_amd64.deb
perhaps
sudo dpkg -i libcudnn8_x.x.x-1+cudax.x_arm64.deb
- Install the developer library, for example:
sudo dpkg -i libcudnn8-dev_8.x.x.x-1+cudax.x_amd64.deb
perhaps
sudo dpkg -i libcudnn8-dev_8.x.x.x-1+cudax.x_arm64.deb
- Install code samples and cuDNN library documentation, for example:
sudo dpkg -i libcudnn8-samples_8.x.x.x-1+cudax.x_amd64.deb
perhaps
sudo dpkg -i libcudnn8-samples_8.x.x.x-1+cudax.x_arm64.deb
4. After I installed the above, my own test failed, so I need to install it cuDNN Library for Linux (x86_64) , which is the first one in the figure above:
Unzip the cuDNN package.
tar -xzvf cudnn-x.x-linux-x64-v8.x.x.x.tgz
perhaps
Copy the following files to the CUDA Toolkit directory.tar -xzvf cudnn-x.x-linux-aarch64sbsa-v8.x.x.x.tgz
sudo cp cuda/include/cudnn*.h /usr/local/cuda/include
sudo cp -P cuda/lib64/libcudnn* /usr/local/cuda/lib64
sudo chmod a+r /usr/local/cuda/include/cudnn*.h /usr/local/cuda/lib64/libcudnn*
tensorrt: 8.0.3
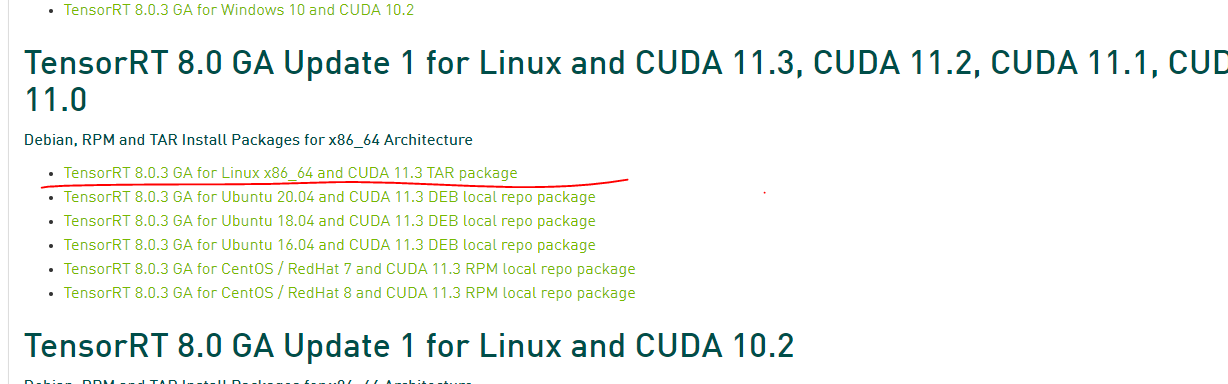
- Install TensorRT from the local. dep package. replace ubuntuxx04, cudax.x, trt8.xxx and yyyymmdd Use your specific operating system version, CUDA version, TensorRT version, and package date.
os="ubuntuxx04"
tag="cudax.x-trt8.x.x.x-yyyymmdd"
sudo dpkg -i nv-tensorrt-repo-${os}-${tag}_1-1_amd64.deb
sudo apt-key add /var/nv-tensorrt-repo-${os}-${tag}/7fa2af80.pub

sudo apt-get update
sudo apt-get install tensorrt
If you use Python 3.x:
The following additional packages will be installed:sudo apt-get install python3-libnvinfer-dev
python3-libnvinfer
If you plan to use TensorRT with TensorFlow:sudo apt-get install uff-converter-tf
this graphsurgeon-tf The software package will also be installed using the above command.
If you want to run an example that requires ONNX Figure surgeon Or use the Python module in your own project to run:sudo apt-get install onnx-graphsurgeon
- Verify installation.
dpkg -l | grep TensorRT
You should see something similar to the following:ii graphsurgeon-tf 8.2.0-1+cuda11.4 amd64 GraphSurgeon for TensorRT package ii libnvinfer-bin 8.2.0-1+cuda11.4 amd64 TensorRT binaries ii libnvinfer-dev 8.2.0-1+cuda11.4 amd64 TensorRT development libraries and headers ii libnvinfer-doc 8.2.0-1+cuda11.4 all TensorRT documentation ii libnvinfer-plugin-dev 8.2.0-1+cuda11.4 amd64 TensorRT plugin libraries ii libnvinfer-plugin8 8.2.0-1+cuda11.4 amd64 TensorRT plugin libraries ii libnvinfer-samples 8.2.0-1+cuda11.4 all TensorRT samples ii libnvinfer8 8.2.0-1+cuda11.4 amd64 TensorRT runtime libraries ii libnvonnxparsers-dev 8.2.0-1+cuda11.4 amd64 TensorRT ONNX libraries ii libnvonnxparsers8 8.2.0-1+cuda11.4 amd64 TensorRT ONNX libraries ii libnvparsers-dev 8.2.0-1+cuda11.4 amd64 TensorRT parsers libraries ii libnvparsers8 8.2.0-1+cuda11.4 amd64 TensorRT parsers libraries ii python3-libnvinfer 8.2.0-1+cuda11.4 amd64 Python 3 bindings for TensorRT ii python3-libnvinfer-dev 8.2.0-1+cuda11.4 amd64 Python 3 development package for TensorRT ii tensorrt 8.2.0.x-1+cuda11.4 amd64 Meta package of TensorRT ii uff-converter-tf 8.2.0-1+cuda11.4 amd64 UFF converter for TensorRT package ii onnx-graphsurgeon 8.2.0-1+cuda11.4 amd64 ONNX GraphSurgeon for TensorRT package
adopt dpkg installation is very convenient, but this method is not recommended because you can't determine where you installed it and it's inconvenient to find it later. Therefore, the following installation is recommended.
runfile installation
cuda11.3.1
wget https://developer.download.nvidia.com/compute/cuda/11.3.1/local_installers/cuda_11.3.1_465.19.01_linux.run
sudo sh cuda_11.3.1_465.19.01_linux.run
cudnn: 8.2.1
Download the first one directly: Installation required cuDNN Library for Linux (x86_64) , which is the first one in the figure above:
Unzip the cuDNN package.
tar -xzvf cudnn-x.x-linux-x64-v8.x.x.x.tgz
perhaps
tar -xzvf cudnn-x.x-linux-aarch64sbsa-v8.x.x.x.tgz
Copy the following files to the CUDA Toolkit directory.
sudo cp cuda/include/cudnn*.h /usr/local/cuda/include
sudo cp -P cuda/lib64/libcudnn* /usr/local/cuda/lib64
sudo chmod a+r /usr/local/cuda/include/cudnn*.h /usr/local/cuda/lib64/libcudnn*
tensorrt: 8.0.3
- Unzip the tar file.
where:version="8.x.x.x" arch=$(uname -m) cuda="cuda-x.x" cudnn="cudnn8.x" tar xzvf TensorRT-${version}.Linux.${arch}-gnu.${cuda}.${cudnn}.tar.gz- 8.xxx is your TensorRT version
- cuda-xx CUDA version ten point two perhaps eleven point four
- cudnn8.x Is cuDNN version eight point two
ls TensorRT-${version} bin data doc graphsurgeon include lib onnx_graphsurgeon python samples targets TensorRT-Release-Notes.pdf uff - Add absolute path library for TensorRT Directory to environment variable LD_LIBRARY_PATH:
export LD_LIBRARY_PATH=$LD_LIBRARY_PATH:<TensorRT-${version}/lib> - Install Python TensorRT round file.
cd TensorRT-${version}/python python3 -m pip install tensorrt-*-cp3x-none-linux_x86_64.whl - Install Python UFF round file. This is only necessary if you plan to use TensorRT with TensorFlow.
cd TensorRT-${version}/uff

python3 -m pip install uff-0.6.9-py2.py3-none-any.whl
Check installation:which convert-to-uff
- Install Python Call.
cd TensorRT-${version}/graphsurgeon python3 -m pip install graphsurgeon-0.4.5-py2.py3-none-any.whl - Install Python onnx-graphsurgeon Round file.
cd TensorRT-${version}/onnx_graphsurgeon

python3 -m pip install onnx_graphsurgeon-0.3.12-py2.py3-none-any.whl
Install CUDA 11.0, cuDNN 8.0.5, PyTorch 1.7.0 for Ubuntu 20.04
NVIDIA cuDNN v8 deb method installation and uninstallation tutorial (Linux/Ubuntu)