Re learn the configuration and application of embedded container of SpringBoot series
- Operation parameter configuration of embedded container
- Configure HTTPS for Web container
- Switch to the jetty & undertow container
- Deploy war package to external tomcat container
Operation parameter configuration of embedded container
In the Spring Boot project, the web application service containers of tomcat, Jetty and Undertow can be supported. When we add the Spring Boot starter web dependency, Tomcat will be used as the embedded web container by default. We don't need to deploy it separately. The web application can be run in a jar package.
There are two configuration methods to adjust the parameters of the SpringBoot application container
- Modify profile (simple)
- Custom configuration class (professional tuning)
Profile mode
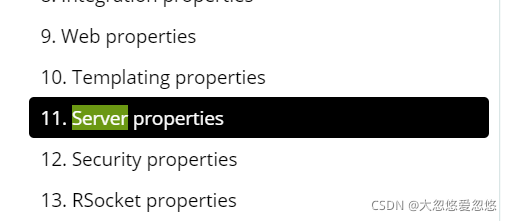
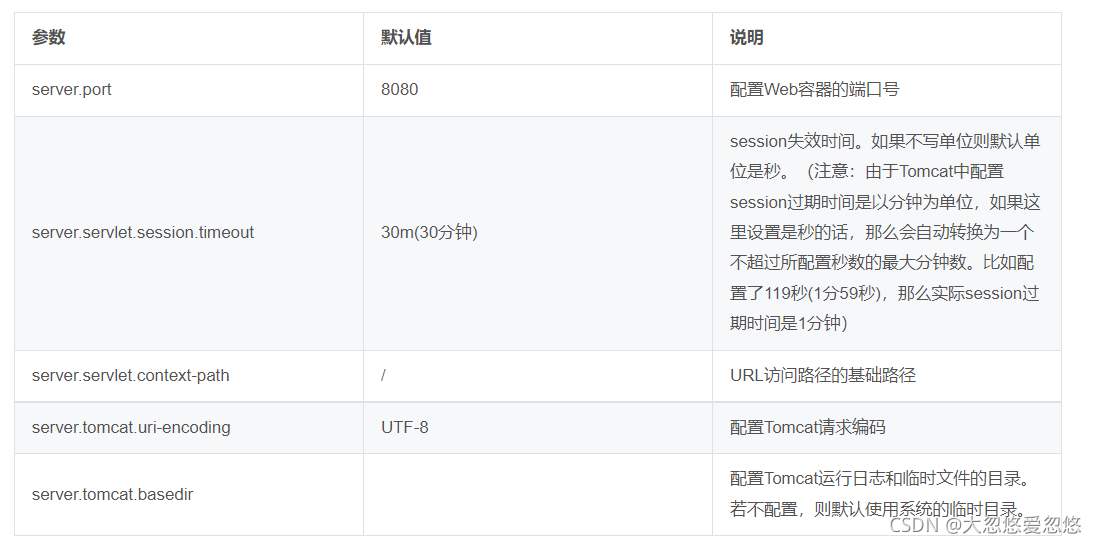
You can configure the properties required for the operation of the Web container in application.properties/application.yml. You can view all configuration items about the server on the official website through this link: server-properties.
- server.xx starts with the configuration common to all servlet containers,
- server.tomcat.xx starts with the configuration parameters unique to the Tomcat container
- server.jetty.xx starts with Jetty container specific configuration parameters
- server.undertow.xx starts with the configuration parameters unique to the undertow container
Common configuration parameters
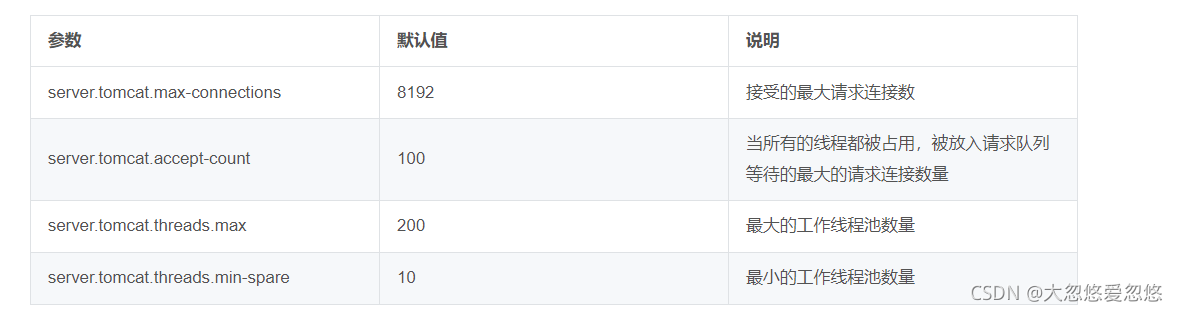
tomcat performance optimization core parameters
Working principle diagram of tomcat connector:

- Maintain a request receiving queue before the Acceptor. The maximum length of the queue is the maximum number of request connections that Tomcat can accept: server.tomcat.max-connections.
- The Acceptor listens to connection requests and generates a SocketProcessor task to submit to the thread pool for processing
- When all threads in the thread pool are occupied, the newly created SocketProcessor task is put into the waiting queue, that is, server.tomcat.accept-count
- The server.tomcat.threads.max of the thread pool determines the maximum SocketProcessor task processing capacity of Tomcat. Not the bigger the better, the more threads consume more resources.
- The server.tomcat.threads.min-spare of the thread pool keeps a certain number of threads in the thread pool when the application is idle. Avoid wasting time temporarily creating threads after requests arrive.
Custom configuration class method
Steps:
1. Create a Configuration class and add @ Configuration annotation
2. Add the customizer ConfigurableServletWebServerFactory
3. Return the customizer to
@Configuration
public class TomcatCustomizer {

    @Bean
    public ConfigurableServletWebServerFactory configurableServletWebServerFactory(){
        TomcatServletWebServerFactory factory = new TomcatServletWebServerFactory();
        factory.addConnectorCustomizers(new MyTomcatConnectionCustomizer());
        return factory;
    }


    static class MyTomcatConnectionCustomizer implements TomcatConnectorCustomizer {

        public MyTomcatConnectionCustomizer() {
        }

        @Override
        public void customize(Connector connector) {
            connector.setPort(Integer.parseInt("8888"));
            connector.setProperty("maxConnections", "8192");
            connector.setProperty("acceptorThreadCount", "100");
            connector.setProperty("minSpareThreads", "10");
            connector.setProperty("maxThreads", "200");
        }
    }
}
This method can customize more content and be more flexible. However, you need to deeply understand the underlying implementation principle and design mechanism of server container, and you also need to have a certain API proficiency of Tomcat servlet webserverfactory.
Configure HTTPS for Web container
HTTPS is a secure version of the HTTP protocol designed to provide data transport layer security (TLS). When your application does not use HTTPS, an unsafe prompt will appear in the browser address bar. HTTPS encrypts each packet, transmits it in a secure manner, and protects sensitive data from eavesdroppers or hackers.
HTTPS can be implemented by installing SSL certificates on Web applications. Trusted certificates on the internet usually require certificates issued by (CA) certification authorities (usually charged). A standard SSL certificate is still a little expensive. Although some domestic manufacturers can provide free certificates, they all have certain free timeliness restrictions.
For learning purposes, we can also use self signed certificates, that is, generate self signed certificates using Java Keytool. There is no need to purchase an SSL certificate certified by a CA authority.
How to generate a self signed certificate
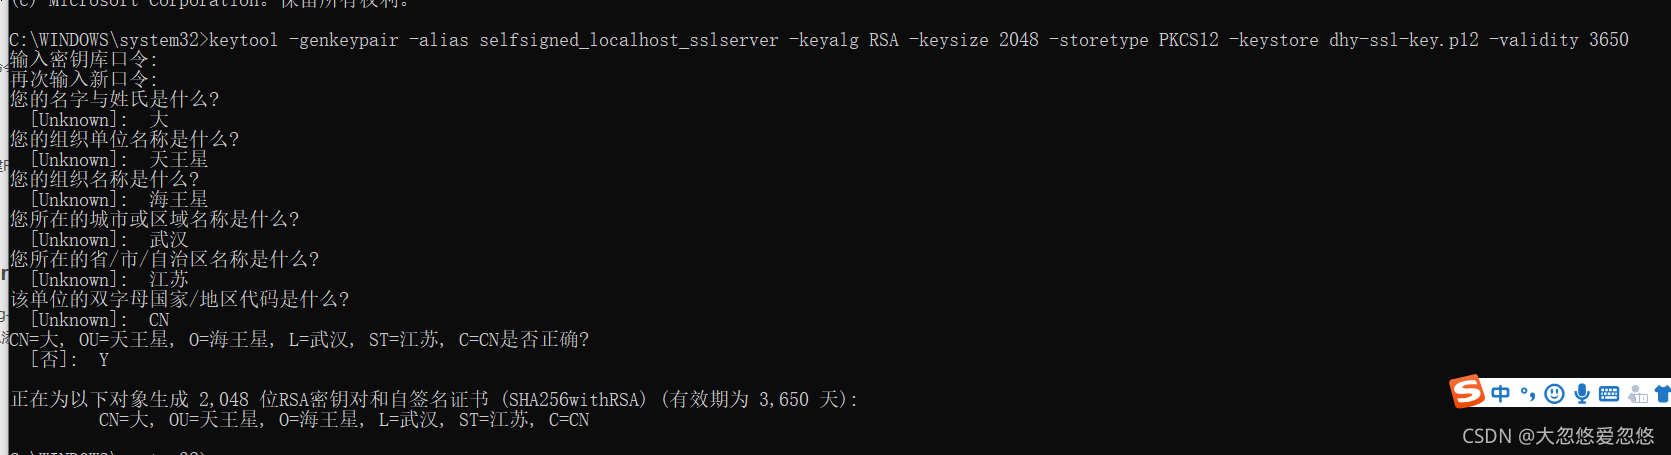
Type cmd in the Windows search field to find the command prompt, and then right-click run as administrator. Use the following keytool command. You can mention the required certificate name, as shown below.
The keytool tool comes with jdk. If the environment variable is configured, you don't need to execute the keytool command in the jdk bin directory
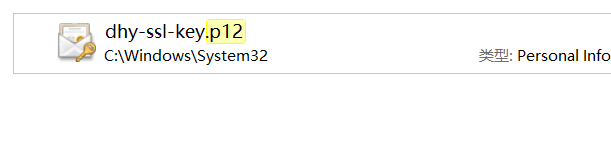
keytool -genkeypair
-alias selfsigned_localhost_sslserver
-keyalg RSA
-keysize 2048
-storetype PKCS12
-keystore dhy-ssl-key.p12
-validity 3650
Command parameter description:

-genkey: Indicates that you want to create a new key
-alias: express keystore Alias for
-keyalg: Indicates that the encryption algorithm used is RSA(An asymmetric encryption algorithm)
-keysize: Indicates the length of the key
-storetype: Type of certificate
-keystore: Indicates where the generated key is stored
-validity: Indicates the effective time of the key (in days)
Self signed certificates are password protected. After the command returns, you will be prompted to enter the password (remember this password, which will be used later) and other details, as shown in the following screenshot.
After completing the above steps, the PKS key will be created and stored in the directory where the current command line is located.
Applying SSL to Spring Boot applications
Copy DHY SSL key from JDK bin folder and put it under src/main/resources of Spring Boot Application. Add SSL key information to application.yml as shown below.
server:
  ssl:
    key-store: src/main/resources/dhy-ssl-key.p12 perhaps classpath: dhy-ssl-key.p12
    key-store-password: 123456(Password to generate certificate)
    key-store-type: PKCS12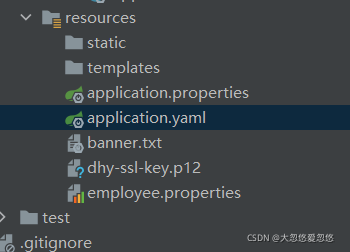
test
At this time, if we continue to use http protocol to access application resources, we will get the following response information:
Bad Request
This combination of host and port requires TLS.
Use HTTPS protocol to access application resources, https://localhost:8888/hello . To get the right results.
Redirect HTTP requests to HTTPS
First, configure two service ports. server.port is our real service port, that is, HTTPS service port. In addition, define a server.httpPort. When the client accesses the HTTP protocol port, it will automatically jump to the HTTPS service port.
server:
  port: 8888
  httpPort: 80
You need to use the coding method for configuration introduced in the previous section. The following configuration classes need not be changed.
@Configuration
public class TomcatCustomizer {

    @Value("${server.httpPort}")
    int httpPort;
    @Value("${server.port}")
    int httpsPort;


    @Bean
    public ConfigurableServletWebServerFactory configurableServletWebServerFactory(){
        TomcatServletWebServerFactory factory = new TomcatServletWebServerFactory(){
            @Override
            protected void postProcessContext(Context context) {
                SecurityConstraint constraint = new SecurityConstraint();
                constraint.setUserConstraint("CONFIDENTIAL");

                SecurityCollection collection = new SecurityCollection();
                collection.addPattern("/*");
                constraint.addCollection(collection);
                context.addConstraint(constraint);
            }
        };;
        factory.addAdditionalTomcatConnectors(connector());
        //The configuration is populated here
        return factory;
    }


    public Connector connector() {
        Connector connector = new Connector("org.apache.coyote.http11.Http11NioProtocol");
        connector.setScheme("http");
        //The port number of the http that the Connector listens on
        connector.setPort(httpPort);
        connector.setSecure(false);
        //After listening to the port number of http, turn to the port number of https
        connector.setRedirectPort(httpsPort);
        return connector;
    }

}
In this way, when we pass the HTTP protocol: http://localhost:80/hello When, the browser access address will automatically jump to the HTTPS connector service port https://localhost:8888/hello
Note that the default port for https is 443
The default port for http is 80
Refer to the article for ssl certificate configuration
Use the JDK built-in tool keytool to generate ssl certificates
Spring boot configuring ssl certificates
Use keytool in JDK to [create Certificate], [view], [use]
Switch to the jetty & undertow container
Although you can replace tomcat with jetty or undertow, I don't recommend it, and I've never done it. In some scenarios, some indicators of the test results of jetty or underow may be better than tomcat. However, tomcat is excellent in terms of performance, stability and resource utilization.
Replace tomcat
By default, spring boot uses tomcat as the default application container. If you need to replace tomcat with jetty or underow, you need to exclude the jar package related to tomcat first. The following code is shown
<dependency>
    <groupId>org.springframework.boot</groupId>
    <artifactId>spring-boot-starter-web</artifactId>
    <exclusions>
        <exclusion>
            <groupId>org.springframework.boot</groupId>
            <artifactId>spring-boot-starter-tomcat</artifactId>
        </exclusion>
    </exclusions>
</dependency>
If you are using a Jetty container, add
<dependency>
    <groupId>org.springframework.boot</groupId>
    <artifactId>spring-boot-starter-jetty</artifactId>
</dependency>
If you use the Undertow container, add
<dependency>
    <groupId>org.springframework.boot</groupId>
    <artifactId>spring-boot-starter-undertow</artifactId>
</dependency
If you do not make special tuning configuration and use the default values, our replacement work has been completed.
Reactor NIO multithreading model

- mainReactor is responsible for listening to the server socket, handling the establishment of new connections, and registering the established socketChannel with subReactor.
- subReactor maintains its own selector, multiplexes IO read-write events based on the socketChannel registered by mainReactor, reads and writes network data, and processes business. In addition, it is thrown to the worker thread pool to complete.
Switch to Jetty Server
Common jetty tuning configuration parameters
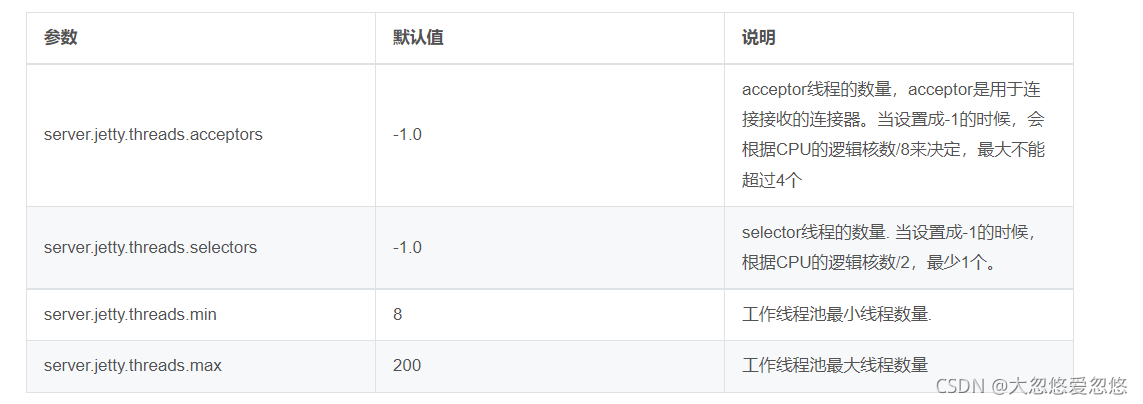
acceptors can be understood as the product manager, who is responsible for processing requests
selectors can be understood as the project manager, who is responsible for distributing the requests received by the product manager to the following programmers for completion
Min < number of programmers < Max: threads that really work
Switch to undertow
The IO threads in the following configuration can be considered as the number of acceptor threads, which is used to establish a connection. Worker threads is the number of threads in the worker thread pool.
server:
  port: 8888
  # Here are the parameters for configuring undertow as the server
  undertow:
    # Set the number of IO threads, which mainly perform non blocking tasks. They are responsible for multiple connections. By default, one thread is set for each CPU core
    io-threads: 4
    # The work task thread pool is 8 times of IO threads by default
    worker-threads: 32
Embedded container detailed reference article
SpringBoot -- embedded server container
Deploy war package to external tomcat container
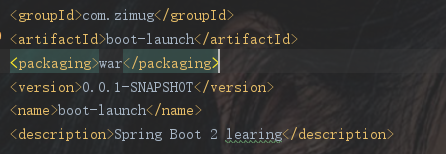
Modify packaging method
<packaging>war</packaging>
Add the above code to the beginning of pom.xml file, as follows:
Exclude built-in tomcat dependencies
When we use the external tomcat, we naturally want to exclude the jar s related to the built-in embedded Tomcat.
<dependency>
    <groupId>org.springframework.boot</groupId>
    <artifactId>spring-boot-starter-web</artifactId>
    <exclusions>
        <exclusion>
            <groupId>org.springframework.boot</groupId>
            <artifactId>spring-boot-starter-tomcat</artifactId>
        </exclusion>
    </exclusions>
</dependency>
Add dependency
<dependency>
    <groupId>org.springframework.boot</groupId>
    <artifactId>spring-boot-starter-tomcat</artifactId>
    <!--You don't have to pack it when you pack it. Other facilities will be provided. In fact, the dependency can theoretically participate in compiling, testing, running and other cycles.
        amount to compile,But the packaging phase did exclude operation-->
    <scope>provided</scope>
</dependency>
A new class is added to inherit SpringBootServletInitializer to implement configure:
Why inherit this class? Spring bootservletinitializer source code comments:
Note that a WebApplicationInitializer is only needed if you are building a war file and deploying it. If you prefer to run an embedded web server then you won't need this at all.
Note that if you are building the WAR file and deploying it, you need the Web application initializer. If you like to run an embedded Web server, you don't need this at all.
Method 1: add a new class to inherit SpringBootServletInitializer and implement configure:
public class ServletInitializer extends SpringBootServletInitializer {
    @Override
    protected SpringApplicationBuilder configure(SpringApplicationBuilder builder) {
        //The Application.class here is the startup class with @ SpringBootApplication annotation
        return builder.sources(BootLaunchApplication.class);
    }
}
Method 2: the startup class inherits SpringBootServletInitializer to implement configure:
@SpringBootApplication
public class Application extends SpringBootServletInitializer {

    public static void main(String[] args) {
        SpringApplication.run(Application.class, args);
    }

    @Override
    protected SpringApplicationBuilder configure(SpringApplicationBuilder builder) {
        return builder.sources(Application.class);
    }
}
matters needing attention: When using external Tomcat deployment access, the following configurations in application.properties (or application.yml) will fail. Please use the external Tomcat port and the project name under Tomcat webapps to access.
server.port=
server.servlet.context-path=
The settings for tomcat in the configuration file only take effect when the built-in tomcat container is used. When the external tomcat is used, it will become invalid
build should have finalName tag
The build code segment in pom.xml should have the name of the final build package of the application.
<finalName>boot-launch</finalName>

Packaging and running
war packaging, and the packaging results will be stored under the target directory of the project.
mvn clean package -Dmaven.test.skip=true
Then copy the war package to the external Tomcat webapps directory. Run startup.bat(windows) or startup.sh(linux) in the ${Tomcat_home}/bin / directory in the external tomcat, and then access the application through the browser to test the effect.
It should be noted that
- In the boot-launch.war directory, unzip it to the boot Launch folder in the tomcat webapps directory. So when you access the application, you must use http://localhost:8888/boot-launch/template/jsp, cannot be: http://localhost:8888/template/jsp . 404 error will be reported.
- jsp static resource reference must also be: / boot launch / image/xxxx.png, not / image/xxxx.png
- In the war package of JSP, the resource usage of webjars is no longer supported