This tutorial is based on Liao Xuefeng's tutorial. Thank the original author for writing the best Git tutorial at present
Liao Xuefeng Git tutorial
Git tutorial
1. Git configuration installation (windows)
You can use Git on Windows directly from Git's official website Download installer , and then install it according to the default option.
After the installation, find "Git" - > "Git Bash" in the start menu and pop up something similar to the command line window, which indicates that Git installation is successful
Or right-click in the blank space of the folder, and the
[the external chain image transfer fails. The source station may have an anti-theft chain mechanism. It is recommended to save the image and upload it directly (img-5IMeqqbn-1638934128878)(C:\Users \ bitter summer \ appdata \ roaming \ typora \ user images \ image-20211208090626088. PNG)]
After the installation is completed, the last step of setting is required. Enter on the command line:
$ git config --global user.name "Your Name"
$ git config --global user.email "email@example.com"
Note the -- global parameter of git config command. Using this parameter means that all Git warehouses on your machine will use this configuration. Of course, you can also specify different user names and Email addresses for a warehouse
2. Create version Library
- New folder to place development files
- Use the git init command to turn this directory into a repository that Git can manage:
$ git init
Initialized empty Git repository in /Users/michael/learngit/.git/
After this step, a. Git directory will appear under the directory. This directory is used by git to track and manage the version library. This directory is hidden by default, but do not touch the contents of this folder, otherwise the GIT warehouse will be damaged.
- Add files to Git repository using git add
$ git add readme.txt
Execute the above command without any display, which is right. The philosophy of Unix is "no news is good news", indicating that the addition is successful. If you are adding all, execute git add. To select all
- Submit the file to the warehouse with the command git commit:
$ git commit -m "1.0.0"
-m the following input is the description of this submission. You can input any content. Of course, it is better to be meaningful, so that you can easily find the change record from the historical record
So far, you have successfully maintained a version in the local warehouse
3. Associated remote warehouse
Push
- Register and create a new warehouse on GitHub or Gitee
- Associated remote warehouse
$ git remote add origin Warehouse address
After adding, the name of the remote library is origin, which is Git's default name, or it can be changed to something else
- Push local library content to remote library for the first time
$ git push -u origin master
Counting objects: 20, done.
Delta compression using up to 4 threads.
Compressing objects: 100% (15/15), done.
Writing objects: 100% (20/20), 1.64 KiB | 560.00 KiB/s, done.
Total 20 (delta 5), reused 0 (delta 0)
remote: Resolving deltas: 100% (5/5), done.
To github.com:michaelliao/learngit.git
 * [new branch]      master -> master
Branch 'master' set up to track remote branch 'master' from 'origin'.
Push the contents of the local library to the remote. Using the git push command actually pushes the current branch master to the remote.
Because the remote library is empty, when we first push the master branch, we add the - u parameter. Git will not only push the contents of the local master branch to the new remote master branch, but also associate the local master branch with the remote master branch. In future push or pull, we can simplify the command.
- If subsequent modifications are submitted, you do not need to add - u
$ git push origin master
SSH warning
When you first use Git's clone or push command to connect to GitHub, you will get a warning:
The authenticity of host 'github.com (xx.xx.xx.xx)' can't be established.
RSA key fingerprint is xx.xx.xx.xx.xx.
Are you sure you want to continue connecting (yes/no)?
This is because Git uses SSH connection. When verifying the Key of GitHub server for the first time, you need to confirm whether the fingerprint information of GitHub Key really comes from GitHub server, and enter yes.
Git will output a warning that you have added GitHub's Key to a local trust list:
Warning: Permanently added 'github.com' (RSA) to the list of known hosts.
This warning will only appear once, and there will be no warning for subsequent operations.
Delete remote warehouse
If the address is written incorrectly when adding, or you just want to delete the remote library, you can use the GIT remote RM < name > command. Before use, it is recommended to use git remote -v to view the remote library information:
$ git remote -v
origin  git@github.com:michaelliao/learn-git.git (fetch)
origin  git@github.com:michaelliao/learn-git.git (push)
Then, delete according to the name, for example, delete origin:
$ git remote rm origin
The "delete" here actually cancels the binding relationship between local and remote libraries, rather than physically deleting remote libraries. The remote library itself has not changed. To really delete a remote library, you need to log in to GitHub, find the delete button on the background page, and then delete it.
Clone from remote warehouse
In practice, it is often cloned from a remote warehouse
Clone a local library with the command git clone:
$ git clone Clone address
Cloning into 'gitskills'...
remote: Counting objects: 3, done.
remote: Total 3 (delta 0), reused 0 (delta 0), pack-reused 3
Receiving objects: 100% (3/3), done.
Branch Management
Create and merge branches
Principle analysis
For each submission, Git strings them into a timeline, which is a branch. So far, there is only one timeline. In Git, this branch is called the main branch, that is, the master branch. Strictly speaking, HEAD does not point to submission, but to master, which points to submission. Therefore, HEAD points to the current branch.
At the beginning, the master branch is a line. Git uses the master to point to the latest submission, and then HEAD to point to the master to determine the current branch and the submission point of the current branch:

Each time you submit, the master branch will move forward one step. In this way, as you continue to submit, the line of the master branch will become longer and longer.
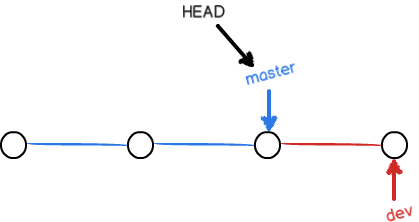
When we create a new branch, such as dev, Git creates a new pointer called dev, points to the same commit as the master, and then points the HEAD to dev, indicating that the current branch is on dev:
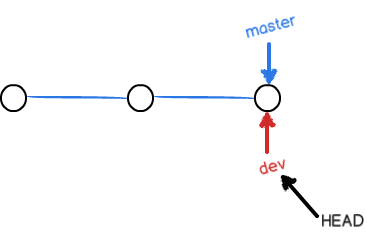
You see, Git creates a branch very quickly, because in addition to adding a dev pointer and changing the direction of HEAD, the files in the workspace have not changed!
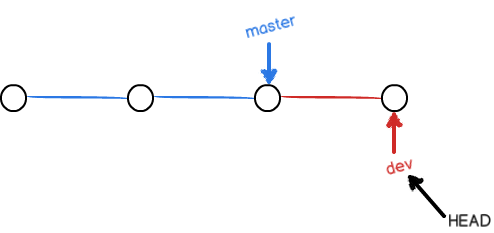
However, from now on, the modification and submission of the workspace are aimed at the dev branch. For example, after a new submission, the dev pointer moves forward one step, while the master pointer remains unchanged:
If our work on dev is completed, we can merge dev into the master. How does Git merge? The simplest way is to directly point the master to the current commit of dev to complete the merge:
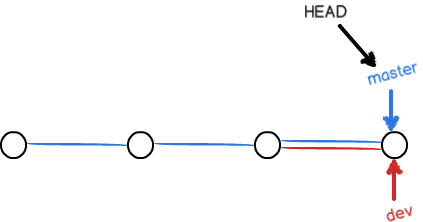
So Git merges branches quickly! Just change the pointer and the content of the workspace will remain the same!
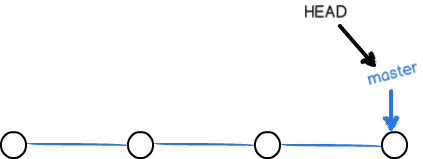
After merging the branches, you can even delete the dev branch. Deleting the dev branch is to delete the dev pointer. After deletion, we have a master branch left:
Actual operation
- We create the dev branch and switch to the dev branch:
$ git checkout -b dev
Switched to a new branch 'dev'
The git checkout command plus the - b parameter indicates creation and switching, which is equivalent to the following two commands:
$ git branch dev
$ git checkout dev
Switched to branch 'dev'
Use the git branch command to view the current branch:
$ git branch
* dev
  master
The git branch command will list all branches, and the current branch will be preceded by a * sign.
- We can commit normally on the dev branch
$ git add readme.txt
$ git commit -m "branch test"
[dev b17d20e] branch test
 1 file changed, 1 insertion(+)
- After the dev branch is completed, we can switch back to the master branch:
$ git checkout master
Switched to branch 'master'
After switching back to the master branch, view a readme.txt file. The content just added is missing! Because the commit is on the dev branch, and the commit point of the master branch does not change at the moment:
- Merge the work of the dev branch into the master branch
$ git merge dev
Updating d46f35e..b17d20e
Fast-forward
 readme.txt | 1 +
 1 file changed, 1 insertion(+)
The git merge command is used to merge a specified branch into the current branch. After merging, check the contents of readme.txt, and you can see that it is exactly the same as the latest commit of dev branch.
Noting the fast forward information above, Git told us that the merge is in the "fast forward mode", that is, directly pointing the master to the current commit of dev, so the merge speed is very fast.
- After the merge, you can safely delete the dev branch:
$ git branch -d dev
Deleted branch dev (was b17d20e).
After deletion, check the branch, and only the master branch is left:
$ git branch
* master
switch
We notice that git checkout < Branch > is used to switch branches, while git checkout -- < File > is used to undo modification. The same command has two functions, which is really confusing.
In fact, the action of switching branches is more scientific with switch. Therefore, the latest version of Git provides a new git switch command to switch branches:
To create and switch to a new dev branch, you can use:
$ git switch -c dev
Directly switch to the existing master branch. You can use:
$ git switch master
Using the new git switch command is easier to understand than git checkout.
Summary
View branch: git branch
Create branch: git branch < name >
Switch branches: git checkout < name > or git switch < name >
Create + switch branch: git checkout - B < name > or git switch - C < name >
Merge a branch to the current branch: git merge < name >
Delete branch: git branch - d < name >
Conflict resolution
If you make changes in both branches, commit
Now, both the master branch and the feature1 branch have new submissions respectively, which becomes as follows:
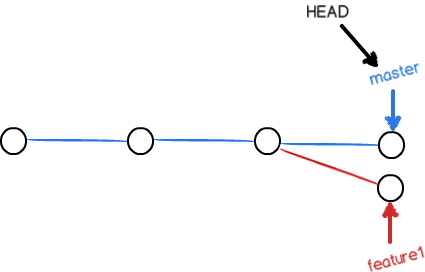
In this case, Git cannot perform "quick merge" and can only try to merge their modifications, but this merge may have conflicts. Let's try:
$ git merge feature1
Auto-merging readme.txt
CONFLICT (content): Merge conflict in readme.txt
Automatic merge failed; fix conflicts and then commit the result.
Sure enough, there was a conflict! Git told us that there was a conflict in the readme.txt file, which must be manually resolved before submission. git status can also tell us the conflicting files:
Sure enough, there was a conflict! Git told us that there was a conflict in the readme.txt file, which must be manually resolved before submission. git status can also tell us the conflicting files:
$ git status
On branch master
Your branch is ahead of 'origin/master' by 2 commits.
  (use "git push" to publish your local commits)

You have unmerged paths.
  (fix conflicts and run "git commit")
  (use "git merge --abort" to abort the merge)

Unmerged paths:
  (use "git add <file>..." to mark resolution)

	both modified:   readme.txt

no changes added to commit (use "git add" and/or "git commit -a")
We can directly view the contents of readme.txt:
Git is a distributed version control system.
Git is free software distributed under the GPL.
Git has a mutable index called stage.
Git tracks changes of files.
<<<<<<< HEAD
Creating a new branch is quick & simple.
=======
Creating a new branch is quick AND simple.
>>>>>>> feature1
Git marks the contents of different branches with < < < <, =========, > > > > > > >. We modify them as follows and save them:
Creating a new branch is quick and simple.
Resubmission:
$ git add readme.txt
$ git commit -m "conflict fixed"
[master cf810e4] conflict fixed
Now, the master branch and feature1 branch are as follows:
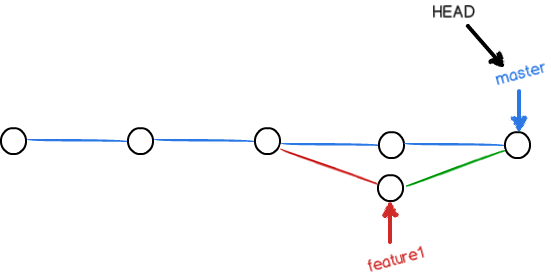
You can also see the merging of branches by using git log with parameters:
$ git log --graph --pretty=oneline --abbrev-commit
*   cf810e4 (HEAD -> master) conflict fixed
|\
| * 14096d0 (feature1) AND simple
* | 5dc6824 & simple
|/
* b17d20e branch test
* d46f35e (origin/master) remove test.txt
* b84166e add test.txt
* 519219b git tracks changes
* e43a48b understand how stage works
* 1094adb append GPL
* e475afc add distributed
* eaadf4e wrote a readme file
Finally, delete the feature1 branch:
$ git branch -d feature1
Deleted branch feature1 (was 14096d0).
completion of jobs.
Summary
When Git cannot automatically merge branches, the conflict must be resolved first. After the conflict is resolved, submit and merge is completed.
Conflict resolution is to manually edit the failed Git merge file to the content we want, and then submit it.
Use the git log --graph command to see the branch merge graph.
Branching strategy
In actual development, we should carry out branch management according to several basic principles:
First, the master branch should be very stable, that is, it is only used to release new versions and cannot work on it at ordinary times;
Where do you work? All work is on the dev branch, that is, the dev branch is unstable. At some time, for example, when version 1.0 is released, merge the dev branch into the master, and release version 1.0 on the master branch;
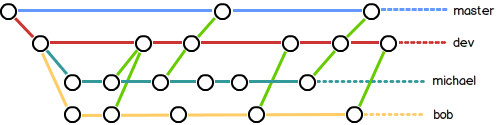
You and your friends, everyone works on the dev branch. Everyone has his own branch. Just merge on the dev branch from time to time.
So the branch of teamwork looks like this:
Multi person collaborative development
When multiple people collaborate, everyone will push their own modifications to the master and dev branches.
Now, simulate a small partner and clone it on another computer (note to add SSH Key to GitHub) or another directory of the same computer:
$ git clone git@github.com:michaelliao/learngit.git
Cloning into 'learngit'...
remote: Counting objects: 40, done.
remote: Compressing objects: 100% (21/21), done.
remote: Total 40 (delta 14), reused 40 (delta 14), pack-reused 0
Receiving objects: 100% (40/40), done.
Resolving deltas: 100% (14/14), done.
He works on the master, and then push es the master branch to the remote from time to time:
$ git add env.txt

$ git commit -m "add env"
[dev 7a5e5dd] add env
 1 file changed, 1 insertion(+)
 create mode 100644 env.txt

$ git push origin master
Counting objects: 3, done.
Delta compression using up to 4 threads.
Compressing objects: 100% (2/2), done.
Writing objects: 100% (3/3), 308 bytes | 308.00 KiB/s, done.
Total 3 (delta 0), reused 0 (delta 0)
To github.com:michaelliao/learngit.git
   f52c633..7a5e5dd  dev -> dev
Your partner has pushed his submission to the origin/master branch, and you happen to have modified the same file and tried to push:
$ cat env.txt
env

$ git add env.txt

$ git commit -m "add new master"
[dev 7bd91f1] add new env
 1 file changed, 1 insertion(+)
 create mode 100644 env.txt

$ git push origin master
To github.com:michaelliao/learngit.git
 ! [rejected]        master -> master (non-fast-forward)
error: failed to push some refs to 'git@github.com:michaelliao/learngit.git'
hint: Updates were rejected because the tip of your current branch is behind
hint: its remote counterpart. Integrate the remote changes (e.g.
hint: 'git pull ...') before pushing again.
hint: See the 'Note about fast-forwards' in 'git push --help' for details.
Push failed because the latest submission of your partner conflicts with the submission you are trying to push. Git has prompted us to grab the latest Submission from the origin/master with git pull, merge locally, resolve the conflict, and then push:
$ git pull
There is no tracking inform$ git pull
info: detecting host provider for 'https://gitee.com/'...
info: detecting host provider for 'https://gitee.com/'...
remote: Enumerating objects: 5, done.
remote: Counting objects: 100% (5/5), done.
remote: Compressing objects: 100% (2/2), done.
remote: Total 3 (delta 1), reused 0 (delta 0), pack-reused 0
Unpacking objects: 100% (3/3), 262 bytes | 26.00 KiB/s, done.
From https://gitee.com/kuxiamuhe/branch
   11d66e8..e0dfe6b  master     -> origin/master
error: Your local changes to the following files would be overwritten by merge:
        New text document.txt
Please commit your changes or stash them before you merge.
Aborting
Updating cbdab4a..e0dfe6b
ation for the current branch.
Please specify which branch you want to merge with.
See git-pull(1) for details.

    git pull <remote> <branch>

If you wish to set tracking information for this branch you can do so with:

    git branch --set-upstream-to=origin/<branch> master
git pull also failed because it was not submitted. git pull is performed after a submission through git commit
$ git pull
Auto-merging env.txt
CONFLICT (add/add): Merge conflict in env.txt
Automatic merge failed; fix conflicts and then commit the result.
git pull is successful this time, but there are conflicts in the merge, which need to be solved manually. The solutions are the same as those in branch management Conflict resolution Exactly the same. After solving the problem, submit and then push:
$ git commit -m "fix env conflict"
[dev 57c53ab] fix env conflict

$ git push origin dev
Counting objects: 6, done.
Delta compression using up to 4 threads.
Compressing objects: 100% (4/4), done.
Writing objects: 100% (6/6), 621 bytes | 621.00 KiB/s, done.
Total 6 (delta 0), reused 0 (delta 0)
To github.com:michaelliao/learngit.git
   7a5e5dd..57c53ab  dev -> dev
Therefore, the working mode of multi person cooperation is usually as follows:
- First, you can try to push your own modifications with git push origin < branch name >;
- If the push fails, you need to use git pull to try to merge because the remote branch is newer than your local branch;
- If there is a conflict in the merge, resolve the conflict and submit it locally;
- If there is no conflict or the conflict is resolved, push it with git push origin < branch name > to succeed!
If git pull prompts no tracking information, it indicates that the link relationship between the local branch and the remote branch has not been created. Use the command git branch -- set upstream to < branch name > origin / < branch name >.
This is the working mode of multi person cooperation. Once you are familiar with it, it is very simple.
Summary
- To view the remote library information, use git remote -v;
- If the newly created local branch is not pushed to the remote, it will not be visible to others;
- Push the branch locally, and use git push origin branch name. If the push fails, first grab the remote new submission with git pull;
- Create a branch corresponding to the remote branch locally. Use git checkout - B branch name origin / branch name. The names of the local and remote branches should be the same;
- Establish the association between local branch and remote branch, and use git branch -- set upstream branch name origin / branch name;
- Grab branches from the remote and use git pull. If there is a conflict, deal with the conflict first.
For others, see the tutorial written by Liao Xuefeng https://www.liaoxuefeng.com/wiki/896043488029600