Experiment 1 HTML Basics
1, Experimental purpose
1. Master common HTML language tags;
2. Use the text editor to create HTML documents and make simple form pages.
2, Experimental environment
Computer, Windows operating system
3, Experimental content, source code and running results
Experiment content:
1. Enter the following HTML code program in the text editor "NOTEPAD" to the file name SY1 Html is saved and run in the browser. (please read the following program statements carefully and understand the function of each statement)
The source program list is as follows:
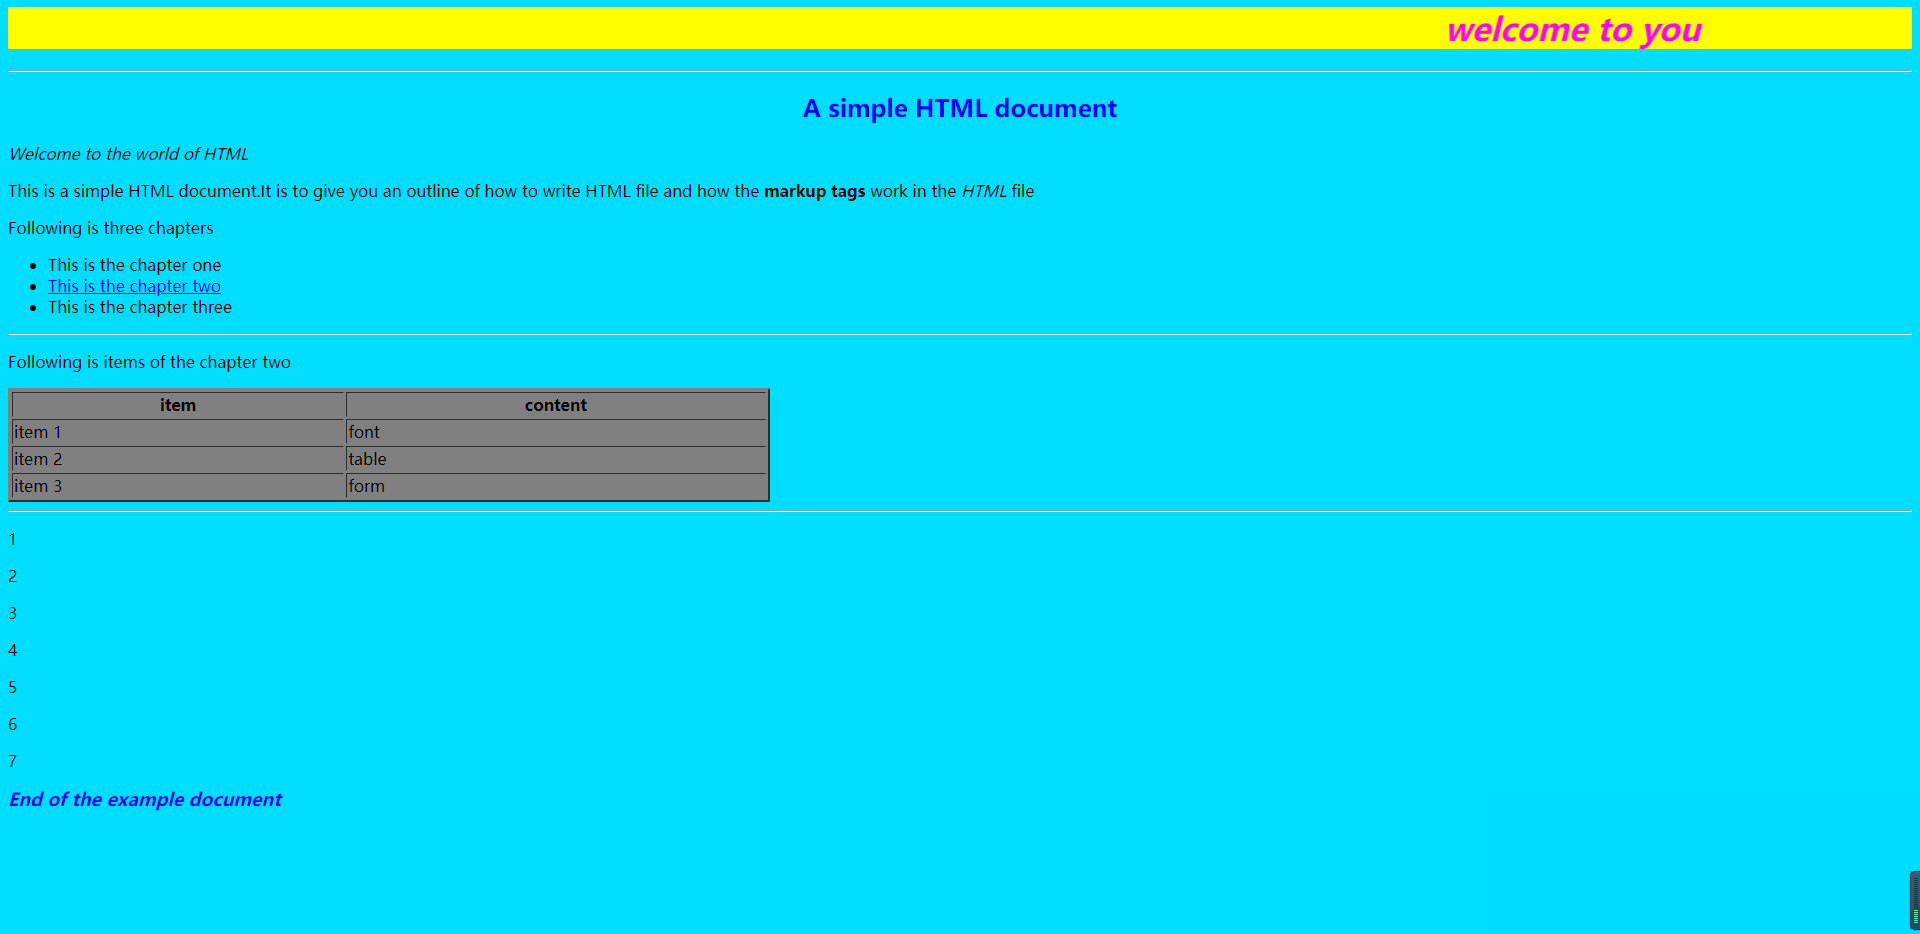
<html>
<head>
<title>Example</title>
</head>
<body bgcolor="#00DDFF">
<h1><B><I><FONT COLOR="#FF00FF">
<MARQUEE BGCOLOR= "#FFFF00" direction=left behavior=alternate>welcome to you</MARQUEE>
</FONT></I></B></h1>
<hr>
<h2 align=center><FONT COLOR="#0000FF">A simple HTML document</FONT></h2>
<EM>Welcome to the world of HTML</EM>
<p>This is a simple HTML document.It is to give you an outline of how to write HTML file and how the<b> markup tags</b> work in the <I>HTML</I> file</p>
<p>Following is three chapters
<ul>
<li>This is the chapter one</li>
<li><A  HREF="#item">This is the chapter two</A></li>
<li>This is the chapter three</li>
</ul></p>
<hr>
<p><A NAME="item">Following is items of the chapter two</A> </p>
<table border=2 bgcolor=gray width="40%">
<tr>
<th>item</th><th>content</th>
</tr>
<tr>
<td>item 1</td>
<td>font</td>
</tr>
<tr>
<td>item 2</td>
<td>table</td>
</tr>
<tr>
<td>item 3</td>
<td>form</td>
</tr>
</table>
<hr><p>
1<p>
2<p>
3<p>
4<p>
5<p>
6<p>
7<p>
<B><I><FONT COLOR=BLUE SIZE=4>End of the example document </FONT></I></B>
</p>
</body>
</html>
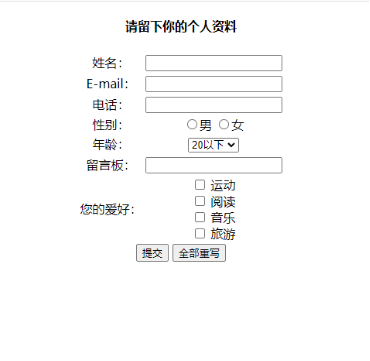
2. Write an HTML file that can output the interface shown in the figure below. requirement:
(1) Verify the format of E-mail input: user name @ domain name.
(2) Verify the input telephone format: composed of 11 digits.
(3) Gender "female" is the default option
(4) The list options of age are below 20, 20, 21, 22, 23, 24, 25 and above 25, of which "below 20" is the default option.
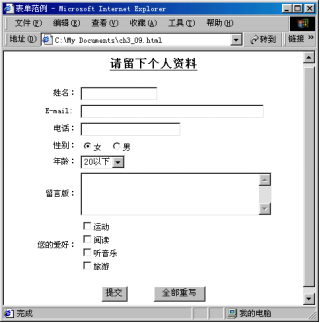
Source code:
<!DOCTYPE html>
<html>
    <head>
        <meta charset="UTF-8" />
        <title>Experiment 1</title>
    </head>
    <body>
        <form action="" align="center">
            <h4>Please leave your personal information</h4>
            <table align="center">
                <tr>
                    <td>full name:</td>
                    <td><input type="text"></td>
                </tr>
                <tr>
                    <td>E-mail: </td>
                    <td><input type="Email" pattern="^([a-zA-Z0-9_\.\-])+\@(([a-zA-Z0-9\-]+\.)+([a-zA-Z0-9]{2,4})+$)"></td>
                </tr>
                <tr>
                    <td>Telephone:</td>
                    <td><input type="tel" maxlength="11" minlength="11" pattern="[0-9]"></td>
                </tr>
                <tr>
                    <td>Gender:</td>
                    <td>
                        <input name="sex" type="radio" id="man"><label for="man">male</label>
                        <input name="sex" type="radio" id="woman"><label for="woman">female</label>
                    </td>
                </tr>
                <tr>
                    <td>Age:</td>
                    <td>
                        <select name="" id="">
                            <option value="" selected>20 following</option>
                            <option value="">20</option>
                            <option value="">21</option>
                            <option value="">22</option>
                            <option value="">23</option>
                            <option value="">24</option>
                            <option value="">25</option>
                            <option value="">25 above</option>
                        </select>
                    </td>
                </tr>
                <tr>
                    <td>Message Board:</td>
                    <td><input type="textarae" ></td>
                </tr>
                <tr>
                    <td>Your hobbies:</td>
                    <td>
                        <input type="checkbox" name="hobbys" id="sport">
                        <label for="sport">motion</label><br>
                        <input type="checkbox" name="hobbys" id="read">
                        <label for="read">read</label><br>
                        <input type="checkbox" name="hobbys" id="music">
                        <label for="music">music</label><br>
                        <input type="checkbox" name="hobbys" id="ly">
                        <label for="ly">Travel</label>
                    </td>
                </tr>
            </table>
            <input type="submit" value="Submit">
            <input type="reset" value="Rewrite all">
        </form>
    </body>
</html>
Operation results:
Experiment 2 CSS+DIV page layout
1, Experimental purpose
1. Understand the separation of web content and performance;
2. Be familiar with the basic syntax and format of CSS;
3. Understand the common layout structure of the page;
4. Learn to make a blog page with CSS+DIV layout.
2, Experimental environment
Computer, Windows operating system
3, Experimental content, source code and running results
Experiment content:
1. Apply CSS in web pages
There are four ways to apply CSS in web pages: inline CSS style, embedded CSS style, linking external CSS style sheet and importing external CSS style sheet.
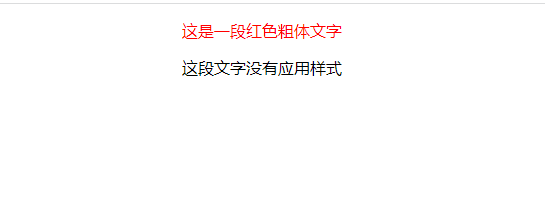
(1) Inline CSS Style
Create a new HTML document and enter the following code in the body tag
<p style="font-size:72;font-style:bold;color:red;>This is a red bold text</p>
<p>This text is not styled</p>
Browse results.
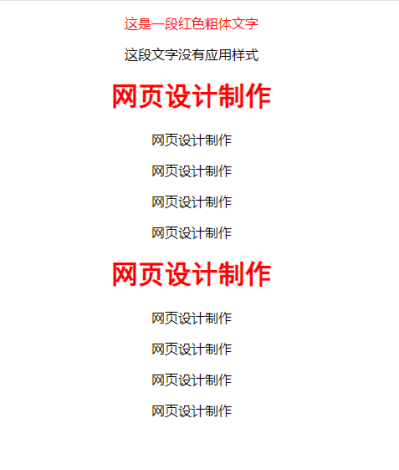
(2) Embedded CSS Styles
Based on the above question, enter the following code in the head tag
<style type="text/css">
  h1{color:#ff0000; Font family: bold}
  .mystyle{color:#0000ff; font- family: bold; font-size:64}
p.first{ color:#000000; font- family: Arial; font-size:12}
p.second{ color:#00ff00; font- family: Arial; font-size:32}
Continue entering the following code in the body tag
<h1>Web design and production</h1>
<p class="first">Web design and production</p>
<p class="second">Web design and production</p>
<p class="mystyle">Web design and production</p>
<div class="mystyle">Web design and production</div>
Browse effect.
(3) External style sheet
To create a new text file, enter the following code
h1{color:#ff0000; Font family: bold}
p.first{ color:#000000; Font family: Arial; font-size:12}
p.second{ color:#00ff00; Font family: Arial; font-size:32}
p. mystyle { color:#0000ff; Font family: Arial; font-size:64}
Save the file as mystyle css
Create a new HTML document and enter the following code in the head tag
<link rel="stylesheet" type="text/css" href=" mystyle.css">
Enter the following code in the body tag
<h1>Web design and production</h1>
<p class="first">Web design and production</p>
<p class="second">Web design and production</p>
<p class=" mystyle">Web design and production</p>
<div class=" mystyle">Web design and production</div>
Browse effect.
(4) Import external CSS Styles
Create a new HTML document and enter the following code in the head tag
  <style type="text/css">
    @import url("mystyle.css");
  </style>
The content in the Body tag is the same as that in (3), and the browsing effect is the same.
2. Combined with the semantic tag of HTML5, a personal blog page is designed by using DIV+CSS web page layout technology. Requirements: (1) the header tag defines the page header area; nav tag defines the navigation area; The div tag defines the content block in the middle, in which two article article article areas are nested with the section tag on the left, and each article area should contain the header area, paragraph content and footer; The sidebar is designed with aside on the right; At the bottom, define the copyright information with the footer tag. As shown in the figure below.

(2) Write an external CSS file to set the style of each label attribute used in the main file, such as background color, font, font size, alignment, etc.
(3) Use the unordered table to realize the horizontal navigation menu. The key point is to eliminate the bullets in front of the unordered list and convert the default vertical arrangement to horizontal arrangement.
(4) Set the hyperlink style of the navigation menu. Key: the link target is #. Set the change of background color when the mouse hovers over the hot word in the navigation bar.
Source code:
HTML section:
<!DOCTYPE html>
<html>
    <head>
        <meta charset="UTF-8" />
        <title>Experiment 1</title>
        <link rel="stylesheet" href="css/style1.css">
    </head>
    <body>
        <header id="top">
            <h1>XX's blog</h1>
        </header>
        <nav>
            <ul>
                <a href="#"> < li > Home Page < / Li ></a>
                <a href="#"> < li > blog < / Li ></a>
                <a href="#"> < li > album < / Li ></a>
                <a href="#"> < li > personal profile < / Li ></a>
            </ul>
        </nav>
        <div class="container">
            <article>
                <header>
                    <h3>HTML5</h3>
                </header>
                <p>HTML5 It's the next generation HTML The standard is still in the development stage. Yes Web2.0 In the new era, Internet-based applications have become more and more abundant, but also put forward higher requirements for Internet applications.</p>
                <footer>Edited in 2018.9</footer>
            </article>
            <article>
                <header>
                    <h3>CSS3</h3>
                </header>
                <p>For port designers, although CSS3 It's not a new technology, but it reboots a window of ideas.</p>
                <footer>Edited in 2018.9</footer>
            </article>
            <aside>
                <h3>brief introduction</h3>
                <p>HTML5 and CSS3 A change is taking place, he is not replacing Flash,But is developing into an open Web The platform not only has outstanding construction in the mobile field, but also challenges traditional applications.</p>
            </aside>
        </div>
        <footer>
            <h5>Copyright 2018</h5>
        </footer>
    </body>
</html>
CSS section:
*{
    margin: 0;
    padding: 0;
}
#top{
    width: 100%;
    height: 100px;
    text-align: center;
}
#top h1 {
    line-height: 100px;
    font-size: 50px;
    letter-spacing:20px;
}
nav{
    background-color:skyblue;
    height: 70px;
}
a{
    text-decoration: none;
}
a:hover{
    color: aqua;
}
ul{
    margin-left: 10%;
}
ul li {
    list-style: none;
    float: left;
    margin-right: 40px;
    font-size:30px;
    line-height: 70px;
}
.container{
    width: 100%;
    margin-top: 50px;
}
.container article{
    width: 55%;
    float: left;
    margin-left: 10%;
    margin-top: 30px;
    padding: 30px;
    box-sizing: border-box;
    border: 1px solid rgb(24, 174, 233);
}
.container article h3{
    border-bottom: 1px dashed rgb(24, 174, 233);
}
.container article p{
    margin-top: 5px;
    line-height:30px;
}
.container aside{
    float: right;
    top: 50%;
    transform: translateY(-50%);
    width: 13%;
    margin-right: 10%;
    padding: 30px;
    box-sizing: border-box;
    border: 1px solid rgb(24, 174, 233);
}
.container aside p{
    top: 5px;
}
footer{
    clear: both;
    border-top: 1px solid rgb(24, 174, 233);
    margin-top: 15px;
}
footer h5{
    float: left;
    margin-left: 50%;
    margin-top: 5px;
    transform:translateX(-50%);
}
Operation results:


Experiment 3 JavaScript built-in functions and built-in objects
1, Experimental purpose
1. Analyze the usage of JavaScript built-in functions;
2. Master the properties and methods of common built-in objects in JavaScript.
2, Experimental environment
Computer, Windows operating system
3, Experimental content, source code and running results
Experimental content
1. Read the following program to understand the functions of the built-in functions of the JavaScript system
The source program list is as follows:
<!DOCTYPE html>
<html>
<head>
<meta http-equiv="Content-Type" content="text/html;charset=utf-8">
<title>Understanding of built-in functions</title>
<style type="text/css">
div{
background:#CDEBE6;
color:#330000;
width:750px;
font-size:20px;
font-weight:bolder;
}
h4{text-align:center;}
b{color: red;font-size:18px;}
</style>
</head>
<body>
<div>
<h4>System function usage</h4>
<b>1.eval("character string")<br/></b>
<script type="text/javascript">
var rel=eval("1000+3/5");
document.write(" "+"1000+3/5="+rel);
document.write("<br/>");
document.write(" "+"x=10,y=20,x*y=");
eval("x=10;y=20;document.write(x*y)");
document.write("<br/> 2+2="+eval("2+2"));
document.write("<br/>");
var x=10;
document.write(" "+"x=10,x+17="+eval(x+17));
document.write("<br/>");
</script>
<b>2.escape("character string")<br/></b>
<script type="text/javascript">
document.write(" "+"escape('&')="+escape("&"));
document.write("<br/>");
result=escape(" "+"my name is Zhang Hua");
document.write(" "+"escape('my name is Zhang Hua')="+result);
</script>
<b>3.unescape(string)<br/></b>
<script type="text/javascript">
document.write(" "+"unescape('%26')="+unescape("%26"));
document.write("<br/>");
result=unescape(" "+"my%20name%20is%20%u5F20%u534E");
document.write(" "+"unescape('my%20name%20is%20%u5F20%u534E')="+result);
</script>
<b>4.parseFloat(string)<br/></b>
<script type="text/javascript">
document.write(" "+"parseFloat('3.14')="+parseFloat("3.14"));
document.write("<br/>");
document.write(" "+"parseFloat('314e-2')="+parseFloat("314e-2"));
document.write("<br/>");
document.write(" "+"parseFloat('3.14ab')="+parseFloat("3.14ab"));
document.write("<br/>");
document.write(" "+"parseFloat('FF2')="+parseFloat("FF2"));
document.write("<br/>");
</script>
<b>5.parseInt("numberstring,radix)<br/></b>
<script type="text/javascript">
document.write(" "+"32:"+parseInt("32"));
document.write("<br/>");
document.write(" "+"032:"+parseInt("032"));
document.write("<br/>");
document.write(" "+"0x32:"+parseInt("0x32"));
document.write("<br/>");
document.write(" "+"parseInt('15*3',10)="+parseInt("15*3",10));
document.write("<br/>");
</script>
<b>6.isNaN()<br/></b>
<script type="text/javascript">
document.write(" "+"isNaN(\"5454g\")="+isNaN("5454g"));
document.write("<br/>");
document.write(" "+"isNaN(\"789\")="+isNaN("789"));
document.write("<br/>");
</script>
</div>
</body>
</html>
2. Read the following program to understand the Date object and its method of JavaScript system.
<!DOCTYPE html>
<html>
<head>
<meta http-equiv="Content-Type" content="text/html; charset=utf-8" />
<title>Date object and its method </title>
    <script type="text/javascript">
    var mydate=new Date();
    var myyear=mydate.getFullYear(); <!--use getFullYear()Year of acquisition-->
    document.write("particular year:"+myyear); <!--Output current year-->
    document.write("<br/>");
    var myMonth=mydate.getMonth(); <!--use getMonth()Get month-->
    document.write("month:"+myMonth); <!--Output current month-->
    document.write("<br/>");

    var mydays=mydate.getDate();
    document.write("date:"+mydays); <!--Output current seconds-->
    document.write("<br/>");

    var weekday=["day","one","two","three","four","five","six"];
    document.write("Week:" + weekday[mydate.getDay()] );
    document.write("<br/>");

    pageOpen=new Date();
    function stay(){
    pageClose=new Date();
    minutes=(pageClose.getMinutes()-pageOpen.getMinutes());
    seconds=(pageClose.getSeconds()-pageOpen.getSeconds());
    time=(seconds+(minutes*60));
    time=(time+"second");
    alert("Have you stayed here"+time+"look forward to seeing you next time");
    }
    </script>
</head>
<body>
<input type="button" value="residence time" onClick="stay()">
</body>
</html>
Source code:
<!DOCTYPE html>
<html>
<head>
<meta charset="UTF-8" />
<title>Experiment 1</title>
<style>
input{
width: 200px;
height: 150px;
font-size: 50px;
}
p{
font-size: 80px;
}
</style>
</head>
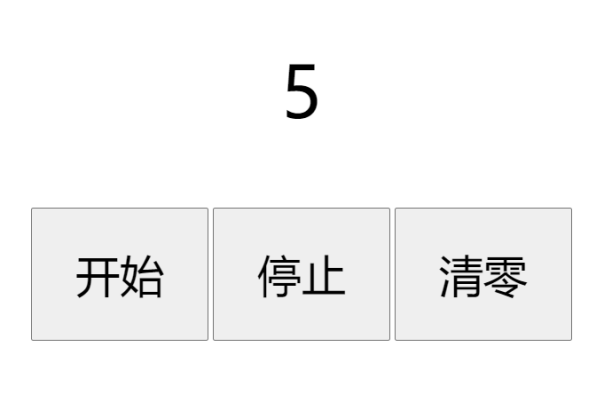
<body style="text-align:center">
<p id="num">0</p>
<input type="button" value="start" onclick="start()" />
<input type="button" value="stop it" onclick="end()" />
<input type="button" value="Clear" onclick="cls()" />
</body>
<script>
var num = document.getElementById("num");
var i = 0;
var timer;
function start() {
clearInterval(timer);
timer = setInterval(result,1000);
}
function result () {
i++;
num.innerText = i;
}
function end() {
clearInterval(timer);
}
function cls() {
i=0;
num.innerText =i;
clearInterval(timer);
}
</script>
</html>
Operation results:

Experiment 4 JavaScript events
1, Experimental purpose
1. Master the concepts of event, event driven and event handler, and understand the relationship among them;
2. Master the method of specifying event handler;
3. Learn to write simple event handlers.
2, Experimental environment
Computer, Windows operating system
3, Experimental content, source code and running results
Experimental content
1. Read the following procedures and understand the events, event drivers and event handling in each section of the procedures.
(1) The list of form event source programs is as follows:
<!DOCTYPE html>
<html>
<head>
<meta charset="UTF-8">
<title>Form Events </title>
<script type="text/javascript">
function getFocus(){
document.bgColor="blue";
};
function loseFocus(){
document.bgColor="white";
};
function submitTest(){
var msg="Acquisition of form data:\n";
msg +="user name:";
var username=document.getElementById("input1").value;
msg +=username;
msg +=",\n password:";
var psw=document.getElementById("input2").value;
msg +=psw;
alert(msg);
return false;
}
function resetTest(){
alert("Clear data");
}
</script>
</head>
<body>
<center>
<form onsubmit="return submitTest()" onreset="resetTest()">
<fieldset height="500px">
<legend>Form event instance</legend><br/>
user name:<input type="text" id="input1"/>
dense code:<input type="password" id="input2"/><br/><br/>
<input type="button" value="get/Loss of trigger event" onFocus="getFocus()" onBlur="loseFocus()"/><br/>
<input type="submit" value="Submit"/>
<input type="reset" value="Reset"/>
</fieldset>
</form>
</center>
</body>
</html>
(2) The list of mouse event source programs is as follows:
<!DOCTYPE html>
<html>
 <head>
  <meta charset="UTF-8">
  <title>Mouse event</title>
  <style type="text/css">
    img{display: none;}
  </style>

 </head>
 <body>
  <p id="name">Maple leaves are red</p>
  <img src="Maple leaves are red.jpg" id="pic"/>
  <script type="text/javascript">
    var names=document.getElementById("name");
    var pic=document.getElementById("pic");
    names.onmouseover=function(){
	names.style.color="red";
    }
    names.onmouseout=function(){
	names.style.color="blue";
    }
    names.onclick=function(){
	pic.style.display="block";
    }
    names.ondblclick=function(){
	pic.style.display=" none";
    }
  </script>
 </body>
</html>
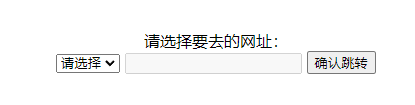
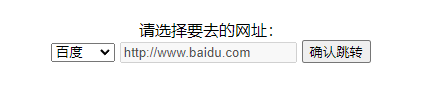
2. Write the web page code of an html file. The page contains a drop-down list box, a text box and a button (see the left in the figure below). The drop-down list box selects the website to go. When the selection is completed, the corresponding web address appears in the text box (see the right in the figure below). Click the confirm jump button to access the web address that appears in the text box.

Source code:
<!DOCTYPE html>
<html>
    <head>
        <meta charset="UTF-8" />
        <title>Experiment 4</title>
        <link rel="stylesheet" href="css/style2.css">
        <style>
            li{
                list-style: none;
            }
            body{
                text-align: center;
            }
        </style>
    </head>
    <body>
        <ul style="margin-top:100px">
            <li>Please select the website you want to go to:</li>
            <li>
                <select name="" id="one">
                    <option selected value="4">Please select</option>
                    <option value="0">Baidu</option>
                    <option value="1">Netease</option>
                    <option value="2">qq</option>
                    <option value="3">Sina</option>
                </select>
                <input type="text" id="two" disabled value=''>
                <input type="button" id="btn" value="Confirm jump">
            </li>
        </ul>
    </body>
    <script>
        var array = ['http://www.baidu.com','http://www.163.com','https://im.qq.com/index','https://www.sina.com.cn/','']
        var one = document.getElementById('one');
        var two = document.getElementById('two');
        var btn = document.getElementById('btn');
        one.addEventListener("change",function() {
            var val = this.value;
            two.value = array[val];
        },false);
        btn.addEventListener("click",function(){
            window.open(two.value);
        },false);
    </script>
</html>
Operation results: