Docker learning notes (1)
Installation of Docker
Docker download and installation
The download and installation of docker is smooth, which is better than Tensorflow, which needs to be equipped with various environments. Docker Desktop can download installation files directly on the official website and install them automatically. The Linux version also has a detailed command-line tutorial in the official website document: Official installation tutorial
Image file location modification
For Docker Desktop for Windows:
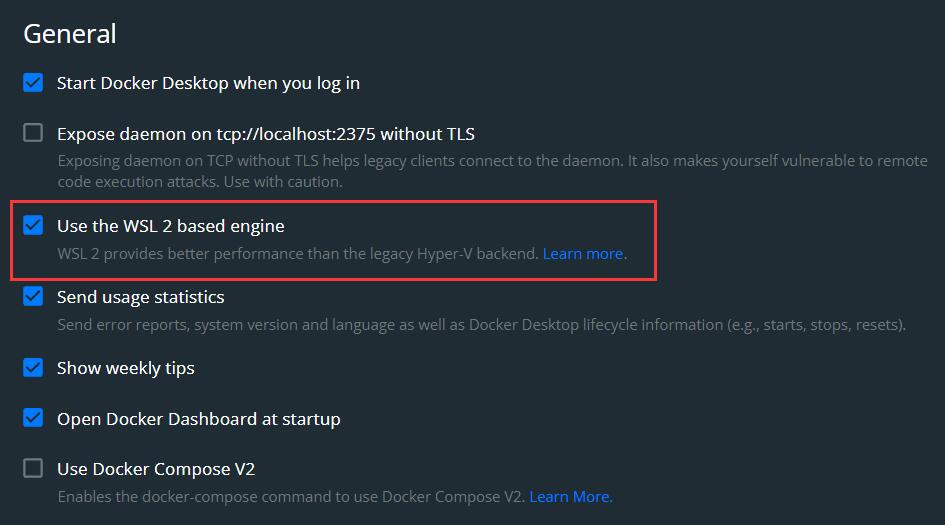
After starting docker, it uses the back end of wsl2 by default, and creates two subsystems named docker desktop and docker desktop data to store file data and system data respectively, which are in drive C by default. Use the following code to change the location of the disk image file:
wsl -v -l 	#View version and wsl list
wsl --shutdown 	#Shut down the system
wsl --export data-desktop destDir\data.desktop.tar 	#Remove data
wsl --unregister data-desktop	#Uninstall subsystem
wsl --import data-desktop destDir\ destDir\data.desktop.tar	#Import data
Then restart docker, and docker will automatically start the two subsystems. After that, the files in docker will be saved in a new directory.

Of course, you can also choose not to use wsl2 in the above interface, so that docker will create a virtual environment through Hyper-V.
Verify that the installation was successful
After installation, execute the following command. If the version is displayed normally, the installation is successful:
docker version # Check version command
Modify mirror warehouse
docker uses the official image warehouse by default. It is recommended to use the Alibaba cloud image acceleration website:
"registry-mirrors": ["https://< your ID > mirror. aliyuncs. com"]
In this way, the docker environment is basically completed! Run the following code to start the sample project:
docker run -d -p 8080:80 docker/getting-started
Where - d represents background execution, - p represents port number mapping, and port 80 in the container is externally mapped to 8080.
Summary
- Official installation tutorial , the official documents are very detailed and can fully meet our installation needs.
- The Docker Desktop uses WSL2 as the backend by default, which can be modified in settings.
- If you don't want to put the disk image of Docker Desktop on Disk C, you can modify it according to the above operations.
- The docker version verifies that the installation was successful.
- Change the mirror warehouse to speed up.
Docker common commands
Help command
docker version 	# docker version
docker info 	# docker system information
docker [opt] --help 	# opt command help for docker
Can be directly in Docker official document address Query related commands.
Docker image command
docker images # view all local images
REPOSITORY               TAG       IMAGE ID       CREATED        SIZE
tomcat                   9.0       3f3cadde9a68   2 days ago     680MB
docker/getting-started   latest    26d80cd96d69   8 days ago     28.5MB

# Optional
-a, --all	# List all mirrors
-q, --quiet	# List mirror id
-aq	# All mirror IDS
docker search # search for images
NAME                 DESCRIPTION        	  STARS     OFFICIAL
mysql                MySQL is a widely used   11803     [OK]
mariadb              MariaDB Server is a hi   4492      [OK]
...
# Optional
--filter=STARTS=3000	# Search for star not less than 3000
docker pull image[:tag] # pulls the image. The default tag is latest
docker pull adopts a layered download mechanism. The federated file system can share some files and reduce disk occupation.
docker pull mysql:5.7	# Version 5.7 must appear on the official website

5.7: Pulling from library/mysql
ffbb094f4f9e: Already exists
df186527fc46: Already exists
fa362a6aa7bd: Already exists
5af7cb1a200e: Already exists
949da226cc6d: Already exists
bce007079ee9: Already exists
eab9f076e5a3: Already exists
c7b24c3f27af: Pull complete
6fc26ff6705a: Pull complete
bec5cdb5e7f7: Pull complete
6c1cb25f7525: Pull complete
Digest: sha256:d1cc87a3bd5dc07defc837bc9084f748a130606ff41923f46dec1986e0dc828d
Status: Downloaded newer image for mysql:5.7
docker.io/library/mysql:5.7
docker rmi [id] # deletes the specified id image, - f forcibly deletes it
docker rmi -f id1 id2 ...	# Batch delete image
docker rmi -f $(docker images -aq)	# Delete all mirrors
Docker container command
Create a new container and start
docker run [opt] image
# Common parameters
--name="Name"	# Container name
-d	# Run in background mode
-p	# Specify mapping port
	-p ip:Host port:Container port
	-p Host port:Container port
	-p Container port
-p 	# Randomly assigned port
-it	# Enter the container and run in interactive mode

# Start centos, execute bash, and enter the container (small centos system)
docker run -it centos /bin/bash
List all running containers
docker ps	# Lists currently running containers
# Common parameters
-a	# Lists all containers that have been run
-n=k	# Displays the last k containers created
-q	# Show container id only
Exit container
exit	# Container stop and exit
ctrl+p+q	# Exit the container and the container continues to run
Delete container
docker rm CONTAINER
docker rm -f $(docker ps -aq)	# Support parameter transfer
docker ps -aq|xargs docker rm	# Borrowing linux pipeline command to delete
Start and stop containers
docker start CONTAINER	# Start container
docker restart CONTAINER	# Restart container
docker stop CONTAINER	# Stop container
docker kill CONTAINER	# Force kill container
Docker advanced common commands
Background startup container
docker run -d centos
# docker ps found censtos stopped
# When docker runs the container in the background, if no application is found, the container will be stopped automatically
# You can use docker run -d centos /bin/bash
View background log
docker logs [opt] CONTAINER
# Optional parameters
-f	# View the next output log
-t	# Show timestamp
--tail k	# Display the last k log s
View process information in container
docker top CONTAINER # View the process information inside the container
Viewing container metadata
docker inspect CONTAINER
# All metadata information about the container
[
    {
        "Id": "37e690bc3d38018588df3ead2ea8d84e30941ba418394c0a293c7f1e7627eb65",
        "Created": "2021-12-11T04:06:26.049296457Z",
        "Path": "/bin/bash",
        "Args": [],
        "State": {
            "Status": "running",
            "Running": true,
            "Paused": false,
            "Restarting": false,
            "OOMKilled": false,
            "Dead": false,
            "Pid": 4213,
            "ExitCode": 0,
            "Error": "",
            "StartedAt": "2021-12-11T04:06:26.335814283Z",
            "FinishedAt": "0001-01-01T00:00:00Z"
        },
....
Enter the currently running container
# Enter the container running in the background and operate

# command
# Method 1: open a new terminal
docker exec -it CONTAINER /bin/bash	# Enter with bash command
# Mode 2: enter the running command line instead of opening a new window
docker attach CONTAINER

# docker exec enters the container and opens a new terminal
# docker attach enters the running terminal
Copy files from the container to the host
In the container, copy / home/geng.java of centos to / home / in the host
# The former is the address in the container, and the latter is the destination address
docker cp CONTAINER:/home/geng.java /home/

# The -v volume technology can be used in the future
Summary

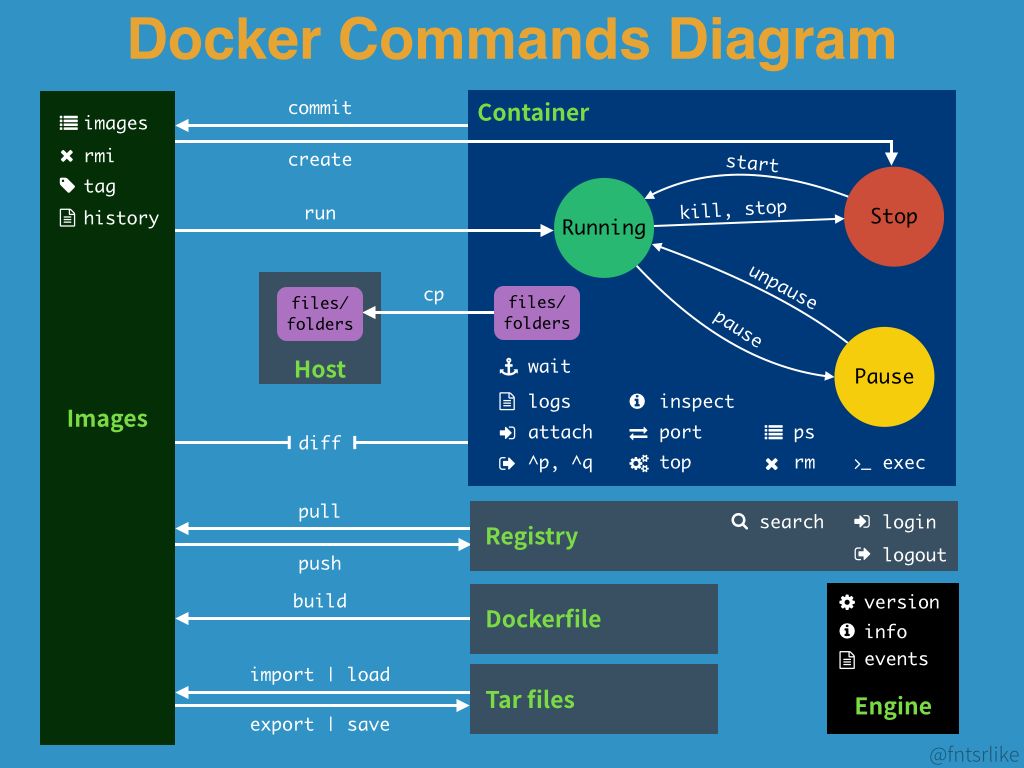
The above figure describes the basic work command diagram of docker. Docker commands are not technically difficult in essence. They are widely used in actual combat. The more you use them, the more familiar you become.
Actual combat practice
Nginx deployment
1, Pull image:
Method 1: pull the latest version
# The diagram is convenient. You can directly pull the latest version
git pull nginx
Method 2: pull the specified version
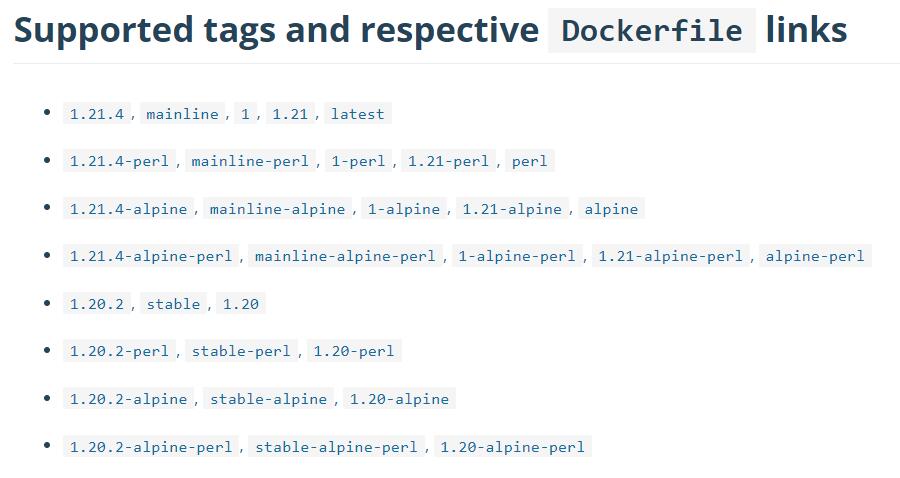
Step 1: open Docker Hub
Step 2: search Nginx to view the version number provided

Step 3: pull the image
# Pull the prepared version, such as:
docker pull nginx:1.21.4
2, Run Nginx
# Run in a container named nginx01 with an external port number of 1314
docker run -d --name nginx01 -p 1314:80 nginx
# Whether the test runs successfully
curl localhost:1314

# The output is as follows
[root@GengCloud home]# curl localhost:1314
<!DOCTYPE html>
<html>
<head>
<title>Welcome to nginx!</title>
<style>
html { color-scheme: light dark; }
body { width: 35em; margin: 0 auto;
font-family: Tahoma, Verdana, Arial, sans-serif; }
</style>
</head>
<body>
<h1>Welcome to nginx!</h1>
<p>If you see this page, the nginx web server is successfully installed and
working. Further configuration is required.</p>

<p>For online documentation and support please refer to
<a href="http://nginx.org/">nginx.org</a>.<br/>
Commercial support is available at
<a href="http://nginx.com/">nginx.com</a>.</p>

<p><em>Thank you for using nginx.</em></p>
</body>
</html>
! note: students running this command on the server may be eager to enter ip:1314 in the browser and view the page. At this time, if the security group is not set, the request may timeout. Therefore, take Alibaba cloud as an example.
3, Set security group
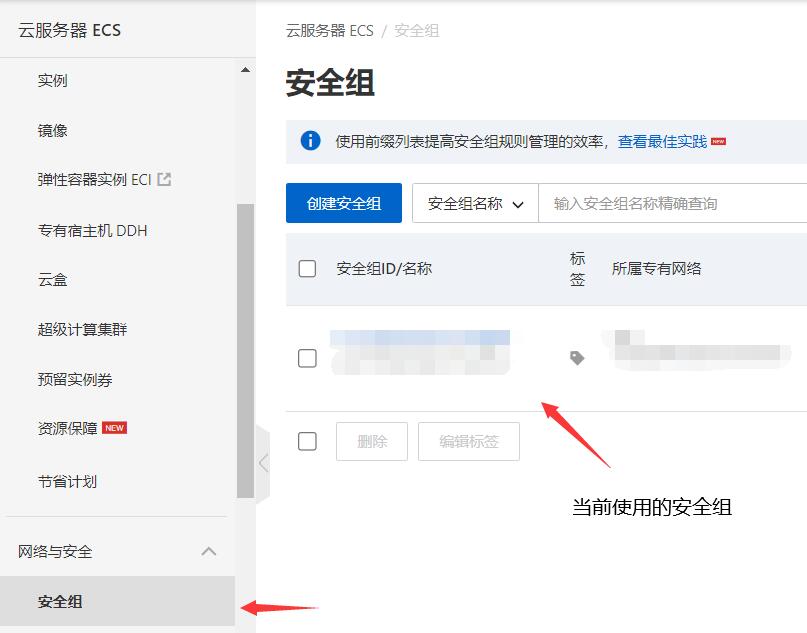
Take alicloud as an example. Open the alicloud official website, find your own server instance, and click Security Group in the sidebar:

We can create a security group or modify it on the currently used security group:

You can see that the original ports such as 80443 are open by default. We only need to enter the ports we want to open to complete the configuration. In this way, we can enter ip:1314 in the browser to display the welcome page of Nginx!