Recently, in charge of the architecture of educational products, two R & D students suggested: "can the Redis client encapsulated by the team adapt to Spring Cache, so it will be much more convenient to add cache". Friends who need the framework source code can see my personal profile and contact me, Recommended distributed architecture source code.
Therefore, while consulting the documents and practicing, I have gained a lot. I write this article to share with you the author's learning process and taste the beauty of Spring Cache design.
1 hard coded
Before learning Spring Cache, I often use cache in hard coding.
For example, in order to improve the query efficiency of user information, we use cache for user information. The example code is as follows:
  @Autowire
  private UserMapper userMapper;
  @Autowire
  private StringCommand stringCommand;
  //Query user
  public User getUserById(Long userId) {
   String cacheKey = "userId_" + userId;
   User user=stringCommand.get(cacheKey);
   if(user != null) {
    return user;
   }
   user = userMapper.getUserById(userId);
   if(user != null) {
    stringCommand.set(cacheKey,user);
    return user;
   }
   //Modify user
   public void updateUser(User user){
    userMapper.updateUser(user);
    String cacheKey = "userId_" + userId.getId();
    stringCommand.set(cacheKey , user);
   }
   //delete user
   public void deleteUserById(Long userId){
     userMapper.deleteUserById(userId);
     String cacheKey = "userId_" + userId.getId();
     stringCommand.del(cacheKey);
   }
  }
I believe many students have written code with similar style. This style is in line with process oriented programming thinking and is very easy to understand. But it also has some disadvantages:
-
The code is not elegant enough. Business logic has four typical actions: store, read, modify and delete. Each operation needs to define the cache Key and call the API of the cache command, resulting in more duplicate codes;
-
The code coupling between cache operation and business logic is high, which is highly invasive to business logic.
Invasiveness is mainly reflected in the following two points:
-
In the development joint debugging stage, the cache needs to be removed, and only the cache operation code can be annotated or temporarily deleted, which is also prone to errors;
-
In some scenarios, cache components need to be replaced. Each cache component has its own API, and the replacement cost is quite high.
-
2 cache abstraction
First of all, it needs to be clear that Spring Cache is not a specific cache implementation scheme, but an abstraction for cache use.
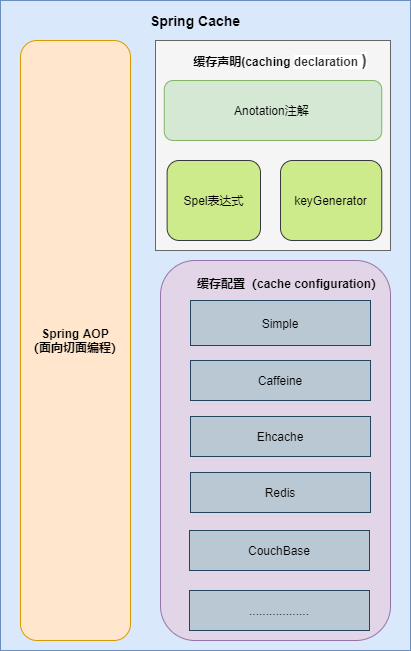
2.1 Spring AOP
Spring AOP is based on proxy based.
Usually, when an object is defined and its method is called, the method is called directly.
 Pojo pojo = new SimplePojo();
 pojo.foo();

Make some adjustments to the code and change the reference of pojo object to proxy class.
ProxyFactory factory = new ProxyFactory(new SimplePojo());
factory.addInterface(Pojo.class);
factory.addAdvice(new RetryAdvice());

Pojo pojo = (Pojo) factory.getProxy();
//this is a method call on the proxy!
pojo.foo();

When the foo method of pojo is called, the foo method is actually called by the dynamically generated proxy class.
The proxy class can obtain the parameters of the method before the method call. When the method call is over, it can obtain the return value of the method call. In this way, the cached logic can be realized.
2.2 cache declaration
Cache declaration, that is, identify the method and cache policy to be cached.
Spring Cache provides five annotations.
-
@Cacheable: cache the results according to the request parameters of the method. When the method is executed with the same parameters next time, the results can be obtained directly from the cache without executing the method again;
-
@CachePut: caches the results according to the request parameters of the method, which will trigger the call of the real method every time;
-
@CacheEvict: delete the cache according to certain conditions;
-
@Caching: combining multiple cache annotations;
-
@CacheConfig: class level shared cache related public configuration.
We will focus on the following three core annotations: @ Cacheable, @ CachePut and @ CacheEvict.
2.2.1 @Cacheable annotation
@The Cacheble annotation indicates that this method has the function of caching.
@Cacheable(value="user_cache",key="#userId", unless="#result == null")
public User getUserById(Long userId) {
  User user = userMapper.getUserById(userId);
  return user;
}
In the code snippet above, the getUserById method and the cache user_cache. If the User object returned by the method is not empty, it will be cached. When the method is called the second time with the same parameter userId, the data is directly obtained from the cache and returned.
▍ generation of cache key
As we all know, the essence of cache is the Key value storage mode. Each method call needs to generate a corresponding Key to operate the cache.
Generally, @ Cacheable has an attribute key, which can directly define the cache key, which can be used by developers SpEL Language defined key value.
If the attribute key is not specified, the cache abstraction provides a key generator to generate the key. The default generator code is shown in the figure below:
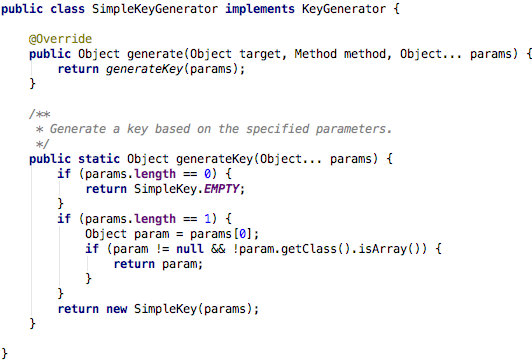
Its algorithm is also easy to understand:
-
If there are no parameters, simplekey is returned directly EMPTY;
-
If there is only one parameter, the parameter is returned directly;
-
If there are multiple parameters, the SimpleKey object containing multiple parameters is returned.
Of course, Spring Cache also considers the need to customize the Key generation method, and we need to implement org springframework. cache. interceptor. Keygenerator interface.
Object generate(Object target, Method method, Object... params);
Then specify the keyGenerator property of @ Cacheable.
@Cacheable(value="user_cache", keyGenerator="myKeyGenerator", unless="#result == null")
public User getUserById(Long userId)
▍ cache condition
Sometimes, whether the result of method execution needs to be cached depends on the method parameters or the return value after method execution.
In the annotation, you can use the condition attribute to determine whether caching is required by whether the result returned by the Spel expression is true or false.
@Cacheable(cacheNames="book", condition="#name.length() < 32")
public Book findBook(String name)
In the above code fragment, when the length of the parameter is less than 32, the result of method execution will be cached.
In addition to condition, the unless attribute can also determine whether the result is cached, but after the method is executed.
@Cacheable(value="user_cache",key="#userId", unless="#result == null")
public User getUserById(Long userId) {
In the above code snippet, when the returned result is null, it is not cached.
2.2.2 @CachePut annotation
@The CachePut annotation works on the scenario where the cache needs to be updated, which is very similar to @ Cacheable, but the annotated method will be executed every time.
Whether the return value will be put into the cache depends on condition and unless. By default, the result will be stored in the cache.
@CachePut(value = "user_cache", key="#user.id", unless = "#result != null")
public User updateUser(User user) {
    userMapper.updateUser(user);
    return user;
}
When the updateUser method is called, the method is executed every time, but because the unless attribute is true every time, the result is not cached. When the unless attribute is removed, the results are cached.
2.2.3 @CacheEvict annotation
@The CacheEvict annotated method removes the stored data from the cache when called.
@CacheEvict(value = "user_cache", key = "#id")
public void deleteUserById(Long id) {
    userMapper.deleteUserById(id);
}
When the deleteUserById method is called, the cache with the cache key equal to the parameter id will be deleted, and the return type of the method is Void, which is obviously different from @ Cacheable.
2.3 cache configuration
Spring Cache is an abstraction of cache usage, which provides a variety of storage integration.
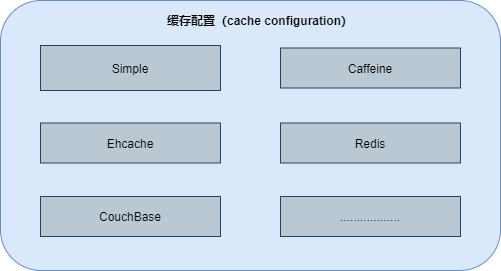
To use them, you need to simply declare an appropriate CacheManager - an entity that controls and manages Cache.
We take the Simple example of the default cache implementation of Spring Cache to briefly explore the mechanism of CacheManager.
CacheManager is very simple:
public interface CacheManager {
   @Nullable
   Cache getCache(String name);

   Collection<String> getCacheNames();
}
In the CacheConfigurations configuration class, you can see that different integration types have different cache configuration classes.
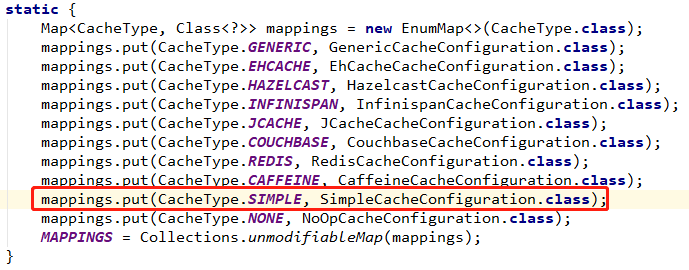
Through the automatic assembly mechanism of SpringBoot, create the implementation class of CacheManager, ConcurrentMapCacheManager.
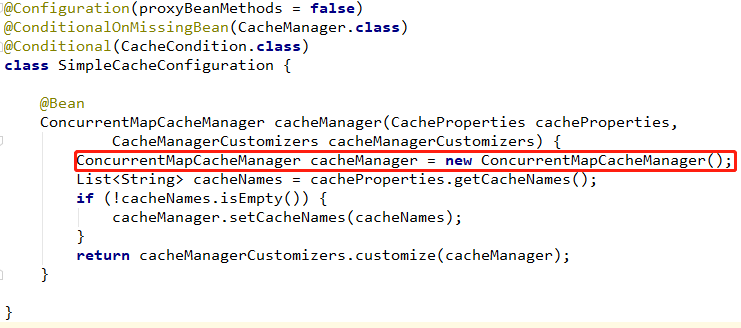
The getCache method of ConcurrentMapCacheManager will create ConcurrentCacheMap.
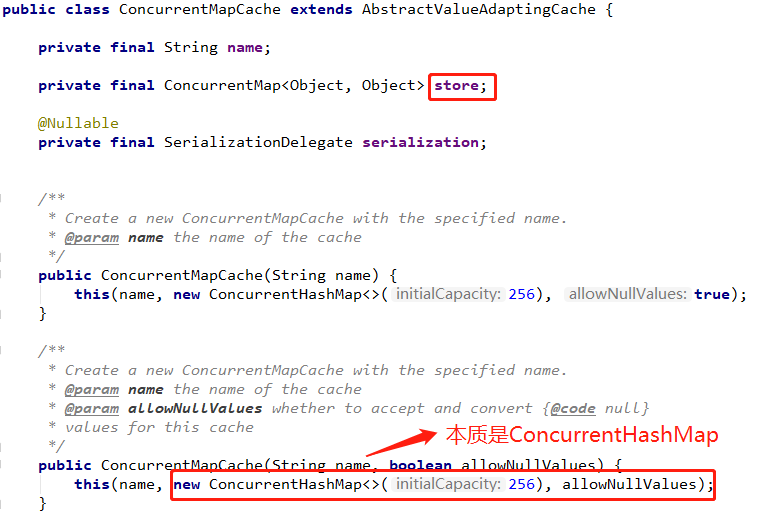
ConcurrentCacheMap implements org springframework. cache. Cache interface.
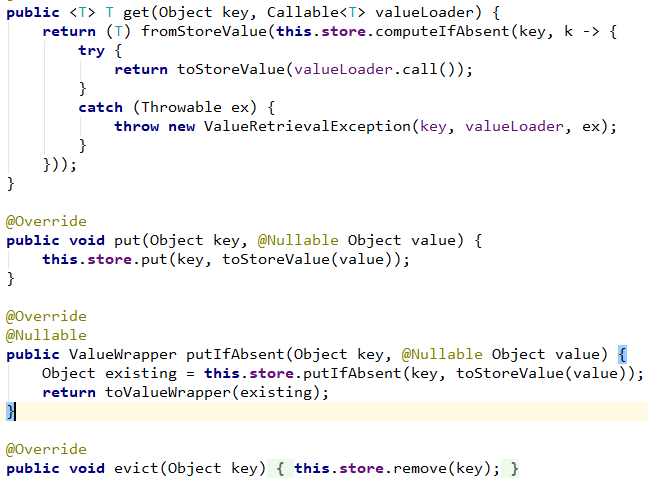
From the Simple implementation of Spring Cache, cache configuration needs to implement two interfaces:
-
org.springframework.cache.CacheManager
-
org.springframework.cache.Cache
3 Introduction examples
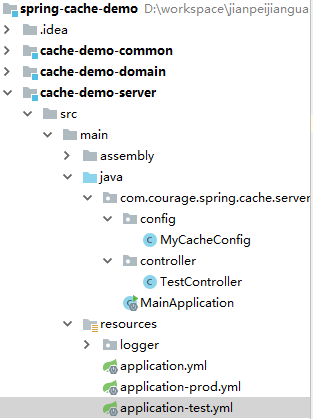
First, we create a spring cache demo project.
caffeine and Redisson are the leaders in the Redis framework of local memory and distributed cache respectively. We demonstrate how to integrate them respectively.
3.1 integrating caffeine
3.1.1 maven dependency
<dependency>
  <groupId>org.springframework.boot</groupId>
  <artifactId>spring-boot-starter-cache</artifactId>
</dependency>
<dependency>
  <groupId>com.github.ben-manes.caffeine</groupId>
  <artifactId>caffeine</artifactId>
  <version>2.7.0</version>
</dependency>
3.1.2 Caffeine cache configuration
Let's first create a cache configuration class MyCacheConfig.
@Configuration
@EnableCaching
public class MyCacheConfig {
  @Bean
  public Caffeine caffeineConfig() {
    return
      Caffeine.newBuilder()
      .maximumSize(10000).
      expireAfterWrite(60, TimeUnit.MINUTES);
  }
  @Bean
  public CacheManager cacheManager(Caffeine caffeine) {
    CaffeineCacheManager caffeineCacheManager = new CaffeineCacheManager();
    caffeineCacheManager.setCaffeine(caffeine);
    return caffeineCacheManager;
  }
}
First, a Caffeine object is created, which identifies that the maximum number of local caches is 10000, and each cache data becomes invalid after 60 minutes of writing.
In addition, we added the annotation @ EnableCaching on the MyCacheConfig class.
3.1. 3 business code
According to the cache declaration section, we can easily write the following code.
@Cacheable(value = "user_cache", unless = "#result == null")
public User getUserById(Long id) {
    return userMapper.getUserById(id);
}
@CachePut(value = "user_cache", key = "#user.id", unless = "#result == null")
public User updateUser(User user) {
    userMapper.updateUser(user);
    return user;
}
@CacheEvict(value = "user_cache", key = "#id")
public void deleteUserById(Long id) {
    userMapper.deleteUserById(id);
}
This code is much simpler than the code snippets in hard coding.
When we call getUserById method in the Controller layer, configure mybatis log level to DEBUG during debugging to monitor whether the method will cache.
The first call will query the database and print relevant logs:
Preparing: select * FROM user t where t.id = ?
Parameters: 1(Long)
Total: 1
When the query method is called the second time, the database SQL log does not appear, which indicates that the cache is effective.
3.2 integration Redisson
3.2.1 maven dependency
<dependency>
   <groupId>org.Redisson</groupId>
   <artifactId>Redisson</artifactId>
   <version>3.12.0</version>
</dependency>
3.2. 2. Redisson cache configuration
@Bean(destroyMethod = "shutdown")
public RedissonClient Redisson() {
  Config config = new Config();
  config.useSingleServer()
        .setAddress("redis://127.0.0.1:6201").setPassword("ts112GpO_ay");
  return Redisson.create(config);
}
@Bean
CacheManager cacheManager(RedissonClient RedissonClient) {
  Map<String, CacheConfig> config = new HashMap<String, CacheConfig>();
 // create "user_cache" spring cache with ttl = 24 minutes and maxIdleTime = 12 minutes
  config.put("user_cache",
             new CacheConfig(
             24 * 60 * 1000,
             12 * 60 * 1000));
  return new RedissonSpringCacheManager(RedissonClient, config);
}
You can see that when switching from cafeine to Redisson, you only need to modify the cache configuration class and define the CacheManager} object. The business code does not need to be changed.
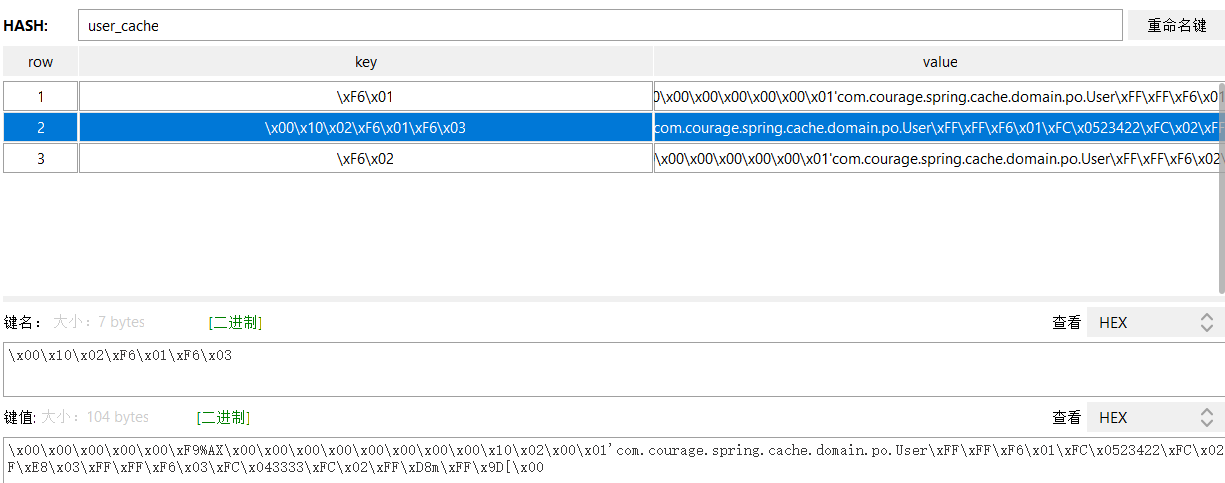
The Controller layer calls the getUserById method. When the user ID is 1, you can see from the Redis Desktop Manager that the user information has been cached, user_cache storage is a Hash data structure.
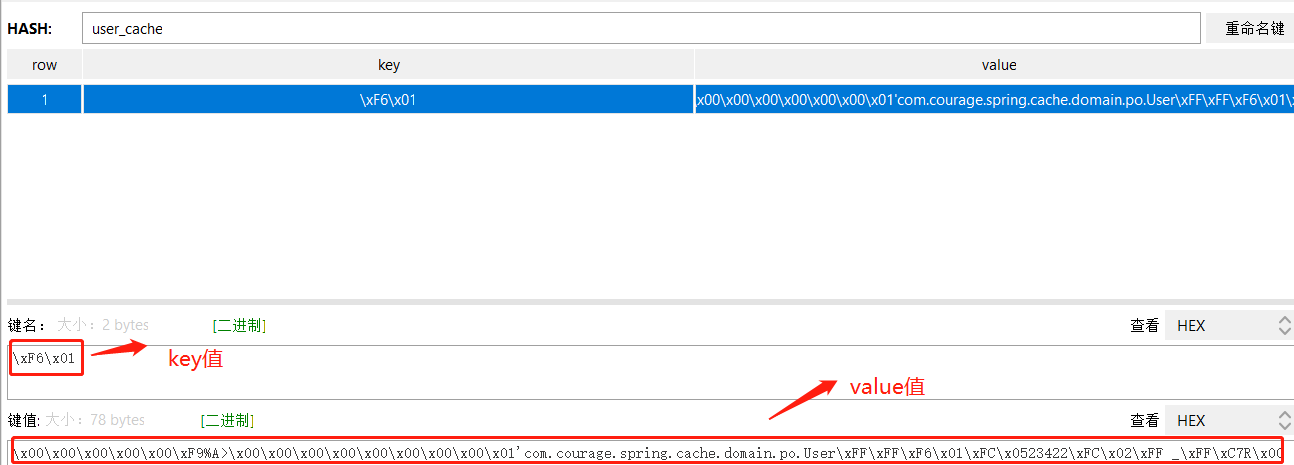
Because the default codec of Redisson is FstCodec, you can see that the name of the key is: \ xF6\x01.
In the cache configuration code, you can modify the codec.
public RedissonClient Redisson() {
  Config config = new Config();
  config.useSingleServer()
        .setAddress("redis://127.0.0.1:6201").setPassword("ts112GpO_ay");
  config.setCodec(new JsonJacksonCodec());
  return Redisson.create(config);
}
Call the getUserById method again, and the console will become:
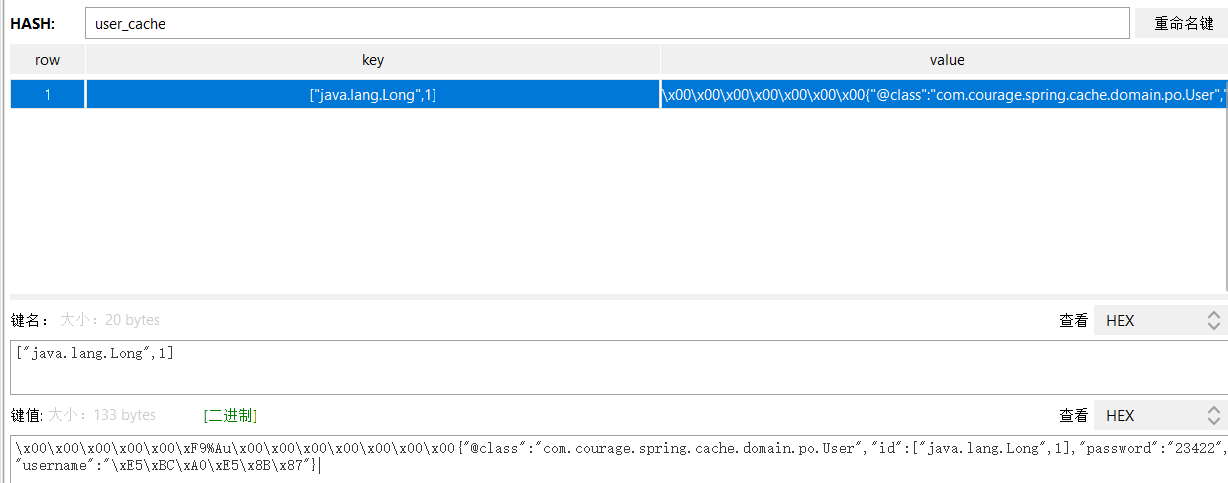
It can be observed that the cached key has become: ["java.lang.Long",1]. After serialization, the key and value have changed.
3.3 understanding cache abstraction again from list cache
List caching is often encountered in business. There are usually two implementations:
-
Overall list cache;
-
According to each item cache, the list is obtained in batches through the aggregate query methods of redis and memcached. If the cache fails to hit, it is reloaded from the database and put into the cache.
How does Spring cache integrate Redisson to cache list data?
@Cacheable(value = "user_cache")
public List<User> getUserList(List<Long> idList) {
    return userMapper.getUserByIds(idList);
}
Execute getUserList method, and the parameter id list is: [1, 3].
After execution, you can see in the console that the whole list is directly cached, and the user list cache and user item cache are not shared. They are parallel.
In this case, the granularity control of the cache is not so detailed.
Many developers have also mentioned this to the Spring Framework R & D team.

The official answer is also very clear: for the cache abstraction, it does not care about the data type returned by the method. If it is a collection, it means that the collection data needs to be saved in the cache.
Another developer defined an @ CollectionCacheable annotation and made a prototype to extend the list caching function of Spring Cache.
 @Cacheable("myCache")
 public String findById(String id) {
 //access DB backend return item
 }
 @CollectionCacheable("myCache")
 public Map<String, String> findByIds(Collection<String> ids) {
 //access DB backend,return map of id to item
 }
It was also not officially adopted because the cache abstraction did not want to introduce too much complexity.
After writing here, I believe you have a further understanding of cache abstraction. When we want to implement more complex caching functions, we need to extend Spring Cache to a certain extent.
4. Customize L2 cache
4.1 application scenarios
The author has used multi-level cache many times in the original project and high concurrency scenario. Multilevel caching is a very interesting function point, which is worth expanding.
Multi level caching has the following advantages:
-
The closer to the user, the faster the speed;
-
Reduce the query frequency of distributed cache and reduce the CPU consumption of serialization and deserialization;
-
Greatly reduce network IO and bandwidth consumption.
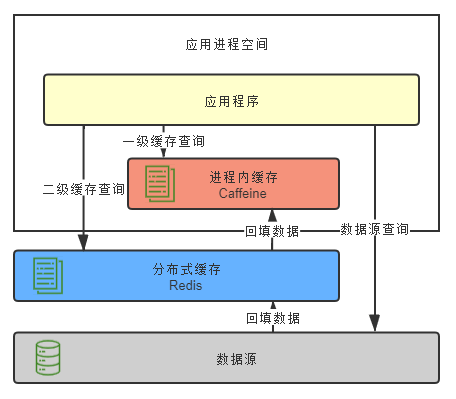
The in-process cache is used as the first level cache and the distributed cache is used as the second level cache. First, query from the first level cache. If the data can be queried, it will be returned directly. Otherwise, query from the second level cache. If the data can be queried from the second level cache, it will be backfilled into the first level cache and the data will be returned. If the L2 cache cannot be queried, query from the data source and backfill the results to the L1 cache and L2 cache respectively.
From the cache chapter of Phoenix architecture
Spring Cache has no L2 cache implementation. We can implement a simple L2 cache DEMO to deepen our understanding of technology.
4.2 design ideas
-
Multilevel cache manager: multilevel cache manager;
-
MultiLevelChannel: encapsulate Caffeine and RedissonClient;
-
MultiLevelCache: implementation org springframework. cache. Cache interface;
-
MultiLevelCacheConfig: configure cache expiration time, etc;
MultiLevelCacheManager is the core class and needs to implement getCache and getCacheNames interfaces.

Create multi-level cache. The first level cache is Caffeine and the second level cache is Redisson.

For L2 cache, in order to quickly complete DEMO, we use Redisson's extension class of Spring Cache redissocache. Its bottom layer is RMap and its bottom storage is Hash.
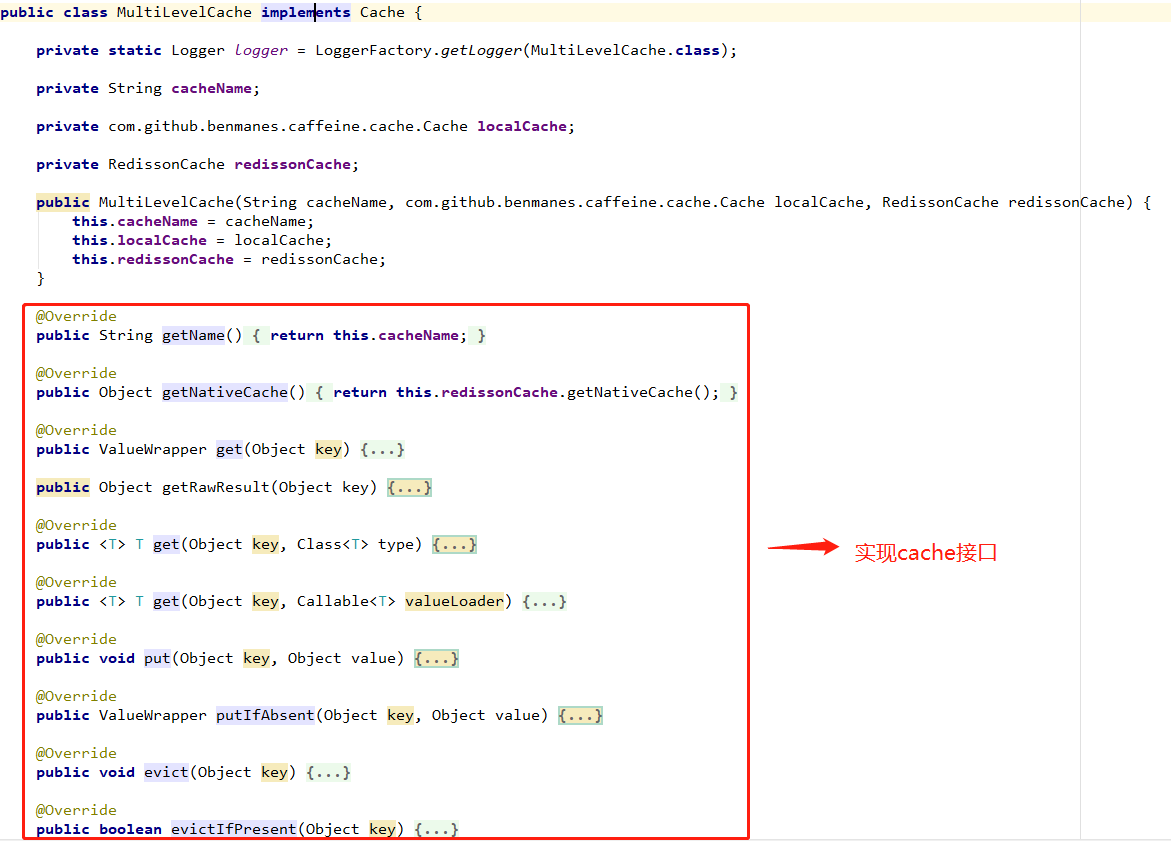
Let's focus on the "query" and "storage" methods of caching:
@Override
public ValueWrapper get(Object key) {
    Object result = getRawResult(key);
    return toValueWrapper(result);
}

public Object getRawResult(Object key) {
    logger.info("Query from L1 cache key:" + key);
    Object result = localCache.getIfPresent(key);
    if (result != null) {
        return result;
    }
    logger.info("Query from L2 cache key:" + key);
    result = RedissonCache.getNativeCache().get(key);
    if (result != null) {
        localCache.put(key, result);
    }
    return result;
}
Process of "query" data:
-
First, query the data from the local cache. If it can be queried, it will be returned directly;
-
If the local cache cannot query the data, query the distributed cache. If it can be queried, backfill it to the local cache and return it;
-
If the distributed cache cannot query the data, the annotated method will be executed by default.
Let's look at the code of "storage":
public void put(Object key, Object value) {
    logger.info("Write L1 cache key:" + key);
    localCache.put(key, value);
    logger.info("Write L2 cache key:" + key);
    RedissonCache.put(key, value);
}
Finally, configure the cache manager, and the original business code remains unchanged.

Execute the getUserById method below to query the user information with user number 1.
- Query from L1 cache key:1
- Query from L2 cache key:1
- ==> Preparing: select * FROM user t where t.id = ?
- ==> Parameters: 1(Long)
- <== Total: 1
- Write L1 cache key:1
- Write L2 cache key:1
Perform the same action for the second time. From the available log, the priority will query the results from the local memory.
- Query from L1 cache key:1
Wait for 30s and execute again. Because the local cache will become invalid, the L2 cache will be queried during execution
- Query from L1 cache key:1
- Query from L2 cache key:1
A simple L2 cache is assembled.
5 what scenario is Spring Cache selected
When making technology selection, you need to select different technologies for the scene.
The author believes that Spring Cache has powerful functions and elegant design. It is especially suitable for scenarios where cache control is not so detailed. For example, portal home page, partial static display page, list, etc. The characteristic of these scenarios is that there are not so strict requirements on the real-time performance of data. Only the data source needs to be cached and automatically refreshed after expiration. In these scenarios, Spring Cache is an artifact, which can greatly improve R & D efficiency.
However, in the scenario of high concurrency and large amount of data, the fine cache granularity control still needs to be extended.
-
Multi level cache;
-
List cache;
-
Cache change listener;
The author is also thinking about these points. I have studied the relevant source codes of j2cache and jetcache and benefited a lot. Subsequent articles will focus on sharing the writer's experience.